- About Bamboo product Release Numbers
- A license error occurs after successful license activation
- About the Installation Files
- How to activate a Bamboo Site Collection Feature
- Activating Your Bamboo Product License Offline
- Activating Your Bamboo Product License
- Bamboo product releases that are supported for migration from SharePoint 2007 to SharePoint 2010
- Bamboo product releases that are supported for migration from SharePoint 2010 to SharePoint 2013
- Bamboo products that use Telerik
- Before you Migrate from SharePoint 2007 to SharePoint 2010 Read This
- Before you uninstall
- Can trials be extended?
- Choosing which farm servers to license
- Complementary Products for List Rotator
- Create a Custom Style for Your Rotated List
- CSS Overview
- Deploying a Bamboo solution to a new Web Application
- ERROR: Could not transfer by custome edit form
- Error Log Files
- Create a Custom Layout for a Picture Library
- Highlights of List Rotator
- How long do trial versions of Bamboo software last and when do they start?
- How to Add a web.config Modification Using PowerShell
- How many License Keys do I need for my SharePoint farm?
- How to activate a Bamboo Site Feature
- How to check the status of your trial license
- How to deactivate your Bamboo Product License if your server doesn't have access to the Internet
- How to find the release number of a Bamboo web part
- Manually uninstall using PowerShell
- How to Migrate a Bamboo Web Part from SharePoint 2007 to SharePoint 2010 using the Database Attach Upgrade Method
- How to move your Bamboo Product License to a new server
- How to Migrate a Bamboo Web Part from SharePoint 2007 to SharePoint 2010 using the In-Place Upgrade Method
- How to Remove a web.config Modification Using PowerShell
- How to run the Installation/Setup Program
- How to uninstall Bamboo.core.v1.wsp from your SharePoint farm
- I am having trouble adding the product Web Part to a page
- Options for Installing
- Generating Activation Keys using My Bamboo
- Installing the Bamboo Web License Manager
- Installing using the updated install process
- Is there a way to find a lost or unknown Bamboo product license key?
- Localize Bamboo Web Parts for your Language
- Location of Installation
- Manually Install using PowerShell
- Manually uninstall using stsadm
- Manually Install using stsadm
- Migrate your Bamboo Product License Key From one SharePoint version to another
- Migrate your Bamboo product from SharePoint 2010 to SharePoint 2013
- Migrate your Bamboo product from SharePoint 2013 to SharePoint 2016
- Migrating List Rotator from SharePoint 2010 to SharePoint 2013
- Migrating List Rotator from SharePoint 2007 to SharePoint 2010
- Overview of moving a Bamboo Product License
- My product was licensed yesterday and today there is an error; what happened?
- My New List View Isn't Shown in the Select View List
- Overview of the new Bamboo product Logging
- Overview of Bamboo Product Trials
- Overview of Licensing and Product Activation
- Overview of List Rotator
- Overview of List Rotator Configuration Tool Pane
- Overview of the Installation/Setup Program
- Overview of the Updated Installation Process for Bamboo components
- Best Practices for a successful install
- Release Notes for List Rotator
- How to modify a web.config file using PowerShell
- Required Installation Permissions
- What Site Collection Features are associated with my Bamboo product?
- Layout Styles
- Rotate Styles
- System Requirements
- The Bamboo Web License Manager does not show up in Central Administration. How do I fix that?
- Troubleshoot Problems with Deploying Farm Solutions
- Uninstalling from SharePoint Central Administration
- Uninstalling using the updated process
- Upgrading using the updated process
- Upgrading your Bamboo Web Part
- Use the provided .lic file to extend your product's trial period
- Using the Setup program to Uninstall
- Value is Invalid Message Appears
- Values for My Columns Do Not Appear in the Custom Display That is Rotated
- What is left behind after uninstalling?
- What version of Telerik Components are deployed by Bamboo Products?
Topics for List Rollup
Topics for List Print
Topics for List Consolidator
Topics for List & Forms Toolkit
Topics for List Bulk Import
Topics for List Bulk Export
Topics for KPI Column
Topics for Knowledge Management Suite
Topics for Knowledge Base
Topics for In/Out Schedule Board
Topics for Group Redirect
Topics for Group Email
Topics for Grants Management
Topics for Filters Collection
Topics for File Share Library
Topics for Essentials Plus Suite
Topics for Essentials Suite
Topics for DWG Parser
Topics for Discussion Board Plus
Topics for Data-Viewer
Topics for Custom Identifier Column
Topics for Cross Site Display
Topics for Cross List
Topics for Community Management Suite
Topics for Community Central
Topics for Column Level Security
Topics for Chart Plus
Topics for Calendar Plus App
Topics for Calendar Plus
Topics for Bamboo Select
Topics for Bamboo Premier
Topics for Alert Plus
Topics for Alerts Administrator
Topics for Administration Toolkit
Y-Axis Settings
| Return to Chart Display Settings |
|---|
The following settings are available to customize the format of the primary and secondary Y-Axes:
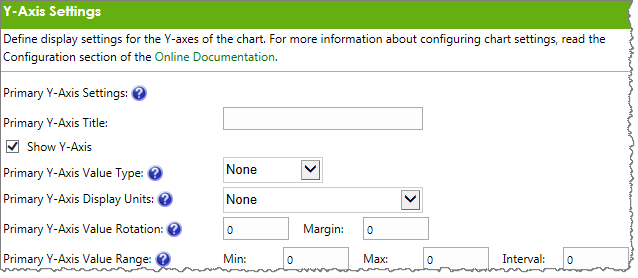
| Primary Y-Axis Settings | ||
| Column | Description | |
| Title | Enter a title to display on the primary Y-Axis. | |
| Show Y-Axis | When checked, the Y-Axis and Y-Axis labels are displayed. When unchecked, the axis and labels are hidden. | |
| Value Type | To specify a number or text format for Y-Axis labels and series data labels, such as currency or percentage, choose a value type. | |
| Display Units | To display Y-Axis data using a relative scale, such as “thousands” or “millions”, select a display unit. To display data using actual values, select None. When using a relative scale, the scale is displayed next to the Y-Axis line. 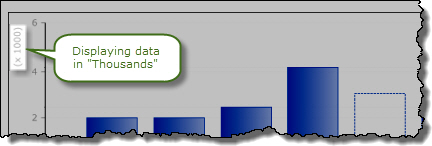 |
|
| Value Rotation | Change the orientation of the Y-Axis labels by entering a rotation percentage, such as 90, 180 or 270. Customize the position of the labels in relation to the Y-Axis by changing the Margin value. | |
| Value Range | To specify a start and end value for the Y-Axis line, enter a Min and Max value. To specify the interval between Y-Axis labels, enter an Interval value. By default, the Y-Axis will start at zero and end at the next interval after the highest data point. | |
You can also opt to have a secondary Y-Axis on your chart: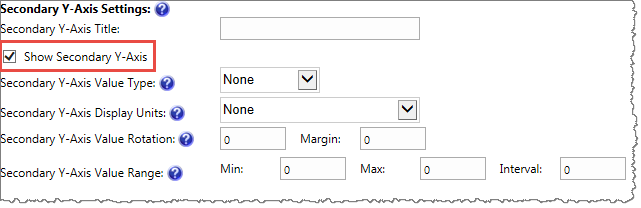
| Secondary Y-Axis Settings | ||
| Column | Description | |
| Secondary Y-Axis Title | Enter a title to display on the secondary Y-Axis. | |
| Show Secondary Y-Axis | You can opt not to show a secondary Y-Axis by unchecking this box. | |
| Secondary Y-Axis Value Type | 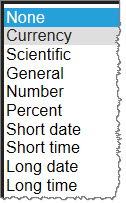 From the drop-down, select a format for secondary Y-Axis data, such as Currency, Number, Percent, etc. From the drop-down, select a format for secondary Y-Axis data, such as Currency, Number, Percent, etc. |
|
| Secondary Y-Axis Display Units | Show secondary Y-Axis data using actual values (‘None’) or express the values using a relative scale, such as ‘Thousands’ or ‘Millions.’ | |
| Secondary Y-Axis Value Rotation | Change the orientation of the secondary Y-Axis labels by entering a rotation percentage, such as 90, 180 or 270. Customize the position of the labels in relation to the Y-Axis line by changing the Margin value.
* Margin – Enter whole numbers to adjust the width of the Margin as it relates to the Y-Axis line. |
|
| Secondary Y-Axis Value Range |
Enter a minimum and maximum value for the primary Y-Axis and an interval between axis labels.
|
|
Chart Plus X-Axis Settings
| Return to Chart Display Settings |
|---|
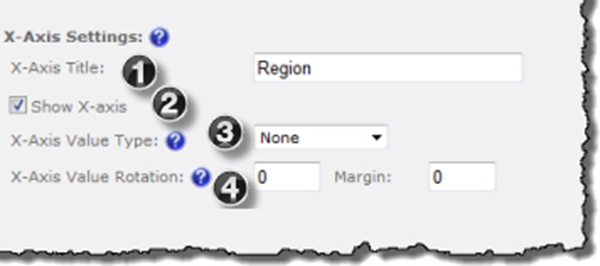 The following settings are available to customize the format of the X-axis.
| No. | Option | Description |
| 1. | X-Axis Title | Enter a title to display on the X-axis. |
| 2. | Show X-Axis | When checked, the X-axis and X-axis labels are displayed. When unchecked, the axis and labels are hidden. |
| 3. | X-Axis Value Type | To specify a number or text format for X-axis labels, such as short or long date, choose a value type. |
| 4. | X-Axis Value Rotation | Change the orientation of the X-axis labels by entering a rotation percentage, such as 90, 180 or 270. Customize the position of the labels in relation to the X-axis by changing the Margin value. |
World Clock and Weather Product Summary
World Clock and Weather Features
 The Bamboo Solutions World Clock & Weather Web Part allows users to display local time and weather for selected major cities around the globe.
| Key Features |
| Show weather or clock by location with temperature, date, and time. |
| Show temperature in celsius and/or fahrenheit. |
| Show only date, time and location. |
| Choose from analog or digital clock styles as well as colors. |
| Choose a date and time format. |
| Change the font and font color of the date and time, temperature and location. |
| Show the country or province of a location. |
| Arrange the weather or clocks vertically or horizontally. |
| Show as many locations as you want with the option to scroll through each location. |
| Holiday Features |
| Configure the Web Part so that snow falls and gathers at the bottom of the screen when users access the page that contains this Web Part. |
| Set the density of the snow fall (i.e. 50%, 75%, etc.). |
| Indicate whether the snow will fall on a light background or dark background. Light background snow is darker colored for visibility. |
| Show a custom Holiday message that moves across the Web Part. |
World Clock and Weather Limitations
The following limitations apply to World Clock and Weather when it is connected to a File Share Library:
- Item versioning is not supported.
- The Document ribbon item options E-mail a Link and Download a Copy do not work properly.
- The World Clock and Weather Upload Media File and New Media File Link options will use the default Document Library upload page, not the customized World Clock and Weather page with the link to supported file types. The functionality is the same.
World Clock & Weather App
 World Clock and Weather App from Bamboo Solutions displays current weather conditions and forecasts for cities around the globe. In a single app, Bamboo Solutions’ World Clock and Weather App allows users to display the local time and weather conditions for cities around the world.
| Highlights of App | Release Notes |
|---|
Install |
Permissions |
License |
Permissions |
|---|---|---|---|
| Bamboo SharePoint Apps let you explore the versatility that SharePoint represents. Apps are available to install through the Microsoft Store for SharePoint Online and for on-premises for free trial and purchase. |  |
The World clock & Weather App is a free tool. It does not need to be licensed. | |
Configure |
Permissions |
Work With |
Permissions |
 to configure this Bamboo product.") |
 |
World Clock & Weather
 |
The World Clock and Weather web part uses web services to display forecast and current weather, along with date and time for the US and around the world. This product is free to use without a license and can be downloaded from our storefront; simply click the Free Product banner to the left. |
| Highlights | Release Notes | Complementary Products |
|---|
Install |
Permissions |
License |
Permissions |
|---|---|---|---|
|
The World clock & Weather web part is a free tool. It does not need to be licensed. |
|
|
Configure |
Permissions |
Work With |
Permissions |
|
|
| Click here if you would rather see a complete list of all topics for this product. |
 Click on the shopping bag or here to download a fully functioning World Clock and Weather web part. Click on the shopping bag or here to download a fully functioning World Clock and Weather web part. |
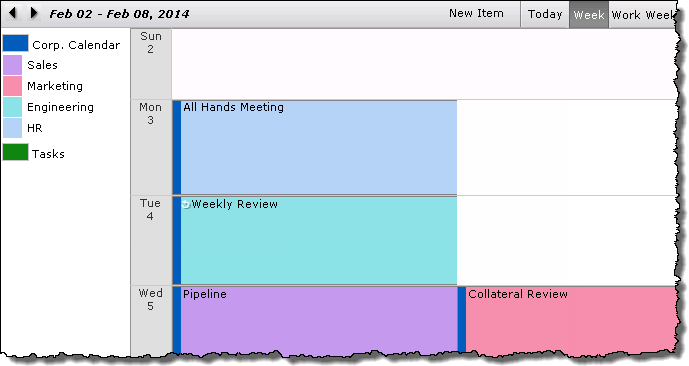
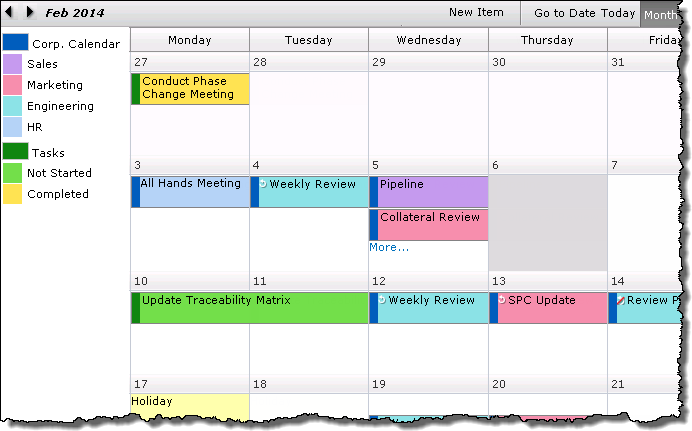
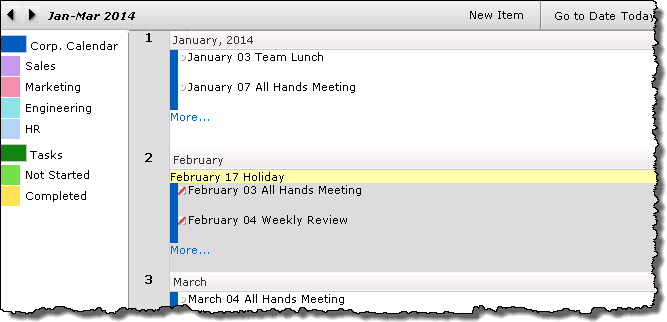
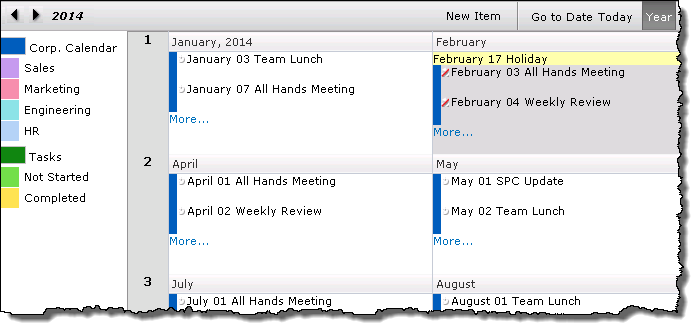
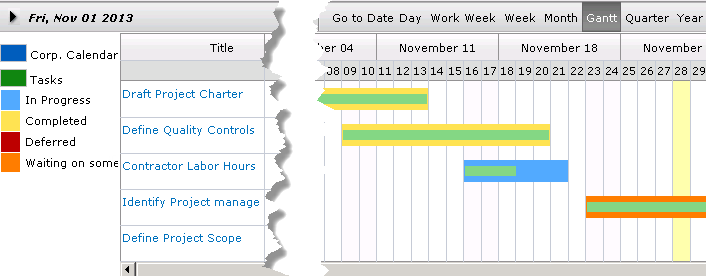
Work with Calendar Plus views
| Overview of Calendar Plus user display |
|---|

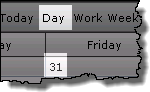
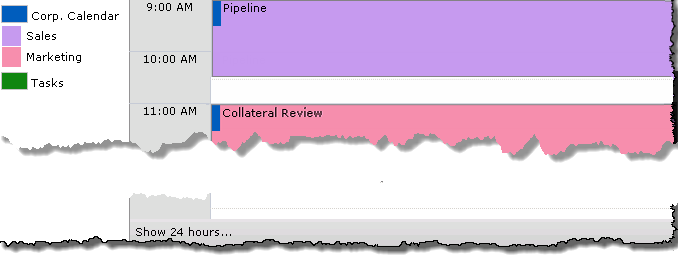
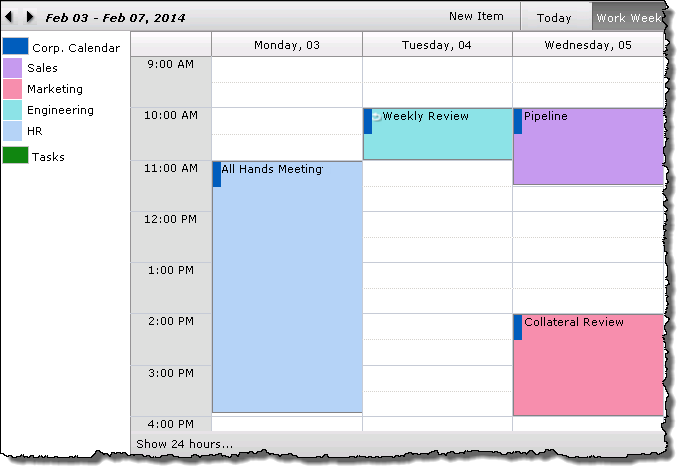
A variety of calendar views are available from the Calendar Plus toolbar.
When working with Calendar Plus views keep in mind:
- Holiday List information is visible in all views
-
Individual calendar views (or the entire toolbar) can be hidden from the General Settings configuration screen.
-
The Display Legend will adjust based on the items displayed in the calendar view
| View | Display |
|---|---|
| Today |
|
| Day |
|
| Work Week |
|
| Week |
|
| Month |
|
| Quarter |
|
| Year |
|
| Gantt |
|
Working With the Search Results
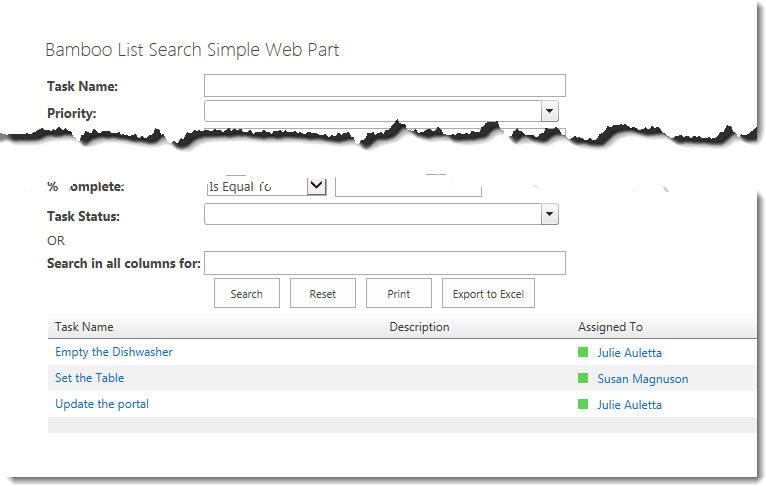
Clicking Search will generate a list of the items that match the search criteria entered.
NOTE: Entering no criteria and clicking Search will return all items.
Depending on the List Search Simple configuration, search results may appear beneath the criteria (as shown above) or on what seems to be a new page.
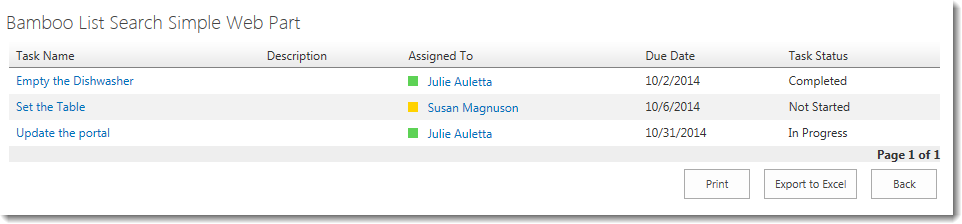
If the results appear on a new page (see below), the Print and Export to Excel buttons will not appear next to the Search and Reset buttons, but with the results. In this configuration, an additional button, Back, also appears with the results so you can return to the criteria page.
There are several things that are possible with search results, depending on the configuration of the Web Part. See the list below for additional information.
Workflow Versioning
After you deploy a workflow, you may want to make a change to it and deploy a new version. As long as you saved the workflow as a workflow template when you created it in Conductor Studio, you can update the template, save it, and publish a new version at any time. When you edit a template, you are not editing the actual workflow.
You are prompted several times during the workflow creation process to save your workflow template. Simply click Save when you are prompted to do so and give the template a name. This template is what you will use to create a new version of the workflow.
NOTE: Workflow templates are saved in the Conductor database and can be accessed by clicking Open in the Workflow Conductor Studio ribbon.
Workflow versioning is handled differently depending on how the workflow was deployed. Click on the link below that applies to the workflow deployment method configured in the Workflow Conductor Control Panel to learn how to create a new version of workflows deployed using that method:
Versioning for Simple Publishing Workflows
To create a new version of a workflow published using a Simple Publishing option (i.e., Publish to List, Publish to Site, Publish to Site Collection, or Publish as Site Workflow), follow these steps:
| Step | Action | Result |
|---|---|---|
| 1. | Open Workflow Conductor Studio from the list ribbon of the list where the workflow runs. In Conductor Studio, go to Workflow > Open and open the workflow template used to publish the workflow the first time. | |
| 2. | Make the required changes to the workflow and save the changes. When the Save dialog appears, be sure to check Overwrite existing files so the existing template is updated with your changes. |
|
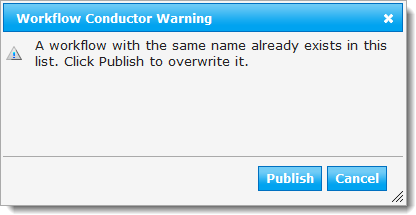
| 3. |
Publish the updated template. Workflow Conductor Studio detects that there is already a published workflow with the same name and will ask if you want to overwrite it. Select Publish to publish the new version and overwrite the old one. |
Instances of the old workflow version that are in progress will continue to run until they are complete. New instances of the workflow will run as the new workflow version.
|
| 4. |
If you click Workflow Settings from the list ribbon, you will see the version history of workflows. Clicking the Remove a workflow link will allow you to remove the old versions, if desired. |
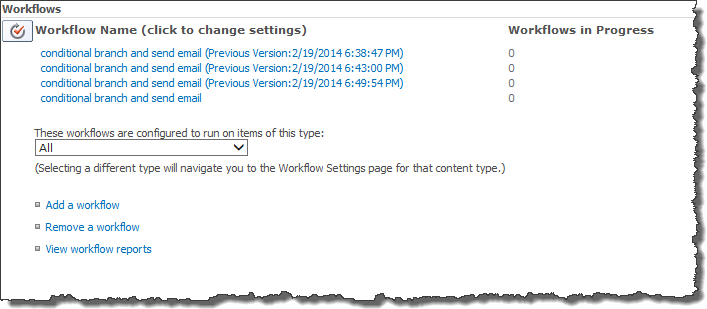 |
| 5. |
On the Remove a workflow page, you will see that only the most recently published version of the workflow is marked Allow. The older versions are marked No New Instances. To remove an old version, mark the Remove button and click OK. |
|


Versioning for Solution Deployment Workflows
The Solution Deployment method deploys workflows as farm solutions. If you want to deploy a new version of a workflow solution, you have two options:
-
Deploy the new version with a different name.
If you do not need to use the same workflow name, edit the workflow template and give the workflow a new name. Deploy the workflow with the new name. You can disable the old version to prevent users from starting new instances of it and remove the old workflow when you don’t need it anymore. -
Remove the old version before deploying the new version.
If you want to use the same name for the new workflow version, you must first retract and remove the existing workflow solution. Instances of the workflow that are in progress will be terminated when the workflow is removed.
For more information, read KB.12500 – HOWTO: Deploy a New Version of a Workflow Conductor Workflow Solution in the Bamboo Knowledge Base.
NOTE: Solution Deployment workflows can overwrite Simple Publishing workflows of the same name directly from Conductor Studio. You do not need to remove the existing published workflow before deploying the new workflow solution.
How to configure the Workflow Reports Web Part
| Overview of Workflow Conductor Web Parts |
|---|
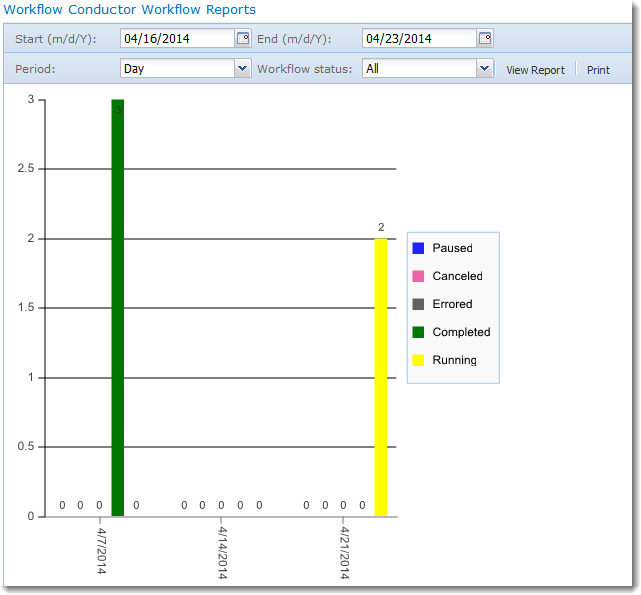 The Workflow Reports Web Part allows you to create reports about workflows run in the current site or site collection. The report is displayed graphically, with a summary list below the chart.
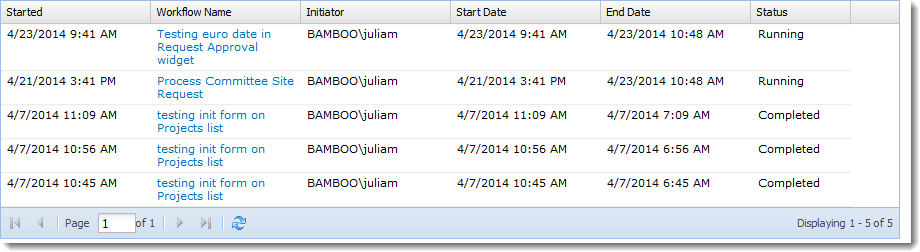
At run time, you can define reporting periods, filter by workflow status, and print report results using the controls at the top of the web part. See How to use the Workflow Reports Web Part for more information on how to use this web part from the end user perspective.
The Workflow Reports Web Part is available in the Web Part Gallery after Workflow Conductor is installed. Users with the Add and Customize Pages right can add the Web Part to a page. (The Add and Customize Pages right is included by default in the Design and Full Control permissions.)
NOTE: If you don’t see the web part in the gallery, check to make sure the site collection feature shown below is activated in your site collection.

Add the web part to a web part page. If you do not know how to add a web part to a page, read the topic How to add a web part to a Web Part page.
To configure the web part once it is on the page, follow these instructions:
| Workflows | Setting | |
| Workflows: | Select the scope of workflows to display. By default, the Web Part will display workflows for the Current Site. You can also select to display workflows in the Site Collection. | 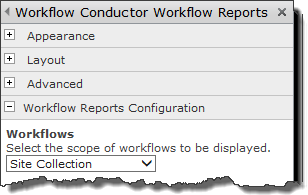 |
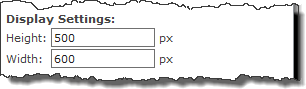
| Display Settings: |
Enter a fixed Height and Width in pixels for the report.
|
 |
| Page Settings: | Select the number of items to display per page and the maximum number of items to include in the list. The more items displayed, the longer the page will take to load. | 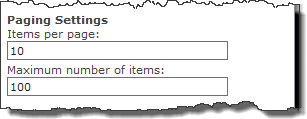 |
| Default Reporting Interval | Select a default reporting interval for the Web Part. The default (None) will show the last week of data. The reporting can be changed at run time, if needed. |  |
For tips on how to use this web part, see How to use the Workflow Reports Web Part
Workflow Settings
 The Workflow Settings in Conductor Studio allows you to set properties for the entire workflow.
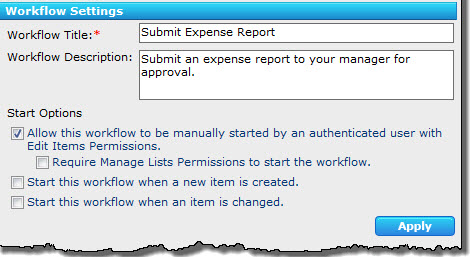
Workflow Title (Required): Enter a name for the workflow. This name is displayed wherever this workflow is referenced within SharePoint.
Workflow Description: This is an optional setting that allows you to add a short description of the workflow. It is displayed in Conductor Studio, and also in the list of workflows for a list or library.
Start Options: Select a start option for the workflow, from the list of workflow start options available in SharePoint. The default is Allow this workflow to be manually started by an authenticated user with Edit Items Permissions.
NOTES:
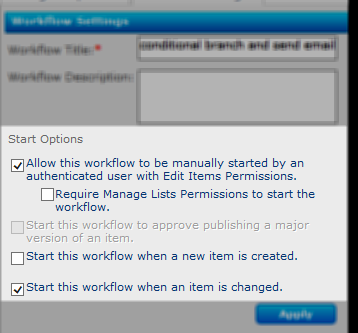
- The Start options Start this workflow when a new item is created and Start this workflow when an item is changed cannot be used if a workflow initialization form exists for the workflow. See Workflow Forms for more information.
- The option Start this workflow to approve publishing a major version of an item is not available for Simple Publishing workflows. It is only available for Solution Deployment workflows. If the list or library is not configured to use major and minor versioning, this start option will be disabled, as seen in the screen shot below.
- Start options only apply to workflows published to the list, site, or site collection; they do not apply to workflows published as site workflows.
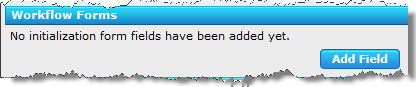 Workflow Forms: You can create a workflow initialization form that collects additional information from the user when a workflow is started. Data collected via this form is stored in parameters that can later be used by the workflow using a Workflow Variable lookup. For more information about creating a workflow initialization form, see Create a new workflow initialization form.
This is an optional workflow setting.
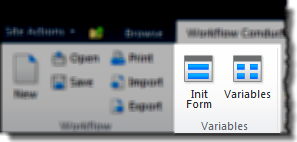
NOTE: You can access the initialization Form Builder from the Workflow Conductor Studio ribbon also.
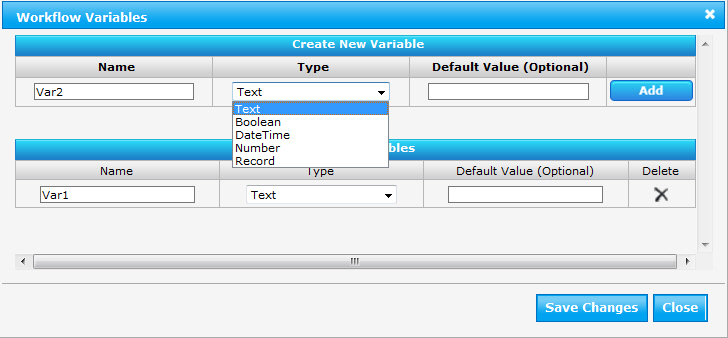 Workflow Variables: Variables store data while the workflow is running. They can be accessed and manipulated by widgets, and some widgets may require that a variable be created to store results. The contents of workflow variables are accessed using a lookup when the workflow runs.
To create a variable, click Add Variable to open the Workflow Variables form. Enter a Name for the variable, select a data Type, and optionally define a Default Value. Click Add to add the new variable to the workflow. Be sure to click Save Changes to save the variables you add. If you later want to delete a variable, return to the Workflow Variables form and click the button next to the variable.
NOTE: You can access the Workflow Variables form from the Workflow Conductor Studio ribbon also.
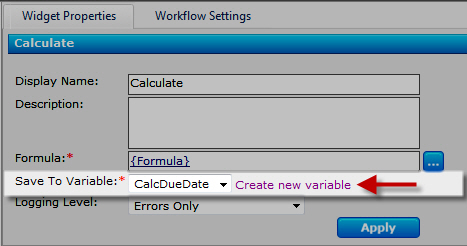 Workflow variables can also be added directly from widgets that use variables, using the Create new variable link. This link opens the Workflow Variables form.
IMPORTANT: After adding, updating, or deleting variables using the Workflow Variables Form, always click Save Changes in the Workflow Variables form or your changes will not be saved.
Workflow Logic Widgets
This is a high level overview of the types of Workflow Logic Widgets available. Click on the name of the widget to get details and examples.
- Calculate Widget: Perform a mathematical, date, or string function.
- Compare Widget: Compare two or more values.
- Conditional Branch Widget: Branch a workflow based on a criteria.
- Delay For Widget: Pause the workflow for a specific amount of time.
- Delay Until Widget: Delay until a specific date/time.
- Delay Until Condition is Met Widget: Delay until a user-defined condition is satisfied.
- Echo Test Widget: Troubleshoot a workflow.
- End Workflow Widget: End a workflow.
- Repeat For Each Item Widget: Repeat part of a workflow for each item in a list or library.
- Repeat While Widget: Repeat part of a workflow while a condition is true.
- Run Parallel Widget: Run two sets of actions simultaneously.
- Set Variable Widget: Set the value of a workflow variable.
- Start Another Workflow Widget: Start another workflow.
- Wait for Field Change Widget: Pause the workflow until a field meets a condition.
Return to About Workflow Conductor Widgets
See also an Alphabetical List of Workflow Conductor Widgets.
Workflow initialization form
If you need to collect information from a user in an initialization form when a workflow is started, add a Workflow Form in Conductor Studio. The Workflow Form is made up of one or more fields. Each field is stored in a workflow variable, which can be used by the widgets in the workflow. See the example at the end of this section for more information about using Workflow Form variables.
NOTE: Workflows with an initialization form must be configured with a manual Start Option to allow users the opportunity to complete the required form fields. The only supported Start Options are Allow this workflow to be manually started by an authenticated user with Edit Items Permissions and Require Manage List Permissions to start the workflow.
To create a Workflow Initialization Form:
| Step | Action | Result |
| 1. | Click the Add Field button in the Workflow Settings tab. This will display the Form Builder. The Form Builder allows you to add fields to the initialization form presented to the user when the workflow starts. Use this same form to edit, delete, or rearrange fields once the initialization form is created. |  |
| 2. |
In the Form Builder page:
|
 |
| 3. |
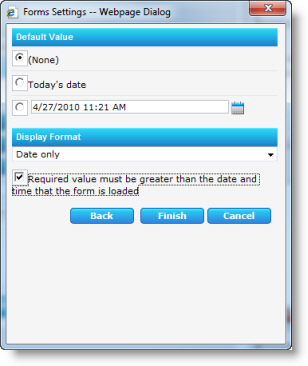
When you click Add or Modify, complete the following in the Forms Settings pages: Page One:
Click Next to proceed to the second page of the Forms Settings. |
|
|
Page Two:
|
 |
|
Workflow does not start automatically
If you are logged in as the System Administrator and workflows configured to start automatically won’t start, try logging in as a different user.
Check the user who is starting the workflow.
The Sys Admin account should be able to start the workflow manually. The automatic start is a limitation.
NOTE: It doesn’t matter who creates the workflow, just who runs it. Also, this is an issue with all workflows, not just those created/deployed with Workflow Conductor.
Create a New Workflow Initialization Form
If you need to collect information from a user in an initialization form when a workflow is started, add a Workflow Initialization Form to your workflow in Conductor Studio. The Workflow Form is made up of one or more fields. Each field is stored in a workflow parameter, which can be used by the widgets in the workflow. Workflow parameters, like workflow variables, appear in the lookup list for Workflow Variables.
NOTE: Workflows with an initialization form must be configured with a manual Start Option to allow users the opportunity to complete the required form fields. When workflows start automatically, users don’t see the initialization form.
To create a new initialization form, follow these steps:
| Step | Action | Result |
| 1. | In the Workflow Conductor Studio, click the Add Field button in the Workflow Settings tab.
|
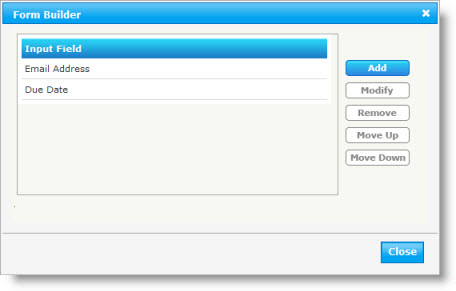
The Form Builder is displayed. The Form Builder allows you to add fields to the initialization form presented to the user when the workflow starts. It also allows you to edit, delete, or rearrange fields once the initialization form is created.
|
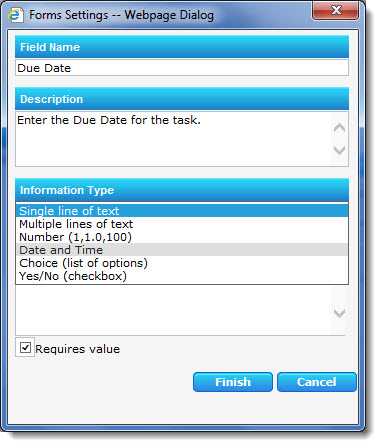
| 2. |
To add a field to the initialization form, click Add. The Forms Settings dialog appears. Enter the Field Name and Description.
Select the Information Type for the new field. Depending on your choice of type, other information may be needed. See Information Types used on Workflow Initialization Forms for more information. Requiring values for fields on the Initialization Form is a new feature in Workflow Conductor R3.5. Previous releases did not include this feature. |
 |
| 3. | Click Finish to save your field. | The Form Settings dialog will close. |
| 4. | Repeat steps 2-3 to add more fields, as needed. | |
| 5. |
To re-arrange the order of the Input Fields (parameters) on the form, highlight one and click Move Up or Move Down. The field will move one position with each click. To delete/remove a field, highlight it and click Remove. |
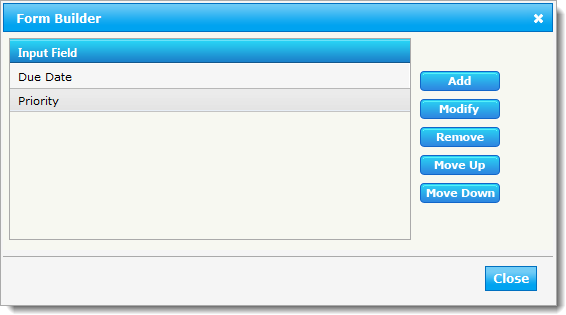 |
| 6. | When finished adding or re-arranging fields, click Close to save and close the Initialization Form. |
The next time you open the Initialization Form, you will see the information you entered previously.
|
| 6. | When your form is complete, click Close to close the Form Builder. | Your form will be saved. |

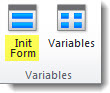 Alternatively, click the Init Form option in the Variables section of the main menu.
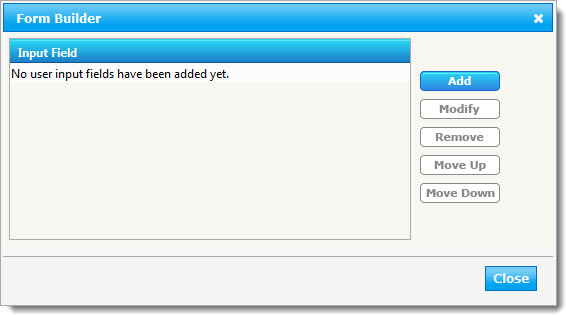
See Using the Workflow Initialization Form or Modify a Workflow Initialization Form for more information.
Workflow Error Reporting
| Configuring WF Conductor General Settings |
|---|
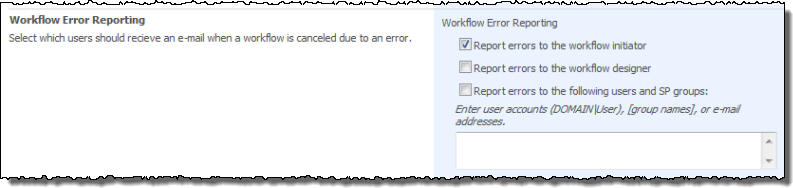 Select the user who will receive an E-mail message when a workflow error occurs.
By default, Report errors to the workflow initiator is checked, so only the workflow initiator will be notified. You can choose to notify the workflow initiator, the workflow designer and/or any user, Active Directory group, or list of E-mail addresses.
- Workflow Initiators are the users who start a workflow manually or create/modify an item that may trigger an automatic workflow to start.
- If the workflow starts automatically, the Workflow Initiator may not be aware of the workflow and may be confused if they receive an email about a workflow error. You may decide to send workflow error emails to the Workflow Designer or specific users instead.
![]() Use the following syntax tips to enter lists of users:
Use the following syntax tips to enter lists of users:
- Enter user accounts in the format DOMAINUser
- Enter group names with square brackets (i.e., [Group Name])
- Separate multiple entries with a comma.
See Also: