| Overview of Password Configuration settings |
|---|
To customize the layout of the Web Part, select Custom Layout, and then click the Modify Layout button.
 In the HTML Editor window, you can customize the HTML used to define the layout of the Web Part. Note: The HTML provided in the HTML Editor window is a sample only and must be replaced by your custom HTML.
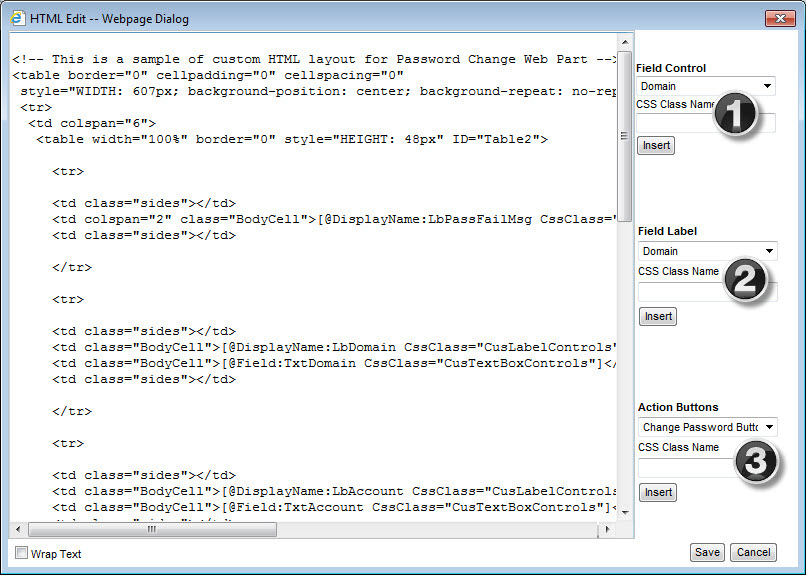
The following options on the right side of the window are available to help you construct the HTML code:
| No. | Column | Description |
| 1. | Field Control |
Contains a list of the text fields that are displayed on the Web Part. Select a field to insert into your custom HTML and provide a CSS class name that can be used later to define the style for the field (optional). Place the cursor in the HTML Editor where you want to insert the field and click the Insert button. The following text will be inserted: [@Field:InternalFieldName CSSClass=”ClassName”]
|
| 2. | Field Label |
Lists the text fields defined by the Web Part. This allows you to create a custom name for each text field that differs from the InternalFieldName. Select a field, define a CSS class name (optional), and click Insert to add the label of the text field into the HTML Editor. The following text will be inserted: [@DisplayName:InternalFieldName CSSClass=”ClassName”]
|
| 3. | Action Buttons |
Use this drop-down list to modify the Change Password button or the Clear button. Select which button to modify and enter a CSS class name (optional). Put the cursor in the HTML Editor where you want the button to be displayed and click Insert. The following text will be inserted: [@Control:BtnControlName CssClass=”ClassName”]
|
When you are finished constructing your custom HTML, click the Save button in the HTML Editor to save the new layout and return to the Look and Feel Settings page. Click Save & Close in the Web Part Settings window and then click Apply and then OK in the Web Part tool pane to view the new layout.
See also: