Retired Bamboo Products
Overview
Retiring products is a decision that is not made lightly here at Bamboo. Ultimately, our focus is on offering leading-edge products that contribute to the SharePoint ecosystem. With many of our customers migrating to SharePoint 2010 and SharePoint 2013 and the window for SharePoint 2007’s end of lifecycle quickly approaching from Microsoft, we have looked at several of our products and conducted cost-benefit analysis to project when we will no longer be supporting these products.
The following Bamboo products have been retired from the Bamboo Solutions Storefront. Please forward all questions regarding product retirement to the Bamboo Sales Team with the subject Product Retirement.
June 11, 2010
On June 11, 2010, Bamboo Solutions no longer accepts purchases of additional license keys or support for the following products. All existing support contracts for these products will be honored, however, no additional support renewals will be offered.
- Form Auto-Save Web Part
- Job Requisition and Interview Management (JRIM) Template Extension
- SharePoint Desktop Explorer
March 1, 2012
On March 1, 2012, Bamboo Solutions no longer accepts purchases of additional license keys or support for the following products. All existing support contracts for these products will be honored, however, no additional support renewals will be offered.
- List Integrity
- Map Chart Web Part
- Password Reset Web Part (ASP.Net Sample Applications and associated API only)
- System Log Manager
- User Management Solution Accelerator
Log in to My Bamboo and click Toolkits, Suites and Libraries for a complete list of products included with your Bamboo Library and for tools to manage everything from licensing to product update alerts.
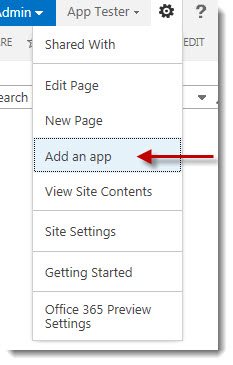
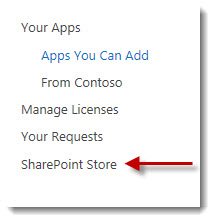
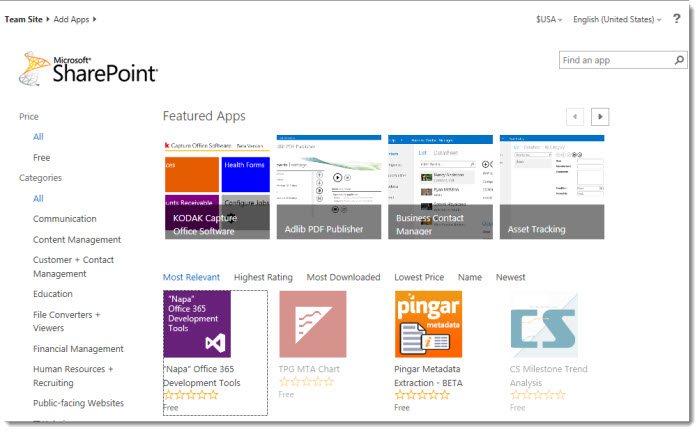
How to buy an app from the SharePoint store
The SharePoint Store is a public marketplace that you can access directly from your SharePoint site where you can buy apps from third-party developers for personal or organizational use. An app for SharePoint is a small, easy-to-use, stand-alone application that performs a specific task or meets a business need. You can add apps to your site to customize it with specific functionality or to display information.
Buy apps here
Getting Started with My Bamboo
Access to My Bamboo is free and does not require a product purchase. My Bamboo provides access to product downloads and purchase histories, up-to-date product information, access to Bamboo Support Team and more.
To get started, click the My Account link on at the top of any Bamboo Solutions web site page.

If you created an account when you purchased or downloaded your product, enter the account information you provided.
Forgot my My Bamboo password – can you reset it?
This article applies to you if you have a My Bamboo account. The username of a My Bamboo account is always an email address.
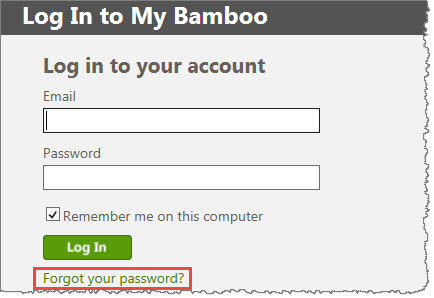 If you forget the password of your account, you can go to the My Bamboo login page and click on the Forgot your password? link.
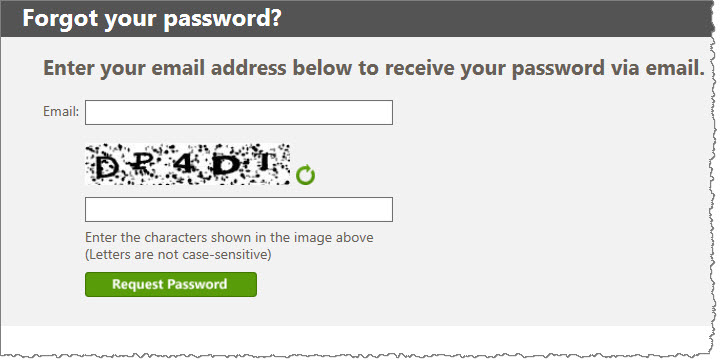 A page opens to validate that you are not a robot, where you enter your email address as well as the characters that appear on the page.
If your email is in our database, you will immediately receive an email at the address on file containing your current password.
Bamboo Feature Needs to be Activated
Ever get an error when creating a site that tells you a feature needs to be activated before you can create the site? Unfortunately, the feature that it tells you about is in the form of a GUID, so it’s not immediately helpful. If it is a SharePoint feature, you search the ID (via Google or Bing) and figure out which one it is. But if it is a Bamboo feature, search will probably not help.
How can you get a list of all the Bamboo features and their associated Feature IDs?
You can generate a report using PowerShell granted you have the appropriate permissions on your server.
Here’s the command we use on a server (CSMoss2) to get that info:
 Get-Spfeature
 | Where-Object {$_.DisplayName -ilike "*bamboo*"}
 | Select-Object DisplayName, Scope, ID
 | Sort-Object scope | ConvertTo-HTML
 | Out-file C:BambooFeatureIDS.htm
The breakdown:
- Get-Spfeature – lists all the features in the farm
- Where-object – shows all the features that contain “Bamboo” in the Display Name
- Select-object – for the properties to display
- Sort-object – sort by scope
- Convert-HTML – converts the results to an html file
- Out-file – puts the html file in your preferred location
The resulting file looks like this:
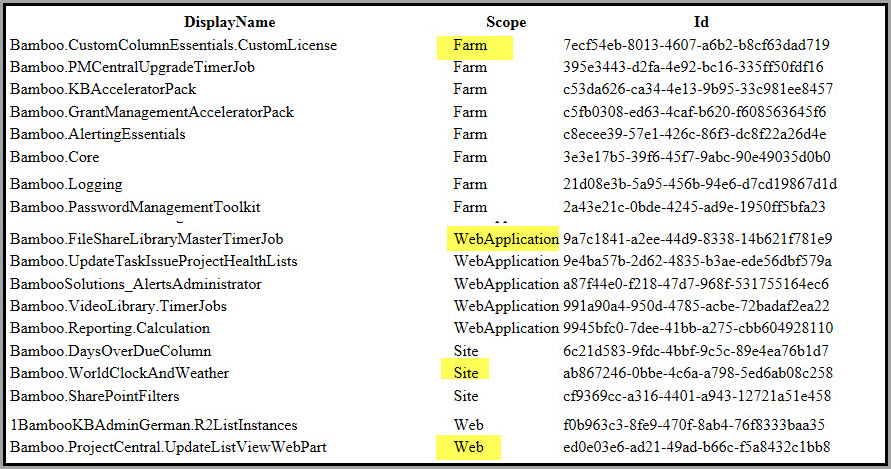
The variety of scopes have been highlighted and truncated for clearer display purposes.
Activating Your Bamboo Product License Offline
Licenses for Bamboo products that are installed on SharePoint servers are activated in SharePoint Central Administration using the Bamboo Web License Manager. Licenses are normally activated online, but sometimes SharePoint servers do not have access to the Internet. If this is the case with your servers, follow these instructions to activate a Bamboo product license offline.
NOTE: Before performing the steps listed below, be sure you have installed the Bamboo Web License Manager on your SharePoint farm. See Installing the Bamboo Web License Manager for more information.
| Step |
Action |
| 1. |
From SharePoint Central Administration, click Manage My License Keys under Bamboo Solutions.
NOTE: If you don’t see this option listed, see The Bamboo Web License Manager does not show up in Central Administration. How do I fix that
|
| 2. |
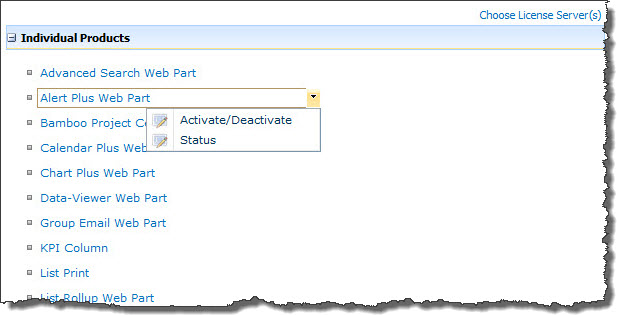
You may see two groupings on the Manage My License Keys page, Suites and Packs and Individual Products depending on what Bamboo products you’ve installed on the farm. When activating a Web Part or Application, expand the Individual Products section.
Locate the product you need to activate. Hover over a product name to see a drop-down menu associated with the product. Select Activate/Deactivate from the menu.
|
| 3. |
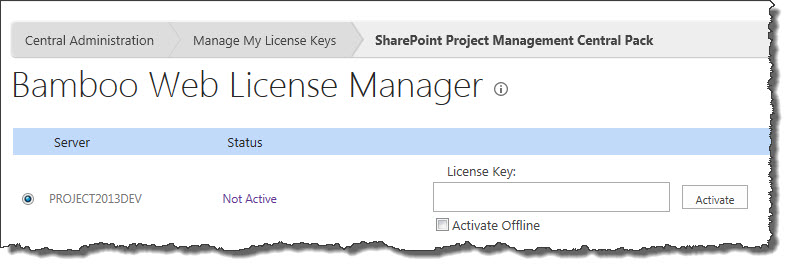
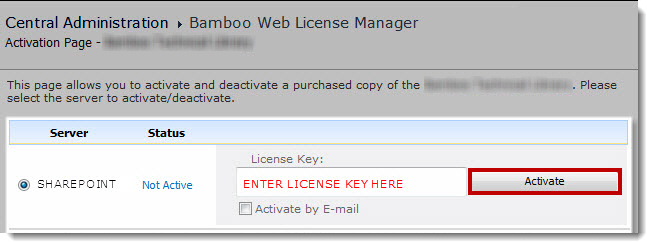
All servers in your SharePoint farm that are running the Microsoft SharePoint Foundation Web Application service will be listed. The license status for each will be Not Active or Trial. You will need an individual License Key for each server.
If some of the servers listed do not receive web traffic, you can remove them from the list. Please see Choosing which farm servers to license for more information.
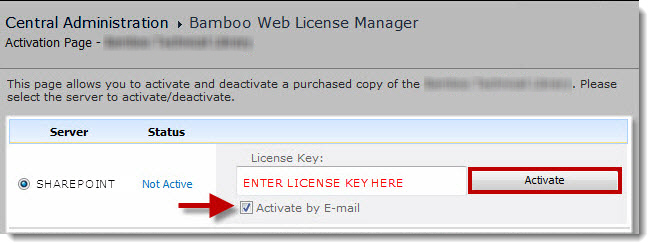
To activate a license for a server, type or copy and paste the License Key into the field provided, check the Activate Offline box, and then click Activate.
|
| 4. |
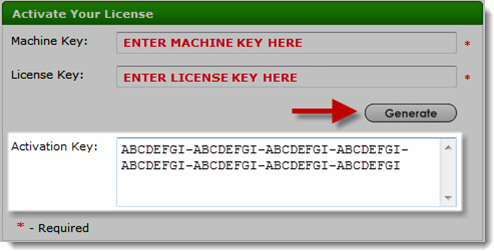
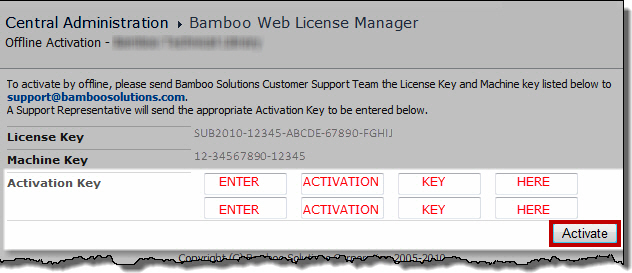
On the page displayed, a Machine Key will be displayed with the License Key and a space to enter the Activation Key.
NOTE: Eight spaces are shown if you are running WSSv3/MOSS. If you are running SharePoint 2010 or 2013, there is just one space.

Copy the License Key and the Machine Key to an email and send it to Bamboo’s Support Team at Support@bamboosolutions.com. They will reply via Email with the Activation Key. If you have several servers in your farm, you can send the License Key-Machine Key combinations for all of them in one Email message to the Support Team.
Alternatively, you can generate the Activation Key yourself via the My Bamboo area of the Bamboo Solutions website. See Generating Activation Keys using My Bamboo for more information.
Once you have the Activation Key, enter it in the space provided and click Activate.
NOTE: The Machine Key, as you may have guessed, is tied to the HW profile of the server. As such, the Activation Key is also tied to the HW profile. If the HW profile of a server changes, the License will fail and need to be deactivated and then re-activated, similar to what is required when you move your farm to new servers. See Migrate your Bamboo Product License Key From one SharePoint version to another for more information on what to do when this happens.
|
| 5. |
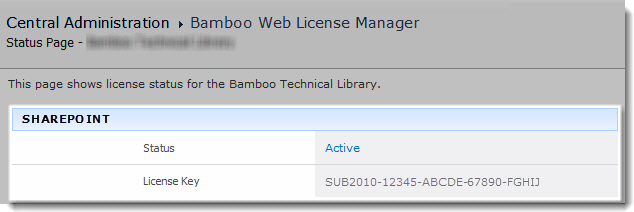
After the license is activated, it’s status will be displayed on the page.

|
Activating Your Bamboo Product License
Licenses for Bamboo products that are installed on SharePoint servers are activated in SharePoint Central Administration using the Bamboo Web License Manager. Follow these instructions to activate a Bamboo product license.
NOTE: Licenses for desktop/server applications such as List Bulk Import, User Profile Sync, and List Bulk Export are activated using a standalone version of the licensing application, called Bamboo License Manager. See Activating a Bamboo Desktop Product Using the License Manager for more information.
Before performing the steps listed below, be sure you have installed the Bamboo Web License Manager on your SharePoint farm. See Installing the Bamboo Web License Manager for more information.
| Step |
Action |
| 1. |
From SharePoint Central Administration, click Manage My License Keys under Bamboo Solutions.
NOTE: If you don’t see this option listed, see Why isn’t Manage My License Keys displayed in SharePoint Central Administration?
|
| 2. |
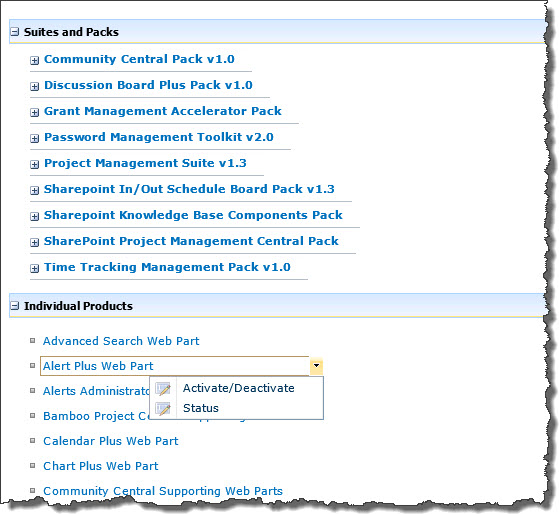
You may see two groupings on the page, Suites and Packs or Individual Products. When activating a Web Part or Application, expand the Individual Products section.
Locate the product you need to activate. Hover over a product name to see a drop-down menu associated with the product. Select Activate/Deactivate from the menu.
|
| 3. |
On the displayed page, the available servers in your SharePoint farm will be listed. You will need an individual License Key for each Web Front End server.
Certain products, such as Alert Plus and List Rollup include features that can be run on application servers as well. In these cases, separate licenses may also be required for one or more application servers.
NOTE: If some of the servers listed do not receive web traffic, or if there are application servers that do not need a license, you can remove them from the list. Please see Choosing which farm servers to license for more information.
To activate a license for a server, type or copy and paste the License Key into the field provided and click Activate.

NOTE: If your SharePoint server does not have Internet access, you may get an error when you click Activate. If you experience this, see Activating My Bamboo Product License Offline for more information.
|
| 4. |
Your Bamboo product is now Active and is ready for use, as shown by the Status column.

If you ever need to check which license key you used to activate each server, the license key used is shown on this status page.
|
Activating the Suite/Toolkit License
Open SharePoint Central Administration.
 IMPORTANT: You need a separate license key for each front-end Web server.
| SharePoint 2007 |
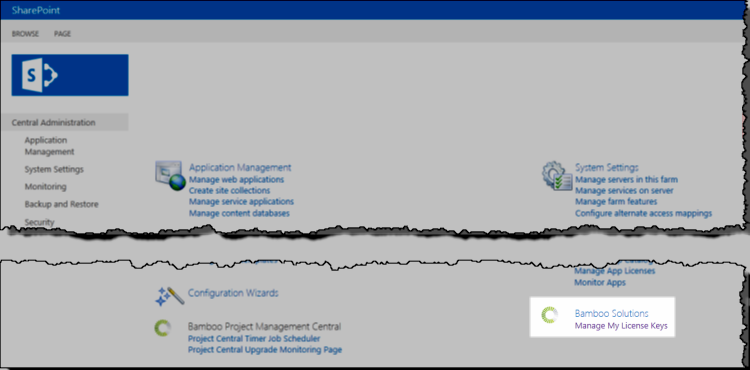
| In the Bamboo Solutions section in Central Administration, click Manage My License Keys. |
 |
| SharePoint 2010 |
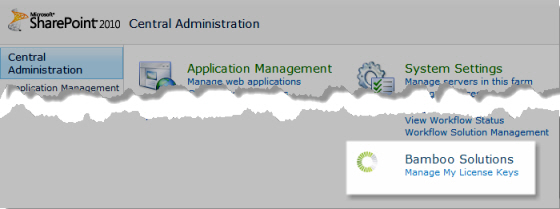
| In the Bamboo Solutions section in Central Administration, click Manage My License Keys. |
 |
| SharePoint 2013 |
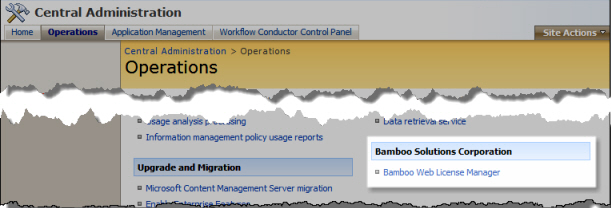
| Click the Operations link. In the Bamboo Solutions Corporation section, click Bamboo Web License Manager. |
 |
|
- In the Bamboo Web License Manager page, expand the Suites and Packs item and click the link for the Bamboo Suite you purchased.
- Click the Status link to display the Activation page.
- You can activate your license online if your server has an Internet connection, or offline if it does not. Follow the instructions below for whichever applies to your server:
Optional Step:
Bamboo products are deployed to all servers in the farm running the SharePoint 2007 Windows SharePoint Services Web Application, the SharePoint 2010 Microsoft SharePoint Foundation Web Application service, or the SharePoint 2013 Microsoft SharePoint Foundation Web Application service, which may include servers that do not serve Web content. Only servers that serve Web content and have Bamboo products installed need a license key, but all servers will appear on the Web License Manager Status and Activation pages.
If you would like to select only Web front-end servers to be displayed in Web License Manager, click the Choose License Server(s) link on the Bamboo Web License Manager main page. This step is optional, but makes it easier for SharePoint administrators to see which servers in the farm need a license key.
 IMPORTANT: You must have a license key for each front-end Web server where you install Suite products.
Activating a Bamboo Desktop Product Using the License Manager
Follow the steps below to activate your Bamboo Desktop product with the Bamboo License Manager.
NOTE: Please install the Bamboo License Manager before proceeding. See Installing the Bamboo License Manager 2.9 for more information.
| Step |
Action |
| 1. |
From the shortcut on the Desktop where you installed the application, start the Bamboo License Manager. The screen shown below will appear.
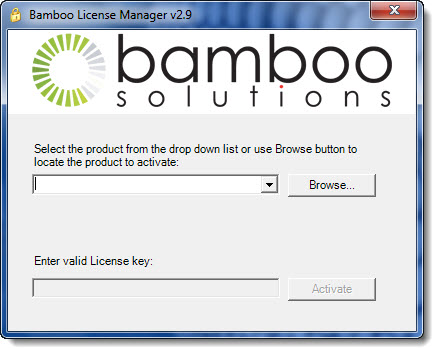
Click the Browse button to browse for the product that you wish to activate. |
| 2. |
If you installed the product in the default location, there should be a product folder in C:Program filesBamboo Solutions Corporation.
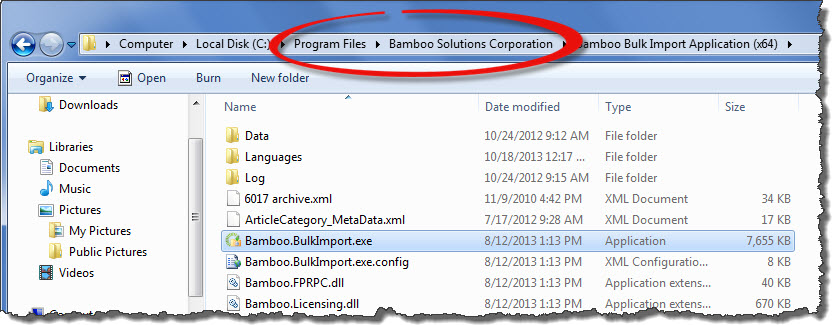
Locate the *.exe file for the product. For example, the *.exe file for Bamboo List Bulk Import, is Bamboo.BulkImport.exe as shown in the screen shot above. |
| 3. |
You are returned to the License Manager and the appropriate product name should appear in the drop down selection.
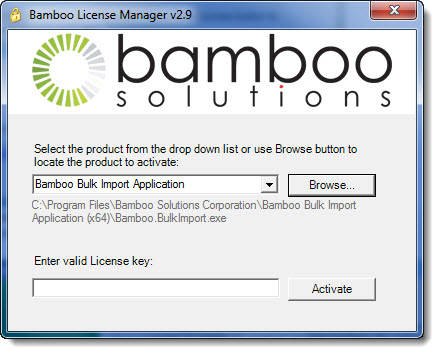
Enter your License Key in the space provided and click Activate. |
| 4. |
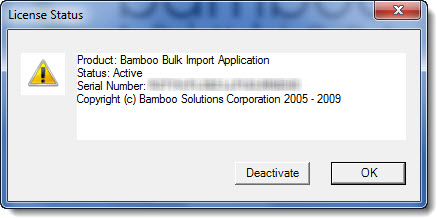
The License Status screen will appear letting you know that your product is Active. The License Key used to activate is shown as the Serial Number.
 |
| 5. |
You can always follow steps 1-4 above to learn the status of your Bamboo product license; particularly if you are wondering what License Key you used to activate this instance of the product. However, in Step 3, rather than entering a License Key, just click Activate while leaving the License key space blank. The License Status screen will appear displaying the current status of the license. |
Display a welcome message on your SharePoint site
 Change the display message welcoming users to your SharePoint site according to the time of day (i.e., Good Morning, Good Afternoon, Good Evening).
First, add Hello to a page in your SharePoint site. How to add a web part to a SharePoint page.
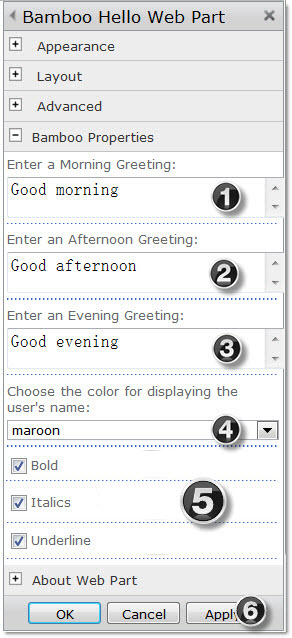
Next, edit the web part in the web part tool pane to customize the greeting(s).
 |
| Step |
Action |
| 1. |
Enter text you want to appear when a user logs into your site in the morning hours. |
| 2. |
Enter text you want to appear when a user logs into your site in the afternoon hours. |
| 3. |
Enter text you want to appear when a user logs into your site in the evening hours. |
| 4. |
Choose your preferred text color from the drop down selection. |
| 5. |
In this section you can check whether text should be bold, italics or underlined. |
| 6. |
Click Apply and OK to save your web part. |
|
|
Exit page edit mode.
Now when users open your SharePoint site, the greeting they see reflects the verbiage you set for the time of day. If you set the text color for their user name, their name will display in that color.
NOTE: The time of day is dependent on the time to which the server hosting your SharePoint site is set.
About the Installation Files
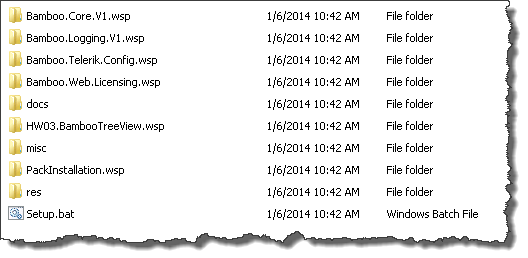 When you extract the product EXE to a location on your SharePoint server, several folders are created that contain installation files and Setup program configuration files. The root level of the extracted file system includes the file Setup.bat, which launches the Setup program. The list below shows the installation files for the Tree View Web Part, as an example.
For manual installation, you will access the following folders that contain installation files:
- Component.wsp: There may be several folders with names ending in .wsp, depending on your product. Each WSP folder contains the installation files for a specific SharePoint Solution. One or more SharePoint Solutions may be installed for each product component.
- docs: Contains the Installation and Licensing Quick Start Guide.
- misc: The MISC folder includes miscellaneous files, including PowerShell scripts for manually installing or uninstalling the product.
- msi: If a MSI folder exists for your product, it could contain multiple files ending in .msi. Each is an installation executable. Some MSI installers in the msi installation folder have both a 32-bit and a 64-bit version. The 64-bit version will include .x64 in the file name. Run the version of the MSI that is appropriate for your operating system. Do not install both.
- res: Contains files required by the Setup program but not necessarily needed during a manual install.
About our documentation
 Here at Bamboo, we think documentation is useful as a reference tool and we don’t expect you will read everything we write about our products. With that in mind, we have organized our documentation to help you find the information you need when you need it. Each product has a landing page that looks like this.
Install
|
Permissions
|
License
|
Permissions
|
- In this quadrant you will discover topics relating to installing Bamboo products for the first time or how to handle installation if you migrate to a new version of SharePoint. Each time you see an ellipsis after the phrase (…), you will find a list of topics rather than a single page of content or there may be no topics for that particular topic and an empty page will display. We will continually be updating and adding topics so you will likely see more content in the future!
|
 |
- Whether you try one Bamboo product, a toolkit or a suite of products, the download is a fully-functional version to install and configure in your environment. When you decide to purchase, this section guides you through activation and licensing, including information about handling your licensed products when you move your Bamboo product to a different server or farm, as well as troubleshooting tips about product licensing.
|
 |
Configure
|
Permissions
|
Work With
|
Permissions
|
- Configuring your product is the how to set it up as it was intended by the developers so that you can best leverage the product features. This quadrant provides information relating to configuring your Bamboo product as well as a list of troubleshooting tips relating to configuration. You may see a link to a video within any topic in our documentation; all of those videos are in our Bamboo Solutions Support YouTube channel.
|
 |
- We want you to use our products and this quadrant covers how users will interact with them. Many of the screens you interact with are featured in this section with a plethora of helpful, how-to topics that explain not just what you see on the screen and how to fill in the fields, but tips on why to choose one option versus another option.
|
 |
At the bottom of the quadrants, we include a link to all
the topics relating to that product. If you still cannot
locate what you need, take advantage of our search
boxes. At the top of each page is a global search to find
topics relating to keywords. We also provide filtering
to narrow down your search results. |
 |
Each page also gives you a quick link to the storefront page where you can download a trial or purchase our products.
Not sure which SharePoint platform you are using? Check out this informative article. |
| We hope you find our new layout easy to use as you interact with our products. We welcome your feedback on any page. Simply leave us a message at the bottom of a page; if you cannot find what you need, let us know. We will continue improving and expanding our product information. |
In addition to the Product Documentation, Bamboo offers the following resources accessible from the Reference Section on the home page to help you use our products during your trial period or after purchase:
- Knowledge Base: Our searchable Knowledge Base includes release notes and product updates as well as articles and answers to frequently asked questions.
- User Forums: Get help from other Bamboo Nation users by posting your question in our user forums. There is a dedicated forum for each Bamboo product. We also welcome your feedback and feature suggestions in the New Product Requests forum.
- Customer Support Website: The Bamboo Support Website includes links to our searchable Knowledge Base, Bamboo Nation user forums, support plan details, and more. To report issues or ask questions, use the official Help Desk portal at My Bamboo.
- My Bamboo: Register with My Bamboo to track product downloads and purchases, submit tickets through our Help Desk portal, manage product notifications and more.
To further augment our online documentation, check out our YouTube channel where may find a growing list of helpful videos.
Not quite what you need? E-mail Bamboo Sales at [email protected] with any questions about functionality, pricing or licensing. |
About Bamboo product Release Numbers
Overview
Bamboo products have several releases throughout the year. To understand more about the type of releases available, see the Bamboo Solutions Upgrade Policy.
Its important to know what release you have installed on your farm because:
- You can better follow the Release Notes for the product, which tell you about new features and known limitations for each version/release.
- If you are planning to migrate to a new version of SharePoint, you need to make sure you have a certain minimum version/release installed.
- If you need to report an issue to our Support Team, they will need to know what version/release you are using.
Where to find Release Notes
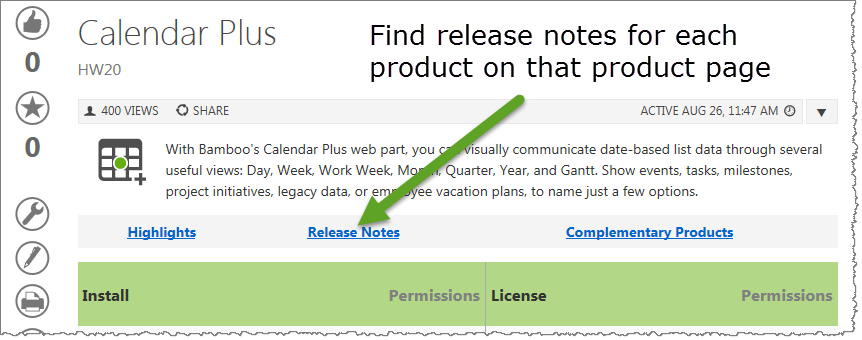 As you look at each product’s documentation page, you will see there is a link to the Release Notes for that product at the top of the page.
Bamboo produces different version numbers of our products for the different SharePoint platforms.
SharePoint 2007 (WSSv3/MOSS) Release Numbers
If you are running SharePoint 2007, the version/release number consists of 4 parts, such as:
R1.2.3.0
- The first digit indicates the Major Release. In the case above, this is “1”.
- The second digit indicates the Minor Release (2 in the example above).
- The third number indicates the build number.
- The fourth number will always be 0 unless you are using SharePoint 2013 (see explanation below).
SharePoint 2010 Release Numbers
If you are running SharePoint 2010 (SharePoint Foundation 2010 or SharePoint Server 2010), the Major Release digit of the installed product’s file version includes a zero (0) in the digit such as:
10.2.3.0
To match your current installed product with the release notes, remove the first zero (0). The end result is version 1.2.3.0.
SharePoint 2013 Release Numbers
If you are running SharePoint 2013 (SharePoint Foundation 2013 or SharePoint Server 2013), the Major Release digit of the installed product’s file version includes a zero (0) and the fourth digit is “2013” such as:
10.2.3.2013
To match your current installed product with the release notes, remove the first zero (0) and the 2013. The end result is version 1.2.3.0.
 .
. 




 If you forget the password of your account, you can go to the
  A page opens to validate that you are not a robot, where you enter your email address as well as the characters that appear on the page.




 Change the display message welcoming users to your SharePoint site according to the time of day (i.e., Good Morning, Good Afternoon, Good Evening).
 When you extract the product EXE to a location on your SharePoint server, several folders are created that contain installation files and Setup program configuration files. The root level of the extracted file system includes the file Setup.bat, which launches the Setup program. The list below shows the installation files for the Tree View Web Part, as an example.
 Here at Bamboo, we think documentation is useful as a reference tool and we don’t expect you will read everything we write about our products. With that in mind, we have organized our documentation to help you find the information you need when you need it. Each product has a landing page that looks like this.


 As you look at each product’s documentation page, you will see there is a link to the Release Notes for that product at the top of the page.