How to Update My Status Web Part

How to Update My Status Web Part

The My Status Web Part allows you to view and alter your status at any time, from any site that contains the Web Part. By default, it always displays your current status, comment, and return time – however, these options can be changed from the tool pane configuration.

To create a new calendar item:

Step Action
1. Click New Item
2.
  • Each item requires, at minimum, values to be entered for Title, Start Time, End Time, EmployeeID (this associates the item with a person in the contact list), and Status (this is the status of the associated person during the event). Enter these values.
  • If applicable, mark the event as an all day event, or a repeating event.
  • Include any other relevant metadata, such as reasons for out of office, or contact method. This information will be displayed on the In/Out Schedule Board, if you have configured it to do so.
3.
  • To change your current status, click Change My Status. This option will only be available if your current status is affected by a calendar event; this event will automatically be opened for you to edit.

How to Configure the My Status Web Part Using the Tool Pane

How to Configure the My Status Web Part Using the Tool Pane

If you are adding the My Status web part to a SharePoint site outside of the In/Out Schedule Board, it must be configured so it can read and update scheduling information from the site’s lists. To do so, use the following procedure to configure the Web Part from the tool pane.

  1. From the page containing the My Status Web Part, click Site Actions in the upper right corner.
  2. Click Edit Page.
  3. From the web part’s top right hand corner menu, select Modify Shared Web Part.
  4. Enter the URL of the In/Out Schedule Board SharePoint site the web part is to reference in the Enter Site URL field.
  5. Click Connect.
  6. Select the Bamboo In and Out Calendar List from the Select List Name drop down list.
  7. Select EmployeeID from the Select User Name drop down list. This is the column the Web Part will use to determine which items are associated with the user.
  8. Select Status from the Select Status Column drop down list. This is the column from which the Web Part will determine the user’s status.
  9. Select all of the status values to associate with “Out” status from the Available Value list, and add them to Value To Out of Office. Any status value included here will be considered “Out” by the My Status web part – anything not included will be considered “In”.
  10. Select End Time from the Return Date Column.
  11. Select Comments from the Select Comment Column drop down list. The Web Part will display this column’s information along with the status of the user.

Highlights of In/Out Schedule Board

Highlights of In/Out Schedule Board

SharePointInOutScheduleBoard.pngProvide a central, online area to track shared and human resources.
The In/Out Schedule Board Solution Accelerator is an easy to use, all-in-one digital whiteboard designed to centralize scheduling and contact information for teams and groups.

Powered by three different Web Parts and tied together by a custom site template, the system allows you to quickly group, sort, and scan the current status of your team members via a color-coded Schedule Board, or review schedule conflicts and future engagements in a Gantt-style calendar. Even better, current and future status information is easily updated from any of the components, including the My Status Web Part, which can be added to any page and used to view and add to the Schedule Board site’s data.

In/Out Schedule Board is easy to install and configure, and can use Contacts from an custom List, or the SharePoint User Info List.

Create an In/Out Schedule Board Site

Create an In/Out Schedule Board Site

Return to Configuration Overview

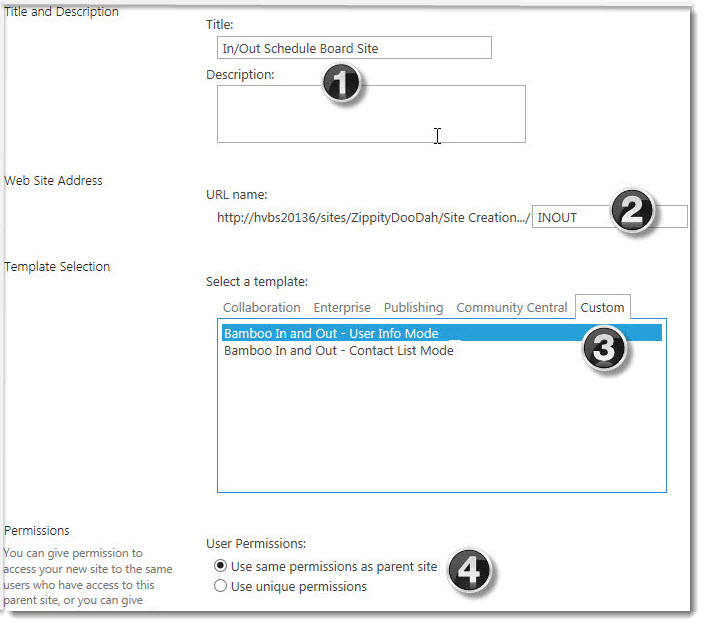
NewSite.jpgAfter In/Out Schedule Board and corresponding site template are installed, you can create a Schedule Board site by using the site template.
NOTE: Even if you plan to use the My Status web part separately on an existing site, you still need to create a new site based on the Schedule Board site template to store the necessary data.

You will need to log in as a user with the rights to create sites from the top level of your site collection.

From the Site Contents menu of your top-level site, select “New Subsite

Step Action
1. Fill in the Title & Description fields to give your site a name.
2. Label your site with a short URL name (we recommend no spaces or punctuation).
3.

Click the Custom tab to select from the available Custom templates; there are two In and Out options. What is the difference?

  • A Schedule Board site that is created using the User Info Mode will hold all of the users in the SharePoint User Info List; in other words, all of the users that have permission to your site.
  • A Schedule Board site created from a separate Contacts list will only contain the users who are in that list. You can always add or remove users to or from the list later.
4. Click Create – The site will now be created. In a few moments, once the site has been created, your browser will load it, and you can start configuring the web parts on the site.

Congratulations! The new In/Out Schedule Board site is now ready to configure.

Configure the My Status Web Part Tool Pane

Configure the My Status Web Part Tool Pane

Return to Configuration Overview

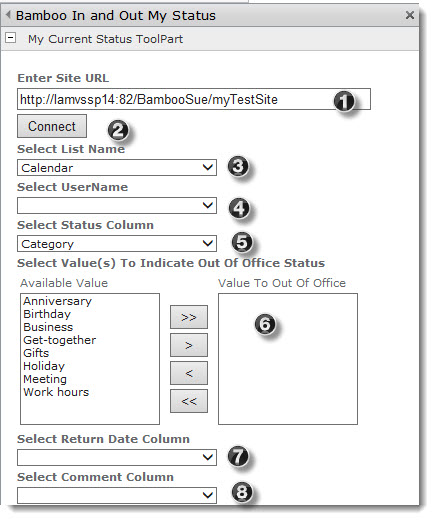
InOutStatus.jpgIf you are adding the My Status web part to a SharePoint site outside of the In/Out Schedule Board site, it must be configured so it can read and update scheduling information from the site’s lists. To do so, use the following procedure to configure the Web Part from the tool pane.
Step Action Result
1. Enter Site URL: Pick the site URL for your site that contains the list to which you want to connect.
2. Connect Click the connect button to make the connection to the site. You’ll see a message explaining whether or not the connection is successful.
3. Select List Name Pick the list you want to use from the drop down options.
4. Select UserName This is the column the Web Part will use to determine which items are associated with the user.
5. Select Status Column This is the column from which the Web Part will determine the user’s status.
6. Select Value(s) To Indicate Out of Office Status Select all of the status values to associate with “Out” status from the Available Value list, and add them to Value To Out of Office. Any status value included here will be considered “Out” by the My Status Web Part – anything not included will be considered “In.”
7. Select Return Date column Select End Time from the Return Date Column so that viewers at a glance see when that person is expected to be back in the office.
8. Select Comment Column The Web Part will display this column’s information along with the status of the user.

Configure the Home Page Web Part

Configure the Home Page Web Part

Return to Configuration Overview

While the different pages and web parts that make up In/Out Schedule Board are designed to work straight out of the box without necessarily being configured, there are a number of features that can be customized from the respective tool panes of the three web parts.

NOTE: If you are using any of the included site templates (recommended), most of these options will already be set, and In/Out Schedule Board will function properly as is. It is not recommended or necessary to manually configure the Home or Calendar web parts for regular usage.

Use the following procedure to manually configure the Home page Web Part. Note that many of these options are pre-configured when the Schedule Board site is created, and that the part may no longer work properly if they are changed. Those options are marked as such in this procedure.

Step Action Result
1. Edit the web part and select the Bamboo In And Out Calendar List from the drop down list. This is the list that will hold the event data that determines In/Out status for each user. By default, the “Bamboo In And Out Calendar List” view is selected. The Schedule Board site template creates this list automatically, and it is not recommended that you change this value.
DisplayOptions.jpg
2. Select the Bamboo In And Out Calendar View from the drop down list. This is the View that will be used to determine which items on the Calendar List will be included on the Schedule Board. By default, the “Calendar” view is selected, and it is not recommended that you change this value.
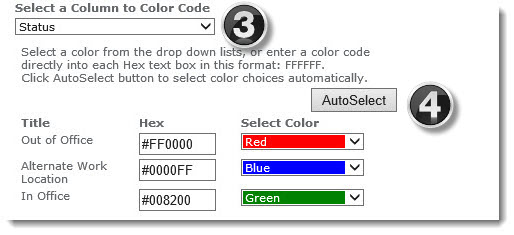
3. Select the Column to Color Code from the drop down list. The contents of this column will be used to determine how each user’s information will be color coded on the Schedule Board. By default, “Status” is selected.
4. Select colors for each of the available values in the column set in Column For Color Code. To automatically apply colors to all values, click AutoSelect. ColorCoding.jpg
5. Select a User Info Source, either the SharePoint User Info List, or a separate Contact List. SelectingSource.jpg
You have two options here; 1) choose the users from a SharePoint User Info List or 2) use a Contact list to pull in user data.
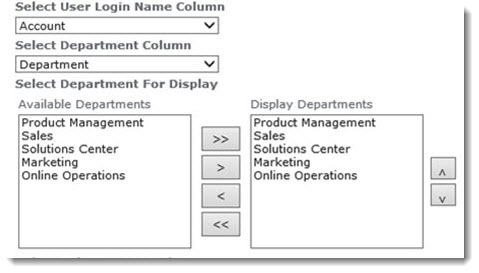
Choice1.jpg Select the User Login Name Column. The value in this column is used to associate events with individual users, and should contain a user login name. SelecUserDept.jpg
By default, the “Account” column is selected, and it is not recommended that you change this value.

Select the Department Column for Display

The list of available departments appear in the left box; highlight the one(s) you want to show and press the > button to set it as a display column. This column will be used to quickly sort users into groups; the default setting is “Department”.
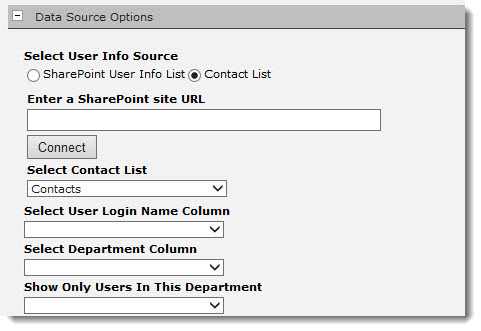
Choice2.jpg If you choose to use a Contact List, enter the URL of the SharePoint site containing the List in the Enter a SharePoint site URL field.

ContactListChoice.jpg
If you used the Bamboo In And Out – Contact List Mode site template, this option is already set, and it is not recommended that you change it.

  • If you’ve entered a new URL, click Connect.
  • Choose the contact list to use from the Select Contact List drop down list.
    Select a column from the Select User Login Name Column drop down list that contains valid user login names. The login name is used to associate an event with a particular user.
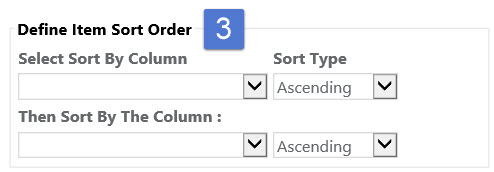
Choice3.jpg Define Item Sort Order

sa06-define-item-sort.jpg

Select the drop down list options in Define Item Sort Order if you prefer to change the default sort order of items by up to two columns.

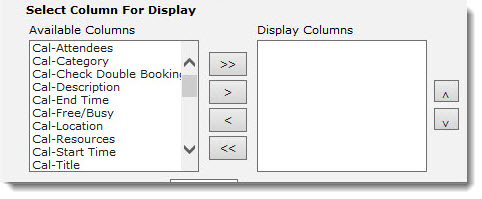
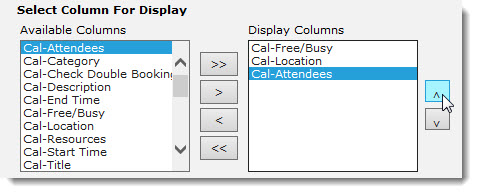
6. Add any columns you want displayed in the Home Schedule Board Web Part from the Available Columns list to the Display Columns list. SelectDispCol.jpg
7. Optionally, you can toggle the Web Part’s filtering, sorting, grouping and export controls by selecting or deselecting the Display Settings check boxes. ColSort.jpg
8. To set a pre-established, custom column width : Select a unit of measurement (Pixel or Percent) from the Measure Columns In drop down list.
Measure.jpg
Enter the desired widths into the Enter column width(s) field, separating each value with a column. For instance, to set the values of three columns to 100, 150, and 200 pixels, select Pixel from the Column Width Unit drop down, and enter “100, 150, 200” into the field.
9. Display Setting sa06-display-settings.jpg
Optionally, you can toggle the Web Part’s filtering, sorting, grouping and export controls by selecting or deselecting the Display Settings check boxes.
10. If you have included a Picture column the Display Column list, you can set the size of the displayed picture. PicSiz.jpg
Enter the Width and Height values into the corresponding fields under Picture Size.
11. To alter the visual appearance of the web part, select from one of the options from the Skin drop down list. Skin.jpg
Preview the available skins

Configure the Calendar Page Web Part Tool Pane

Configure the Calendar Page Web Part Tool Pane

Return to Configuration Overview

Use the following procedure to manually configure the Calendar page Web Part.

NOTE: Many of these options are pre-configured when the Schedule Board Site is created and the web parts may no longer work properly if they are changed. Those options are marked as such in this procedure.

Step Action Result
1. Edit the web part and select the Bamboo In And Out Calendar List from the drop down list. This is the list that will hold the event data that determines In/Out status for each user. By default, the “Bamboo In And Out Calendar List” view is selected. The Schedule Board site template creates this list automatically, and it is not recommended that you change this value.
DisplayOptions.jpg
2. Select the Bamboo In And Out Calendar View from the drop down list. This is the View that will be used to determine which items on the Calendar List will be included on the Schedule Board. By default, the “Calendar” view is selected, and it is not recommended that you change this value.
3. Select the Column to Color Code from the drop down list. The contents of this column will be used to determine how each user’s information will be color coded on the Schedule Board. By default, “Status” is selected.
4. This section is not visible until you select a column in Step 3. You can pick the hex colors for each of the available values. To automatically apply colors to all values, click AutoSelect. ColorCoding.jpg
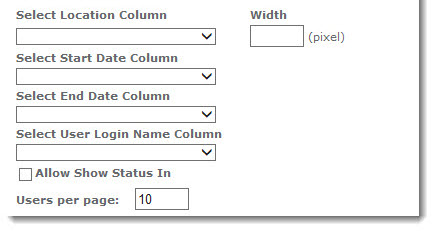
5. Select the Location Column from the drop down list.
CalDisplayOptions.jpg

The contents of this column will be used to provide location information for each event so be sure your users fill it in.

  • Select Start Date Column:
  • Select End Date Column:
  • Select User Login Name Column:
  • Allow Show Status In: Select to display status even when users are scheduled as “In”; if this option is not selected, the Web Part will only display those who have an out of office status on the calendar.
  • Users per page: Note that exceptionally large numbers of users per page may negatively affect performance.
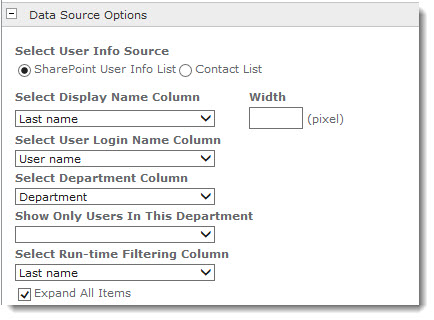
6. SharePoint User Info List Options
CalDataSourceOptions.jpg

Depending on whether you select the User Info List or the Contact List on which to base your user data, there are some columns that need to be filled in.

  • Select Display Name Column: The selected column’s values will display under the Employee/Subject Column in the Web Part interface.
  • Width: Enter the number of pixels wide you want to set the Display Name column.
  • Select User Login Name Column: This is the list that contains valid user login names. The login name is used to associate an event with a particular user.

  • Select Department Column: This column will be used to quickly sort users into groups; the default setting is “Department”.

  • Show Only Users in This Department: To show only the users from certain departments (or groups), add any departments you want displayed in the Calendar Schedule Board view from the Available Departments list to the Display Departments list.
  • Select Run-time Filtering Columns: Optionally, you can toggle the Web Part’s Display Settings by selecting or deselecting the Expand All Items and Allow Runtime Filtering check boxes:
    Select a Run-Time Filtering Column. This is the column that can be quickly sorted alphabetically by clicking the A through Z links at the top of the web part. By default, this is set to “Name”, so that clicking on “J” would display all users with first names that began with “J”.
  • Expand All Items: To automatically show all events for all users select the Expand All Item check box.
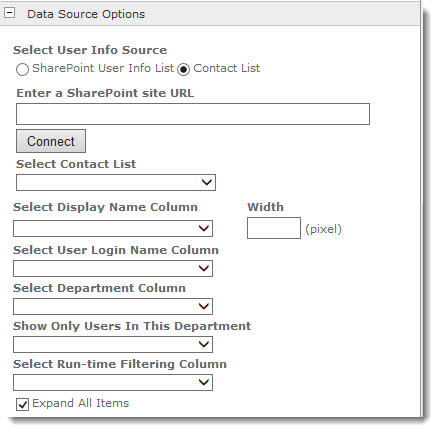
Contact List
UserInfoListOptions.jpg

If you select Contact list, you still have some of the same columns as above, except the web part needs to make a connection to know which list you are picking data from.

  • Enter a SharePoint Site URL: Enter the URL of the SharePoint site containing the Contact List.
  • Connect: Click the button to make a connection to the site.
  • Select Contact List: Choose from the available lists shown in the drop down.

All subsequent column choices are identical to above.

Configure In/Out Schedule Board

Configure In/Out Schedule Board

In/Out Schedule Board consists of three web part pages, tied together with a custom site template. The template gives you easy access to the Home, Calendar, and My Status web parts, and lets you and your users to enter any scheduled items that will alter your In/Out status. Given View permission, anyone can also review the current and future status of team members and co-workers.

Along with the web parts, the site template also creates several SharePoint lists, for storing data used by the Schedule Board. They include:

  • Bamboo In and Out Calendar List – contains date, location, and other scheduling information, which is used by the different web parts to display status
  • Contacts – contains full list of tracked users, as well as contact information and user information; In/Out Schedule Board can also be configured to use the SharePoint User Info List, instead.
  • Picture Library – stores profile pictures referenced by the Contacts list, and used in the Home view
  • Attendees – standard list included with Meeting Workspace sites (not used by In/Out Schedule Board )
  • The Home and Calendar web parts are designed to be used within the In/Out Schedule Board Site Template only; however, the My Status web part can be added to any site and – once assigned to a working In/Out Schedule Board site from the tool pane – used to view and modify the status of the currently logged-in user. Alternatively, the part can be added to a user’s My Site page, where it will display the status of the site owner.

Complementary Products for In/Out Schedule Board

Complementary Products for In/Out Schedule Board

sharepointsolutions.pngYou will find many of our products complement each other quite nicely saving you the time and trouble to write custom code. With Bamboo at the heart of your SharePoint investment, you gain access to a huge catalog of enhancements, components, and accessories that add the critical functionality your business requires.
The same components can be easily used in future applications and they all come from a single, trusted vendor, ensuring an easy purchase process and support you can count on. That’s the Bamboo Way!