Using the List Rollup Schema Designer Support Page

Using the List Rollup Schema Designer Support Page

The List Rollup Schema Designer Support page provides a useful utility to help troubleshoot issues with rollups.

To use the utility, follow these steps:

Step Action
1. HW24 LRSD Support option on menu.jpgIn the List Rollup Schema Designer Web Part, click Support from the main menu.
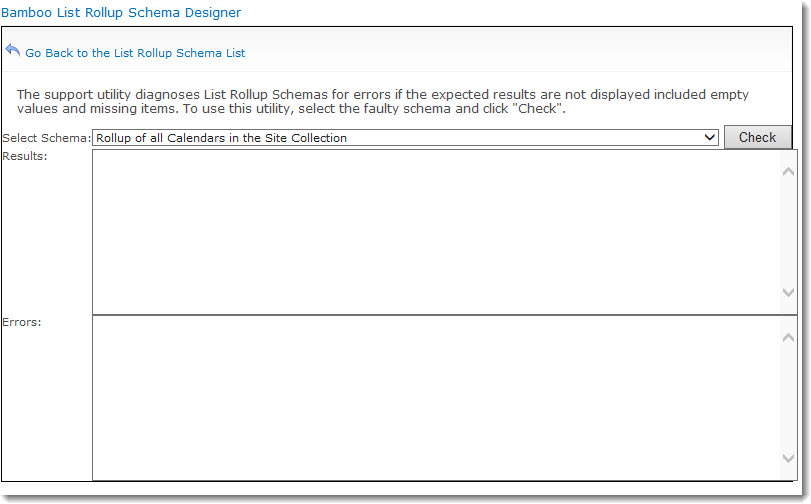
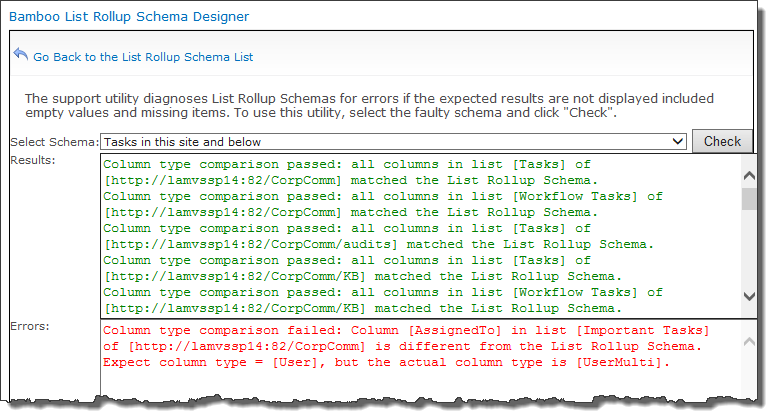
2. Select the schema you need to check in the Check Schema list and then click the Check button. All schemas that have been defined on the current site should be listed.
HW24 LRSD Support page.jpg
3. The schema will be analyzed and the results shown in the Results area. Information shown in green text is just information, but if you see red text you should review the findings more carefully.
HW24 LRSD Support example1.jpg
4.

Examples of other issues you may encounter that you can troubleshoot with the Support Page:

If you encounter an issue that is not explained and you need help with it, please submit a ticket to our Support Team via the My Bamboo area of the Bamboo web site.

The Rollup is Missing Data From One List

The Rollup is Missing Data From One List

Issues:

You created a rollup that gets all the Tasks in your site collection. You did not configure a filter for the rollup. There is a list called Important Tasks in the top level site that has tasks in it, but none from that list are shown in the rollup.

Resolution:

To troubleshoot and resolve this issue, follow these steps:

Step Action
1.

Check the List Rollup Schema Design Support Page.

HW24 Support page example.png

It reports that the Column type comparison failed for the Assigned To column in the list called Important Tasks. Further, it reports

Expect column type = [User], but the actual column type is [UserMulti].
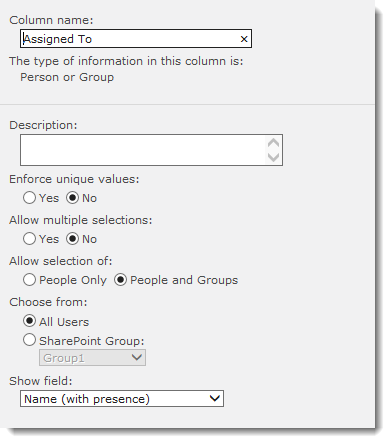
2. HW24 Assigned To column in master list.pngCheck the configuration of the Assigned To column in the master list of the rollup. Verify that Allow multiple selections is set to No.
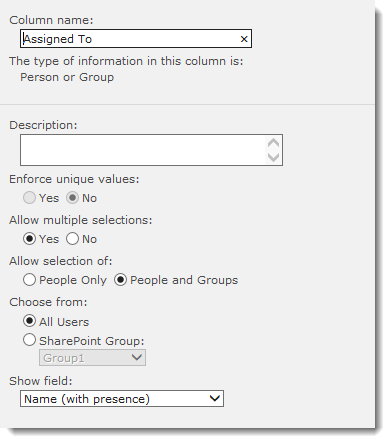
3. HW24 Assigned to column in important tasks.pngCheck the configuration of the Assigned To column in the Important Tasks list. See that Allow multiple selections is set to Yes.
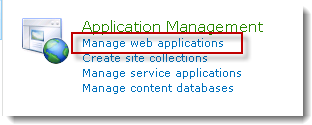
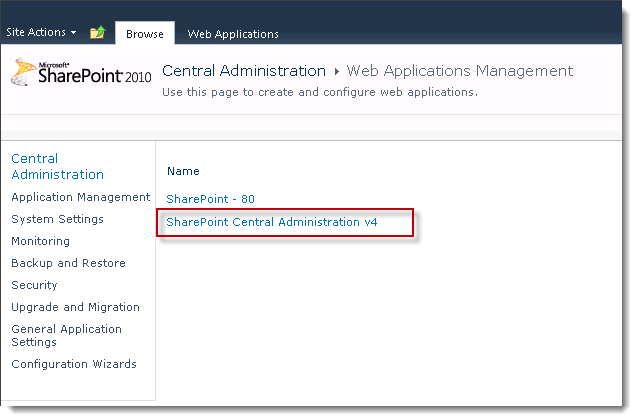
4. To resolve, change the configuration of the Assigned To column in the Important Tasks list to match the configuration in the master list for the rollup.

Select the Columns to include in your Schema-based Rollup

Select the Columns to include in your Schema-based Rollup

Create a new List Rollup Schema

To select the columns to include in your schema-based rollup, follow these steps:

Step Action
1. Click Select Columns to display the Select Columns dialog. The button will be grayed until a list is selected.

hw24 LRSD Columns.jpg
2.

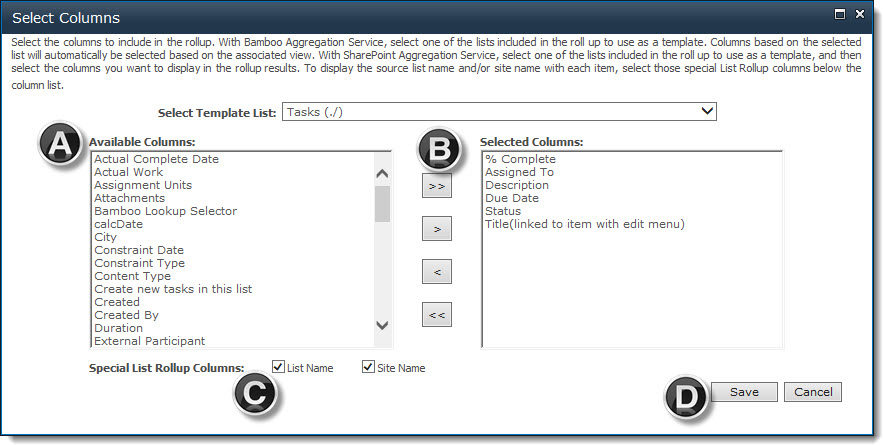
In the Select Columns dialog,

hw24 lrsd select columns with letters.jpg

  1. The columns found in the selected list are listed in the Available Columns list.
  2. Highlight a column in Available Columns and click the right arrow button (rightarrowicon.jpg) to move it to the Selected Columns list. If desired, select multiple columns by holding down the Ctrl key on your keyboard while clicking to highlight a column.

    Icon-WarningIMPORTANT: Only the select the columns that you need to display in your rollup. Getting, formatting, and displaying data in a rollup takes time. Achieve optimal performance by selecting only the columns you need.

    Icon-WarningIMPORTANT: The column names shown in the Available Columns list box are the display names of the column. To ensure your data rolls up properly within the columns you select, you must make sure the internal names of the columns and the column attributes match across all lists. For example, if you select a Status column in the master list with an internal name of ‘Status’ and data type of Choice that allows a single selection, then only those included lists that contain single-Choice columns with an internal column name of ‘Status’ will be rolled up.

  3. If desired, choose to also include a hyperlink to the List Name and Site Name of each aggregated item.

  4. When ready, click Save to save your column configuration and close the dialog. Otherwise, click Cancel to close the dialog without saving anything.

NOTE: The order that the columns are selected is not important in this section. You are defining the schema here and not yet deciding how to display the data to the end user.

3. When ready, click Save to save your configuration and close the dialog. Otherwise, click Cancel to close the dialog without saving anything.

Create a new List Rollup Schema

Select the Filter for your Schema-based Rollup

Select the Filter for your Schema-based Rollup

Create a new List Rollup Schema

To configure the filter for your schema-based List Rollup, follow these steps:

Step Action
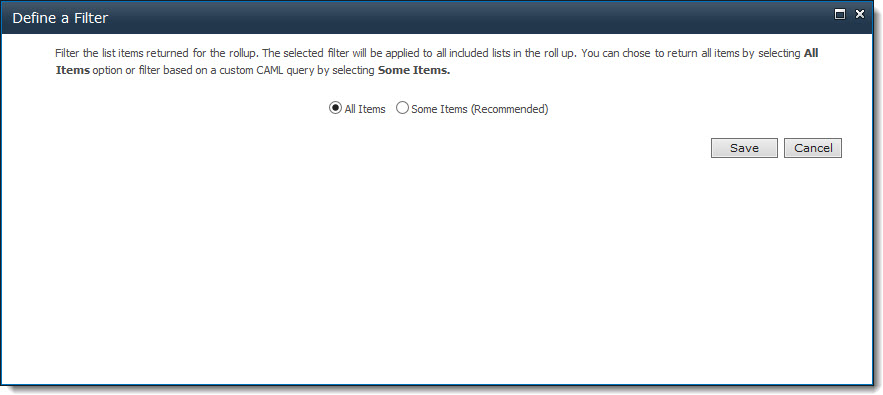
1. If you don’t want to filter the data, you still need to configure the Filter section. You won’t be able to create your schema until you do. For no filter, choose to return All Items, as shown below.
hw24 lrsd filter all.jpg
2.

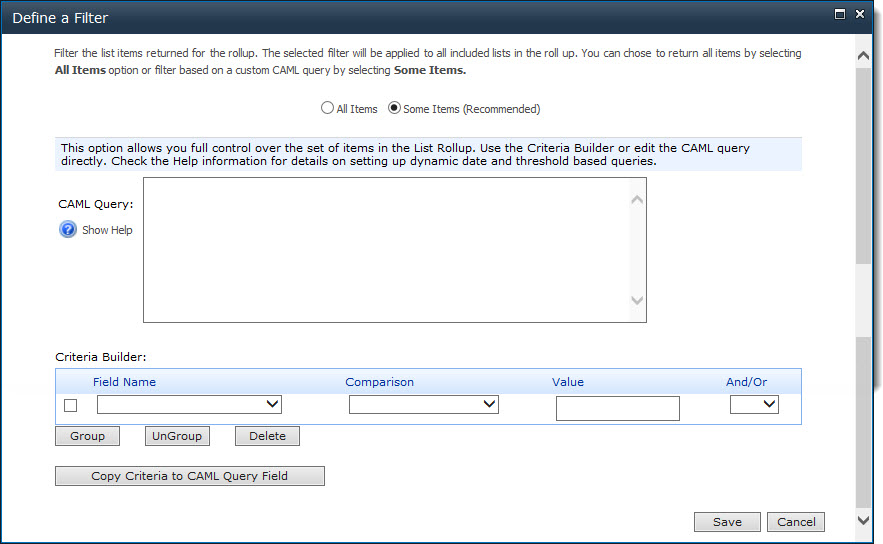
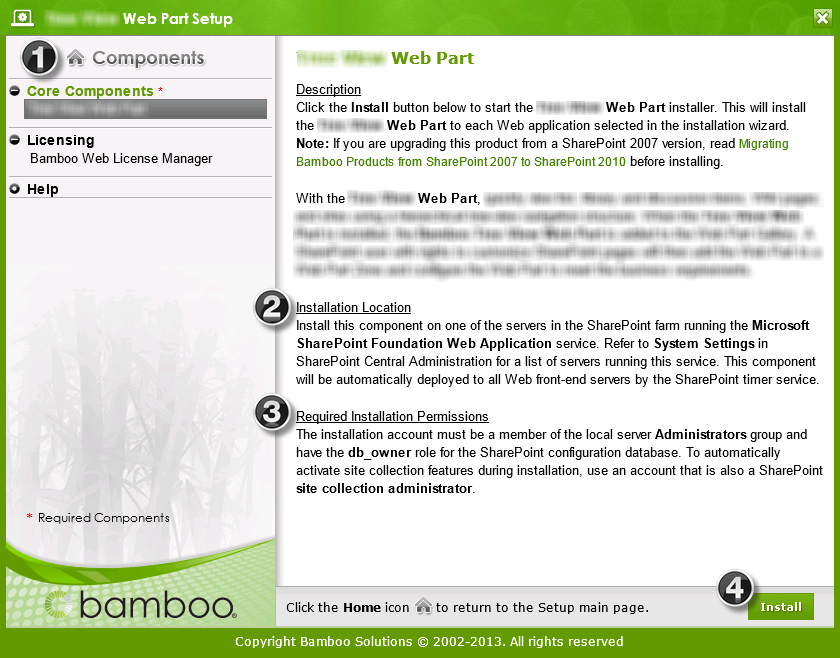
Otherwise, choose to filter the data returned. Click Some Items (Recommended) in the Define a Filter dialog. The Criteria Builder will appear on the screen with an area to copy the CAML Query to.

Icon-Tip Although you can usually filter the data on the client side, it is ALWAYS better to filter the rollup in the schema definition rather than at display time (on the client side). Only get the data that you need to display!

hw24 lrsd filter some2.jpg
3.

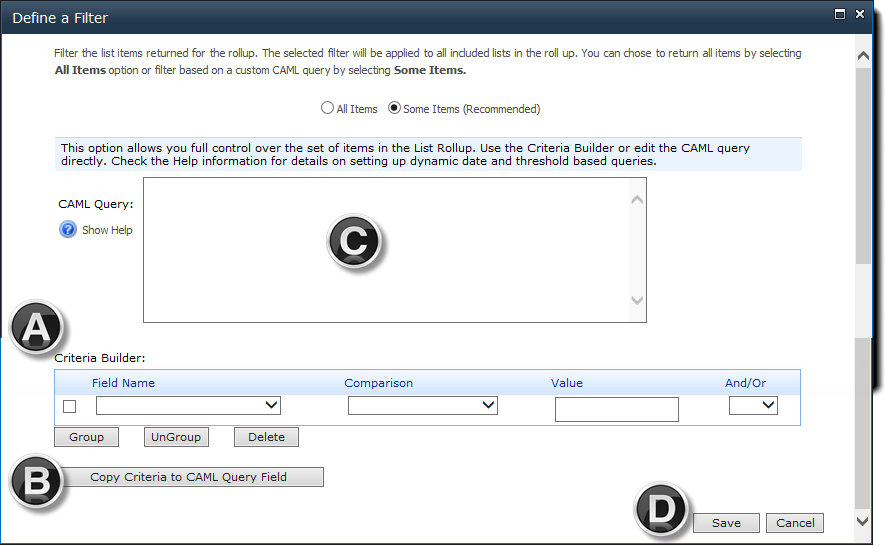
It’s easiest to use the Criteria Builder to build your CAML query, which will perform as the filter. However, if you are a CAML expert, you can enter the CAML directly in the CAML Query area. Follow the steps below to build a CAML Query using the Criteria Builder.

hw24 lrsd filter some2 with letters.png

  1. Build your criteria by selecting a column from your MASTER list using the Field Name selection list. Choose an appropriate Comparison and then enter a Value. Add additional criteria by making a selection in the And/Or drop-down box. Group (or ungroup) multiple criteria by checking the box for the rows to group and clicking the Group (or Ungroup) button. Grouping allows you to control the order of operation of your criteria. If needed, delete criteria by checking the box for the rows to delete and clicking the Delete button.
  2. Once your criteria is specified in the Criteria Builder, click the Copy Criteria to CAML Query Field button. This writes the CAML appropriate for your criteria. For additional help with CAML queries, click the Show Help button (showhelpicon.png) next to the CAML Query box and see Additional Tips for using the CAML Criteria Builder.
  3. The CAML Query will be generated and will appear in the CAML Query box.
  4. When ready, click Save to save your filter and close the dialog. Otherwise, click Cancel to close the dialog box without saving anything.

NOTE: All the columns from your MASTER list/library will be available for selection in the Criteria Builder, not just the ones you have decided to include in your rollup.

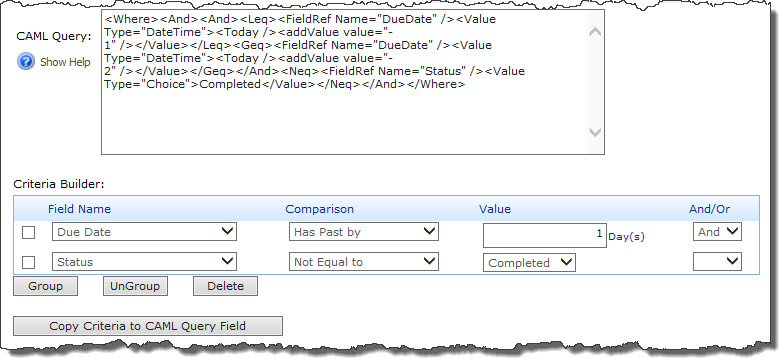
The screen shot below shows a CAML Query and the associated Crtieria used to build it. The query gets the Tasks where Due Date is in the past by one day and Status is not equal to Completed. In other words, this query gets only overdue tasks.

hw24 lrsd filter some3.jpg

Create a new List Rollup Schema

Select the Included Lists for your Schema-based List Rollup

Select the Included Lists for your Schema-based List Rollup

Create a new List Rollup Schema

Icon-WarningIMPORTANT: The discovery modes avilable for schemas that use the Bamboo Aggregation Service (BAS) are slightly different than the modes available for schemas using the SharePoint Aggregation Service (SAS). The differences are described in detail in this article.

To select the lists or libraries to include in your schema-based List Rollup, follow these steps:

Step Action
1.

Included Lists, Step 1: Discovery Mode. Click the Configure Discovery Mode button to select a method to identify lists to include in your schema. The Discovery Modes available will depend on the Aggregation Service you selected.

hw24 - LRSDIncluded Lists-step1.jpg

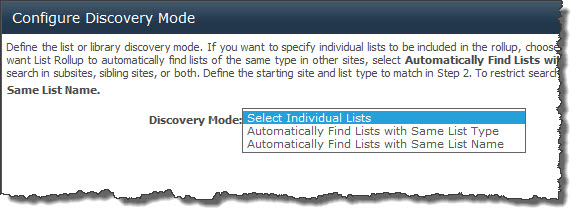
HW24 lrsd BAS disc mode cut1.jpgIf you are using the Bamboo Aggregation Service (BAS), the available Discovery Modes are:
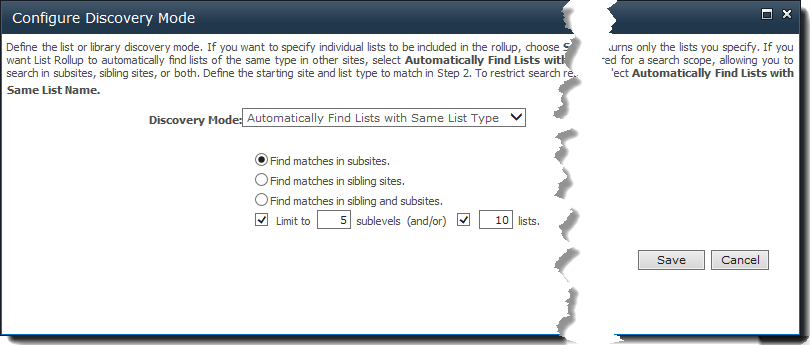
  • Select Individual Lists. Choose this option if you want to individually identify the specific lists/libraries that you want to aggregate.
  • Automatically Find Lists with Same List Type. Match by list name will automatically find all the lists that have the same display name as the list selected in Step 2.
  • Automatically Find Lists with Same List Name. Match by list name will automatically find all the lists that have the same display name as the list selected in Step 2.

Icon-Tip Automatically finding lists, whether by type, name or in subsites or the site collection, means that you won’t have to edit your schema to include new lists as they are created. List Rollup is capable of automatically discovering new lists, minimizing the need for future schema modifications.

If you choose to automatically find lists while using the BAS, you will then be asked to define the scope of where to look for those lists. The scope choices are the same regardless of whether you choose to match by List Type or List Name.

HR24 lrsd BAS match list type.png

Choose to:

  • Find matches in subsites. Subsites are the sites beneath the site where the list selected in Step 2 resides.
  • Find matches in sibling sites. Sibling sites are sites at the same level as the site where the list selected in Step 2 resides.
  • Find matches in sibling and subsites.
  • Find matches in current site (exclude subsites). This option can be used to find lists of the same type on the current site, without including lists of that type found in subsites.

NOTE 1: If you choose to discover matches in subsites OR sibling and subsites, you can limit the search scope to a specific number of sublevels or lists. When the specified number is reached, the List Rollup will look no further. It is recommended that you limit the scope this way in order to improve performance. The more sites that are included in the discovery scope, the longer the rollup will take to display.

NOTE 2: When looking for lists in subsites and/or sibling sites, the site where the selected list resides is also included in the search.

HW24 lrsd SAS disc mode cut.jpgIf you are using the SharePoint Aggregation Service (SAS), the available Discovery Modes are:

  • Select Individual Lists. Choose this option if you want to individually identify the specific lists/libraries that you want to aggregate.
  • Automatically Find Lists in Subsites. Choose this if you want to have List Rollup automatically find lists of the same list type in the site where the list selected in Step 2 resides and all its subsites.
  • Automatically Find Lists in Site Collection. Choose this if you want to have List Rollup automatically find lists of the same list type in all the sites of the site collection where the list selected in Step 2 resides.

Icon-Tip Automatically finding lists, whether in subsites or the site collection, means that you won’t have to edit your schema to include new lists as they are created. List Rollup is capable of automatically discovering new lists, minimizing the need for future schema modifications.

Once the Discovery Mode is selected, click Save to save it and close the dialog. Otherwise, click Cancel to close the dialog without saving.

NOTE: When looking for lists in subsites, the site where the selected list resides is also included in the search.

Icon-WarningIMPORTANT: It is not possible to limit the discovery scope when using the SharePoint Aggregation Service (SAS). With SAS you can auto-discover within a site or site collection only. You cannot auto-discover sibling or subsites like you can with Bamboo Aggregation Service (BAS).

2.

Included Lists, Step 2: Select a List. Click the Select a List button.

hw24-LRSDIncluded Lists-Step2.jpg

Depending on the aggregation service you picked, the Select a List dialog will look slightly different. If using the SharePoint Aggregation Service(SAS), you will see:
hw24 LRSD Select a List with num2.png

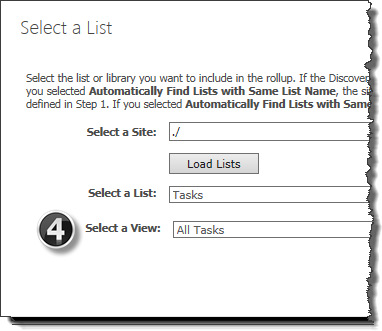
Select a List for BASa.pngIf using the Bamboo Aggregation Service (BAS), you will see an extra selection, the Select a View. Choose a view of the selected list. The selected view will determine the columns to be included in your roll-up and may also determine the filter of your rollup (or this list in your rollup).

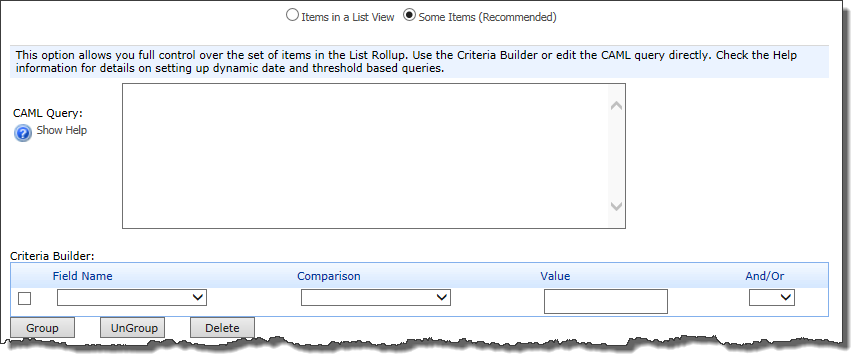
On the dialog that appears:

  1. Enter the URL of the site that contains a list you want to add to the schema.

    NOTE: Site URLs can be absolute (http://domain/site) or relative (./site). Relative URLs should be used for SharePoint Web applications containing multiple Alternative Access Mappings (AAM), if the Web Part is part of a site template, or if you plan to migrate the content database to another environment in the future.

  2. Click Load Lists to populate the Select a List drop-down with available lists in the site.
  3. Choose a list or library from the Select a List drop-down selection.
  4. If using BAS, choose a view of the selected list from the Select a View drop-down.

    NOTE: The View will determine the columns included in your rollup and potentially the filter of the items from this list.

  5. Click Save to save your list selection and close the dialog. Otherwise, click Cancel to close the dialog without saving anything.
3.

Included Lists, Step 3 (only if using BAS): Filter. After selecting a list, you can then choose to filter the list. To filter, click Define a Filter

NOTE: If using SAS, the filter is defined after selecting columns.

BAS step 3 - Filter.png

In the Define a Filter dialog, choose to use the filter defined in the list view selected by picking Items in a List View.

BAS define a filter.png

Otherwise, pick Some Items (Recommended) to build a filter specifically for this schema using the CAML Query Builder.

CAML builder.png

See Select the Filter for your Schema-based Rollup for more information about building a filter with the CAML Query Builder.

4.

Included Lists, Step 3 (if using BAS, this is Step 4): Include List. After you select a discovery mode and a list, click the Include List in Rollup button to add the list to the Included Lists table.

hw24-LRSDIncluded Lists-Step3.jpg

Icon-WarningIMPORTANT: The FIRST list that you include is known as the master list. When using the SharePoint Aggregation Service, all subsequent lists included MUST be of the same type as the master. When selecting columns to be included in a rollup using the SharePoint Aggregation Service (SAS), they are selected from the master list.

5.

If desired, choose another list from another site collection and include it in your rollup. After clicking Include List in Rollup, two lists will be shown in the Included Lists table.

NOTES:

  1. When choosing a second list, the list of available lists/libraries in the selected site will be shorter if using the SAS, as it will include only those lists/libraries of the same type as your MASTER list (the first list chosen).
  2. When auto-discovering items, the more lists/libraries you include in the Included Lists table, the longer it will take to display the contents of your rollup.

Create a new List Rollup Schema

Select the Recurrence Option for your Schema-based Rollup

Select the Recurrence Option for your Schema-based Rollup

Create a new List Rollup Schema

If you are rolling up Calendar lists or lists with Events in them, you need to consider what you want to do about recurring/repeating events in your rollup.

One great benefit of a List Rollup is that it will show recurring events as single events, unlike the way they appear in an out-of-the-box SharePoint list view. This means that you can show the single events separately in the List Rollup Grid View Web Part or alert on a single event.

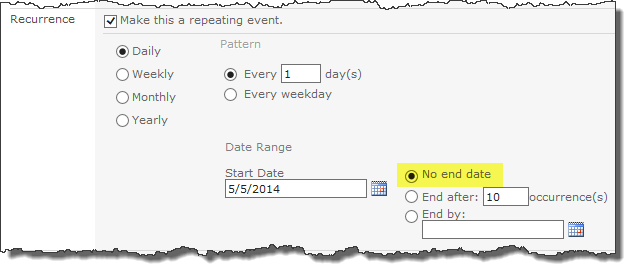
However, for performance reasons, it’s good to limit the number of single events from a repeating event that are included in the rollup since it takes time to process them. Often, recurring events are configured with No end date since that is the SharePoint default (see below). That’s OK when you’re displaying them in a Calendar with one month displayed at a time, but not necessarily when you are displaying them in a list.

no end date repeating item.png

To limit the number of repeating events to include in your rollup, follow these steps:

Step Action
1.

If you are not aggregating items of type Event, the Define Recurrence button will be grayed and you don’t need to worry about configuring it.

hw24 lrsd recurrence gray.jpg

NOTE: The Define Recurrence button, like all other configuration buttons, will also be grayed if a list has not yet been selected.

2.

If you are aggregating events, you should configure the recurrence section. Click Define Recurrence to open the dialog.

hw24 lrsd recurrence.jpg

Icon-WarningIMPORTANT: If you do not define recurrence, the rollup will include only the first item in the series and any individual occurrences that were modified separately from the series.

3.

Choose whether you want to expand recurring (or repeating) events. If you choose to expand them, choose how many periods before and after today and then choose the period. The choices for period are: Day, Month, and Year.

NOTE: Today is the day the List Rollup runs. In other words, that would be the day that an end user visits a page that displays the contents of a List Rollup Schema-based rollup.

hw24 lrsd define recurrence.jpg
4. When ready, click Save to save your configuration and close the dialog. Otherwise, click Cancel to close the dialog without saving anything.

Create a new List Rollup Schema

Select Lists for a Classic Edition List Rollup

Select Lists for a Classic Edition List Rollup

Create a new List Rollup

HW24 LRC Select Lists with num.jpg

Step Action
1.

From the Site text box, enter a static site URL or a relative URL path (./) to a site. You may select from sites within and across the site collection.

Next click the green arrow button (green arrow button.jpg) to populate the List selection down-down box with values from that site.

Icon-WarningIMPORTANT: It is recommended that you use relative paths if this page will be included in a site templates, if your environment uses multiple Alternative Access Mappings, or if you intend to migrate the content database anytime in the future.

2. From the List drop-down box, select a list. The View selection down-down box will be populated with values from that list.
3. From the View drop-down box, select a view. This List View filters the included lists according to any filters applied to the List View.
4. [Optional] By default, the rollup will use the filtering criteria defined in the selected View. This filtering can be overridden with a custom query using the CAML Query text box.

Type in a CAML query from scratch or use the Get View Query link to copy the View filter CAML and work from there. As a reminder, this step is optional.

hw24 LRC select lists with caml critbuilder.pngYou can also build a CAML query by using the Criteria Builder; this tool is built into the Web Part, and enables you create custom filters without any knowledge of CAML. For information on using the Criteria Builder (and filtering in general), see How to Filter the Rolled Up Data View Web Part.
Create a new List Rollup

Run List Rollup from an Application Server

Run List Rollup from an Application Server

In versions 7.0 and higher, the backend services for List Rollup can be run from a SharePoint Application Server as an alternative to running on the SharePoint Web Front End (WFE) servers. This option also allows you to distribute the workload for different Web Applications across different Application Servers.

Note: A separate Application Server license is required each non-WFE server on which you decide to run the List Rollup service. The related Web Parts will still be installed and licensed for all Web Front End servers. Please contact Bamboo Solutions directly for more details.

To run the List Rollup services on an Application Server, you must perform the following steps:

Option Description
1. Install Application Server Add-in Components

From the product installer, select and install the Application Server Add-In. This will install the necessary components to run List Rollup on a SharePoint Application Server.

NOTE: This step is only required if you are trying to use an Application Server that is not also a Web Front End Server. If you want to use the Application Server functions on a WFE, skip this step.

2. Install the Service Components

Go to Central Administration>Application Management>Bamboo List Rollup Service Administration and click the Install button to install the required components for the List Rollup Service and List Rollup Service Proxy to your farm.

NOTE: If the page returns an error saying “Could not find any resources appropriate for the specified culture or the neutral culture”, you may need to run the Install-SPApplicationContent command as an administrator from the SharePoint Management Shell. For more information, see the following knowledge base article: https://store.bamboosolutions.com/KB/Article.aspx?id=11785

3. Start the Service

Start the service on one or more servers:

  • Click Manage next to one of the servers in the Service Instance Status section of the page. This will take you to the list of available services on your Application Server.
  • Find the Bamboo List Rollup Service in the list of available services and click the Start link to the right of it.

Starting the service on one or more servers will start the List Rollup service instance on those servers. If more than one server runs this instance, then the load will be shared by all these instances with the use of the load balancer

4. Add the List Rollup Service and Alert Service Proxy

Create instances of the List Rollup Service and List Rollup Service Proxy:

  • Click on the Manage Service Applications link that is now visible at the bottom of the List Rollup Service Administration page, or go to Central Administration>Application Management>Service Applications.
  • At the top of the page, click New and select the List Rollup Service Application from the list of available services.
  • Enter a service application name such as “List Rollup Service Application”.
  • Create a new application pool or use an existing one.
  • Define the security account under which the service will run. This account will determine the data that can be accessed by List Rollup.
  • Check the option for adding to the Default Proxy Group.
  • Click OK to save the settings.
5. Set List Rollup to Run on Application Servers
  • From Central Administration, click List Rollup Settings from the List Rollup section.
  • Choose the desired Web Application and choose Run List Rollup on Application Server to move processing functions for List Rollup from the Web Front End Servers to the configured Application Server.

Release Notes for List Rollup

Release Notes for List Rollup

NOTE: Release Notes will open in a new browser tab

WSSv3/MOSS SharePoint 2010 SharePoint 2013 SharePoint 2016
Release Notes Release Notes Release Notes Release Notes
Microsoft ended mainstream support for SharePoint 2007 in October 2012. See Microsoft’s Lifecycle Support Policy.
At that time, Bamboo stopped enhancements to our SharePoint 2007 product line, but continues to provide support and bug fixes to customers with active support contracts until October 2017. Previously purchased licenses will continue to function after October 2017, but support for these products will end, and no additional bug fixes will be provided beyond that time. Bamboo plans to cease selling new licenses and annual support contacts for its SharePoint 2007 products in October 2016 to ensure customers will be eligible to receive support for at least one year after purchase.
Microsoft plans to end mainstream support for SharePoint 2010 in October 2015. See Microsoft’s Lifecycle Support Policy. At that time, we will stop any enhancements for our SharePoint 2010 product line but will continue to provide support and bug fixes for our SharePoint 2010 products to customers with active support contracts until October 2020. Previously purchased licenses will continue to function after October 2020, but support for these products will end, and no additional bug fixes will be provided beyond that time. Bamboo plans to cease selling new licenses and annual support contacts for its SharePoint 2010 products in October 2019 to ensure customers will be eligible to receive support for at least one year after purchase.

Visit our website where you can get the latest info about each of our products for SharePoint 2013.

A separate installation package and license key is required for SharePoint 2013 deployment. For additional details, review the following knowledge base articles:

Bamboo Solutions has also begun releasing products for SharePoint 2016. For additional details, check the product release notes in the link above, or contact us.

For details on migration, see the Knowledge Base Article “Migrate Bamboo Products from SharePoint 2013 to SharePoint 2016”

Understanding Bamboo Releases:

  • Bamboo offers Trial, Basic and Premium support.
    • Free Trial support expires after 30 days.
    • For more information about Basic and Premium support, please see the Support Plans page.
    • There may be a fee to upgrade from a major version to another.

See Also:

Performance Tuning for List Rollups

Performance Tuning for List Rollups

As one might expect, the performance of List Rollup is affected by two major components:

  • the number of Lists
  • the number of List Items that are included in a rollup
  • the number of columns displayed for each item
  • the type of column displayed

The actual time it takes to perform a rollup will vary depending on server hardware and general system load. Some servers may be able to quickly process rollups containing over 50 lists and some will experience noticeable delays processing as few as 20. The best way to determine the practical limit in your environment is to try rollups with a varying number of Lists.

Some tips to improve performance are listed in the table below:

Tip Explanation
Review the types of columns displayed

SharePoint data is stored as text. When it is retrieved for display in a list rollup, non-text data (i.e., dates, KPIs) needs to be formatted. This sometimes takes more time than just getting the data. To improve performance,

  • minimize the number of non-text columns, if possible
  • if you have some date columns that you don’t need to sort, create a calculated column in the list(s) that converts the date to a text column. A typical formula for this is:

    =IF([Review Date],TEXT([Review Date],"mm/dd/yyy"),"-")
    
Review the number of columns displayed Only display the columns that your end users really need to see. If you are rolling up Tasks assigned to [Me] (the logged in user), do you need to display the Assigned To column?
Review the number items displayed If you are rolling up events, do you need to see events that occurred in the past?

List Rollup Classic Configuration Options

List Rollup Classic Configuration Options

Overview of the List Rollup Web Parts

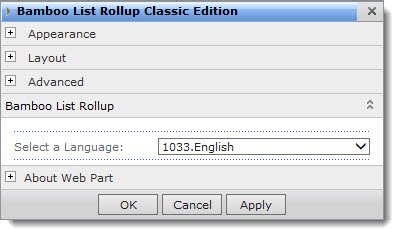
HW24 LRC Tool pane.jpgOnce you add the web part to a page, there isn’t a lot to configure in the List Rollup Classic Edition Web Part tool pane. All you need to do is select the Language that you want to use.

See Localize Bamboo Web Parts for your Language for more information about translation and languages.

After selecting the language, click Apply and then OK to save your configuration and close the tool pane. Otherwise, click Cancel to close the tool pane without saving any changes.

List Rollup Grid View Configuration Options

List Rollup Grid View Configuration Options

Overview of the List Rollup Web Parts

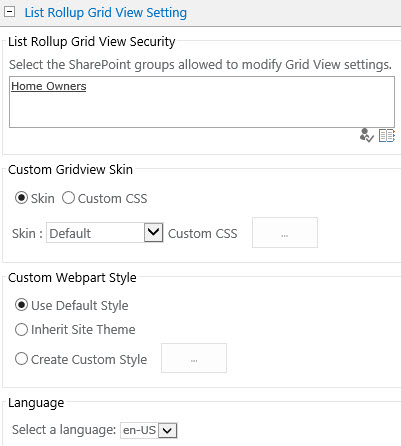
LRGV_Settings.jpgOnce you add the web part to a page, there isn’t a lot to configure in the List Rollup Grid View tool pane. All you need to do is:

  • Choose who should be able to modify the grid view settings, which is done from the browser. Enter a SharePoint Group name and click Check Names (peoplechecker.jpg) to make sure you entered it correctly. Alternatively, use the people finder (peoplefinder.jpg) to search for the group name. Separate multiple group names with a semi-colon (;). Everyone in the group(s) identified will be able to modify the settings of the display.
  • Choose a style for displaying the web part. See List Rollup Grid View Skins for visual examples of each choice and Custom CSS for more information about customizing the CSS.
  • Choose the settings for the rest of the Web Part layout. Select from the default Bamboo theme, inheriting the SharePoint theme, or creating a custom theme (requires version 7.0 or later).
  • Select the Language that you want to use. See Localize Bamboo Web Parts for your Language for more information about translation and languages.

When ready, click Apply and then OK to save your configuration and close the web part tool pane.

List Rollup Schema Designer Configuration Options

List Rollup Schema Designer Configuration Options

Overview of the List Rollup Web Parts

Once you add the web part to a page, you can configure the display settings in the List Rollup Schema Designer tool pane.

Setting Description
Header Options These options allow you to show or hide the various settings found in the header of the Web Part. LR_SD_Header_Links.jpg
Look and Feel Settings

Select the style applied to the Web Part.

  • Use Default Style – This setting will use Bamboo’s default settings for the Web Part theme.
  • Inherit Site Theme – This setting will attempt to inherit most fonts, colors, etc. from the values used by the current site theme in SharePoint.
  • Create Custom Style – This setting will allow you to customize the various fonts, colors, borders, etc. in the Web Part.
Select a Language

All you need to do is select the Language that you want to use.
See Localize Bamboo Web Parts for your Language for more information about translation and languages.

After selecting the language, click Apply and then OK to save your configuration and close the tool pane. Otherwise, click Cancel to close the tool pane without saving any changes.

NOTE: The page does not need to be in Edit mode in order to create a schema.

See Create a new List Rollup Schema or Edit an existing List Rollup Schema for information about creating a new or editing an existing List Rollup schema definition.

Overview of the List Rollup Web Parts

Overview of the List Rollup Web Parts

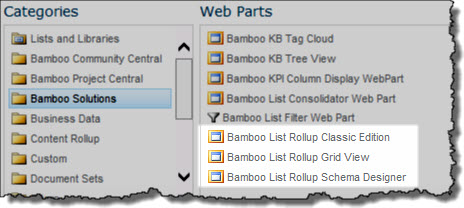
three KR web parts in the gallery.jpgAfter successfully installing, deploying, and activating the List Rollup product, you will see three web parts in your web part gallery when you begin to add a web part to a page:

  • Bamboo List Rollup Classic Edition (retired)
  • Bamboo List Rollup Grid View
  • Bamboo List Rollup Schema Designer

Use the information in the table below to decide which to use and when.

Web Part Description
Bamboo List Rollup Schema Designer

Icon-Tip Use this first to design a Schema!

The List RollupSchema Designer is used to define schemas. Schemas describe the data that you want to roll up. Although you can preview data in the Schema Designer, it is not used to display data for end users. Use the List Rollup Grid View instead to display the data.

Although you can put this web part on any page in any site, it is best to put it on one page per site. When you add the web part to a page, a list called Bamboo List Rollup Configuration is created. This list is where schema definitions are stored. Since only one list of this name can reside in a site, all List Rollup Schema Designer Web Parts on the site will use the same list.

Icon-Tip Consider putting your List Rollup Schema Designer Web Part on one page per site collection, so your schema definitions can be managed in a central location.

For more information, see:

Bamboo List Rollup Grid View

Icon-Tip Use this web part to display the data in the schema you designed!

The List Rollup Grid View web part is used to display the data defined in the schema definition. You can put this web part on any page on any site in your portal.
For more information, see:

Icon-Tip If you own the Data Viewer Web Part, Calendar Plus Web Part, Chart Plus Web Part, List Search Advanced or Alert Plus Web Part, you can also use them with a List Rollup Schema. Click the link to the product for more information.

Bamboo List Rollup Classic Edition (Retired)

Icon-WarningIMPORTANT: This Web Part has been retired and is no longer available as of List Rollup 7.0. Please see Migrate an existing List Rollup Data View to the new List Rollup Schema Architecture to learn how to migrate old rollups.

The List Rollup Classic Edition Web Part was previously used to create Rollups Data Views. This is the original List Rollup web part and is now retired. It is included in the package to support customers who may still have it in use. We recommend that list rollups created with this web part be migrated to a schema-based rollups for better performance.

Overview of List Rollup Configuration

Overview of List Rollup Configuration

There are three different web parts within List Rollup and each are configured a little differently.

Overview of the List Rollup Classic Configuration Options

For List Rollup version 6.0, Bamboo List Rollup Classic Edition has been retired so Bamboo provides a new option to integrate List Rollup Classic Edition into the List Rollup Schema; this option is known as the Bamboo Aggregation Service.

LRSchema.png

To start creating a new List Rollup Schema, add List Rollup Schema Designer web part to a page and click the New Schema button in the Web Part toolbar.

A new section called Aggregation Service is now shown; it will define which aggregation service the Schema rollup will use: select Bamboo Aggregation Service or SharePoint Aggregation Service you want to work. See Select the Included Lists for your Schema-based List Rollup

Overview of the List Rollup Grid View Configuration Options

Overview of the List Rollup Schema Designer Configuration Options

Move a List Rollup Classic Data View to another page

Move a List Rollup Classic Data View to another page

Overview of the List Rollup Web Parts

By default, a List Rollup Classic Edition Data View Web Part is created on the same page as the List Rollup Classic Edition Web Part.

Icon-Tip It’s best to move a data view to a page where it is the only (or one of a few) rollup on the page. Multiple rollups on the same page negatively impacts page load time.

When you edit the page, you will see it as a hidden web part. If you want to move/copy it to a different page of your portal, follow these steps:

Step Action
1.

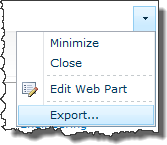
HW24 LRC Export a WP.pngFrom the web part menu, choose to Export.. the web part.

A message will appear giving you the opportunity to save the exported web part file (a *.webpart file). The location and appearance of the message will vary slightly depending on the version of your browser.

Save the file and make a note of where you save it.
HW24 LRC export save dwp file with cutout.png

For an alternative method of exporting the web part, see Export or Import List Rollup Data Views.

2. HW24 LRC import dwp2.pngGo to the page where you want the Data View Web Part to appear and edit that page. Choose to insert a web part. When the Web Part Gallery appears, in the Upload a Web Part area, browse for the file you exported in step 1 above. When ready, click Upload.
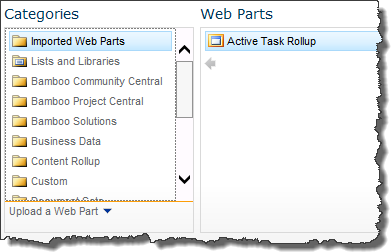
3. HW24 LRC add imported web part.pngAfter the page refreshes, you should see a Category in Gallery called Imported Web Parts. The imported Data View Web Part should appear there so you can add it to any web part zone.
Overview of the List Rollup Web Parts

Migrating List Rollup from SharePoint 2010 to SharePoint 2013

Migrating List Rollup from SharePoint 2010 to SharePoint 2013

Be sure you have at least the Minimum SharePoint 2010 Product Release (shown in the table below) installed before migrating. If not, upgrade your Bamboo product release before migrating. For more information, see Upgrading your Bamboo Web Part. Also, the target SharePoint 2013 farm requires at least the Minimum SharePoint 2013 product release shown.

Icon-WarningIMPORTANT: When migrating from SharePoint 2010 to SharePoint 2013, the Database Attach Upgrade Method is the only method supported.

Minimum SharePoint 2010 Product Release 60.0.64 Minimum SharePoint 2013 Product Release 60.0.70.2013
Database Attach Upgrade Method
Issues The successful migration of the List Rollup Web Part depends on the configuration of the product prior to upgrade:

  1. If relative URLs were used and lists and/or libraries included in the aggregated view are contained in the same site collection, then the migration will be successful without additional steps.
  2. If absolute URLs were used or references to lists and/or libraries from multiple site collections were used, no data will be returned after migration.
Resolution To resolve the issue, follow these steps:

  1. Visit the site where the List Rollup Schema Designer resides.
  2. From Site Settings > View All Site Content, select the List Rollup Configuration list.
  3. Edit each alert to modify any URLs that include the old server name.
  4. Repeat for each site where List Rollup is used.

NOTE: Bamboo recommends using relative URLs whenever possible.

Migrating List Rollup from SharePoint 2007 to SharePoint 2010

Migrating List Rollup from SharePoint 2007 to SharePoint 2010

.
Be sure you have at least the Minimum SharePoint 2007 Product Release (shown in the table below) installed before migrating. If not, upgrade your Bamboo product release before migrating. For more information, see Upgrading your Bamboo Web Part. Also, the target SharePoint 2010 farm requires at least the Minimum SharePoint 2010 product release shown.

Icon-Warning IMPORTANT: When migrating from SharePoint 2007 to SharePoint 2010, you MUST select the option to change existing SharePoint sites to use the new user experience. Your Bamboo products will not perform as expected with the old look and feel.

Minimum SharePoint 2007 Product Release Classic: 5.0.55
Schema: 5.0.77
Minimum SharePoint 2010 Product Release Classic: 40.5.13
Schema: 50.0.85
In-Place Upgrade
Issues The List Rollup Web Part (both Classic Edition and Schema Designer) migrates without any errors or additional steps required.
Resolution N/A
Database Attach Upgrade Method
Issues The successful migration of the List Rollup Web Part depends on the configuration of the product prior to upgrade:

  1. If relative URLs were used and lists and/or libraries included in the aggregated view are contained in the same site collection, then the migration will be successful without additional steps.
  2. If absolute URLs were used or references to lists and/or libraries from multiple site collections were used, no data will be returned after migration.
Resolution The resolution for the issues described in case 2 depend on the type of rollup.

  • For Classic Edition roll-ups. Users have 2 options:

    1. Modify the Query XML directly by opening the Web Part Tool Pane and clicking Query XML. Replace the original absolute URLs with relative URLs.
    2. Rebuild the rollups using the List Rollup Classic Edition Web Part for SharePoint 2010.
  • For Schema Designer roll-ups. Update the existing List Rollup Schema using the List Rollup Schema Designer Web Part for SharePoint 2010. Load the Schema and remove existing invalid entries from the Included Lists and Libraries grid. Replace them with new entries with the proper URL. Bamboo recommends using relative URLs whenever possible.

Migrate an existing List Rollup Data View to the new List Rollup Schema Architecture

Migrate an existing List Rollup Data View to the new List Rollup Schema Architecture

Overview of the List Rollup Web Parts

To migrate a List Rollup Classic Edition Data View to a schema-based rollup, follow these steps:

Step Action
1.

Import the Data Views to migrate to the page where the List Rollup Schema Designer Web Part resides. See Export or Import List Rollup Data Views for more information.

Alternatively, add the List Rollup Schema Designer Web Part to the page(s) where the existing Data Views reside.

2. HW24 LRC Migration.pngGo to the List Rollup Schema Designer Web Part and click Migration of List Rollup Data Views in the Action bar at the top of the web part.
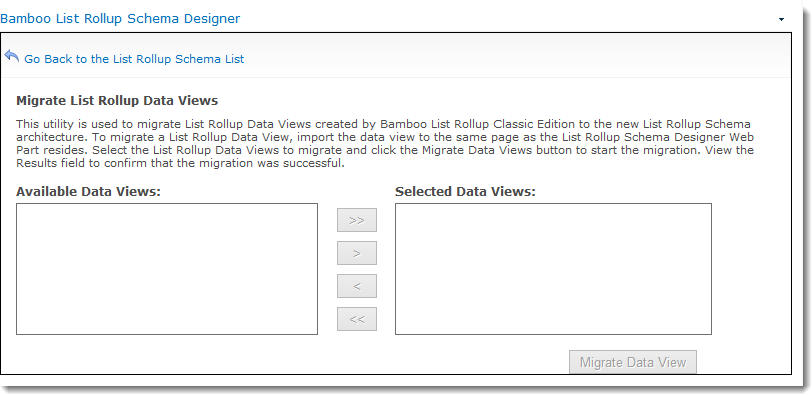
3. The Data Views on the page will appear in the Available Data Views list. Select one or more Data Views from the Available Data Views list. Using the single or double arrow button, move them to Selected Data Views list.

HW24 LRC Migrate to schema-based.png
4. When you are ready, click Migrate Data View button.

Overview of the List Rollup Web Parts

Manipulate the Rollup Data in the List Rollup Grid View

Manipulate the Rollup Data in the List Rollup Grid View

Overview of the List Rollup Web Parts

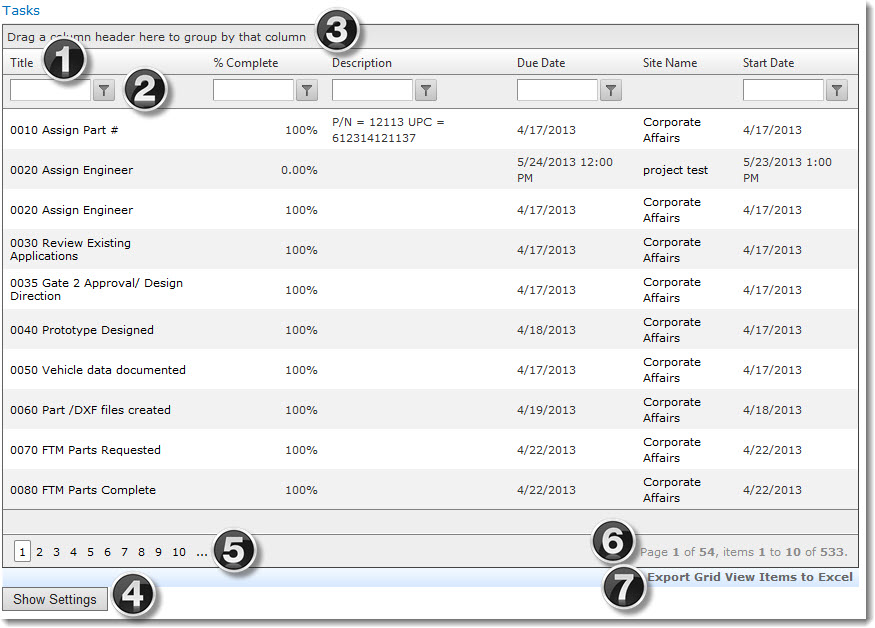
Depending on the configuration of your List Rollup Grid View, you may see all or some of the features highlighted below.

HW24 lrgv overview of end user with num1.jpg

Item Description
1.

Sort. If enabled, click the heading of any column to sort the data. Clicking the same column a second time reverses the sort order.

Icon-WarningIMPORTANT: The display can be sorted by only one column at a time.

2.

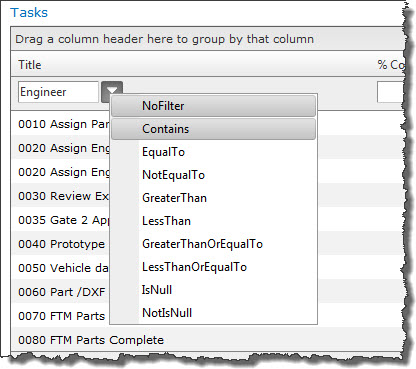
hw24 lrgv filter.jpgFilter. If enabled, enter filter text in the box at the top of a column and then click the filter icon (filter icon.jpg) to choose the filter type. The data will be filtered to show only that which meets the filter criteria.
NOTE: Depending on the data type displayed in the column, the available filter types may vary.

To remove the filter, delete the filter text and choose No Filter as the filter type.

3.

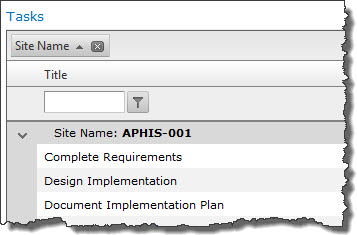
hw24 lrgv group.jpgGroup. If enabled, group the data by dragging a column header to the group bar at the top of the display. The grouping will appear expanded or collapsed, depending on the configuration.
Add a second level of grouping by dragging a second column to the group bar.

To remove a grouping, click the X next to the column name in the group bar.

4. Show Settings. This button is shown only to users who are members of the SharePoint Group configured to be able to modify the settings of the display. See Display a List Rollup Schema using the Grid View for details about how to modify the settings of the display.
5. Page Navigation. If the displayed data spans multiple pages, use the page navigation to jump to various pages as needed.
6. Data Summary. The Data Summary tells you the total number of items and the total page count for the current display.
7. Export to Excel or PDF. If enabled, click one of these links to export the items to Excel. You will be asked to save or view the resulting Excel spreadsheet file. In version 7.0 and higher, you also have the option to export to PDF format.

Overview of the List Rollup Web Parts

Managing Existing List Rollup Schemas

Managing Existing List Rollup Schemas

Overview of the List Rollup Web Parts

After you create a schema, it is displayed in the List Rollup Schema Designer Web Part. Schemas are listed in this web part in the order that they are created. From there, you can perform the following actions:

Icon-WarningIMPORTANT: Any user with Contribute permission can create, edit, copy, or delete a List Rollup Schema.

HW24_2010_ListofSchemasWithEdit.jpg

Step Action
Preview Preview the data in a schema from the List Rollup Schema Designer by clicking the Preview Data button. The first 15 rows of the data will be displayed at the bottom of the web part. It will remain displayed until you click Close in the lower right corner of the preview display.
Edit

To edit an existing schema, click on the schema name in the Title column or choose Edit Schema from the item edit menu. The Schema Configuration page will be displayed. See Edit an existing List Rollup Schema for more information.

Icon-WarningIMPORTANT: Consider restricting the Contribute permission level to trusted users so a schema doesn’t get inadvertently edited.

Copy

To make a copy of a schema, click Copy Schema in the item edit menu.

Icon-Tip Copying a schema is a good way to save time by creating a new schema based on the configuration of an existing one.

The new schema will be displayed on the last page of your Schema list and will have a name similar to the schema it was copied from. For example, if copying a schema called Tasks Rollup, the copied schema will be Tasks Rollup – Copy.

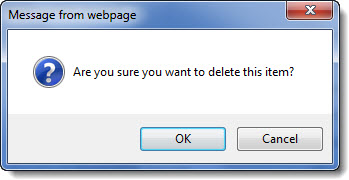
Delete HW24 lrsd confirm delete.jpgTo delete a schema, click Delete Schema in the item edit menu and then click OK to the confirmation message.
Overview of the List Rollup Web Parts