Overview of Virtual Map View Web Part
An example of the Virtual Map View displaying the location for each Major League Baseball park in the USA is shown below. Use the numbers shown to learn more about the display features of the web part.

|
Description |
| 1. |
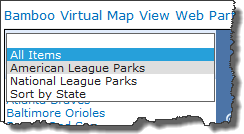 Select View. This is an optional display feature. You may not see it if it wasn’t configured in the instance of the map you are using. Select View. This is an optional display feature. You may not see it if it wasn’t configured in the instance of the map you are using.
It allows you to select different views of the data to be displayed. Typically, the various views are ones that filter the data different ways.
For example, in our baseball field example, we have a view that includes only the parks from the National League teams and another view that includes only the parks from the American League. Another view is one that includes all the parks, but is sorted by State. The first view on the list (which is the default view) is a view called All Items)) that includes all of the parks, regardless of the League. It is sorted by ID.
 Because the map is automatically zoomed to show just the best view of the displayed locations, selecting a view of just the locations in a certain area provides a convenient way to zoom into that area of the map. Because the map is automatically zoomed to show just the best view of the displayed locations, selecting a view of just the locations in a certain area provides a convenient way to zoom into that area of the map.
In addition to the filter in a view, the sort order is also used for the Virtual Map View display. Choosing a different view may change the sort order of the items displayed in the list on the left side of the display. for example, choosing the sort by State view in our example will display the list of parks sorted by State, even though State is not displayed in the list.
|
| 2. |
Sort Bar. Clicking the arrow on the sort bar will sort the list of items displayed. Clicking it a second time will reverse the sort order.
NOTE: If your list spans multiple pages, the sort impacts just the items on the current page.
|
| 3. |
List of Displayed Locations. The list on the right side includes all the locations that appear on the map, at the particular time. The locations will change if your locations are displayed in pages (see #5 below).
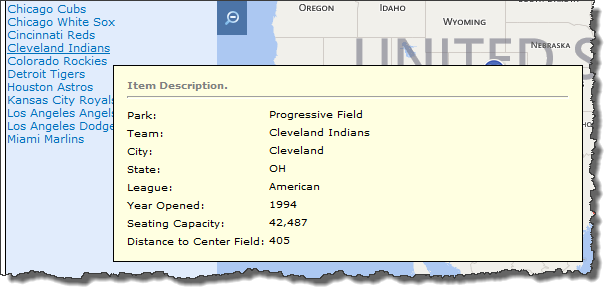 Hover your cursor over a list item and a popup appears listing additional information about the location. The information displayed on this popup is configurable, so if you don’t see something you expect to see, talk to the person who configured the map. Hover your cursor over a list item and a popup appears listing additional information about the location. The information displayed on this popup is configurable, so if you don’t see something you expect to see, talk to the person who configured the map.
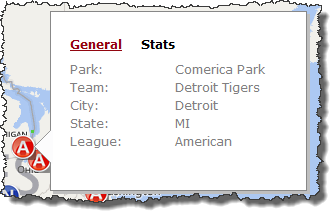 If you click on a list item, that location will be centered on the map and another popup, if configured, will appear next to the marker. This popup is also configured and can show data in up to three different tabs. If you click on a list item, that location will be centered on the map and another popup, if configured, will appear next to the marker. This popup is also configured and can show data in up to three different tabs.
The example shown here has just two tabs: General and Stats. Notice how the order of the displayed information is the same as the list item popup; its just spread across the two tabs.
|
| 4. |
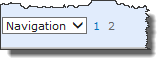 Navigation selection. The Navigation selection will always appear regardless of whether the map is configured to show locations in multiple pages. The options available in the selection are: Navigation selection. The Navigation selection will always appear regardless of whether the map is configured to show locations in multiple pages. The options available in the selection are:
|
| 5. |
Page Navigation. Click the page number to display locations from that page.
Because the map is automatically zoomed to show the best view of the displayed locations, selecting a different page will refresh the map and may zoom into another area of the map since each page includes different locations.
|
| 6. |
Map Provider Tools. Use the standard map user interface to zoom, pan and select the type of background on the map (i.e., simple streets, roads with terrain, aerial views, satellite).
 IMPORTANT: The available tools will depend on the Map Provider used. Available options are GoogleTM or BingTM. IMPORTANT: The available tools will depend on the Map Provider used. Available options are GoogleTM or BingTM.
|
| 7. |
Map Markers. Click a map marker and that location will be centered on the map and the marker pop-up, if configured, will appear next to the marker. This pop-up is configured in the web part tool pane and can show data in up to three different tabs. If you don’t see the data you need, talk with the person responsible for configuring the map.
To close the pop-up, in BingTM just move the cursor to a different location on the map. To close it on a GoogleTM map, click the X in the upper right corner of the pop-up or click another marker.
With the BingTM maps, hovering over the marker will cause the pop-up to appear. No need to click. However, if you want to center the marker on the map, click the marker.
NOTE: Clicking the marker on a GoogleTM map doesn’t center the location. It may shift the map so the popup can be displayed.
|