After you add the web part to a page, you will need to configure the web part tool pane.
| Image | Step | Action | Result |
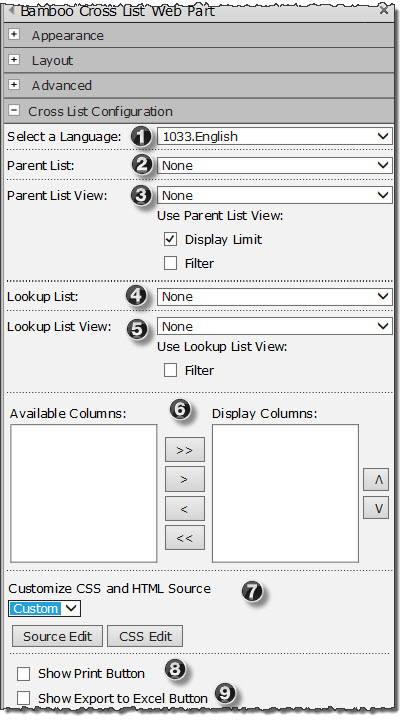 |
1. | Select a Language | Follow the instructions here to localize the web part. |
| 2. | Parent List | Select the primary list where lookup fields are used to link to other child lists. | |
| 3. | Parent List View |
Select a view for the primary list. The Web Part will use the fields defined in the selected view for inclusion in the combined display view.
|
|
| 4. | Lookup List | This drop down list box contains all the lists that are being linked to from the primary list. Select each list and an associated view if you want to include those fields in the combined display view. | |
| 5. | Lookup List View |
Select a view for the child list. The Web Part will use the fields defined in the selected view for inclusion in the combined display view.
|
|
| 6. | Available and Display Columns | Use the arrow buttons to select the fields that you want to display in the combined view. The Up and Down button can be used to arrange the order of the displayed fields. | |
| 7. | Customize CSS and HTML Source | Customize CSS and HTML Source. The Default option displays the Web Part as-is. If you select the Custom option, you can modify the CSS and the HTML Source for the Cross List Web Part by clicking the CSS Edit button. See Styling the Web Part for more information. Modifying the HTML source allows you to change the names of the columns displayed in the Web Part by clicking the Source Edit button. See Renaming the Column Headings for more information. | |
| 8. | Show Print Button | Select this option to enable the “Print” button to appear on the user interface. Users can print the content of the list through this button. | |
| 9. | Show Export to Excel Button | Select this option to enable the “Export to Excel” button to appear on the user interface. Users can export the data to an Excel spreadsheet. | |
| 10. | Save your configuration settings by clicking Apply and then OK. | ||