The Create New Article link uses the Bamboo KB Articles List. To edit the columns used in the list, or to modify the options available in the list such as for Article Type, edit the list settings. To do this, navigate to the list by selecting All Site Content > Lists > Bamboo KB Articles. Use the ribbon to edit the list settings by selecting List > List Settings.
Create a new article
From the KB Admin site, click Create New Article.
| Step | Column Name | Description | |
| 1. | Article Title: | Enter a name for the article. This is a required field. | 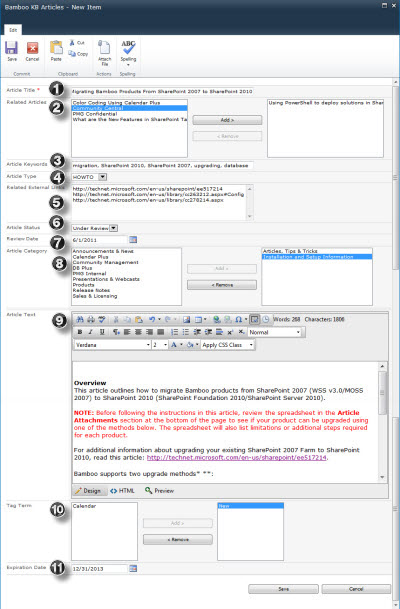 |
| 2. | Related Articles: | Add other articles that are related to this new article, if applicable. Click the related articles, then click Add. Click Remove to delete a related article. | |
| 3. | Article Keywords: | Enter keywords that you want to be associated with the article, such as “SharePoint 2010,” “installation” or “troubleshooting”. | |
| 4. | Article Type: |
Select the type of article. This list is prepopulated with the following options: |
|
| 5. | Related External Links: | Enter any related links to this article, if necessary, for example: links to Microsoft TechNet. | |
| 6. | Article Status: | Choose the article’s status, such as Draft, Under Review, Publish or Archived. | |
| 7. | Review Date: | Enter a date, or click on the calendar icon, to select a review date. | |
| 8. | Article Category: | Choose one or multiple categories for the article. Click Add to add the categories; click Remove to delete them. Use the CTRL key to select multiple categories. | |
| 9. | Article Text: | Enter the text for the body of the article. Use the formatting options at the top to format text, images and more. |  Use the Design option to edit in rich text format. Use the HTML option to edit in source code. Click Preview to view how the article will appear when it is submitted. |
| 10. | Tag Term: | Choose tags to be applied to the article. These tags will allow the article to be searched via the Tag Cloud on the KB Client site. | |
| 11. | Expiration Date: | Enter a date, or click the calendar icon, when the article will expire. This ensures that the Knowledge Base remains up to date and current. | |
| 12. | Click Save. | ||