Associating a site or site collection workflow with a new list
This topic applies to workflows that have been published to the site or site collection or deployed as a solution to the site collection.
| Step |
Action |
| 1. |
 On the list where you want to associate a workflow that has been published to the site or site collection, go to the list ribbon. On the list where you want to associate a workflow that has been published to the site or site collection, go to the list ribbon.
In the Settings area of the ribbon, click the Workflow Settings icon. The Workflows page appears.
|
| 2. |
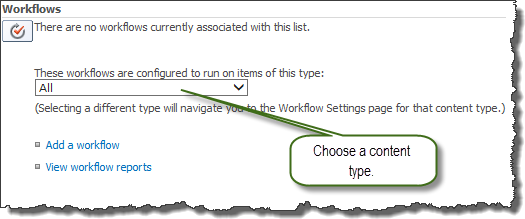
 On the Workflows page, see the workflows that are already associated with the list, if any. On the Workflows page, see the workflows that are already associated with the list, if any.
NOTE: There may be some workflows associated with a specific content type on the list; you won’t see them until you select the content type.

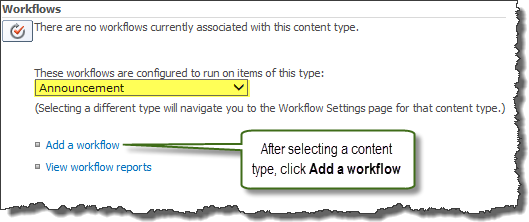
If you want to associate a workflow that was published to a specific content type, select the content type from the drop down selection box and click Add a workflow. Otherwise, select All and then click Add a workflow.
|
| 3. |
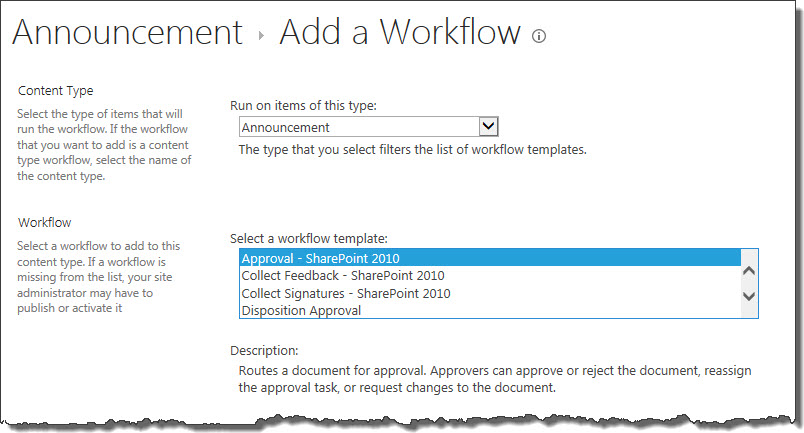
Select the workflow template from the list at the top of the page. SharePoint out-of-the-box workflows will be listed here, as well as Workflow Conductor workflows that may have been published to the site or site collection.
NOTE: If you don’t see the template you want, it may be associated with a specific content type (or not). Be sure to choose the correct content type or All.
 |
| 4. |
Give the new workflow a unique name. This will be the name that will be listed in the Workflow Settings page.
 The name you give the workflow will also be used in the Tasks list and/or History list if you choose to create new tasks and history lists (see Steps 5 & 6 below). The name you give the workflow will also be used in the Tasks list and/or History list if you choose to create new tasks and history lists (see Steps 5 & 6 below).

 IMPORTANT: When you give the workflow a unique name, it will not be as easy to link it to the workflow template that was used to publish the workflow. You might consider using the original name as part of the new, unique name. IMPORTANT: When you give the workflow a unique name, it will not be as easy to link it to the workflow template that was used to publish the workflow. You might consider using the original name as part of the new, unique name.
|
| 5. |
Choose the task list to use for storing tasks created in the workflow. All tasks lists that exist on the site will be listed.
NOTE: Not all workflows create tasks, so worrying about this selection may be unnecessary.
If you choose New task list, a new task list will be created in the site when the workflow is associated with the list. The new tasks list will be named according to the unique name you give your workflow. For example, if the unique name given is XXX, the new tasks list will be called XXX Tasks.

 IMPORTANT: If your workflow references a workflow task (i.e., a Collect Data From User widget references the Workflow Tasks list), choosing a different workflow tasks list may result in a broken workflow if the workflow designer assumed the workflow tasks list would not change. See Using the Collect Date from User Widget in a Workflow Published to a Site or Site Collection for more information. IMPORTANT: If your workflow references a workflow task (i.e., a Collect Data From User widget references the Workflow Tasks list), choosing a different workflow tasks list may result in a broken workflow if the workflow designer assumed the workflow tasks list would not change. See Using the Collect Date from User Widget in a Workflow Published to a Site or Site Collection for more information.
|
| 6. |
Choose the history list to use for storing the history of this workflow. All workflow history lists that exist on the site will be listed.
NOTE: All workflows generate history, but workflow history lists are hidden lists. You will not see them listed in Site contents.
If you choose New history list, a new history list will be created in the site when the workflow is associated with the list. The new history list will be named according to the unique name you give your workflow. For example, if the unique name given is XXX, the new history list will be called XXX History.

|
| 7. |
Choose the desired start options for this workflow on this list.
 If some start options are disabled, it is because those options were NOT checked when the workflow was published to the site or site collection. If some start options are disabled, it is because those options were NOT checked when the workflow was published to the site or site collection.
 |
| 8. |
Click OK to complete the workflow association. Your workflow is now associated with the list. |


 On the Workflows page, see the workflows that are already associated with the list, if any.