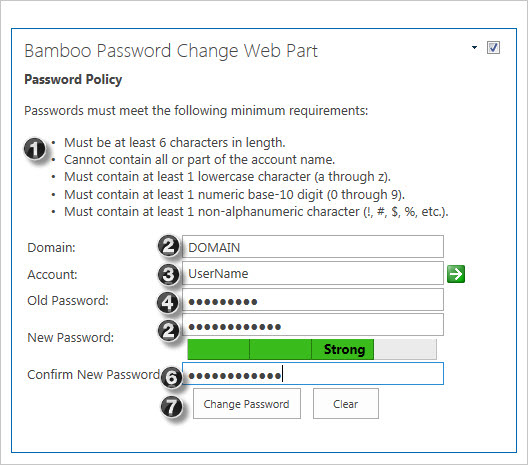
After the web part is installed and configured, users can then change their account passwords.
 To use Password Change, enter the required information in the fields described below.
| Step | Action |
| 1. | The Password Policy section displays the text that your administrator has configured in the General Settings section of the Web Part Settings window. It describes the user account password policies created by your server administrator. |
| 2. |
The Domain field allows you to see and configure the domain name of the server where your account information is stored. This field is automatically filled in with the domain that you are currently logged into.
|
| 3. |
The Account field allows you to enter or change the account name that you want to change the password for. This field is automatically filled in with the account name that is currently logged in.
|
| 4. |
Enter your current password in the Old Password field to authenticate your identity.
|
| 5. |
If the Password Strength Meter is displayed in the Web Part, it appears directly beneath the New Password field. The meter displays how strong your password is by filling in the gray bars and indicating the strength of the password by text, for example “Weak”.
|
| 6. | Once you have entered a strong password, re-type it into the Confirm New Password field. Make sure the password you enter in this field exactly matches the one you entered in the New Password field. |
| 7. |
Once you have filled in these fields, you can click the Change Password button to change your password. To clear all fields and start the procedure again, click the Clear button. After successfully changing your password, the system will display a message to notify you of the change and to prompt you to close your browser for applying the changes.
|