| Configuring Grants Management |
|---|
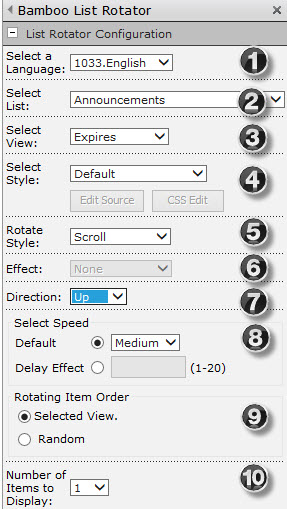
After creating a new Grants Management master site, there are a few things you will want to configure before you open up the site to your users. The first is the List Rotator web part that sits at the top of your master site.
| No. | Setting | Description | |
 SharePoint 2010 web part |
1. | Select a Language | Read detailed information here about setting up the language for your environment. |
| 2. | Select List | Select from the selection list provided. All available lists are displayed. We default to the announcements list. | |
| 3. | Select View | Select the view from the selection list provided. All available views for the selected list are displayed. The data displayed will be based on this view. The web part defaults to the Expired view within the announcements list; but you can change it! | |
| 4. | Select Style |
Select the style from the selection list provided. All available styles for the selected list are displayed. Default style leaves the HTML and CSS for the Web Part as is. Custom style automatically uses the custom source HTML and CSS styles included with the Web Part and available for your modification. This allows you to display images and image column data based on the selected list and list view. See Styling the Web Part for more information. |
|
| 5. | Rotate Style | Select the display effect from Scroll, Smooth Scroll, Random* or Slideshow. | |
| 6. | *Effect | The Effect choices are disabled unless you pick Random in the Rotate Style above. The choices are GradientWipe, Pixelate and Dissolve. | |
| 7. | Direction | Select the scroll direction from Left, Right, Up or Down. | |
| 8. | Select Speed |
|
|
| 9. | Rotating Item Order | This option is displayed only when you choose Scroll rotating style. By default, list rotator will rotate the items in the list by the order specified in the selected view. Choose “Random” option to start rotating the items randomly. | |
| 10. | Number of Items to Display | You can specify the number of items to display per rotation. | |