Configure the Calendar Page Web Part Tool Pane

Configure the Calendar Page Web Part Tool Pane

Return to Configuration Overview

Use the following procedure to manually configure the Calendar page Web Part.

NOTE: Many of these options are pre-configured when the Schedule Board Site is created and the web parts may no longer work properly if they are changed. Those options are marked as such in this procedure.

Step Action Result
1. Edit the web part and select the Bamboo In And Out Calendar List from the drop down list. This is the list that will hold the event data that determines In/Out status for each user. By default, the “Bamboo In And Out Calendar List” view is selected. The Schedule Board site template creates this list automatically, and it is not recommended that you change this value.
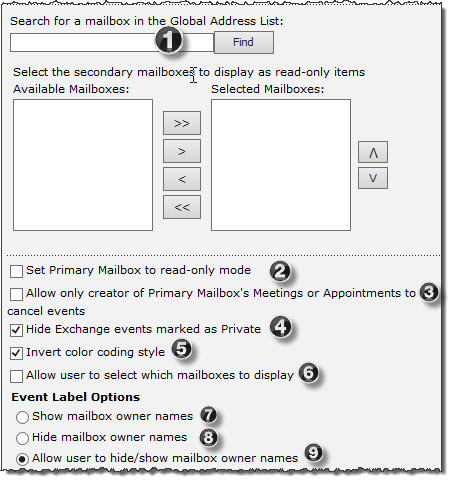
DisplayOptions.jpg
2. Select the Bamboo In And Out Calendar View from the drop down list. This is the View that will be used to determine which items on the Calendar List will be included on the Schedule Board. By default, the “Calendar” view is selected, and it is not recommended that you change this value.
3. Select the Column to Color Code from the drop down list. The contents of this column will be used to determine how each user’s information will be color coded on the Schedule Board. By default, “Status” is selected.
4. This section is not visible until you select a column in Step 3. You can pick the hex colors for each of the available values. To automatically apply colors to all values, click AutoSelect.
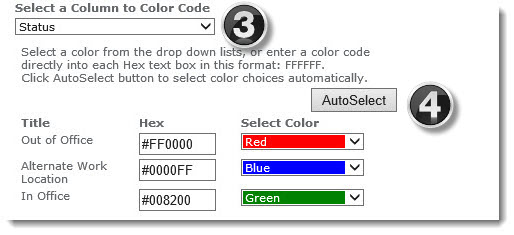
 ColorCoding.jpg
5. Select the Location Column from the drop down list.
CalDisplayOptions.jpg

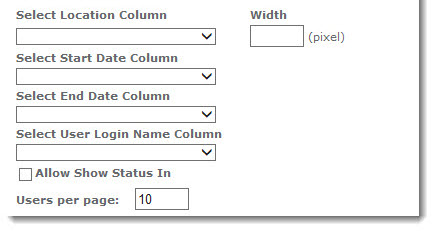
The contents of this column will be used to provide location information for each event so be sure your users fill it in.

  • Select Start Date Column:
  • Select End Date Column:
  • Select User Login Name Column:
  • Allow Show Status In: Select to display status even when users are scheduled as “In”; if this option is not selected, the Web Part will only display those who have an out of office status on the calendar.
  • Users per page: Note that exceptionally large numbers of users per page may negatively affect performance.
6. SharePoint User Info List Options
CalDataSourceOptions.jpg

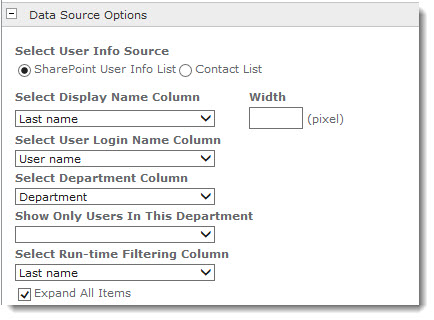
Depending on whether you select the User Info List or the Contact List on which to base your user data, there are some columns that need to be filled in.

  • Select Display Name Column: The selected column’s values will display under the Employee/Subject Column in the Web Part interface.
  • Width: Enter the number of pixels wide you want to set the Display Name column.
  • Select User Login Name Column: This is the list that contains valid user login names. The login name is used to associate an event with a particular user.

  • Select Department Column: This column will be used to quickly sort users into groups; the default setting is “Department”.

  • Show Only Users in This Department: To show only the users from certain departments (or groups), add any departments you want displayed in the Calendar Schedule Board view from the Available Departments list to the Display Departments list.
  • Select Run-time Filtering Columns: Optionally, you can toggle the Web Part’s Display Settings by selecting or deselecting the Expand All Items and Allow Runtime Filtering check boxes:
    Select a Run-Time Filtering Column. This is the column that can be quickly sorted alphabetically by clicking the A through Z links at the top of the web part. By default, this is set to “Name”, so that clicking on “J” would display all users with first names that began with “J”.
  • Expand All Items: To automatically show all events for all users select the Expand All Item check box.
Contact List
UserInfoListOptions.jpg

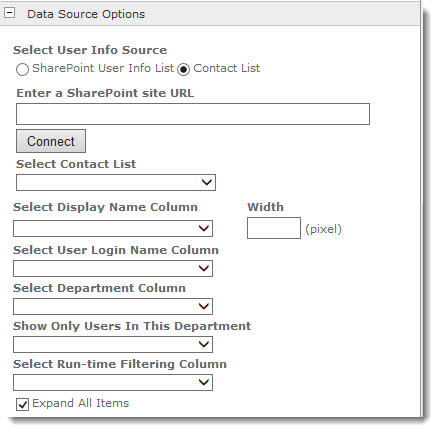
If you select Contact list, you still have some of the same columns as above, except the web part needs to make a connection to know which list you are picking data from.

  • Enter a SharePoint Site URL: Enter the URL of the SharePoint site containing the Contact List.
  • Connect: Click the button to make a connection to the site.
  • Select Contact List: Choose from the available lists shown in the drop down.

All subsequent column choices are identical to above.