Select the Columns to include in your Schema-based Rollup
To select the columns to include in your schema-based rollup, follow these steps:
| Step |
Action |
| 1. |
Click Select Columns to display the Select Columns dialog. The button will be grayed until a list is selected.
 |
| 2. |
In the Select Columns dialog,
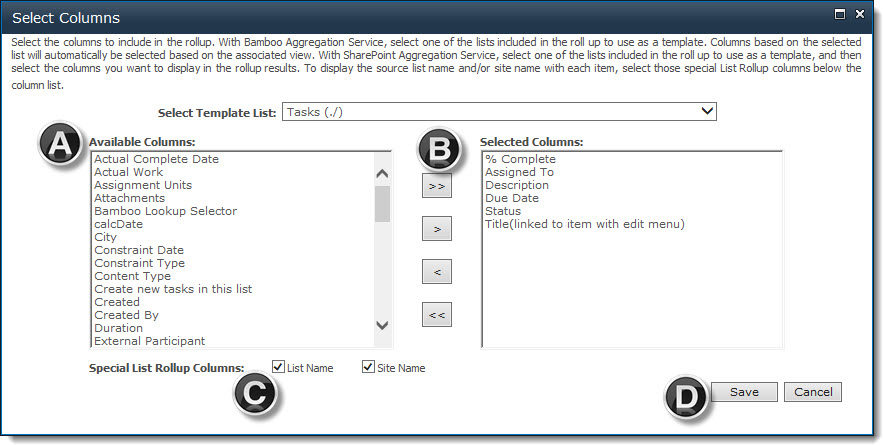
- The columns found in the selected list are listed in the Available Columns list.
-
Highlight a column in Available Columns and click the right arrow button ( ) to move it to the Selected Columns list. If desired, select multiple columns by holding down the Ctrl key on your keyboard while clicking to highlight a column. ) to move it to the Selected Columns list. If desired, select multiple columns by holding down the Ctrl key on your keyboard while clicking to highlight a column.
 IMPORTANT: Only the select the columns that you need to display in your rollup. Getting, formatting, and displaying data in a rollup takes time. Achieve optimal performance by selecting only the columns you need. IMPORTANT: Only the select the columns that you need to display in your rollup. Getting, formatting, and displaying data in a rollup takes time. Achieve optimal performance by selecting only the columns you need.
IMPORTANT: The column names shown in the Available Columns list box are the display names of the column. To ensure your data rolls up properly within the columns you select, you must make sure the internal names of the columns and the column attributes match across all lists. For example, if you select a Status column in the master list with an internal name of ‘Status’ and data type of Choice that allows a single selection, then only those included lists that contain single-Choice columns with an internal column name of ‘Status’ will be rolled up.
-
If desired, choose to also include a hyperlink to the List Name and Site Name of each aggregated item.
- When ready, click Save to save your column configuration and close the dialog. Otherwise, click Cancel to close the dialog without saving anything.
NOTE: The order that the columns are selected is not important in this section. You are defining the schema here and not yet deciding how to display the data to the end user.
|
| 3. |
When ready, click Save to save your configuration and close the dialog. Otherwise, click Cancel to close the dialog without saving anything. |