| Overview of the Workflow Conductor Studio |
|---|
 After a widget is dropped into the workflow, it must be configured before the workflow can use it. To set the properties of a widget, drag your widget to the studio and right-click on it to display the Widget Properties ** for that widget.
Widget Properties vary by widget, but there are a few properties that most widgets have in common. They are described on this page. For a list of the properties unique to a particular widget, see the documentation for that widget.
IMPORTANT: After making changes to any property in the Widget Properties, be sure to click Apply to save your changes.
The common widgets are described in the table below.
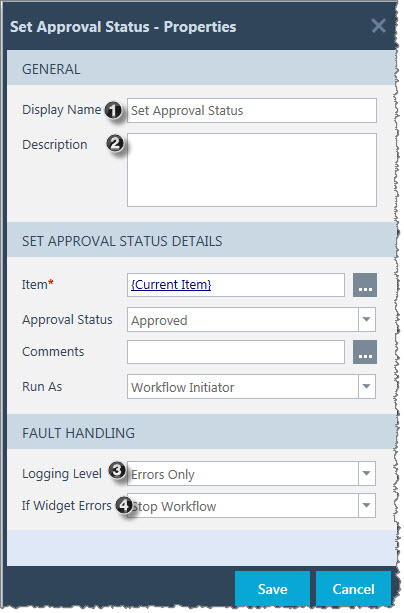
| # | Common Property | Description |
| 1. | Display Name | This property will default to the widget name, but you can change it to something specific to your workflow to better describe what that widget is configured to do. For example, you might change the Display Name from “Send Email” to “Notify Initiator via Email” to provide more detail about what that particular Send Email widget is doing. When you update a widget Display Name property, it also updates the widget in the Studio diagram. |
| 2. | Description | This is an optional setting that allows you to add a short description for the widget to explain the purpose of it in the workflow. It is only displayed in Conductor Studio, and is not used anywhere in the workflow. |
| 3. | Logging Level |
You can select different levels of logging for each widget in your workflow. Workflow logs of workflow run time events can be viewed using the Workflow Conductor Log Viewer Web Part by selecting Run Time mode. Available Logging Level settings are:
Workflow Designers can override individual widget Logging Level settings when a workflow is started manually. |
| 4. | If Widget Errors: |
By default, Conductor will stop a workflow if it encounters an error on any widget. You can customize this behavior for each widget by selecting one of the following options:
|
|
By default, widgets are executed with the permission level of the Workflow Initiator. You can override this for many widgets using the Run As property. The Run As property has the following options:
|
||
 and enter the Username and Password of another user account. Click Save.