| Overview of the List Rollup Web Parts |
|---|
To display the contents of the schema in the List Rollup Grid View Web Part once you have defined a List Rollup Schema with the List Rollup Schema Designer Web Part, follow these steps:
| Step | Action |
|---|---|
| 1. |
Add the List Rollup Grid View Web Part to the page. To configure it, see Overview of the List Rollup Grid View Configuration Options for more information.
|
| 2. |
As a user who IS in the SharePoint Group which is allowed to modify the settings of the Grid View, click Show Settings button. The Settings page is displayed.
|
| 3. | 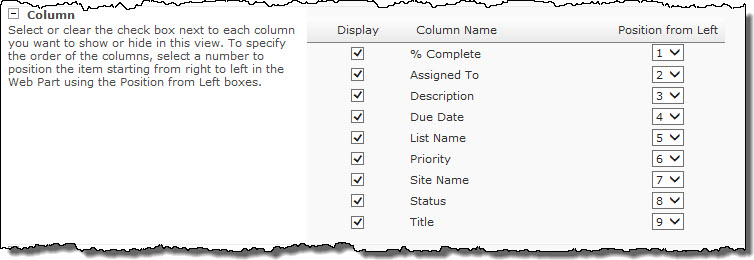 In the Column section, choose the columns you want to display and the order they will appear. In the Column section, choose the columns you want to display and the order they will appear. |
| 4. | 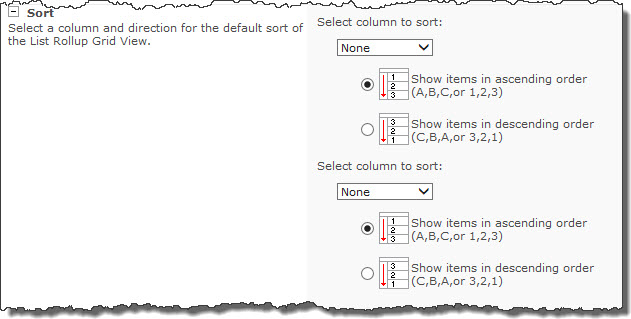 In the Sort section, configure the default sort for the data to be displayed. You can sort by up to two columns. In the Sort section, configure the default sort for the data to be displayed. You can sort by up to two columns. |
| 5. |  If you want to return all items defined in the schema by default, leave the default selection of Show all items in this view in the Filter section. If you want to return all items defined in the schema by default, leave the default selection of Show all items in this view in the Filter section.
|
| 6. | 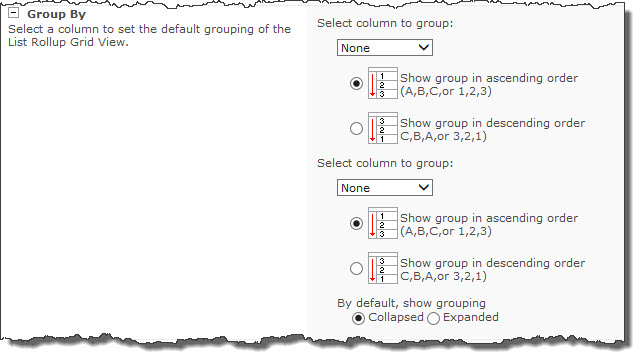 In the Group section, configure the default grouping if needed. It is possible to group by a maximum of two columns. Don’t forget to choose how to display the default grouping – collapsed or expanded. In the Group section, configure the default grouping if needed. It is possible to group by a maximum of two columns. Don’t forget to choose how to display the default grouping – collapsed or expanded. |
| 7. |  In the Item Limit section, configure the number of items to display per page and also the total number of items to return. The more items per page, the slower the page load. In the Item Limit section, configure the number of items to display per page and also the total number of items to return. The more items per page, the slower the page load. |
| 8. |
There are two export options:
|
| 9. |
When finished configuring all the sections, click the Save Data button at the bottom left corner of the page to save the configuration and close the Settings page. All users, including those who are NOT in the SharePoint Group allowed to modify the settings, will see the newly configured rollup. At any time, users in the SharePoint Group allowed to modify the settings can modify the settings as needed. They modify the public view. Unlike the List Consolidator Web Part, there are no private views with the List Rollup Grid View Web Part. See Manipulate the Rollup Data in the List Rollup Grid View for more information about using the Grid View from an end user perspective. |
 In the List Rollup Schema Name section:
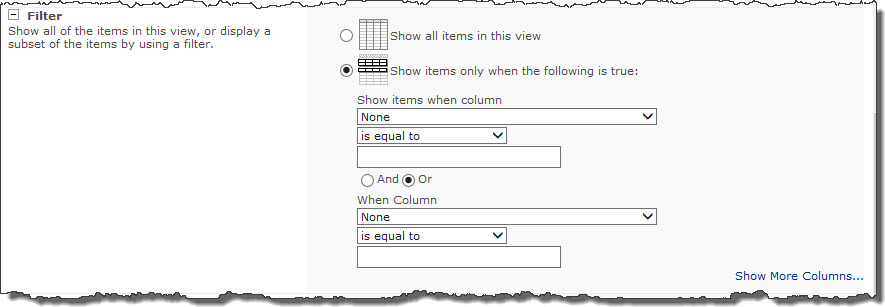 Alternatively, click the Show items only when the following is true and then configure the filter criteria. If it takes more than two columns to define your filter criteria, click Show more columns… to add more.
 In the Grid View General Settings section configure what end users can do from their browser. You can allow them to Filter, Sort, Group, or Export the data displayed.
| Overview of the List Rollup Web Parts |
|---|