| Return to Configuration Overview |
|---|
To use Tree View to show SharePoint List columns in multiple tree levels, you first need to configure your list so that it is grouped by the columns that you want to use in Tree View.
 For example, a Task List contains Status and Priority columns. First open up the list settings and create or modify the view that you want to use.
Set the Group By section so that tasks are:
- grouped by the Priority column
- then grouped by the Status column
- groups are showing Collapsed by default and 30 groups per page
When viewing the list after it has been configured this way, all of the groups show up on the List as shown in the screenshot below:
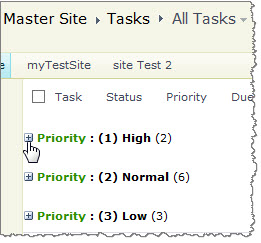 Users will need to click the Plus symbol next to the column name to see the contents within that group.
Now that your List View is configured to group by these columns, you can set up Tree View to show the groups as hierarchies in the tree level as displayed below:
 With Tree View, they can see the groups at a glance in a more familiar look and feel (it’s similar to a file share or Windows Explorer desktop view) and simply click on the group name so that the contents within that group displays in the right side of the window.