| Return to Overview of Web Part Configuration |
|---|
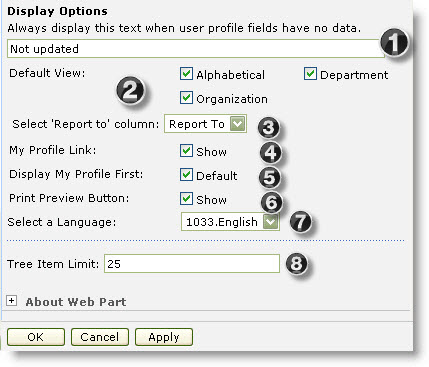
 You have a variety of display options to configure what users see in the user interface when they are interacting with User Profile Plus.
| Step | Action | Result |
| 1. | Always display this text when user profile fields have no data | Enter the text you want to display for each user profile column/field that does not have any data. Leave this blank if you do not want to display any text. |
| 2. | Default View | Select these check boxes to display users by alphabet, department, or organizational hierarchy. |
| 3. | Select ‘Report to’ column: | If you select Organization (as shown in #2 above), you must also specify which column/field holds the Report To data since the Organization option displays users based on to whom they report. |
| 4. | My Profile Link | Select this check box to display this link at the top of the Web Part next to the Search box. |
| 5. | Display My Profile First | Select this check box so that when users navigate to User Profile Plus, the first profile they see is their own. |
| 6. | Print Preview Button | Select this check box to show the Print Preview in the Web Part. Users can preview and print user profile information. |
| 7. | Select a Language |
Select a language from the drop-down menu to translate the Web Part user interface and tool pane settings. You can also create your own translation or modify the default files available in the drop-down menu.
|
| 8. | Tree Item Limit | Set the limit for the number of items to display in the tree. When you limit the number, a More link displays at the bottom of the tree so that you can view the next set of items up to the limit. For example, if you enter 25, then you will see only 25 items in the tree and a More link if there are more than 25 items. After clicking the link, you will see the next 25 items. This feature helps you to manage performance of the Web Part if you have hundreds or thousands of items to display in the tree. |