When List Bulk Import runs an update on a list that contains attachments, it must replace all of the attachments for each item whether the attachment has been updated or not as List Bulk Import has no way of knowing if the attachment has been updated or not. For those users using List Bulk Import as a data syncing tool, this causes the primary recycle bin to fill up quickly and inflate the database size.
The Bamboo Attachment Cleanup Application uses a log file created during the import process to identify which attachments were deleted/replaced, and then move the deleted items from the primary recycle bin to the secondary recycle bin, which is managed by the Site Collection Administrator. Like List Bulk Import, the clean up process can be scheduled using Windows Task Scheduler to run unattended or run manually from one of the SharePoint WFE servers.
NOTE: Once the clean up process runs, the file extension of the deleted attachments log file is automatically changed to .BAK.
| Step | Action | Result |
| 1. |
Double-click the Bamboo Attachment Clean Up Application icon on your server desktop. Alternatively, select Programs from your Windows Start Menu and then Bamboo Attachment Clean Up Application. If you don’t see the icon or the program, see Installing the Bamboo Attachment Cleanup Application to install it. |
The Attachment Clean-Up Application starts.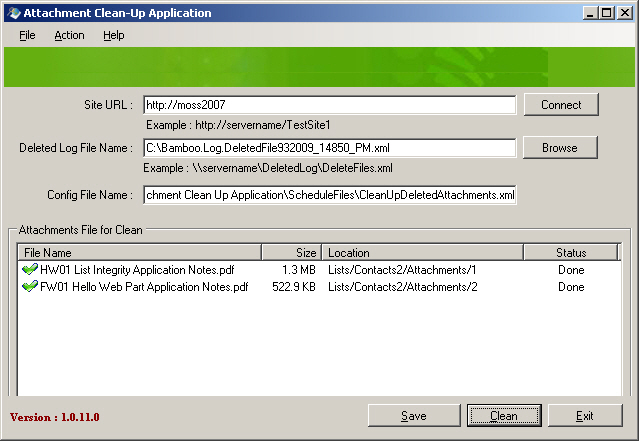 |
| 2. |
If you have previously save a configuration file, open it by selecting File > Open Config File from the main menu. The configuration files are typically saved in the following folder where the application is installed: |
|
| 3. | Site URL. Enter the URL for the site where the import process was run. The deleted file(s) from the import/update process should reside in the Recycle Bin of this site. When ready, click Connect. | |
| 4. |
Deleted Log File Name. Type in the location and file name of the deleted attachments log file, or click Browse to locate the file.
|
|
| 5. | Config File Name. If you want to save this cleanup configuration in an XML file so you can schedule it to run unattended using Windows Task Scheduler, type in a configuration file name, and click Save. See Schedule the Cleanup Application to Run Unattended for more information and then click Exit to close the application. | |
| 6. |
If you prefer to run the utility manually, click Clean when ready to start the cleanup process. All the files that were removed from the primary recycle bin are listed in the Attachments File for Cleaning box (see screenshot above).
|
|
| 7. | Click Exit to close the application. | |