How to configure the Workflow Start Feature

How to configure the Workflow Start Feature

Step Action Result
1.

On the site where you wish to use the Workflow Start Feature, navigate to Site Actions > Site Settings > Manage Site Features. On the list displayed, locate the Workflow Start Feature and activate it by clicking Activate.

WF start feature.jpg

NOTE: If you don’t see this feature listed, the farm solution bamboo.startworkflow.wsp may not be deployed to your web application and/or the bamboo.startworkflow.wsp site collection feature may not be activated in your site collection. Check with your System Administrator and/or Site Collection Adminstrator.

A list called Workflow Configuration List will be created on the site.
2.

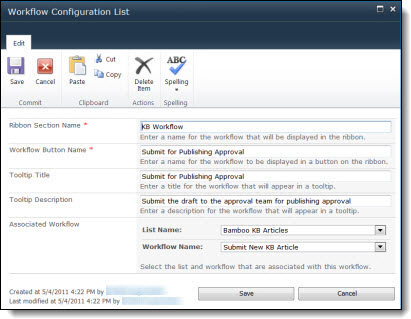
Select the newly created Workflow Configuration List and create an item; complete the following fields:

  • Ribbon Section Name: Enter a name for the section of the ribbon that will contain the workflow button. This is a required field.
  • Workflow Button Name: Enter a name for the button that will be displayed in the ribbon. This is a required field.
  • Tooltip Title: Enter a title for the workflow that will appear in a tooltip.
  • Tooltip Description: Enter a description for the workflow that appear in a tooltip.
  • Associated Workflow: Choose the list where the button will appear and the workflow that will be associated with the button for items in that list.

wf configuration list.jpg

Create an item for each Workflow Start option you need for any list in the site. You may have several items in this list.
3. Navigate to the list and open an item to see the workflow start buttons created for that list.
Click on one of the buttons to start the associated workflow on that item.