How to Create a Rollup with List Consolidator
After configuring List Consolidator (see Overview of the Configuration Parameters for List Consolidator for more information), you can create a rollup.
NOTE: The process is the same whether you are the designated user creating the default rollup or a user with Contribute or higher permissions is creating a personal rollup.
Follow these steps to configure a rollup:
| Step |
Action |
Result |
| 1. |
From the Define Lists for Rollup section, select the list type you want to rollup. The drop-down list shows all list types available in the site collection.
 |
| 2. |
In the Sites Included in Rollup section,
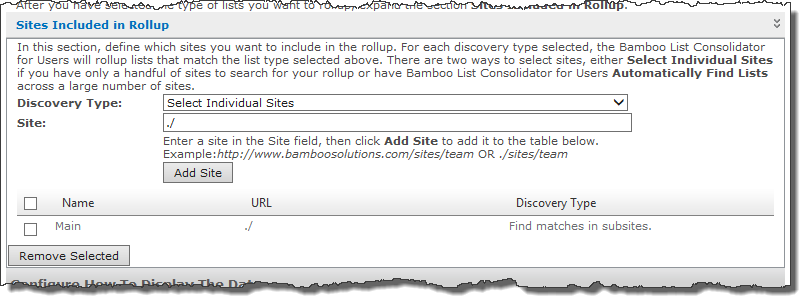
select one of the following site discovery types:
- Select Individual Sites. Enter the full URL or a relative URL for a site in the Site text box.
 Use relative paths whenever possible. Relative notation doesn’t include the name of the server. The relative notation for the current site is ./ and the relative notation for the parent site is ../. Use relative paths whenever possible. Relative notation doesn’t include the name of the server. The relative notation for the current site is ./ and the relative notation for the parent site is ../.
- Automatically Find Lists in Sub-sites of Selected Site. Use this option to automatically find all lists that match the selected list type in the current site AND the sites under the site where List Consolidator is being configured.
- Automatically Find Lists in Entire Site Collection. Use this option to automatically find all lists that match the selected list type in the entire site collection.
Click the Add Site or Add Defined Discovery Type button to add the rollup configuration to the table just below this button. This table shows all the sources selected for your rollup. Each item in this table makes up the data source for your rollup.
To add another site, enter another URL in the Site box and click Add Site again. Two lines will appear in the table.
To remove items from the table, select the check box for that item, then click Remove Selected.
|
| 3. |
From the Configure How to Display the Data section. For each subsection, click the double arrows or the section title to expand the section.
 |
| 4. |
Configure the following:
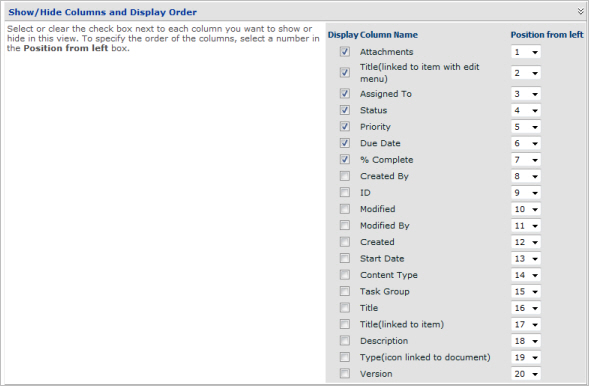
- Show/Hide columns and display order – Select or clear the check box of columns you want shown/hidden in the rollup. To re-order the columns, select the drop-down box under Position from left and select a position number for each column shown in the rollup.
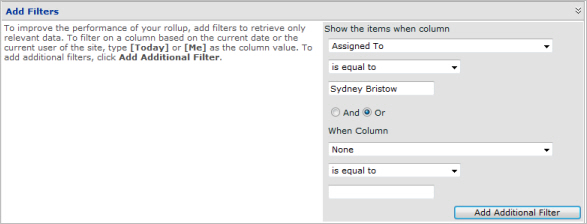
- Add filters – Select a column, comparison operator, and then enter a value. If you want to add more to the filter condition, select And/Or and enter more filter information. Click the Add Additional Filter button to add another filter using an And or an Or Boolean operator.
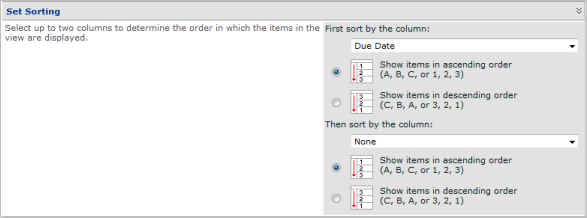
- Set sorting – Select a column to sort by, then a sort order. If desired, add information for a second sort column as well.
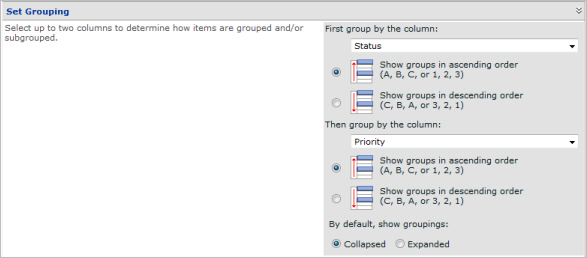
- Set grouping – Select a column to group by, then a group order. If desired, add information for a second level grouping as well. Select whether you want the group(s) collapsed or expanded by default.
|
 |
| 5. |
After you have completed configuring your rollup, click the Create View button in the lower right corner of the display. |
|


