Connect to a SharePoint Server
| Step | Action |
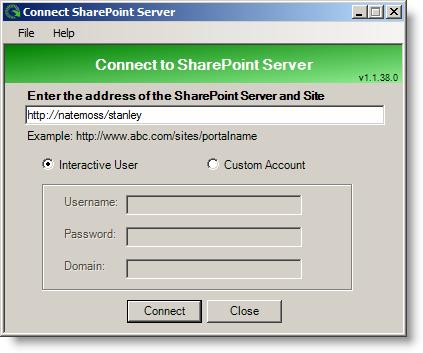
| 1. | Double-click the .exe file, or right click it and select Run, or select Programs from your Windows Start menu and then List Bulk Export. The connect dialog will appear.  |
| 2. | Enter the URL of the portal you need to export from. |
| 3. | Select if you will use the Interactive User or a Custom Account. If you want to use a Custom Account, enter the username, password, and domain for the selected user. |
| 4. | When ready, click Connect. The List Bulk ExportApplication window will appear. |
| 5. | To cancel, click Close. |
Connect to a Different Server
| Step | Action |
| 1. | Select File and then Re-connect to SharePoint Server from the main menu. You will be asked to confirm that you want to cancel the current export process. When you click Yes, the Re-connect dialog appears. |
| 2. | Enter a new SharePoint Site address and new custom credentials if needed. |
| 3. | When ready, click Connect. The List Bulk Export Application window will appear. |
Select the Data and Files to Export
| Step | Action |
| 1. | Select File and then Re-connect to SharePoint Server from the main menu. You will be asked to confirm that you want to cancel the current export process. When you click Yes, the Re-connect dialog appears. |
| 2. | Enter a new SharePoint Site address and new custom credentials if needed. |
| 3. | When ready, click Connect. The List Bulk Export Application window will appear. |
| 4. |
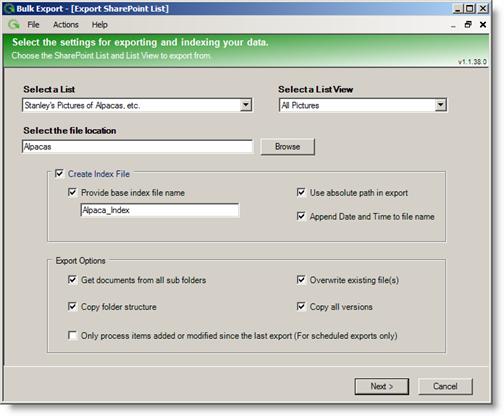
Select the SharePoint List (or Document Library, or Picture Library) to export the data and documents from.
|
| 5. | Once a library is selected, the Views available in that library appear as selections in the List Views list. Select the appropriate view. |
| 6. | Select the Local or Network File Directory to export the files to. Click Browse… to browse to the location. Be sure the user entered previously has access to this location. |
| 7. |
Choose your Index File Options. Select Append Date and Time to file name to add the current date and time to the end of each exported file; the result will be a uniquely named file. This is useful for keeping track of multiple copies of the same file, if you choose to export these and still keep the originals. Select Use absolute path in export if you want to include the full, absolute path location of each exported file in the index file. If this option is not selected, the index file will include shorter, relative paths. |
| 8. |
Enter the appropriate Export Options:
|
| 9. | Click Next when ready.
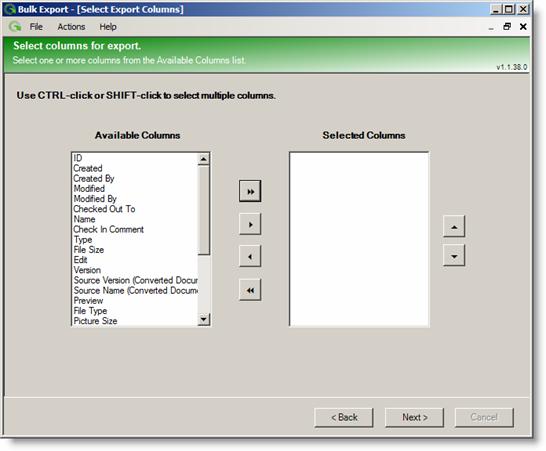
The Column Export screen appears. |
| 10. | Specify the columns you want to include in your index file by selecting them from the Available Columns list, and clicking the right arrow button. |
| 11. | To add all columns, click the double right arrow button. |
| 12. | To remove columns, select them from the Selected Columns list, and click the left arrow. To remove all columns, click the double left arrow. Any columns on this list will be included in the export.
When you are satisfied with the contents of the Selected Columns list, click Next. |
| 13. |
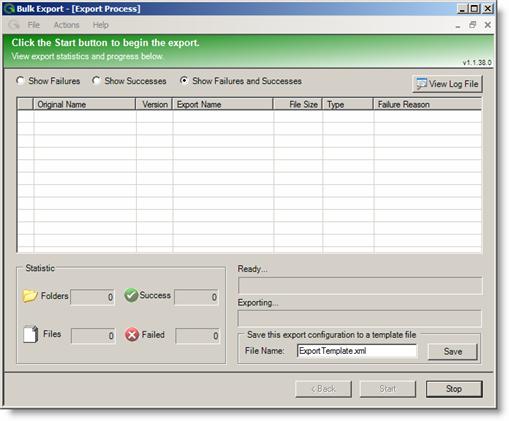
Before you export, select Show Failures, Show Successes, or Show Failures and Successes to determine what feedback to receive during export. Then, click Start to begin the export interactively. The process progress will appear on the screen, and depending on the chosen setting, the list will populate with successful conversions, failed conversions, or all conversions. To view a log file, click File and then View Log Files from the main menu. The List Bulk Export Application Log File Viewer is able to filter the information so you can view information, failures, successes, or all items. |


