| Step | Action | Result | |
| 1. | On the Map the Columns screen, select the Source Column to populate data in the Target Column (SharePoint List or Library). Target Columns that match Source Columns are shown by default. For an exact match, these columns require the same title AND the same order. | 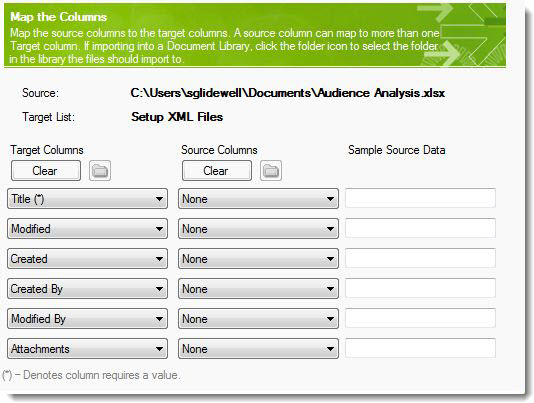 Note: If there are more than six columns, use the scroll bar on the right to move up and down the list. |
|
| 2. |
You can modify the default mapping by:
|
List Bulk Import provides the capability of maintaining historical information with the ability to update the target items’ read-only columns (Created, Created By, Modified, and Modified By) with your legacy data (see specifics in the list below). For Created or Modified columns (Date values)
For Created or Modified by columns:
|
|
| 3. | Because columns are mapped, data from the first record of the import file are displayed in the Sample Data column. If you selected the First row contains column headings checkbox on the previous screen, the data from the second row of the import file is shown as sample data. | ||
| 4. | Users can attach files to list items by matching the Attachment column of the target list to a Source Column that includes the file path and name. To include multiple attachments for a single item, separate each field path with a vertical bar (|). | ||
| 5. |
When importing files to a Document or Picture library, SharePoint requires the mapping of the file path and name. To do so, map the target column Name to the source column that contains the file path and name.
|
||
| 6. | If importing to a Document Library, select a subfolder of the library to import your data to by clicking on the folder icon appearing next to the library name. Click the plus sign of the tree in the popup window and select the destination subfolder. Then, click OK. |
|
|
| 7. | After mapping all columns, click Next. | ||
