Geographical information is one example where a dependent field is immediately useful. In this example, assume you have the following:
- A list of your company’s various offices that contains a “State/Province” column, and a “City” column. It can have other data too, as long as it contains these two columns somewhere in the list.
- Assuming you want to keep track of the state and specific branch office in that state where the sale occurred, you have another list that keeps track of sales (called “Sales Record”).
Using just standard SharePoint column types, you’d probably create two lookup fields on the Sales Record list, and point them to the columns on the list that contained your geographic information. Users would have to scroll through a list of states, make a selection, and then scroll through a list of cities posing two immediate problems with this setup:
- First of all, users will be forced to spend a lot of time scrolling through a large list that contains mostly irrelevant information, because the columns do not communicate with each other. Even if a user enters “New York” under “State”, he or she will still have to scroll through all of the other options to choose “City”.
- The second problem is the potential for human error. Since the list of cities is unfiltered, there’s nothing to keep a user from choosing a city value that is incompatible with the state value (something like “New York, Florida”). Later on, when the data is reviewed, there’s no way to know which value was incorrectly entered, so all of the data is essentially independent.
Here’s how to alleviate both of these issues by using a Lookup Selector Column’s dependency features to control the options presented to the user.
| Step | Action | Result |
| 1. | Open the new list, called Sales Record. Assume there are two standard columns, “Title” (in this case, the name of the customer), and “Revenue” (a numeric field that contains the value of the sale). | |
| 2. | Create the new list’s “State/Province” column by choosing Create Column from the Settings menu, and choosing a Lookup Selector Column type. |  |
| 3. | Under Source Site URL, enter the URL of the SharePoint site that contains the list of city and state/province data. Lookup Selector Column lets you to draw data from a list on a separate site (as long as it’s in the current site collection), something you can’t do with standard SharePoint lookup columns. | |
| 4. | Once you’ve entered the location of the source site, click the green arrow to load the site’s lists and update the Source List drop-down menu. Choose the list that contains the city and state/province data. In this example, the list is titled MapDataList, as pictured above. | |
| 5. |
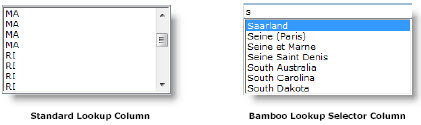
Choose the specific column of the list to draw values from. In this example, the column is simply titled State/Province. Remember, this is the column on the source list. Click OK. The first thing you’ll notice about the Lookup Selector Column is the absence of duplicate choices. Lookup Selector Column filters out this data automatically, which makes navigating through potentially long lists of values much faster. The second big difference is that the Lookup Selector Column quickly and continually removes choices from the drop down as text is entered into the field. In the example pictured above, just typing “S” immediately removes every possible choice that doesn’t begin with “S”. Again, with large datasets, this is much faster than scrolling through the entire alphabet, including duplicates. Now, we’ll use the data entered into the State/Province column to make an even more restricted dependent column, called “City”. |
|
| 6. | Create another new column, again setting the column type as Lookup Selector Column. Since we’re pulling our geographic data (city and state/province) from the same source list, configure the Source Site URL and Source List values for this new “City” column just as you did for the “State/Province”. | |
| 7. | Set the Display Column to the source column you wish to draw the new column’s choices from. In this case, set it to “City”, since that’s what the user will select from the new column. | |
| 8. | Now, it’s time to assign a relationship to the column, so that only cities associated with the selected state show up in the “City” drop-down. Select the Make this a dependent column checkbox, to bring up several additional fields. | 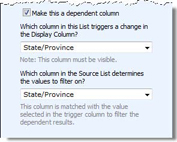 |
| 9. | The first drop-down determines which column on the current list (Sales Record) causes – or “triggers” – the new column’s available choices to change. In this case, the “City” field changes as the user selects a “State/Province”. So set the first column to “State/Province”. | |
| 10. | The second drop down determines which source column is used to filter the available choices. Again, in this example, we want to filter out the possible list of cities by the values in their corresponding state/province fields. So set the second column to “State/Province” as well, and click OK. | |
| 11. | The column is configured. Your users now see an additional drop-down (called “City”) that changes based on the contents in “State”. | 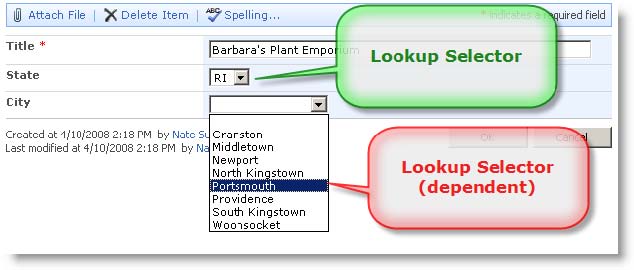 |
| 12. |
Two Lookup Selector Column, one of which is dependent on the other Notice how this setup, now that it reduces the two biggest problems of using standard lookup columns. Users entering data are now much less likely to enter incorrect city data (since only relevant cities are displayed), and no longer need to waste time scrolling through long lists of values. |
|