| Return to Overview of TTM Report Center |
|---|
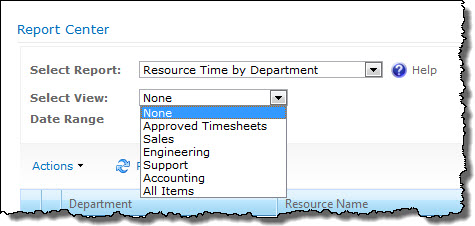
You are not limited to the views currently configured to the Timesheets list. You can add new views to add flexibility to your reports. For example, if you want to create a view for each department for the Resource Time by Department report, do the following:
| Step | Action |
| 1. | Click the All Site Content link in the Quick Launch menu, or go to Site Actions > View All Site Content. |
| 2. | In the Lists section, click the Timesheets list. In the List Tools > List ribbon, click the Create View button. |
| 3. | In the Start from existing view section, click one of the existing views, such as Approved Timesheets or All Items. |
| 4. | Give your new view a name. This name will be displayed in the View drop-down in the Report Center page. If you are creating a view for an individual department, consider including the department name in the view. |
| 5. | In the Filter settings, add an additional filter, such as Show the items when column Department is equal to Sales. |
| 6. | Click OK to save the view. |
Repeat for each department (if you are creating new department views).
After you create a view, you can add the view to a report.
If you create a view for each department as described above, the list of views for the Resource Time by Department report could look like this:
Add a View to a Report
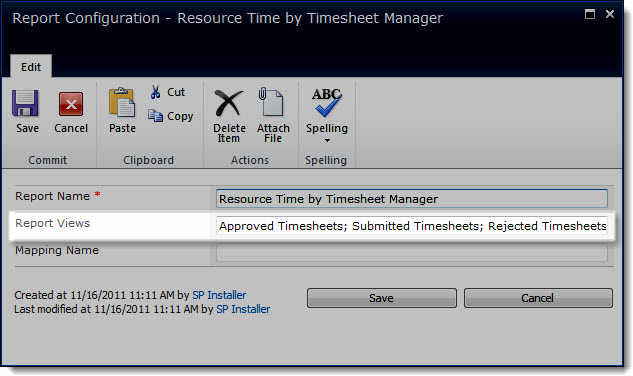
You can add more views to reports. For example, to add a view filter for submitted time to the Project Time by Resource report, do the following:
| Step | Action |
| 1. | Click the All Site Content link in the Quick Launch menu, or go to Site Actions > View All Site Content. |
| 2. | In the Lists section, click the Report Configuration list. |
| 3. | Select the name of the report you want to modify, such as the Project Time by Resource report, and click Edit Item. |
| 4. | In the Report Views field, add the existing view name you want to include, such as Submitted Timesheets. View names are case-sensitive. Separate multiple views with a semicolon. The view must already exist in the Timesheets list. |
| 5. | Click Save. |
When you return to the Report Center and select the report, the view you added to the list is now an available filter for the report.