| Overview of Workflow Conductor Control Panel |
|---|
On the E-mail Settings page of the Workflow Conductor Control Panel, globally configure:
E-mail Templates
To configure global e-mail templates for task e-mails sent by Workflow Conductor, go to Central Administration > Workflow Conductor, and then E-mail Settings. You can configure the default templates used for E-mail messages sent for Request Approval, Request Feedback, and Collect Data From User task notifications, task reassignments, and task change requests. Administrators can also configure E-mail Approval settings from this page of the Workflow Conductor Control Panel.
These e-mail templates are used as the default text for corresponding properties in the Request Approval, Request Feedback, and Collect Data From User widgets. The default text can be customized on a per-widget basis by the workflow designer.
To add references to elements like the list name, the workflow initiator, the workflow title, “Current Task” properties, and other common elements, click the Add Lookup button next to each section and select a lookup to insert. The actual value of the lookup will be filled in when the workflow runs.
NOTE: To add a hyperlink that has a display name different from the URL (e.g., Bamboo instead of http://www.bamboosolutions.com), enter the hyperlink in the following format, including the surrounding brackets ([]):
[_URL(http://url.com),_Text(Text to display)]See Using Lookups in Workflow Studio for more information.
To set an e-mail template back to the system default, click the Reset to Default button below the template. To save changes to a template, make sure to click OK at the bottom of the E-mail Settings page.
E-mail-based Task Approvals
E-mail-based task approvals are available for tasks created from the Request Approval Widget. Prior to using email-based approval the following actions are required:
-
E-mail needs to be enabled and configured on the Windows Server running SharePoint.
-
SharePoint needs to be configured to allow incoming email.
-
For each site where a workflow that requires e-mail-based task approval runs, configure settings that allow users to approve requests via e-mail:
Step Action 1. 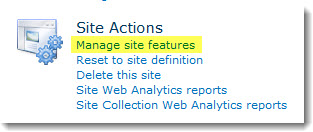 Activate the site feature Bamboo Workflow Incoming Email for each site where email-based approval will be allowed. This is a site where the workflow runs and the Workflow Tasks list resides.
Click Site Actions > Site Settings > Site Features. Locate the Bamboo Workflow Incoming Email feature and click Activate to activate it on the site.

NOTE: This site feature is not activated by default.
When the site feature is activated, the list Bamboo.Conductor.IncomingEmail will be created.
2. From the List Settings page for the Bamboo.Conductor.IncomingEmail list, configure the Incoming email settings.
 IMPORTANT: Make sure the E-mail address you choose is unique. No other lists should have the same address.
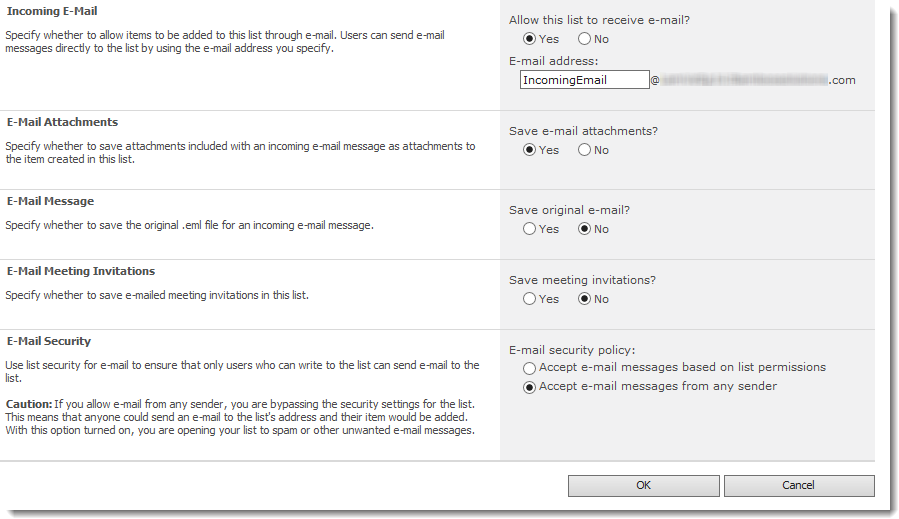
3. In the E-mail Settings page of the Workflow Conductor Control Panel in Central Administration, locate the Email-based Approval and Rejection Settings (at the bottom of the page). 4. 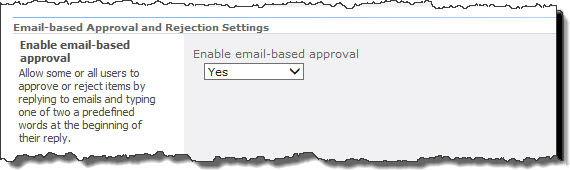 In the Enable email-based approval section, select Yes from the drop-down menu.
5. 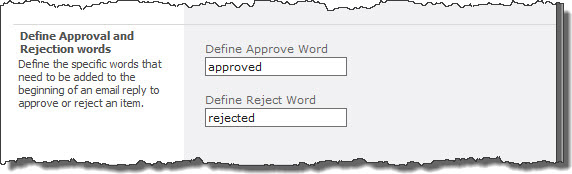 In the Define Approval Word box, enter the word users should respond with for an approval. In the Define Reject Word box, enter the word users should respond with for a rejection.IMPORTANT: The Approve and Reject words are case sensitive.
When task assignees receive the e-mail notification message telling them they need to review a task, they can reply to the email, entering either the Approve Word or the Reject Word in the body of the reply. The task will then be automatically approved or rejected with no further action required by the assignee.
6. 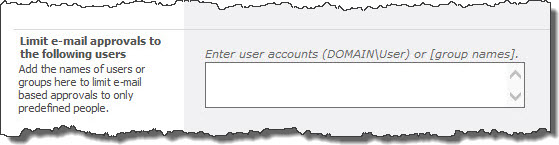 The Limit e-mail approvals to the following users section allows administrators to restrict approval emails to specific users or groups by typing their names in the box.IMPORTANT: When adding more than one user or group, separate names with semi-colons.
7. When all settings are made, click OK to save your changes.