Completing the PM Central project site’s project checklist
The Project Checklist provides project managers with a list of steps for working with project sites in PM Central. A link to the checklist will be available from the Project Home page when the mandatory items in the Configuration Checklist have been marked as completed.

NOTE:The Project Manager’s Checklist was new in PM Central 4.3
The list contains the following steps:
| Action |
Description |
| Enter the Project Objective |
Access the Project Objectives Add New Item link from the Project Home page, or this item’s action link.
NOTE: You should delete the default item which summarizes how to write an effective objective.
|
| Verify the project details in the Project Health list |
The Project Health list contains key information about the project including, Project Department, Project Type, Project Start Date, Project End Date, % Complete, etc.
- Click the Project Name link under the Project Info display on the Project Home page, or this item’s action link, and review the project information entered.
 Important: Check the Auto Update box to have PM Central update the Project Start Date, Project End Date and % Complete fields based on the contents of the project’s Tasks list. Updates are performed hourly (by default) by the Bamboo Update… Project Health timer job and will overwrite manually entered values. Important: Check the Auto Update box to have PM Central update the Project Start Date, Project End Date and % Complete fields based on the contents of the project’s Tasks list. Updates are performed hourly (by default) by the Bamboo Update… Project Health timer job and will overwrite manually entered values.
|
| Add Users to the Project Resource Pool |
PM Central provides two methods for adding users into the Project Resource Pool. Both methods will copy information associated with a user’s profile in the Enterprise Resource Pool into the local Resource Pool.
1. Add an individual user:
-
From the Project Control Panel, click View Resource under the Resource Center header to access the Project Team Info page, or click this item’s action link
-
Click Add new item and select the user from the Resource drop down selector
-
Click Save
NOTE: The drop down will display all users identified in the Enterprise Resource Pool. Users will Full Control permissions on the site will also be able to add the selected user to a SharePoint group directly from the New Contact form.
2. Add multiple users:
-
From the Project Central Panel, click Copy Resource under the Resource Center, or click this item’s action link and access the Copy Resources tab
-
Check all the users to be added to the Project Resource Pool from those available in the EPR
-
Click the Select Resources to be copied button, then click Copy Resources
NOTE: Permissions to the site will need to be granted separately when using the bulk import method.
|
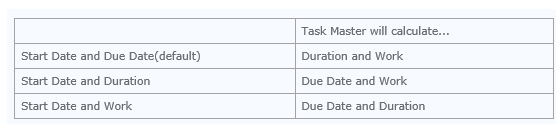
| Determine how tasks should be defined in Task Master |
Task can be defined using one of 3 different methods:
To check, or change, Task Master’s configuration, complete the following steps:
-
Navigate to the Tasks tab, or click this item’s action link to access the main Task page
-
Click the gear icon  on the right of the toolbar to access Project Schedule Settings. on the right of the toolbar to access Project Schedule Settings.
-
Make the necessary modifications in the Rules section and click Update.
|
| Enter the project schedule in Task Master |
The Task Master Web Part provides a Gantt display of the project plan.
- To access Task Master navigate to the Task page, or click this item’s action link.
There are several options available for entering tasks:
-
Enter the project tasks in the New Item form.
-
Copy a basic project plan into Task Master from Excel
-
Use the Bamboo MS Project Add-In tool.
|
| Identify the project’s risks |
- Navigate to the Risks page under the Issues and Risks tab, or click this item’s action link
Click the Add New Item link
Provide information about the risk, including Probability, Impact, Cost, Business Value and Due Date.
|
| Capture baselines |
PM Central can capture baselines for the project schedule, tasks and project costs.
- Go to the Tasks tab, or click this items’s action link, and click Update All. This will recalculate the project and update cost information (if applicable).
- Go to the Baseline View and click Capture Baseline in the toolbar of the desired baseline(s)
Up to 10 baselines can be created for Project Schedule and Scheduled Tasks. Each baseline will be displayed in a different color, with the current status displayed at the top of the baseline view in blue.
|
|