Create a new List Rollup using the List Rollup Classic Edition Web Part
 IMPORTANT: The List Rollup Classic Edition Web Part has been retired. We urge you to use the List Rollup Schema Designer Web Part to create more powerful rollups and the List Rollup Grid View Web Part to display them.
If you have existing rollups that you created with the web part, please see Migrate an existing List Rollup Data View to the new List Rollup Schema Architecture.
To use the List Rollup Classic Edition Web Part, you must complete the following steps:
| Step |
Action |
| 1. |
Select a List. Choose the specific List to rollup in a combined view. See Select Lists for more information. |
| 2. |
Discovery Mode. If desired, select the parameters for the automatic rollup of new and existing sites. See Auto-Discovery for more information. |
| 3. |
If needed, repeat steps 1-2 to add other lists to your rollup. |
| 4. |
Select a Master List. This is used to define the columns to roll up from all the Lists and set the filter criteria for the result set.
 Select the radio button beside one of the lists in the Include Lists pane to mark it as the master list. The master list determines which fields/columns are displayed in the rolled up Data View and how those fields are formatted. Select the radio button beside one of the lists in the Include Lists pane to mark it as the master list. The master list determines which fields/columns are displayed in the rolled up Data View and how those fields are formatted.
NOTE: The master List must contain at least one item. If you need to quickly add a default item, you can click the URL link of the list to view the list in a separate window and add an item to it.
|
| 5. |
Preview and create the rollup Data View Web Part. This process will create new web part on the page. It is separate from the List Rotator web part.
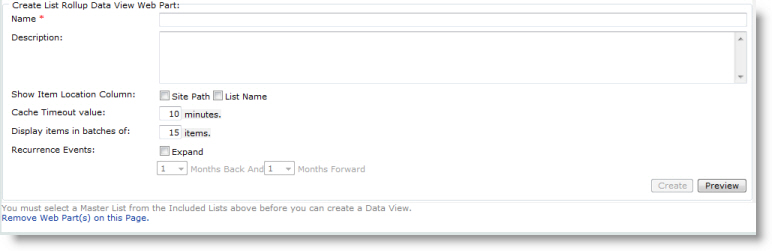
- In the Name field, type a name for the rolled up Data View Web Part to be created.
- optionally, in the Description field, type a description for the rolled up Data View Web Part.
- If you want a link to the list or site for each item in the rollup, check one or both of the Show Item Location Column check boxes.
- Enter a Cache Timeout Value. The List Rollup caches data so that it can be quickly displayed when users access the rolled up Data View. The cache data is saved per user and this setting indicates how long the web service should wait before reloading this data set.
- Specify the Display items in batches to set the default number of items to display per page in the rolled up Data View Web Part.
- If you are rolling up calendar events, define how you want repeating events to be expanded. Select the Expand check box if you want to expand repeating/recurring events when rolling up Calendar Lists so that each individual event is shown in the rollup. You can set how far back to show the individual events and how far into the future by months.
NOTE: If Recurrence is disabled, AND a single occurrence is modified, both the series event and the individual occurrences are displayed.
IMPORTANT: If Recurring events are expanded, the performance of the List Rollup Data View Web Part when displaying the rollup will be impacted.
- Click Preview to preview the data in your rollup to make sure you have configured it correclty.
- When ready, click the Create button. A message will appear at the top of the Web Part to let you know the new Data View Web Part was created successfully in the Web Part Page Gallery. Choose to display it on the current page or export it so you can display it on another page.
NOTE: The regional settings of the user who creates the Data View Web Part are hard coded in the Data View. All users will see the same regional settings when they access the Data View Web Part.
|