| Overview of Calendar Plus Configuration settings |
|---|
SQL Server Table or View is one of the four available data sources for Calendar Plus.
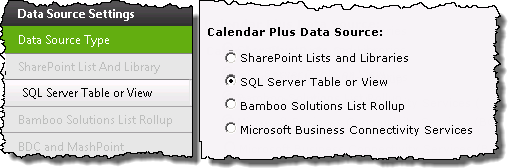
When working with SQL Table or View as the data source keep in mind:

SQL Server must use Mixed Authentication mode. Additional information on Mixed Authentication mode is available here
The following steps require you to have accessed the Calendar Plus Settings screens by clicking the Calendar Plus Web Part Settings button in the web parts configuration tool pane.
| Step | Action | Result |
|---|---|---|
| 1. |
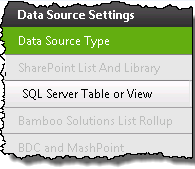
Click the SQL Server Table or View button under Data Source Settings in the navigation tool pane. You will only be able to select this button if SQL Table or View is selected as the Data Source Type |
The SQL Server Table or View Settings will be visible on the right side of the configuration screen and is divided into two sections:
|
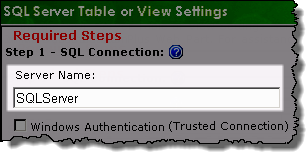
| 2. | Enter the Server Name of the SQL server to which you want to connect credentials
Keep in mind: To connect to a Named Instance you will need to specify both the server and instance name in the Server Name field. |
 |
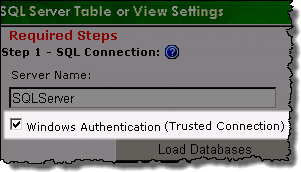
| 3. |
If you are connecting to a database that resides on the same server as SharePoint, check the Trusted Connection box. This will allow you to bypass the requirement to enter authentication information as Trusted Connections utilize the current logged in SharePoint account to access the defined SQL server.
|
 |
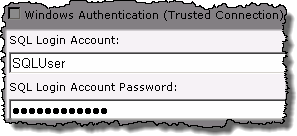
| 4. | Enter the SQL Login Account and Password credentials if you are not using a Trusted Connection. 1. The SQL Login Account must have at least db_datareader access to the desired table or view that resides on the database specified in the Server Name field. 2. The SQL server must be configured for Mixed Authentication mode. 3. Domain Users accounts are not supported |
 |
| 5. | Click the Load Databases button to populate the Database drop-down box, then select the desired SQL Database from the available options. | 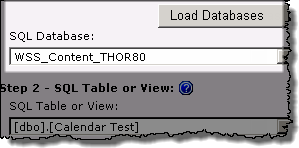 |
| 6. | Select the SQL Table or View to display, the choose the display column from the Item Display Column drop down menu. |
 |
| 7. | Select the Date and Time column(s) in the list or library that will be displayed in the calendar. 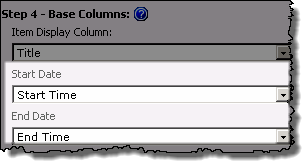 |
Whether you see Start Date and End Datefields or Single Date field will depend on the selection made on the General Settings screen to use a …Single Date or Interval. 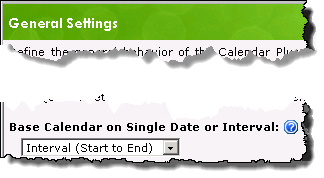 |
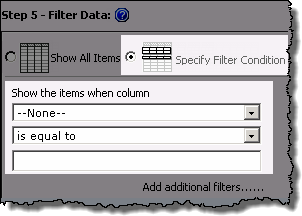
| 8. |
Apply a filter for the content by selecting from the following options:
|
Keep in mind: 2. Use the Add Filters link if you want to add another specified filter condition using AND/OR boolean operators. 3. Web part connections can be used to filter the contents of the calendar display but are not configured in the Calendar Plus web part settings. Information on using web connections is available here |
| 9. |
Stay in the SQL Server Table or View Settings screen and configure the Optional Steps associated with the data source] ORUse the left navigation pane and configure View Settings for the Calendar Plus web part. |
Clicking Save and Close will exit the Calendar Plus Web Part settings screen |
| Overview of Calendar Plus Configuration settings |
|---|