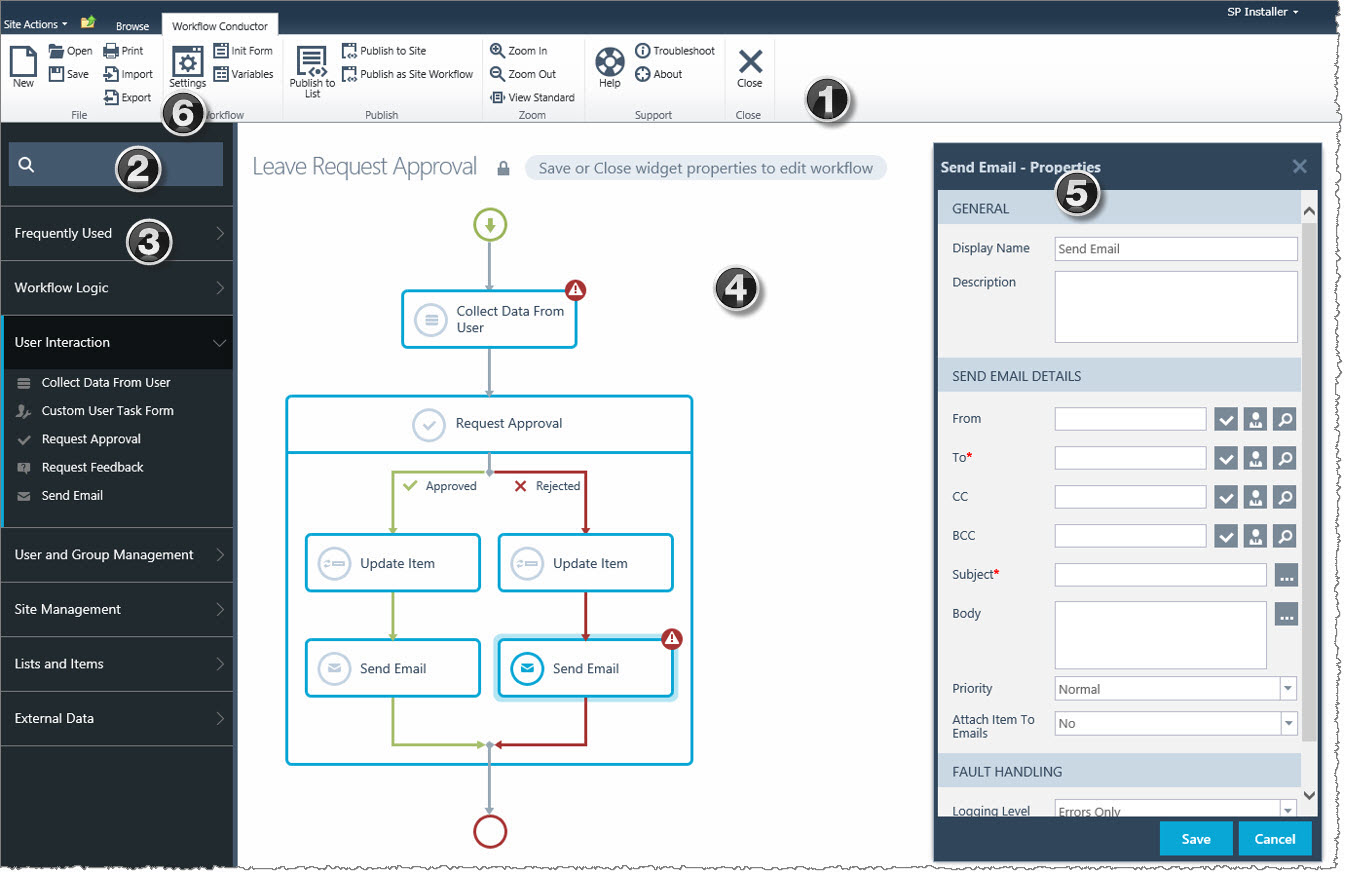
 Workflow Conductor provides a simple, yet powerful way to automate and manage your business processes. A simple drag-and-drop interface lets designers easily create and deploy complex workflows without the need for custom coding. Conductor Studio is the Workflow Conductor interface that allows you to create, edit, and deploy new workflows or workflow templates.
If using a version prior to Release 4.0, see the differences in layout of Workflow Conductor Studio before Release 4.0.
| Step | Action | Result |
| 1. | Workflow Conductor Ribbon | The Workflow Conductor ribbon replaces the list ribbon when you open the Workflow Conductor Studio. Detailed information about the options on the menu ribbon are illustrated here. |
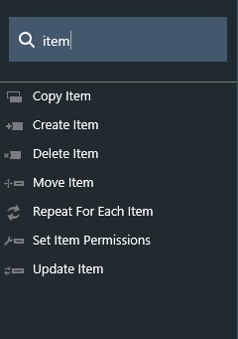
| 2. | Search |  With the many widgets we offer in Workflow Conductor, you have an option now to find a particular widget using a search tool. With the many widgets we offer in Workflow Conductor, you have an option now to find a particular widget using a search tool.
As you begin typing a widget name in the search box, the corresponding widgets will display as shown here. |
| 3. | Widgets | The widget pane contains a list of categories and widgets used to design a workflow. You can optionally change which widgets appear in which category from the Configuring WF Conductor Categories page of the Workflow Conductor Control Panel in SharePoint Central Administration. |
| 4. | Workflow Diagram Pane | The center section of Conductor Studio is the workflow diagram pane, where widgets are dropped to create the workflow path. The diagram pane is described in more detail here. |
| 5. | Widget Properties | When you right-click a widget, you can see its properties. This dialog opens to display the properties of the currently selected widget. You can read an overview of the widget pane and the common widget properties here, but keep in mind each widget has its own unique properties so if you are working on a specific widget and want to get an understanding of the properties for that widget, find the widget in the Alphabetical List of Workflow Conductor Widgets. |
| 6. | Workflow Settings | The settings option is now located within the Ribbon; it contains general settings for the workflow, including the title and description, workflow start options, and workflow variables. You can read more in depth information about workflow settings here. |
To start Conductor Studio, first make sure that the account you are using has the Design or Full Control permission level for the list or library. Then, navigate to a list or library and click the Create or Edit Workflows button in the List or Library tab of the Tools ribbon.
NOTE: Administrators can further restrict who can design workflows in Conductor Studio using the Workflow Designers settings in Central Administration > Workflow Conductor. If you are a SharePoint Designer but do not have the Create or Edit Workflows option in the Tools ribbon, contact your SharePoint administrator.
If you are using Workflow Conductor Studio prior to Release 4.0, the studio layout has changed; see prior release of the studio interface here.
Also see: Upgrading Workflow Conductor from a previous version
