Create your own marker
If the markers provided out-of-the-box with the Virtual Map View Web Part aren’t sufficient for your situation, you can create your own markers. See an example of a map with customer markers here.
Follow these steps to add a custom marker:
| Step |
Action |
| 1. |
Create icon files for your custom markers using your preferred graphic design tool. The supported file formats are GIF, JPG, and PNG.
 The recommended size for the markers is 18 to 48 pixels square. The recommended size for the markers is 18 to 48 pixels square.
|
| 2. |
Copy your marker icon files to the resource directory on your SharePoint server(s). The resource directory is typically found at this path:
c:Program FilesCommon FilesMicrosoft SharedWeb Server Extensions
   wpresourcesBamboo.VirtualMapViewxxx

Where xxx is a code for the version of the product you have installed.
 IMPORTANT: The files will need to be copied to all Web Front End (WFE) servers that run the Microsoft SharePoint Foundation Web Application. IMPORTANT: The files will need to be copied to all Web Front End (WFE) servers that run the Microsoft SharePoint Foundation Web Application.
You will know you are in the right place when you see the files for the out-of-the-box markers (i.e., house.png, plus.png, default.png)
IMPORTANT: Don’t overwrite the existing, out-of-the-box markers. They will be updated when you upgrade your Virtual Map View web part. Always give your custom markers unique names.
|
| 3. |
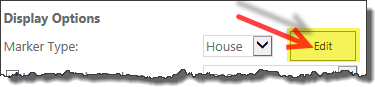 In the web part tool pane, click Edit next to the Marker Type selection. A window will appear where you can edit information about the available marker types. In the web part tool pane, click Edit next to the Marker Type selection. A window will appear where you can edit information about the available marker types.

For each marker available, there is an XML tag like this:
<House IconName = "house.png" IconWidth = "32" IconHeight = "32" MarkerType = "1" />
You need to edit the code in the window to add a tag for your custom marker and insert it in the file before the ending </Icons> tag. As an example, consider a custom marker called Amarker.png that is 45 pixels wide and 45 pixels high. The tag for it would be:
<AL IconName = "Amarker.png" IconWidth = "45" IconHeight = "45" MarkerType = "1" />
Where:
Once the new tag is added, click Save to close the window and save your change. Otherwise, click Cancel to close the window without saving any changes.
|
| 4. |
 Once the tag for your custom marker is saved, it will be available in the Marker Type selection list. Select it in order to see it displayed on your map. Once the tag for your custom marker is saved, it will be available in the Marker Type selection list. Select it in order to see it displayed on your map.
IMPORTANT: Although the custom marker file has been copied to the SharePoint server(s), only the current instance of the Virtual Map View knows about it. To use this custom marker in other instances, repeat Steps 3-4 for those instances.
|