How to Use the SQL View Web Part
Go to the page where SQL View is installed and generate the SQL query statement by following these simple steps:
| Step |
Action |
Result |
| 1. |
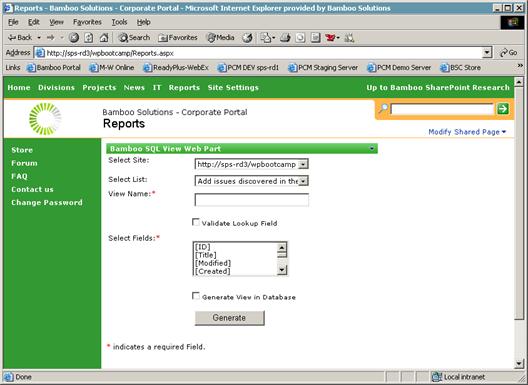
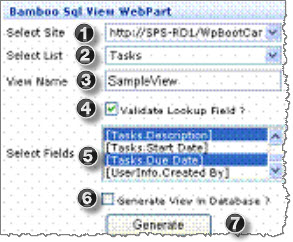
In the Select Site drop-down list, pick the site where the Task list was created. |
 |
| 2. |
Select the desired list in the Select List drop-down list. |
| 3. |
Enter a name for the view in the View Name text box. |
| 4. |
Check the Validate Lookup Fields check box if you want to include referenced fields in your query. If checked, they will appear in the Select Fields list. |
| 5. |
Select the fields you want to return in the query by highlighting them in the Select Fields list. Select more than one by using the Ctrl or Shift keys while selecting. |
| 6. |
Check Generate View in Database check box if you want to automatically create a view in the SharePoint content database. |
| 7. |
Click Generate. A message will be displayed to indicate success or failure. |
|
How to create a SQL query statement that can be embedded into a Crystal report
The following procedure describes how to create a SQL query statement that can be embedded into a Crystal report, running from your client desktop.
| Step |
Action |
Result |
| 1. |
Install SQL View as described in the Installation section and configure the Web Part to make sure it can communicate with the SharePoint content database as described in the Configuration section. |
| 2. |
Go to the page where SQL View is installed and generate the SQL query statement by completing as shown here: |
-
In the Select Site drop-down list, pick the site where the Task list was created.
-
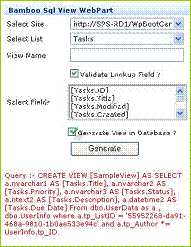
Select “Tasks” in the Select List drop-down list.
-
Enter a name in the View Name text box. To create a view in the SharePoint Content database, this view name must be unique. If a view with a similar name already exists, then the Web Part identifies it and view is not created. Note that the existing views are not deleted or dropped.
-
Select the Validate Lookup Fields check box so the query will perform the joined query to get the name of the assigned user.
-
Select the fields you want returned in the query.
-
Check the Generate View in Database check box and click the Generate button.
|
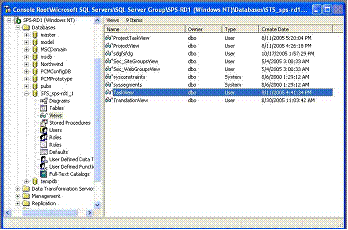
| 3. |
After clicking the Generate button, check the database to make sure a view was created, using SQL Enterprise Manager as in this example: |
 |
| 4. |
Create a data source on your desktop that provides the connection to the SharePoint content database where the task list exists. You can do this on a Windows XP desktop by selecting Start > All Programs > Administrative Tools > Data Sources (ODBC). |
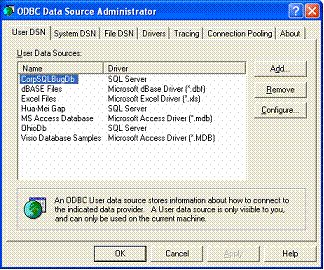 |
| 5. |
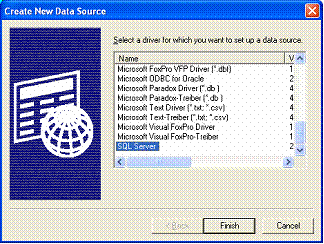
Add a new data source, using the SQL Server driver. |
 |
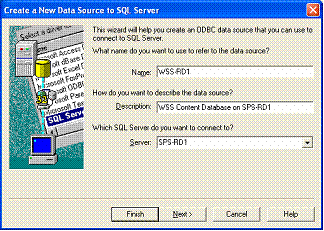
| 6. |
Enter the name of the data source and select the appropriate SharePoint server name. |
 |
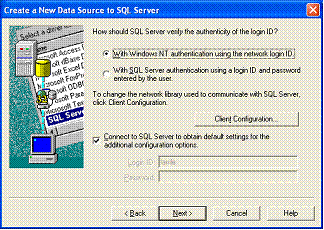
| 7. |
Fill in the account logon with the appropriate permission to read the content database. |
 |
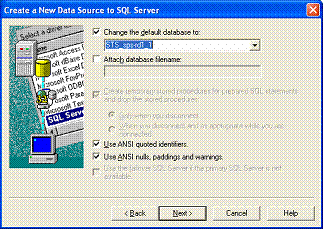
| 8. |
Select the correct table name for the SharePoint content database. |
 |
| 9. |
Test the data source you just created to make sure that access permission to the table is working correctly. You should now have a new DSN (WSS-RD1 in this example) listed in the ODBC data sources list. |
| 10. |
Startup Crystal Reports, create a new report and select a new ODBC driver. |
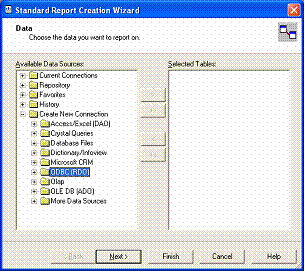 |
| 11. |
Expand the ODBC tree, select the DSN that you just created in step 3, supply the correct user information, and then select the SharePoint content database. |
 |
| 12. |
Once the connection to the database is completed, you are presented with the tables, views and stored procedures in the SharePoint content database. Expand the Views node in the tree, and select the SQL View name that was created in step 1 above (TaskView in this example). |
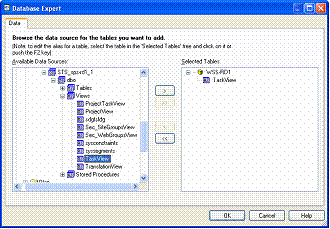 |
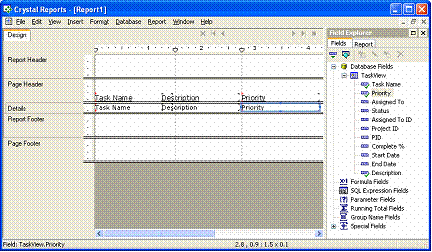
| 13. |
You will now be able to see the fields that were selected in SQL View above, which is ready to be dragged and dropped on to the report Design View. |
 |
|
Create a Microsoft Access Report for a SharePoint Task List
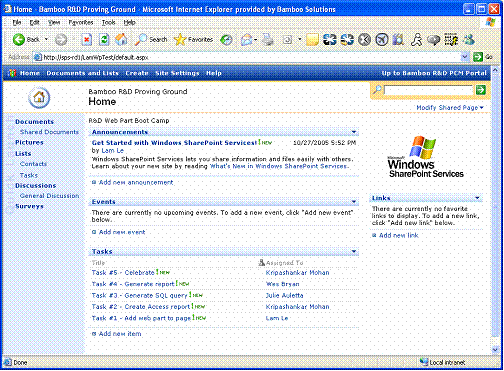 This topic covers how to create a Microsoft Access report for a SharePoint Task List. In this example, our sample task list resides in a sub-site based on a standard Team Site template, as shown here.
Create a SQL query statement from SQL View and use that query in a Microsoft Access report, running from your desktop. Go to the page where SQL View is installed, generate the SQL query statement by completing the following:
| Step |
Action |
Result |
| 1. |
In the Select Site drop-down list, choose the site where the Task list was created. |
 |
| 2. |
Select your task list in the Select List drop-down menu. |
| 3. |
Enter a name in the View Name text box. To create a view in the SharePoint Content database, this view name must be unique. If a view with a similar name already exists, then the web part identifies it and view is not created. Note that the existing views are not deleted or dropped. |
| 4. |
Select the Validate Lookup Fields check box so the query will perform the joined query to get the name of the assigned user. |
| 5. |
Select Fields you want returned in the query. |
| 6. |
Leave the Generate View in Database check box clear. |
| 7. |
Click the Generate button. |
Copy the SQL statement result to the windows clipboard starting from the SELECT statement. |
| 8. |
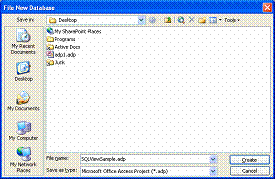
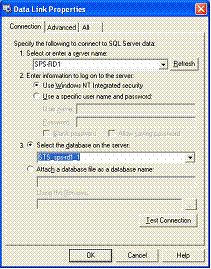
Open Microsoft Access and select Project using existing data… from the wizard menu. The first thing you have to do is set the name of the project. Then the next screen asks for the connection information. |
 |
| 9. |
In this example, we will set the connection to use Windows Authentication, the name of the SharePoint server, and the name of the SharePoint content database. Make sure to test the connection to the database before you click OK. |
 |
| 10. |
After a few moments, the wizard finishes and you can see the tables and views within the SharePoint content database. |
 |
| 11. |
Navigate to the Report tab in the control panel on the left. You can use a wizard to build the report or just create the report in Design View by clicking on Create Report in Design View. The report and its properties and events sheets are displayed. Click on the Data tab and enter the SQL query statement (saved in step 7) in the Record Source property. |
 |
| 12. |
Once the SQL statement is inserted, a box displays with all the fields in the Select statement so that it can be dragged onto the report. |
|