Conditional Branching Workflow Example Process Steps
This workflow will use four widgets.
- Request Approval (used twice in this example)
- Conditional Branch
- Update Item
- End Workflow
NOTE: After configuring each widget, make sure to click the Apply button at the bottom of the Widget Properties tab to save its settings.
| Widget |
Action |
Result |
| Request Approval Widget |
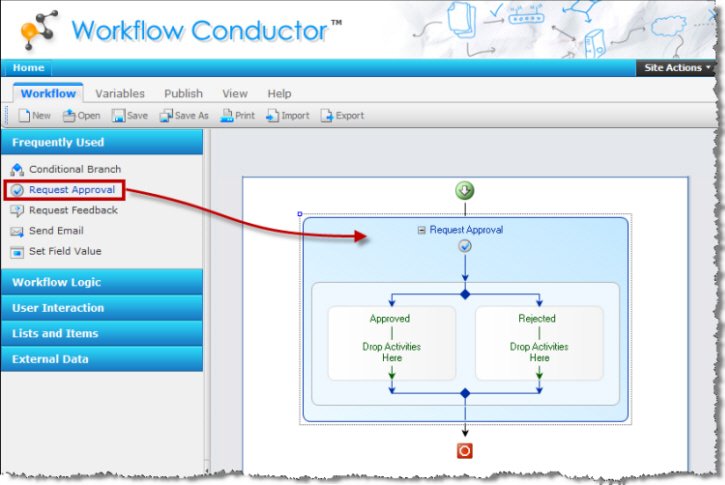
Since all expense reports have to be approved first by a manager, start by dragging a Request Approval widget to the Studio diagram. For the purposes of this scenario, the following properties are important:
-
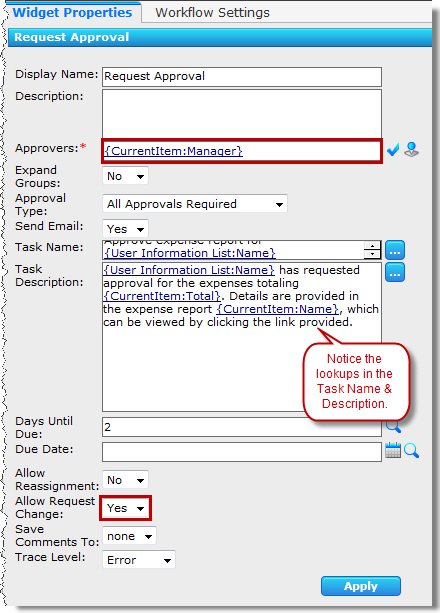
The Approvers property is a lookup to the “Manager” field in the Expense Reports library, which gets populated by the InfoPath form.
-
The Allow Request Change property is set to Yes. If you’ve ever had an expense report rejected for something trivial, you know how frustrating it can be to have to start the whole process all over again. Allow Request Change lets the approver assign a new task for someone else to complete first, such as having the employee add that missing name to a meal expense. When that task is completed, the approver is notified and can pick up where he left off.
- Some basic information about the expense report is provided in the Task Name and Task Description properties. Since the approving manager needs a basic idea of what he is approving, several lookups to actual expense report data have been included in these properties.
|
TIP: Copy & Paste Widgets
You can copy and paste the original Request Approval widget. Conductor will copy the widget properties too, so this will save you some configuration time. Right-click the widget and choose Copy, then right-click inside the Conditional Branch widget’s True branch and choose Paste. All the properties of the Request Approval widget are copied, including any widgets inside it, so be sure to delete the extra Conditional Branch widget by right-clicking on it and choosing Delete.
The Request Approval widget is highly customizable. You can read about each property in detail in the Request Approval Widget topic.
Learn more about Workflow Conductor Lookups, References, and Variables.
|
| Conditional Branch Widget |
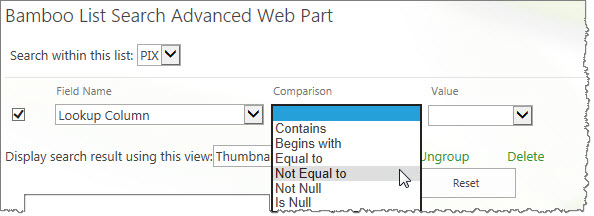
You can force the workflow to check if an expense report needs additional approval using the Conditional Branch widget.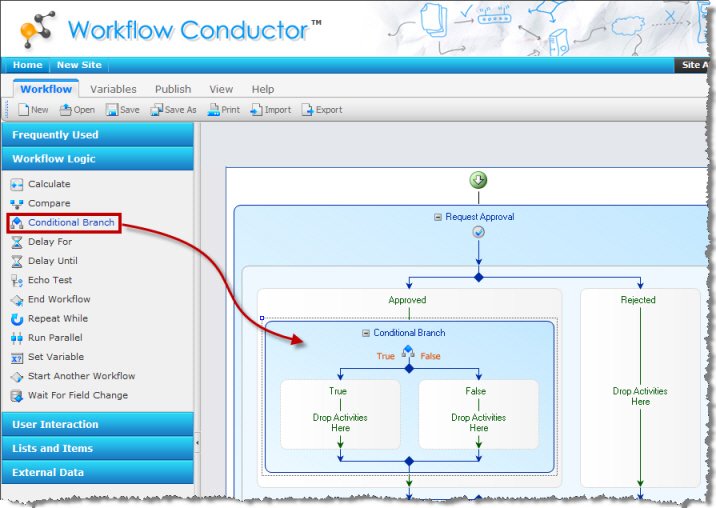 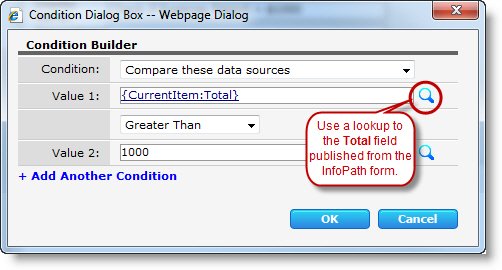
- Drag a Conditional Branch widget inside the Approved branch of the Request Approval widget.
- To set the dollar amount condition required by this scenario, click the
 next to the Condition property to display the Condition Builder, and configure it as shown here. With this condition, anything over $1,000 will follow the True branch, and anything $1,000 or less will follow the False branch. next to the Condition property to display the Condition Builder, and configure it as shown here. With this condition, anything over $1,000 will follow the True branch, and anything $1,000 or less will follow the False branch.
Learn more about Conditional Branch Widget.
|
| Update Item Widget |
 Because employees want to see the status of the expense report, use Update Item. Workflow Conductor has two other widgets that perform a similar function: Update Item and Set Field Value. Either will work here, but this example is a little faster to configure if the field you want to update already has possible values in a Choice field. It will be used extensively within the workflow to give employees the updates they may need. Because employees want to see the status of the expense report, use Update Item. Workflow Conductor has two other widgets that perform a similar function: Update Item and Set Field Value. Either will work here, but this example is a little faster to configure if the field you want to update already has possible values in a Choice field. It will be used extensively within the workflow to give employees the updates they may need.
TIP: Name That Widget
 As you get deeper into designing your workflow, you can make it easier to follow by renaming widgets, starting with the Update Items. As you get deeper into designing your workflow, you can make it easier to follow by renaming widgets, starting with the Update Items.
Click on each one and change the Display Name property to something a little more descriptive, like the actual status name. (Don’t forget to click Apply!)
You’ll see that the widget names now reflect whatever you name it. Do the same with the Request Approval widgets and the Conditional Branch widget, and your workflow will be simpler to follow.
|
| Request Approval Widget (second pass) |
You already have a Request Approval widget for manager approval. To set another approval, drop a new Request Approval widget inside the True branch of the Conditional Branch widget (remember, True matches anything more than $1,000). Configure it the same way as the original widget, but this time use a lookup to the “VP” field in the Approvers property.
Tip: You can also copy and paste the original Request Approval widget. Conductor will copy the widget properties too, so this will save you some configuration time.
Right-click the widget and choose Copy.
Right-click inside the Conditional Branch widget’s True branch and choose Paste.
All the properties of the Request Approval widget are copied, including any widgets inside it, so be sure to delete the extra Conditional Branch widget by right-clicking on it and choosing Delete.
|
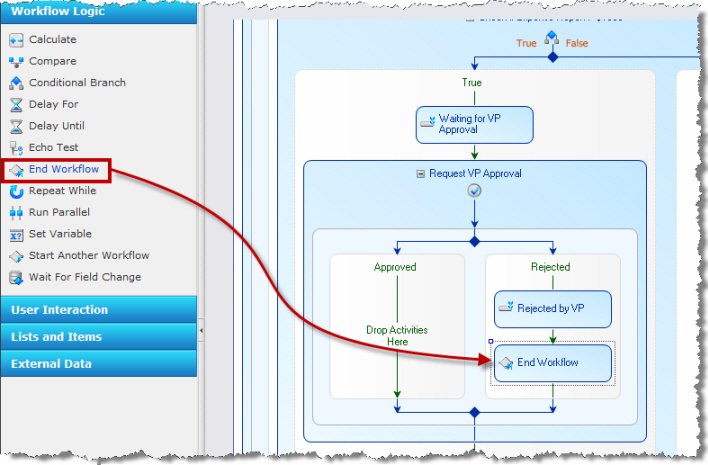
| End Workflow Widget |
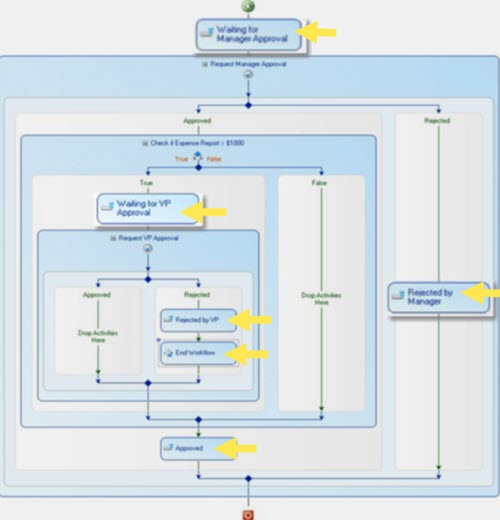
If an expense report gets rejected by the manager, the workflow simply updates the status and ends, since the workflow would follow the Rejected path of the first Request Approval widget and there are no widgets after it.
However, if an expense report is over $1,000 and gets rejected by a VP, the workflow as it is currently configured would update the “Approval Status” column to Approved when it exits the Request Approval and Conditional Branch widgets.
To prevent this from happening, drag an End Workflow widget to the Rejected branch of the second Request Approval widget. |
Now the workflow ends in case of a VP rejection.
 |
|
Workflow Process Steps