Overview of the new Bamboo product Logging
In April 2017, Bamboo released Bamboo.Logging v3.1.0.0 with the Q1 (2017) Cumulative Update of Bamboo component products.
In response to customer feedback the new logging version uses SharePoint ULS logs by default, instead of the the Bamboo logs. The main benefits of this change are:
- Bamboo Log files will not fill the C: drive on WFE servers. Previously, Bamboo products reported errors to proprietary log files located in C:WindowsTempBambooSolutions on each web front end server in the farm as described in Error Log Files.
- SharePoint administrators are very familiar with ULS logs and the ULS Log Viewer. When Bamboo products log to ULS, SharePoint administrators have one less set of logs to review.
- ULS log files can be more easily managed for size and archived, a feature that was not previously available for Bamboo logs.
Bamboo component products installed or upgraded after April 2017 will have the new Bamboo Logging deployed as part of the Bamboo.Framework.wsp solution, which is common to Bamboo products and globally deployed to the SharePoint farm.
 IMPORTANT:
1) If you have multiple Bamboo products installed on your farm, some Bamboo log files may remain in C:/Windows/Temp/BambooSolutions until you upgrade all of the Bamboo products.
2) Bamboo applications (e.g., PM Central, Workflow Conductor, In/Out Schedule Board) will not have the new Bamboo Logging until their respective CU’s are available in Q2 2017.
Please note the following for the new scripts:
The script installs all the WSPs found in the installation folder, in alpha order
The install/upgrade script deploys to all content web apps. If you would prefer to deploy to a single web app, you can modify the script or deploy via Central Administration.
Uses Upgrade instead of Install for existing components.
For additional information about how to use the updated processes:
Installing using the updated install process
Upgrading using the updated process
Uninstalling using the updated process
How to Configure Calendar Plus App
 From the Site Contents, select Calendar Plus or from the Settings icon
  , select Calendar Plus Settings.
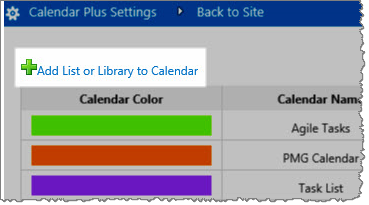
From the Calendar Plus Settings, select the list(s) that you want to display in the calendar from Add List or Library to Calendar option.
When you select the Add List or Library option, a new window is displayed that contains the settings to configure the list or library. There are two sections: Required Steps and Optional Steps. Required Steps are the minimum settings you must configure in order to include the list or library in the Calendar Plus App.
Required Steps:
Optional Steps:
| Step |
Action |
Result |
| 4. |
Columns to Display in Item Tooltip |
Use this option to display specific columns in a tooltip that is displayed when users mouse over an item in the calendar.
-
Select columns under Available Columns. To select multiple columns, press SHIFT or CTRL while clicking your mouse.

-
Click the arrow buttons to move the desired column(s) to Selected Columns.
- Use the up and down arrow buttons to reorder the columns under Selected Columns.
|
| 5. |
Item Identification |
Choose a column to color code; then choose whether you want the colors to be Gradient or Solid.
NOTE: If you select Gradient, note that the column value colors will not display gradient colors in this Settings screen. However, the App does display the gradient.
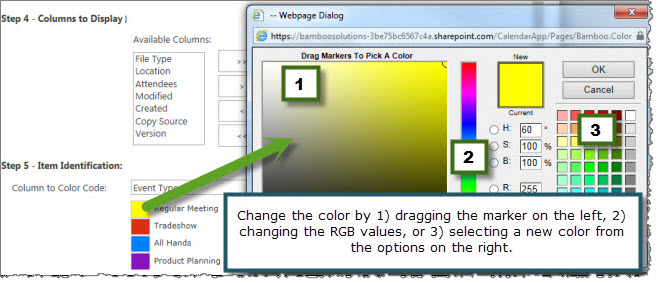
The column values are displayed under Column Values. To change the color for a value, simply click the color. The Bamboo Color Picker opens in a new window.

NOTE: Columns of type Choice, Lookup, and Person or Group are supported for color coding and icon assignment.
Change the color by doing one of the following:

- Drag the marker
- Change the Hue (H), Saturation (S), Brightness (B), Red (R), Green (G) and Blue (B) values
- Switch to Alpha color mode (A)
- Enter a hex value (#FFAAFF)
- Select a new color from the options on the right
|
|
Click Save to save and apply your settings.
Then click Apply in the settings to apply the settings.

IMPORTANT:
 From the Site Contents, select Calendar Plus or from the Settings icon
  , select Calendar Plus Settings.


