User Registration Configuration List Settings

User Registration Configuration List Settings

Return to Overview of Configuration
These settings involve the Configuration list, which is used by User Registration Accelerator to determine who is permitted to create an account and where that account is created.
ConfigListSettings.jpg
Step Action Result
1. Allowed E-mail Address List This is the Configuration list that is built when you installed the web part.
2. Allowed E-mail Address List View Select from the drop down, the view of the Configuration list to use as the default view when determining an allowed E-mail address.
3. Allowed E-mail Address Column This is the column of the Configuration list that contains the allowed E-mail addresses.
4. SharePoint Group Column This is the column of the Configuration list that contains the SharePoint group a certain email address’ new account should be assigned to.
5. Organization Unit Column The column of the Configuration list that contains the Organizational Unit a certain email address’ new account should be assigned to.
6. Security Groups Column The column of the Configuration list that contains the Organizational Unit a certain email address’ new account should be assigned to.

Outgoing E-mail Settings

Outgoing E-mail Settings

Return to Overview of Configuration
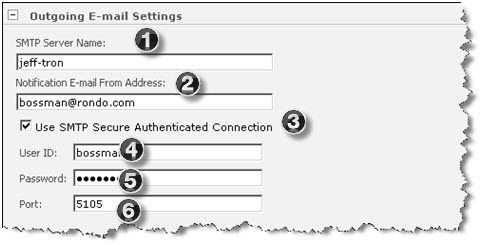
These settings affect how user Registration Accelerator sends automated system email regarding account creation.
Outgoing.jpg
Step Action Result
1. SMTP Server Name Enter the SMTP server name from which the email is to be sent.
2. From Address (Notification Email) This is the address that will emails will be coming “from” and which will appear on the email.
3. Use SMTP Secure Authenticated Connection To send confirmation and approval emails through a secure SMTP connection, you’ll need to provide User Registration Accelerator with the SMTP account information, including User ID, Password, and Port.
(The next section will display when you click the box.)
4. User ID Enter the User ID of the secure email account.
5. Password Enter the Password for the secure email account.
6. Port Enter the port number which the secure email account uses.

Localize Bamboo Applications or Custom Columns

Localize Bamboo Applications or Custom Columns

Overview of the localization process for Bamboo Products

Bamboo applications and custom columns are slightly different than web parts when it comes to localizing/translating. The user interface isn’t confined to a web part, but can exist as site definitions or other custom pages. For example, the configuration of a Bamboo custom column is within the SharePoint list settings area.
The text strings that require translation are located in different files than the strings that appear in a web part.

Changing the language or text for an application or custom column is a multi-step process:

Top

About the Language Files

Text displayed in a Bamboo application may be included in one or both of the following locations:

  • Provisioning Resources. These resources are located in the 12, 14, or 15 “Hive”, in the Resources folder. The number of the Hive depends on the version of SharePoint you are using (e.g., SP2007 has a 12 Hive, SP2010 has a 14 Hive, and SP2013 has a 15 Hive). 14Hiveresources.jpg
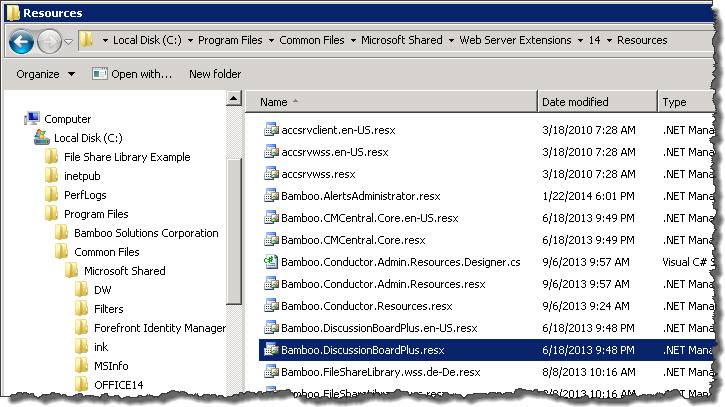
    The Bamboo.*.resx files include text used in site features, site definitions, list definitions, and other provisioning resource elements. Any changes you make in these files will apply to new product instances only.

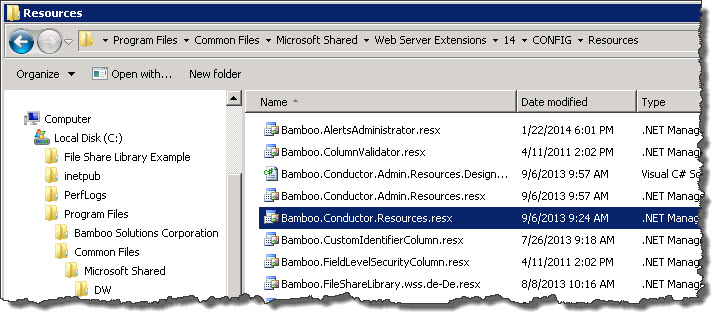
  • Application/Runtime Resources. These are also located in the 12, 14, or 15 Hive, but in the CONFIGResources folder.The Bamboo.*.resx file in the CONFIG folder is different than the one included in the Resource folder.14HiveCONFIGResources.jpg This one includes text used in application pages, custom site menu actions, navigation elements, and other runtime resources. Any changes you make will apply to new and existing product instances only.

In each location, there may be multiple versions of Bamboo.*.resx files with identical content. The different files are provided for English (en-US), German (de-DE), French (fr-FR), and Spanish (es-ES). The content of all files is in English until you translate it to your language. If your site is configured to use a language that does not have a corresponding Bamboo product .resx file, copy an existing file and rename it to include the culture name for that language pack. For example, create a file for Italian by saving the default file as Bamboo.[Product].it-IT.resx. Make your changes to this new file. If your site is configured to use a specific language but you do not have a culture-specific file, the product will use the default Bamboo.[Product].resx file instead.

Icon-WarningIMPORTANT: If you customize one of the default resource files provided with the product, your changes will be overwritten when you upgrade.

To avoid losing customizations, copy the customized file to a different location (not the same folder) before upgrading. After the upgrade is finished, compare the new file with your customized file to incorporate any new entries. Then copy the merged file to the Resources folder. Culture-specific files created for languages that are not provided with the product will not be overwritten during an upgrade, but you still need to incorporate new resource entries.

Top

Editing text in resource files

Icon-WarningIMPORTANT: Before making any changes, back up your original file to a different folder.

To change text in a resource file, open it in a text editor and locate the text you want to change. Editable text is usually found between the <value></value> tags, as shown in the screen shot below. Do not modify the data tag. If you want to remove text completely, delete only the text; do not delete the <data> or <value> entries from the file, or the server will display an error message. In the example below, the editable text is highlighted in gray.

Common_resxEdit.jpg

When you are finished with your changes, save the file and copy it to the appropriate Resources *folder on *all Web front-end servers in your SharePoint farm. Follow the instructions below to make your changes take effect.

Top

Applying Language File Updates

To apply changes to Provisioning Resource Files:

If you modified the provisioning resources file, apply your changes by restarting Web services with the following command on all Web front-end servers.

iisreset

NOTE: changes to provisioning resources affect new instances of the Bamboo product only; existing instances of the product are not updated.

To apply changes to Application/Runtime Resource Files:

If you modified the application/runtime resources file, apply your changes by executing the following stsadm command on all Web front-end servers. This command copies the updated resource file to the App_GlobalResources folder of each Web application. Changes apply to existing product instances and any new instances you create.

stsadm -o CopyAppBinContent

NOTE: Changes apply to EXISTING product instances AND any new instances you create.
Layout and Language Settings

Layout and Language Settings

Return to Overview of Configuration
These settings determine the CSS/HTML style settings of the Web Part itself, along with the language of the tool pane.
Layout.jpg
Step Action Result
1. Style Select “default” to use the built in style, or ”custom” to use your own. If “custom” is selected, you can edit the HTML of User Registration Accelerator by clicking the Source Edit button, or edit the CSS by clicking the CSS Edit button.
2. Show optional user information section When this option is selected, User Registration Accelerator will include fields for users to enter optional account information (address, contact information, etc.).
3. Language Determines the language file used the in User Registration Accelerator tool pane. For more information on Language and Translation settings, see Localize Bamboo Web Parts for your Language.

How to Customize Automated Emails

How to Customize Automated Emails

sa07021.jpgAn automated e-mail is sent to the submitted e-mail address by the User Registration Accelerator twice during the registration process.
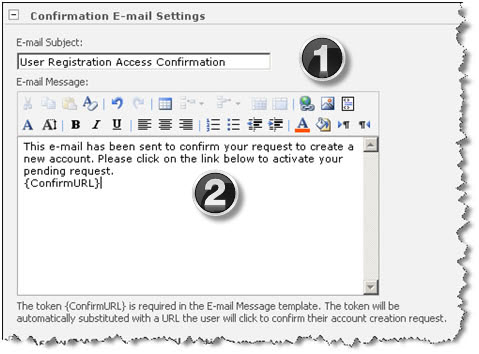
  • The first email contains a link, and is used to confirm the authenticity of the submitted address.
  • The second email confirms that an account has been successfully created, and contains login information for the new account.

The content of these emails can be adjusted from the tool pane, under the Confirmation E-mail Settings and Account Approval E-mail Settings sections, respectively.

You can modify the email in any way (formatting, text, images, tables, etc.) you see fit. However, the Confirmation E-mail must contain the {Confirm URL} token somewhere in the message, as this will create the link users must click in order to confirm their address and finish the account creation process. The Account Approval E-mail has similar tokens for {NewUserName} and {NewPassword}. It is recommended that you use these, but it is not required.

For more information on configuring tool pane settings, consult the Configuration section.

Edit the Configuration List (for administrators only)

Edit the Configuration List (for administrators only)

Return to Overview of Configuration

The Configuration list is an automatically created list containing custom “rules” that help User Registration Accelerator determine whether each subsequent account creation request is accepted or rejected.

When a request is made, User Registration Accelerator consults the Configuration list, reading each rule until either:

  • It finds a rule that applies to the submitted e-mail address, in which case the account is created according to the specifications indicated by that rule,
    or…
  • All rules have been read, and none apply to the current e-mail address, in which case the account is NOT created, and the user receives an error message
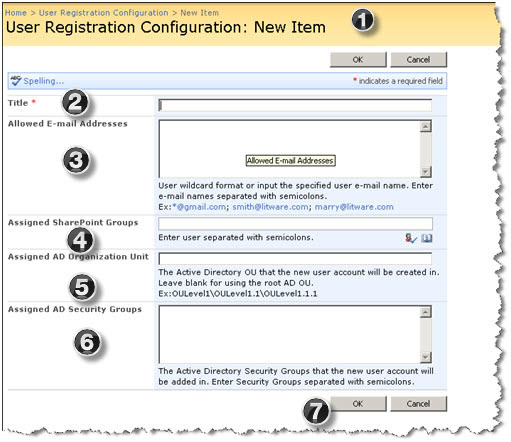
NewItem.jpg
Step Action Result
1. Navigate in your site to view all Site Contents and locate the list labeled User Registration Configuration. If you have just added the Web Part, you’ll notice that the list is empty. To create a new rule, click the New button and select the New Item option.sa07018.jpg
2. Enter a Title Enter a name for the rule under Title. Note that although “Title” is the only field that is required, technically, to make a rule, rules will not function correctly unless you fill out the rest of the form.
3. Allowed Email Addresses Enter the e-mail addresses that the new rule will be applied to, separated by semicolons. You can also use the “wildcard” character * to include all addresses containing a phrase or domain. To include all emails from the “jefftronics.com” domain, for example (such as sales@jefftronics.com , jrobinson@jefftronics.com , etc.) you would enter ”*@jefftronics.com ”.
4. Assigned SharePoint Groups Enter the SharePoint Groups that new accounts created under this rule should be added to. You can enter these names manually and click the Check Names button located below the field, or look up a Group by clicking the People Picker button.
5. Assigned AD Organization Unit To assign accounts created under this rule to a specific Active Directory Organizational Unit (OU), enter it into the Assigned AD Organizational Unit field. If you leave this field blank, new accounts will be created in the root Active Directory OU.
6. Assigned AD Security Groups To assign accounts created under this rule to one or more Active Directory Security Groups, enter those groups (separated by semicolons).
7. Click OK. You can create as many rules as you’d like, and edit or delete them like any other list item. Remember, any email address that fails to match at least one rule will not be able to register an account via User Registration Accelerator.

Confirmation E-mail Settings

Confirmation E-mail Settings

Return to Overview of Configuration

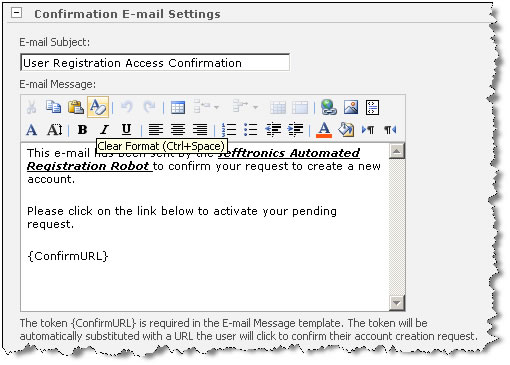
These settings affect the automated system email that is sent out when an account creation request has been made. An automated e-mail is sent to the submitted e-mail address by User Registration Accelerator twice during the registration process.
The first email contains a link, and is used to confirm the authenticity of the submitted address.
The second email confirms that an account has been successfully created, and contains login information for the new account. The content of these emails can be adjusted from the tool pane in this section and on the Account Approval E-mail Settings section as well.

Confirm.jpg
Step Action Result
1. E-Mail Subject The subject of the email sent to the address making the account creation request.
2. E-Mail Message Enter the contents of the message.

NOTE: You can modify the email in any way (formatting, text, images, tables, etc.) you see fit. However, the Confirmation E-mail must contain the {Confirm URL} token somewhere in the message, as this will create the link users must click in order to confirm their address and finish the account creation process. You will also notice that the Account Approval E-mail has similar tokens for {NewUserName} and {NewPassword}. It is recommended that you use these, but it is not required.

Administrative Connection Settings

Administrative Connection Settings

Return to Overview of Configuration
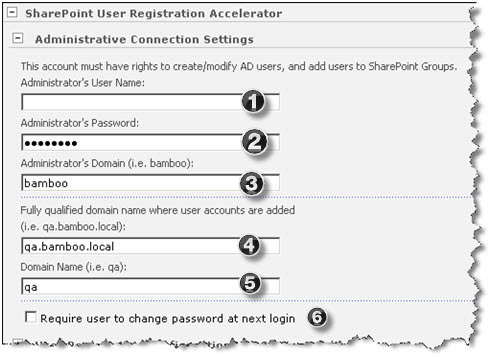
The information you enter here enables User Registration Accelerator to create accounts in the domain of your choosing.
AdminConnection.jpg
Step Action Result
1. Administrator’s User Name The name of the account used to handle new account creation requests; note that the account you must provide must have the rights required to create and modify Active Directory users for the Web Part to work properly.
2. Administrator’s Password The password for the provided Administrator account.
3. Administrator’s Domain The domain of the provided Administrator account.
4. Fully qualified domain name The fully qualified (i.e., “qa.bamboo.local”) domain name indicating where any new accounts are to be created.
5. Domain name The domain name only where accounts are to be created (following the above example, this would just be “qa”).
6. Require user to change password Select this option to force new users to change their password the first time they log in after their account is successfully created.

Account Approval E-mail Settings

Account Approval E-mail Settings

Return to Overview of Configuration
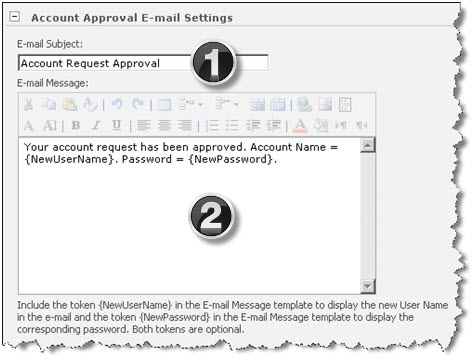
The information you enter here is what users see when the automated system email is sent out after an account has been successfully created.
Approval.jpg
Step Action Result
1. E-Mail Subject The subject of the email sent to the address making the account creation request.
2. E-Mail Message The contents of the message.
You can modify the email in any way (formatting, text, images, tables, etc.) you see fit. You can use tokens for {NewUserName} and {NewPassword}. It is recommended that you use these, but it is not required.