Whenever a video is inserted in a thread, users can view the video by clicking the Play Button.
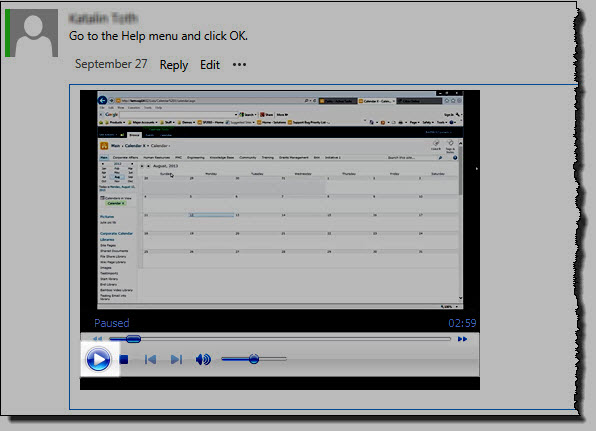
NOTE: If you just inserted the video in a discussion thread, refresh the browser after your insertion of the video.
See also:
Bamboo Solutions
Product Documentation
Whenever a video is inserted in a thread, users can view the video by clicking the Play Button.
NOTE: If you just inserted the video in a discussion thread, refresh the browser after your insertion of the video.
See also:
Any reply can be marked as a Verified Answer, whether it was first marked as a Suggested Answer or not. There can be only one Verified Answer. The steps are slightly different depending on which version of SharePoint you are using.
|
SharePoint 2010:
|
||
| Decision | Action | Result |
| Mark a reply as the Verified Answer |
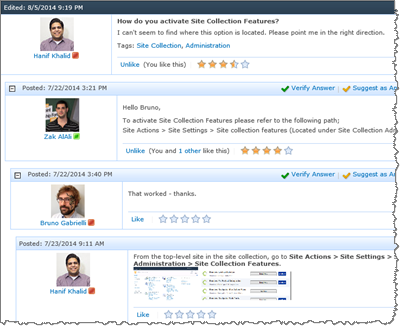
In the Forum view of the discussion board within the reply you want to verify, click on Verify Answer.
|
After you click Verify Answer, the post will be shaded yellow and your name will appear at the top of the replies to show that it was “Verified by [Your Name]”. The reply will also be moved to the top of the list, directly under the original post. If another post was previously marked as the Verified Answer, it will be unmarked and returned to its normal position in the thread.  |
| Suggest as Answer | To suggest a reply as an answer, in the Forum view of the discussion board within the reply, click on Suggest as Answer. |
After you click Suggest as Answer, the reply will be shaded green and your name will appear at the top of the post to show that it was “Suggested by [Your Name]”.
|
| Undo Verify as Answer | If you are the topic creator or a forum moderator and decide that the post is not really the answer, use Mark as Not Answer to remove the suggestion or click Verify Answer on a different post.  |
If the post had been a Verified Answer, it will be removed from the top of the list and returned to its normal position in the thread.
|
| Delete an Answer |
Discussion Board Plus uses the built-in SharePoint permissions to determine what actions a user can perform in a Discussion Board Plus list. For a description of permissions required to perform actions in forums, see Permissions in Discussion Board Plus. In addition to the default permissions provided by Discussion Board Plus:
|
|
|
SharePoint 2013:
|
||
| Decision | Action | Result |
| Mark a reply as the Verified Answer |
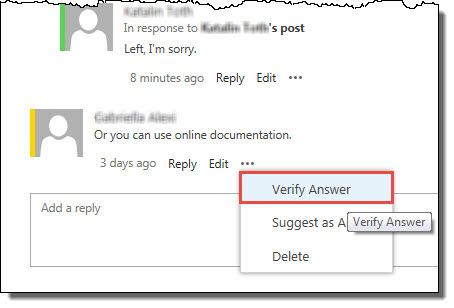
In the Forum view of the discussion board within the reply you want to verify, click on the ellipsis (…) and select the option Verify Answer in the Context Menu pop-up.
|
After you click Verify Answer, the post will be shaded yellow and your name will appear at the top of the replies to show that it was “Verified by [Your Name]”. The reply will also be moved to the top of the list, directly under the original post. If another post was previously marked as the Verified Answer, it will be unmarked and returned to its normal position in the thread. 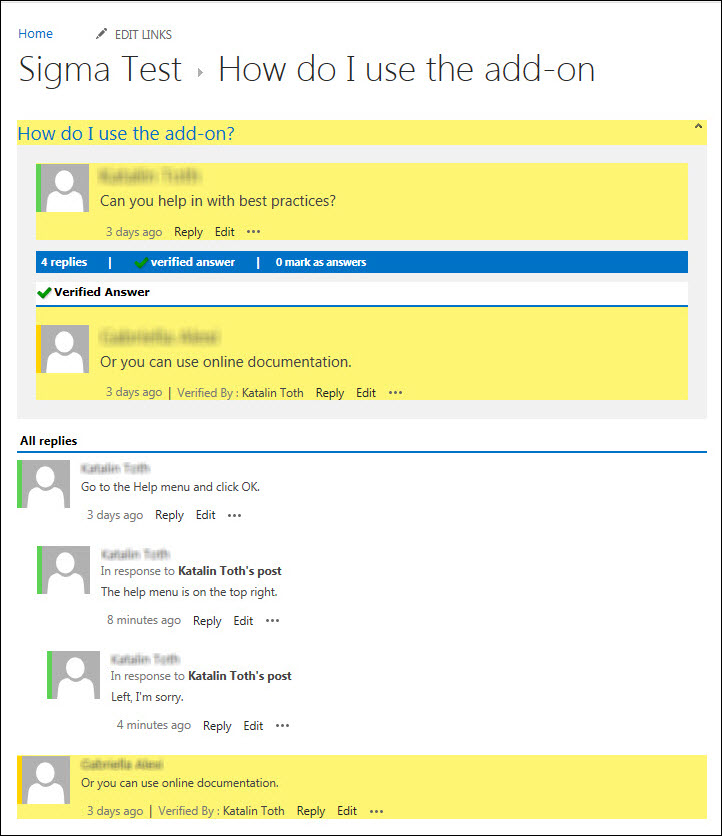 |
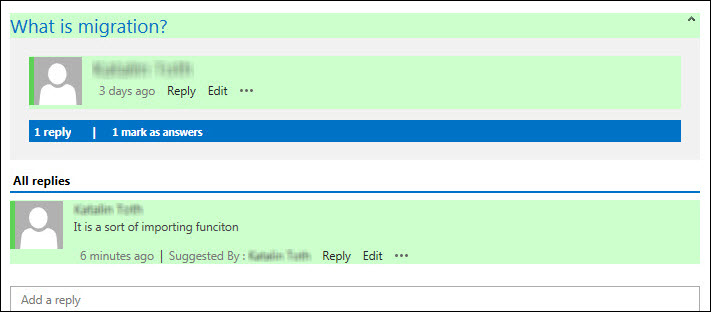
| Suggest as Answer | To suggest a reply as an answer, in the Forum view of the discussion board within the reply, click on the ellipsis (…) and select the option Suggest as Answer in the Context Menu pop-up.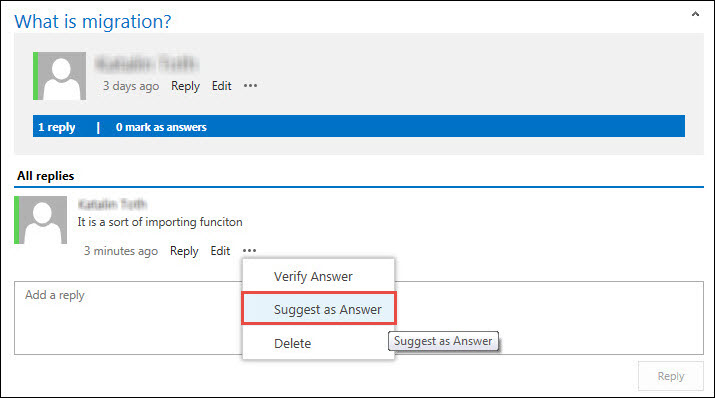 |
After you click Suggest as Answer, the reply will be shaded green and your name will appear at the top of the post to show that it was “Suggested by [Your Name]”.
|
| Undo Verify as Answer | If you are the topic creator or a forum moderator and decide that the post is not really the answer, use Unmark Verified Answer. Click on the ellipsis (…) within the reply you want to change and select the option Unmark Verified Answer in the Context Menu pop-up. | The post will no longer be highlighted yellow in the thread. |
| Delete an Answer |
Discussion Board Plus uses the built-in SharePoint permissions to determine what actions a user can perform in a Discussion Board Plus list. For a description of permissions required to perform actions in forums, see Permissions in Discussion Board Plus. In addition to the default permissions provided by Discussion Board Plus:
|
|
After you create a new Discussion Board Plus
application, you can start adding and replying to posts just like you would in an out-of-the-box SharePoint Discussion Board.
|
SharePoint 2010:
|
||
| Step | Action | Result |
| 1. | To add a new post, click New Item in the Items ribbon. By clicking the drop-down arrow, you can select to create a BambooDiscussion or a Discussion. | 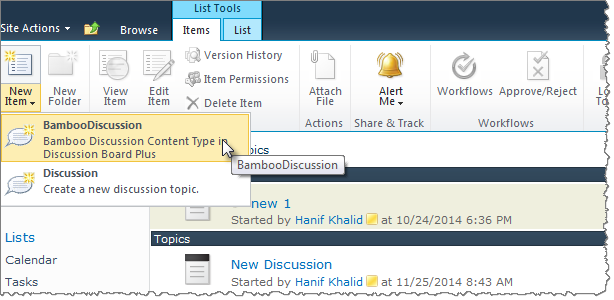 |
| 2. | To view all the posts in a topic (thread), click the Topic name. | 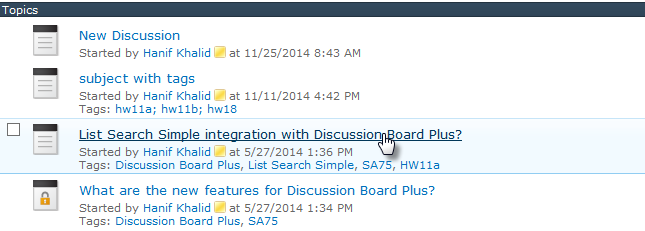 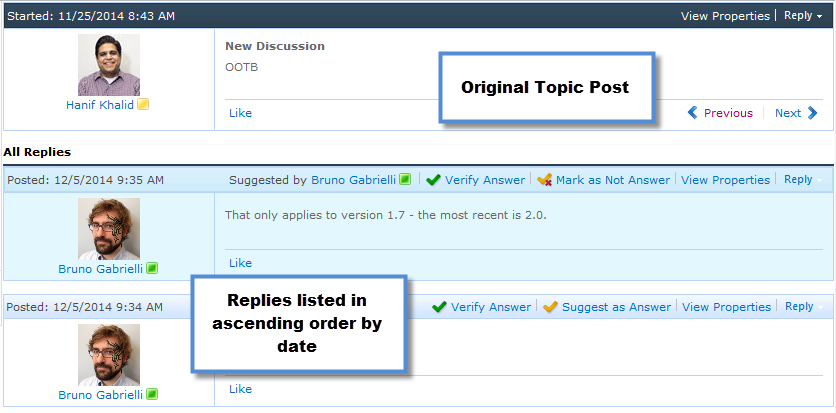 |
| 3. | To reply to a post, click the Reply in the top right section of the post.
Compose your reply and click Save. |
 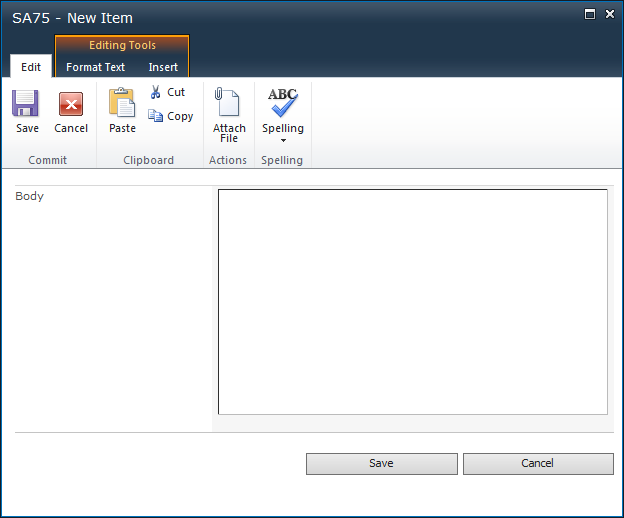 |
| 4. | To edit an existing post that you posted, click View Properties and select Edit Item in the View ribbon. |   |
| 5. | After editing your post click Save to save your changes or Cancel to return to the post unchanged. |
|
|
SharePoint 2013:
|
||
| Step | Action | Result |
| 1. | To add a new post, click the + new discussion link or click New Item in the Items ribbon. By clicking the drop-down arrow, you can select to create a BambooDiscussion, a BambooMessage, or a Discussion. | 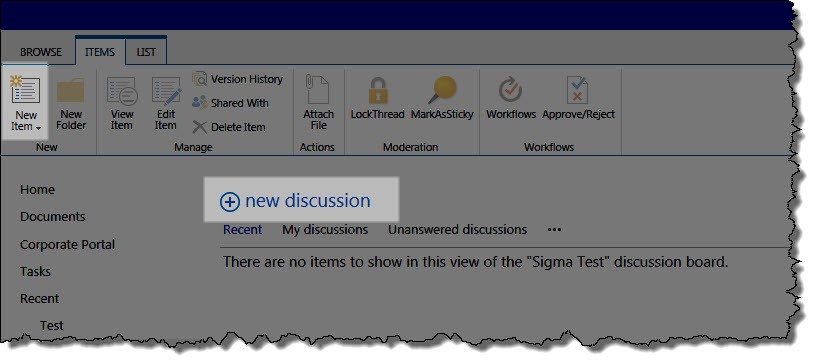 |
| 2. | To view all the posts in a topic (thread), click the Topic name. | 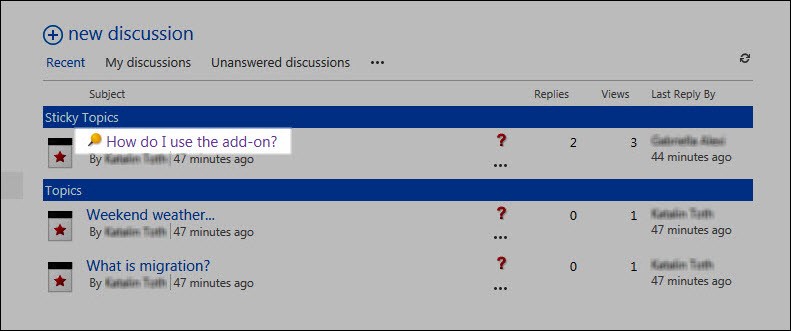 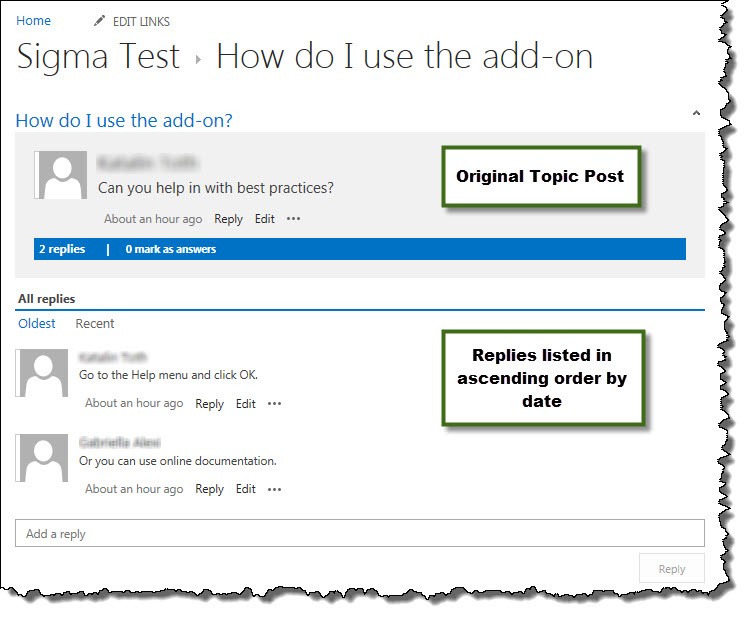 |
| 3. | To reply to a post, click the Reply in the ribbon under the topic owner’s name or click in the Add a reply field and start writing your reply. Click Reply and your reply is sent and appears in the thread. | 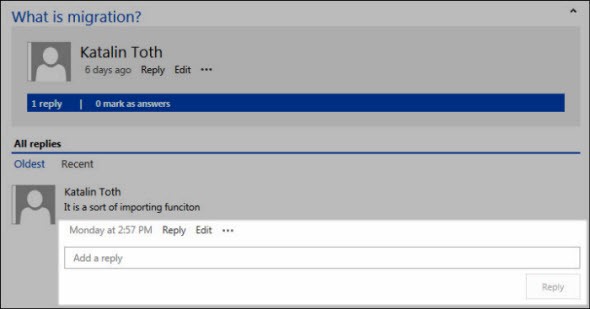 |
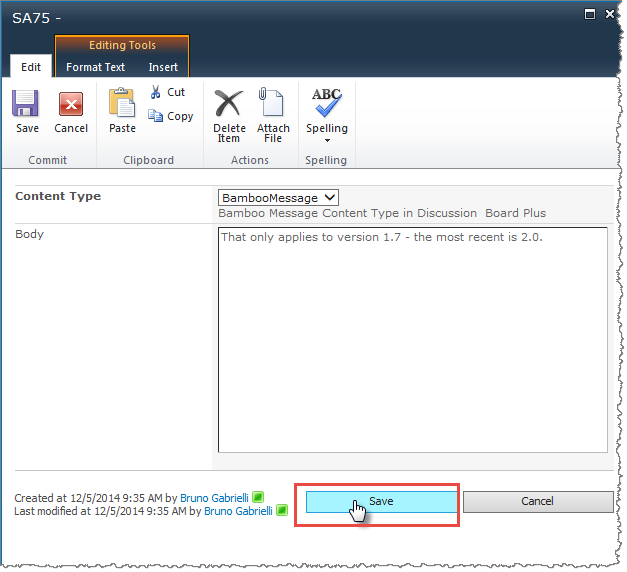
| 4. | To edit an existing post that you posted, click the topic name and click Edit in the ribbon under your name and start writing. | 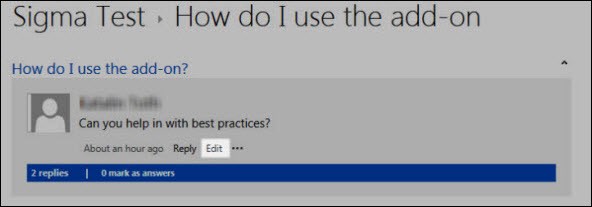 |
| 5. | After editing your post click Save to save your changes or Cancel to return to the post unchanged. |
|
See also:
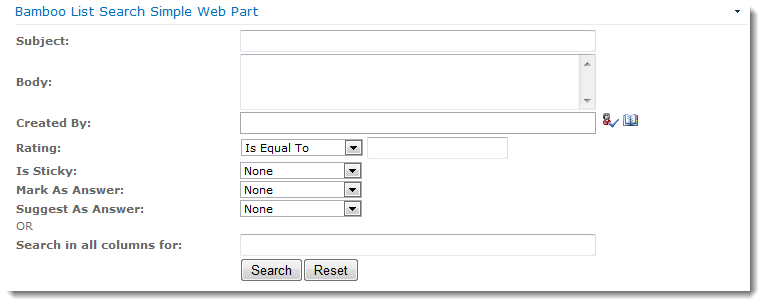
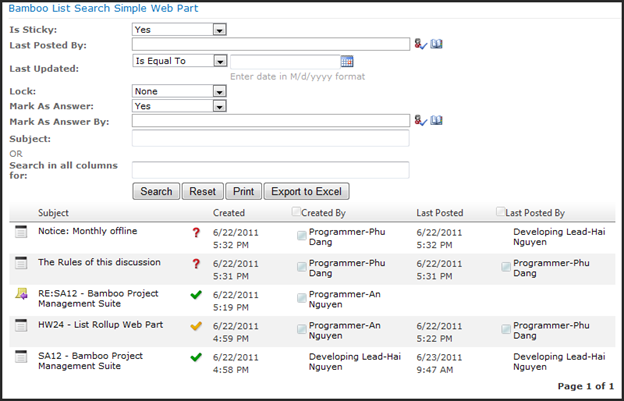
After successfully configuring List Search Simple Web Part, you are now ready to begin searching your Discussion Board Plus list. To search the posts in a Discussion Board Plus list, enter search words or phrases or select options in the List Search Simple Web Part and click the Search button. If Print and Export to Excel options are enabled for the List Search Simple Web Part, these options are displayed below the search criteria.
The following information describes how to use individual Discussion Board Plus search fields to obtain effective search results. For general search tips, including tips for combining search terms and using search operators, see How to Use the List Search Simple Web Part.
| Search Field | Search Tips |
|---|---|
| Subject | Searches the Subject field of discussion topics. A single result is returned for each matching topic; results are not repeated for individual replies in the thread. For search term tips, see Using the List Search Simple Web Part. |
| Body | Searches the Body field of all discussion posts. Results are returned for all posts that contain matches. For search term tips, see Using the List Search Simple Web Part. |
| Created By | Searches the Created By field of all discussion posts to identify topics and replies posted by a specific user. Enter a name and click the Check User button or use the Browse feature to search for a user. Note: You can only search for one Created By user. |
| Rating Column | Available if a Bamboo Rating column was added to the Discussion Board Plus list and the column was added to the Search Columns in the List Search Simple Web Part Settings. Can match topics or replies with ratings Equal To, Less Than, Greater Than, or Between the specified rating. |
| Is Sticky | When Yes, matches posts that are marked as Sticky. When No, matches posts that are not Sticky. |
| Mark as Answer | When Yes, matches posts that are Verified Answers. When No, matches posts that are not Verified Answers. |
| Suggest as Answer | When Yes, matches posts that are marked as Suggested Answers. When No, matches posts that are not Suggested Answers. |
| Search in all columns for: |
Available search option if the SharePoint Search service is configured and the option to Allow search in all columns is checked in the List Search Simple Web Part Settings. Search terms entered in the Search in all columns for field will be matched in any Discussion Board List column. Entering search terms here overrides any search criteria entered in other fields. For search term tips, see Using the List Search Simple Web Part. Note: For an item to be found using a Search in all columns for search, you must also be able to find it in SharePoint Search. |
After you click Search, search results are displayed using a view optimized for Discussion Board Plus.
The following columns are included in the search results:
| Result Field | Description |
|---|---|
| Topic/Reply icon |
Indicates whether the search result is a topic
|
| Subject |
Click on a Subject link to display the entire discussion thread.
Click the item drop-down menu for the result to display additional options for the topic or post. |
| Status | Indicates whether the post has been Suggested as Answer |
| Created By | Displays who entered the topic or reply. |
| Last Posted | Displays when a reply was last posted for the topic (topic results only). |
| Last Posted By | Displays who posted the last reply to the topic (topic results only). |
Discussion Board Plus provides a default view for the topic list (Forum view) and two different views for discussion threads. Click on a view name for more details about each view.
Thread view provides the same features as Flat view, with one difference: In Thread view, posts are displayed in a nested view.
NOTE: Thread View available in SharePoint 2010 only at this time.
Replies to a parent post are listed as child posts.
A Verified Answer is listed immediately after the original post, no matter when it was originally posted.
As with Flat view, the original post in the thread will always be listed at the top.
Return to: Using Views in Discussion Board Plus
| Return to Overview of the Configuration Toolpane |
|---|
Discussion Board Plus uses the built-in SharePoint permissions to determine what actions a user can perform in a Discussion Board Plus list. We’ve divided up the sections of Discussion Board Plus to provide you a helpful way to understand the variations in permissions and settings for the tool.
The table below describes the permission or permission level required to perform each action.
| Discussion Board Plus Action | ||||
| Verify Answer | ||||
| Move Topic | ||||
| Suggest as Answer | ||||
| Mark as Not Answer | ||||
| Lock/Unlock Topic | ||||
| Mark/Unmark Topic as Sticky | ||||
| Access Forum Settings | ||||
| Edit/Reply | ||||
| After topic is locked: Edit/Reply/Suggest or Verify Answer/ Mark as Not Answer |
||||
| After topic is locked: Mark or Unmark as Sticky/Unlock Topic |
||||
1The user who created the topic (does not apply to anonymous users).
2SharePoint site collection administrators.
*Yes, if the creator has the Manage Lists permission, Full Control permission level, or is a site collection administrator.
**Yes, if the user suggested or verified the answer originally.
***Yes, if the user has the Edit Items permission.
To set up your own SharePoint permission levels to use with Discussion Board Plus, refer to the following information from Microsoft: Edit, create, and delete permission levels.
| Discussion Board Plus Action | ||||||
| Create Topic | ||||||
| Share With | ||||||
| Access Topic | ||||||
| Get Alert Notification |
*Yes, if the user has Full Control permission level.
**Yes, alert sent to the Recipients only.
| Discussion Board Plus Action | ||||||
| Create Reply | ||||||
| Access Reply | ||||||
| Get Alert Notification |
| Discussion Board Plus Action | |||
| Is a Locked Topic? | |||
| Is a Sticky Topic? | |||
| Is a Private Topic? | |||
| Contains a Private Reply? | |||
| Inherits List Permissions from Parent? | |||
| Inherits Site Permissions from Parent? | |||
| Forum Settings | |||
| Verify Answer | |||
| Suggest as Answer | |||
| Tagging | |||
| Like | |||
Forums use the general permissions by default. And in addition to the permissions provided by Discussion Board Plus, please note the following for Community Central forums:
Community Central uses the default SharePoint settings to determine who can perform actions in a blog site. For a list of default permissions for basic blog actions, see the table below. For information about customizing blog site permissions, see the following article:
Configure permissions and settings for a blog (From office.microsoft.com)
| Blog Action | Users |
||||
| Read Blog Posts and Comments | |||||
| Create Blog Posts | |||||
| Edit Blog Posts | |||||
| Add Comments | |||||
| Edit Comments | |||||
| Approve Blog Posts and Comments | |||||
| View Draft Posts and Pending Comments | |||||
| Manage Blog Categories |
* Members can edit any blog post or comment by default (not just their own post/comment).
1. Allow visitors and anonymous users to add comments by modifying list permissions.
** Members can view their own draft posts and comments pending approval, but not posts/comments created by other Members.
By default, anonymous access is not enabled in SharePoint 2013. SharePoint administrators may want to enable anonymous users to have access to Community Central content without having to provide authentication credentials. Anonymous access is permitted or denied based on the permissions for the site. Additional configuration is needed for anonymous users to access Community Central content.
For example:
For more information about configuring SharePoint for anonymous access, see:
Alternatively, you can configure SharePoint for anonymous access for forms-based authentication where the accounts can be created from the database. For more information on configuring anonymous users for forms-based authentication, see:
See also:
If enabled by your site admin, you can a topic from one Discussion Board Plus list to a different Discussion Board Plus list.
| Step | Action | Result |
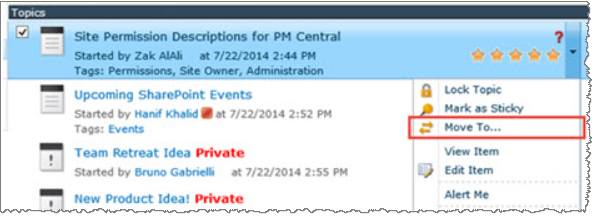
| 1. | In the Forum view of the discussion board, select the topic you want to move. |
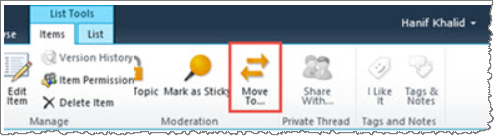
In the Items ribbon or from the item drop-down menu, select Move To.
|
| 2. | In the Items ribbon or from the item drop-down menu, select Move To and enter the Site URL of the Discussion Board Plus List to which the topic will be moved. | 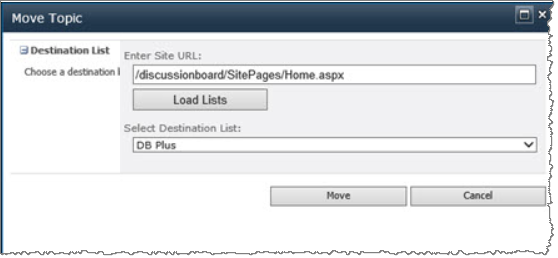 |
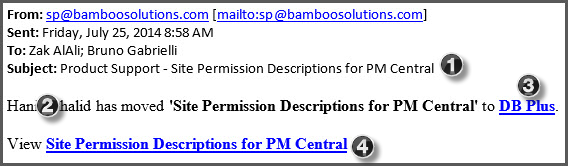 Moving a topic triggers an email alert to the topic’s author and participants.
The body of this email contains the following information:
NOTE: An alert is not sent to users who rated content or marked answers but did not post a reply in the discussion thread. If you do not have the required permissions to move a topic or if the Move Topic feature is not enabled in the Forum Settings, you will not see the option in the ribbon or item menu.
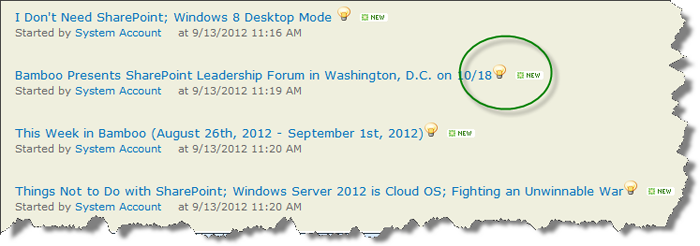
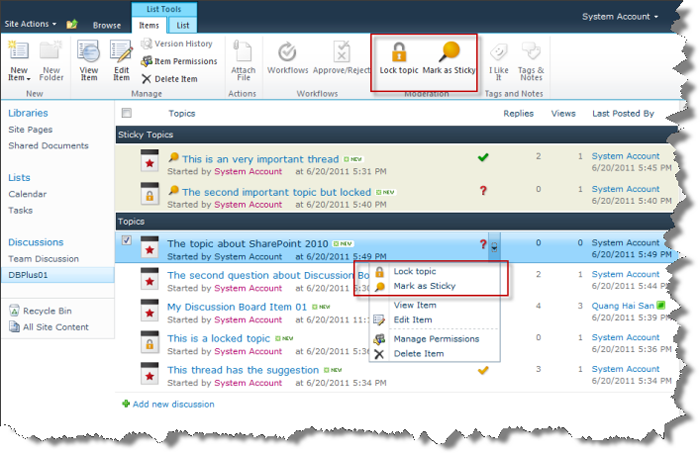
You can view the status of a topic at a glance via the icon or tooltips
| Topic Status | ||||||
 |
 |
|||||
| Moderation | ||||||
 |
 |
 |
 |
 |
||
| Post Status Indicators | ||||||
| Highlight Multiple Replies as Suggested or Verified * | ||||||
|
 |
 |
 |
|||
| Multiple Rating Options | ||||||
 |
 |
 |
 |
|||
| Topic Navigation* | ||||||
Move between topics using the Previous and Next functions:  |
||||||
| Pagination* | ||||||
Navigation across forums or threads with clickable page numbers:  |
||||||
When you install Discussion Board Plus for SharePoint, List Search Simple is also installed.
List Search Simple lets you configure a search page for your Discussion Board Plus list so users can search discussion board posts for relevant content. The search page is not created automatically. Follow the instructions below to configure and use List Search Simple to search Discussion Board Plus for SharePoint lists.
| Step | Action | Result |
| 1. | Follow the instructions for Adding the List Search Simple to a Page. You can add the Web Part to any page in the same Web application as Discussion Board Plus for SharePoint. | |
| 2. | Edit the Web Part and click List Search Simple Settings button. | 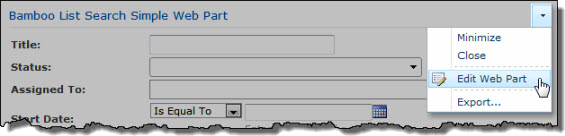 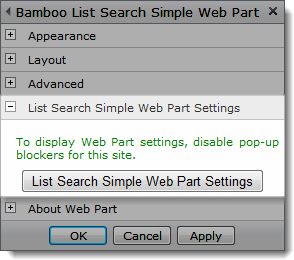 |
| 3. | In the List Search Simple Settings page, click the Search Criteria Configuration tab. | 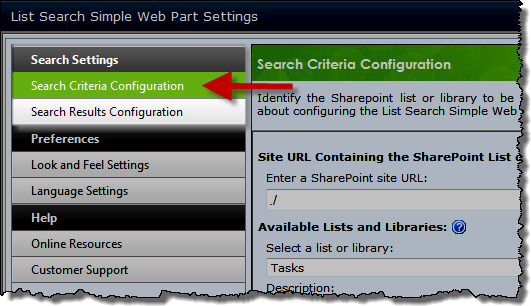 |
| 4. | In the Enter a SharePoint site URL box, type the path to the SharePoint site that contains the Discussion Board Plus list you want to search. The Discussion Board Plus list can reside in the same site, a different site, or a site in another site collection, as long as it is in the same Web application. Site URLs can be absolute (http ://servername/site) or relative (./site). Bamboo recommends using a relative URL if the Web application has multiple access points using Alternative Access Mappings (AAM) or if the Web Part will be saved as part of a site template. | |
| 5. | Click the View Lists and Libraries button to populate the Available Lists and Libraries drop-down list. | |
| 6. | In the Select a list or library drop-down list, select the Discussion Board Plus list you want to search. | 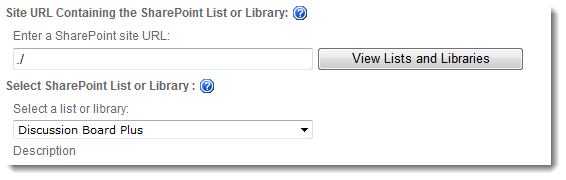 |
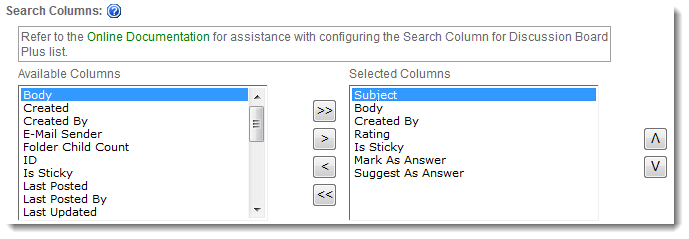
| 7. | In the Search Columns section, select the following columns and click the > button to move them to the Selected Columns list. Hold down the CTRL key to select multiple columns. To reorder how the columns are displayed in the List Search Simple search page, click on a column name and click the up or down arrow. |
|
| 8. | Review the remaining settings in the Search Criteria Configuration tab. For more information about each setting, see the Search Criteria Configuration section of Configuring the List Search Simple. | |
| 9. | Click the Search Results Configuration tab. The Search Results Display settings are preconfigured for optimal performance with Discussion Board Plus lists and cannot be changed. Review the Search Result Options and make any changes to options available when viewing search results. For more information about each setting, see the Search Results Configuration section of Configuring the List Search Simple. | 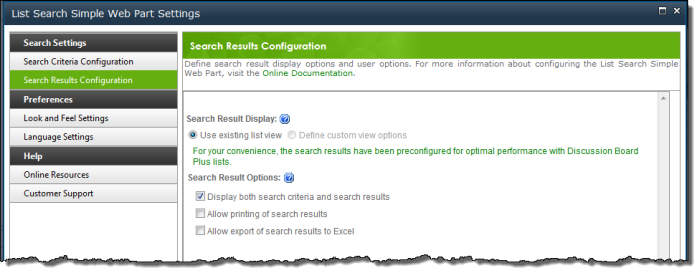 |
| 10. | When you have reviewed all settings, click Save & Close in the List Search Simple Settings page. Click OK in the Web Part tool pane. | List Search Simple is now configured and ready to search the Discussion Board Plus list. |
Discussion Board Plus is a useful tool for enhancing collaboration and sharing information in SharePoint without bombarding your team with email. We recognize, however, that the default HTML output of Discussion Board Plus may not meet the needs of all companies. For this reason, Bamboo provides the ability to modify the layout and information displayed to meet your business needs. By modifying the CSS file, you can make a variety of changes, including, but not limited to: text color; change location between text and symbol; and embed an image/icon. Below are a few illustrations of how you can control styling and HTML output in Discussion Board Plus by modifying the CSS and XSL files.
| Step | Action |
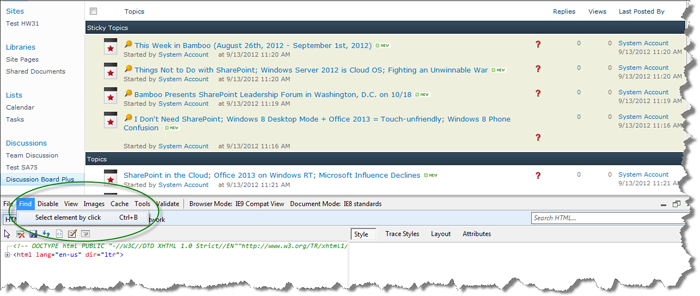
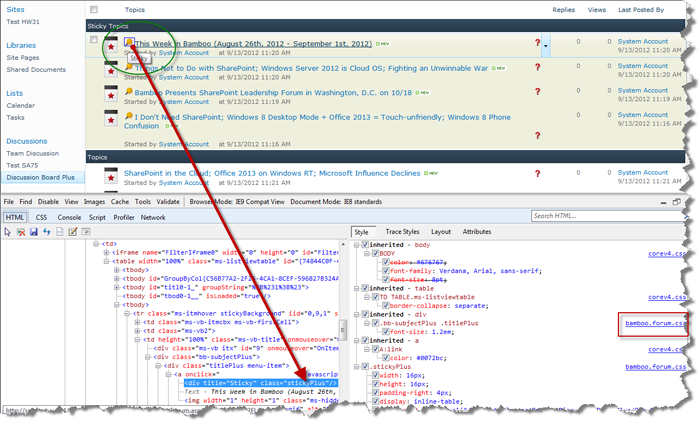
| 1. | From the Discussion Board Plus list, press F12. In the Menu bar, choose the Select element by clicking an item menu. This means the HTML page will automatically focus on the element when you click on any location in the Discussion Board Plus list.
|
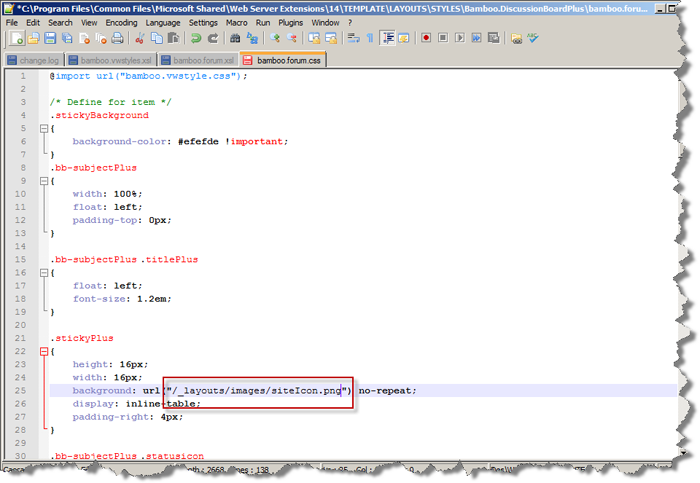
| 2. | In the screen shot here, note the HTML page is highlighting the Sticky element. Remember to copy the class name for later use. The class name can be found near the CSS file name on the Style pane.
For example: class = “stickyPlus” with bamboo.forum.css |
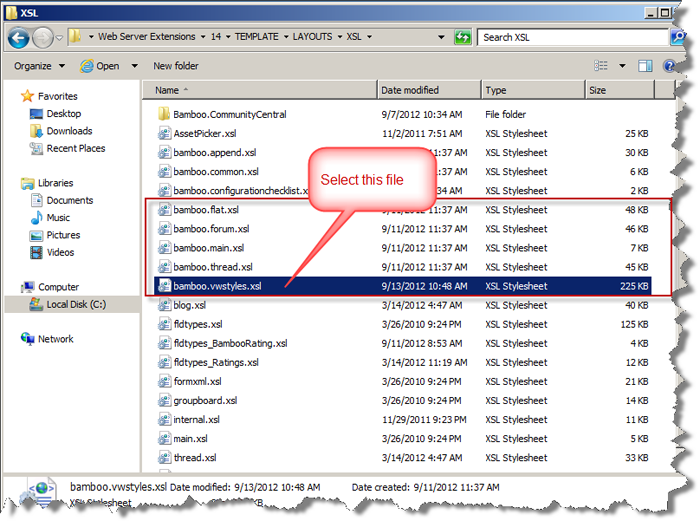
| 3. | Next, you need to go to C: Program FilesCommon FilesMicrosoft SharedWeb Server Extensions14TEMPLATELAYOUTSXSL, where you will find some XSL files related to the Views in Discussion Board Plus list, including: bamboo.flat.xsl; bamboo. append.xsl; bamboo. forum.xsl; bamboo.thread.xsl, and bamboo.vwstyles.xsl.
From there, open the bamboo.vwstyles.xsl file and find the class name = “stickyPlus”
|
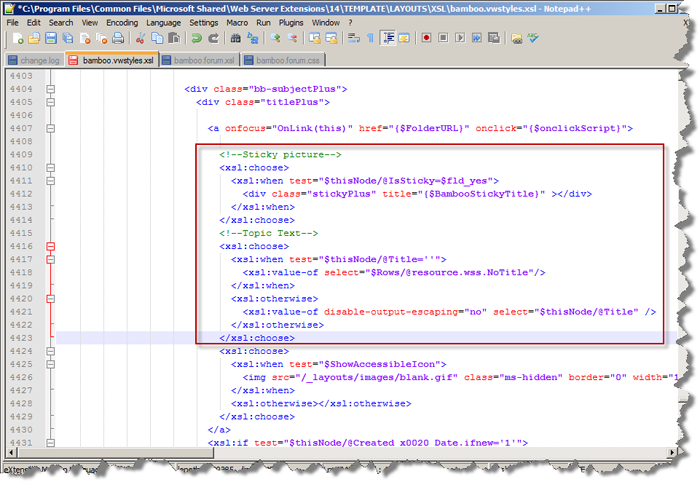
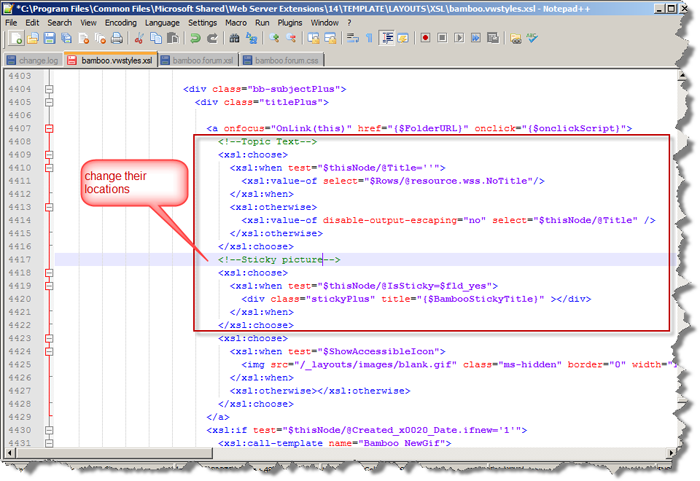
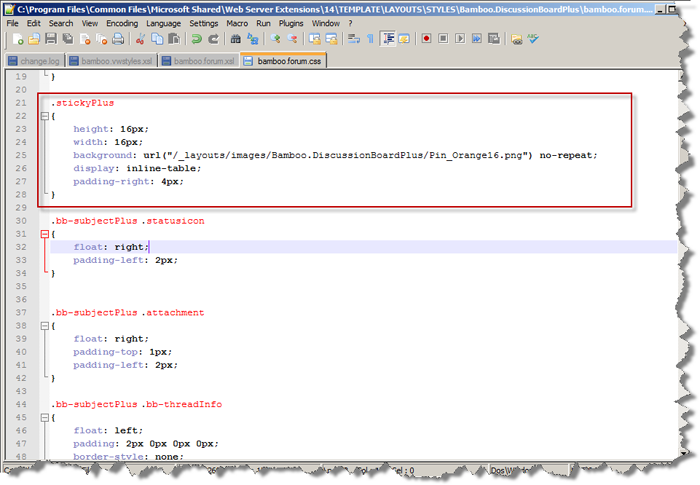
| 4. | We have 2 locations for class name = “stickyPlus”; you can change the location between text and symbol for them as shown here.
Before changing:
After changing:
|
| 5. | Remember to run the iisreset command line in Command Prompt program:
|
| 6. |
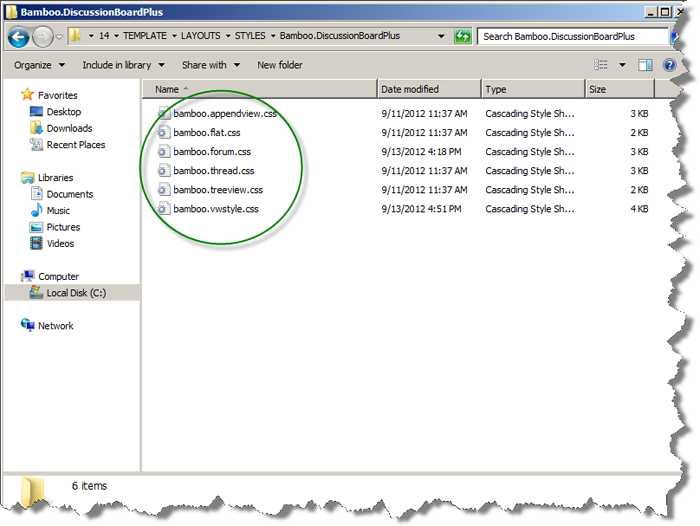
Go to your site and click refresh page, and you will see your changes. You will see some CSS files related to the Views in Discussion Board Plus including: bamboo.flat.css; bamboo. append.css; bamboo. forum.css; bamboo.thread.css, and bamboo.vwstyles.css files. For class name = “stickyPlus”, we have the related bamboo.forum.css file.
|
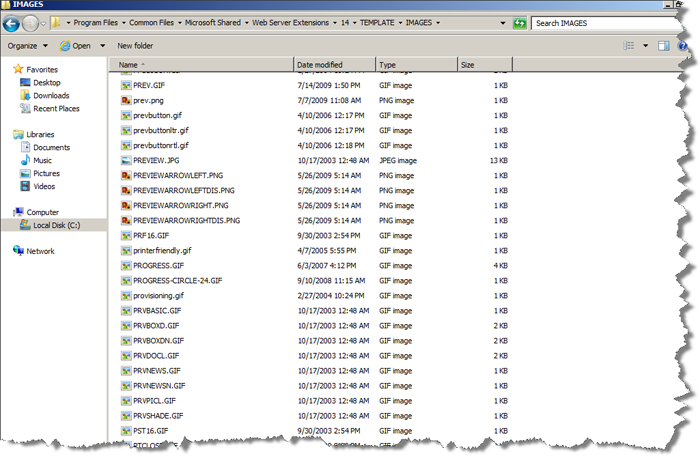
| 7. | If you want to change the Symbol, go to “C: Program FilesCommon FilesMicrosoft SharedWeb Server Extensions14TEMPLATEIMAGES” where you can choose an image and copy the path into CSS file.
After the change:
|
| 8. | Remember to run the iisreset command line in Command Prompt:
|
| 9. | Now, go to your site to see your changes:
|
Enabling Auto Subscribe allows Discussion Board Plus authors to receive notifications when a new topic is created and when current posts receive a reply. Turning this feature ON will alert authors who participate in the discussion when there is a new post or new reply.
Auto Subscribe enables three types of notifications:
The table below identifies discussion board actions and the corresponding email recipients when Auto Subscribe is enabled:
| Action | Alert Recipient(s) |
| A new topic is created | The post creator |
| A reply is posted | The post creator and the author of the reply |
NOTE: Only an Author* receives Auto Subscribe alerts.
See Also:
Microsoft TechNet for additional help for settings and using alerts.
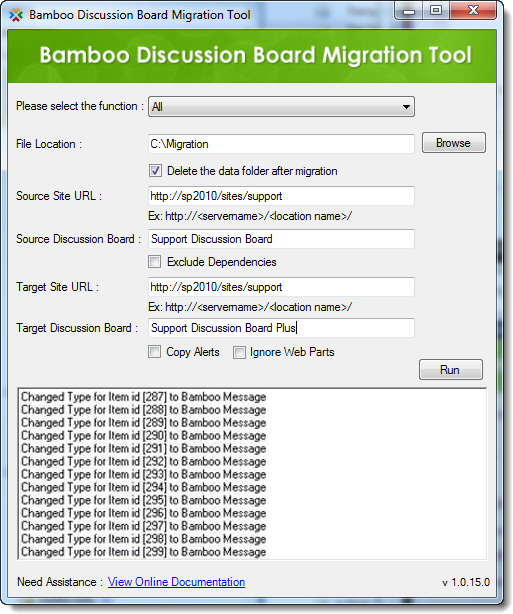
The All function in the Migration Tool exports existing SharePoint Discussion Board data and then imports it into a Discussion Board Plus list. This option is appropriate for most migration scenarios.
| Step | Action |
| 1. | In the Discussion Board Plus Migration Tool, select the All function. |
| 2. | WARNING: Use this option with caution. Users who have alerts configured on the old discussion board will get new alerts when posts are copied to the new discussion board. SharePoint treats the new copy of the discussion board posts as “changed” or “new”. For large discussion boards, this could generate hundreds or thousands of alert e-mails!
|
| 3. | After completing all migration settings, click Run to begin the migration.
|
| 4. |
The migration tool will export all data from the existing SharePoint Discussion Board list and import it into the target Discussion Board Plus list. SharePoint Alerts are also copied if the Copy Alerts option was checked. Migration results are displayed in the Migration Tool status window and are also logged to a file in the folder you specified in the File Location setting.
|


 or a reply
  .
.