Examples of Request Approval Widget
Sample Request Approval Workflow and Tasks
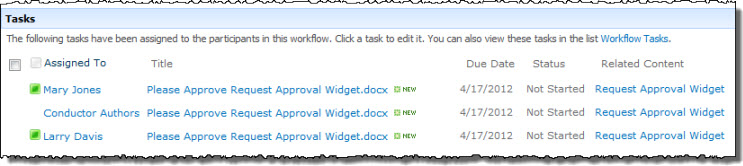
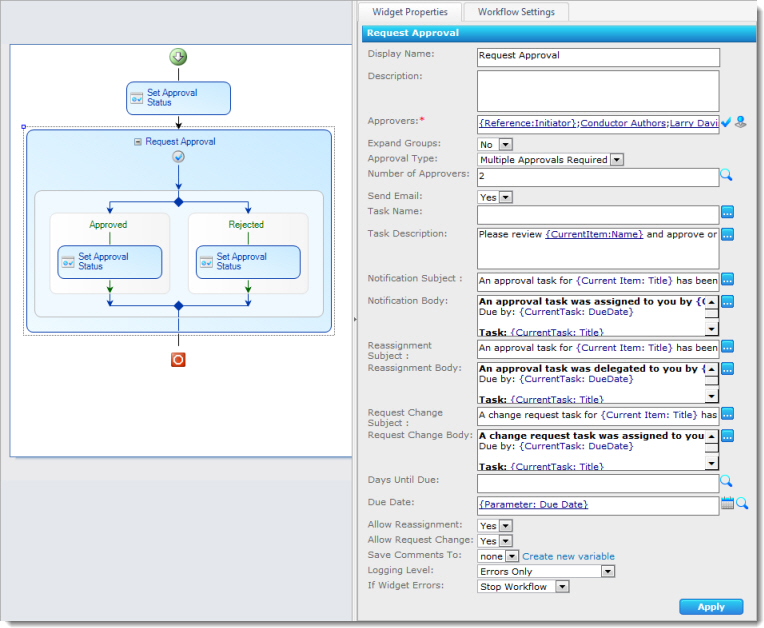 The screenshot here shows a configured Request Approval workflow with the following properties:
- One Reviewer name is a lookup to the workflow initiator.
- One Reviewer is a SharePoint group, which will NOT be expanded – only one task will be assigned for the group.
- Multiple approvals are required.
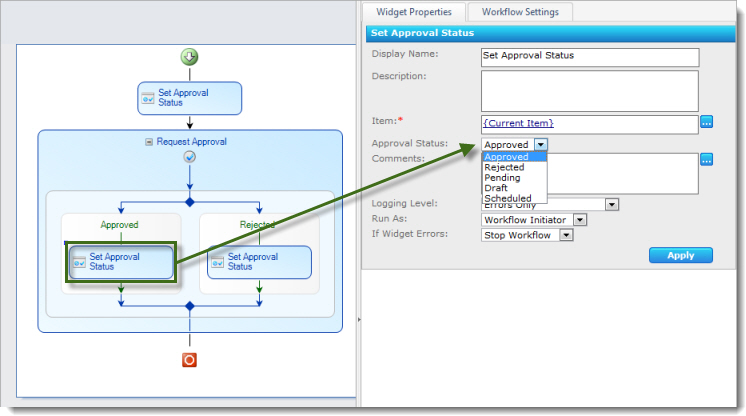
- Throughout the workflow, an Approval Status column is updated to show the item status depending on the path of the workflow.
- The Task Description includes lookups to the list item Name and a workflow initialization form variable. This description will be included in the body of the task notification e-mail, which uses default text configured in the global E-mail Settings.
- The Task Due Date will be set to a due date collected in a workflow initialization form variable.
- Reassignment and Request Change are allowed.
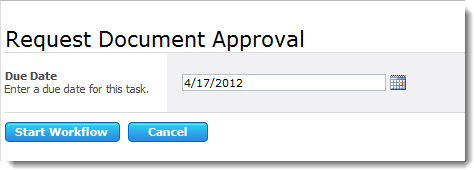
When this workflow runs, the workflow initiator is prompted to enter a Due Date for the task using a workflow initialization form configured with the workflow. For details on configuring workflow initialization forms, see the Workflow Forms section.
After the workflow initiator enters a Due Date, the workflow starts by updating the Status of the item to Pending using the first Update Item widget in the workflow, and then assigns tasks to the workflow initiator, the SharePoint group, and other Approvers assigned in the widget.

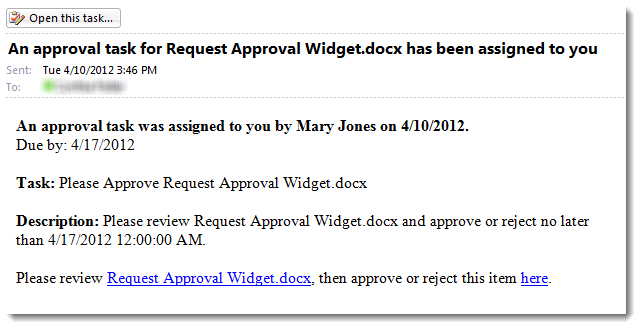
In this example, e-mail notifications are sent to each person or group assigned an approval task.
Each approver now has the option to complete the approval task and provide comments in the task form. In this form, an approver has the following options:
- Approve the item by entering comments (optional) and clicking Approve.
- Reject the item by entering comments (optional) and clicking Reject.
- Reassign the task to another user using Reassign Task (see the Reassign Task topic for more details).
- Create a new task for the item using Request Change (see the Request Change section for more details).
- Cancel and do nothing at this time.
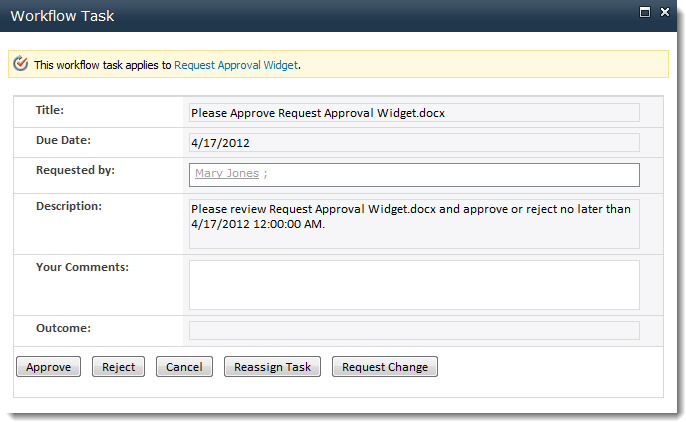
NOTE: If you have Workflow Conductor 2.5 or higher and InfoPath Forms Services, you can customize this task form.
During this particular workflow instance, the following events occur:
- Approver and workflow initiator Mary Jones uses the Request Change option to assign a task to user Sue Brown. Mary’s original task is marked Completed.
- Bob Smith, a member of the Conductor Authors group, Reassigns the Conductor Authors task to John Adams. The Conductor Authors task is marked Completed.
- John Adams completes the task Reassigned to him by Bob Smith, and approves the item.
- Sue Brown completes her Change Request task, and a new task is automatically created for Mary Jones.
- Mary Jones completes her task and approves the item.
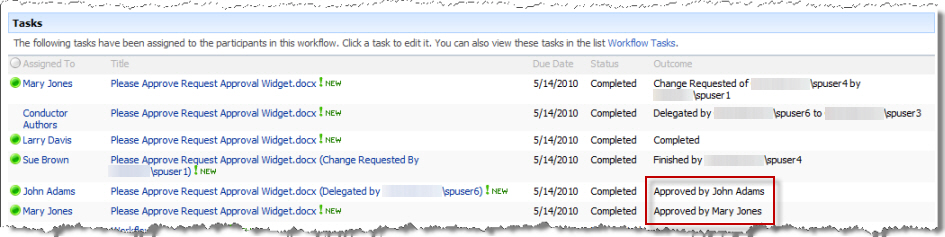
- The Status column for the item is updated to Approved by the Update Item widget in the Approved branch of the Request Approval widget.

When the widget finishes running, the workflow initiator is sent an e-mail notification that includes a summary of any comments entered by the approvers.
Examples Using Update Item Widget
Updating Fields in the Current Item
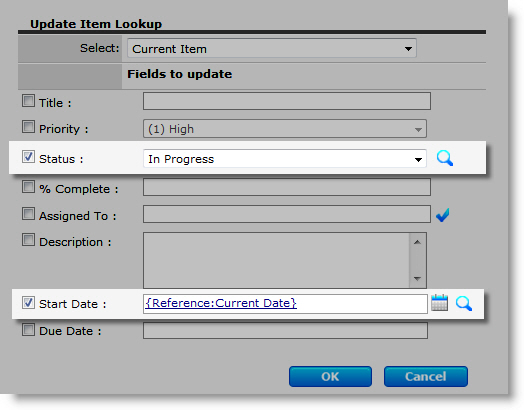 This screenshot shows the Update Item form configured to update two fields in the current item:
Updating a Field in Another List
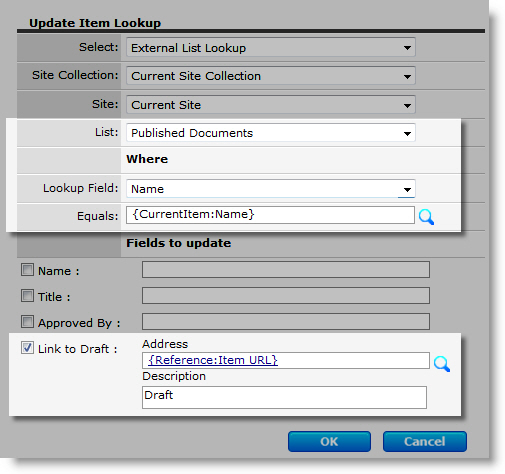 This example shows an Update Item widget that is part of a workflow that approves documents in a Draft Documents library and copies them (using the Copy Item widget) to a library called Published Documents.
To provide a link back to the item in the Draft Documents library, a field called “Link to Draft” in the Published Documents library is updated using an Easy Reference lookup to the Draft Document item URL.
Return to:
Widget Properties
Lists and Items Widgets
See Also:
Example Using Subscribe User Alert Widget
Create Alert for New Task Item
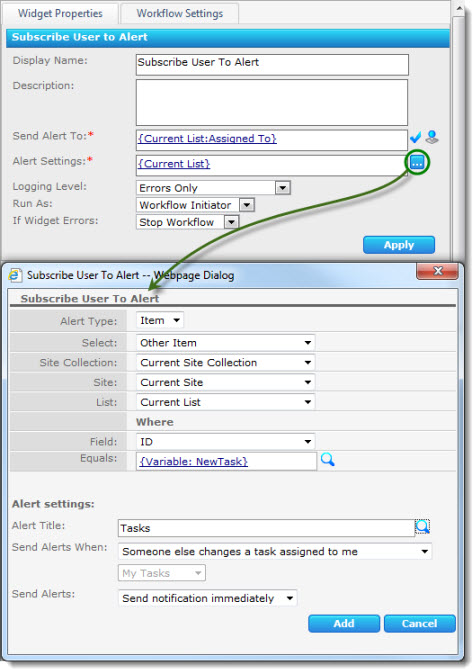 This example creates an alert for a task item created earlier in the workflow.
The alert is created for the person assigned to the new task, and the alert is sent anytime the task is changed by someone other than the Assigned To user.
The alert item is specified using a lookup to the workflow variable containing the new item’s ID, which is assigned in the Create Task widget.
Return to:
See Also:
Example Using Set Field Value Widget
Update Assigned To Field to Workflow Initiator
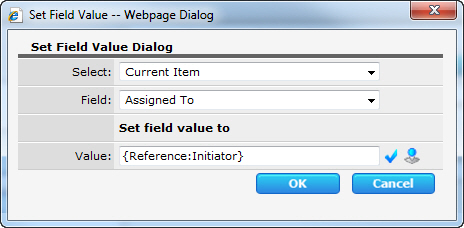 The example below shows a Set Field Value widget configured to set the “Assigned To” field for the current item in a Task list to the workflow initiator using an Easy Reference lookup:
Return to:
Widget Properties
Lists and Items Widgets
See Also:
Example Using Run Parallel Widget
The sample workflow below shows a Run Parallel widget used to allow two Request Approval widgets to run at the same time.

Return to:
Run Parallel Widget
Workflow Logic Widgets List
See Also:
Example Using Log to History Widget
Logging Workflow Outcome
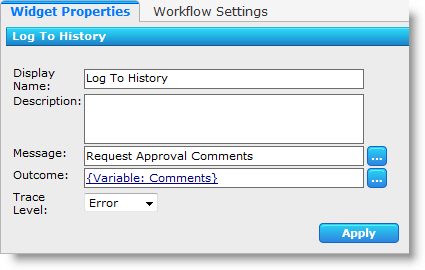 The Log History widget below is configured to log the comments entered by participants in a Request Approval workflow, which were captured in a workflow variable.

Return to:
Widget Properties
Lists and Items Widgets
See Also:
Example Using Move Item Widget
Move Item to a Department Archive Site
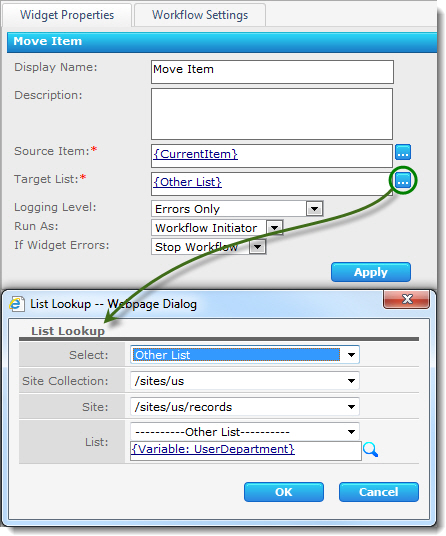 The Move Item widget shown below is configured to move an item to an archive library for the user’s department.
The department library name is a lookup to the workflow initiator’s SharePoint user profile Department value, stored in a workflow variable by the Get User Info widget.
Return to:
Widget Properties
Lists and Items Widgets
See Also:
Example Using Delete Item Widget
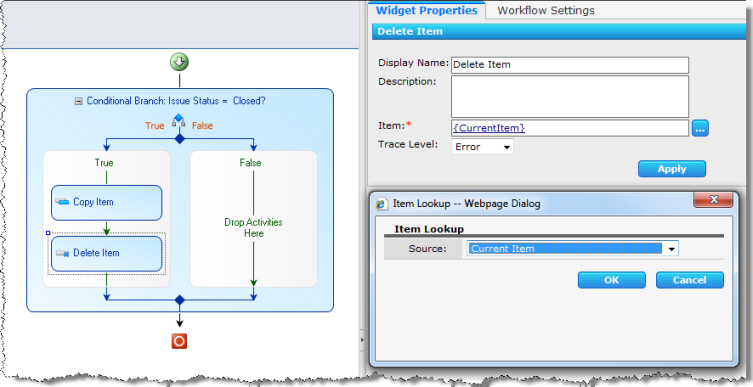 This example shows the Delete Item widget configured to delete the current item as part of a workflow that archives an item in an Issues list to another location when it is marked Closed.
Return to:
Widget Properties
Lists and Items Widgets
See Also:
Example Using Delete List
Delete List Named in Workflow Variable
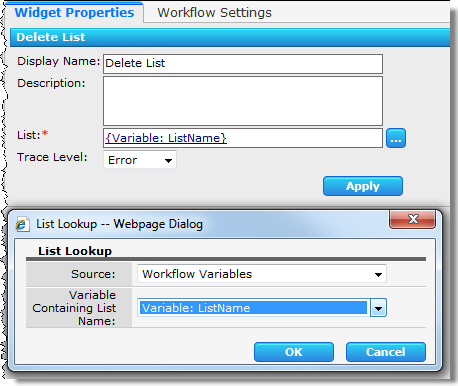 The example here shows a Delete List widget configured to delete a list that was created during the same workflow with a Title stored in a workflow variable:
Return to:
Widget Properties
Lists and Items Widgets
See Also:
Example Using Discard Check Out
Discard Check Out for Current Item
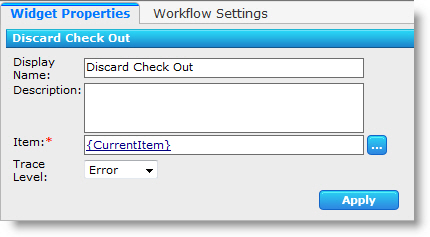 When you drop a Discard Check Out widget to the Studio diagram, it is already pre-configured to discard check out for the current item, as shown here:
Widget Properties
Lists and Items Widgets
See Also:
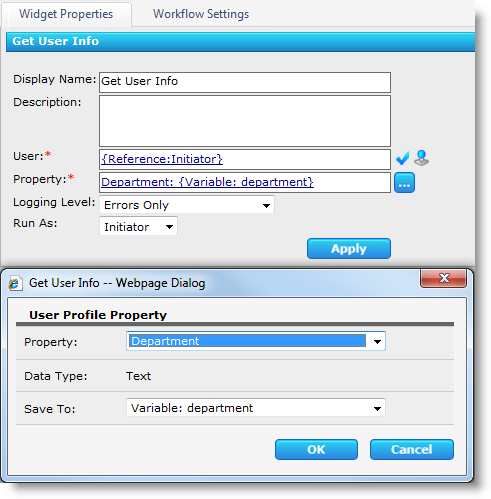
Example Using Get User Info Widget
The Get User Info widget retrieves a single SharePoint user profile property for a user and stores it in a workflow variable.
Notes for MOSS Users: This widget uses the MOSS User Profile Account property in the Workflow Conductor Control Panel > Account Settings page. This setting specifies a user account that has the Manage User Profiles Shared Services right in Shared Services Administration > Personalization services permissions.
This account is used to access the SharePoint User Profile Properties list.
Access to specific user profile data is security trimmed at runtime based on the permission of the user account configured for the widget in the Run As property.
Notes for WSS Users: The widget will retrieve profile data from the User Information List in the current site collection. Access to SharePoint user profile data is security trimmed at runtime based on the permission of the user account configured for the widget in the Run As property.
Return to:
Widget Properties
User & Group Management Widgets
See Also:
Example Using Check In Widget
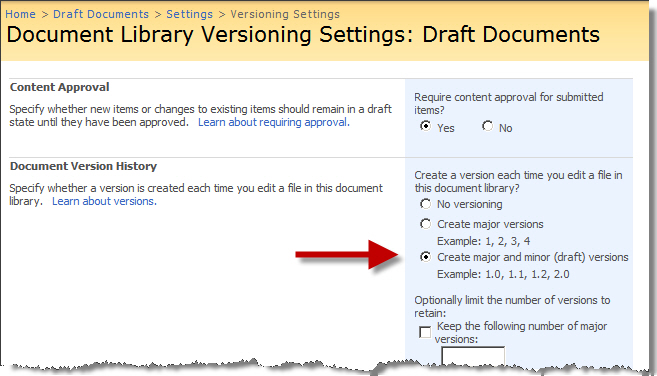
Check In a Major Version of a Document
The Check In widget here is configured to check in a major version of the current item to a document library configured for versioning.
Return to
Check In Widget
Lists and Items Widgets
See Also:
Example Using Create List Widget
Create a List in the Current Site
|
This example shows a Create List widget configured to create a Discussion Board in the current site to discuss content for a new version of a document as part of a feedback workflow.
The list Title and Description contain lookups to the Title and Version of the current item.
|
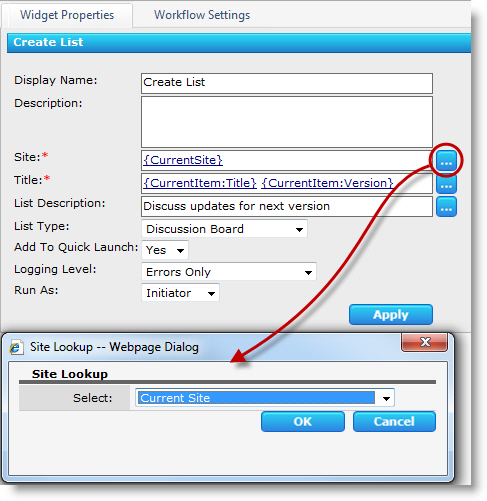 |
Create a List in Another Site
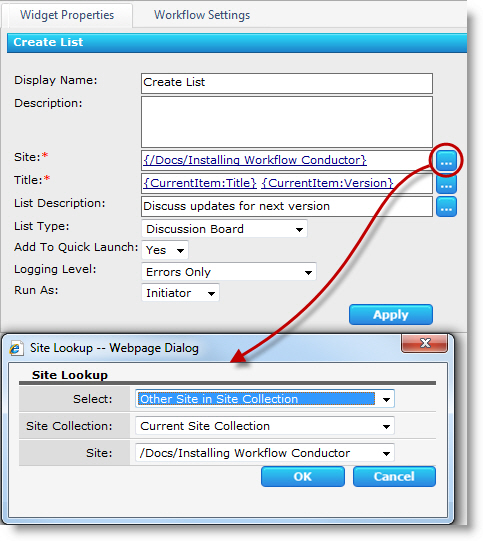 Here, the same widget is configured to create the list in a Document Workspace site instead of the current site.
Return to:
Widget Properties
Lists and Items Widgets
See Also:
Example Using Complete Task Widget
 Completing a Task Created in the Same Workflow
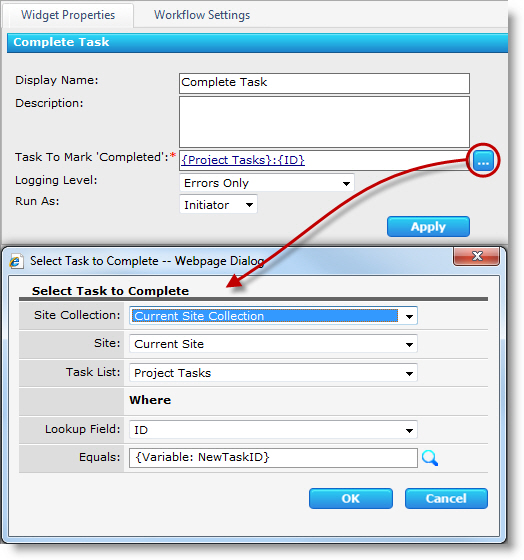
The following example shows a Complete Task widget configured to complete a task that was created earlier in the workflow.
The task is identified using the workflow variable the task ID was saved to by the Create Task widget.
Return to:
Complete Task
Lists and Items Widgets
See Also:
Example Using Create Task Widget
Creating a Task in a Project Task List
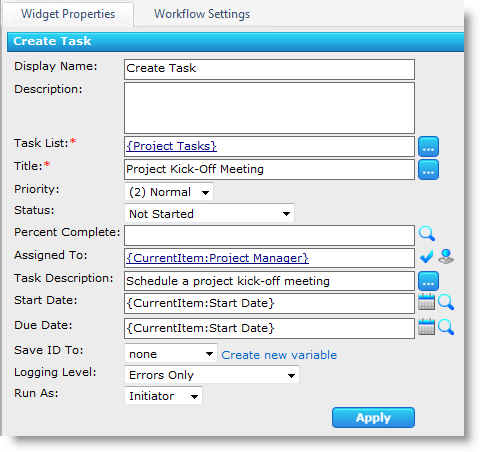 In this example, a workflow creates a series of tasks in a Project Tasks list when a new entry is added to a project tracking list.
The screenshot here shows a Create Task widget configured for one of the tasks created by the workflow.
Return to:
Widget Properties
Lists and Items Widgets
See Also:
Example Using Create Column Widget
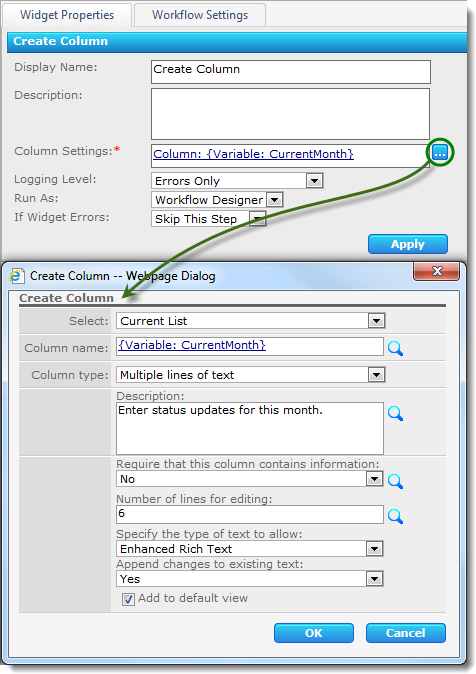 The example here shows a Create Column widget used to create a new column for monthly status updates.
If the column already exists, the widget is configured to skip the step using the If Widget Errors property. The current month can be calculated using a Calculate widget.
Return to Create Column
See Also:
Example Using Copy Item Widget
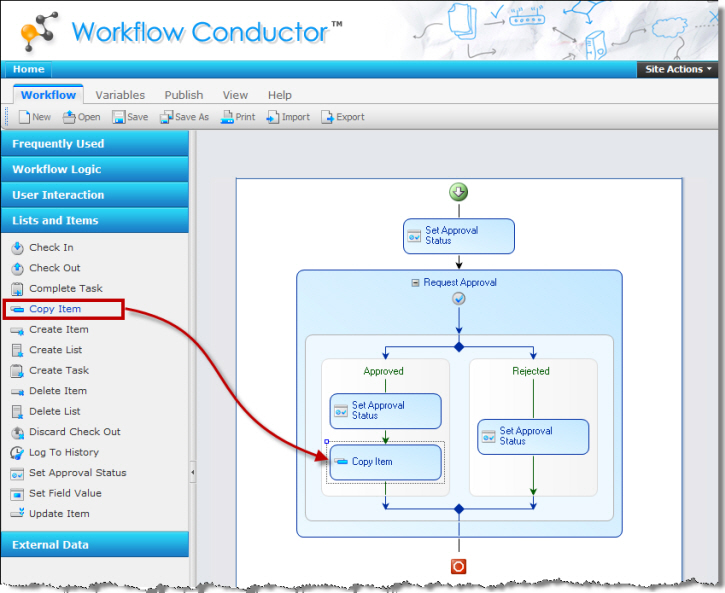 This is an example of the Copy Item widget used as part of a more complex workflow.
The Copy Item Widget is used here to copy a document that was approved using a Request Approval widget from a draft document library to a document library for published documents.
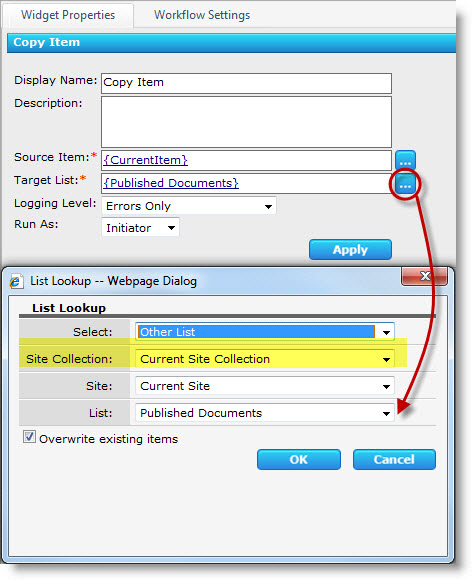
The example below is the way that this widget’s properties were set to copy the item to another list in the same site. You can choose a sub-site or a site in a different site collection. (Remember that document libraries are also lists in SharePoint!)
Return to:
See Also:
Example of the Collect Data From User Widget
Normally, you can collect data for a workflow only on an initialization form when the workflow starts. However, the are many instances when you might need to collect some information later in the workflow. You can use the Collect Data From User widget to do that. Here is an example.
Scenario
The scenario for this example is to create a site workflow that can be started by someone in the HR department when they need to request travel preference information from an employee.
Creating the Workflow
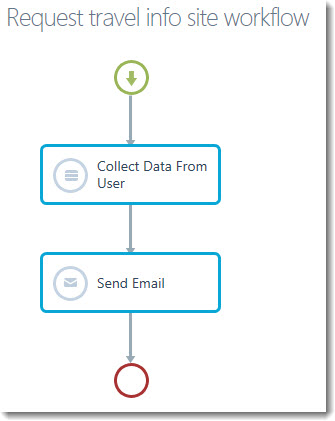 The workflow will look like that shown. In addition to the Collect Data From User and the Send Email widgets, it also has an Initialization Form.
Open the Workflow Conductor Studio from any list and follow these steps to build this workflow:
| Step |
Action |
| 1. |
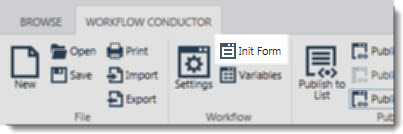 Click the Init Form link in the main menu to open the Initialization Form editor. Click the Init Form link in the main menu to open the Initialization Form editor. |
| 2. |
Add one parameter to the Initialization form. Call it Employee and make it a Single line of text.
 |
| 3. |
Create a variable to store the WF Task ID created in the Collect Data From User widget.
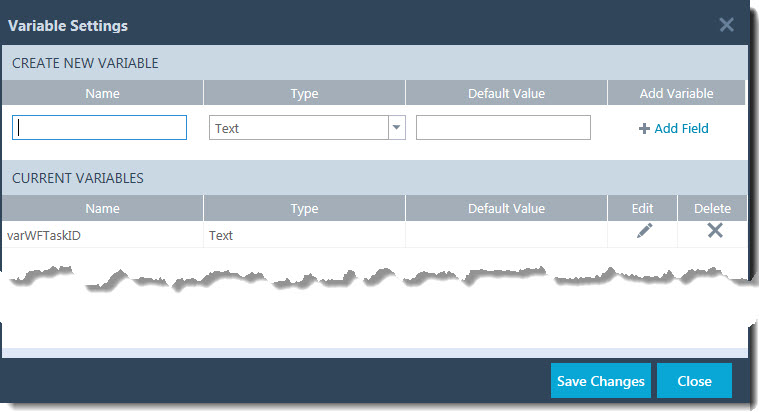 Click the Variables link in the main menu to open the Variable Settings form. Click the Variables link in the main menu to open the Variable Settings form.
Create a variable of type Single line of text and call it varWFTaskID.
|
| 4. |
Configure the Collect Data from User widget.
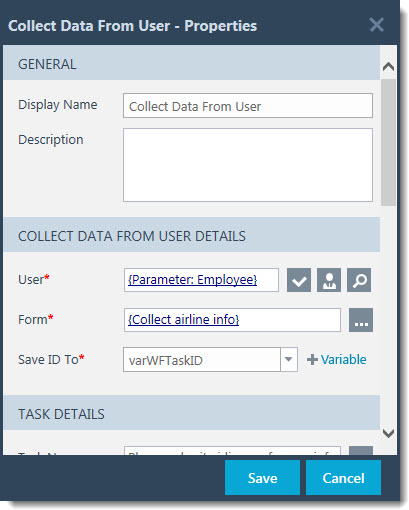 Double click the Collect Data from User widget to open the widget properties. Double click the Collect Data from User widget to open the widget properties.
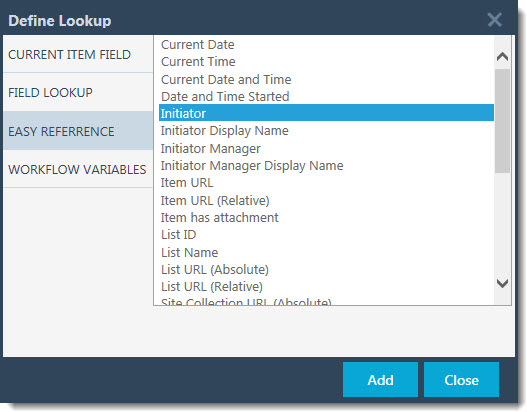
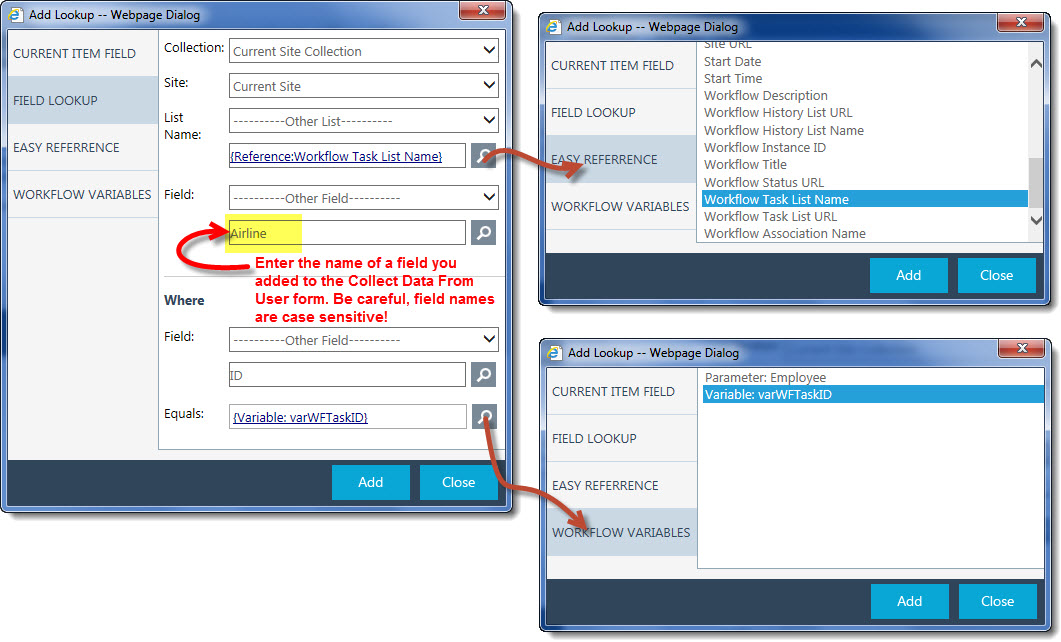
For the User property, click the lookup icon ( ) to open the Define Lookup dialog. ) to open the Define Lookup dialog.
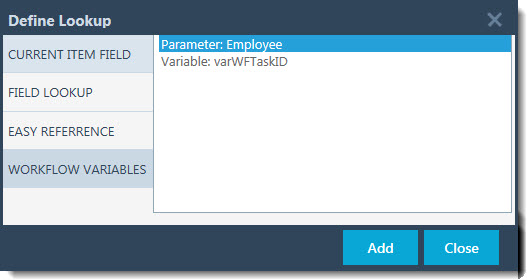 On the Define Lookup dialog, click the Workflow Variables category and select the Parameter: Employee from the list. Click Add to save your selection and close the Define Lookup dialog. On the Define Lookup dialog, click the Workflow Variables category and select the Parameter: Employee from the list. Click Add to save your selection and close the Define Lookup dialog.
 Parameters are fields defined in the initialization form. Variables are created on the Variables page. Parameters are fields defined in the initialization form. Variables are created on the Variables page.
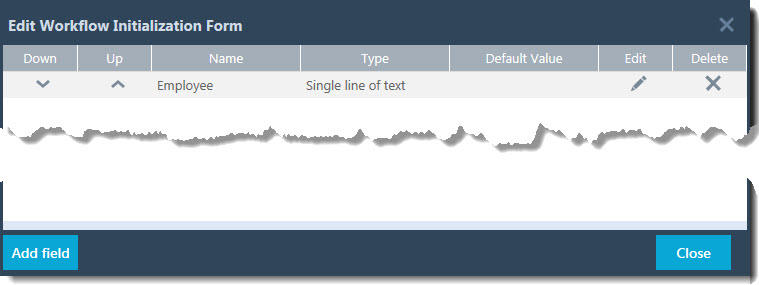
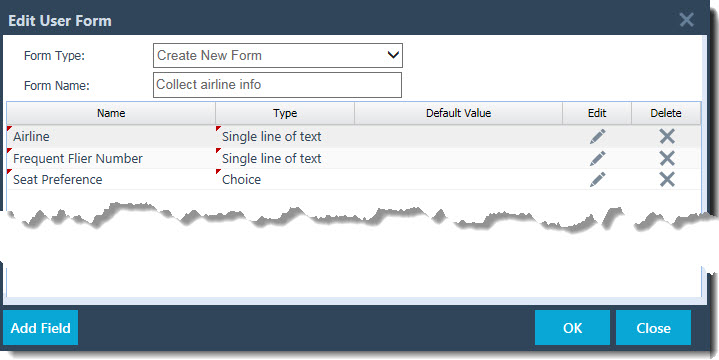
On the widget properties page, click the  icon for the Form property to open the Edit User Form dialog. Enter Collect airline info as the Form Name and add the three fields shown below by clicking the Add Field button in the lower left corner of the dialog. When done, click OK to save the form and close the Edit User Form dialog. icon for the Form property to open the Edit User Form dialog. Enter Collect airline info as the Form Name and add the three fields shown below by clicking the Add Field button in the lower left corner of the dialog. When done, click OK to save the form and close the Edit User Form dialog.
Fill in the other information in the widget properties. When ready, click Save on the widget properties form to save and close the widget properties.
|
| 5. |
Configure the Send Email widget.
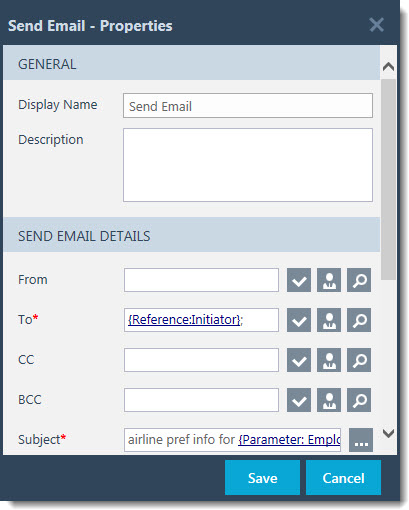 For the To property, click the hourglass icon () to open the Define Lookup dialog. For the To property, click the hourglass icon () to open the Define Lookup dialog.
 Select Initiator from the Easy Reference area. Select Initiator from the Easy Reference area.
Click Add to save the selection and close the Define Lookup dialog.
Configure the Subject line by clicking the hourglass (), entering Airline preference information for, and selecting Parameter: Employee from the Workflow Variables section of the Define Lookup dialog. Click Save to save the Subject and close the Rich Text Editor.
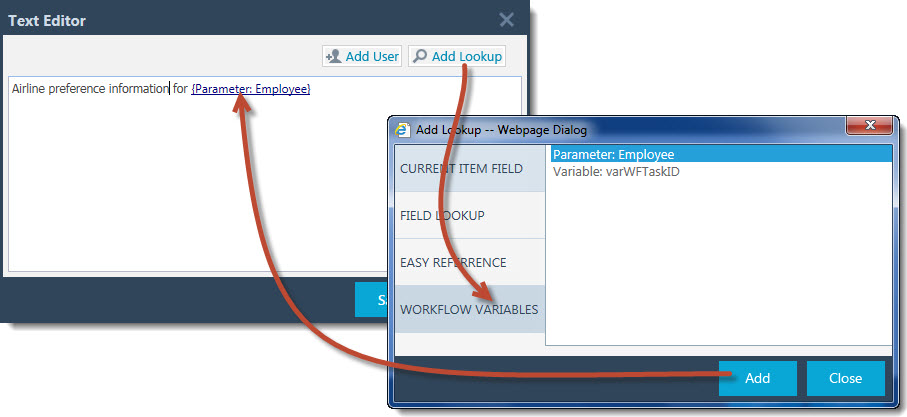
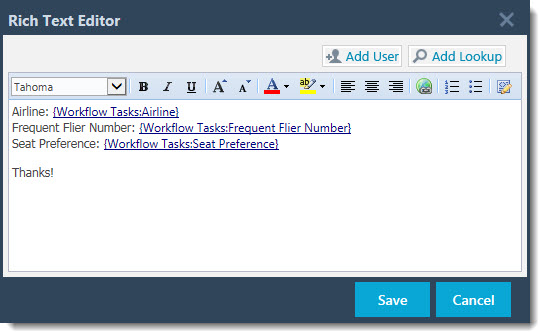 Configure the email Body by clicking () to open the Rich Text Editor. Configure the message like that shown. Configure the email Body by clicking () to open the Rich Text Editor. Configure the message like that shown.
To add the lookups for form values, click Add Lookup and configure them like that shown below.
Rather than entering a name for the workflow tasks list, lookup to the Easy Reference called Workflow Task List Name. This way, the form values will always be retrievable, even if the person who associates the workflow to new a list changes the name of the associated workflow tasks list.
Click Save to save the message Body and close the Rich Text Editor. Then click Save to save the widget properties and close the Properties dialog.
|
| 6. |
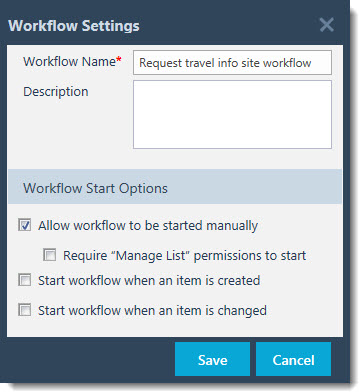 Click the Settings link in the main menu to open the Workflow Settings form. Name the workflow Request travel info site workflow and make sure the manual workflow start option is enabled. Click the Settings link in the main menu to open the Workflow Settings form. Name the workflow Request travel info site workflow and make sure the manual workflow start option is enabled. |
| 7. |
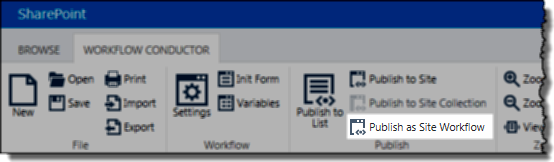 Save and publish the workflow as a Site Workflow by clicking Publish as Site Workflow from the main menu. Save and publish the workflow as a Site Workflow by clicking Publish as Site Workflow from the main menu. |
Running the Workflow
This workflow was published as a Site Workflow. Site workflows are not associated with any list, so you do not start them from a list item. Follow these steps to start this Site Workflow:
| Step |
Action |
| 1. |
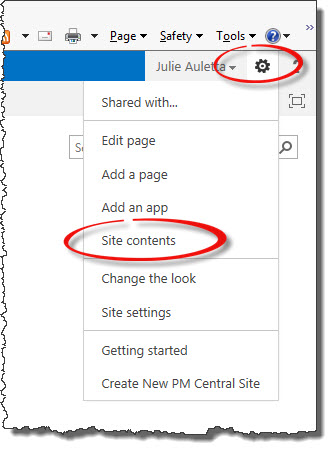 View Site Contents by clicking the gear icon ( View Site Contents by clicking the gear icon ( ) and selecting Site Contents. ) and selecting Site Contents. |
| 2. |
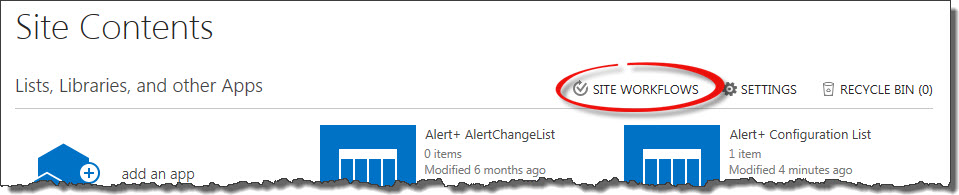
On the Site Contents page, click Site Workflows.
 |
| 3. |
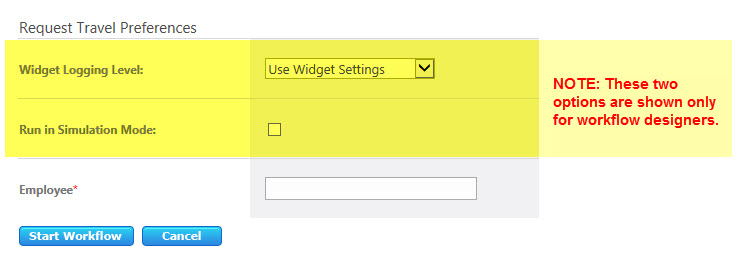
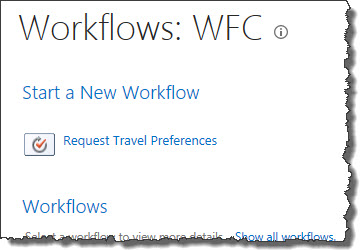 Click the desired workflow to start it. The initialization form is presented. Click the desired workflow to start it. The initialization form is presented.
Fill in the appropriate information and then click Start Workflow.
 |
| 4. |
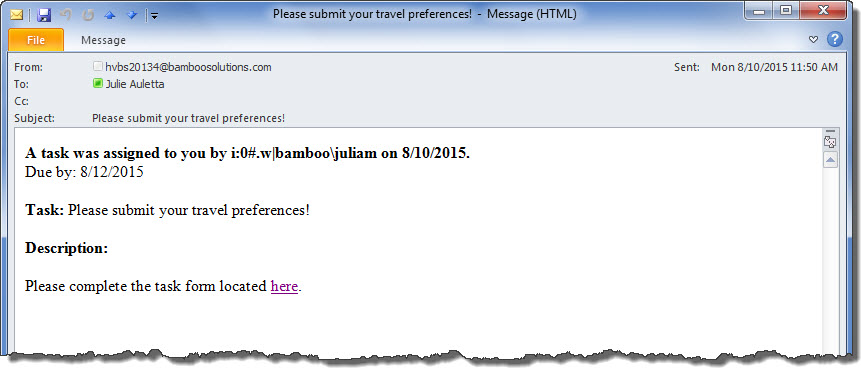 For this particular workflow, an email is sent to the Employee entered in the initialization form. The email has a link to a SharePoint workflow task form, which is shown here. For this particular workflow, an email is sent to the Employee entered in the initialization form. The email has a link to a SharePoint workflow task form, which is shown here. |
| 5. |
Clicking the link in the email opens the task form in SharePoint.
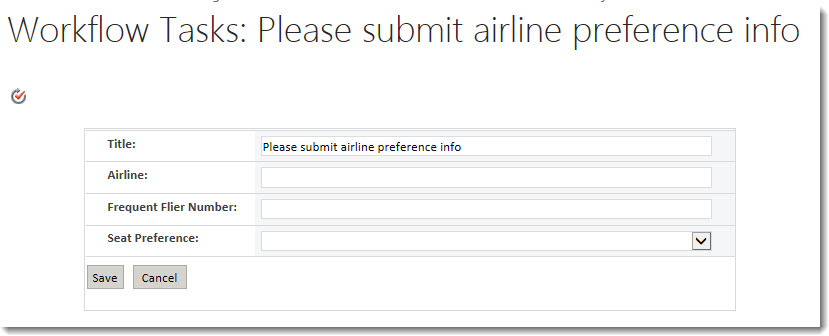
The employee enters values and clicks Save to complete the task. |
| 6. |
A final email containing the employee’s travel preferences is sent to the workflow initiator.
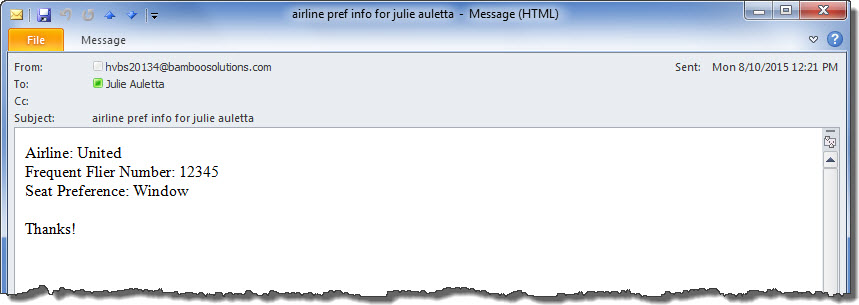
Instead of sending the travel preferences in an email, you could also create an item in a list and send the link to the item via email. This alternative stores the preferences in SharePoint for future reference, rather than in an email sent to an individual.
|
Example of the Calculate Widget
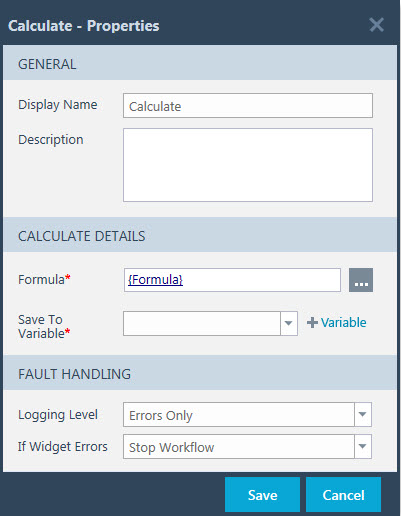 The Calculate widget accepts Excel-style functions and stores the result in a workflow variable. Function parameters can include lookups and functions can be nested to perform multiple operations. In this example, a Calculate widget formula calculates a date 10 days from today to use as a task Due Date.
 The Formula column is required.
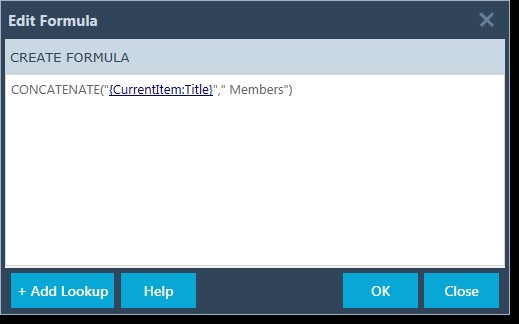
Click the  button to enter a formula. The Edit Formula dialog will appear as show here.
- Create Formula: Enter a formula in the formula box. For a list of available functions and usage information, click the Help button. The example here shows the CONCATENATE function in use.
- Add Lookup: To insert a lookup in a function, click the + Add Lookup button.
- OK: Click OK to save changes to your formula.
- Close: Click Close to close the Edit Formula dialog without saving any changes.
Click Save to save the widget settings. Otherwise click Cancel to close the Properties dialog without saving any changes. Note that you will not be able to open properties of another widget until you close the open dialog.
Return to
See Also:
Example of Wait for Field Change
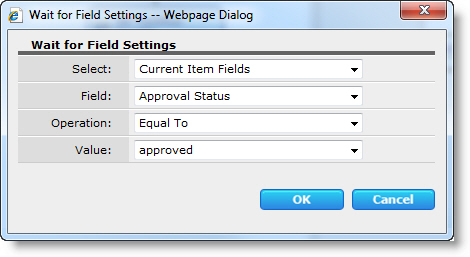 In this example, a Wait For Field Change widget is configured to pause the workflow until a field named “Approval Status” is updated to Approved:
Return to
Wait for Field Change Widget
Workflow Logic Widgets List
See Also:
Example of Using the Disable AD Account Widget
 This example shows a Disable AD Account widget configured as part of an employee out-processing workflow.
The workflow performs various tasks when an employee leaves the company, including disabling the user account in Active Directory.
In this case, the LDAP path selected is from a list of LDAP paths configured in the Active Directory Settings section of the Workflow Conductor Control Panel > General Settings page.
Return to:
Disable AD Account Widget Properties
User & Group Management Widgets
See Also:
Example of Using Create AD Account Widget
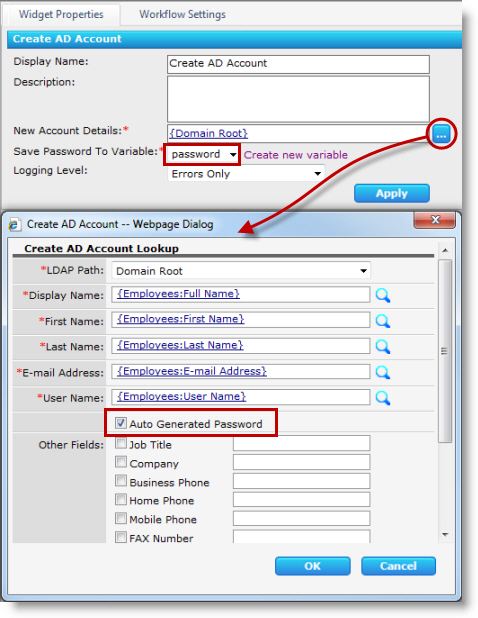 In this example, a Create AD Account widget is configured to create a new Active Directory account for an employee in a SharePoint list called “Employees”.
In this example, the Active Directory path for the account, “Domain Root”, was selected from a list of LDAP paths that were configured in the Active Directory Settings section of the Workflow Conductor Control Panel > General Settings page.
The password in this example is auto-generated, and is saved to a variable called password. This allows the password to be e-mailed to the workflow initiator later in the workflow by including the workflow variable in the Body property of a Send Email widget.
Return to
Create AD Account
User & Group Management Widgets
See Also:
Example of Using Compare Widget
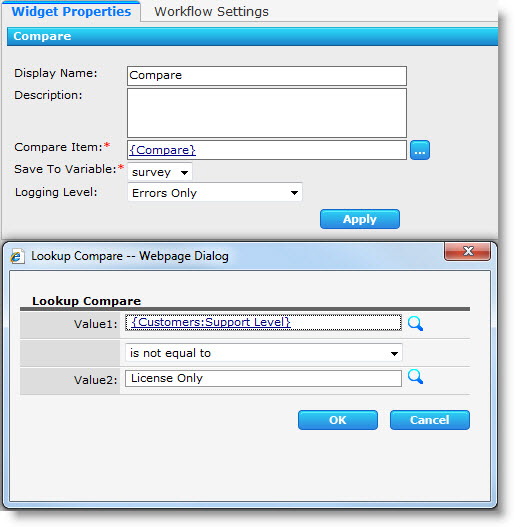 In this example, a customer service group wants to use a workflow to set a Phone Survey field in a trouble ticket list to True when a ticket is created if a customer has purchased a support contract.
To do this, a Compare widget checks the Support Level field for the customer in a Customers list and stores the result in a workflow variable.
An Update Item widget then updates the Phone Survey field to the new value of the workflow variable.
Return to Compare Widget Properties
See Also:
Example of Using Access SP via REST Widget
Example: Add an Item to an External SharePoint Site
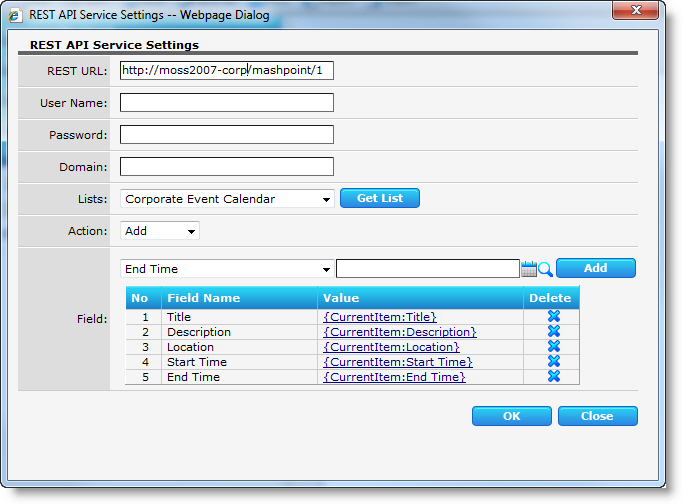 In this example, an Access SP via REST widget is configured to allow a user to add an item in a local SharePoint calendar list to a SharePoint calendar list called “Corporate Events Calendar” in an external site.
NOTE: Remember that workflows run in the security context of the workflow initiator, not the designer. The user running the workflow must have permission to add items to the external list, unless the designer entered a specific Username and Password with the widget.
Return to:
Access SP via REST
External Data Widgets
See Also:
Example of Send E-mail from Workflow Conductor
 Here is an example of a Send Email widget configured to send an e-mail about the details of a new change request submitted to a SharePoint list:
- The From property is a standard e-mail address.
- The To property is a SharePoint group. Each member of the group will receive a copy of the e-mail.
- The CC property is the workflow initiator.
- The Subject and Body properties contain text combined with various types of Lookups.
- Any item attachments will be sent with the e-mail.
Return to
Send Email Widget
User Interaction Widgets List
See Also:
Example of Set Variable Widget
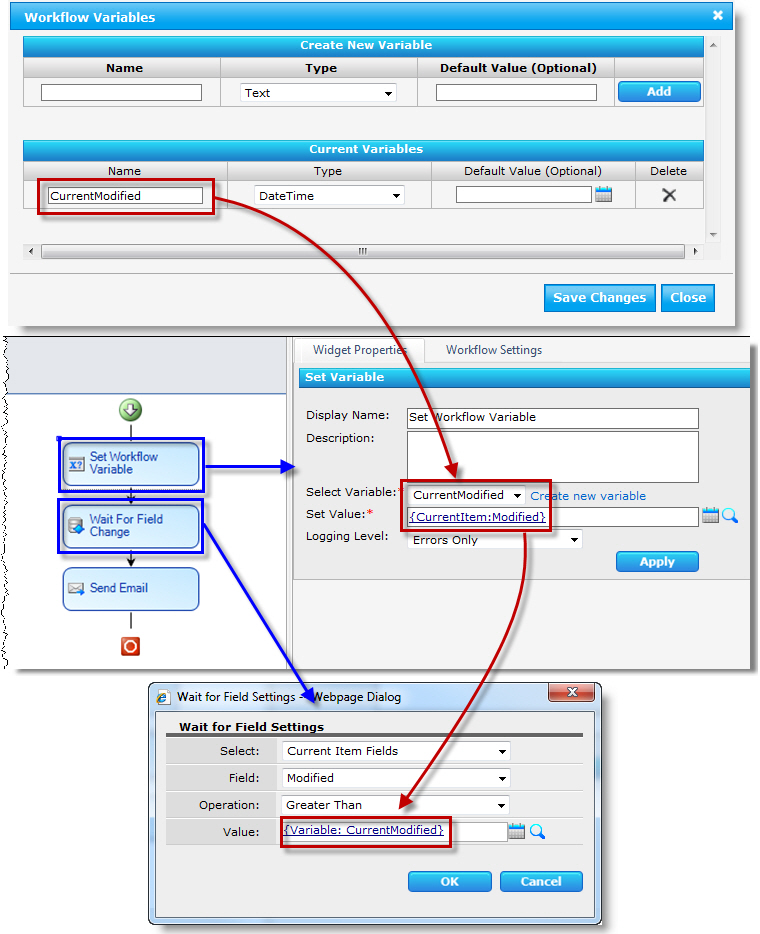
In this example, a workflow variable is set to the current Modified date of an item, which is then used in a Wait for Field Change widget to pause the workflow until the Modified date of the item changes (i.e, the item is updated).
Return to:
Set Variable Widget
Workflow Logic Widgets List
See Also:
Example of Repeat While With Two Conditions
Example 1: Repeat While Ticket with High Priority Status is Open
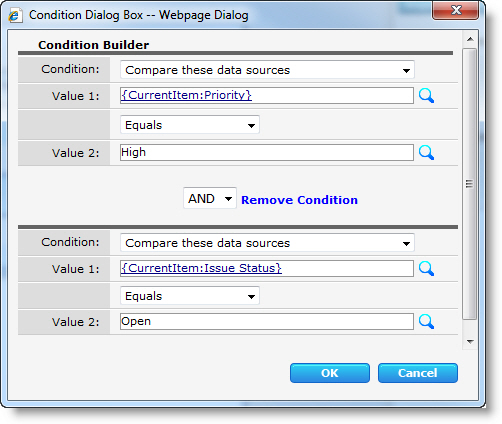 Here is an example of a Repeat While widget configured to send a status update e-mail to a manager every 60 minutes while a ticket with a Priority of “High” has a Status of “Open”. The Compare Widget is used to compare the values and the Repeat While Widget loops every sixty minutes checking the condition.

Example 2: Repeat While a Field Is Empty
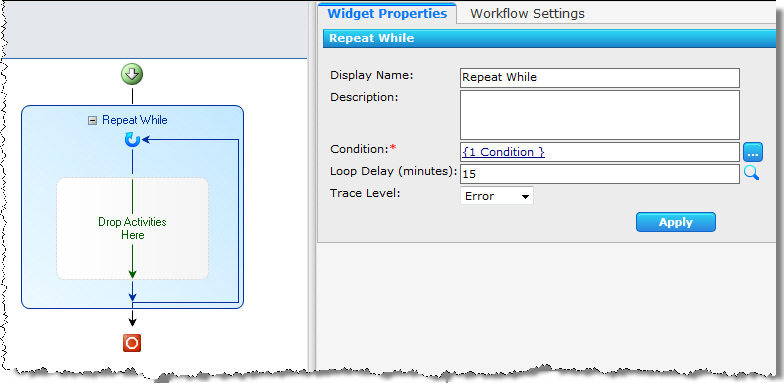
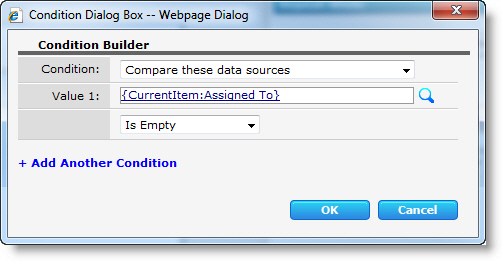 Here is an example of a Repeat While widget configured to check every 15 minutes to see if an Assigned To field has been filled out.
Once the Assigned To field is no longer empty, the widget will exit and the workflow continues with the next widget. Notice that there are no widgets inside the Repeat While widget; it is being used in this instance to simply pause the workflow until a condition is met.
Return to
Repeat While Widget Properties
Workflow Logic Widgets List
See Also:
Example of Start Another Workflow
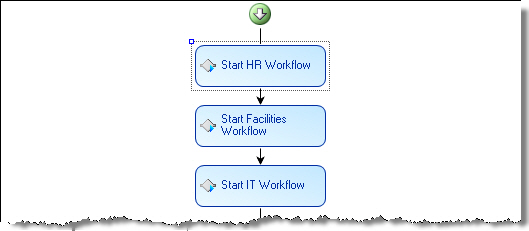 Here is an example of a workflow started when a new employee is added to an Employees contacts list. This workflow starts workflows for each department that has to perform tasks prior to an employee’s start date (which is a field in the Employees list). Notice that each Start Another Workflow has been configured with a custom Display Name to make the workflow easier to follow.
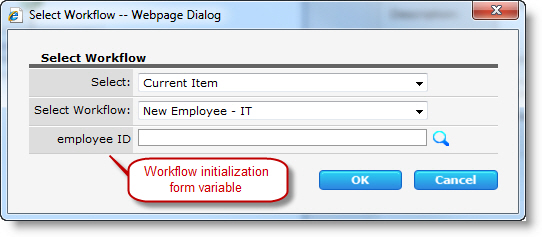 Each of the workflows in the Start Another Workflow widgets is configured with a workflow initialization form variable to gather the Employee ID stored in the Employees contacts list, because this ID is needed in the workflow. The value for this form field is provided in the Start Another Workflow widget, as shown below.
Return to
Start Another Workflow Widget
Workflow Logic Widgets List
See Also:
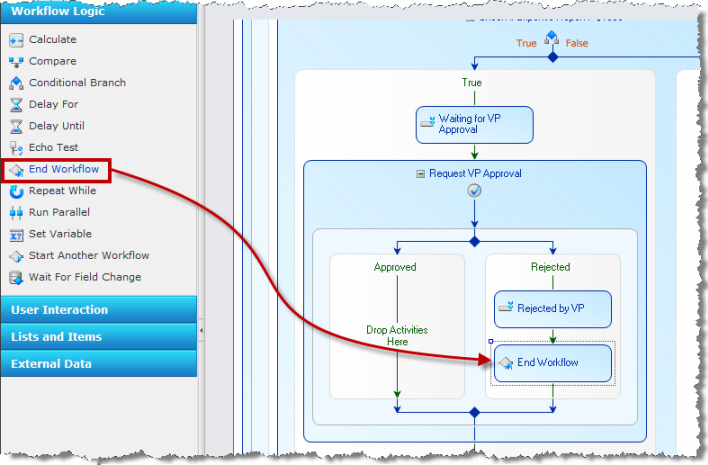
Example of End Workflow
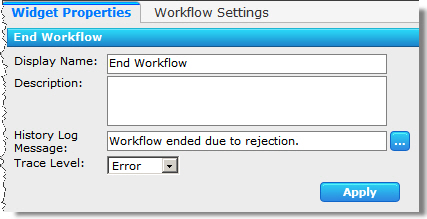
This is an example of an End Workflow widget used inside a Request Approval widget to end the workflow if it follows the Rejected path:
Return to
End Workflow Widget
Workflow Logic Widgets
See Also:
Example of Echo Test Widget
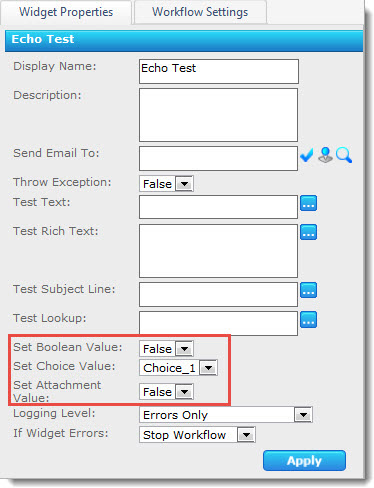
| In this example, the Echo Test widget is configured to send the current value of several lookups, along with the current value of any workflow variables, to a trace recipient. |
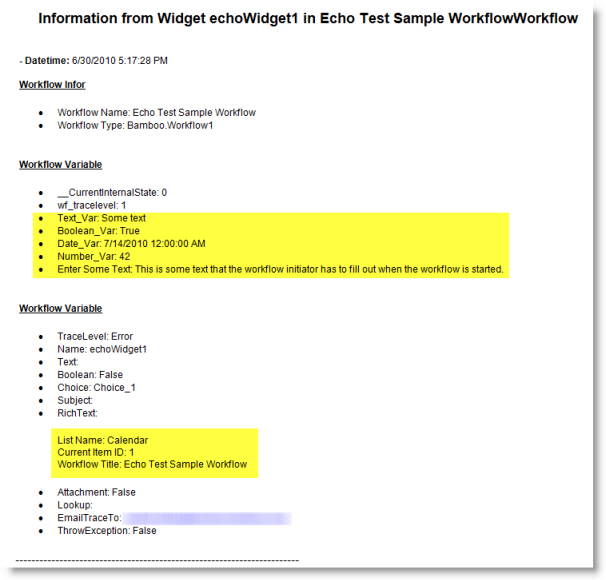
Below is an example of the test results: |
 |
 |
|
Return to:
Echo Test Widget
Workflow Logic Widgets List
See Also:
Example of Delay Until Widget
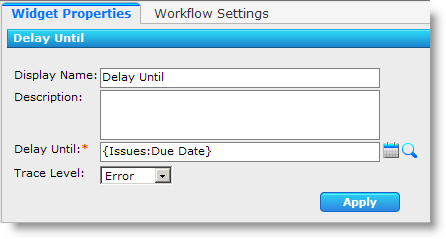 The Delay Until widget pauses a workflow until the date and time specified in another SharePoint field is reached.
In this example, it is delayed until the date is reached on the Due Date in an Issues List.
Return to:
Delay Until Widget Properties
Workflow Logic Widgets List
See Also:
Example of Delay Until Condition is Met
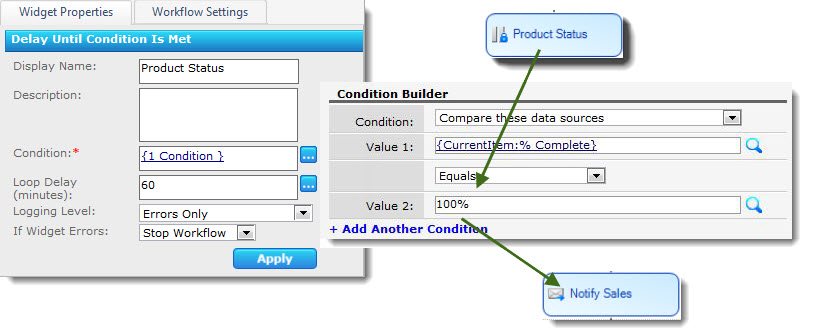
In this example a manager wants to design a workflow to notify sales to begin promoting a new product immediately after management decides it is complete.
The Delay Until Condition is Met widget below pauses the workflow until the % Complete column is equal to 100%. Once the status is 100% the workflow moves on to send a notification email.
Return to:
Delay Until Condition is Met Widget Properties
Workflow Logic Widgets List
See Also:
Example of Delay For Widget
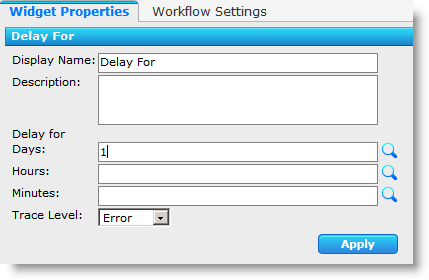 The example here shows how the widget Delay For is configured to pause the workflow for 1 day to allow a user time to complete another part of the business process.
You can enter very precise time frames in the hours and minutes columns as well.
Return to:
Delay For Widget Properties
Workflow Logic Widgets List
See Also:
Example of Custom User Task Form Widget
Example
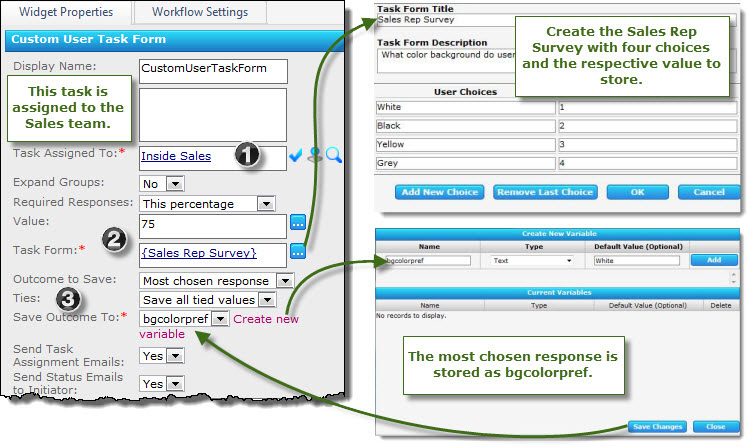 In this example XYZ corporation’s product development group wants to know what color background customers prefer as the default for one of their applications.
The Widget Properties for the form are completed as follows:
- Task Assigned To: – “Inside Sales” is chosen because the product manager decides they have the most interaction with customers.
- Required Responses: and Value: The manager wants to hear from at least 75% of the Sales team.
- Ties: In case there is a tie for the most chosen color, the manager wants all results saved in the variable.
Return to
Custom User Task Form Widget
User Interaction Widgets
See Also:
Example of Conditional Branching Workflow
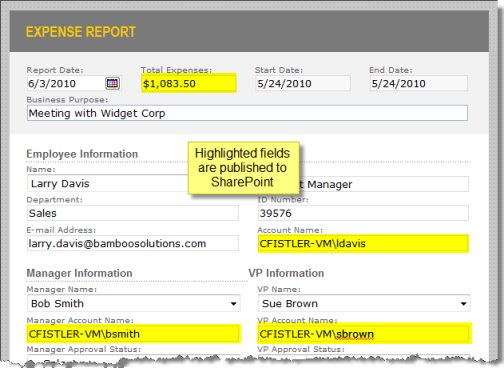 In this example, the Condition Builder is configured to check if an expense report saved to a Forms Library has a Total greater than $1,000. Based on the Request Approval widget, you can add conditional branching, sequential approval, and SharePoint field updates. To make it easier to remember what your workflow does, you can customize widget names.
Setting the stage
Your company submits expense reports using an InfoPath form. Expense reports less than or equal to $1,000 can be approved by the employee’s manager, but expenses over $1,000 must also be approved by someone in a higher job role, such as a Vice President (VP). Expense reports are currently e-mailed for approval, but you want a way to enforce the approval process for larger expenses and employees want more feedback on where the expense report is in the approval process.
Branching Workflow Process Steps
In Summary
No matter how complicated the workflow is, it is simple to create with the Workflow Conductor drag-and-drop user interface. No coding required! You can even “comment” the workflow by customizing widget names.
- The Conditional Branch widget adds intelligence to your workflow and lets it do different things depending on SharePoint item properties.
- Supercharge your InfoPath form libraries by integrating them with Workflow Conductor workflows.
- Copy & paste widgets, including their properties, to save time!
- Need to update a SharePoint field? Try Update Item, Set Approval Status, or Set Field Value – whichever best fits your needs.
- Workflow Conductor integrates with native SharePoint workflow functionality to allow you to change workflow start options.