How many License Keys do I need for my SharePoint farm?
For most products, you will need one Bamboo product License Key per Web Front End (WFE) server. A WFE server is any farm server running the Microsoft SharePoint Foundation Web Application (or Windows SharePoint Services Web Application in WSSv3/MOSS).
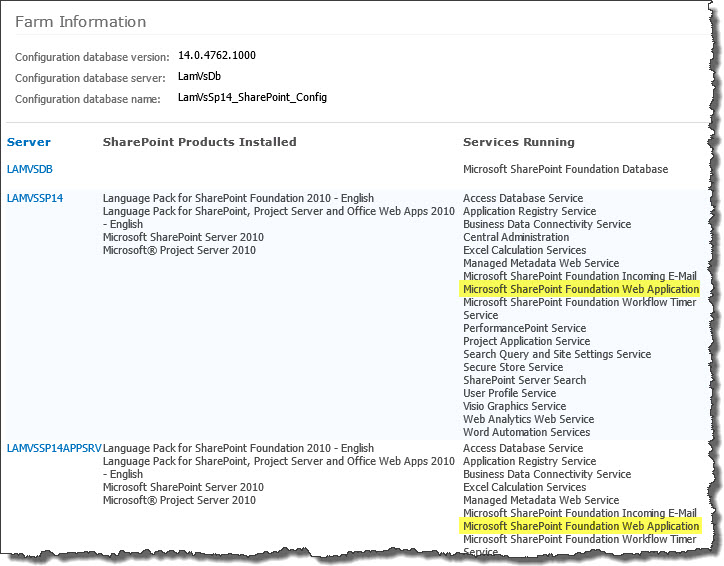 To determine which servers on the farm run these services, go to Central Administration > System Settings > and then Manage servers in this farm. If you are using WSSv3/MOSS, this page is accessed in Central Administration through Operations > Servers in Farm. In this example, there are two WFE servers on the farm.
Some SharePoint farms have WFE servers that do not serve content to users, even though they are running the Microsoft SharePoint Foundation Web Application. You will not need a license key for WFEs that do not deliver content to end users.
Desktop applications, such as List Bulk Import and List Bulk Export require only one license per instance.
Some products, such as List Rollup and Alert Plus may include optional components that run on application servers in addition to WFE servers. To use these product features, you may need an additional server license for each separate (non-WFE) application server on which you would like to run the associated service for that product. Using application server features on already licensed WFE servers does not require any additional licensing.
See also:
How long do trial versions of Bamboo software last and when do they start?
Currently, trials for Bamboo products run for 30 days, and begin when the product is installed. So if you download the software today, but don’t actually install for two weeks, that’s OK.
If you need an extension to a trial, contact your Bamboo Sales Representative (Sales@bamboosolutions.com).
Highlights of Cross Site Display
 Display SharePoint lists in Standard, Calendar, and Gantt views across sites and site collections without complicated configuration or coding.
SharePoint deployments are continually growing, with new sites being created daily, distributing information all across the SharePoint farm. How can SharePoint site owners effectively share the wealth of knowledge contained in lists and libraries across sites—and/or site collections—while still preserving the presentation views that were so painstakingly constructed?
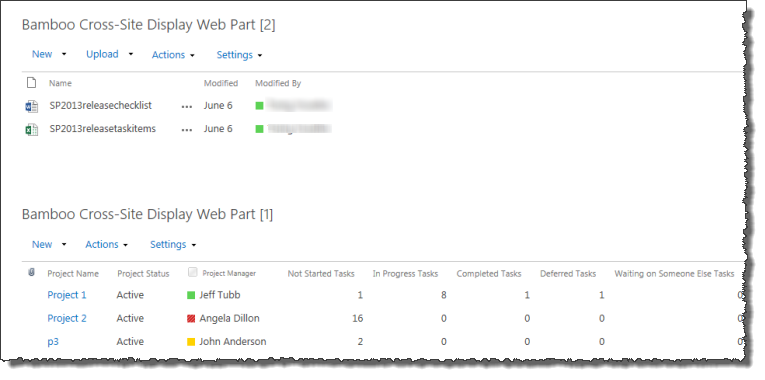
Cross Site Display does just that. Simply add Cross Site Display to a Web Part Page in any site, and enter the list URL of the list or library to be displayed — from any site in any site collection. Using the concept of “what you see is what you get” (WYSIWYG), Cross Site Display displays the SharePoint list or library just as if you were viewing it in a SharePoint List View. Support for standard list views like Calendar View and Gantt View, as well as support for the specialized views for Discussion Boards and Picture Libraries, means list and library information is presented in exactly the format in which it was intended to be viewed.
Need to display multiple lists and libraries from different sites or site collections? No problem! Just add Cross Site Display for each list or library you want to display. Each Web Part instance is configured individually so you can easily customize your page to create a cohesive presentation composed of distributed SharePoint information.
Error Log Files
Applies To
- Bamboo Products
- Windows SharePoint Services v3 and Microsoft Office SharePoint Server 2007
- SharePoint Foundation 2010 and SharePoint Server 2010
- SharePoint Foundation 2013 and SharePoint Server 2013—Standard Edition
- SharePoint Server 2016
While troubleshooting issues, the Bamboo support team may request a copy of the log files for your Bamboo product(s). Many licensing, functionality and access issue information is captured in the log files found in the BambooSolutions file folder.
This directory is located at C:WindowsTempBambooSolutions
The log files are named in this format: bsc_bamboo_{processID}.log
- where {processID} is the ID of the w3wp.exe process which was handling the request at the time of the error
NOTE: These files will be created on any farm server running the Microsoft SharePoint Foundation Web Application (on SharePoint 2010 or SharePoint 2013) or the Windows SharePoint Services Web Application (on SharePoint 2007).
To determine which servers on the farm run these services:
SharePoint 2007:
- Go to the page Central Administration > Operations > Servers in Farm
SharePoint 2010:
- Go to the page Go to the page Central Administration > System Settings > Manage Servers in this Farm
 SharePoint 2013:
- Go to the page Central Administration > System Settings > Manage Servers in this Farm
There may be many log files. When reporting a problem to support, attach the most recent file(s) to your support ticket. If you know the time at which the error occurred, choose the file with the corresponding date/time.
Refer to Topology and Services in SharePoint Central Administration for a list of servers running this service. Learn more…
Configure Cross SIte to Use a Custom Login Account so Users Can View Data
Cross Site Display uses standard SharePoint security trimming to display items from a list or library. If the currently logged-in user does not have access to view a list or item, it will not be displayed in Cross Site Display .
However, if you would like users to be able to view items in a list even if they do not normally have permission to do so, you can configure a Custom Login Account for the Cross Site Display to use so as to display items with read-only access. The Custom Login Account must have at least View permission on all items in the list or library.

Note: The Custom Login Account is used to display SharePoint items only. If the user attempts to perform other actions on the list or item, Cross Site Display will use the identity of the current user instead of the Custom Login Account.
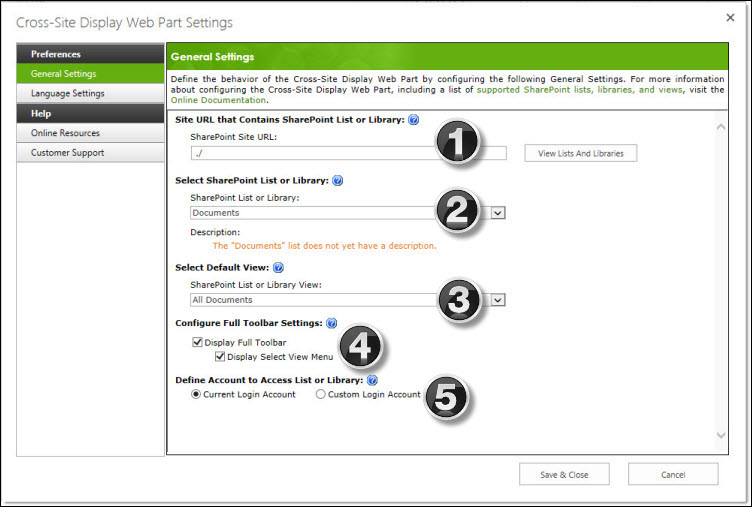
Configuring the Cross Site Display Web Part
To configure the Cross-Site Display Web Part, select a list or library to display in the Web Part settings. Interact with list and library items, change views, and manage list settings just as you would from the standard SharePoint List View.
Configure Full Toolbar Settings
By default, Cross Site Display will display the full SharePoint toolbar at the top of the list or library. The toolbar includes access to new item actions, the Actions menu, the Settings menu, and the View drop-down list, if they are available to the current user. To hide these options for all users, uncheck Display Full Toolbar.
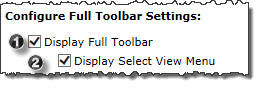 To disable the ability for users to change the view displayed in Cross Site Display, uncheck the option Display Select View Menu. This will allow users to still access toolbar options, but restrict their actions to the view defined by the administrator.
| Step |
Action |
Result |
| 1. |
Display Full Toolbar |
By default, Cross Site Display will display the full SharePoint toolbar at the top of the list or library. The toolbar includes access to new item actions, the Actions menu, the Settings menu, and the View drop-down list, if they are available to the currently logged-in user. To hide these options for all users, uncheck Display Full Toolbar. |
| 2. |
Display Select View Menu |
 On the right side of the web part view that users will see is the drop down selector that a user can pick to see the various views in a list. On the right side of the web part view that users will see is the drop down selector that a user can pick to see the various views in a list.
If you prefer not to show this selector, you can disable it by unchecking this box. Users who do not have the permission to create or edit views will not see the Modify this View or Create View options in the menu.
|
|
Complementary Products for Cross Site
 You will find many of our products complement each other quite nicely saving you the time and trouble to write custom code. With Bamboo at the heart of your SharePoint investment, you gain access to a huge catalog of enhancements, components, and accessories that add the critical functionality your business requires.
The same components can be easily used in future applications and they all come from a single, trusted vendor, ensuring an easy purchase process and support you can count on. That’s the Bamboo Way!
Choosing which farm servers to license
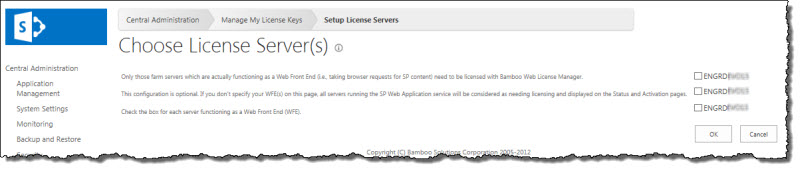
Bamboo products are deployed to all servers in the farm running the Microsoft SharePoint Foundation Web Application service (or Windows SharePoint Services Web Application in WSSv3/MOSS), which may include servers that do not serve Web content. For most products, only servers that serve Web content need a license key (Alert Plus is an exception), but all servers that run the Microsoft SharePoint Foundation Web Application service will appear on the Web License Manager Status and Activation pages by default.
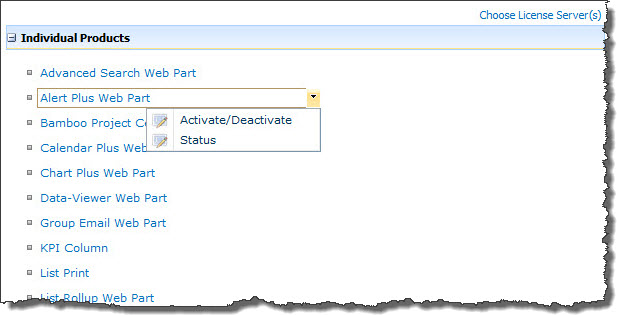
If you would like to see only certain servers displayed in the Web License Manager, follow these steps:
| Step |
Action |
| 1. |
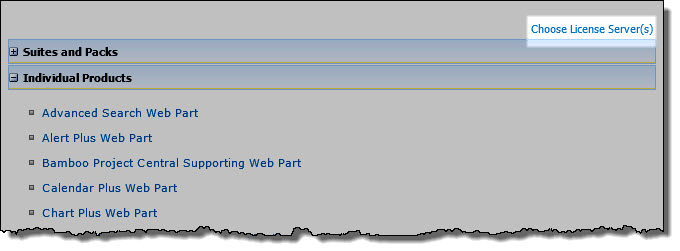
Click the Choose License Server(s) link on the Bamboo Web License Manager main page.
|
| 2. |
Although this step is optional, it makes it easier for SharePoint Administrators to see which servers in the farm need a license key, if not all do.
On the page displaying the list of servers, check the box for each server functioning as a Web Front End (WFE).
Some products, such as Alert Plus or List Rollup, may include optional features that require licensing of a SharePoint application server as well. If so, these servers can also be selected.
|
Can trials be extended?
Once you have installed a Bamboo product on your farm and the trial period has passed, you cannot install a second trial. Instead, you need to extend the original trial period. Contact your Bamboo Sales Account Manager (Sales@bamboosolutions.com) for a trial extension.
Before you uninstall
 IMPORTANT: Before you uninstall a Bamboo product, make sure that it is no longer in use on any site in your farm. If a web part resides on a page and you uninstall the web part, an error will be displayed for users that visit that page. The uninstall process does not update individual pages in your SharePoint portal.
Also, if you uninstall Workflow Conductor (WFC) and some workflows built with WFC are still active, those workflows will fail.
You have several choices for how to uninstall your Bamboo product:
| Option |
Comment |
| Use the Updated Uninstall Process for Bamboo components |
Based on feedback from our customers, Bamboo introduced updated install/uninstall processes for component products (web parts). Instead of the Setup.exe Installation Application, we now supply two PowerShell scripts – one for Install/Upgrade and the other for Uninstall – to be used to install, upgrade, or uninstall the product.
For more information, see Overview of the Updated Installation Process for Bamboo components.
|
| Bamboo Installation Package |
IMPORTANT: As of April 2017, Bamboo no longer includes the Installation/Setup program in product download packages.
You can use the Bamboo product installation package that you used to install the product to uninstall. This is the preferred method, because it performs some automated system checks to help ensure the uninstall will be successful. It also steps you through each component, so its easier to make sure everything is uninstalled. See Using the Setup program to Uninstall for more information.
|
| SharePoint Central Administration |
Many Bamboo products are deployed as SharePoint solutions, so you can retract and remove them from Central Administration. See Uininstalling from SharePoint Central Administration for more information. |
| PowerShell |
Some Bamboo products are packaged with a PowerShell script that you can use to uninstall. See Manually uninstall using PowerShell for more information. |
| stsadm |
If you prefer, you can use stsadm commands to retract and delete Bamboo SharePoint solutions. See Manually uninstall using stsadm for more information. |
| Add/Remove Programs |
Some Bamboo products include components that are installed using an EXE or MSI installer. See Uninstalling a Bamboo .msi or .exe for more information. |
Depending on the uninstall method you choose, there may be a solution left behind after the install. This is intentional, as several Bamboo products use some of the same components. See What is left behind after uninstalling? for more information and steps for how to uninstall completely.
Before you Migrate from SharePoint 2007 to SharePoint 2010 Read This
Overview
Microsoft recommends that you use one of two basic approaches when you upgrade from SharePoint 2007 to SharePoint 2010:
You can also combine these two types of upgrade in hybrid approaches that reduce downtime during an upgrade. For more information about these approaches, see Determine upgrade approach (SharePoint Server 2010) from Microsoft TechNet.
General Migration Restrictions for Bamboo Products
- Regardless of the upgrade method you choose, you MUST change existing SharePoint sites to use the new user SharePoint 2010 experience. If you don’t, some features of your Bamboo products will not work as expected.
- You need to make sure that you are running the latest available Bamboo product release in your SP2007 environment before migrating. Review information specific to the product(s) you are migrating to learn the minimum product release to migrate. See Bamboo product releases that are supported for migration from SharePoint 2007 to SharePoint 2010 for details.
- Bamboo Solutions does not support the migration of Bamboo products deployed on WSSv2/SharePoint 2003 environments to SharePoint 2010 farms.
- Bamboo Solutions does not support the downgrade of SharePoint editions when migrating from SharePoint 2007 to SharePoint 2010. For example, Bamboo products are not supported when migrating from MOSS 2007 to SharePoint Foundation 2010.
Migration Restrictions for Specific Bamboo Products
Before following the instructions for the method you choose, review information specific to the product(s) you are migrating. The In-Place Upgrade method is sometimes easier, but it takes longer. Some Bamboo products do not support the In-Place upgrade method and we recommend a hybrid In-Place Upgrade method as an alternative.
Bamboo product releases that are supported for migration from SharePoint 2010 to SharePoint 2013
The table below shows the minimum required Bamboo product version required when migrating Bamboo products from SharePoint 2010 to SharePoint 2013. If you have an earlier version installed than the one listed, please upgrade that product before migrating to SharePoint 2013.
For additional information:
| Product |
minimum SP2010 version |
minimum SP2013 version |
| Alert Plus |
30.2.115 |
30.2.121.2013 |
| Alerts Administrator |
10.4.52 |
10.4.62.2013 |
| Calendar Plus |
40.1.143 |
40.1.155.2013 |
| Chart Plus |
30.5.109 |
30.5.143.2013 |
| Column Level Security |
10.3.34 |
10.3.48.2013 |
| Community Central |
10.1.91 |
10.5.76.2013 |
| Cross List |
10.5.20 |
N/A |
| Cross Site Display |
10.2.26 |
10.2.40.2013 |
| Custom Identifier Column |
10.0.45 |
10.0.57.2013 |
| Data-Viewer |
30.5.67 |
30.5.57.2013 |
| Discussion Board Plus |
10.5.22 |
20.0.57.2013 |
DWG Parser
SharePoint 2007 Only |
N/A |
N/A |
| Filters Collection |
10.3.25 |
10.3.35.2013 |
| File Share Library |
20.0.60 |
20.0.81.2013 |
| Grants Management |
10.5.20 |
N/A |
| Group Email |
10.7.43 |
10.7.46.2013 |
| Group Redirect |
20.3.27 |
20.3.33.2013 |
| Hello |
20.1.9 |
N/A |
| In/Out Schedule Board |
10.4.56 |
10.4.57.2013 |
| Knowledge Base |
20.2.47 |
20.2.75.2013 |
| KPI Column |
10.3.65 |
10.3.78.2013 |
| List Bulk Export |
1.4.12 |
20.0.18.1 |
| List Bulk Import |
2.5.105 |
30.0.29.2013 |
| List Consolidator |
10.0.79 |
10.0.107.2013 |
| List Print |
10.4.31 |
10.4.35.2013 |
| List Rollup |
60.0.64 |
60.0.70.2013 |
| List Rotator |
20.5.82 |
20.5.99.2013 |
| List Search Advanced |
10.8.93 |
10.8.121.2013 |
| List Search Simple |
20.1.140 |
20.1.167.2013 |
| Lookup Selector Column |
20.3.61 |
20.3.88.2013 |
| Mini-Calendar |
20.8.67 |
20.8.86.2013 |
| My Alerts Organizer |
10.4.43 |
10.4.51.2013 |
| Navigators |
10.3.47 |
10.3.57.2013 |
| Password Change |
40.1.65 |
40.1.68.2013 |
| Password Expiration |
10.6.43 |
10.6.49.2013 |
| Password Reset |
20.4.51 |
20.4.70.2013 |
| Poll |
10.4.53 |
10.4.63.2013 |
| Project Management Central |
40.1.135 |
40.1.109.2013 |
| Project Portfolio Dashboard |
10.8.58 |
10.8.80.2013 |
| Quick Add |
10.0.29.0 |
10.0.29.2013 |
| Rating Column |
10.2.43 |
10.1.54.2013 |
| Rich Text Column |
10.3.27 |
10.3.28.2013 |
| Site Creation Plus |
10.4.66 |
10.4.71.2013 |
| SQL View |
10.6.26 |
N/A |
| Task Master |
30.5.117 |
30.5.116.2013 |
| Team Calendar |
10.7.18 |
10.7.36.2013 |
| Time Tracking and Management |
1.6.46 |
10.6.88.2013 |
| Tree View |
10.7.83 |
10.8.23.2013 |
| User Account Setup |
40.0.107 |
40.0.148.2013 |
| User Directory |
10.7.53 |
10.7.81.2013 |
| User Manager for Sites |
10.3.46 |
10.3.62.2013 |
| User Profile Plus |
10.4.39 |
10.4078.2013 |
| User Profile Sync |
1.6.10 |
20.0.20.2013 |
| User Redirect |
10.5.16 |
10.5.27.2013 |
| User Registration Accelerator |
10.3.24 |
10.3.35.2013 |
| Validator Column |
10.3.20 |
10.3.35.2013 |
| Video Library |
20.0.87 |
20.0.106.2013 |
| Virtual Map View |
10.9.46 |
10.9.42.2013 |
| Visual Indicator Column |
10.3.59 |
10.3.79.2013 |
| Wiki Publisher |
10.0.65 |
10.0.85.2013 |
| Workflow Conductor |
30.0.0 |
30.0.1.2013 |
| World Clock and Weather |
20.4.47 |
20.4.52.2013 |
Bamboo product releases that are supported for migration from SharePoint 2007 to SharePoint 2010
The table below shows the minimum required Bamboo product release required when migrating Bamboo products from SharePoint 2007 to SharePoint 2010. If you have an earlier release installed than the one listed, please upgrade that product before migrating to SharePoint 2010.
For additional information:
| Product |
minimum SP2007 release |
minimum SP2010 release |
| Alert Plus |
3.0.62 |
30.0.59 |
| Alerts Administrator |
1.4.12 |
10.4.30 |
| Calendar Plus |
4.0.96 |
40.0.36 |
| Chart Plus |
2.5.43 |
20.5.25 |
| Column Level Security |
1.3.4 |
10.3.7 |
| Cross List |
1.5.5 |
10.5.6 |
| Custom Identifier Column |
1.0.35 |
10.0.35 |
| Data-Viewer |
3.3.59 |
30.3.67 |
| DWG Parser |
N/A |
N/A |
| Filters Collection |
1.3.5 |
10.3.13 |
| File Share Library |
|
|
| Grants Management |
TBD |
TBD |
| Group Email |
1.7.4 |
10.7.11 |
| Group Redirect |
2.3.11 |
20.3.14 |
| Hello |
TBD |
TBD |
| In/Out Schedule Board |
|
|
| Knowledge Base |
2.0.71
NOTE: Releases earlier than 1.2 are no longer supported for upgrade or migration.
|
20.0.56 |
| KPI Column |
1.2.40 |
10.3.33 |
| List Bulk Export |
N/A |
N/A |
| List Bulk Import |
N/A |
N/A |
| List Consolidator |
1.0.87 |
10.0.62 |
| List Print |
1.4.5 |
10.4.18 |
| List Rollup |
Classic: 5.0.55
Schema: 5.0.77 |
Classic: 40.5.13
Schema: 50.0.85 |
| List Rotator |
2.5.24 |
20.5.44 |
| List Search Advanced |
1.8.51 |
10.8.48 |
| List Search Simple |
1.8.64 |
10.8.60 |
| Lookup Selector Column |
1.3.24 |
20.3.15 |
| Mini-Calendar |
2.7.8 |
20.7.11 |
| My Alerts Organizer |
1.4.13 |
10.4.40 |
| Navigators |
1.3.11 |
10.3.12 |
| Password Change |
3.5.8 |
30.5.14 |
| Password Expiration |
1.5.11 |
10.5.19 |
| Password Reset |
2.4.11 |
20.4.31 |
| Project Management Central |
2.1.21 |
20.1.12 |
| Rich Text Column |
1.3.9 |
10.3.14 |
| Site Creation Plus |
1.4.31 |
10.4.18 |
| SQL View |
1.6.17 |
10.6.23 |
| Task Master |
2.0.150 |
20.0.34 |
| Team Calendar |
1.5.4 |
10.5.11 |
| Tree View |
1.7.29 |
10.7.27 |
| User Account Setup |
3.4.8 |
30.4.31 |
| User Directory |
1.7.1 |
10.7.2 |
| User Manager for Sites |
1.3.1 |
10.3.19 |
| User Profile Plus |
1.4.7 |
10.4.35 |
| User Profile Sync |
N/A |
N/A |
| User Redirect |
1.5.3 |
10.5.14 |
| Validator Column |
1.3.1 |
10.3.12 |
| Virtual Map View |
1.9.25 |
10.9.9 |
| Visual Indicator Column |
1.3.7 |
10.3.19 |
| Wiki Publisher |
1.0.26 |
10.0.25 |
| Workflow Conductor |
1.5.1 |
1.5.1 |
| World Clock and Weather |
2.3.15 |
20.3.15 |
Activating Your Bamboo Product License
Licenses for Bamboo products that are installed on SharePoint servers are activated in SharePoint Central Administration using the Bamboo Web License Manager. Follow these instructions to activate a Bamboo product license.
NOTE: Licenses for desktop/server applications such as List Bulk Import, User Profile Sync, and List Bulk Export are activated using a standalone version of the licensing application, called Bamboo License Manager. See Activating a Bamboo Desktop Product Using the License Manager for more information.
Before performing the steps listed below, be sure you have installed the Bamboo Web License Manager on your SharePoint farm. See Installing the Bamboo Web License Manager for more information.
| Step |
Action |
| 1. |
From SharePoint Central Administration, click Manage My License Keys under Bamboo Solutions.
NOTE: If you don’t see this option listed, see Why isn’t Manage My License Keys displayed in SharePoint Central Administration?
|
| 2. |
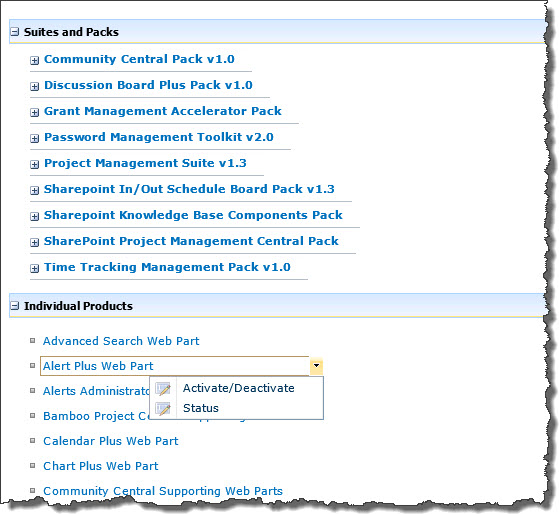
You may see two groupings on the page, Suites and Packs or Individual Products. When activating a Web Part or Application, expand the Individual Products section.
Locate the product you need to activate. Hover over a product name to see a drop-down menu associated with the product. Select Activate/Deactivate from the menu.
|
| 3. |
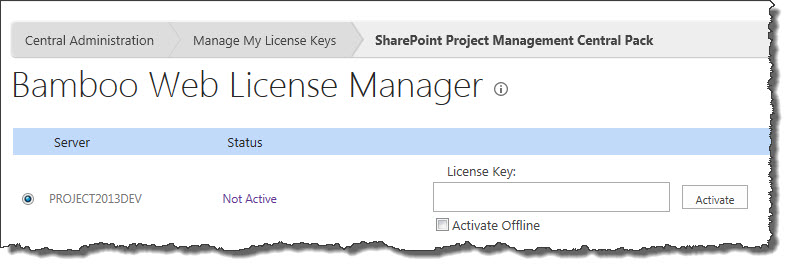
On the displayed page, the available servers in your SharePoint farm will be listed. You will need an individual License Key for each Web Front End server.
Certain products, such as Alert Plus and List Rollup include features that can be run on application servers as well. In these cases, separate licenses may also be required for one or more application servers.
NOTE: If some of the servers listed do not receive web traffic, or if there are application servers that do not need a license, you can remove them from the list. Please see Choosing which farm servers to license for more information.
To activate a license for a server, type or copy and paste the License Key into the field provided and click Activate.
NOTE: If your SharePoint server does not have Internet access, you may get an error when you click Activate. If you experience this, see Activating My Bamboo Product License Offline for more information.
|
| 4. |
Your Bamboo product is now Active and is ready for use, as shown by the Status column.
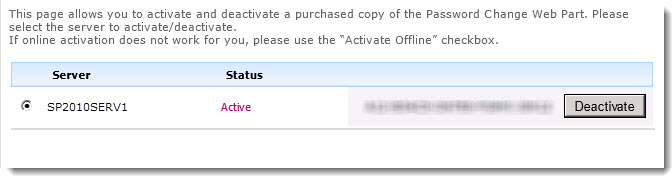
If you ever need to check which license key you used to activate each server, the license key used is shown on this status page.
|
Activating Your Bamboo Product License Offline
Licenses for Bamboo products that are installed on SharePoint servers are activated in SharePoint Central Administration using the Bamboo Web License Manager. Licenses are normally activated online, but sometimes SharePoint servers do not have access to the Internet. If this is the case with your servers, follow these instructions to activate a Bamboo product license offline.
NOTE: Before performing the steps listed below, be sure you have installed the Bamboo Web License Manager on your SharePoint farm. See Installing the Bamboo Web License Manager for more information.
| Step |
Action |
| 1. |
From SharePoint Central Administration, click Manage My License Keys under Bamboo Solutions.
NOTE: If you don’t see this option listed, see The Bamboo Web License Manager does not show up in Central Administration. How do I fix that
|
| 2. |
You may see two groupings on the Manage My License Keys page, Suites and Packs and Individual Products depending on what Bamboo products you’ve installed on the farm. When activating a Web Part or Application, expand the Individual Products section.
Locate the product you need to activate. Hover over a product name to see a drop-down menu associated with the product. Select Activate/Deactivate from the menu.
|
| 3. |
All servers in your SharePoint farm that are running the Microsoft SharePoint Foundation Web Application service will be listed. The license status for each will be Not Active or Trial. You will need an individual License Key for each server.
If some of the servers listed do not receive web traffic, you can remove them from the list. Please see Choosing which farm servers to license for more information.
To activate a license for a server, type or copy and paste the License Key into the field provided, check the Activate Offline box, and then click Activate.
|
| 4. |
On the page displayed, a Machine Key will be displayed with the License Key and a space to enter the Activation Key.
NOTE: Eight spaces are shown if you are running WSSv3/MOSS. If you are running SharePoint 2010 or 2013, there is just one space.
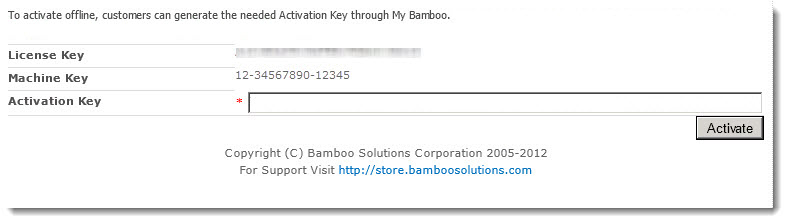
Copy the License Key and the Machine Key to an email and send it to Bamboo’s Support Team at Support@bamboosolutions.com. They will reply via Email with the Activation Key. If you have several servers in your farm, you can send the License Key-Machine Key combinations for all of them in one Email message to the Support Team.
Alternatively, you can generate the Activation Key yourself via the My Bamboo area of the Bamboo Solutions website. See Generating Activation Keys using My Bamboo for more information.
Once you have the Activation Key, enter it in the space provided and click Activate.
NOTE: The Machine Key, as you may have guessed, is tied to the HW profile of the server. As such, the Activation Key is also tied to the HW profile. If the HW profile of a server changes, the License will fail and need to be deactivated and then re-activated, similar to what is required when you move your farm to new servers. See Migrate your Bamboo Product License Key From one SharePoint version to another for more information on what to do when this happens.
|
| 5. |
After the license is activated, it’s status will be displayed on the page.
|
How to activate a Bamboo Site Collection Feature
Product feature activations can be done automatically at the site collection level when the product is installed using the Bamboo Installation/Setup program. However, there are a few reasons why you may need to manually activate (or deactivate) Bamboo product features:
To manually activate (or deactivate) Bamboo product features, follow the instructions below.
IMPORTANT: Perform these steps using an account that is a Site Collection Administrator.
| Step |
Action |
| 1. |
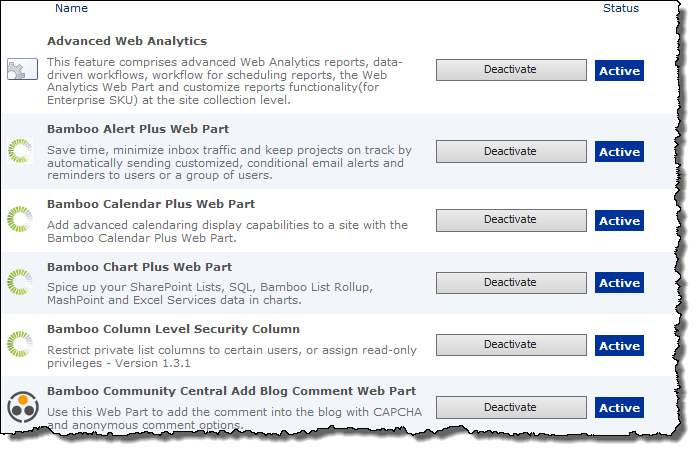
From a page on the top level site of a site collection, click Site Actions and then Site Settings. In the Site Collection Administration section of the page displayed, click Site collection features.
 If you don’t see this section, you may not be a Site Collection Administrator. If you don’t see the link, you may not be on the top level site of the collection. If you don’t see this section, you may not be a Site Collection Administrator. If you don’t see the link, you may not be on the top level site of the collection.
A list of available features will be listed.
|
| 2. |
Find the appropriate feature. The status column indicates if the feature is currently active. If it hasn’t yet been activated, click the Activate button. If it’s activated and you need to Deactivate, click Deactivate.
For information about which feature to activate for a particular product, please see this article.
|
About the Installation Files
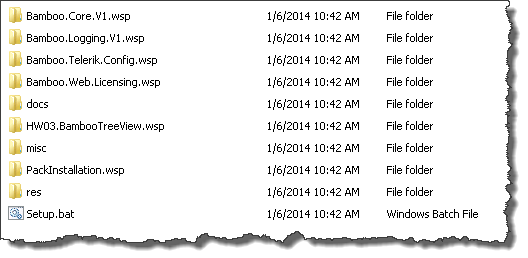 When you extract the product EXE to a location on your SharePoint server, several folders are created that contain installation files and Setup program configuration files. The root level of the extracted file system includes the file Setup.bat, which launches the Setup program. The list below shows the installation files for the Tree View Web Part, as an example.
For manual installation, you will access the following folders that contain installation files:
- Component.wsp: There may be several folders with names ending in .wsp, depending on your product. Each WSP folder contains the installation files for a specific SharePoint Solution. One or more SharePoint Solutions may be installed for each product component.
- docs: Contains the Installation and Licensing Quick Start Guide.
- misc: The MISC folder includes miscellaneous files, including PowerShell scripts for manually installing or uninstalling the product.
- msi: If a MSI folder exists for your product, it could contain multiple files ending in .msi. Each is an installation executable. Some MSI installers in the msi installation folder have both a 32-bit and a 64-bit version. The 64-bit version will include .x64 in the file name. Run the version of the MSI that is appropriate for your operating system. Do not install both.
- res: Contains files required by the Setup program but not necessarily needed during a manual install.
A license error occurs after successful license activation
SYMPTOM
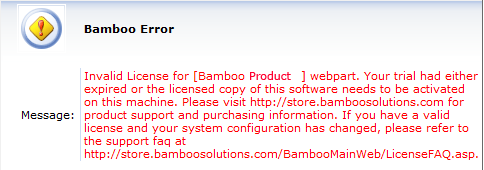
You followed the directions in Activating Your Bamboo Product License successfully activated your license. However, when you go to a page where the web part is used you see a license error:
CAUSE
If this happens immediately after successful activation, the error is typically that one or more WFE servers on the farm do not have an activated license. If you are sure all servers have been successfully activated, another cause could be that a trial extension file (.lic) remains on one of the WFE servers in the farm and is causing a conflict.
If the license error happens after you have been using your activated product for some time, the cause for the issue could be that the hardware profile of one of your WFE servers has changed. Bamboo product licenses are tied to the hardware profile. If that profile changes (i.e., you add a new hard drive), the license needs to be re-activated. See How to move your Bamboo Product License to a new server for resolution information.
RESOLUTION
Confirm that there are no Bamboo trial extension files (Bamboo.lic) on the any of the WFE servers. Follow these steps:
| Step |
Action |
| 1. |
From the SharePoint server, use Windows Explorer to drill down the inetpub folder structure to locate and access the appropriate virtual directory for the web application where the license error appears. |
| 1. |
Locate the ‘bin’ folder where the Bamboo product’s DLL should be found. |
| 1. |
Search for files that start with “Bamboo” and have a .lic extension. If one exists for the product with the license issue, delete it.
NOTE: Be sure to check all WFE servers for the .lic file.
|
About Bamboo product Release Numbers
Overview
Bamboo products have several releases throughout the year. To understand more about the type of releases available, see the Bamboo Solutions Upgrade Policy.
Its important to know what release you have installed on your farm because:
- You can better follow the Release Notes for the product, which tell you about new features and known limitations for each version/release.
- If you are planning to migrate to a new version of SharePoint, you need to make sure you have a certain minimum version/release installed.
- If you need to report an issue to our Support Team, they will need to know what version/release you are using.
Where to find Release Notes
 As you look at each product’s documentation page, you will see there is a link to the Release Notes for that product at the top of the page.
Bamboo produces different version numbers of our products for the different SharePoint platforms.
SharePoint 2007 (WSSv3/MOSS) Release Numbers
If you are running SharePoint 2007, the version/release number consists of 4 parts, such as:
R1.2.3.0
- The first digit indicates the Major Release. In the case above, this is “1”.
- The second digit indicates the Minor Release (2 in the example above).
- The third number indicates the build number.
- The fourth number will always be 0 unless you are using SharePoint 2013 (see explanation below).
SharePoint 2010 Release Numbers
If you are running SharePoint 2010 (SharePoint Foundation 2010 or SharePoint Server 2010), the Major Release digit of the installed product’s file version includes a zero (0) in the digit such as:
10.2.3.0
To match your current installed product with the release notes, remove the first zero (0). The end result is version 1.2.3.0.
SharePoint 2013 Release Numbers
If you are running SharePoint 2013 (SharePoint Foundation 2013 or SharePoint Server 2013), the Major Release digit of the installed product’s file version includes a zero (0) and the fourth digit is “2013” such as:
10.2.3.2013
To match your current installed product with the release notes, remove the first zero (0) and the 2013. The end result is version 1.2.3.0.