Examples of Request Approval Widget
Sample Request Approval Workflow and Tasks
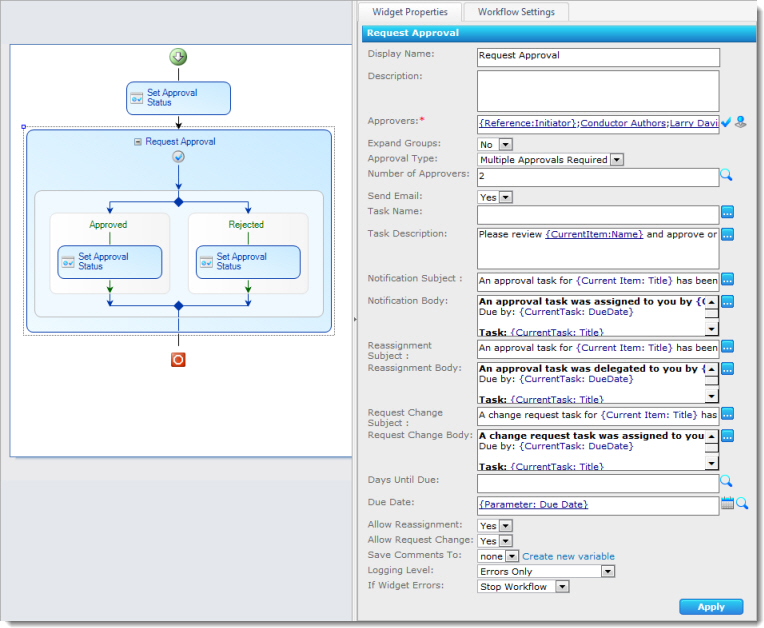 The screenshot here shows a configured Request Approval workflow with the following properties:
- One Reviewer name is a lookup to the workflow initiator.
- One Reviewer is a SharePoint group, which will NOT be expanded – only one task will be assigned for the group.
- Multiple approvals are required.
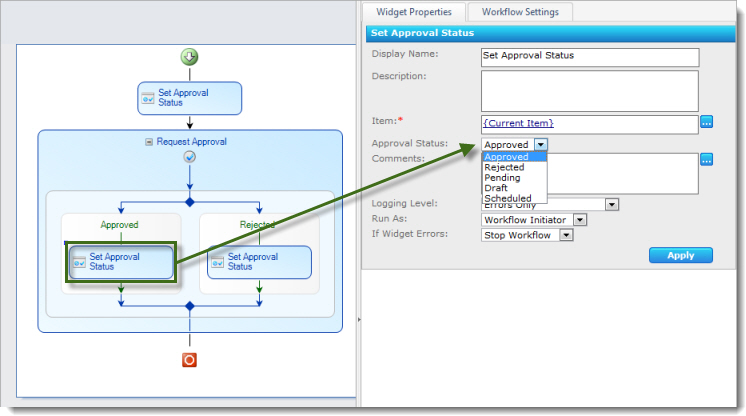
- Throughout the workflow, an Approval Status column is updated to show the item status depending on the path of the workflow.
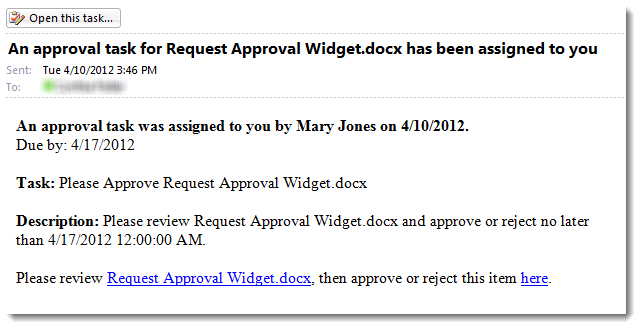
- The Task Description includes lookups to the list item Name and a workflow initialization form variable. This description will be included in the body of the task notification e-mail, which uses default text configured in the global E-mail Settings.
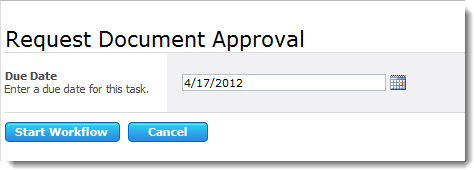
- The Task Due Date will be set to a due date collected in a workflow initialization form variable.
- Reassignment and Request Change are allowed.
When this workflow runs, the workflow initiator is prompted to enter a Due Date for the task using a workflow initialization form configured with the workflow. For details on configuring workflow initialization forms, see the Workflow Forms section.
After the workflow initiator enters a Due Date, the workflow starts by updating the Status of the item to Pending using the first Update Item widget in the workflow, and then assigns tasks to the workflow initiator, the SharePoint group, and other Approvers assigned in the widget.


In this example, e-mail notifications are sent to each person or group assigned an approval task.
Each approver now has the option to complete the approval task and provide comments in the task form. In this form, an approver has the following options:
- Approve the item by entering comments (optional) and clicking Approve.
- Reject the item by entering comments (optional) and clicking Reject.
- Reassign the task to another user using Reassign Task (see the Reassign Task topic for more details).
- Create a new task for the item using Request Change (see the Request Change section for more details).
- Cancel and do nothing at this time.
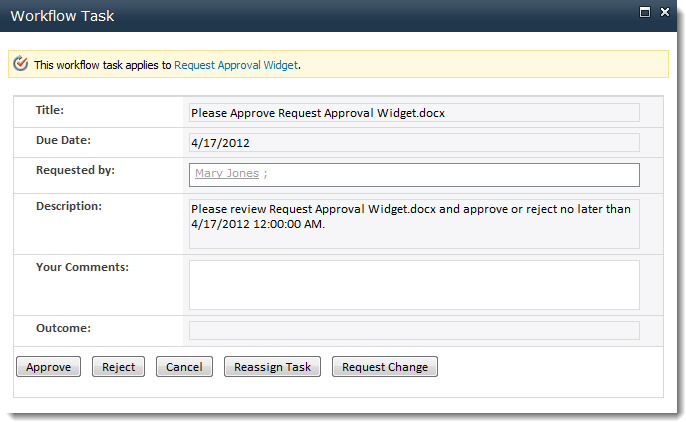
NOTE: If you have Workflow Conductor 2.5 or higher and InfoPath Forms Services, you can customize this task form.
During this particular workflow instance, the following events occur:
- Approver and workflow initiator Mary Jones uses the Request Change option to assign a task to user Sue Brown. Mary’s original task is marked Completed.
- Bob Smith, a member of the Conductor Authors group, Reassigns the Conductor Authors task to John Adams. The Conductor Authors task is marked Completed.
- John Adams completes the task Reassigned to him by Bob Smith, and approves the item.
- Sue Brown completes her Change Request task, and a new task is automatically created for Mary Jones.
- Mary Jones completes her task and approves the item.

- The Status column for the item is updated to Approved by the Update Item widget in the Approved branch of the Request Approval widget.

When the widget finishes running, the workflow initiator is sent an e-mail notification that includes a summary of any comments entered by the approvers.
Example Using Log to History Widget
Logging Workflow Outcome
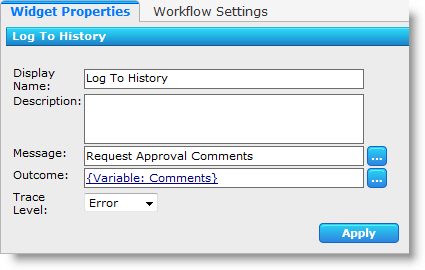 The Log History widget below is configured to log the comments entered by participants in a Request Approval workflow, which were captured in a workflow variable.

Return to:
Widget Properties
Lists and Items Widgets
See Also:
Example Using Move Item Widget
Move Item to a Department Archive Site
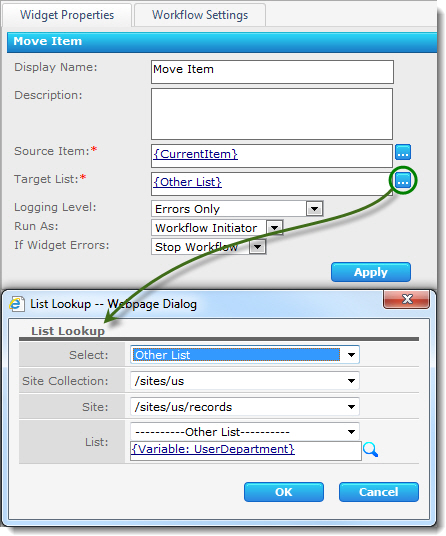 The Move Item widget shown below is configured to move an item to an archive library for the user’s department.
The department library name is a lookup to the workflow initiator’s SharePoint user profile Department value, stored in a workflow variable by the Get User Info widget.
Return to:
Widget Properties
Lists and Items Widgets
See Also:
Example Using Run Parallel Widget
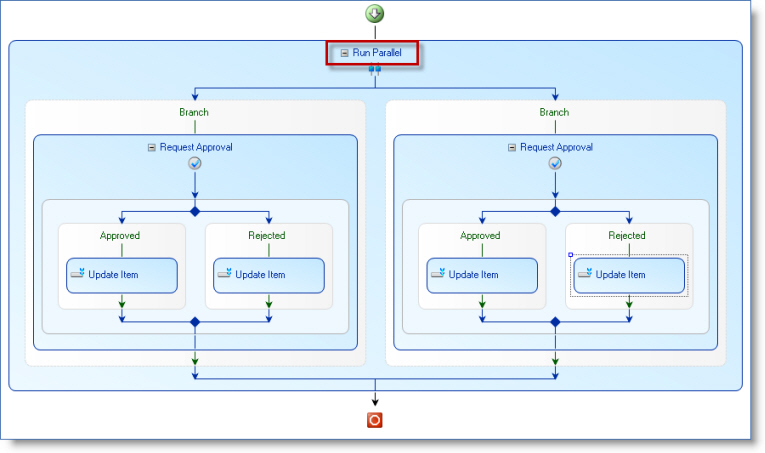
The sample workflow below shows a Run Parallel widget used to allow two Request Approval widgets to run at the same time.
Return to:
Run Parallel Widget
Workflow Logic Widgets List
See Also:
Example Using Delete Item Widget
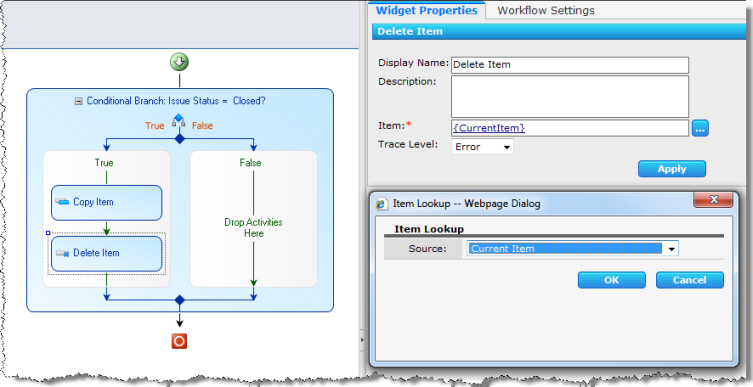 This example shows the Delete Item widget configured to delete the current item as part of a workflow that archives an item in an Issues list to another location when it is marked Closed.
Return to:
Widget Properties
Lists and Items Widgets
See Also:
Example Using Delete List
Delete List Named in Workflow Variable
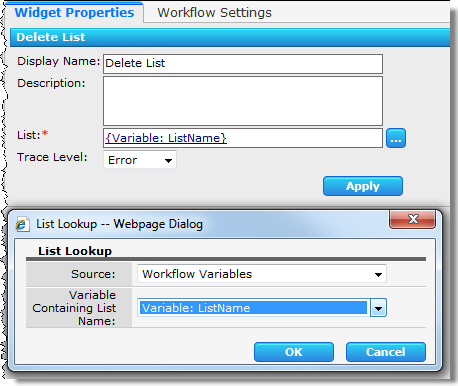 The example here shows a Delete List widget configured to delete a list that was created during the same workflow with a Title stored in a workflow variable:
Return to:
Widget Properties
Lists and Items Widgets
See Also:
Example Using Discard Check Out
Discard Check Out for Current Item
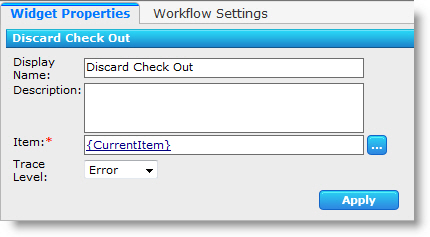 When you drop a Discard Check Out widget to the Studio diagram, it is already pre-configured to discard check out for the current item, as shown here:
Widget Properties
Lists and Items Widgets
See Also:
Example Using Get User Info Widget
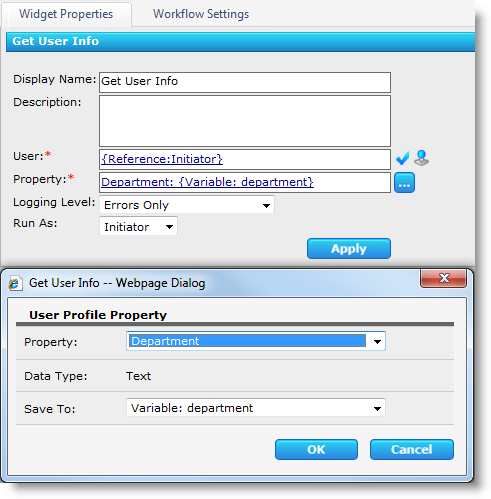
The Get User Info widget retrieves a single SharePoint user profile property for a user and stores it in a workflow variable.
Notes for MOSS Users: This widget uses the MOSS User Profile Account property in the Workflow Conductor Control Panel > Account Settings page. This setting specifies a user account that has the Manage User Profiles Shared Services right in Shared Services Administration > Personalization services permissions.
This account is used to access the SharePoint User Profile Properties list.
Access to specific user profile data is security trimmed at runtime based on the permission of the user account configured for the widget in the Run As property.
Notes for WSS Users: The widget will retrieve profile data from the User Information List in the current site collection. Access to SharePoint user profile data is security trimmed at runtime based on the permission of the user account configured for the widget in the Run As property.
Return to:
Widget Properties
User & Group Management Widgets
See Also:
Example Using Check In Widget
Check In a Major Version of a Document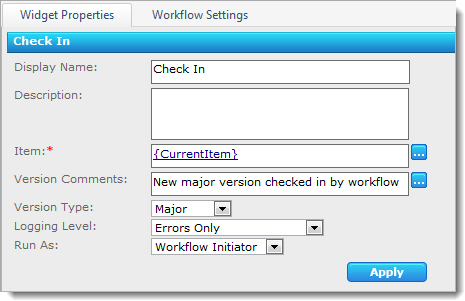
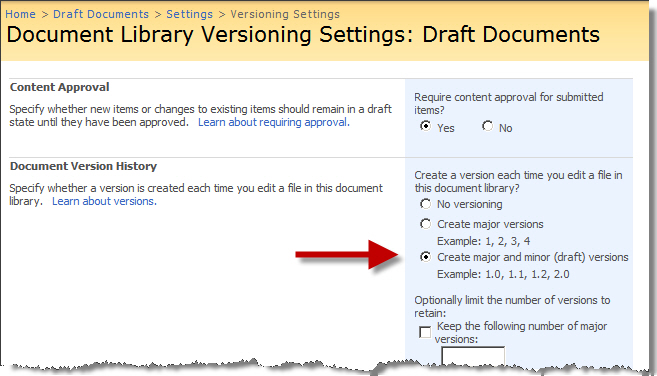
The Check In widget here is configured to check in a major version of the current item to a document library configured for versioning.
Return to
Check In Widget
Lists and Items Widgets
See Also:
Example Using Complete Task Widget
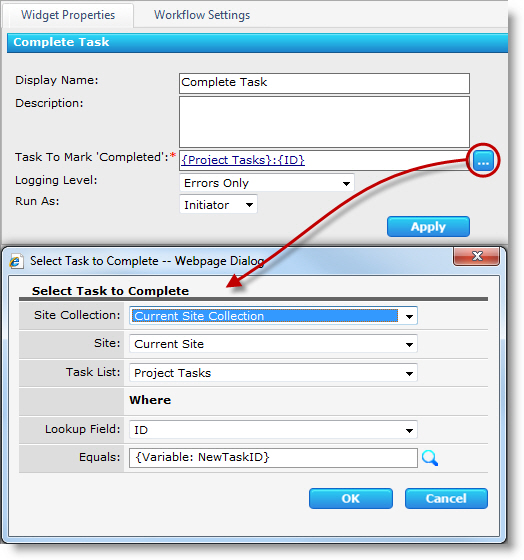 Completing a Task Created in the Same Workflow
The following example shows a Complete Task widget configured to complete a task that was created earlier in the workflow.
The task is identified using the workflow variable the task ID was saved to by the Create Task widget.
Return to:
Complete Task
Lists and Items Widgets
See Also:
Example Using Copy Item Widget
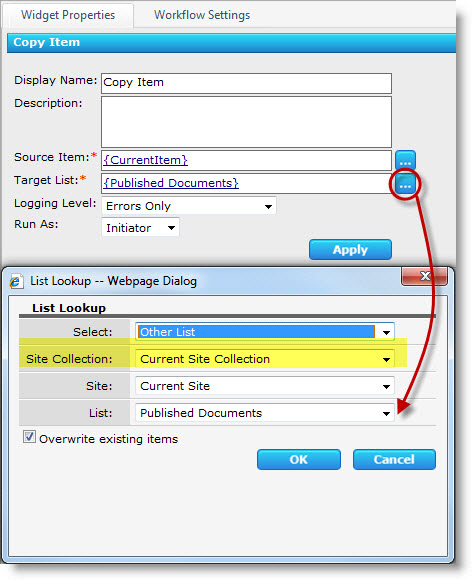
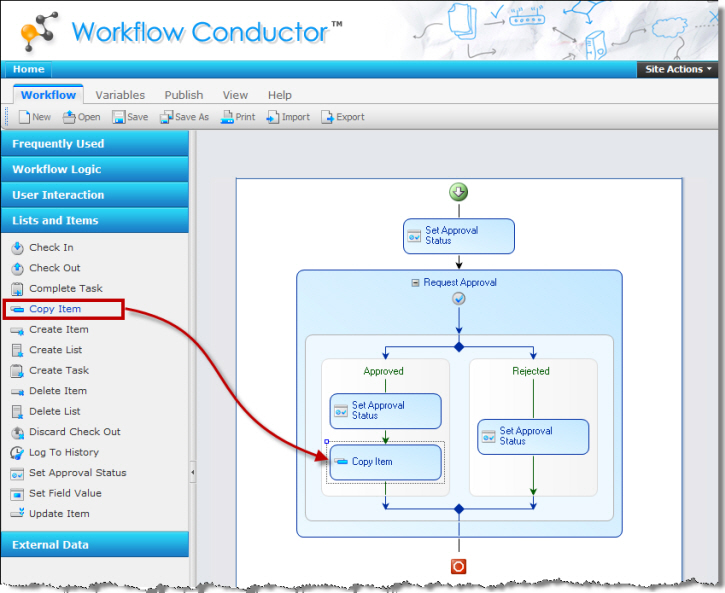 This is an example of the Copy Item widget used as part of a more complex workflow.
The Copy Item Widget is used here to copy a document that was approved using a Request Approval widget from a draft document library to a document library for published documents.
The example below is the way that this widget’s properties were set to copy the item to another list in the same site. You can choose a sub-site or a site in a different site collection. (Remember that document libraries are also lists in SharePoint!)
Return to:
See Also:
Example Using Create Column Widget
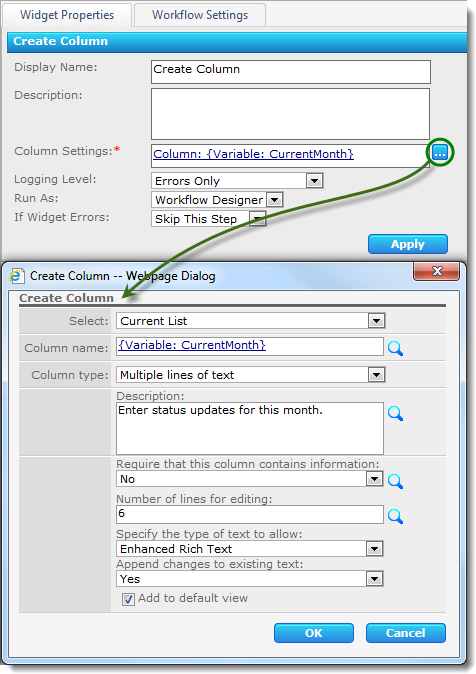 The example here shows a Create Column widget used to create a new column for monthly status updates.
If the column already exists, the widget is configured to skip the step using the If Widget Errors property. The current month can be calculated using a Calculate widget.
Return to Create Column
See Also:
Example Using Create List Widget
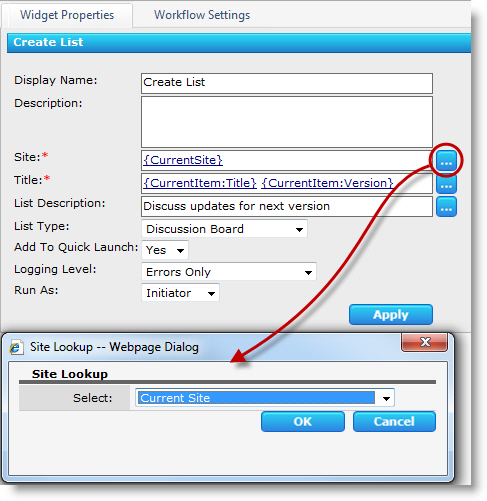
Create a List in the Current Site
|
This example shows a Create List widget configured to create a Discussion Board in the current site to discuss content for a new version of a document as part of a feedback workflow.
The list Title and Description contain lookups to the Title and Version of the current item.
|
 |
Create a List in Another Site
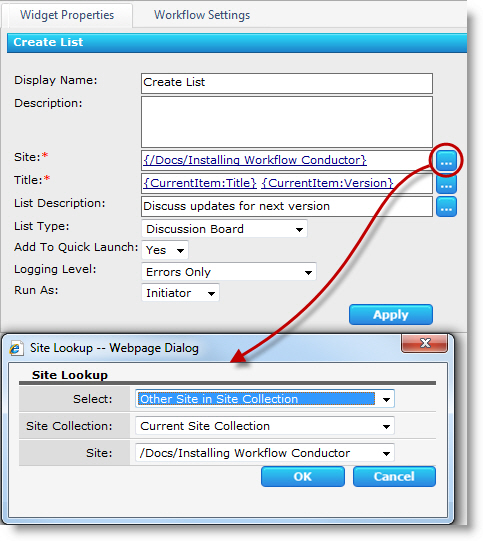 Here, the same widget is configured to create the list in a Document Workspace site instead of the current site.
Return to:
Widget Properties
Lists and Items Widgets
See Also:
Example Using Create Task Widget
Creating a Task in a Project Task List
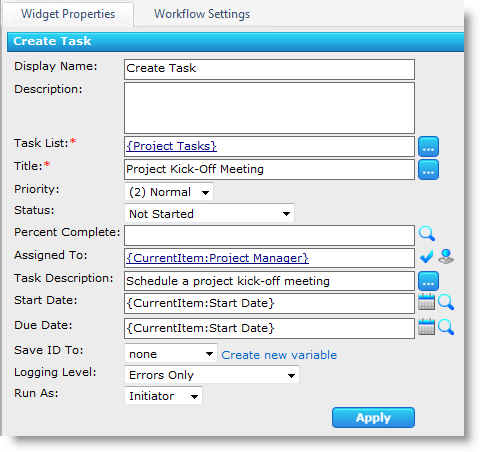 In this example, a workflow creates a series of tasks in a Project Tasks list when a new entry is added to a project tracking list.
The screenshot here shows a Create Task widget configured for one of the tasks created by the workflow.
Return to:
Widget Properties
Lists and Items Widgets
See Also:
Example of Using Access SP via REST Widget
Example: Add an Item to an External SharePoint Site
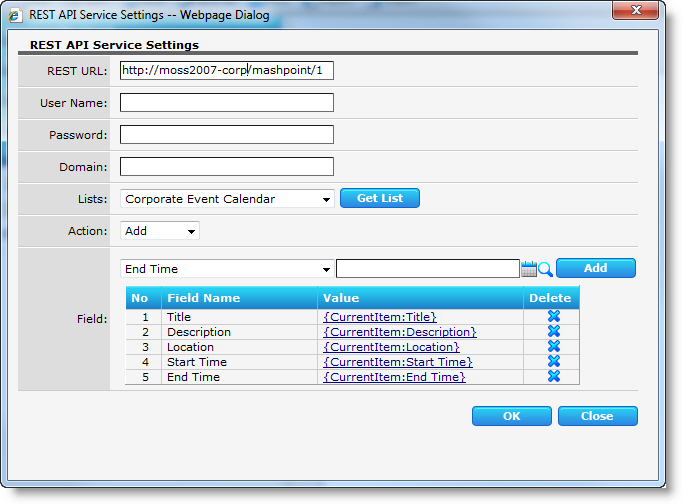 In this example, an Access SP via REST widget is configured to allow a user to add an item in a local SharePoint calendar list to a SharePoint calendar list called “Corporate Events Calendar” in an external site.
NOTE: Remember that workflows run in the security context of the workflow initiator, not the designer. The user running the workflow must have permission to add items to the external list, unless the designer entered a specific Username and Password with the widget.
Return to:
Access SP via REST
External Data Widgets
See Also:
Example of Using Compare Widget
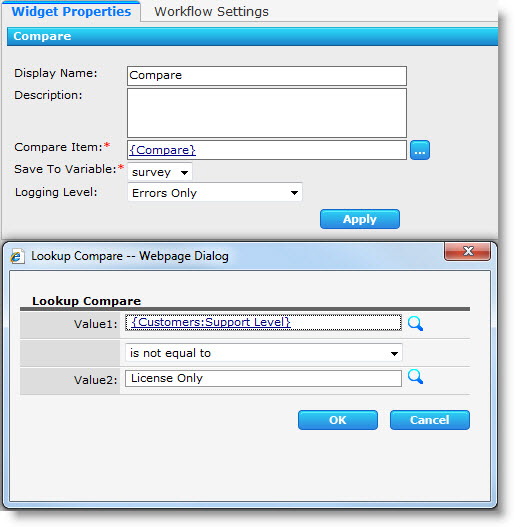 In this example, a customer service group wants to use a workflow to set a Phone Survey field in a trouble ticket list to True when a ticket is created if a customer has purchased a support contract.
To do this, a Compare widget checks the Support Level field for the customer in a Customers list and stores the result in a workflow variable.
An Update Item widget then updates the Phone Survey field to the new value of the workflow variable.
Return to Compare Widget Properties
See Also:
Example of Using Create AD Account Widget
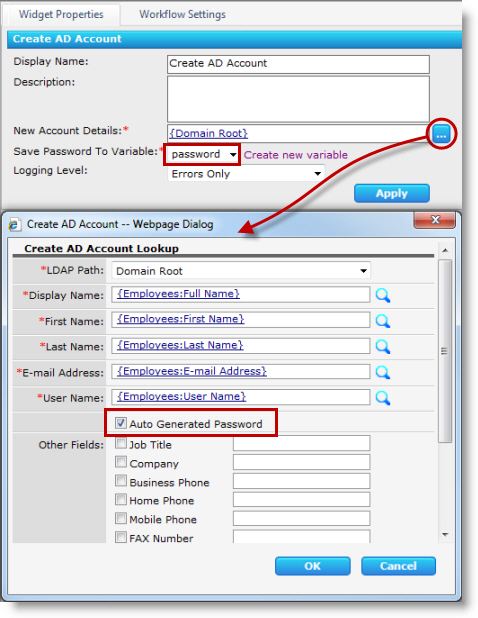 In this example, a Create AD Account widget is configured to create a new Active Directory account for an employee in a SharePoint list called “Employees”.
In this example, the Active Directory path for the account, “Domain Root”, was selected from a list of LDAP paths that were configured in the Active Directory Settings section of the Workflow Conductor Control Panel > General Settings page.
The password in this example is auto-generated, and is saved to a variable called password. This allows the password to be e-mailed to the workflow initiator later in the workflow by including the workflow variable in the Body property of a Send Email widget.
Return to
Create AD Account
User & Group Management Widgets
See Also:
Example of Using the Disable AD Account Widget
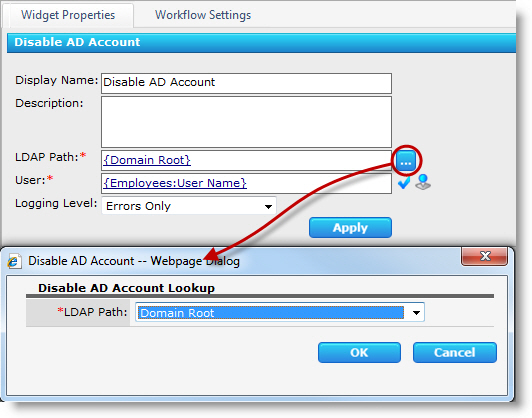 This example shows a Disable AD Account widget configured as part of an employee out-processing workflow.
The workflow performs various tasks when an employee leaves the company, including disabling the user account in Active Directory.
In this case, the LDAP path selected is from a list of LDAP paths configured in the Active Directory Settings section of the Workflow Conductor Control Panel > General Settings page.
Return to:
Disable AD Account Widget Properties
User & Group Management Widgets
See Also:
Example of Wait for Field Change
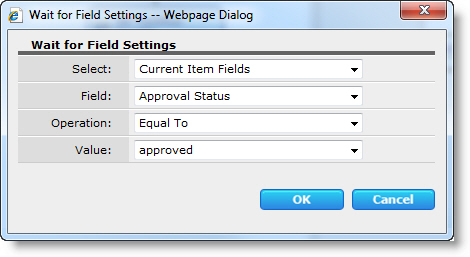 In this example, a Wait For Field Change widget is configured to pause the workflow until a field named “Approval Status” is updated to Approved:
Return to
Wait for Field Change Widget
Workflow Logic Widgets List
See Also:
Example of the Calculate Widget
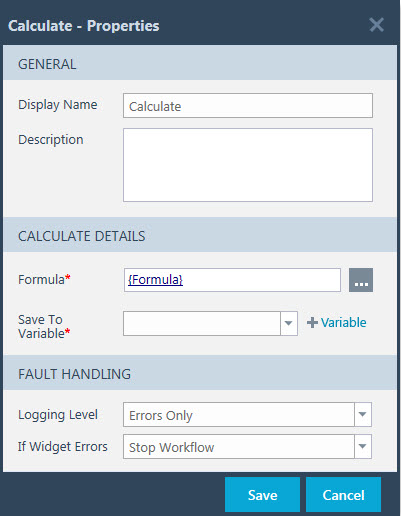 The Calculate widget accepts Excel-style functions and stores the result in a workflow variable. Function parameters can include lookups and functions can be nested to perform multiple operations. In this example, a Calculate widget formula calculates a date 10 days from today to use as a task Due Date.
 The Formula column is required.
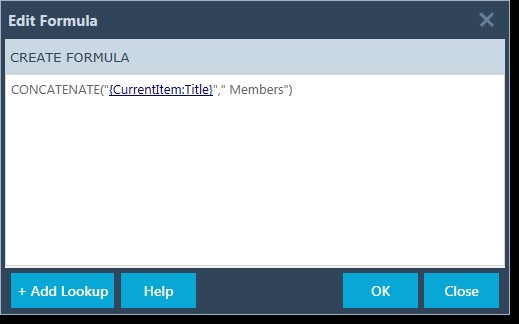
Click the  button to enter a formula. The Edit Formula dialog will appear as show here.
- Create Formula: Enter a formula in the formula box. For a list of available functions and usage information, click the Help button. The example here shows the CONCATENATE function in use.
- Add Lookup: To insert a lookup in a function, click the + Add Lookup button.
- OK: Click OK to save changes to your formula.
- Close: Click Close to close the Edit Formula dialog without saving any changes.
Click Save to save the widget settings. Otherwise click Cancel to close the Properties dialog without saving any changes. Note that you will not be able to open properties of another widget until you close the open dialog.
Return to
See Also:
Example of the Collect Data From User Widget
Normally, you can collect data for a workflow only on an initialization form when the workflow starts. However, the are many instances when you might need to collect some information later in the workflow. You can use the Collect Data From User widget to do that. Here is an example.
Scenario
The scenario for this example is to create a site workflow that can be started by someone in the HR department when they need to request travel preference information from an employee.
Creating the Workflow
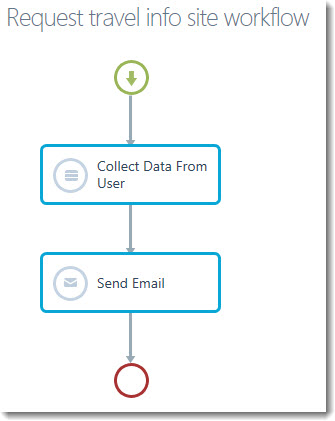 The workflow will look like that shown. In addition to the Collect Data From User and the Send Email widgets, it also has an Initialization Form.
Open the Workflow Conductor Studio from any list and follow these steps to build this workflow:
| Step |
Action |
| 1. |
 Click the Init Form link in the main menu to open the Initialization Form editor. Click the Init Form link in the main menu to open the Initialization Form editor. |
| 2. |
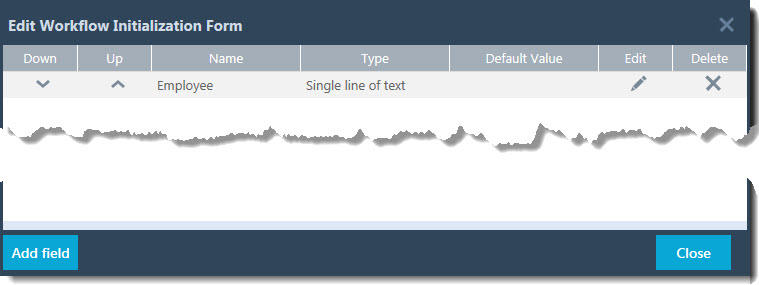
Add one parameter to the Initialization form. Call it Employee and make it a Single line of text.
 |
| 3. |
Create a variable to store the WF Task ID created in the Collect Data From User widget.
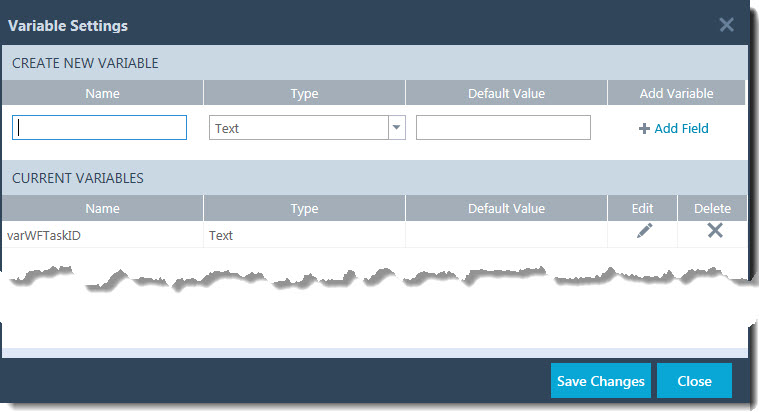 Click the Variables link in the main menu to open the Variable Settings form. Click the Variables link in the main menu to open the Variable Settings form.
Create a variable of type Single line of text and call it varWFTaskID.
|
| 4. |
Configure the Collect Data from User widget.
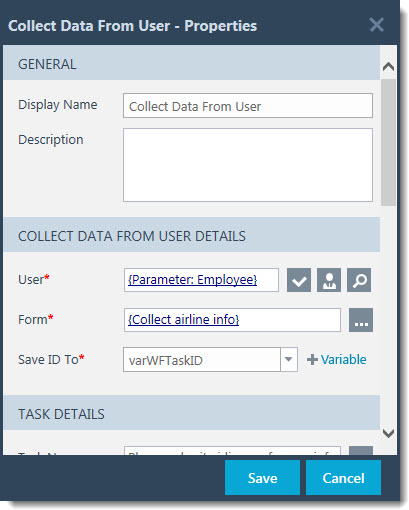 Double click the Collect Data from User widget to open the widget properties. Double click the Collect Data from User widget to open the widget properties.
For the User property, click the lookup icon ( ) to open the Define Lookup dialog. ) to open the Define Lookup dialog.
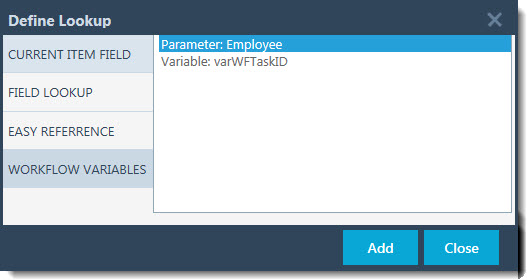 On the Define Lookup dialog, click the Workflow Variables category and select the Parameter: Employee from the list. Click Add to save your selection and close the Define Lookup dialog. On the Define Lookup dialog, click the Workflow Variables category and select the Parameter: Employee from the list. Click Add to save your selection and close the Define Lookup dialog.
 Parameters are fields defined in the initialization form. Variables are created on the Variables page. Parameters are fields defined in the initialization form. Variables are created on the Variables page.
On the widget properties page, click the  icon for the Form property to open the Edit User Form dialog. Enter Collect airline info as the Form Name and add the three fields shown below by clicking the Add Field button in the lower left corner of the dialog. When done, click OK to save the form and close the Edit User Form dialog. icon for the Form property to open the Edit User Form dialog. Enter Collect airline info as the Form Name and add the three fields shown below by clicking the Add Field button in the lower left corner of the dialog. When done, click OK to save the form and close the Edit User Form dialog.
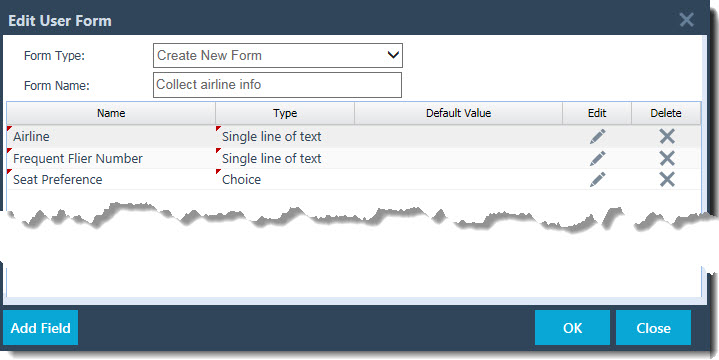
Fill in the other information in the widget properties. When ready, click Save on the widget properties form to save and close the widget properties.
|
| 5. |
Configure the Send Email widget.
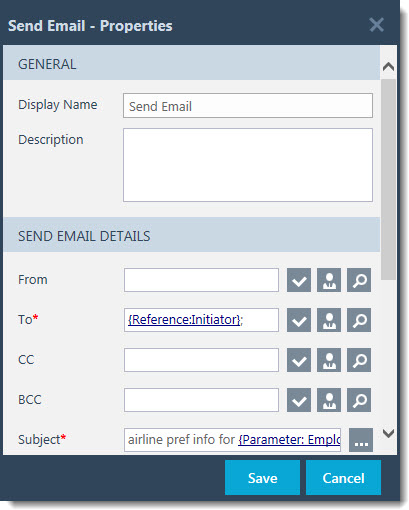 For the To property, click the hourglass icon ( For the To property, click the hourglass icon ( ) to open the Define Lookup dialog. ) to open the Define Lookup dialog.
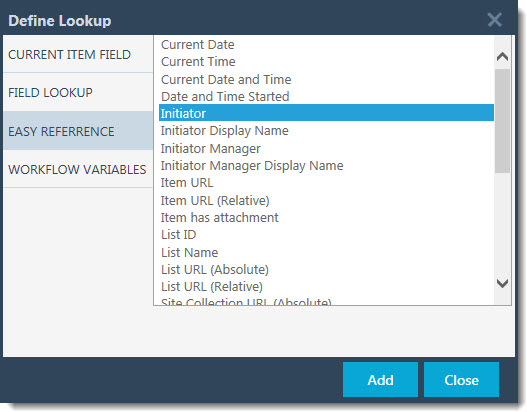 Select Initiator from the Easy Reference area. Select Initiator from the Easy Reference area.
Click Add to save the selection and close the Define Lookup dialog.
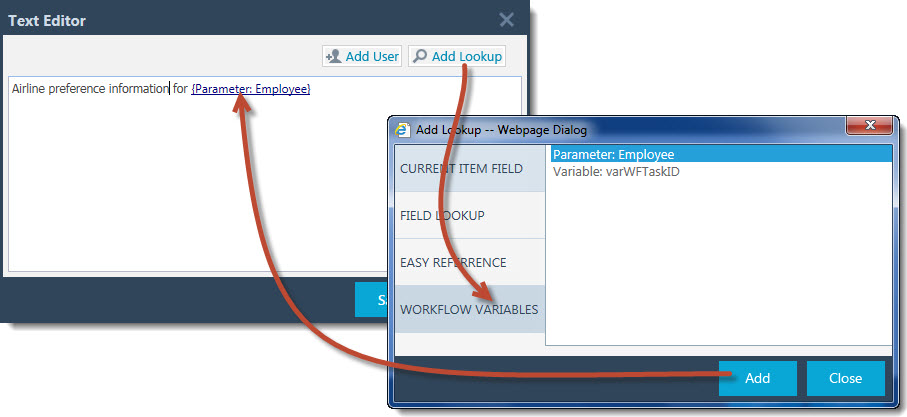
Configure the Subject line by clicking the hourglass ( ), entering Airline preference information for, and selecting Parameter: Employee from the Workflow Variables section of the Define Lookup dialog. Click Save to save the Subject and close the Rich Text Editor. ), entering Airline preference information for, and selecting Parameter: Employee from the Workflow Variables section of the Define Lookup dialog. Click Save to save the Subject and close the Rich Text Editor.
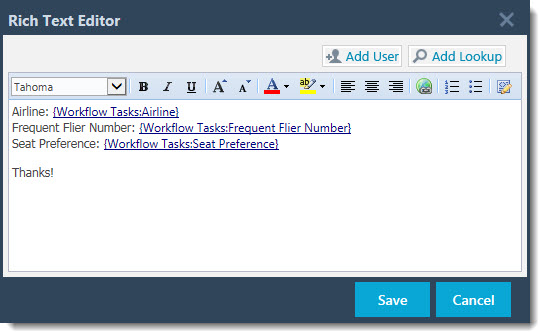 Configure the email Body by clicking ( Configure the email Body by clicking ( ) to open the Rich Text Editor. Configure the message like that shown. ) to open the Rich Text Editor. Configure the message like that shown.
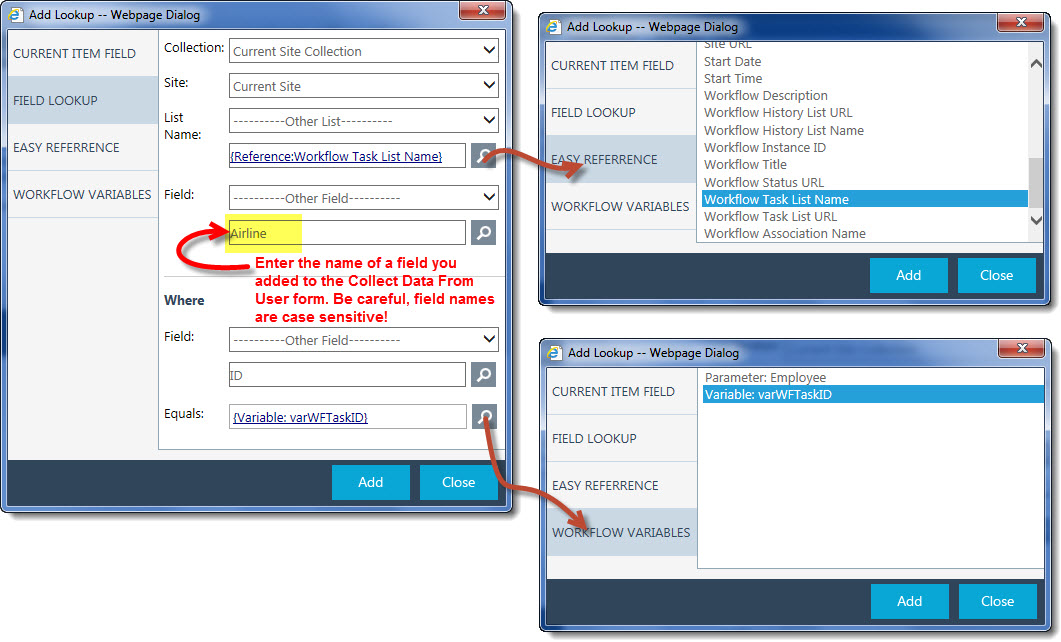
To add the lookups for form values, click Add Lookup and configure them like that shown below.
 Rather than entering a name for the workflow tasks list, lookup to the Easy Reference called Workflow Task List Name. This way, the form values will always be retrievable, even if the person who associates the workflow to new a list changes the name of the associated workflow tasks list. Rather than entering a name for the workflow tasks list, lookup to the Easy Reference called Workflow Task List Name. This way, the form values will always be retrievable, even if the person who associates the workflow to new a list changes the name of the associated workflow tasks list.
Click Save to save the message Body and close the Rich Text Editor. Then click Save to save the widget properties and close the Properties dialog.
|
| 6. |
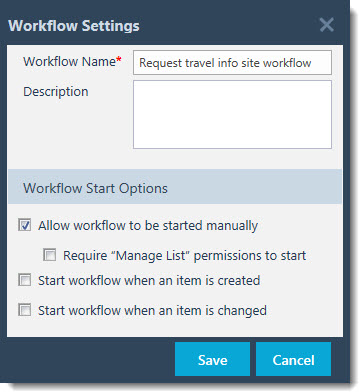 Click the Settings link in the main menu to open the Workflow Settings form. Name the workflow Request travel info site workflow and make sure the manual workflow start option is enabled. Click the Settings link in the main menu to open the Workflow Settings form. Name the workflow Request travel info site workflow and make sure the manual workflow start option is enabled. |
| 7. |
 Save and publish the workflow as a Site Workflow by clicking Publish as Site Workflow from the main menu. Save and publish the workflow as a Site Workflow by clicking Publish as Site Workflow from the main menu. |
Running the Workflow
This workflow was published as a Site Workflow. Site workflows are not associated with any list, so you do not start them from a list item. Follow these steps to start this Site Workflow:
| Step |
Action |
| 1. |
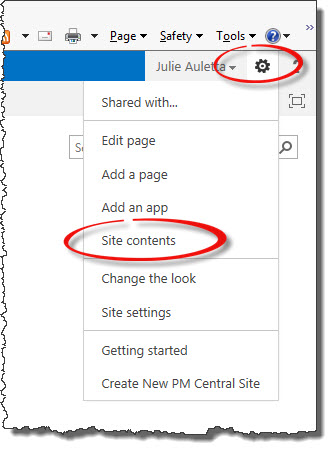 View Site Contents by clicking the gear icon ( View Site Contents by clicking the gear icon ( ) and selecting Site Contents. ) and selecting Site Contents. |
| 2. |
On the Site Contents page, click Site Workflows.
 |
| 3. |
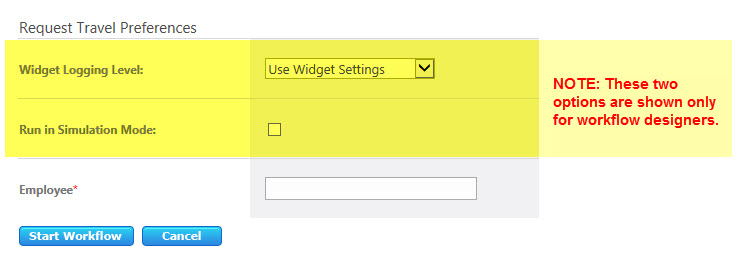
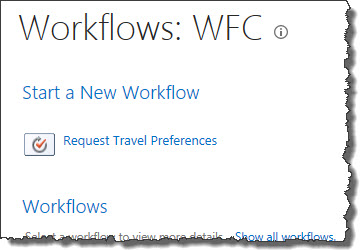 Click the desired workflow to start it. The initialization form is presented. Click the desired workflow to start it. The initialization form is presented.
Fill in the appropriate information and then click Start Workflow.
 |
| 4. |
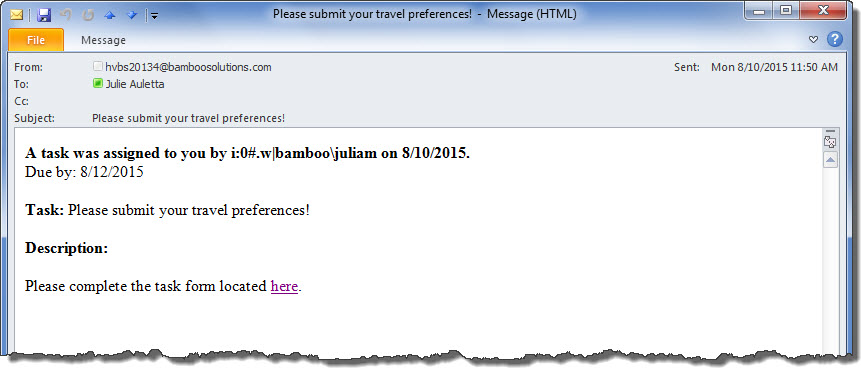 For this particular workflow, an email is sent to the Employee entered in the initialization form. The email has a link to a SharePoint workflow task form, which is shown here. For this particular workflow, an email is sent to the Employee entered in the initialization form. The email has a link to a SharePoint workflow task form, which is shown here. |
| 5. |
Clicking the link in the email opens the task form in SharePoint.
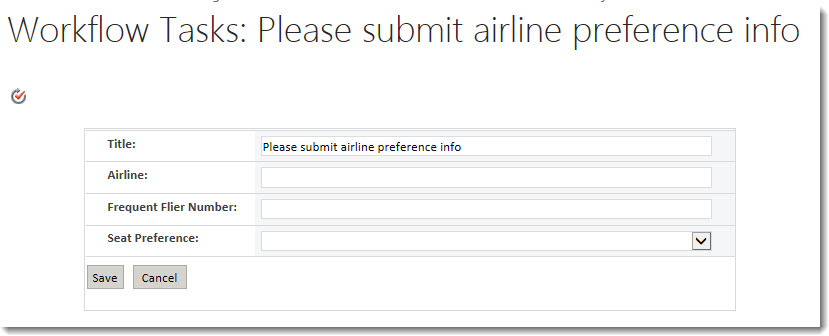
The employee enters values and clicks Save to complete the task. |
| 6. |
A final email containing the employee’s travel preferences is sent to the workflow initiator.
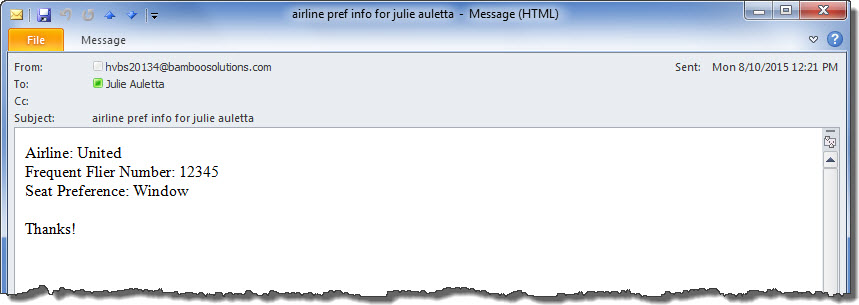
 Instead of sending the travel preferences in an email, you could also create an item in a list and send the link to the item via email. This alternative stores the preferences in SharePoint for future reference, rather than in an email sent to an individual. Instead of sending the travel preferences in an email, you could also create an item in a list and send the link to the item via email. This alternative stores the preferences in SharePoint for future reference, rather than in an email sent to an individual.
|
Example of Delay Until Condition is Met
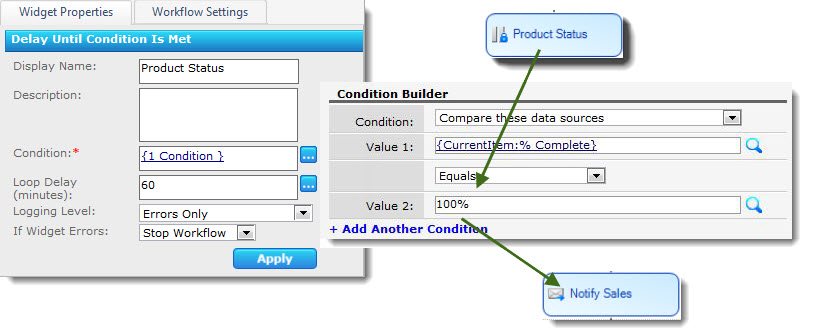
In this example a manager wants to design a workflow to notify sales to begin promoting a new product immediately after management decides it is complete.
The Delay Until Condition is Met widget below pauses the workflow until the % Complete column is equal to 100%. Once the status is 100% the workflow moves on to send a notification email.
Return to:
Delay Until Condition is Met Widget Properties
Workflow Logic Widgets List
See Also:
Example of Delay Until Widget
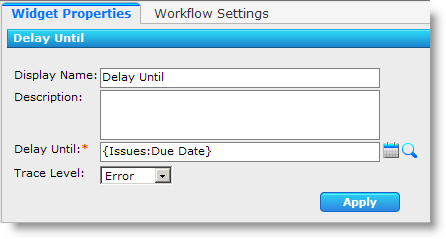 The Delay Until widget pauses a workflow until the date and time specified in another SharePoint field is reached.
In this example, it is delayed until the date is reached on the Due Date in an Issues List.
Return to:
Delay Until Widget Properties
Workflow Logic Widgets List
See Also:
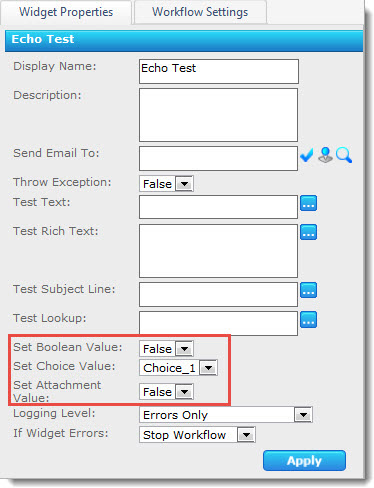
Example of Echo Test Widget
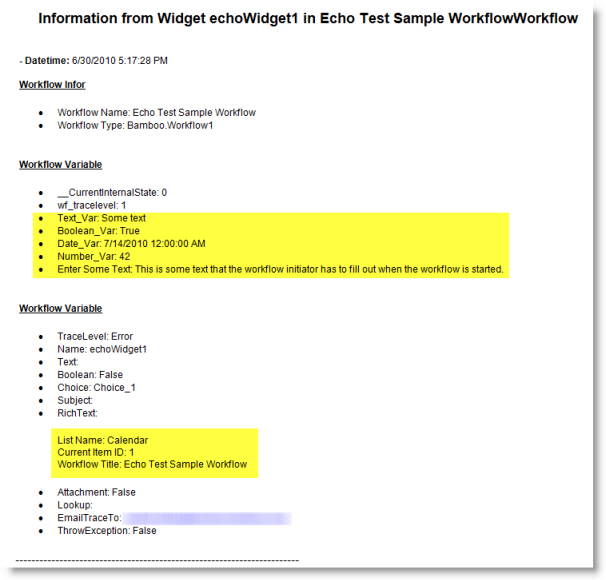
| In this example, the Echo Test widget is configured to send the current value of several lookups, along with the current value of any workflow variables, to a trace recipient. |
Below is an example of the test results: |
 |
 |
|
Return to:
Echo Test Widget
Workflow Logic Widgets List
See Also:
Example of End Workflow
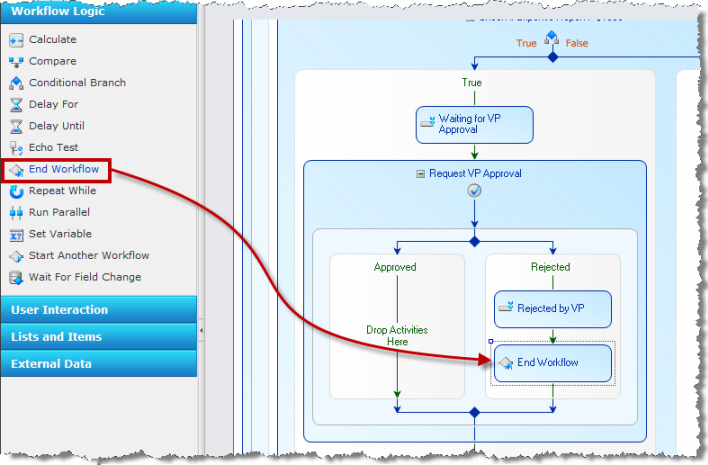
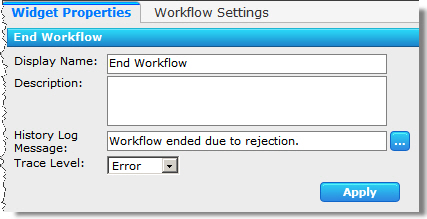
This is an example of an End Workflow widget used inside a Request Approval widget to end the workflow if it follows the Rejected path:
Return to
End Workflow Widget
Workflow Logic Widgets
See Also:
Example of Start Another Workflow
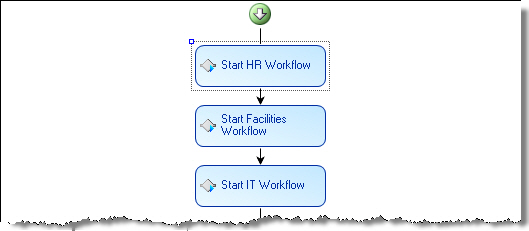 Here is an example of a workflow started when a new employee is added to an Employees contacts list. This workflow starts workflows for each department that has to perform tasks prior to an employee’s start date (which is a field in the Employees list). Notice that each Start Another Workflow has been configured with a custom Display Name to make the workflow easier to follow.
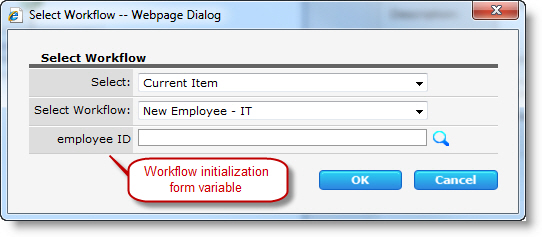 Each of the workflows in the Start Another Workflow widgets is configured with a workflow initialization form variable to gather the Employee ID stored in the Employees contacts list, because this ID is needed in the workflow. The value for this form field is provided in the Start Another Workflow widget, as shown below.
Return to
Start Another Workflow Widget
Workflow Logic Widgets List
See Also:
Example of Repeat While With Two Conditions
Example 1: Repeat While Ticket with High Priority Status is Open
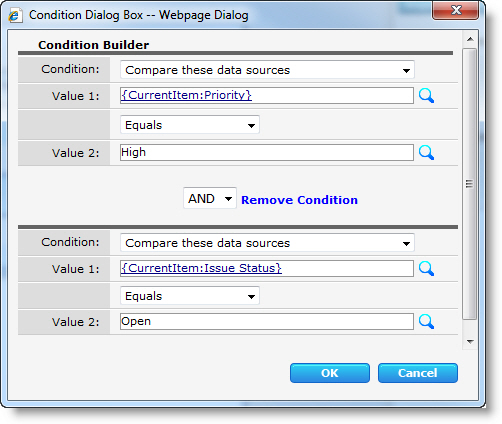 Here is an example of a Repeat While widget configured to send a status update e-mail to a manager every 60 minutes while a ticket with a Priority of “High” has a Status of “Open”. The Compare Widget is used to compare the values and the Repeat While Widget loops every sixty minutes checking the condition.
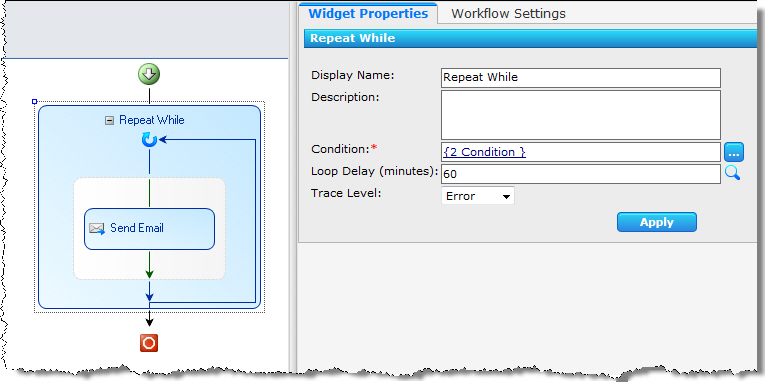
Example 2: Repeat While a Field Is Empty
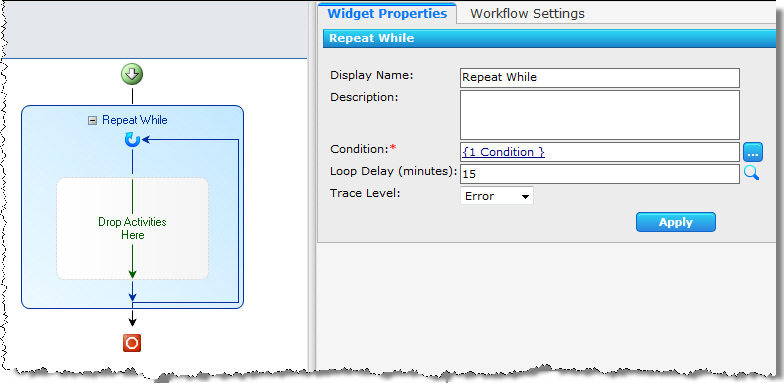
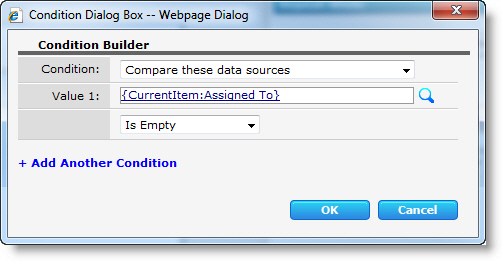 Here is an example of a Repeat While widget configured to check every 15 minutes to see if an Assigned To field has been filled out.
Once the Assigned To field is no longer empty, the widget will exit and the workflow continues with the next widget. Notice that there are no widgets inside the Repeat While widget; it is being used in this instance to simply pause the workflow until a condition is met.
Return to
Repeat While Widget Properties
Workflow Logic Widgets List
See Also:
Example of Send E-mail from Workflow Conductor
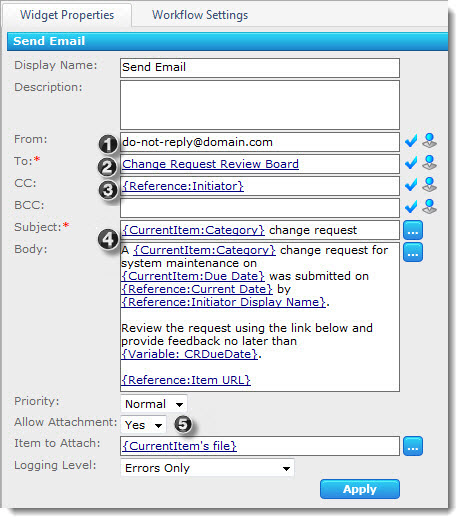 Here is an example of a Send Email widget configured to send an e-mail about the details of a new change request submitted to a SharePoint list:
- The From property is a standard e-mail address.
- The To property is a SharePoint group. Each member of the group will receive a copy of the e-mail.
- The CC property is the workflow initiator.
- The Subject and Body properties contain text combined with various types of Lookups.
- Any item attachments will be sent with the e-mail.
Return to
Send Email Widget
User Interaction Widgets List
See Also:
Example of Set Variable Widget
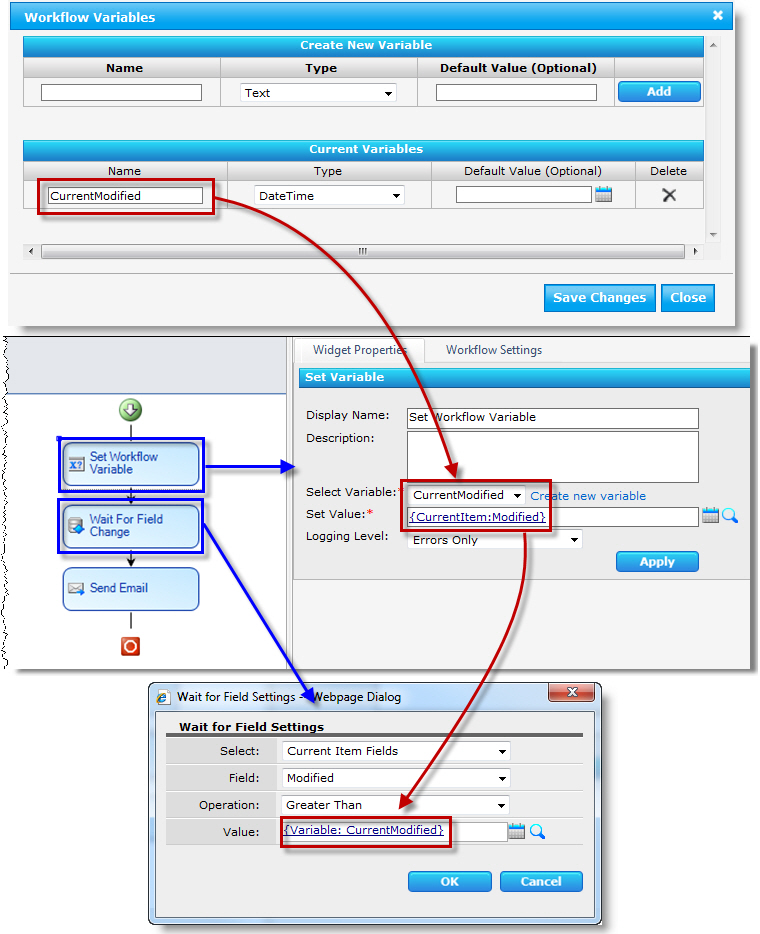
In this example, a workflow variable is set to the current Modified date of an item, which is then used in a Wait for Field Change widget to pause the workflow until the Modified date of the item changes (i.e, the item is updated).
Return to:
Set Variable Widget
Workflow Logic Widgets List
See Also:
Example of Conditional Branching Workflow
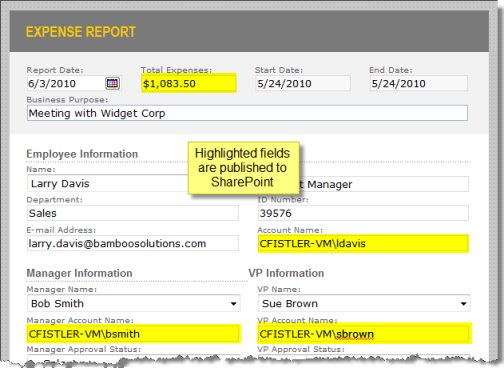 In this example, the Condition Builder is configured to check if an expense report saved to a Forms Library has a Total greater than $1,000. Based on the Request Approval widget, you can add conditional branching, sequential approval, and SharePoint field updates. To make it easier to remember what your workflow does, you can customize widget names.
Setting the stage
Your company submits expense reports using an InfoPath form. Expense reports less than or equal to $1,000 can be approved by the employee’s manager, but expenses over $1,000 must also be approved by someone in a higher job role, such as a Vice President (VP). Expense reports are currently e-mailed for approval, but you want a way to enforce the approval process for larger expenses and employees want more feedback on where the expense report is in the approval process.
Branching Workflow Process Steps
In Summary
No matter how complicated the workflow is, it is simple to create with the Workflow Conductor drag-and-drop user interface. No coding required! You can even “comment” the workflow by customizing widget names.
- The Conditional Branch widget adds intelligence to your workflow and lets it do different things depending on SharePoint item properties.
- Supercharge your InfoPath form libraries by integrating them with Workflow Conductor workflows.
- Copy & paste widgets, including their properties, to save time!
- Need to update a SharePoint field? Try Update Item, Set Approval Status, or Set Field Value – whichever best fits your needs.
- Workflow Conductor integrates with native SharePoint workflow functionality to allow you to change workflow start options.
Example of Custom User Task Form Widget
Example
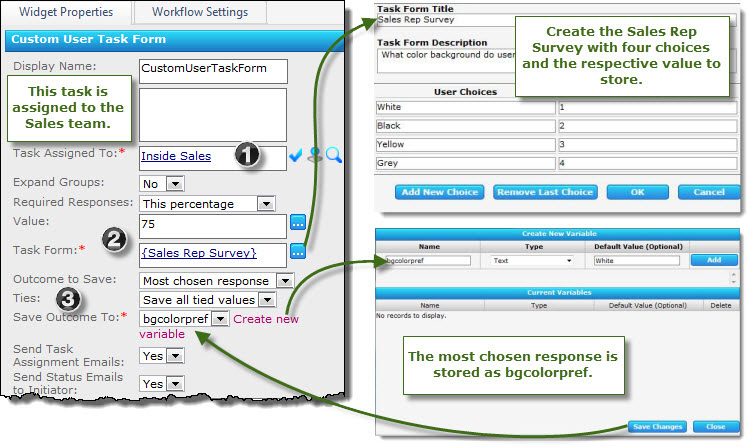 In this example XYZ corporation’s product development group wants to know what color background customers prefer as the default for one of their applications.
The Widget Properties for the form are completed as follows:
- Task Assigned To: – “Inside Sales” is chosen because the product manager decides they have the most interaction with customers.
- Required Responses: and Value: The manager wants to hear from at least 75% of the Sales team.
- Ties: In case there is a tie for the most chosen color, the manager wants all results saved in the variable.
Return to
Custom User Task Form Widget
User Interaction Widgets
See Also:
Example of Delay For Widget
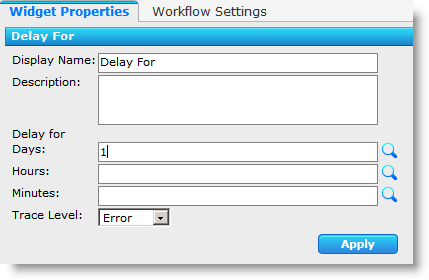 The example here shows how the widget Delay For is configured to pause the workflow for 1 day to allow a user time to complete another part of the business process.
You can enter very precise time frames in the hours and minutes columns as well.
Return to:
Delay For Widget Properties
Workflow Logic Widgets List
See Also:
Error Log Files
Applies To
- Bamboo Products
- Windows SharePoint Services v3 and Microsoft Office SharePoint Server 2007
- SharePoint Foundation 2010 and SharePoint Server 2010
- SharePoint Foundation 2013 and SharePoint Server 2013—Standard Edition
- SharePoint Server 2016
While troubleshooting issues, the Bamboo support team may request a copy of the log files for your Bamboo product(s). Many licensing, functionality and access issue information is captured in the log files found in the BambooSolutions file folder.
This directory is located at C:WindowsTempBambooSolutions
The log files are named in this format: bsc_bamboo_{processID}.log
- where {processID} is the ID of the w3wp.exe process which was handling the request at the time of the error
NOTE: These files will be created on any farm server running the Microsoft SharePoint Foundation Web Application (on SharePoint 2010 or SharePoint 2013) or the Windows SharePoint Services Web Application (on SharePoint 2007).
To determine which servers on the farm run these services:
SharePoint 2007:
- Go to the page Central Administration > Operations > Servers in Farm
SharePoint 2010:
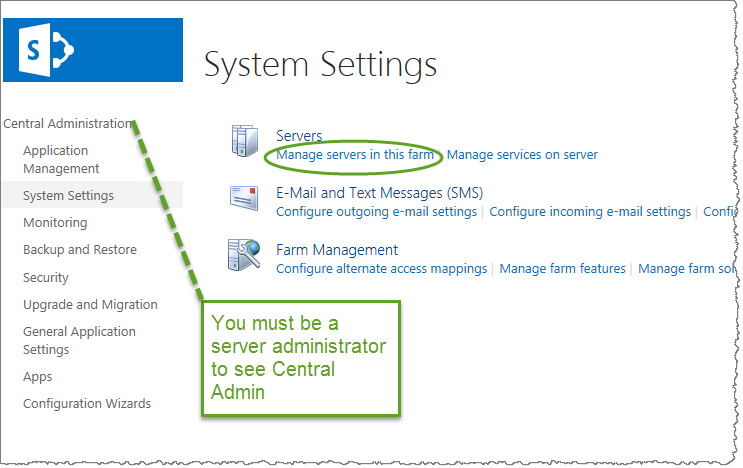
- Go to the page Go to the page Central Administration > System Settings > Manage Servers in this Farm
 SharePoint 2013:
- Go to the page Central Administration > System Settings > Manage Servers in this Farm
There may be many log files. When reporting a problem to support, attach the most recent file(s) to your support ticket. If you know the time at which the error occurred, choose the file with the corresponding date/time.
Refer to Topology and Services in SharePoint Central Administration for a list of servers running this service. Learn more…
End Workflow Widget
The End Workflow widget stops the workflow with an optional message to the workflow history log. No further widgets will be executed.
The primary purpose of this widget is to end a workflow inside one branch of a branched widget, such as Conditional Branch Widget, Request Approval Widget, or Request Feedback Widget.
NOTE: This widget does not need to be added to the bottom of a workflow, since workflows will always end after the last widget runs.
Widget Properties:
| Column |
Description |
| History Log Message |
Enter an optional message to be written to the workflow history when the workflow is stopped. The message can be typed directly into the text field, or click the to add lookups. |
| Click Apply to save the widget settings. |
|
Example of End Workflow
Return to Workflow Logic Widgets List
See Also:
Echo Test Widget
The Echo Test widget is provided for troubleshooting purposes, and would not usually be used as part of a production workflow. The Echo Test widget writes the current value of all workflow variables and any data entered in the other widget properties to the file <drive>:WindowsTempBambooSolutionsConductorEchoWidgetBamboo.Conductor_Echo_%workflowinstanceID%.log.
If there is an e-mail address in the Email Trace To property, the widget will send the information contained in this file to the e-mail recipient.
Widget Properties:
| Column |
Description |
| Send Email To |
Enter a destination e-mail address for the Echo Test widget results using one of the following methods:
- Type a display name or account name for a SharePoint or Active Directory user or SharePoint group* and click the Check User icon (
 ). ).
- Click the Lookup User icon (
 ) to search for a SharePoint or Active Directory user or SharePoint group* in the User Lookup form. ) to search for a SharePoint or Active Directory user or SharePoint group* in the User Lookup form.
- Enter a lookup to e-mail address, user, or group* data using the Add Lookup button (
 ) ) in the User Lookup form. ) ) in the User Lookup form.
- Type an e-mail address (user@domain.com).
NOTE: Groups will be expanded to send an e-mail to each user in the group.
|
| Other Properties |
Values specified for any other property in this widget will simply be echoed in the e-mail body. The Test Text, Test Rich Text, Test Subject Line, and Test Lookup properties all support lookups, and can be used to include current lookup values in the trace e-mail. |
|
Example of Echo Test Widget
Return to Workflow Logic Widgets List
See Also:
Disable AD Account
The Disable AD Account widget disables an Active Directory user account.
This widget uses the Active Directory Settings property in the Workflow Conductor Control Panel > General Settings page. These settings provide a list of pre-configured LDAP paths that can be used in the widget and determines if Conductor Studio designers can enter their own LDAP paths. See the General Settings page for more information.
NOTE: This widget accesses Active Directory with the permission of the user account configured with the LDAP path selected in the widget.
Widget Properties:
Example of Using the Disable AD Account Widget
Return to User & Group Management Widgets
See Also:
Disabling a Workflow
Disable a workflow when you want to prevent users from starting new instances of the workflow but you want to let running instances finish. This is typically done before the workflow association is permanently removed from the list. Disabling a workflow also lets you keep workflow history data available for future reference. If needed, the workflow can be enabled again if it is not removed.
 IMPORTANT: Removing a workflow association terminates any instances of the workflow that might be running and removes the workflow history.
You must have Design or Full Control permission on the list or library to perform these procedures.
| Step |
Action |
| 1. |
 From the List Ribbon, click Workflow Settings. From the List Ribbon, click Workflow Settings. |
| 2. |
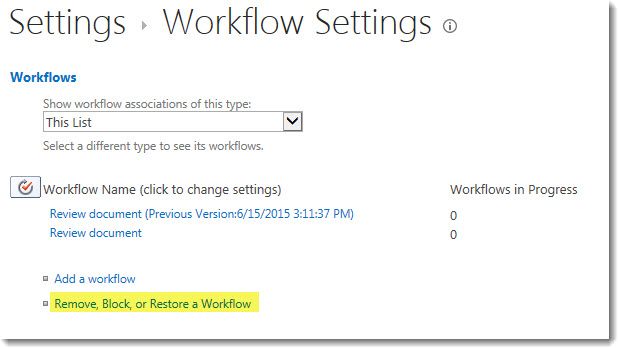 In the Workflow Settings page for the list, click Remove, Block, or Restore a workflow. In the Workflow Settings page for the list, click Remove, Block, or Restore a workflow. |
| 3. |
In the Remove Workflows page, choose the No New Instances radio button for the workflow you want to disable. This will allow current workflow instances to finish, but the workflow will no longer be listed in the available workflows list. 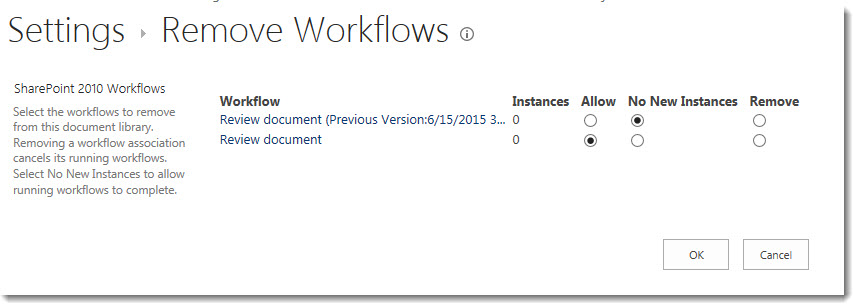
Once no instances are running, it is safe to Remove the workflow by choosing the Remove radio button for a particular workflow association. It is also possible to remove the workflow from the Associated Workflows page accessed from the List Ribbon.
NOTE: Previous Versions of workflows are shown only on the Remove Workflows page shown above and therefore can only be removed from there. Active workflows are shown on the Associated Workflows page and can be removed from either place.
|
See Also:
Discard Check Out Widget
The Discard Check Out widget removes the “Checked Out” status from an item that is currently checked out and restores the previous version number.
NOTE: To discard check out for items checked out to other users, the user configured in the Run As property must have the Override Check Out permission.
Widget Properties:
| Column |
Description |
| Item (Required) |
By default, the Current Item’s “Checked Out” status is discarded. To discard check out on a different item, click the  button. button.
- Source:
- Select Current Itemto discard check out for the item the workflow was started on.
- Select External List Lookup to discard check out for an item in another library in the site, site collection, or another site in another site collection:
- To discard an item from a list in the current site, select a list in the List box. To delete an item from a list in another site or site collection, make the desired selections in the Site Collection and Site boxes and then select a list from the List of available lists and libraries.
- To identify the item in the library that you want to discard check out for, select a Filter Field and enter a match criteria in the Equals box, either by typing one or by adding a lookup using the Add Lookup icon (
 ). If more than one item matches the criteria, the first item returned is deleted. ). If more than one item matches the criteria, the first item returned is deleted.
|
| Run As |
This widget can run with the permissions of the workflow initiator, the workflow designer, or another user. Select the option in the Run As property that best matches your requirement. For more information, see the Common Widget Properties topic. |
| Click Apply to save the widget settings. |
Example Using Discard Check Out
Return to Lists and Items Widgets
See Also:
Deleting a workflow template
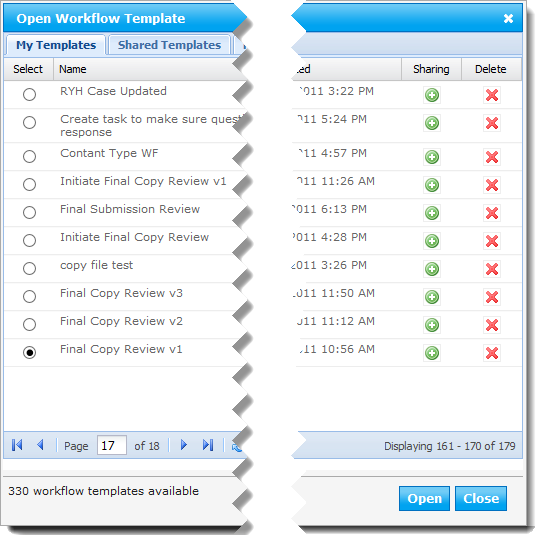 To delete a workflow template from Workflow Conductor Studio, open the template gallery and locate the copy of the template you want to delete.
 IMPORTANT: Deleting a workflow is different than deleting a workflow template. See Removing a Workflow for more information about deleting or removing workflows.
To delete your personal copy of the template, locate it in the My Templates tab and click the Delete link ( ). Click OK to the warning displayed to delete the template.
 IMPORTANT: Once you delete your copy of a template, you cannot get it back. There is no recycle bin. Deleting a template does not affect the published or deployed copy of the workflow in the farm.
To delete the shared copy of a template so it is no longer available to other workflow designers, locate it in the Shared Templates tab and click the Remove from Shared link ( ). You can only delete templates you originally shared, unless you are a template manager.
NOTE: Since the template listed in the Shared Templates tab is a copy of the original, deleting it will NOT delete the original. The owner of the original template can choose to share it again at a later time.
Featured templates can only be deleted by template managers from either the Workflow Conductor Studio Managed Templates tab or the Workflow Conductor Control Panel in SharePoint Central Administration. See Featured workflow templates for more information.
Delete Item
The Delete Item widget deletes an item from a list or library.
Widget Properties:
| Column |
Description |
| Item (Required) |
Click the  button to select an item to delete: button to select an item to delete:
- Source:
- Select Current Item to delete the current item.
- Select External List Lookup to delete an item to another library in the site, site collection, or another site in another site collection:
- To delete an item from a list in the current site, select a list in the List box. To delete an item from a list in another site or site collection, make the desired selections in the Site Collection and Site boxes and then select a list from the List of available lists and libraries.
- To identify the item in the library that you want to delete, select a Filter Field and enter a match criteria in the Equals box, either by typing one or by adding a lookup using the Add Lookup icon (
 ). If more than one item matches the criteria, the first item returned is deleted. ). If more than one item matches the criteria, the first item returned is deleted.
|
| Run As |
This widget can run with the permissions of the workflow initiator, the workflow designer, or another user. Select the option in the Run As property that best matches your requirement. For more information, see the Common Widget Properties topic. |
| Click Apply to save the widget settings. |
Example Using Delete Item Widget
Return to Lists and Items Widgets
See Also:
Delete List
The Delete List widget deletes an entire list or library from the current site.
Widget Properties:
| Column |
Description |
| List (Required) |
Click the  button to select a list or library to delete: button to select a list or library to delete:
- Source:
- Select Current List to delete the current item.
- Select Other List and make selections in the Site Collection, Site, and List boxes to delete another list in the site, site collection, or another list in another site collection.
- Select Workflow Variables to delete a list in a site named in a workflow variable, selected from the Variable Containing Site Name list. If you are deleting a list from the current site collection, the variable must contain the sitename portion of the site URL (e.g., http://myserver/sales). If you are deleting a list from another site collection, the variable must contain the full URL of the site (e.g., http://myserver/sitecoll/site).
|
| Run As |
This widget can run with the permissions of the workflow initiator, the workflow designer, or another user. Select the option in the Run As property that best matches your requirement. For more information, see the Common Widget Properties topic. |
| Click Apply to save the widget settings. |
Example Using Delete List
Return to Lists and Items Widgets
See Also:
Delete Site
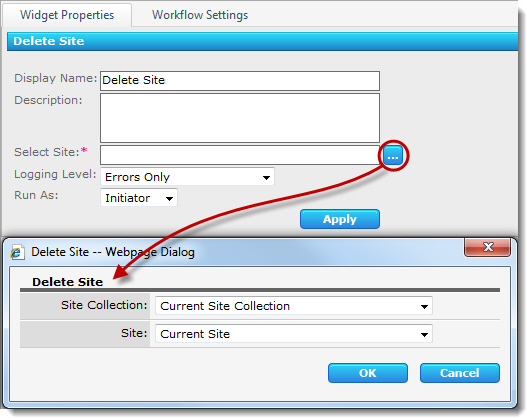 The Delete Site widget permanently deletes a SharePoint site from the site collection. The widget includes the following options and features:
- Choose to delete a site in the existing site list or specify a site URL with a lookup or workflow variable.
- Delete sites in other site collections.
- Run this widget with alternate credentials.
 IMPORTANT: If you delete the current site, the workflow (and any workflows in progress in that site) will not complete. Deleting the site deletes any workflow associations.
Return to Site Management Widgets
See Also:
Default Task List Name
Select the default task list where Workflow Conductor will create/store tasks created by workflows.

The default task list name is Workflow Tasks, but you can change it to a different list to suit your needs.
If a list by this name does not exist in the site where a workflow is published, it will be created when the workflow is published.
Delay For Widget
The Delay For widget pauses a workflow until a specified amount of time has elapsed.
NOTE: Workflow processing is dependent on the SharePoint Timer Service, which evaluates workflow status every 5 minutes. The workflow will resume at the next timer interval after the specified amount of time has elapsed.
Widget Properties:
| Column |
Description |
| Days |
Enter a number of days to pause the workflow. You can type a number or enter a lookup to a number using the Add Lookup icon ( ). ). |
| Hours |
Enter a number of hours to pause the workflow. You can type a number or enter a lookup to a number using the Add Lookup icon. |
| Minutes |
Enter a number of hours to pause the workflow. You can type a number or enter a lookup to a number using the Add Lookup icon.
NOTE: The Days/Hours/Minutes properties can be used in combination. For example: to pause a workflow for 1 hour and 15 minutes, enter 1 in the Hours property and 15 in the Minutes property. If none of the Days/Hours/Minutes properties are filled in, the workflow will pause until the next Workflow timer job interval (up to 5 minutes).
|
| Click Apply to save the widget settings. |
|
Example of Delay For Widget
Return to Workflow Logic Widgets
See Also:
Delay Until Condition is Met Widget
The Delay Until Condition is Met widget pauses the workflow until a predefined condition is reached.
Widget Properties:
| Step |
Action |
| 1. |
Condition (Required): Click the ellipses (  ) beside this field to open the Condition Builder window. ) beside this field to open the Condition Builder window. |
| 2. |
Select a condition from the drop-down menu. |
| 3. |
In the Value 1 box, type in the desired value or click the magnifying glass ( ) to use a lookup. ) to use a lookup. |
| 4. |
Choose an operator from the drop-down menu (e.g. Equals, Greater than, Less than). |
| 5. |
In the Value 2 box, type in the desired value or click the magnifying glass ( ) to use a lookup. ) to use a lookup. |
| 6. |
Click OK. |
The table below lists the possible conditions and a description of each:
| Condition |
Description |
Enter Comparison
Value(s) As |
| Compare these data sources |
Compares two values (of the same data type) using a logical operator. The following logical operators are available:
- Equals / Does Not Equal
- Contains / Does Not Contain
- Is Empty / Is Not Empty
- Starts With / Does Not Start With
- Ends With / Does Not End With
- Greater Than / Less Than
- Greater Than or Equal To / Less Than or Equal To
|
Text or lookup |
| Current item was created between these dates |
Checks whether an item was created within a date range |
Date/Time or lookup to date/time value |
| Current item was modified between these dates |
Checks whether an item was last modified within a date range. |
Date/Time or lookup to date/time value |
| If two date ranges overlap |
Checks whether two sets of dates overlap each other. |
Date/Time or lookup to date/time value |
| Specific date/time is within a date range |
Checks whether a specific date time is between two dates. |
|
| Current item was created by this user |
Current item was created by this user |
Date/Time or lookup to date/time value |
| Current item was modified by this user |
Checks whether an item was last modified by a specific user. |
Person or lookup to Person value |
| Current item has these keywords in the title |
Checks whether the Title of the current item contains a particular text string (case insensitive). |
Text or lookup to text string |
| User is a member of an Active Directory group |
Checks whether a user is a member of a specific Active Directory group. |
User: Person or lookup to Person value
Group: Group or lookup to Group value |
| User is a member of a SharePoint group |
Checks whether a user is a member of a specific SharePoint group. |
User: Person or lookup to Person value
Group: Group or lookup to Group value |
| Role is assigned to user |
Checks whether a user has a role assigned. |
User: Person or lookup to Person value
Group: Group or lookup to Group value |
|
Example of Delay Until Condition is Met
Return to Workflow Logic Widgets List
See Also:
Delay Until
The Delay Until widget pauses the workflow until a specified date and time is reached.
Note: Workflow processing is dependent on the Workflow timer job, which evaluates workflow status every 5 minutes. The workflow will resume at the next timer job interval after the specified date/time.
Widget Properties:
| Column |
Description |
| Delay Until (Required) |
Enter a date and time the workflow should resume using one of the following methods:
- Type a date and time directly in the text box. If no time is specified, the workflow will resume at 12:00 AM on the date provided.
- Select a date and time using the Calendar icon (
 ). ).
- Add a lookup to a date or date/time value using the Add Lookup icon (
 ). If the lookup value does not include a time, the workflow will resume at 12:00 AM on the date provided. ). If the lookup value does not include a time, the workflow will resume at 12:00 AM on the date provided.
|
| Click Apply to save the widget settings. |
|
Example of Delay Until Widget
Return to:
Workflow Logic Widgets List
See Also:
 The screenshot here shows a configured Request Approval workflow with the following properties:


 The Log History widget below is configured to log the comments entered by participants in a Request Approval workflow, which were captured in a workflow variable.
 The Move Item widget shown below is configured to move an item to an archive library for the user’s department.
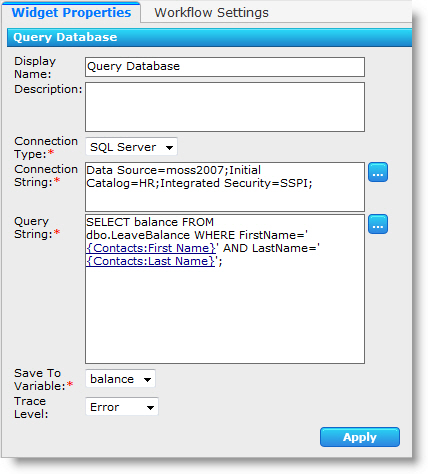
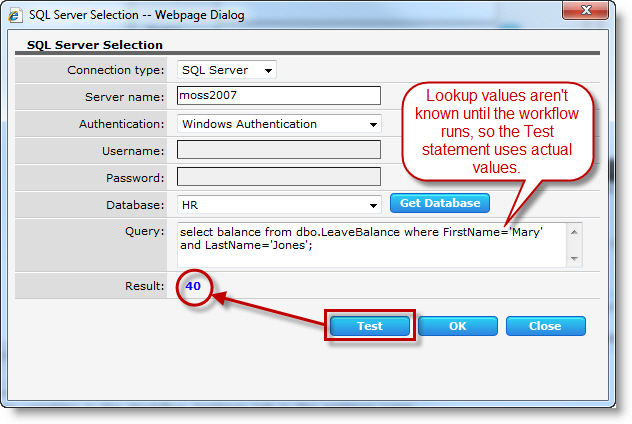

 This example shows the Delete Item widget configured to delete the current item as part of a workflow that archives an item in an Issues list to another location when it is marked Closed.
 The example here shows a Delete List widget configured to delete a list that was created during the same workflow with a Title stored in a workflow variable:
 When you drop a Discard Check Out widget to the Studio diagram, it is already pre-configured to discard check out for the current item, as shown here:
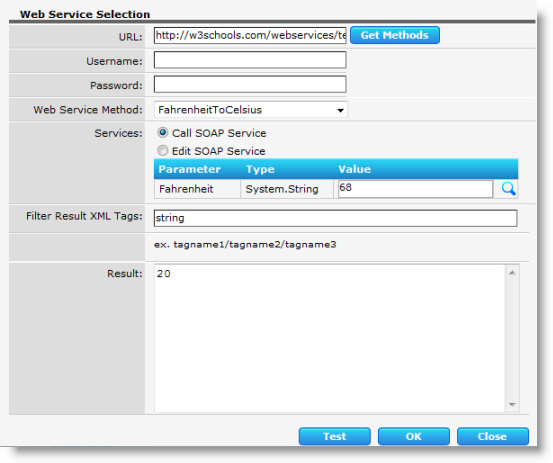
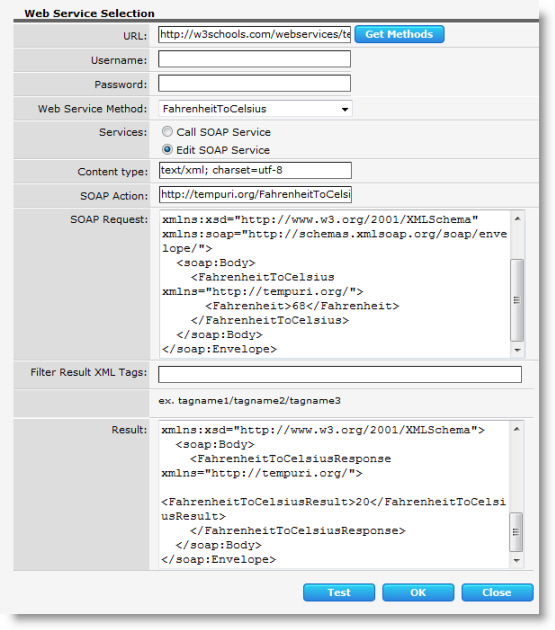


 Completing a Task Created in the Same Workflow
 This is an example of the Copy Item widget used as part of a more complex workflow.
 The example here shows a Create Column widget used to create a new column for monthly status updates.
 Here, the same widget is configured to create the list in a Document Workspace site instead of the current site.
 In this example, a workflow creates a series of tasks in a Project Tasks list when a new entry is added to a project tracking list.
 In this example, an Access SP via REST widget is configured to allow a user to add an item in a local SharePoint calendar list to a SharePoint calendar list called “Corporate Events Calendar” in an external site.
 In this example, a customer service group wants to use a workflow to set a Phone Survey field in a trouble ticket list to True when a ticket is created if a customer has purchased a support contract.
 In this example, a Create AD Account widget is configured to create a new Active Directory account for an employee in a SharePoint list called “Employees”.
 This example shows a Disable AD Account widget configured as part of an employee out-processing workflow.
 In this example, a Wait For Field Change widget is configured to pause the workflow until a field named “Approval Status” is updated to Approved:
 The Calculate widget accepts Excel-style functions and stores the result in a workflow variable. Function parameters can include lookups and functions can be nested to perform multiple operations. In this example, a Calculate widget formula calculates a date 10 days from today to use as a task Due Date.
  The Formula column is required.
 The workflow will look like that shown. In addition to the Collect Data From User and the Send Email widgets, it also has an Initialization Form.
 Click the Init Form link in the main menu to open the Initialization Form editor.
 Click the Variables link in the main menu to open the Variable Settings form.
 Double click the Collect Data from User widget to open the widget properties.
 ) to open the Define Lookup dialog.
 On the Define Lookup dialog, click the Workflow Variables category and select the Parameter: Employee from the list. Click Add to save your selection and close the Define Lookup dialog.
 icon for the Form property to open the Edit User Form dialog. Enter Collect airline info as the Form Name and add the three fields shown below by clicking the Add Field button in the lower left corner of the dialog. When done, click OK to save the form and close the Edit User Form dialog.
 For the To property, click the hourglass icon (
 Select Initiator from the Easy Reference area.
 Configure the email Body by clicking (
 Click the Settings link in the main menu to open the Workflow Settings form. Name the workflow Request travel info site workflow and make sure the manual workflow start option is enabled.
 Save and publish the workflow as a Site Workflow by clicking Publish as Site Workflow from the main menu.
 View Site Contents by clicking the gear icon (
 Click the desired workflow to start it. The initialization form is presented.

 For this particular workflow, an email is sent to the Employee entered in the initialization form. The email has a link to a SharePoint workflow task form, which is shown here.


 The Delay Until widget pauses a workflow until the date and time specified in another SharePoint field is reached.


 Here is an example of a workflow started when a new employee is added to an Employees contacts list. This workflow starts workflows for each department that has to perform tasks prior to an employee’s start date (which is a field in the Employees list). Notice that each Start Another Workflow has been configured with a custom Display Name to make the workflow easier to follow.
 Each of the workflows in the Start Another Workflow widgets is configured with a workflow initialization form variable to gather the Employee ID stored in the Employees contacts list, because this ID is needed in the workflow. The value for this form field is provided in the Start Another Workflow widget, as shown below.
 Here is an example of a Repeat While widget configured to send a status update e-mail to a manager every 60 minutes while a ticket with a Priority of “High” has a Status of “Open”. The Compare Widget is used to compare the values and the Repeat While Widget loops every sixty minutes checking the condition.
 Here is an example of a Repeat While widget configured to check every 15 minutes to see if an Assigned To field has been filled out.
 Here is an example of a Send Email widget configured to send an e-mail about the details of a new change request submitted to a SharePoint list:
 In this example, the Condition Builder is configured to check if an expense report saved to a Forms Library has a Total greater than $1,000. Based on the Request Approval widget, you can add conditional branching, sequential approval, and SharePoint field updates. To make it easier to remember what your workflow does, you can customize widget names.
  In this example XYZ corporation’s product development group wants to know what color background customers prefer as the default for one of their applications.
 The example here shows how the widget Delay For is configured to pause the workflow for 1 day to allow a user time to complete another part of the business process.
 If you encounter any errors while installing or using KB Accelerator, refer to the error logs located on the SharePoint server in:
 SharePoint 2013:
 ).
).  ) to search for a SharePoint or Active Directory user or SharePoint group* in the User Lookup form.
 ) ) in the User Lookup form.
 From the List Ribbon, click Workflow Settings.
 In the Workflow Settings page for the list, click Remove, Block, or Restore a workflow.
 To delete a workflow template from Workflow Conductor Studio, open the template gallery and locate the copy of the template you want to delete.
 ). Click OK to the warning displayed to delete the template.
 The Delete Site widget permanently deletes a SharePoint site from the site collection. The widget includes the following options and features: