-
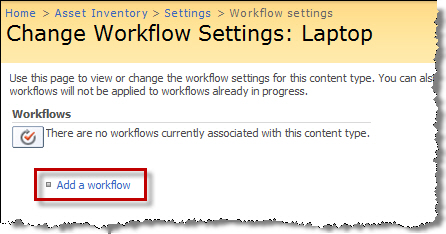
Verify that the associated product feature is active in the site collection by following the instructions for Activating a Bamboo Site Collection Feature. If you are wondering which Site Collection Feature to activate for your product, refer to.
-
If the product feature is active but you still have problems adding it to the site, deactivate it and then activate it again.
-
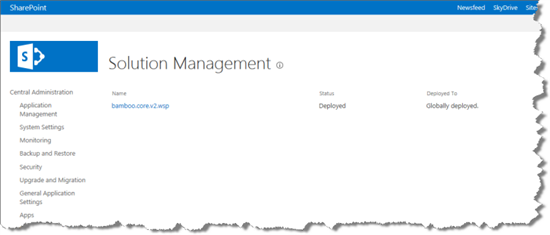
If the product feature is not available to the site collection, verify that the product was successfully deployed to the Web Application. Deployment status can be verified in SharePoint Central Administration > System Settings > Manage Farm Solutions. If you are using WSSv3/MOSS, its in SharePoint Central Administration > Operations > Solution Management.
-
If the product does not appear in the list of Farm Solutions in Central Administration, it hasn’t yet been installed on the farm.
-
If the product shows a status of “Error” in the Farm Solutions list in Central Administration, Retract and then Remove the solution before running the Installation/Setup Program again to reinstall it. Refer to How to run the Installation-Setup Program for more information.
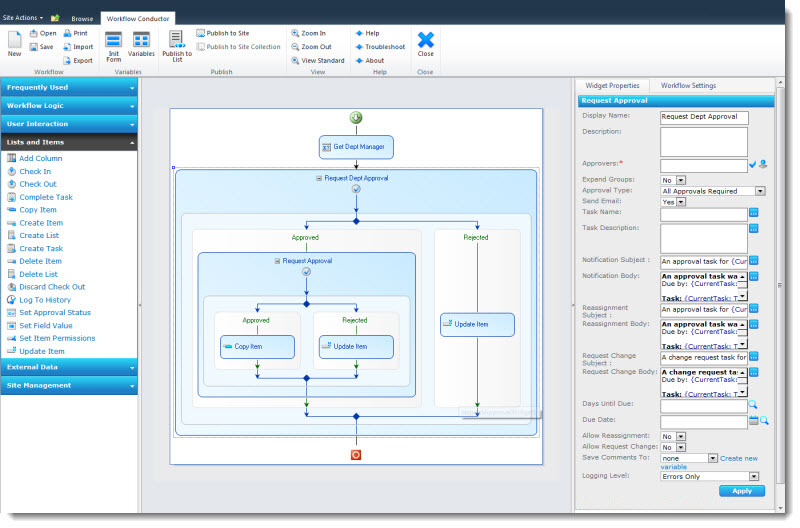
About Workflow Conductor Widgets
 Workflow Conductor widgets are the modular building blocks used to create workflows in Workflow Conductor Studio. Some widgets define the flow, or path, of a workflow, and others perform specific actions, such as sending an e-mail, updating the properties of an item, or creating a task.
Widgets are grouped by function in the widget list in the left pane of Conductor Studio. The categories in this list can be customized by an administrator in Central Administration. See Configuring WF Conductor Categories for more information. The default categories represent the major widget functions (listed below). A Frequently Used category contains widgets that administrators expect to be used most often by workflow designers.
- Workflow Logic Widgets: Workflow Logic widgets handle the “flow” of the workflow. This category includes widgets that allow workflow branching or parallel processing. Some of the widgets in this category are container widgets that allow other widgets to be dropped inside of them. For example, drop other widgets inside the two branches of a Run Parallel widget to allow two sets of actions to be executed simultaneously.
- User Interaction Widgets: User Interaction widgets request input from users or communicate to users during a workflow. Widgets that send e-mail or assign certain types of tasks can be found in this category.
- User & Group Management Widgets: User & Group Management widgets query, create, update, and delete accounts and groups. Widgets that manage Active Directory and SharePoint user accounts and groups are found in this category.
- Lists and Items Widgets: Widgets in the List and Items category read or manipulate SharePoint items, lists, and libraries. Actions such as creating, copying, or updating list items are found here.
- Site Management Widgets: Site Management widgets provide options to create and manage SharePoint sites.
- External Data Widgets: External Data widgets access data outside of the current SharePoint environment. Access to Web services, databases, and even external SharePoint environments is provided by these widgets.
See also an Alphabetical List of Workflow Conductor Widgets.
Workflow Conductor widgets can access data in the current site, other sites in the current site collection, and (in Workflow Conductor 1.5 and higher) most widgets can also access data in other site collections. If a widget can access data in other site collections, you will see the Site Collection box, which allows you to select the site collection and site to access. In addition, any widget property that supports lookups can access data in other site collections with the Field Lookup option.
To add a widget to a workflow, simply drag it from the widget list pane on the left and drop it where you want it in the Conductor Studio diagram. Most widgets require configuration, which is done in the Widget Properties tab of the settings pane. No coding is required to set the properties of a widget.
General information about features common to all widgets can be found in the following sections:
How to Use Workflow Conductor for Process Automation in SharePoint Knowledge Base Solution Accelerator
Applies To:
- SharePoint Knowledge Base Solution Accelerator R2.0 or newer
- Workflow Conductor R1.6 or newer
- SharePoint Server and Foundation 2010
- MOSS 2007 and WSS v3.0
IMPORTANT: Set up the following workflow processes during off hours. Publishing the workflow templates requires the application pool to be recycled.
LIMITATIONS: To approve workflow tasks, users require the following permissions: Assignee, Initiator, Site Collection Administrator.
To complete task forms and to view the Approve, Reject and Submit buttons, users must be able to
- read the workflow item that the workflow is running on, and
- edit items in the Workflow Tasks List that is associated with the workflow.
Click a section below for details on each process:
How to use Workflow Variables as Lookups
| Using Lookups in Workflow Studio |
|---|
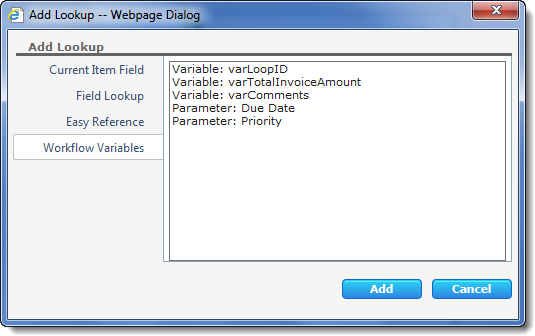 The Workflow Variables lookup list contains Variables and Parameters related to the workflow. Parameters are fields that you add to a workflow initialization form.
If you haven’t created an Initialization form or any variables for your workflow yet, you won’t see anything listed here.
Just like the other lookup types, Conductor retrieves Workflow Variable lookups when the workflow reaches the widget.
How to Use the Workflow Start Feature
Workflow Start Feature Overview:

The Workflow Start Feature allows custom workflow start buttons to be added to the item ribbons within SharePoint lists/libraries. The workflow buttons will display customizable names and will launch any desired workflow associated with them on the current item. Users simply click the button to start the workflow.
Configuring and Using the Workflow Start Feature:
NOTE: You must be a site collection administrator to conduct this task!
| Step | Action | Result |
| 1. | On the site where you wish to use the Workflow Start Feature, navigate to Site Actions > Site Settings > Site Actions > Manage Site Features and activate the Workflow Start Feature. |  |
| 2. |
On the same site, select the newly created Workflow Configuration List and complete the following fields:
|
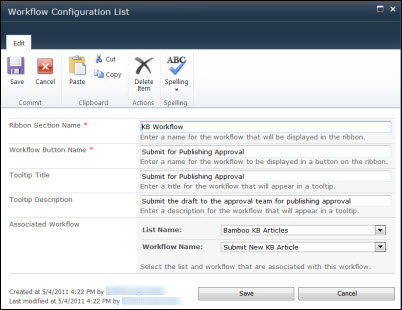 |
| 3. | Navigate to the list and open an item to see the workflow start buttons created for that list. | |
| 4. | Click on one of the buttons to start the associated workflow on that item. | |
How to use Workflow Conductor for process automation in Knowledge Base
| KBSA Configuration Overview |
|---|
Applies To:
- SharePoint Knowledge Base R2.0 or newer
- Workflow Conductor R1.6 or newer
- SharePoint Server and Foundation 2010
- MOSS 2007 and WSS v3.0
To complete task forms and to view the Approve, Reject and Submit buttons, users must be able to
- Read the workflow item that the workflow is running on
and - Edit items in the Workflow Tasks List that is associated with the workflow.
Click a section below for more information:
How to use the Workflow Reports Web Part
| Overview of Workflow Conductor Web Parts |
|---|
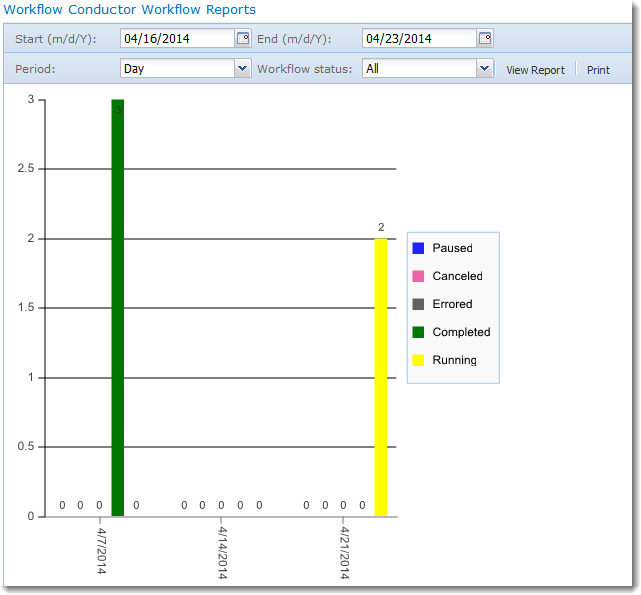 The Workflow Reports Web Part allows you to create reports about workflows in the current site or site collection. The report is displayed graphically, with a summary text-based list below the chart.
It is possible to specify the range of information you wish to display in the chart. Choose:
- Start Date – the start of the reporting interval
- End Date – the end of the reporting interval
- Period – Summarize the data by period. Choose Day, Week, Month, or Quarter.
- Workflow Status – choose All, Running, Completed, Errored, Canceled, or Paused.
When ready, click View Report. If desired, choose to print the report by click Print. The print includes the graph, but not the list display beneath the chart.
For information about the configuration parameters for this web part, see How to Configure the Workflow Reports Web Part
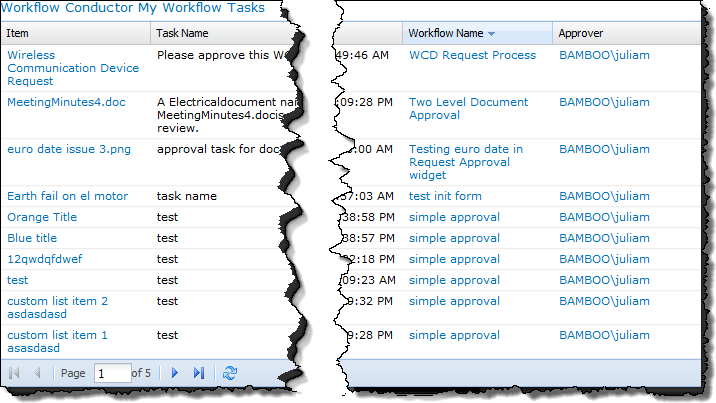
How to use the My Workflow Tasks Web Part
| Overview of Workflow Conductor Web Parts |
|---|
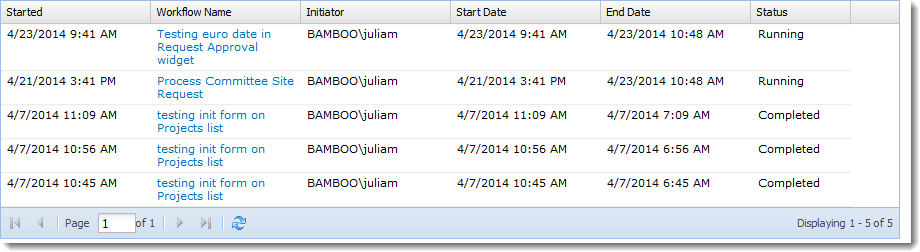
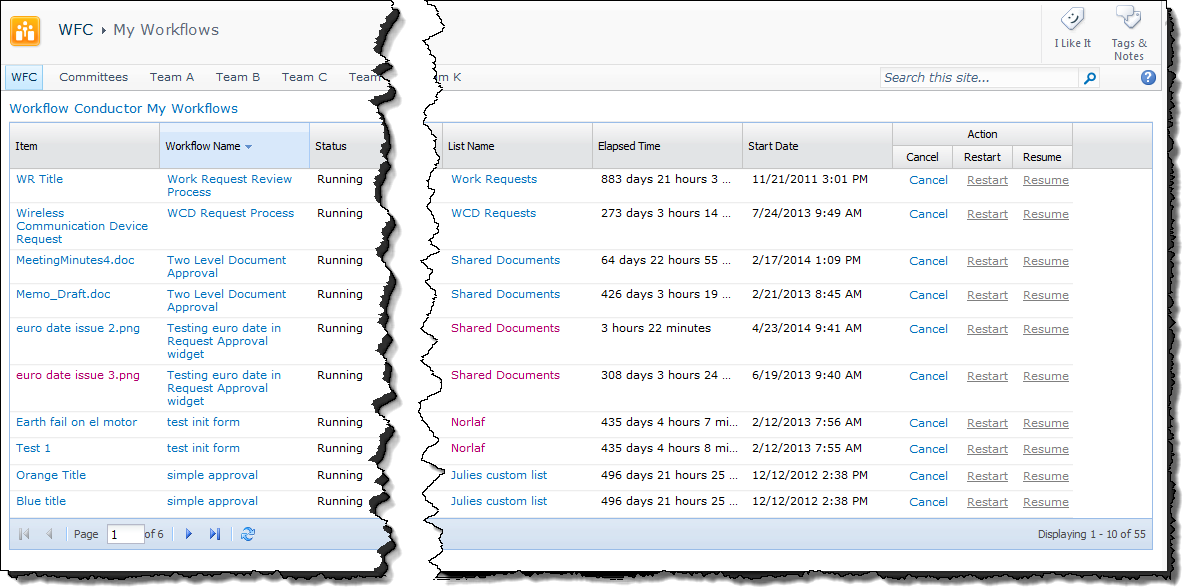
The My Workflow Tasks Web Part displays tasks created by workflows. These tasks typically reside in lists called Workflow Tasks. My Workflow Tasks can display tasks for the current user or for all users, and can display tasks for the site, the Web application, or the entire farm.
Use the links displayed with each task to see the item that triggered the workflow (in the Item column), the workflow history (in the Workflow Name column).
For information about how to configure the My Wrokflow Tasks Web Part, see How to configure the My Workflow Tasks Web Part.
How To Use Text Columns in a Workflow Conductor Widget Condition
APPLIES TO
The following widgets in Workflow Conductor 1.1 and higher:
- Conditional Branch
- Compare
- Repeat While
- Wait For Field Change
- Repeat For Each Item (Workflow Conductor 1.5 and higher)
- Field Lookups
- External List Lookups
Some Widgets in Workflow Conductor allow you to specify a condition that must be met in order for the Widget to run. If the condition is comparing a value with a SharePoint Single line of text, SharePoint Multiple lines of text column, or Bamboo Rich Text column, here are some important tips:
-
When matching text strings, use less specific match conditions. For example, use Contains instead of Equal To.
-
Comparisons are case-sensitive. “Text” and “text” are different strings and will not match.
-
If you change the settings for a SharePoint Multiple lines of text column from Plain text formatting to Rich text or Enhanced rich text formatting, an Equal To condition that worked before may stop working. This is because a rich text field contains non-printing characters, even if the text does not appear formatted.
-
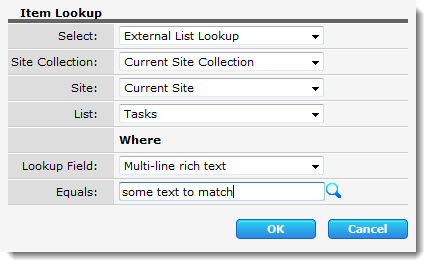
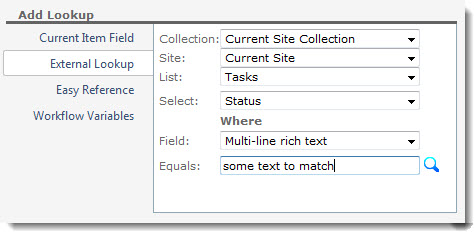
Field Lookup conditions that require an Equals match will not match Bamboo Rich Text columns or SharePoint Multiple lines of text columns formatted as Rich text or Enhanced rich text. Perform the lookup using a different column in the list.
| The Field Lookup conditions shown here will not match any items, even if the text appears to match the column text: | |
 |
 |
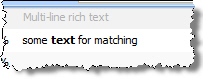
For Bamboo Rich Text and SharePoint Multiple lines of text columns configured for rich text or enhanced rich text formatting, be aware that any text formatting adds non-printing characters that can make the condition false.
| The conditions shown below will not match if the word “text” is in bold in the list column: | |
 |
 |
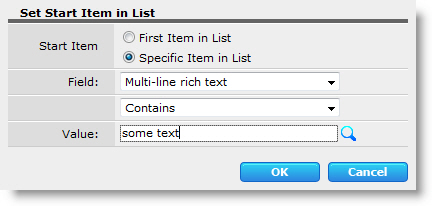 |
|
How to Use Add User to AD Group Widget
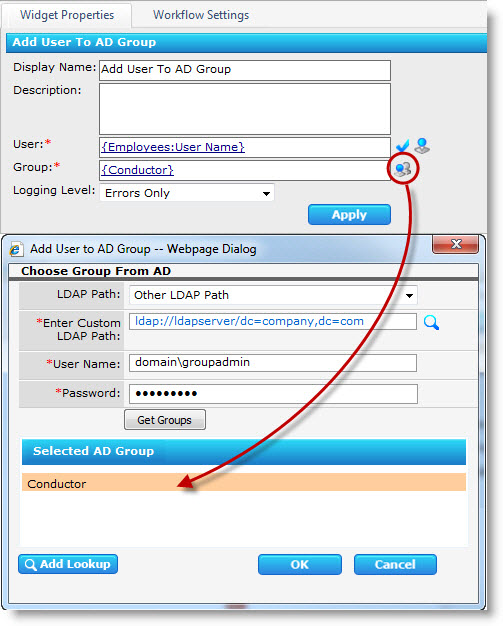 The Add User to AD Group widget shown here is configured to add a new employee to a group “Conductor”.
In this example, the workflow designer has permission to enter custom LDAP paths in Active Directory widgets.
This setting is configured in the Active Directory Settings section of the Workflow Conductor Control Panel > General Settings page in SharePoint Central Administration.
Return to
User & Group Management Widgets
See Also:
How to Run Workflows in Simulation Mode
When a workflow is started manually, Workflow designers have the option to run the workflow in Simulation Mode. Simulation Mode allows designers to test workflow functionality without affecting other users. It skips all delays, and sends e-mail and assigns tasks only to the workflow initiator.
Specifically, Simulation Mode affects workflows in the following ways:
- All Delay For and Delay Until widgets are skipped.
- The Delay Time property in any Repeat While widgets is changed to “0”.
- Approvers and Reviewers configured in Request Approval and Request Feedback widgets are changed to the workflow initiator.
- Send Email widgets will send e-mail only to the workflow initiator.
- The Assigned To property of any Create Task widgets is changed to the workflow initiator.
- Echo Test widgets will send e-mail only to the workflow initiator.
To start a workflow in Simulation Mode, check the appropriate checkbox in the workflow initiation page before clicking the Start Workflow button.
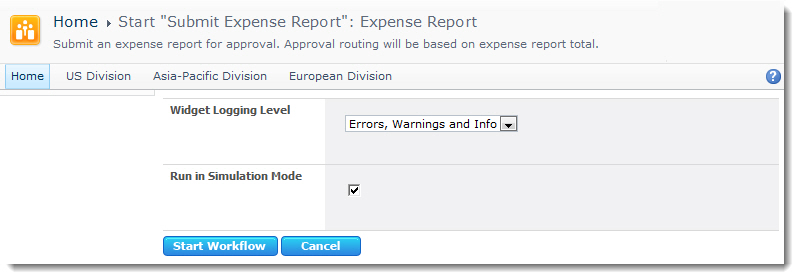
Workflow designers also have the option to override the logging level configured for widgets and specify a new logging level for all widgets for that workflow instance. To override the widget logging level, select the desired logging level in the workflow initiation page.
 Double-click the product EXE file to extract the contents of the product download.

How to Manage Workflow Solutions
Workflow Conductor provides a central page to view and manage workflow solutions deployed with Workflow Conductor using the Solution Deployment method. To view the list of workflow solutions, go to Central Administration > Workflow Conductor, and then click Workflow Solution Management.
This list is similar to the Central Administration > System Settings > Manage farm solutions list in SharePoint Central Administration, but limits the list of solutions to those deployed by Workflow Conductor.
The following tasks can be performed in the Workflow Solution Management page.
View workflow solutions
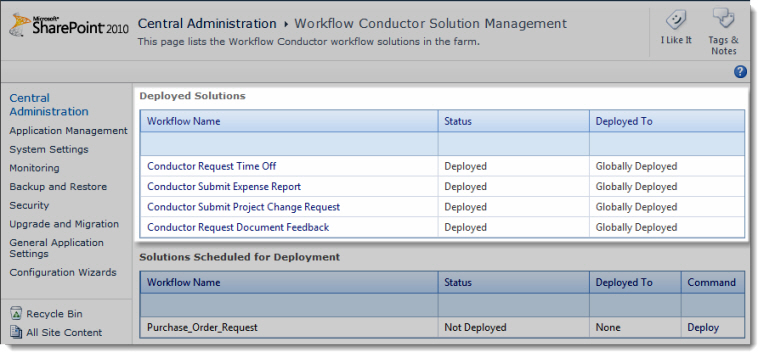 Workflow solutions deployed to the SharePoint farm are listed in the Deployed Solutions section.
For more information about the solution, view the Status and Deployed To columns or click the solution name.
Retract and remove workflow solutions
Retracting a workflow solution removes it as a site collection feature. The workflow will no longer be available to associate to lists and libraries. Any workflow instances that are running will be terminated. Removing the workflow solution removes it from the list of solutions in the SharePoint farm.
For more information about removing workflow associations, see Removing a Workflow Association.
To retract and remove a workflow solution, follow these steps:
| Step | Action | Result |
| 1. | Click the solution name in the Workflow Solution Management list. | |
| 2. | In the Solution Properties page, click Retract Solution. | 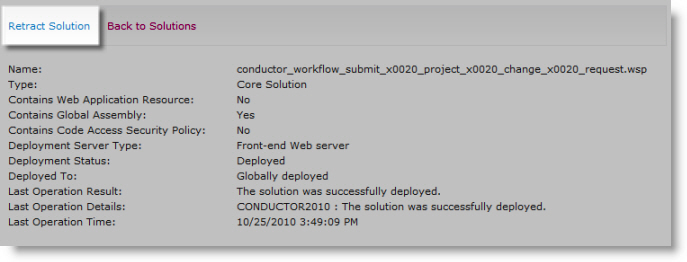 |
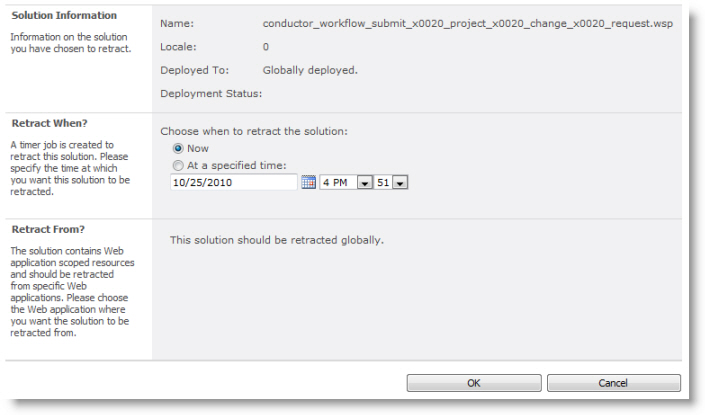
| 3. |
Enter a time to schedule the retraction (which will recycle the application pool) and click OK. For more information about retracting workflow solutions, see Retract and remove the workflow solution from the Web application. |
 |
| 4. | After the solution is retracted, its Status in the Workflow Solution Management list will change to Not Deployed (you may need to refresh the page). |  The solution is no longer available to associate to any list in the Web application. If you want to be able to deploy the workflow solution again later, you can leave it in the list. However, you will not be able to deploy any other workflows with the same name to the same Web application. |
| 5. | To completely remove the workflow solution from the farm, click its name again and click Remove Solution. | 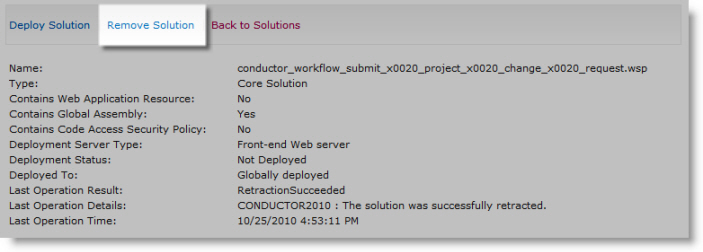 |
| Viewing Workflow Association Counts | ||
| 1. | To view the number of associations for a workflow before retracting it, go to Site Actions > Site Settings in the top-level site as a site collection administrator. In the Site Administration section, click Workflows. | 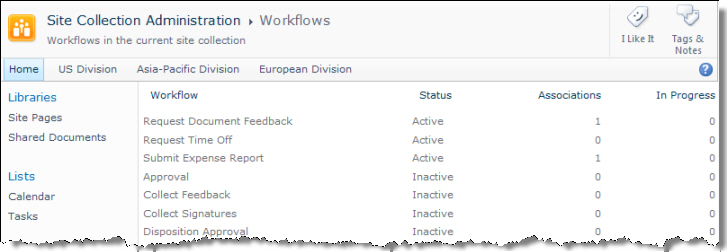 |
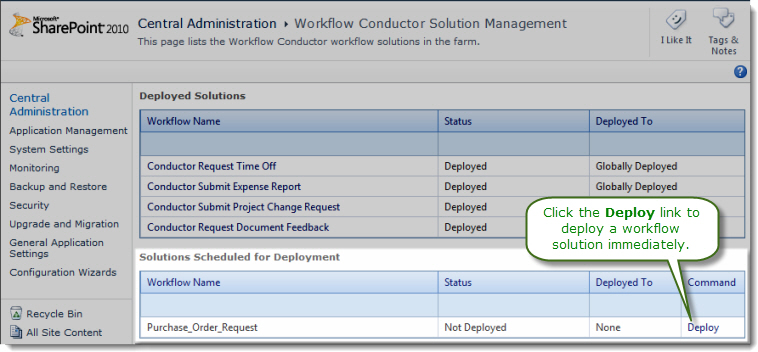
| Manually Deploy Workflow Solutions Scheduled for Deployment | ||
| 1. | If Workflow Conductor is configured for scheduled solution deployment, solutions that are waiting to be deployed will be listed separately. To deploy a solution immediately instead of waiting for the scheduled time, click the Deploy link for the solution. |
|
See Also:
How to Manage Workflows
Workflow Conductor provides a number of tools and web parts to help you run, manage, and view the status of workflows in your environment. You can find each of these topics separately in our documentation and we include them here grouped by permission level.
For SharePoint contributors:
- Running Conductor Workflows on List Items
- Running Site Workflows (for workflows published as site workflows)
- My Workflows Web Part
- My Workflow Tasks Web Part
- Workflow Reports Web Part
- Resolving Workflow Errors
For workflow designers:
- Viewing Workflow Status
- Managing Workflow Associations
- Running Workflows in Simulation Mode
- Log Viewer Web Part
For SharePoint administrators:
How To Install the Bamboo MashPoint REST Extensions
Applies To:
- Bamboo MashPoint REST API
- Windows SharePoint Services 3.0 and Microsoft Office SharePoint Server 2007
- SharePoint 2010 Foundation and SharePoint 2010 Server
- Workflow Conductor 1.0 and higher
The Bamboo MashPoint REST API, the companion to Bamboo’s MashPoint, is a REST-based remote interface to the data in MashPoint and SharePoint. The MashPoint REST API is a framework for getting data in and out of SharePoint using standard HTTP methods, and gives developers access to the entire SharePoint object model. For more information about the Bamboo MashPoint REST API, click here.
One of the many ways Bamboo has incorporated the MashPoint REST API into our products is with the Workflow Conductor Access SP via REST Widget. This Widget allows Workflow Conductor workflows to access data on external SharePoint Web applications (Workflow Conductor Widgets can already natively access data in any site collection in the Web application where Workflow Conductor is installed).
The following topics are covered in this article:
- Where to get the Bamboo MashPoint REST API
- Bamboo MashPoint REST API installation instructions
- Enabling the Workflow Conductor Access SP via REST Widget
Where to get the Bamboo MashPoint REST API
The Bamboo MashPoint REST API is a free component that can be installed on SharePoint 2007 (WSS and MOSS) and SharePoint 2010 (Foundation and Server). The MashPoint REST API installer (also called the MashPoint REST Extensions) is included in the Workflow Conductor for SharePoint 2007 installation package, or can be downloaded directly here: Download MashPoint REST API.
Bamboo MashPoint REST API installation instructions
Run the installer on one front-end Web server in the SharePoint farm where the Windows SharePoint Services Web Application service is running. Check SharePoint 3.0 Central Administration > Operations > Topology and Services > Servers in Farm or SharePoint 2010 Central Administration > System Settings > Manage servers in this farm on the server where you want to install the MashPoint REST Extensions for a list of servers running this service.
Required permissions for the installation user account:
- Must be a member of the local server’s Administrators group.
- Must be a member of the SharePoint Farm Administrators group.
- Must be a site collection administrator (for automatic feature activation).
Enabling the Workflow Conductor Access SP via REST Widget
In Workflow Conductor for SharePoint 2007, the Access SP via REST Widget is already enabled and included in the default External Data category in Conductor Studio. If you are using Workflow Conductor for SharePoint 2010 or if you do not see this Widget in Conductor Studio,see Configuring WF Conductor Categories for more information.
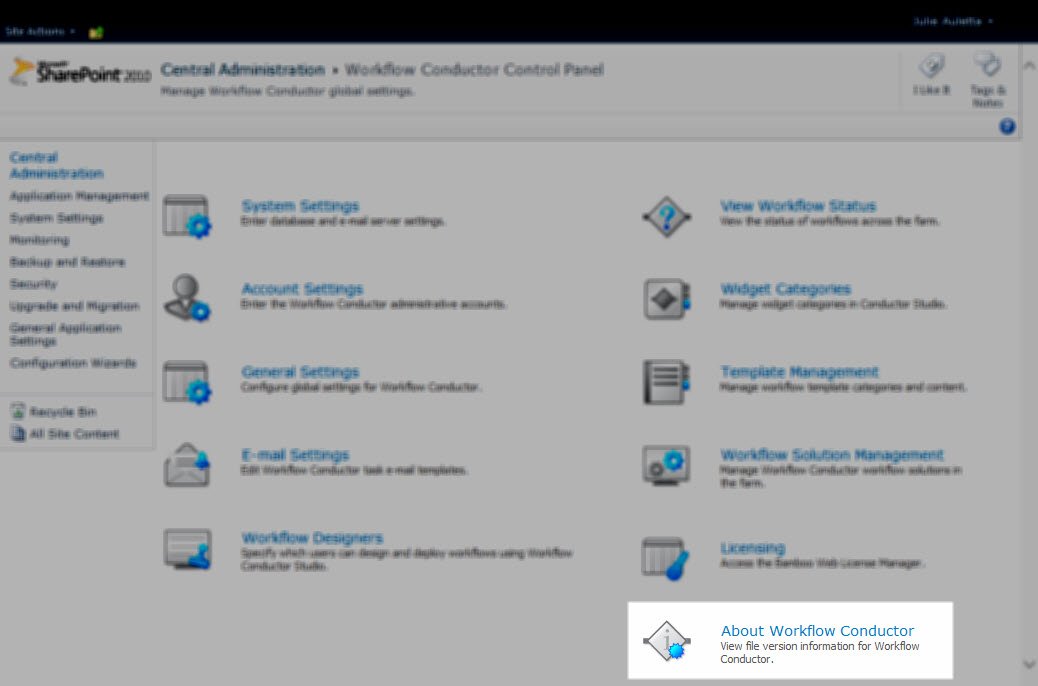
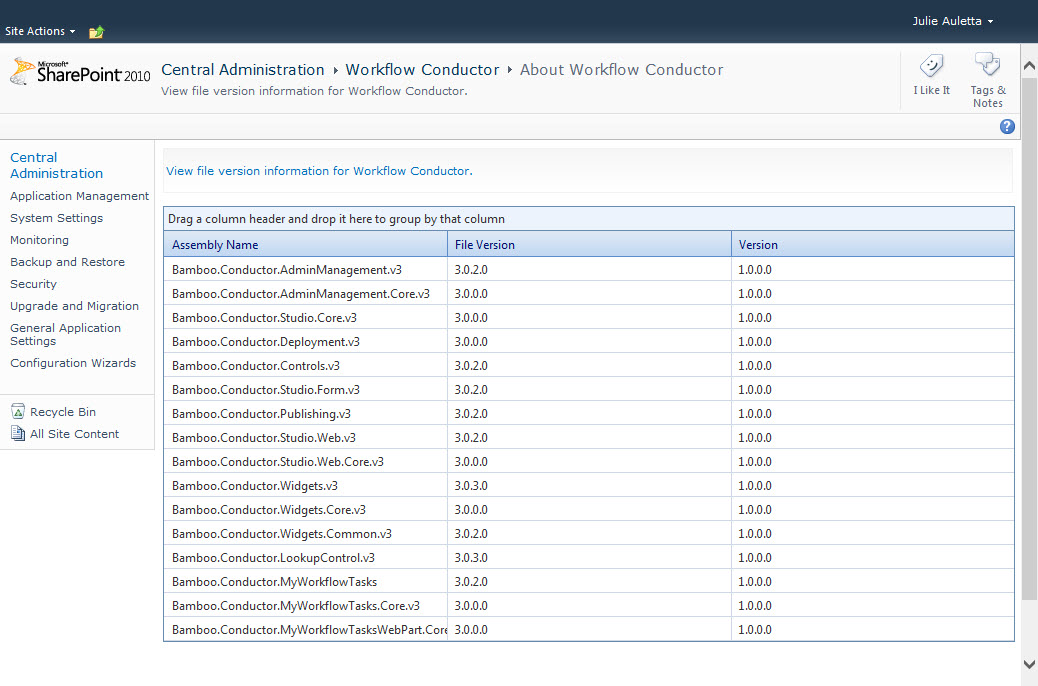
How to find the version of Workflow Conductor
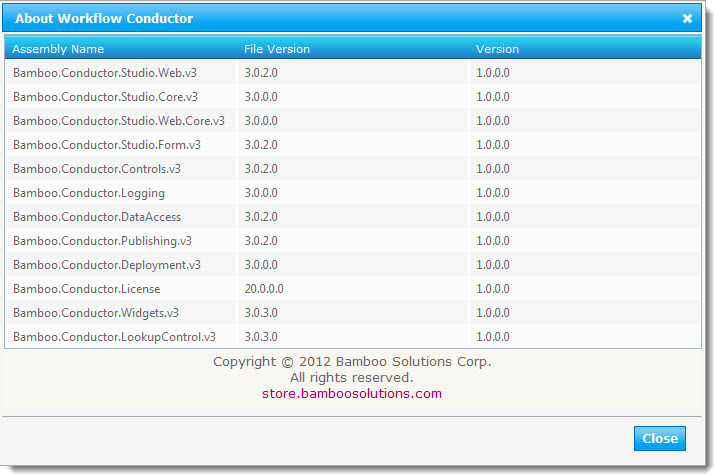
There are two ways to determine the version of Workflow Conductor you are using on your farm:
- from the Workflow Conductor Studio
- from SharePoint Central Administrator
NOTE: To determine the version of Workflow Conductor, you need to be either a user who has the appropriate level of permission to create workflows or someone with access to SharePoint Central Administration.
| Step | Action |
|---|---|
| 1. |
From SharePoint Central Administration
|
| 2. |
From the Workflow Conductor Studio, click the About choice on the Main Menu.
The About Workflow Conductor screen will appear.
|


How to determine who published a workflow and when
| Overview of Workflow Conductor Templates |
|---|
When multiple designers are working in the same SharePoint farm, you may have a need to figure out who published a workflow and when so you can more easily locate the template used to publish/deploy the associated workflow.
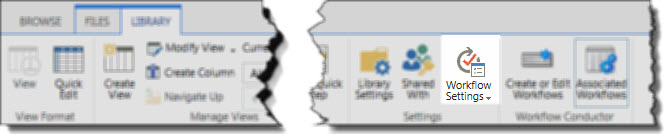
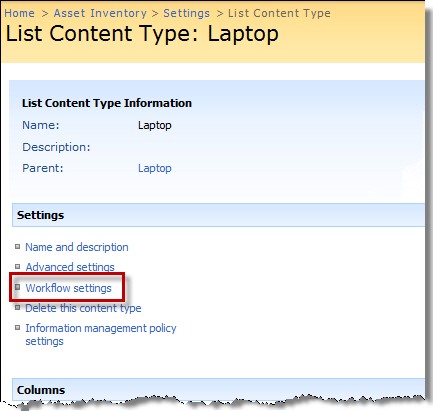
You can use the SharePoint Workflow Settings page to see the workflows associated with a list or library. Access Workflow Settings from the list/library ribbon, as shown below to open the Workflow Settings page.
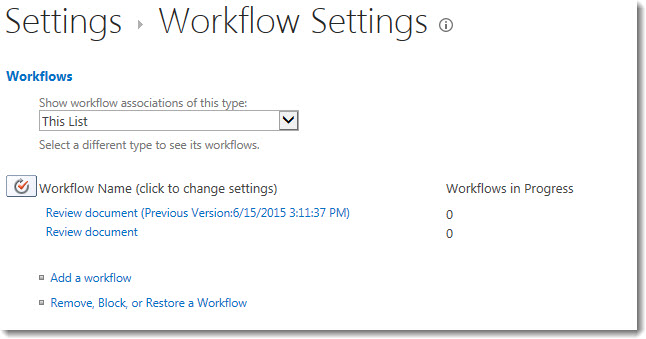 The Workflow Settings page shows active and disabled workflows for the selected content type.
In the example shown here, there is one active workflow called Review Document. There is also a disabled workflow called Review Document (Previous Version:6/15/2015 3:11:37 PM).
This page provides no information about when the active workflow was published or who published it. It also does not show workflows that may be associated with a particular content type on the list. More information is needed.
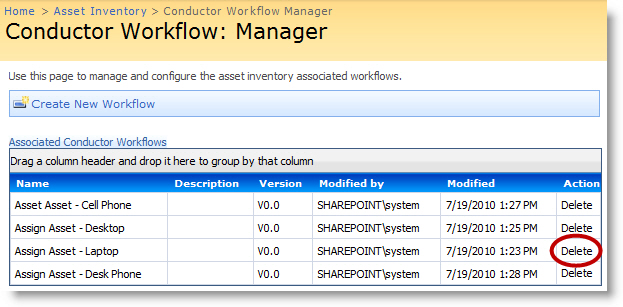
If you are using Workflow Conductor, you can also access the Associated Workflows page from the list/library ribbon and learn more.
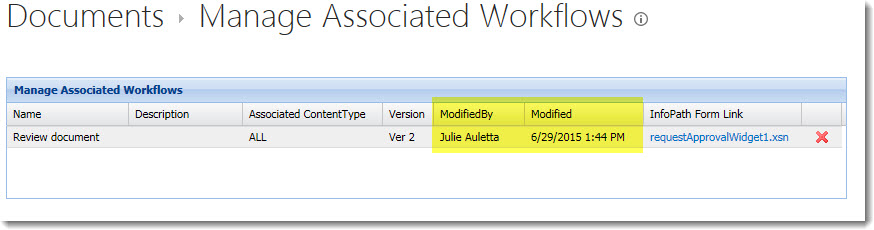
The Manage Associated Workflows page is a Workflow Conductor page that shows only the active associated workflows for the list, including those associated with only a specific content type.
It also shows when (Modified) and who (Modified By) published/deployed the active workflow. In the example below, we know that Julie published the workflow on June 29 at 1:44PM.
Armed with information about who published the workflow and when, and knowing that the name of the associated workflow is also the name of the Workflow Conductor template used to publish it, you can access the Manage Templates tab of the Workflow Conductor Template Gallery to locate the template with the same name, created by that user, and last modified at the approximate date and time the associated workflow was published.
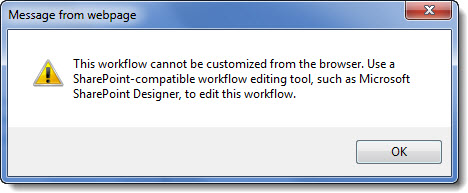
To determine if the workflow was published directly to the list (rather than associated with the list later), click on the workflow name in the Workflow Settings page. If the workflow was published directly to the list, this message will appear.
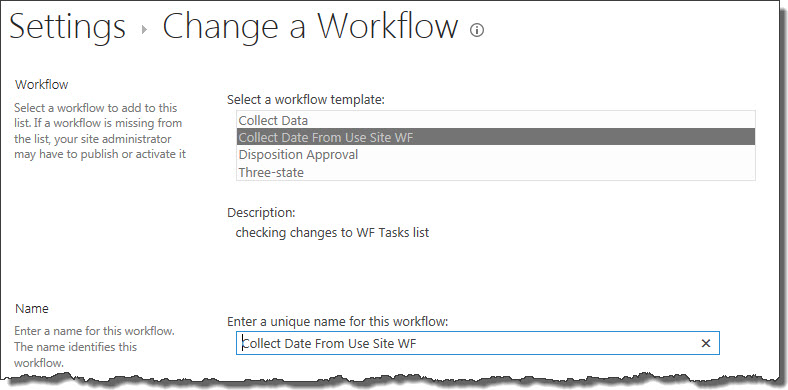
If it was associated with the list afterward, you will see the Change workflow… page when you click the link on the Workflow Settings page.
If you see this page, the template used to publish the workflow to the site or site collection is highlighted in the Select a workflow template area of the page.
For more information, see a video example of how to determine who published a workflow.

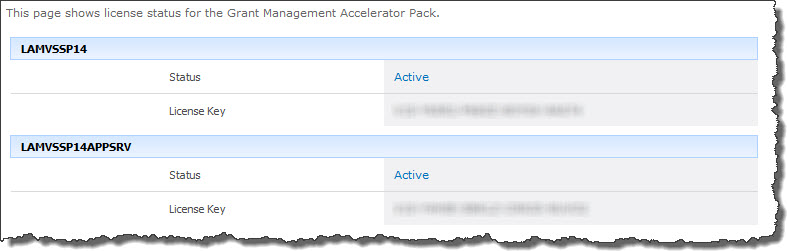
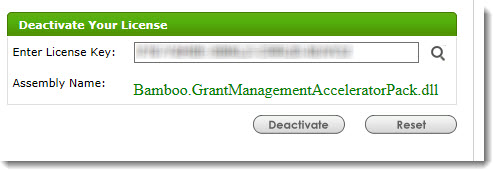
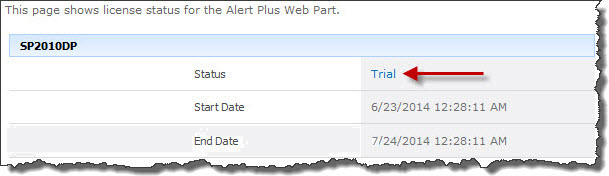
 ). The Assembly Name licensed with this key will be displayed. Ensure it is the product you expect and then click Deactivate.
How to configure the My Workflows Web Part
| Overview of Workflow Conductor Web Parts |
|---|
The My Workflows Web Part displays all the workflows initiated by the current user in the Site, the Web application, or the entire Farm. My Workflows displays the status, workflow name, a link to the item the workflow was triggered by, and additional information that might be relevant depending on the type of workflow.
From this Web Part, the workflow initiator can Cancel a workflow that is Running, Restart a workflow that errored, or Resume a paused workflow. See How to use the My Workflows Web Part for more information.
The My Workflow Web Part is available in the Web Part Gallery after Workflow Conductor is installed. Users with the Add and Customize Pages right can add the Web Part to a page. (The Add and Customize Pages right is included by default in the Design and Full Control permissions.)
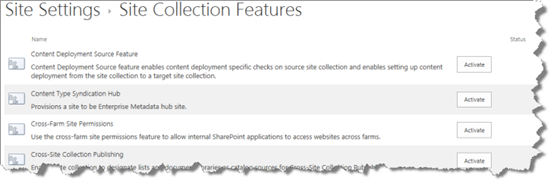
NOTE: If you don’t see the web part in the gallery, check to make sure the site collection feature shown below is activated in your site collection.

Add the web part to a web part page. If you do not know how to add a web part to a page, see How to add a web part to a Web Part page
To configure the web part once it is on the page, follow these steps:
| Section | Setting | |
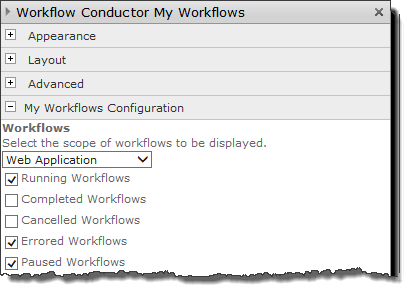
| Workflows: | Select the scope of workflows to display. By default, the Web Part will display workflows for the Current Site. You can also select Web Application or Farm.
Select which workflow statuses to include in the list. The Web Part will include all workflow statuses by default. The more you choose, the more workflows to display and the longer it will take to load the page. |
|
| Paging Settings: | Select the number of items to display per page and the maximum number of items to include in the list. | 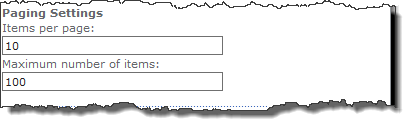 |
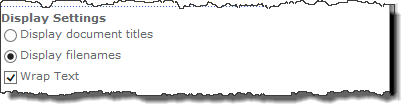
| Display Settings | Select Display document titles to display the Title field of an item, if one is available. Select Display filenames to display the Name field of an item, if one is available.
Uncheck the Wrap Text box if you prefer the Web Part zone width to automatically adjust so that all items in this Web Part fit on one line. |
 |
| Sorting: | Select your preferred sort column and sort order. | 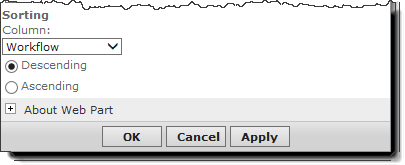 |
How to configure the Workflow Start Feature
| Step | Action | Result |
|---|---|---|
| 1. |
On the site where you wish to use the Workflow Start Feature, navigate to Site Actions > Site Settings > Manage Site Features. On the list displayed, locate the Workflow Start Feature and activate it by clicking Activate.
|
A list called Workflow Configuration List will be created on the site. |
| 2. |
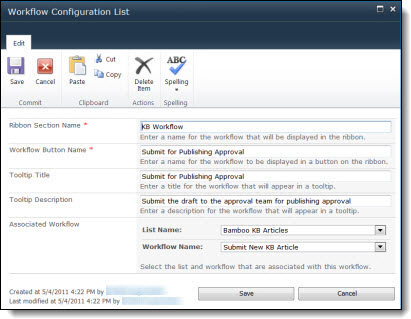
Select the newly created Workflow Configuration List and create an item; complete the following fields:
|
Create an item for each Workflow Start option you need for any list in the site. You may have several items in this list. |
| 3. | Navigate to the list and open an item to see the workflow start buttons created for that list. Click on one of the buttons to start the associated workflow on that item. |

How to count items in a SharePoint list using Workflow
If you need a workflow to count items in a list, you can set up the KPI Column to count your items and then your workflow can lookup the count of items for the result. Follow the instructions below to set up KPI Column to count items in a task list.
| Step | Action | Result |
| 1. | Edit your list from the settings menu and add the KPI column to your list. | 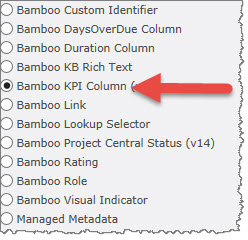 |
| 2. | In the Additional Column Settings section, choose the KPI Column that you want to display, the list in which the column resides and the view for the list. Select The number of list items in the view radio button. | 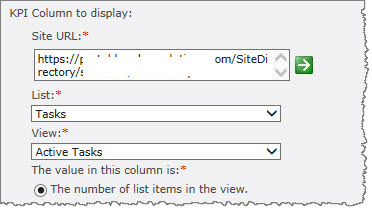 |
| 3. | Show Value – Because you simply want the KPI Column to count up the number of items in the view, you need to display the Column Value. |  |
| 3. | Click OK and now in your workflow you can use the value that this KPI Column displays. | |
How To Concatenate Two or More Fields
Using Workflow Conductor and trying to setup so it will add a user to AD.
After creating a list with a field called ‘First Name’ and another field called ‘Last Name’, the goal is to concatenate these two fields in the workflow to form an AD Display Name and an AD Logon name as follows:
- AD Display Name = ‘First Name’ & “ ” & ‘Last Name’
- AD Logon Name = ‘First Name’ & “.” & ‘Last ‘Name’
Use the Calculate Widget to concatenate text strings.
For example, assuming First Name and Last Name are fields/columns in list item that triggered the workflow:
First Name = Tom
Last Name = Thumb
CONCATENATE("{CurrentItem:First Name}"," ","{CurrentItem:Last Name}")
Result: Tom Thumb
NOTE: If you do not include the double quotes, it returns #NAME?, so be sure to use the double quotes.
How to Branch a Workflow Conductor Workflow With Dependency
APPLIES TO
- Workflow Conductor 1.0 and higher
While workflows can be associated with specific Content Types in a list or library, sometimes your workflow only has one or two steps that differ depending on the item’s Content Type. In that scenario, you may not want to maintain multiple workflows for each Content Type. Instead, consider branching your workflow using the Conditional Branch widget with a condition that checks for the item’s Content Type.
Branching a Workflow
| Step | Action | Result |
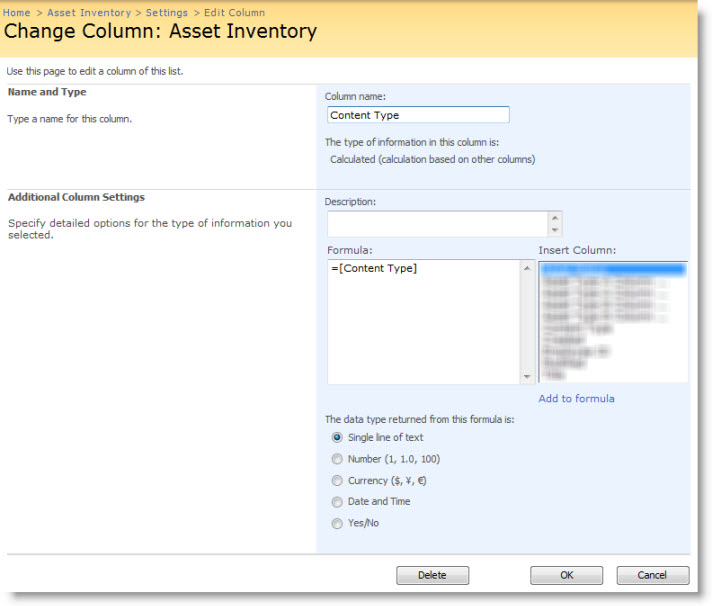
| 1. | Add a Calculated column to your list or library with a value of =Content Type, as shown below. Make sure to associate this column with all Content Types. |
The column will auto-populate with the name of the Content Type used to create the item. The column does not have to be included in any views. |
| 2. | In your workflow, insert a Conditional Branch widget wherever your workflow needs to branch depending on Content Type. Configure at least one of the conditions for the widget to include checking the value of the Content Type column, similar to the example shown here: | 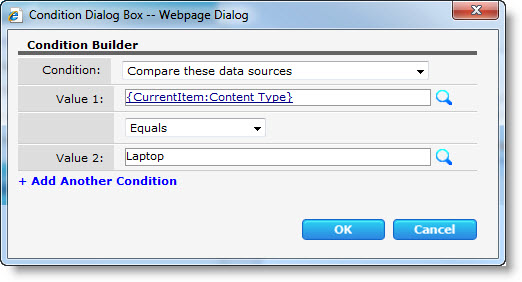 |
| 3. | If you have more than two Content Types and your workflow takes a different action for each one, you can nest Conditional Branch widgets: | 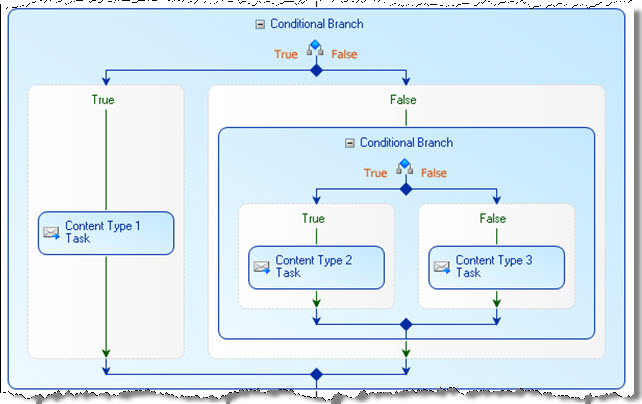 |
To learn how to associate separate workflows to each Content Type, see How to Associate a Workflow Conductor workflow to a Content Type.
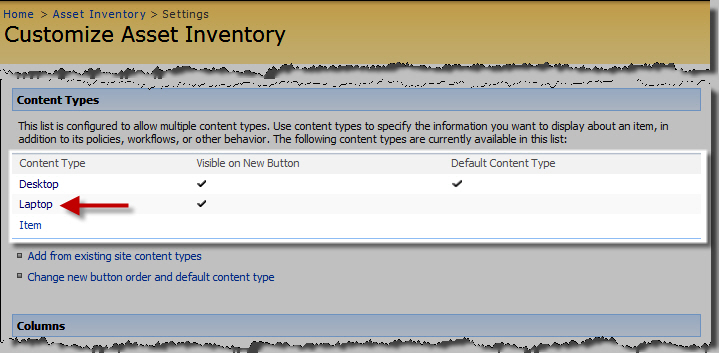
How to Associate a Workflow Conductor workflow to a Content Type
APPLIES TO
- Workflow Conductor 1.0 and higher
- Windows SharePoint Services 3.0
- Microsoft Office SharePoint Server 2007
Workflow Conductor workflows can be associated to specific content types in SharePoint, including site content types, just like any other SharePoint workflow. You may want to associate a workflow to a content type if your workflow is only applicable to items created using that content type, or if you have different versions of a workflow depending on the content type of the item.
When you deploy a workflow in Workflow Conductor Studio, it will automatically be associated with the list or library you launched Conductor Studio from. The workflow will be available for all content types for that list. To restrict the workflow to a specific content type, remove its association from the list or library and associate it with just the content type.
You can perform these two actions (removing the workflow’s association from the list and adding the content type association) in any order.
| To associate the workflow to a Content Type in a List: | |
|
 |
|
 |
|
 |
|
|
| Click OK. | The workflow is now associated to the content type, and will be in the list of available workflows for items created with that content type. |
If a user clicks the Workflow option for an item that uses a different content type, that workflow will not appear in the list of available workflows.
NOTE: Associating a workflow to a content type at the list level only affects the content type for that list. To associate a workflow to a site content type and make it available wherever that content type is used in the site or site collection, instead associate the workflow to the content type in the Site Content Type Gallery.
| To associate a workflow to a SITE CONTENT TYPE: |
|
| To REMOVE the workflow association for the list or library: | |
|
 |
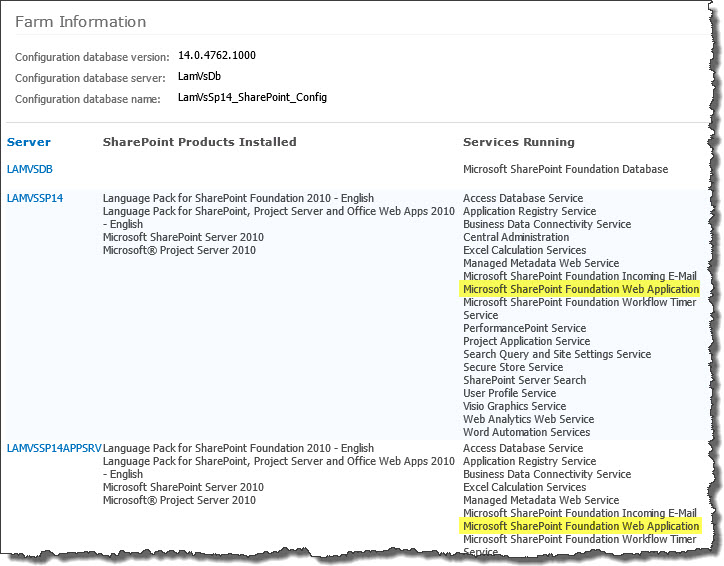 To determine which servers on the farm run these services, go to Central Administration > System Settings > and then Manage servers in this farm. If you are using WSSv3/MOSS, this page is accessed in Central Administration through Operations > Servers in Farm. In this example, there are two WFE servers on the farm.


Highlights of Workflow Conductor
 Workflow Conductor provides a simple, yet powerful way to automate and manage your business processes. A simple drag-and-drop interface lets designers easily create and deploy complex workflows without the need for custom coding. Centralized configuration, management, and reporting gives administrators the ability to manage workflows across the entire farm. Personalized Web Parts, Microsoft Office integration, and automatic task notification allows end-users to interact with their workflows and tasks.
Workflow Conductor Benefits
- Increase process efficiency
Automatic task notification and hand off means faster turn-around times and less process overhead. - Improve process visibility
Reporting and status features make it easy to see the state of any running process. - Decrease complexity for end-users
Users only need to handle their own tasks, not manage the process itself. Integration with SharePoint and Office make things even simpler. - Increase accountability
Automation means tasks are tracked and visible, and events are logged for auditing. - Decrease failure rates
Automated process hand off means fewer places where processes can stall or fail. - Fast and Simple Process Automation
Writing custom workflow applications in SharePoint can take a lot of time and money, and maintenance can be a nightmare. With Workflow Conductor, your processes can be up and running in hours, not days or weeks.
How do I build a workflow that runs when items are added or changed?
When you design a workflow in Conductor Studio, you can configure the workflow Start Options in the Workflow Settings tab. Workflow Conductor supports the same start options as SharePoint, including starting a workflow when an item is created or changed. To change workflow start options after the workflow has been deployed, follow the instructions in Changing Workflow Options.
How do I stop users from running a workflow?
To disable a workflow so that users are not able to start new instances but existing instance finish running, follow the instructions for Disabling a Workflow. To remove a workflow from the list or library, including terminating any existing instances, follow the instructions for Removing a Workflow Association on the same page. For more information, you can also see the Remove a workflow from a list or library and Remove a Workflow Solution From a Site Collection or Web Application.
Get Previous Version
The Get Previous Version Data widget allows a workflow to query and return the value of a field for the previous version of an item if Item Versioning is enabled in the targeted SharePoint list.
NOTE: This widget is available in Workflow Conductor version 3.5 or later.
Widget Properties:
| Field | Description |
| Select Item/Field: | Select either the current item on which the workflow is being run, or select a different item using a Lookup, then select the field whose previous value will be returned. |
| Select Version: |
Select the version of the item that will be queried. The available choices are: Last Minor Version (default): Returns the previous value of the defined field from the most recently saved minor version of the item. If minor versioning is not enabled, the value of the previous major version will still be returned. Last Major Version: Returns the previous value of the defined field from the most recently saved major version of the item. If minor versioning is not enabled, this is the same as the previous version of the item. Oldest Version: Returns the value of the defined field from the oldest available item version. |
| Save Value To: | Select the variable that will store the value that is returned. The variable type must be compatible with the field data being returned. |
| Click Apply to save the widget settings. | |
Return to Lists and Items Widgets
See Also:
Get User Info
The Get User Info widget retrieves a single SharePoint user profile property for a user and stores it in a workflow variable.
Notes for MOSS Users: This widget uses the MOSS User Profile Account property in the Workflow Conductor Control Panel > Account Settings page. This setting specifies a user account that has the Manage User Profiles Shared Services right in Shared Services Administration > Personalization services permissions. This account is used to access the SharePoint User Profile Properties list. Access to specific user profile data is security trimmed at runtime based on the permission of the user account configured for the widget in the Run As property.
Notes for WSS Users: The widget will retrieve profile data from the User Information List in the current site collection. Access to SharePoint user profile data is security trimmed at runtime based on the permission of the user account configured for the widget in the Run As property.
Widget Properties:
| Column | Description |
| User (Required) |
Enter a user, using one of the following methods: Type a SharePoint or Active Directory display name or account name for the user and click the Check User icon ( |
| Property (Required) |
Click the
|
| Run As | This widget can run with the permissions of the workflow initiator, the workflow designer, or another user. Select the option in the Run As property that best matches your requirement. For more information, see the Common Widget Properties topic. |
| Click Apply to save the widget settings. | |
 ) in the User Lookup form.
Example Using Get User Info Widget
Return to User & Group Management Widgets
See Also:
Launching Conductor Studio
 Workflow Conductor allows Designers and Administrators to easily create custom workflows using a simple drag-and-drop interface. We call that interface Workflow Conductor Studio, or Conductor Studio for short. It is a browser-based design interface that runs within SharePoint and can be accessed directly from a list or library. For more information about using Conductor Studio, visit the following sections:
To start Conductor Studio, first make sure that the account you are using has the Design or Full Control permission level for the list or library. Then, navigate to a list or library and click the Create or Edit Workflows button in the List or Library tab of the Tools ribbon.
NOTE: Administrators can further restrict who can design workflows in Conductor Studio using the Workflow Designers settings in Central Administration >Workflow Conductor. If you are a SharePoint Designer but do not have the Create or Edit Workflows option in the Settings menu, contact your SharePoint administrator.
You can learn more about the four sections of the Workflow Conductor Studio interface by clicking an item below:
Filter or Sort the List of Templates in the Template Gallery in Release 3.2 and Earlier
| Open a Workflow Template |
|---|
When working with Workflow Conductor, your list of templates may grow quickly and span multiple pages. When this happens, use the Sort and Filter features of the Template Gallery to quickly and easily find the template you need.
NOTE: The sort and filter features of the Template Manager changed a bit in Workflow Conductor Release 3.5. This page describes how it worked in older releases. If you are using a newer release, please see Filter or Sort the List of Templates in the Template Gallery.
To filter or sort the list of templates shown, follow these steps:
| Step | Action |
|---|---|
| 1. | 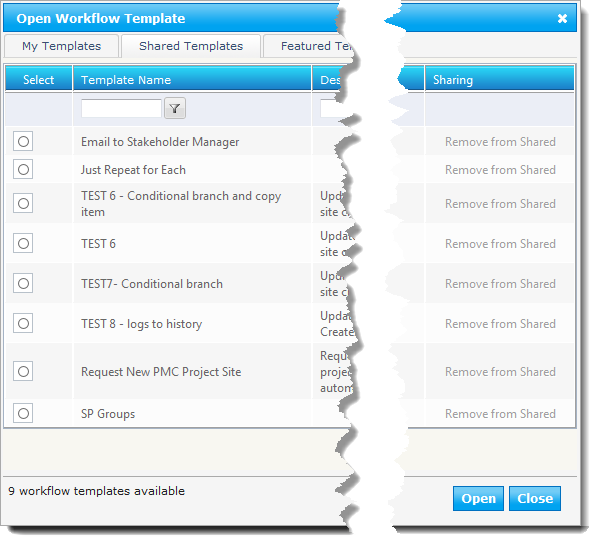 In the Template Gallery, enter filter text in the column heading where you want to filter. In the Template Gallery, enter filter text in the column heading where you want to filter. |
| 2. |
To remove the filter, delete the filter text, click the filter icon, and choose No filter from the parameter list. |
| 3. |
|
 Click the filter icon (
 ) and choose the filter parameter from the list shown. Once the parameter is clicked, the list will be filtered accordingly.
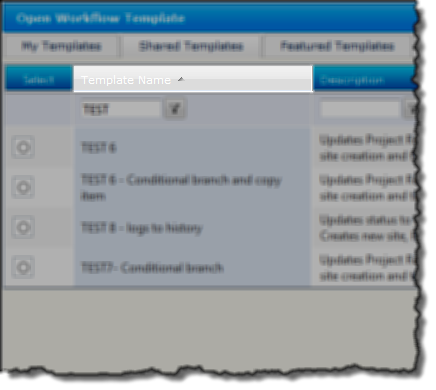 To sort the list, simply click the header text. Clicking the same header a second time, will reverse the sort order.
Filter or Sort the List of Templates in the Template Gallery
| Open a Workflow Template |
|---|
When working with Workflow Conductor, your list of templates may grow quickly and span multiple pages. When this happens, use the Sort and Filter features of the Template Gallery to quickly and easily find the template you need.
NOTES:
- The sort and filter features of the Template Manager changed a bit in Workflow Conductor Release 3.5. This page describes how they work in the latest release. If you are using an older release, please see Filter or Sort the List of Templates in the Template Gallery in Release 3.2 and Earlier.
- The screen shot shows the Manage Templates tab because the logged in user is a template manager. If you are not a template manager, you will not see that tab.
To filter or sort the list of templates shown, follow these steps:
| Step | Action |
|---|---|
| 1. |
|
| 2. |
To remove the filter, uncheck the Filters box. |
| 3. |
To sort the list, simply click the header text. Clicking the same header a second time, will reverse the sort order. Alternatively, you can choose Sort Ascending or Sort Descending from the menu displayed in Step 2. |
| 4. | 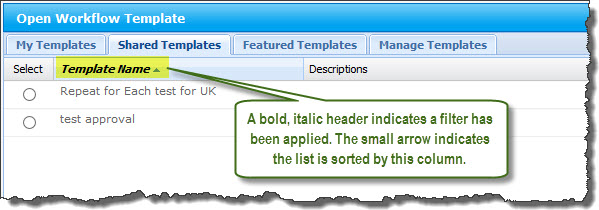 The font of the header will change to indicate a filter is applied to the list using that column. A small arrow ( The font of the header will change to indicate a filter is applied to the list using that column. A small arrow ( ) will appear to indicate the list is sorted by that column. The arrow will point up or down, depending on the sort order selected. ) will appear to indicate the list is sorted by that column. The arrow will point up or down, depending on the sort order selected. |
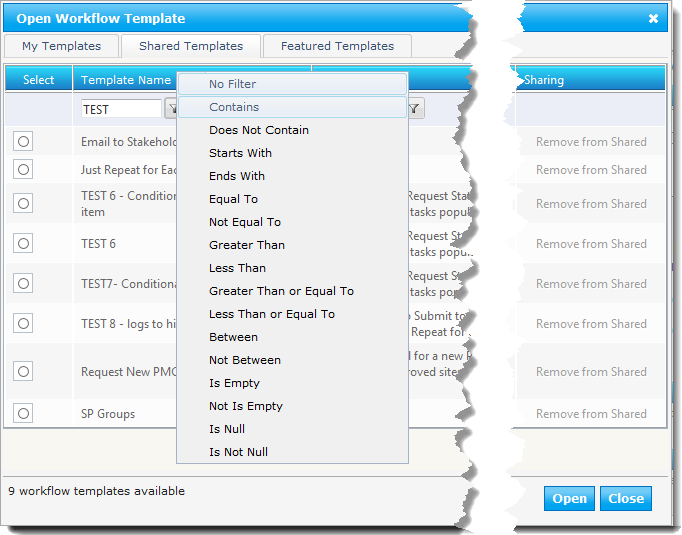
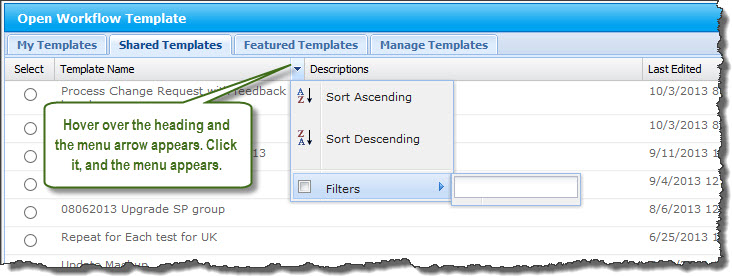 In the Template Gallery, hover over the heading of the column that shows the information you want to sort or filter on. A menu arrow (
 ) will appear. Click it to see the menu.
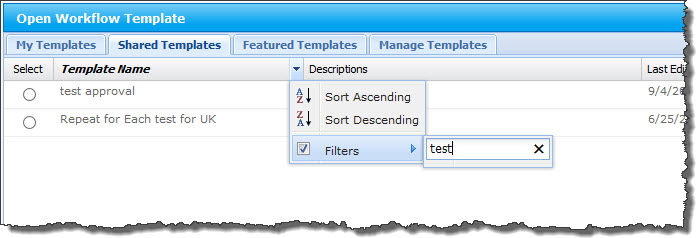 To filter the list, hover over Filters to see the text entry box. Enter filter text in the box. The list will be filtered to only those templates that have the text anywhere in the column. For example, the screen shot shows how to filter the list to show only the templates with the word “test” anywhere in the Template Name. As you enter the filter string, the list is filtered dynamically.
Exporting or Importing workflow templates
| Overview of Workflow Conductor Templates |
|---|
Export a template for
- safe keeping,
- to be able to import it to another SharePoint environment, or
- to send a copy to Bamboo’s Support Team if you are having an issue.
Export a template
| Step | Action |
|---|---|
| 1. |
|
| 2. | A message will appear at the bottom of your Internet Explorer browser, asking if you want to save the *.xoml file. You can choose to save it with the given workflow title, or you can choose to Save As a file with a different name.
|

Import a template
| Step | Action |
|---|---|
| 1. |  To import a workflow template, select Import from the Workflow area of the menu in the Workflow Conductor Studio. To import a workflow template, select Import from the Workflow area of the menu in the Workflow Conductor Studio. |
| 2. |
|
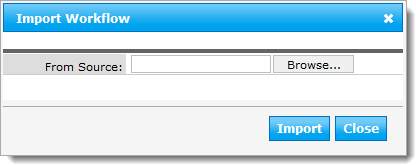 In the dialog box that appears, browse for the *.xoml file to import and then click Import.
External Data Widgets
This is a high level overview of the types of External Data Widgets available. Click on the name of the widget to get details and examples.
- Access SP via REST: Read and update items in an external SharePoint list.
- Call Web Service: Call a SOAP Web service.
- Query Database: Query a database.
- Run PowerShell Script: Run a PowerShell script on the SharePoint server.
Return to About Workflow Conductor Widgets
See also an Alphabetical List of Workflow Conductor Widgets.
Featured Workflow Conductor templates
| Overview of Workflow Conductor Templates |
|---|
 Any designer can share a workflow template. However, you may want to highlight specific templates as those that are commonly used, approved for use by all designers, or maybe just good examples for other designers. The template gallery includes a Featured Templates area for this purpose.
To add a template to the Featured Templates tab, follow these steps:
| Step | Action | |
| 1. | Go to Central Administration and click the Workflow Conductor section. | |
| 2. | In the Workflow Conductor Control Panel, click Template Management. | |
| 3. |
In the Template Management page, use the table to locate the template you want to feature. You can browse for templates in either the User Templates or Shared Templates tabs. Click the column header to sort the display by that column. Click the same column a second time to reverse the sort order. There is no filter capability for the lists on these tabs. |
|
| 4. | To remove a template from the Featured Templates list, click on the Featured Templates tab in the table and click the Delete icon ( ). ). |
Template managers can also delete featured templates from the Manage Templates tab in the Conductor Studio template gallery.
|
 ) for the specific template.
Example Using Set Field Value Widget
Update Assigned To Field to Workflow Initiator
 The example below shows a Set Field Value widget configured to set the “Assigned To” field for the current item in a Task list to the workflow initiator using an Easy Reference lookup:
Return to:
See Also:
Example Using Subscribe User Alert Widget
Create Alert for New Task Item
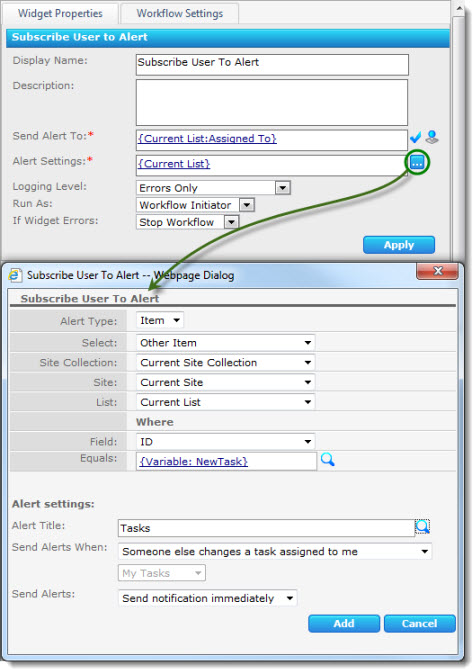 This example creates an alert for a task item created earlier in the workflow.
The alert is created for the person assigned to the new task, and the alert is sent anytime the task is changed by someone other than the Assigned To user.
The alert item is specified using a lookup to the workflow variable containing the new item’s ID, which is assigned in the Create Task widget.
Return to:
See Also:
Examples Using Update Item Widget
Updating Fields in the Current Item
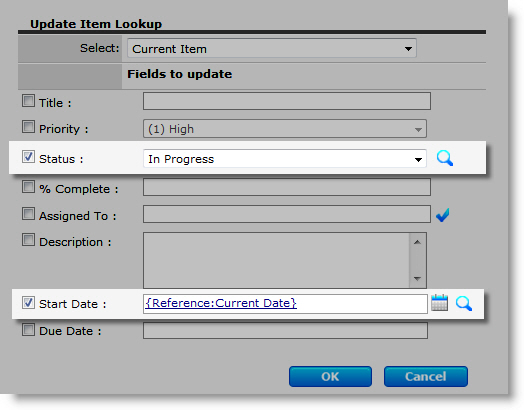 This screenshot shows the Update Item form configured to update two fields in the current item:
-
The “Status” choice field is updated to one of the available choices configured for the field.
-
The “Start Date” field is updated to the current date using an Easy Reference lookup.
Updating a Field in Another List
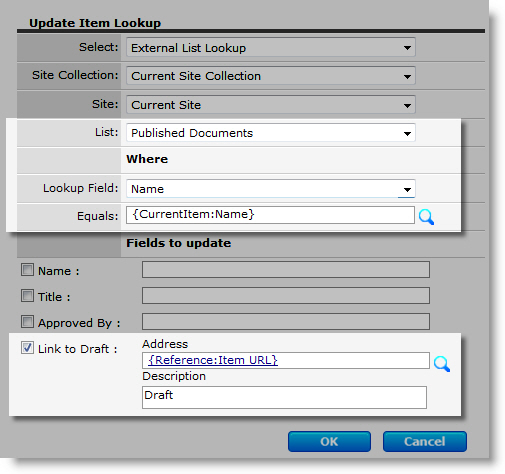 This example shows an Update Item widget that is part of a workflow that approves documents in a Draft Documents library and copies them (using the Copy Item widget) to a library called Published Documents.
To provide a link back to the item in the Draft Documents library, a field called “Link to Draft” in the Published Documents library is updated using an Easy Reference lookup to the Draft Document item URL.
Return to:
See Also: