Using the List Rollup Schema Designer Support Page
The List Rollup Schema Designer Support page provides a useful utility to help troubleshoot issues with rollups.
To use the utility, follow these steps:
| Step |
Action |
| 1. |
 In the List Rollup Schema Designer Web Part, click Support from the main menu. In the List Rollup Schema Designer Web Part, click Support from the main menu. |
| 2. |
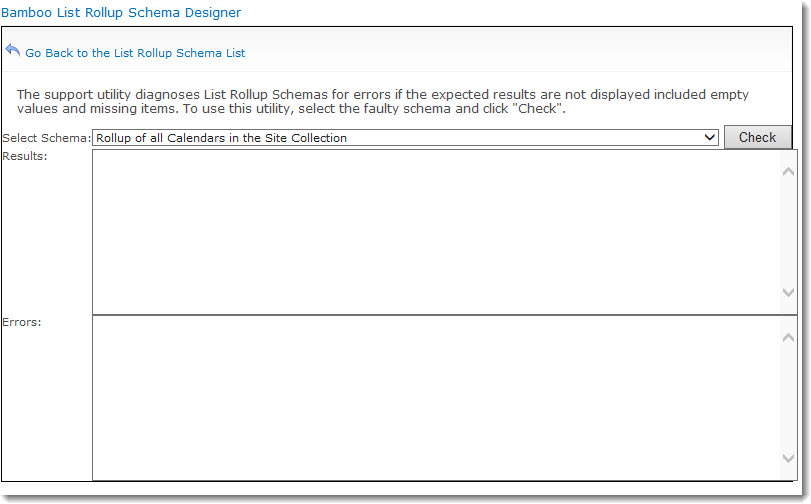
Select the schema you need to check in the Check Schema list and then click the Check button. All schemas that have been defined on the current site should be listed.
 |
| 3. |
The schema will be analyzed and the results shown in the Results area. Information shown in green text is just information, but if you see red text you should review the findings more carefully.
 |
| 4. |
Examples of other issues you may encounter that you can troubleshoot with the Support Page:
If you encounter an issue that is not explained and you need help with it, please submit a ticket to our Support Team via the My Bamboo area of the Bamboo web site.
|
Select the Recurrence Option for your Schema-based Rollup
If you are rolling up Calendar lists or lists with Events in them, you need to consider what you want to do about recurring/repeating events in your rollup.
One great benefit of a List Rollup is that it will show recurring events as single events, unlike the way they appear in an out-of-the-box SharePoint list view. This means that you can show the single events separately in the List Rollup Grid View Web Part or alert on a single event.
However, for performance reasons, it’s good to limit the number of single events from a repeating event that are included in the rollup since it takes time to process them. Often, recurring events are configured with No end date since that is the SharePoint default (see below). That’s OK when you’re displaying them in a Calendar with one month displayed at a time, but not necessarily when you are displaying them in a list.
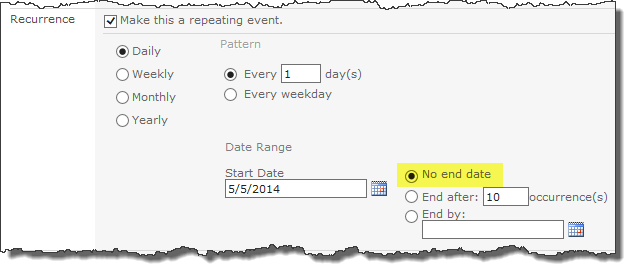
To limit the number of repeating events to include in your rollup, follow these steps:
| Step |
Action |
| 1. |
If you are not aggregating items of type Event, the Define Recurrence button will be grayed and you don’t need to worry about configuring it. 
NOTE: The Define Recurrence button, like all other configuration buttons, will also be grayed if a list has not yet been selected.
|
| 2. |
If you are aggregating events, you should configure the recurrence section. Click Define Recurrence to open the dialog.

 IMPORTANT: If you do not define recurrence, the rollup will include only the first item in the series and any individual occurrences that were modified separately from the series. IMPORTANT: If you do not define recurrence, the rollup will include only the first item in the series and any individual occurrences that were modified separately from the series.
|
| 3. |
Choose whether you want to expand recurring (or repeating) events. If you choose to expand them, choose how many periods before and after today and then choose the period. The choices for period are: Day, Month, and Year.
NOTE: Today is the day the List Rollup runs. In other words, that would be the day that an end user visits a page that displays the contents of a List Rollup Schema-based rollup.
 |
| 4. |
When ready, click Save to save your configuration and close the dialog. Otherwise, click Cancel to close the dialog without saving anything. |
Select the Included Lists for your Schema-based List Rollup
 IMPORTANT: The discovery modes avilable for schemas that use the Bamboo Aggregation Service (BAS) are slightly different than the modes available for schemas using the SharePoint Aggregation Service (SAS). The differences are described in detail in this article.
To select the lists or libraries to include in your schema-based List Rollup, follow these steps:
| Step |
Action |
| 1. |
Included Lists, Step 1: Discovery Mode. Click the Configure Discovery Mode button to select a method to identify lists to include in your schema. The Discovery Modes available will depend on the Aggregation Service you selected.

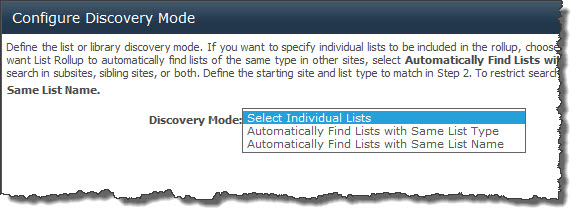 If you are using the Bamboo Aggregation Service (BAS), the available Discovery Modes are: If you are using the Bamboo Aggregation Service (BAS), the available Discovery Modes are:
- Select Individual Lists. Choose this option if you want to individually identify the specific lists/libraries that you want to aggregate.
- Automatically Find Lists with Same List Type. Match by list name will automatically find all the lists that have the same display name as the list selected in Step 2.
- Automatically Find Lists with Same List Name. Match by list name will automatically find all the lists that have the same display name as the list selected in Step 2.
 Automatically finding lists, whether by type, name or in subsites or the site collection, means that you won’t have to edit your schema to include new lists as they are created. List Rollup is capable of automatically discovering new lists, minimizing the need for future schema modifications. Automatically finding lists, whether by type, name or in subsites or the site collection, means that you won’t have to edit your schema to include new lists as they are created. List Rollup is capable of automatically discovering new lists, minimizing the need for future schema modifications.
If you choose to automatically find lists while using the BAS, you will then be asked to define the scope of where to look for those lists. The scope choices are the same regardless of whether you choose to match by List Type or List Name.
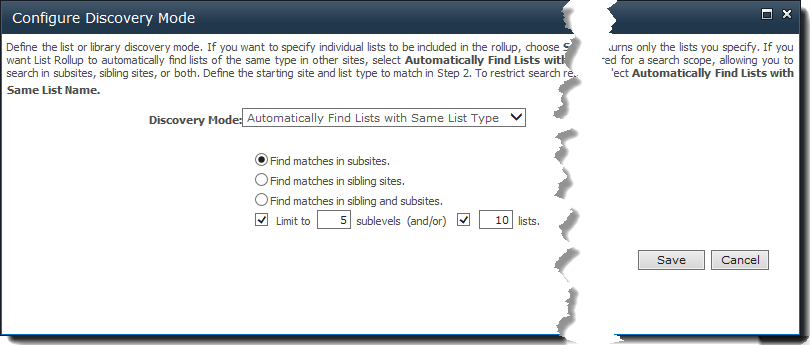
Choose to:
- Find matches in subsites. Subsites are the sites beneath the site where the list selected in Step 2 resides.
- Find matches in sibling sites. Sibling sites are sites at the same level as the site where the list selected in Step 2 resides.
- Find matches in sibling and subsites.
- Find matches in current site (exclude subsites). This option can be used to find lists of the same type on the current site, without including lists of that type found in subsites.
NOTE 1: If you choose to discover matches in subsites OR sibling and subsites, you can limit the search scope to a specific number of sublevels or lists. When the specified number is reached, the List Rollup will look no further. It is recommended that you limit the scope this way in order to improve performance. The more sites that are included in the discovery scope, the longer the rollup will take to display.
NOTE 2: When looking for lists in subsites and/or sibling sites, the site where the selected list resides is also included in the search.
 If you are using the SharePoint Aggregation Service (SAS), the available Discovery Modes are: If you are using the SharePoint Aggregation Service (SAS), the available Discovery Modes are:
- Select Individual Lists. Choose this option if you want to individually identify the specific lists/libraries that you want to aggregate.
- Automatically Find Lists in Subsites. Choose this if you want to have List Rollup automatically find lists of the same list type in the site where the list selected in Step 2 resides and all its subsites.
- Automatically Find Lists in Site Collection. Choose this if you want to have List Rollup automatically find lists of the same list type in all the sites of the site collection where the list selected in Step 2 resides.
 Automatically finding lists, whether in subsites or the site collection, means that you won’t have to edit your schema to include new lists as they are created. List Rollup is capable of automatically discovering new lists, minimizing the need for future schema modifications. Automatically finding lists, whether in subsites or the site collection, means that you won’t have to edit your schema to include new lists as they are created. List Rollup is capable of automatically discovering new lists, minimizing the need for future schema modifications.
Once the Discovery Mode is selected, click Save to save it and close the dialog. Otherwise, click Cancel to close the dialog without saving.
NOTE: When looking for lists in subsites, the site where the selected list resides is also included in the search.
 IMPORTANT: It is not possible to limit the discovery scope when using the SharePoint Aggregation Service (SAS). With SAS you can auto-discover within a site or site collection only. You cannot auto-discover sibling or subsites like you can with Bamboo Aggregation Service (BAS). IMPORTANT: It is not possible to limit the discovery scope when using the SharePoint Aggregation Service (SAS). With SAS you can auto-discover within a site or site collection only. You cannot auto-discover sibling or subsites like you can with Bamboo Aggregation Service (BAS).
|
| 2. |
Included Lists, Step 2: Select a List. Click the Select a List button.

Depending on the aggregation service you picked, the Select a List dialog will look slightly different. If using the SharePoint Aggregation Service(SAS), you will see:

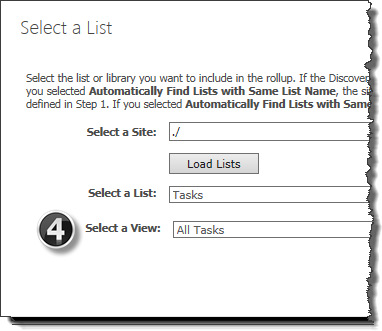 If using the Bamboo Aggregation Service (BAS), you will see an extra selection, the Select a View. Choose a view of the selected list. The selected view will determine the columns to be included in your roll-up and may also determine the filter of your rollup (or this list in your rollup). If using the Bamboo Aggregation Service (BAS), you will see an extra selection, the Select a View. Choose a view of the selected list. The selected view will determine the columns to be included in your roll-up and may also determine the filter of your rollup (or this list in your rollup).
On the dialog that appears:
-
Enter the URL of the site that contains a list you want to add to the schema.
NOTE: Site URLs can be absolute (http://domain/site) or relative (./site). Relative URLs should be used for SharePoint Web applications containing multiple Alternative Access Mappings (AAM), if the Web Part is part of a site template, or if you plan to migrate the content database to another environment in the future.
- Click Load Lists to populate the Select a List drop-down with available lists in the site.
- Choose a list or library from the Select a List drop-down selection.
-
If using BAS, choose a view of the selected list from the Select a View drop-down.
NOTE: The View will determine the columns included in your rollup and potentially the filter of the items from this list.
- Click Save to save your list selection and close the dialog. Otherwise, click Cancel to close the dialog without saving anything.
|
| 3. |
Included Lists, Step 3 (only if using BAS): Filter. After selecting a list, you can then choose to filter the list. To filter, click Define a Filter
NOTE: If using SAS, the filter is defined after selecting columns.

In the Define a Filter dialog, choose to use the filter defined in the list view selected by picking Items in a List View.

Otherwise, pick Some Items (Recommended) to build a filter specifically for this schema using the CAML Query Builder.
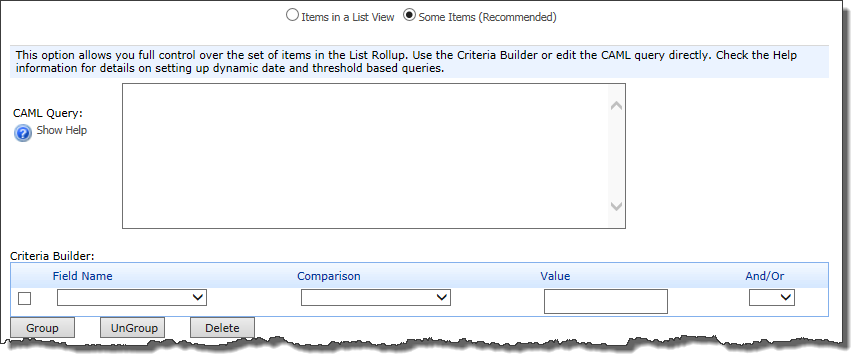
See Select the Filter for your Schema-based Rollup for more information about building a filter with the CAML Query Builder.
|
| 4. |
Included Lists, Step 3 (if using BAS, this is Step 4): Include List. After you select a discovery mode and a list, click the Include List in Rollup button to add the list to the Included Lists table.

 IMPORTANT: The FIRST list that you include is known as the master list. When using the SharePoint Aggregation Service, all subsequent lists included MUST be of the same type as the master. When selecting columns to be included in a rollup using the SharePoint Aggregation Service (SAS), they are selected from the master list. IMPORTANT: The FIRST list that you include is known as the master list. When using the SharePoint Aggregation Service, all subsequent lists included MUST be of the same type as the master. When selecting columns to be included in a rollup using the SharePoint Aggregation Service (SAS), they are selected from the master list.
|
| 5. |
If desired, choose another list from another site collection and include it in your rollup. After clicking Include List in Rollup, two lists will be shown in the Included Lists table.
NOTES:
- When choosing a second list, the list of available lists/libraries in the selected site will be shorter if using the SAS, as it will include only those lists/libraries of the same type as your MASTER list (the first list chosen).
- When auto-discovering items, the more lists/libraries you include in the Included Lists table, the longer it will take to display the contents of your rollup.
|
Select the Filter for your Schema-based Rollup
To configure the filter for your schema-based List Rollup, follow these steps:
| Step |
Action |
| 1. |
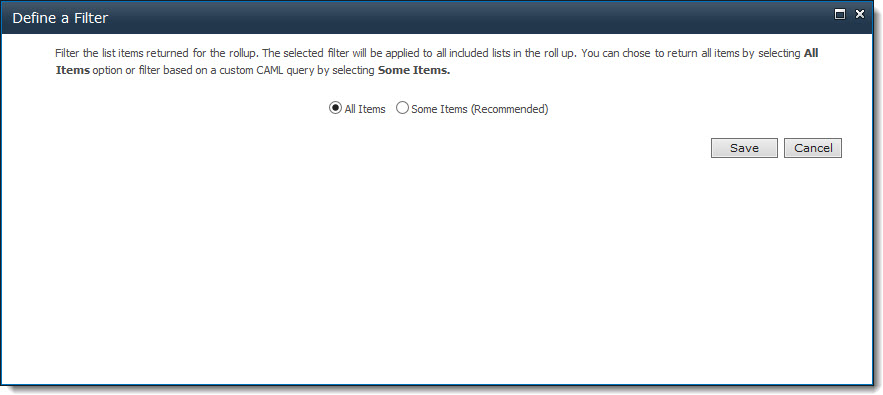
If you don’t want to filter the data, you still need to configure the Filter section. You won’t be able to create your schema until you do. For no filter, choose to return All Items, as shown below.
 |
| 2. |
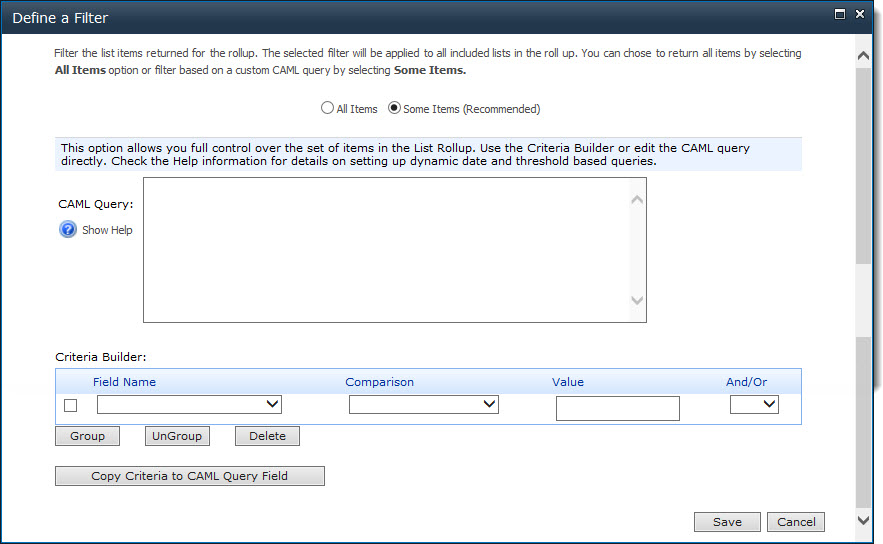
Otherwise, choose to filter the data returned. Click Some Items (Recommended) in the Define a Filter dialog. The Criteria Builder will appear on the screen with an area to copy the CAML Query to.
 Although you can usually filter the data on the client side, it is ALWAYS better to filter the rollup in the schema definition rather than at display time (on the client side). Only get the data that you need to display! Although you can usually filter the data on the client side, it is ALWAYS better to filter the rollup in the schema definition rather than at display time (on the client side). Only get the data that you need to display!
 |
| 3. |
It’s easiest to use the Criteria Builder to build your CAML query, which will perform as the filter. However, if you are a CAML expert, you can enter the CAML directly in the CAML Query area. Follow the steps below to build a CAML Query using the Criteria Builder.
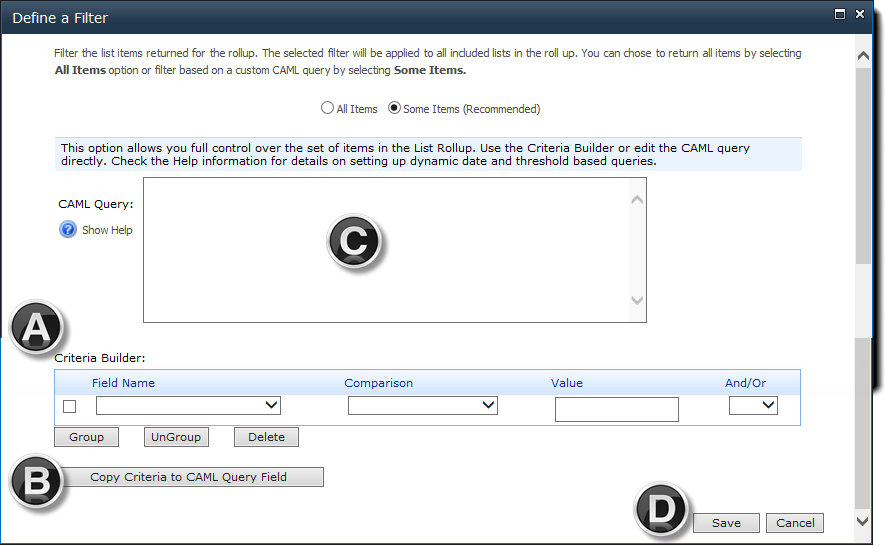
- Build your criteria by selecting a column from your MASTER list using the Field Name selection list. Choose an appropriate Comparison and then enter a Value. Add additional criteria by making a selection in the And/Or drop-down box. Group (or ungroup) multiple criteria by checking the box for the rows to group and clicking the Group (or Ungroup) button. Grouping allows you to control the order of operation of your criteria. If needed, delete criteria by checking the box for the rows to delete and clicking the Delete button.
- Once your criteria is specified in the Criteria Builder, click the Copy Criteria to CAML Query Field button. This writes the CAML appropriate for your criteria. For additional help with CAML queries, click the Show Help button (
 ) next to the CAML Query box and see Additional Tips for using the CAML Criteria Builder. ) next to the CAML Query box and see Additional Tips for using the CAML Criteria Builder.
- The CAML Query will be generated and will appear in the CAML Query box.
- When ready, click Save to save your filter and close the dialog. Otherwise, click Cancel to close the dialog box without saving anything.
NOTE: All the columns from your MASTER list/library will be available for selection in the Criteria Builder, not just the ones you have decided to include in your rollup.
The screen shot below shows a CAML Query and the associated Crtieria used to build it. The query gets the Tasks where Due Date is in the past by one day and Status is not equal to Completed. In other words, this query gets only overdue tasks. 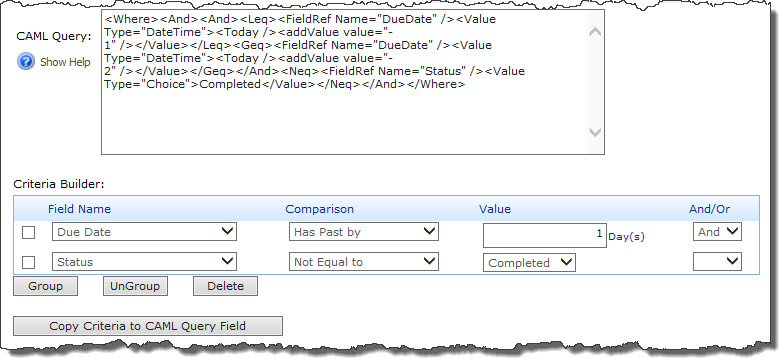
|
Select the Columns to include in your Schema-based Rollup
To select the columns to include in your schema-based rollup, follow these steps:
| Step |
Action |
| 1. |
Click Select Columns to display the Select Columns dialog. The button will be grayed until a list is selected.
 |
| 2. |
In the Select Columns dialog,
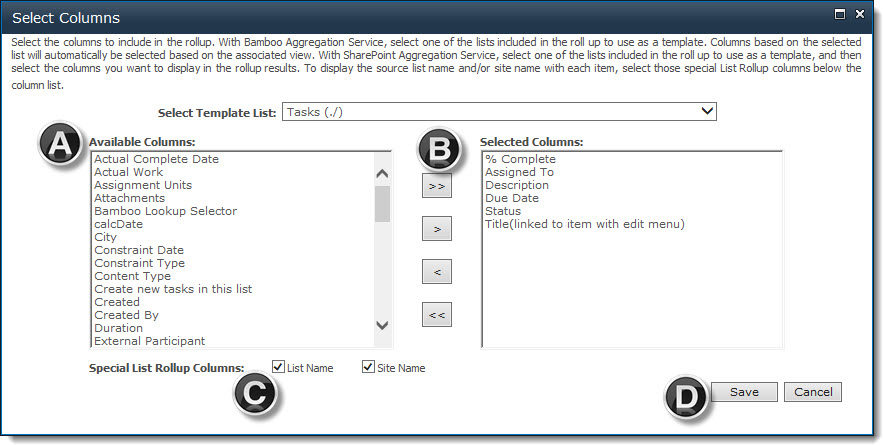
- The columns found in the selected list are listed in the Available Columns list.
-
Highlight a column in Available Columns and click the right arrow button ( ) to move it to the Selected Columns list. If desired, select multiple columns by holding down the Ctrl key on your keyboard while clicking to highlight a column. ) to move it to the Selected Columns list. If desired, select multiple columns by holding down the Ctrl key on your keyboard while clicking to highlight a column.
 IMPORTANT: Only the select the columns that you need to display in your rollup. Getting, formatting, and displaying data in a rollup takes time. Achieve optimal performance by selecting only the columns you need. IMPORTANT: Only the select the columns that you need to display in your rollup. Getting, formatting, and displaying data in a rollup takes time. Achieve optimal performance by selecting only the columns you need.
 IMPORTANT: The column names shown in the Available Columns list box are the display names of the column. To ensure your data rolls up properly within the columns you select, you must make sure the internal names of the columns and the column attributes match across all lists. For example, if you select a Status column in the master list with an internal name of ‘Status’ and data type of Choice that allows a single selection, then only those included lists that contain single-Choice columns with an internal column name of ‘Status’ will be rolled up. IMPORTANT: The column names shown in the Available Columns list box are the display names of the column. To ensure your data rolls up properly within the columns you select, you must make sure the internal names of the columns and the column attributes match across all lists. For example, if you select a Status column in the master list with an internal name of ‘Status’ and data type of Choice that allows a single selection, then only those included lists that contain single-Choice columns with an internal column name of ‘Status’ will be rolled up.
-
If desired, choose to also include a hyperlink to the List Name and Site Name of each aggregated item.
- When ready, click Save to save your column configuration and close the dialog. Otherwise, click Cancel to close the dialog without saving anything.
NOTE: The order that the columns are selected is not important in this section. You are defining the schema here and not yet deciding how to display the data to the end user.
|
| 3. |
When ready, click Save to save your configuration and close the dialog. Otherwise, click Cancel to close the dialog without saving anything. |
Move a List Rollup Classic Data View to another page
By default, a List Rollup Classic Edition Data View Web Part is created on the same page as the List Rollup Classic Edition Web Part.
 It’s best to move a data view to a page where it is the only (or one of a few) rollup on the page. Multiple rollups on the same page negatively impacts page load time.
When you edit the page, you will see it as a hidden web part. If you want to move/copy it to a different page of your portal, follow these steps:
| Step |
Action |
| 1. |
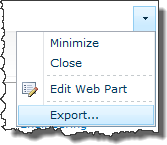 From the web part menu, choose to Export.. the web part. From the web part menu, choose to Export.. the web part.
A message will appear giving you the opportunity to save the exported web part file (a *.webpart file). The location and appearance of the message will vary slightly depending on the version of your browser.
Save the file and make a note of where you save it.

For an alternative method of exporting the web part, see Export or Import List Rollup Data Views.
|
| 2. |
 Go to the page where you want the Data View Web Part to appear and edit that page. Choose to insert a web part. When the Web Part Gallery appears, in the Upload a Web Part area, browse for the file you exported in step 1 above. When ready, click Upload. Go to the page where you want the Data View Web Part to appear and edit that page. Choose to insert a web part. When the Web Part Gallery appears, in the Upload a Web Part area, browse for the file you exported in step 1 above. When ready, click Upload. |
| 3. |
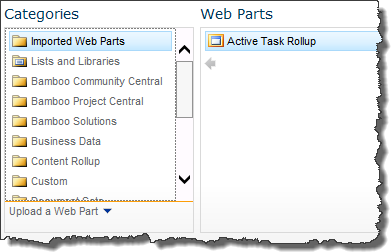 After the page refreshes, you should see a Category in Gallery called Imported Web Parts. The imported Data View Web Part should appear there so you can add it to any web part zone. After the page refreshes, you should see a Category in Gallery called Imported Web Parts. The imported Data View Web Part should appear there so you can add it to any web part zone. |
Managing Existing List Rollup Schemas
After you create a schema, it is displayed in the List Rollup Schema Designer Web Part. Schemas are listed in this web part in the order that they are created. From there, you can perform the following actions:
 IMPORTANT: Any user with Contribute permission can create, edit, copy, or delete a List Rollup Schema.

| Step |
Action |
| Preview |
Preview the data in a schema from the List Rollup Schema Designer by clicking the Preview Data button. The first 15 rows of the data will be displayed at the bottom of the web part. It will remain displayed until you click Close in the lower right corner of the preview display. |
| Edit |
To edit an existing schema, click on the schema name in the Title column or choose Edit Schema from the item edit menu. The Schema Configuration page will be displayed. See Edit an existing List Rollup Schema for more information.
 IMPORTANT: Consider restricting the Contribute permission level to trusted users so a schema doesn’t get inadvertently edited. IMPORTANT: Consider restricting the Contribute permission level to trusted users so a schema doesn’t get inadvertently edited.
|
| Copy |
To make a copy of a schema, click Copy Schema in the item edit menu.
 Copying a schema is a good way to save time by creating a new schema based on the configuration of an existing one. Copying a schema is a good way to save time by creating a new schema based on the configuration of an existing one.
The new schema will be displayed on the last page of your Schema list and will have a name similar to the schema it was copied from. For example, if copying a schema called Tasks Rollup, the copied schema will be Tasks Rollup – Copy.
|
| Delete |
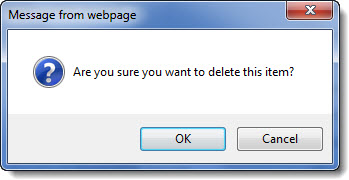 To delete a schema, click Delete Schema in the item edit menu and then click OK to the confirmation message. To delete a schema, click Delete Schema in the item edit menu and then click OK to the confirmation message. |
Identify Lists to be Excluded from your Schema-based Rollup
If you defined an automatic discovery mode when you configured the Included Lists of your rollup, you can exclude specific lists using the Excluded Lists option. To exclude lists from your rollup, follow these steps:
| Step |
Action |
| 1. |
Click the Excluded Lists button to enter lists to exclude.
 |
| 2. |
Type the path of the list to exclude. Enter multiple lists separated by semicolons. List URLs can be absolute (http://domain/site/list) or relative (./site/list). Relative URLs should be used for SharePoint Web applications containing multiple Alternative Access Mappings (AAM),if the Web Part is part of a site template, or if you plan to migrate the content database to another environment sometime in the future.
 |
| 3. |
When ready, click Save to save your configuration and close the dialog. Otherwise, click Cancel to close the dialog without saving anything. |
Export or Import List Rollup Data Views
Data Views created by the List Rollup Classic web Part are hidden on the page where they are created (they are created on the page where the List Rollup Classic Web Part resides). To add them to another page on your site, export the data view web part to the site’s Web Part Gallery so you can easily add it to another page in the site.
From the site’s Web Part Gallery, you can also download a copy of the web part so you can upload it to the Web Part Gallery of another site.
To export and then import a data view web part, follow these steps:
| Step |
Action |
| 1. |
Once a Data View is created with the List Rollup Classic Web Part, it is stored as a template on the page and listed under the heading Available Templates on the right side of the web part. In the screen shot below, Task Rollup is a saved template.
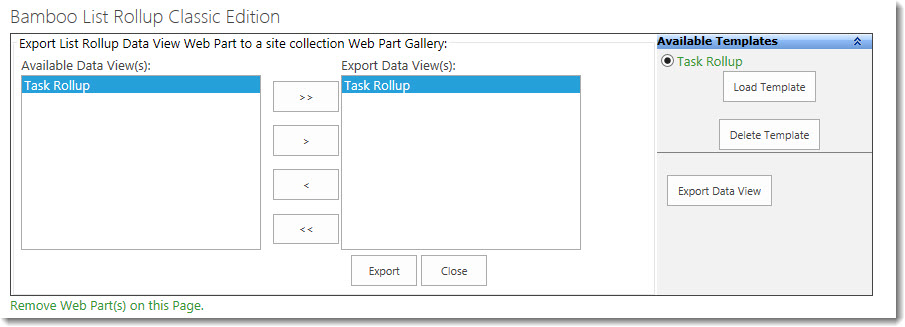
To export the template, select it and click Export Data View.
|
| 2. |
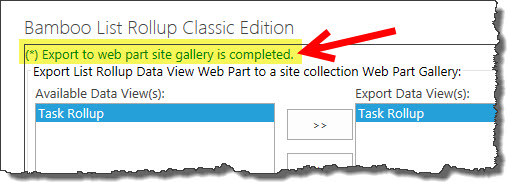 A wait cursor will appear during the export. When the export is complete, the message Export to web part site gallery is completed will appear at the top of the display. A wait cursor will appear during the export. When the export is complete, the message Export to web part site gallery is completed will appear at the top of the display. |
| 3. |
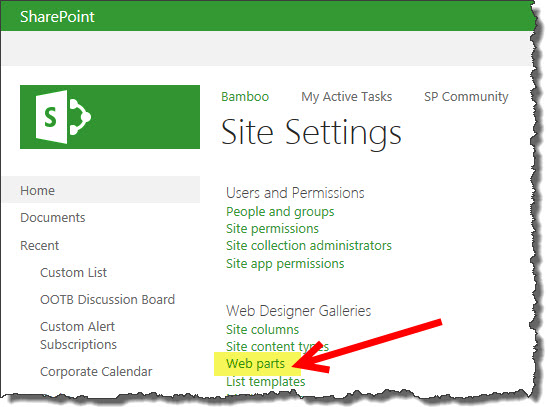 Access the sites Web Part Gallery in Site Settings under Web Designer Galleries > Web Parts. Access the sites Web Part Gallery in Site Settings under Web Designer Galleries > Web Parts. |
| 4. |
Your exported data view will appear in the list.

|
| 5. |
Import the web part to another page in the site as you would any other web part from the site’s Web Part gallery.
To import the web part to a page in another site, download a copy of the web part from the gallery to your PC by selecting the web part and clicking Download a Copy from the Files ribbon. Keep track of where you download it to as you will browse for it in Step 7 below.

|
| 6. |
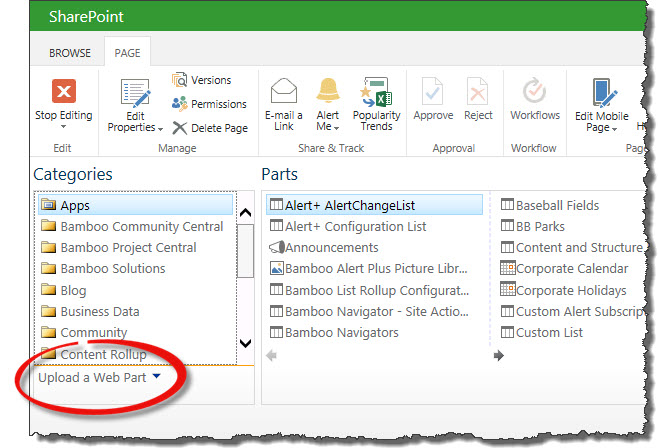 Go to the page where you want to import the saved web part and choose to insert a web part. When the web part gallery appears, click Upload a Web Part beneath the Categories list. Go to the page where you want to import the saved web part and choose to insert a web part. When the web part gallery appears, click Upload a Web Part beneath the Categories list. |
| 7. |
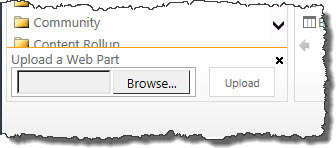 Click the Browse… button to browse for the file you exported in Step 5 above. Then click Upload to upload it. The web part gallery will close. Click the Browse… button to browse for the file you exported in Step 5 above. Then click Upload to upload it. The web part gallery will close. |
| 8. |
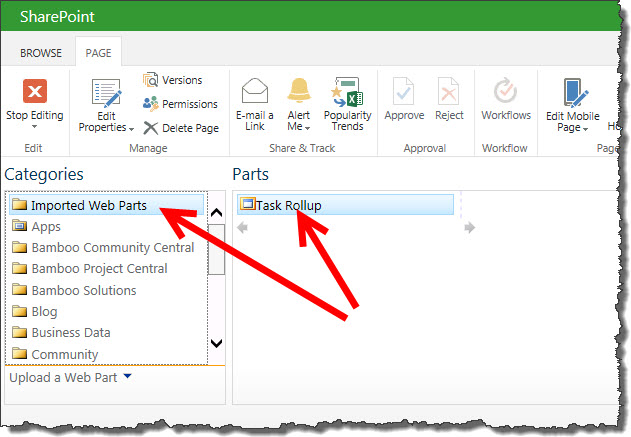 Click to insert/add a web part to the page. This time, a Category called Imported Web Parts will appear. Select it and your uploaded web part will appear in the Parts list. Insert it as you would any other web part. Click to insert/add a web part to the page. This time, a Category called Imported Web Parts will appear. Select it and your uploaded web part will appear in the Parts list. Insert it as you would any other web part. |
Edit an existing Classic List Rollup
To edit a rolled up Data View Web Part, do the following:
| Step |
Action |
| 1. |
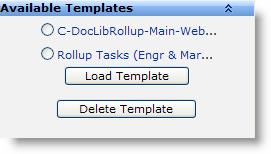 From the List Rollup Classic Edition Web Part, select the template you want to modify and click Load Template. From the List Rollup Classic Edition Web Part, select the template you want to modify and click Load Template.
The templates listed are those that exist in the Web Part Page Gallery.
|
| 2. |
The lists and associated CAML queries for the selected Data View Web Part template are loaded into the configuration section of the List Rollup Web Part and are ready for editing. |
| 3. |
When you go to save your updated template, you will need to give it a new name since web parts in the page gallery require unique names.
NOTE: This update will NOT be reflected in web parts that you exported from this page to import to other pages of your portal.
|
Display a List Rollup Schema using the Grid View
To display the contents of the schema in the List Rollup Grid View Web Part once you have defined a List Rollup Schema with the List Rollup Schema Designer Web Part, follow these steps:
| Step |
Action |
| 1. |
Add the List Rollup Grid View Web Part to the page. To configure it, see Overview of the List Rollup Grid View Configuration Options for more information.
NOTE: After the web part is configured via its tool pane, but before the display settings are configured for the first time, users (who are NOT in the SharePoint Group which is allowed to modify the settings) will see this error in the web part display:

|
| 2. |
As a user who IS in the SharePoint Group which is allowed to modify the settings of the Grid View, click Show Settings button. The Settings page is displayed.
 In the List Rollup Schema Name section: In the List Rollup Schema Name section:
|
| 3. |
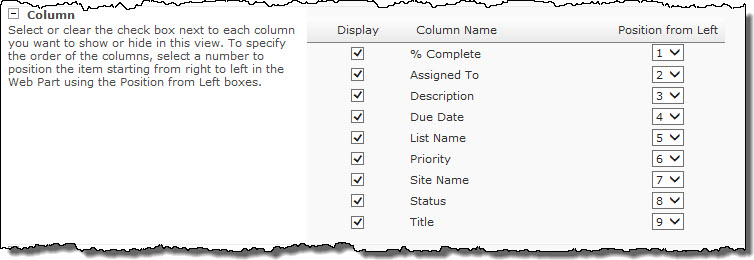 In the Column section, choose the columns you want to display and the order they will appear. In the Column section, choose the columns you want to display and the order they will appear. |
| 4. |
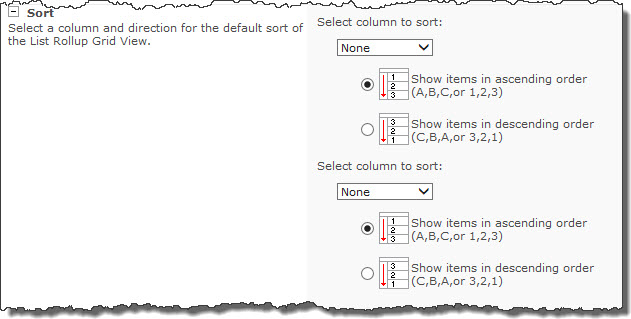 In the Sort section, configure the default sort for the data to be displayed. You can sort by up to two columns. In the Sort section, configure the default sort for the data to be displayed. You can sort by up to two columns. |
| 5. |
 If you want to return all items defined in the schema by default, leave the default selection of Show all items in this view in the Filter section. If you want to return all items defined in the schema by default, leave the default selection of Show all items in this view in the Filter section.
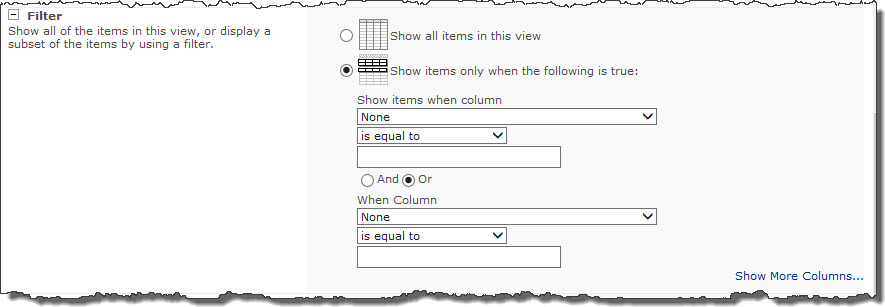 Alternatively, click the Show items only when the following is true and then configure the filter criteria. If it takes more than two columns to define your filter criteria, click Show more columns… to add more. Alternatively, click the Show items only when the following is true and then configure the filter criteria. If it takes more than two columns to define your filter criteria, click Show more columns… to add more.
|
| 6. |
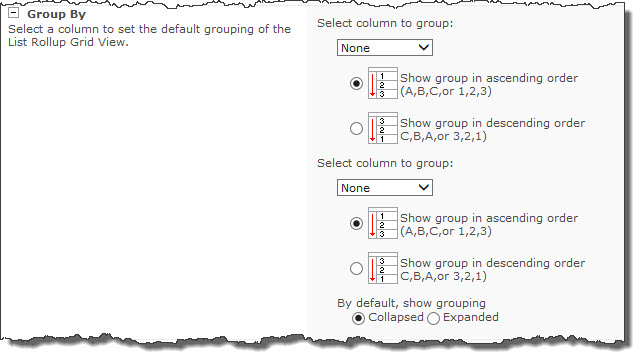 In the Group section, configure the default grouping if needed. It is possible to group by a maximum of two columns. Don’t forget to choose how to display the default grouping – collapsed or expanded. In the Group section, configure the default grouping if needed. It is possible to group by a maximum of two columns. Don’t forget to choose how to display the default grouping – collapsed or expanded. |
| 7. |
 In the Item Limit section, configure the number of items to display per page and also the total number of items to return. The more items per page, the slower the page load. In the Item Limit section, configure the number of items to display per page and also the total number of items to return. The more items per page, the slower the page load. |
| 8. |
 In the Grid View General Settings section configure what end users can do from their browser. You can allow them to Filter, Sort, Group, or Export the data displayed. In the Grid View General Settings section configure what end users can do from their browser. You can allow them to Filter, Sort, Group, or Export the data displayed.
There are two export options:
- All Export of Items to Excel. This will export all data as text, like it is exported from a regular SharePoint list view. Once it’s in Excel, you can format it as needed.
- Export to Excel with Data Formatting. This will export formatted data to Excel, which means that dates will appear as dates in Excel. This saves time spent formatting exported data once it’s in Excel. It takes a little bit longer to export formatted data, so there is a warning note about slower performance.
|
| 9. |
When finished configuring all the sections, click the Save Data button at the bottom left corner of the page to save the configuration and close the Settings page.
All users, including those who are NOT in the SharePoint Group allowed to modify the settings, will see the newly configured rollup. At any time, users in the SharePoint Group allowed to modify the settings can modify the settings as needed. They modify the public view. Unlike the List Consolidator Web Part, there are no private views with the List Rollup Grid View Web Part.
See Manipulate the Rollup Data in the List Rollup Grid View for more information about using the Grid View from an end user perspective.
|
Create a new List Rollup Schema using the Bamboo Aggregation Service
Bamboo Aggregation Service. Unlike the SharePoint Content Query Web Part, you can aggregate items of different types if you select this service. Because it is capable of aggregating items of various types, it takes a little bit longer, so choose this only if you need to rollup items of various types.
To create a new List Rollup Schema definition, follow these steps:
| Step |
Action |
Result |
| 1. |
From the main menu at the top of the web part, click New Schema to create a new schema definition.
 |
The schema configuration page will appear. |
| 2. |
Click the Select Aggregation Service (required) to choose the service for your schema. This will be the first thing you do; until you choose an aggregation service, nothing else is enabled.

Choose Bamboo Aggregation Service. Unlike the SharePoint Content Query Web Part, you can aggregate items of different types if you select this service. Because it is capable of aggregating items of various types, it takes a little bit longer, so choose this only if you need to rollup items of various types.

Click Save to save the aggregation service selection and close the dialog. Otherwise, click Cancel to close the dialog without saving anything. Once a service is selected and saved, it will be shown on the page in the center column (see below) so it will be easy to see which configurations you have completed.

 IMPORTANT: Although it is possible to modify a List Rollup Schema definition after it is first created, you will not be able to change the aggregation service selected once the schema is created (saved for the first time). IMPORTANT: Although it is possible to modify a List Rollup Schema definition after it is first created, you will not be able to change the aggregation service selected once the schema is created (saved for the first time).
|
| 3. |
Included Lists (required). In the Included Lists section, configure the discovery mode, select a list, and include it. You must select at least one list in order to create a schema. See Select the Included Lists for your Schema-based List Rollup for details. Once the list (or lists) is selected, it will appear in the Included List table, shown below.
If needed, you can check the box in the right column of the Included Lists table and then click Remove Selected to remove a selected list if you change your mind. |
| 4. |
Columns to Rollup (required). Identifying the columns to rollup is a required step, however you will not be able to select columns until you select a list. You will not be able to create your schema if you do not select at least one column. See Select the Columns to include in your Schema-based Rollup for details. Once columns are selected, they will be shown in the center column of the schema designer, as shown below.
 |
| 5. |
Filter (required). Defining a filter is a required step and you will not be able to create your schema if you do not specify whether you want to see all items or a filtered set. See Select the Filter for your Schema-based Rollup for details. Once the filter has been configured, it will be shown in the center column of the schema designer, as shown below.
 |
| 6. |
Recurrence. If you are rolling up Calendar/Events lists, see Select the Recurrence Option for your Schema-based Rollup for details. Once the recurrence has been configured, it will be shown in the center column of the schema designer, as shown below.
 |
| 7. |
Exluded Lists. If you defined an automatic discovery mode in the Included Lists step, you can exclude specific lists from the rollup. See Identify Lists to be Excluded from your Schema-based Rollup for details. If an excluded list is defined, it will be shown in the center column of the schema designer, as shown below.
 |
| 8. |
Schema General Settings (required). This is a required step; you will not be able to create your schema until you give it a name. See Configure the General Settings of your Schema-based Rollup for details. Once you have given your schema a name, it will be shown in the center column of the schema designer, as shown below.
 |
| 9. |
 If desired, preview your rollup by clicking the Preview Rollup button. The first 15 items in the rollup will be displayed at the bottom of the page (you may need to scroll down to see it). See an example below. If desired, preview your rollup by clicking the Preview Rollup button. The first 15 items in the rollup will be displayed at the bottom of the page (you may need to scroll down to see it). See an example below.
 |
| 10. |
When ready, click Create/Update Schema to save your schema and return to the List Rollup web part. Otherwise, click Cancel and accept the warning question to return to the List Rollup web part without saving any changes.
Your schema is displayed in the list of available schemas in the List Rollup Schema Designer Web Part. If you have multiple pages of schemas listed, the new schema will be on the last page.
|
Create a new List Rollup Schema
 IMPORTANT: List Rollup Schemas are security-trimmed when they are displayed. Users will only see data that they can browse to manually.
To create a new List Rollup Schema definition, follow these steps:
| Step |
Action |
Result |
| 1. |
From the main menu at the top of the web part, click New Schema to create a new schema definition.
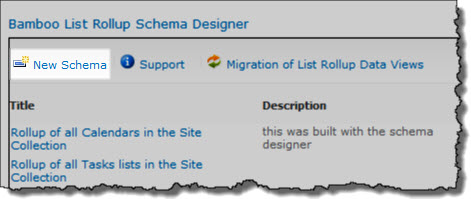
NOTE: The New Schema function must be enabled in the Web Part settings pane for this option to be visible to users.
|
The schema configuration page will appear. |
| 2. |
Click the Select Aggregation Service (required) to choose the service for your schema. This will be the first thing you do; until you choose an aggregation service, everything else is grayed out.

This a required selection. There are two options:
- Bamboo Aggregation Service. Unlike the SharePoint Content Query Web Part, you can aggregate items of different types if you select this service. Because it is capable of aggregating items of various types, it takes a little bit longer, so choose this only if you need to rollup items of various types.
- SharePoint Aggregation Service. This service is similar to that used in the SharePoint Content Query Web Part, in that you are restricted to including items of the same type in the rollup. This is generally the recommended selection for performance reasons.
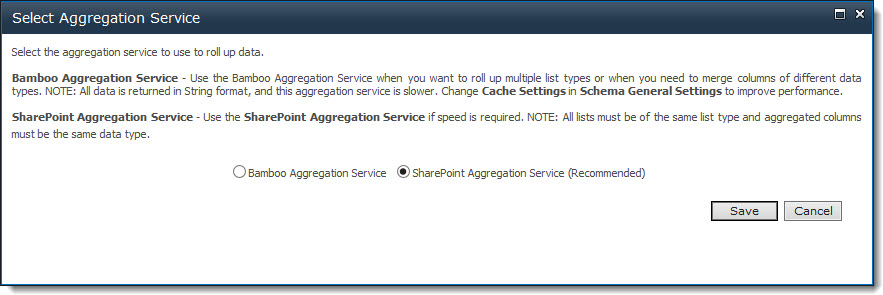
Click Save to save the aggregation service selection and close the dialog. Otherwise, click Cancel to close the dialog without saving anything. Once a service is selected and saved, it will be shown on the page in the center column (see below) so it will be easy to see which configurations you have completed.

 IMPORTANT: Although it is possible to modify a List Rollup Schema definition after it is first created, you will not be able to change the aggregation service selected once the schema is created (saved for the first time). IMPORTANT: Although it is possible to modify a List Rollup Schema definition after it is first created, you will not be able to change the aggregation service selected once the schema is created (saved for the first time).
If you chose to use the Bamboo Aggregation Service for your new schema, complete your schema definition with the instructions found here. The user interface for schemas based on the Bamboo Aggregation Service is slightly different than that for the SharePoint Aggregation Service.
|
| 3. |
Included Lists (required). In the Included Lists section, configure the discovery mode, select a list, and include it. You must select at least one list in order to create a schema. See Select the Included Lists for your Schema-based List Rollup for details. Once the list (or lists) is selected, it will appear in the Included List table, shown below.

If needed, you can check the box in the right column of the Included Lists table and then click Remove Selected to remove a selected list if you change your mind.
NOTE: If you remove a MASTER list (the first list selected), you will need to reconfigure several configuration parameters of your schema definition.
|
| 4. |
Columns to Rollup (required). Identifying the columns to rollup is a required step, however you will not be able to select columns until you select a list. You will not be able to create your schema if you do not select at least one column. See Select the Columns to include in your Schema-based Rollup for details. Once columns are selected, they will be shown in the center column of the schema designer, as shown below.
 |
| 5. |
Filter (required). Defining a filter is a required step and you will not be able to create your schema if you do not specify whether you want to see all items or a filtered set. See Select the Filter for your Schema-based Rollup for details. Once the filter has been configured, it will be shown in the center column of the schema designer, as shown below.
 |
| 6. |
Recurrence. If you are rolling up Calendar/Events lists, see Select the Recurrence Option for your Schema-based Rollup for details. Once the recurrence has been configured, it will be shown in the center column of the schema designer, as shown below.
 |
| 7. |
Exluded Lists. If you defined an automatic discovery mode in the Included Lists step, you can exclude specific lists from the rollup. See Identify Lists to be Excluded from your Schema-based Rollup for details. If an excluded list is defined, it will be shown in the center column of the schema designer, as shown below.
 |
| 8. |
Schema General Settings (required). This is a required step; you will not be able to create your schema until you give it a name. See Configure the General Settings of your Schema-based Rollup for details. Once you have given your schema a name, it will be shown in the center column of the schema designer, as shown below.
 |
| 9. |
 If desired, preview your rollup by clicking the Preview Rollup button. The first 15 items in the rollup will be displayed at the bottom of the page (you may need to scroll down to see it). See an example below. If desired, preview your rollup by clicking the Preview Rollup button. The first 15 items in the rollup will be displayed at the bottom of the page (you may need to scroll down to see it). See an example below.
 |
| 10. |
When ready, click Create/Update Schema to save your schema and return to the List Rollup web part. Otherwise, click Cancel and accept the warning question to return to the List Rollup web part without saving any changes.
Your schema is displayed in the list of available schemas in the List Rollup Schema Designer Web Part. If you have multiple pages of schemas listed, the new schema will be on the last page.
|
Create a new List Rollup using the List Rollup Classic Edition Web Part
 IMPORTANT: The List Rollup Classic Edition Web Part has been retired. We urge you to use the List Rollup Schema Designer Web Part to create more powerful rollups and the List Rollup Grid View Web Part to display them.
If you have existing rollups that you created with the web part, please see Migrate an existing List Rollup Data View to the new List Rollup Schema Architecture.
To use the List Rollup Classic Edition Web Part, you must complete the following steps:
| Step |
Action |
| 1. |
Select a List. Choose the specific List to rollup in a combined view. See Select Lists for more information. |
| 2. |
Discovery Mode. If desired, select the parameters for the automatic rollup of new and existing sites. See Auto-Discovery for more information. |
| 3. |
If needed, repeat steps 1-2 to add other lists to your rollup. |
| 4. |
Select a Master List. This is used to define the columns to roll up from all the Lists and set the filter criteria for the result set.
 Select the radio button beside one of the lists in the Include Lists pane to mark it as the master list. The master list determines which fields/columns are displayed in the rolled up Data View and how those fields are formatted. Select the radio button beside one of the lists in the Include Lists pane to mark it as the master list. The master list determines which fields/columns are displayed in the rolled up Data View and how those fields are formatted.
NOTE: The master List must contain at least one item. If you need to quickly add a default item, you can click the URL link of the list to view the list in a separate window and add an item to it.
|
| 5. |
Preview and create the rollup Data View Web Part. This process will create new web part on the page. It is separate from the List Rotator web part.

- In the Name field, type a name for the rolled up Data View Web Part to be created.
- optionally, in the Description field, type a description for the rolled up Data View Web Part.
- If you want a link to the list or site for each item in the rollup, check one or both of the Show Item Location Column check boxes.
- Enter a Cache Timeout Value. The List Rollup caches data so that it can be quickly displayed when users access the rolled up Data View. The cache data is saved per user and this setting indicates how long the web service should wait before reloading this data set.
- Specify the Display items in batches to set the default number of items to display per page in the rolled up Data View Web Part.
- If you are rolling up calendar events, define how you want repeating events to be expanded. Select the Expand check box if you want to expand repeating/recurring events when rolling up Calendar Lists so that each individual event is shown in the rollup. You can set how far back to show the individual events and how far into the future by months.
NOTE: If Recurrence is disabled, AND a single occurrence is modified, both the series event and the individual occurrences are displayed.
 IMPORTANT: If Recurring events are expanded, the performance of the List Rollup Data View Web Part when displaying the rollup will be impacted. IMPORTANT: If Recurring events are expanded, the performance of the List Rollup Data View Web Part when displaying the rollup will be impacted.
- Click Preview to preview the data in your rollup to make sure you have configured it correclty.
- When ready, click the Create button. A message will appear at the top of the Web Part to let you know the new Data View Web Part was created successfully in the Web Part Page Gallery. Choose to display it on the current page or export it so you can display it on another page.
NOTE: The regional settings of the user who creates the Data View Web Part are hard coded in the Data View. All users will see the same regional settings when they access the Data View Web Part.
|
Configure the General Settings of your Schema-based Rollup
You will not be able to create your schema until you provide a unique name for it. To name your schema, follow these steps:
| Step |
Action |
| 1. |
Click Schema Settings.
 |
| 2. |
In the Schema General Settings dialog, enter a name for your schema in the Name of Schema box. This name needs to be unique in the site. If desired, enter a Description as well.
 |
| 3. |
When ready, click Save to save your configuration and close the dialog. Otherwise, click Cancel to close the dialog without saving anything. |
Additional Tips for using the CAML Criteria Builder
Some other ways you can use the Criteria Builder to build a CAML Query are outlined below:
| You want to… |
Try this |
| Use a value that is not listed in the Value column. |
If you choose a Person or Group column type and want to use a value that is not listed in the Value list for the column, first select any user and copy the criteria to the CAML Query field. Once the query is in the CAML Query box, manually edit it to replace the selected user between the tags with the unlisted name as it is displayed in SharePoint:
Old CAML:
  <Value Type="User">Listed User</Value>

New CAML:
  <Value Type="User">Unlisted User</Value>
|
| Use the SharePoint variable [Me] as the value for a Person or Group column. |
This variable is not listed in the Value List by default, but you can still use it. To use the SharePoint variable [Me] as the value for a Person or Group column, first select any user and copy the criteria to the CAML Query field. Once the query is in the CAML Query box, manually edit it to replace the CAML text as shown here:
Old CAML:
  <Value Type="User">Some User</Value>

New CAML:
  <Value Type="Integer"><UserID /></Value>
 IMPORTANT 1: The tag <UserID /> is case-sensitive! If you enter <UserId />, you will not get any data. IMPORTANT 1: The tag <UserID /> is case-sensitive! If you enter <UserId />, you will not get any data.
 IMPORTANT 2: Be careful specifying a filter using [Me] in an alert. That variable designates the logged in user. When the alert is processed, the logged in user is a system account, so an Alert that uses [Me] may not generate any alert messages. IMPORTANT 2: Be careful specifying a filter using [Me] in an alert. That variable designates the logged in user. When the alert is processed, the logged in user is a system account, so an Alert that uses [Me] may not generate any alert messages.
|
| Use the SharePoint variable [Today] as the value for a Date column. |
A Date and Time column type automatically displays a Calendar control to select a specific date. To use the [Today] SharePoint variable instead, first select any date and copy the criteria to the CAML Query field. Once the query is in the CAML Query box, manually edit it to change the date value to <Today /> as shown below.
Old CAML:
  <Value Type="DateTime">2011-05-01T00:00:00Z</Value>

New CAML:
  <Value Type="DateTime"><Today /></Value>
|
| Add or subtract a number of days from [Today] |
To add or subtract a number of days from [Today] to create a filter like “a task overdue by 3 days”, first select any date and copy the criteria to the CAML Query field. Once the query is in the CAML Query box, manually edit it to replace the placeholder date with the following CAML, adjusted for the desired number of days:
Old CAML:
  <Value Type="DateTime">2011-05-01T00:00:00Z</Value>

New CAML ("3 days after today"):
  <Value Type="DateTime"><Today /><addValue value="3" /></Value>

New CAML ("3 days before today"):
  <Value Type="DateTime"><Today /><addValue value="-3" /></Value>
|
 In the List Rollup Schema Designer Web Part, click Support from the main menu.


 If you are using the Bamboo Aggregation Service (BAS), the available Discovery Modes are:
 If you are using the SharePoint Aggregation Service (SAS), the available Discovery Modes are:

 If using the Bamboo Aggregation Service (BAS), you will see an extra selection, the Select a View. Choose a view of the selected list. The selected view will determine the columns to be included in your roll-up and may also determine the filter of your rollup (or this list in your rollup).


 ) to populate the List selection down-down box with values from that site.
 You can also build a CAML query by using the Criteria Builder; this tool is built into the Web Part, and enables you create custom filters without any knowledge of CAML. For information on using the Criteria Builder (and filtering in general), see How to Filter the Rolled Up Data View Web Part.
 From the web part menu, choose to Export.. the web part.
 Go to the page where you want the Data View Web Part to appear and edit that page. Choose to insert a web part. When the Web Part Gallery appears, in the Upload a Web Part area, browse for the file you exported in step 1 above. When ready, click Upload.
 After the page refreshes, you should see a Category in Gallery called Imported Web Parts. The imported Data View Web Part should appear there so you can add it to any web part zone.
 To delete a schema, click Delete Schema in the item edit menu and then click OK to the confirmation message.


 A wait cursor will appear during the export. When the export is complete, the message Export to web part site gallery is completed will appear at the top of the display.
 Access the sites Web Part Gallery in Site Settings under Web Designer Galleries > Web Parts.

 Go to the page where you want to import the saved web part and choose to insert a web part. When the web part gallery appears, click Upload a Web Part beneath the Categories list.
 Click the Browse… button to browse for the file you exported in Step 5 above. Then click Upload to upload it. The web part gallery will close.
 Click to insert/add a web part to the page. This time, a Category called Imported Web Parts will appear. Select it and your uploaded web part will appear in the Parts list. Insert it as you would any other web part.
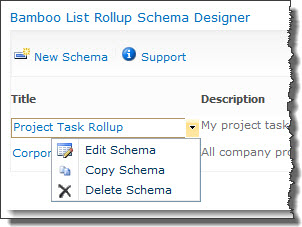 To edit an existing schema, click on the schema name in the Title column or choose Edit Schema from the item edit menu.
 From the List Rollup Classic Edition Web Part, select the template you want to modify and click Load Template.
 In the List Rollup Schema Name section:
 In the Column section, choose the columns you want to display and the order they will appear.
 In the Sort section, configure the default sort for the data to be displayed. You can sort by up to two columns.
 If you want to return all items defined in the schema by default, leave the default selection of Show all items in this view in the Filter section.
 Alternatively, click the Show items only when the following is true and then configure the filter criteria. If it takes more than two columns to define your filter criteria, click Show more columns… to add more.
 In the Group section, configure the default grouping if needed. It is possible to group by a maximum of two columns. Don’t forget to choose how to display the default grouping – collapsed or expanded.
 In the Item Limit section, configure the number of items to display per page and also the total number of items to return. The more items per page, the slower the page load.
 In the Grid View General Settings section configure what end users can do from their browser. You can allow them to Filter, Sort, Group, or Export the data displayed.


 If desired, preview your rollup by clicking the Preview Rollup button. The first 15 items in the rollup will be displayed at the bottom of the page (you may need to scroll down to see it). See an example below.


 If desired, preview your rollup by clicking the Preview Rollup button. The first 15 items in the rollup will be displayed at the bottom of the page (you may need to scroll down to see it). See an example below.


 Discovery Search Path. Select the desired Discovery Search Path option to indicate which sub-sites are to be searched during the automatic discovery of lists.
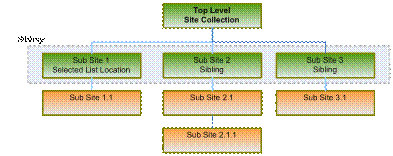
 Discovery Scope Limits. You can limit the scope of the automatic discovery process by specifying a limit to the number of sub-sites or number of lists that the discovery process will traverse. Setting these limits is important for obvious performance reasons. Note that there is no way to guarantee that a particular set of lists is included when the limit is applied. Lists will be selected for inclusion in the order they are returned from SharePoint.