Using Relative Paths

Using Relative Paths

KBSA Configuration Overview

Use the table below to determine how your relative paths will appear.

Site Path Equivilent to
Top Site (Root Site)

/SiteDirectory/KBAdmin/

or

~/SiteDirectory/KBAdmin/

http://servername/SiteDirectory/KBAdmin/_blank
Sub-site (Current Web Site)

Lists/Discussion20Board/

or

./Lists/Discussion20Board/

http://servername/SiteDirectory/KBAdmin/Lists/Discussion20Board/_blank

Toggle Anonymous Access

Toggle Anonymous Access

Step Action Result
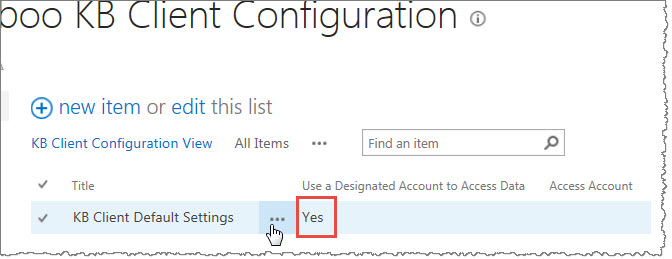
1. Navigate to your site contents and open the Bamboo KB Client Configuration list. KBclientConfig.jpg
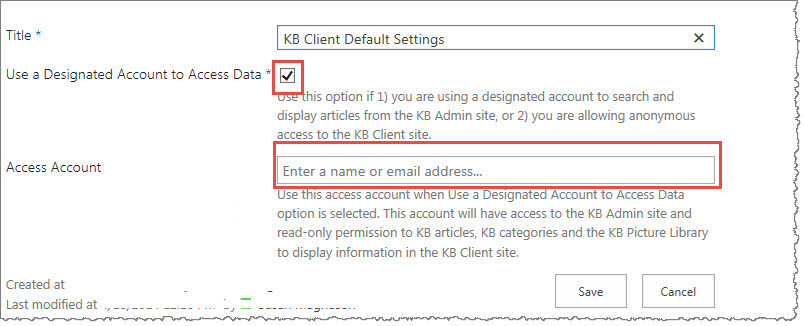
2. By default, this list is set to use a designated account to access data, so the end users can be anonymous. If you are using the KB internally and won’t have anyone accessing it anonymously, edit the item and uncheck the Use a Designated Account to Access Data checkbox. EditConfigLIst.jpg
3.

You can keep this box checked if:

  1. you are using a designated account to search and display articles from the KB Admin site
    or
  2. you are allowing anonymous access to the KB Client site.
DesAcct.jpg
Either way, you need to enter an email address associated to your designated account.
Or you can uncheck the box and not use a designated account. BambooError.jpg
Either option will eliminate the error message from showing up on the front page when you first create a KB Client site.

Localize Bamboo Applications or Custom Columns

Localize Bamboo Applications or Custom Columns

Overview of the localization process for Bamboo Products

Bamboo applications and custom columns are slightly different than web parts when it comes to localizing/translating. The user interface isn’t confined to a web part, but can exist as site definitions or other custom pages. For example, the configuration of a Bamboo custom column is within the SharePoint list settings area.
The text strings that require translation are located in different files than the strings that appear in a web part.

Changing the language or text for an application or custom column is a multi-step process:

Top

About the Language Files

Text displayed in a Bamboo application may be included in one or both of the following locations:

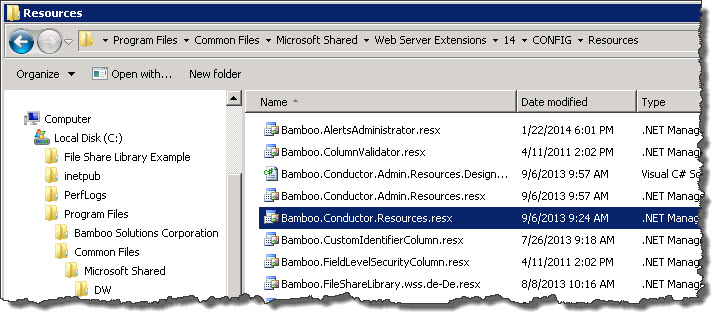
  • Provisioning Resources. These resources are located in the 12, 14, or 15 “Hive”, in the Resources folder. The number of the Hive depends on the version of SharePoint you are using (e.g., SP2007 has a 12 Hive, SP2010 has a 14 Hive, and SP2013 has a 15 Hive). 14Hiveresources.jpg
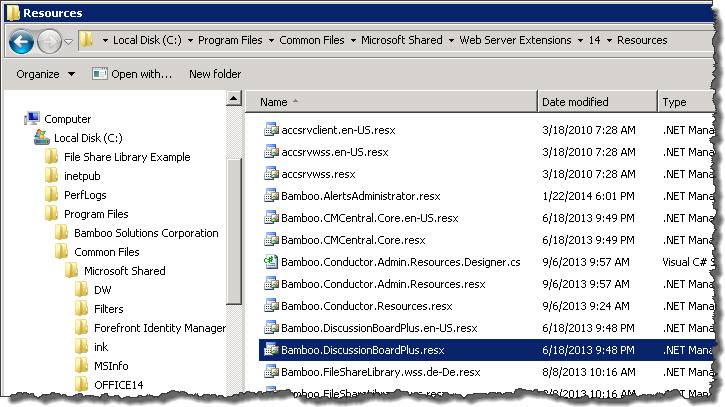
    The Bamboo.*.resx files include text used in site features, site definitions, list definitions, and other provisioning resource elements. Any changes you make in these files will apply to new product instances only.

  • Application/Runtime Resources. These are also located in the 12, 14, or 15 Hive, but in the CONFIGResources folder.The Bamboo.*.resx file in the CONFIG folder is different than the one included in the Resource folder.14HiveCONFIGResources.jpg This one includes text used in application pages, custom site menu actions, navigation elements, and other runtime resources. Any changes you make will apply to new and existing product instances only.

In each location, there may be multiple versions of Bamboo.*.resx files with identical content. The different files are provided for English (en-US), German (de-DE), French (fr-FR), and Spanish (es-ES). The content of all files is in English until you translate it to your language. If your site is configured to use a language that does not have a corresponding Bamboo product .resx file, copy an existing file and rename it to include the culture name for that language pack. For example, create a file for Italian by saving the default file as Bamboo.[Product].it-IT.resx. Make your changes to this new file. If your site is configured to use a specific language but you do not have a culture-specific file, the product will use the default Bamboo.[Product].resx file instead.

Icon-WarningIMPORTANT: If you customize one of the default resource files provided with the product, your changes will be overwritten when you upgrade.

To avoid losing customizations, copy the customized file to a different location (not the same folder) before upgrading. After the upgrade is finished, compare the new file with your customized file to incorporate any new entries. Then copy the merged file to the Resources folder. Culture-specific files created for languages that are not provided with the product will not be overwritten during an upgrade, but you still need to incorporate new resource entries.

Top

Editing text in resource files

Icon-WarningIMPORTANT: Before making any changes, back up your original file to a different folder.

To change text in a resource file, open it in a text editor and locate the text you want to change. Editable text is usually found between the <value></value> tags, as shown in the screen shot below. Do not modify the data tag. If you want to remove text completely, delete only the text; do not delete the <data> or <value> entries from the file, or the server will display an error message. In the example below, the editable text is highlighted in gray.

Common_resxEdit.jpg

When you are finished with your changes, save the file and copy it to the appropriate Resources *folder on *all Web front-end servers in your SharePoint farm. Follow the instructions below to make your changes take effect.

Top

Applying Language File Updates

To apply changes to Provisioning Resource Files:

If you modified the provisioning resources file, apply your changes by restarting Web services with the following command on all Web front-end servers.

iisreset

NOTE: changes to provisioning resources affect new instances of the Bamboo product only; existing instances of the product are not updated.

To apply changes to Application/Runtime Resource Files:

If you modified the application/runtime resources file, apply your changes by executing the following stsadm command on all Web front-end servers. This command copies the updated resource file to the App_GlobalResources folder of each Web application. Changes apply to existing product instances and any new instances you create.

stsadm -o CopyAppBinContent

NOTE: Changes apply to EXISTING product instances AND any new instances you create.

Using Tree View

Using Tree View

How to Use the KB Client Site

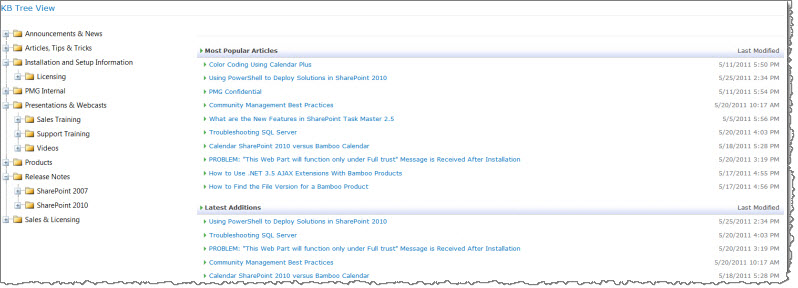
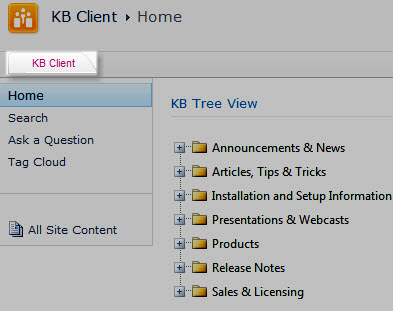
The Tree View page displays a tree view of articles that allow users to search for articles. Use the tree view to view articles by expanding or collapsing the categories to view subcategories. The Most Popular Articles, Latest Additions and All Articles sections then display that category’s most popular articles, most recently added articles and all articles.

sa05-2010-usingclient6.jpg

Step Action Result
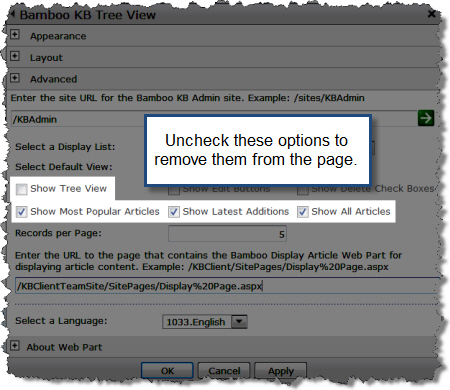
1. The sections for Most Popular Articles, Latest Additions and All Articles can be hidden. The tree view web part itself can also be hidden. To hide one or all of these options, edit the Web Part. In the configuration tool pane, uncheck the options that you want to hide. sa05-2010-usingclient3.jpg
You have the option to show or hide the Tree view, show or hide the most popular articles, show or hide the latest additions to the list and show or hide all articles. Click Apply and then OK to save your changes.
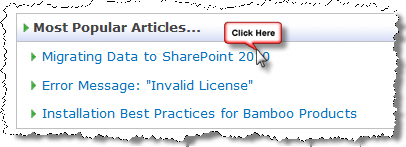
2. To view any of the articles in the Most Popular Articles, Latest Additions and All Articles sections, simply click the article title to view it. sa05-2010-usingclient5.jpg
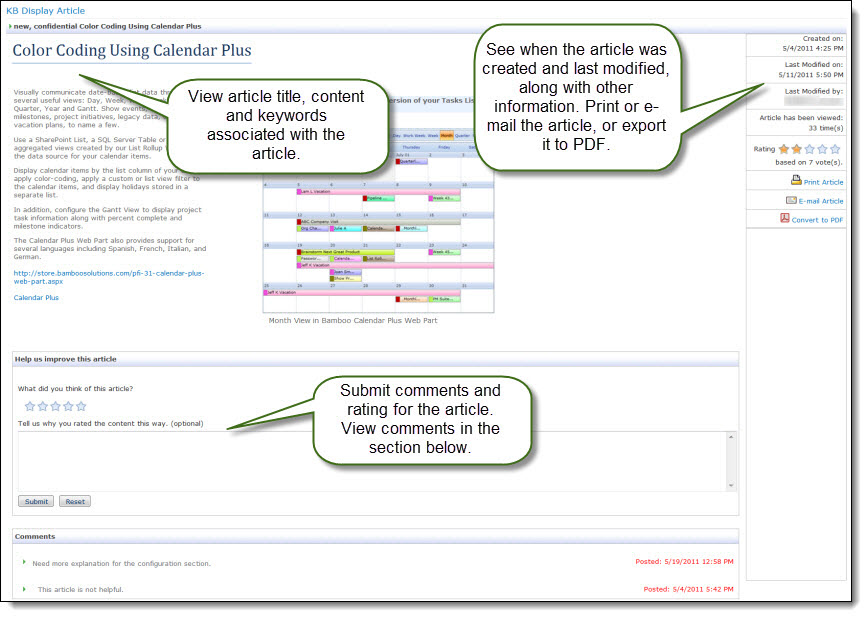
The article’s title and content are displayed. Keywords associated with the article are displayed above the article title. On the right side of the page, view when the article was created and last modified as well as who last modified the article. See how many times the article has been viewed and what the article rating is. You can also print or e-mail the article. Underneath the article, you can rate the article and submit comments. You can also view related external links associated with the article. Under Additional Article Details, you can view the article type, tag terms associated with the article, the date that the article was last reviewed, and the categories associated with the article.
3. Use the tree view to view articles by expanding or collapsing the categories to view subcategories. sa05-2010-usingclient4.jpg
The Most Popular Articles, Latest Additions and All Articles sections then display that category’s most popular articles, most recently added articles and all articles.

How to use Workflow Conductor for process automation in Knowledge Base

How to use Workflow Conductor for process automation in Knowledge Base

KBSA Configuration Overview

Applies To:

  • SharePoint Knowledge Base R2.0 or newer
  • Workflow Conductor R1.6 or newer
  • SharePoint Server and Foundation 2010
  • MOSS 2007 and WSS v3.0

Icon-Warning IMPORTANT if you are using Workflow Conductor prior to Release2.x: Set up the following workflow processes during off hours. Publishing the workflow templates requires the application pool to be recycled. (Upgrade your WFC product soon so that you won’t need to publish during off hours!)

Icon-Warning LIMITATIONS: To approve workflow tasks, users require the following permissions: Assignee, Initiator, Site Collection Administrator.

To complete task forms and to view the Approve, Reject and Submit buttons, users must be able to

  1. Read the workflow item that the workflow is running on
    and
  2. Edit items in the Workflow Tasks List that is associated with the workflow.

Click a section below for more information:

How to Use the KB Creation Utility

How to Use the KB Creation Utility

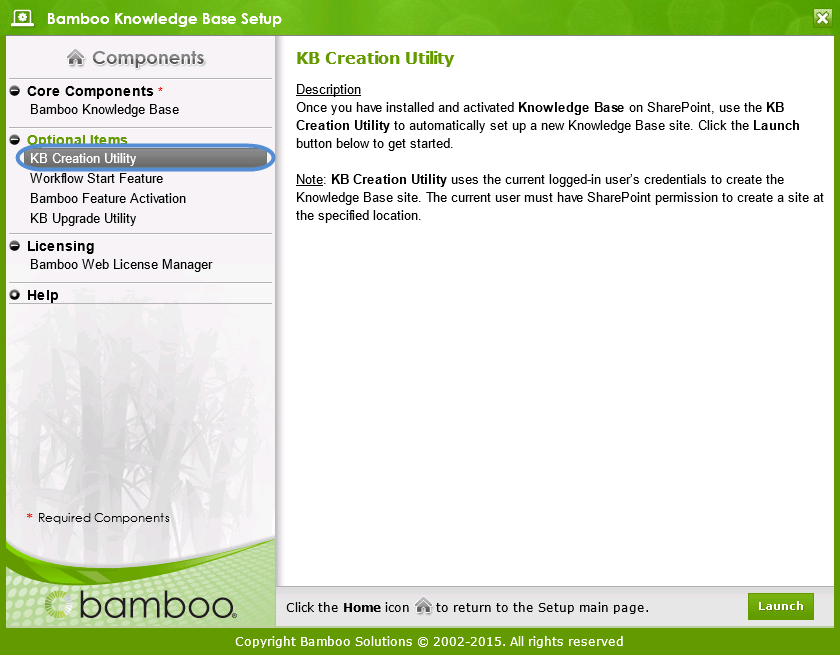
The KB Creation Utility is located in the Bamboo Knowledge Base installer, under Optional Items:

kb-creation-installer.png

Note: KB Creation Utility uses the current logged-in user’s credentials to create the Knowledge Base site. The current user must have SharePoint permission to create a site at the specified location.

Step Action Result
1. Click the Launch button at the bottom of the window to start the Creation Utility. kb-creation-launch.png
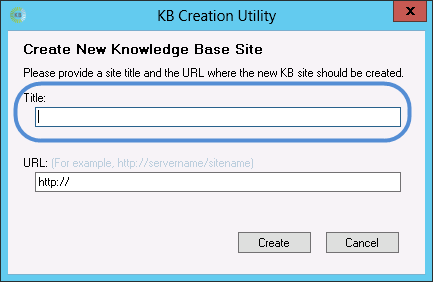
2. Provide a title for your new Knowledge Base site. kb-creation-title.png
The KB Client Site will be created with the provided title.
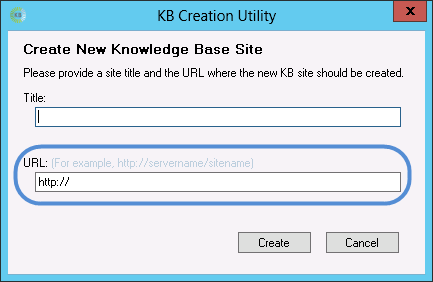
3. Provide a location for the site to be created. Note that the provided URL cannot point to an existing location. kb-creation-url.png
The KB Client Site will be created at the specified location, with the KB Admin Site as a sub-site.
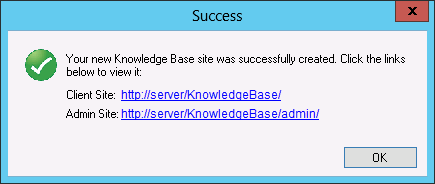
4. Click Create, and within a few minutes the links to your newly created KB Client and KB Admin Sites will be displayed. kb-creation-success.png

Do Not Use a Designated Account to Access Data

Do Not Use a Designated Account to Access Data

Knowledge Base Administrators can choose not to use a designated account to access data, but they must make the following configurations:

  • KB Client site: Grant Read-Only access to the KB Client site for SharePoint users/groups
  • KB Admin site: Grant the following permissions to the same SharePoint users/groups:
    • Read-Only access to the following:
      • Bamboo KB Articles List
      • Bamboo KB Categories List
      • KB Picture Library
    • Limited access to the KB Admin site

Knowledge Base Administrators can also break item permissions for the KB Articles and KB Categories lists and allow certain groups to see those items. For example, an Administrator wants to allow the SharePoint group “Sales” to have read access to the Sales KB category and to all KB articles in the Sales category. The Administrator filters the list view of the KB Articles List to locate these items. Then the Administrator breaks item permissions for each item and removes access for all SharePoint groups except the Sales group. The Administrator then applies the same permissions in the KB Categories List.

Security Configuration for Other Lists in the KB Admin Site

The Administrator does not need to grant permission to any user/group from the KB Client site to the following lists:

  • Bamboo KB Configuration List
  • Bamboo Article Questions and Answers

SharePoint Knowledge Base Solution Accelerator reverts to the application pool account to read and write information to these lists. Administrators can stop inheriting site permissions for these lists and can remove KB Client users/groups’ access to these lists as desired.

Security Configuration for Group Redirect Web Part and Bamboo Navigator TabStrip in KB Admin Site

Knowledge Base Administrators can use the Group Redirect Web Part to redirect end users back to the KB Client site if they try to access the KB Admin site. See Configuring the KB Admin Site for more information.

Configuring Site Permission for the KB Admin Site

Knowledge Base Administrators should grant Read-Only access to SharePoint groups with Limited Access so that this group can view the home KB Admin site home in order to redirect end users to the KB Client site using the Group Redirect Web Part. This redirection is only performed at the KB Admin site home. Users in the SharePoint group can still access other pages in the KB Admin site if they know the URLs for those pages. The Administrator can choose to remove this group from other lists and libraries.

Bamboo Navigator List and Item Permissions in the KB Admin Site

By default, SharePoint groups with Limited Access will have Read-Only permissions to the Bamboo Navigators List. Knowledge Base Administrators are not required to perform additional steps for this list.

Bamboo Navigator List and Item Permissions in the KB Client Site

sa05-2010-client_tab_only.jpgSharePoint groups with Limited Access should already have access to the KB Client site’s Bamboo Navigators List. Administrators can remove this group’s permission to the KB Admin site by performing the steps below:

  1. From the KB Client site, select All Site Content > Lists > Bamboo Navigators.
  2. Click the KB Admin item. From the item context menu, select Manage Permissions.
  3. Select the desired users/groups and select Remove User Permissions from the ribbon to break permissions. Members of this group will only see the KB Client site tab when they log in.

Best Practices for Knowledge Management Using Knowledge Base

Best Practices for Knowledge Management Using Knowledge Base

Knowledge Base Overview

KBcloud.pngBeyond what is visible to the end users in Knowledge Base, your KB administrator may want to control who has access to write the articles, review articles and publish them. These are the processes and business intelligence that go beyond the tool and are important considerations to think through before exposing a tool across the enterprise.
Start small. The best way to get good collaboration practices going so that a group is thinking of topics they can write about in Knowledge Base is to start with a group that has cohesion, a reason to work together, and where all members are committed to the group and the quality of its results. For example, you may have an internal SharePoint Users Group where members are committed to sharing knowledge about SharePoint. Knowledge Base is a great tool for this type of group. It could be a project team, for instance, or perhaps a management group. What is important, is to start with groups that are intrinsically motivated to capture and share their knowledge, rather than groups that only exist in the organizational charts but which do not function as groups in practice.

Why is this important? Because Knowledge Base is the kind of tool that can easily spread organically on the grassroots level in an organization. If there is an early adopter group using Knowledge Base in a productive way, it is likely that their best practices will be spread to other colleagues – simply because people in organizations these days typically belong to several groups and social structures.

In a committed group of early adopters, it is likely that best practices will be developed, and those practices may be useful also to other groups within the organization.

The KB Admin site allows:

  • Knowledge Base administrators to view data about articles and authors
  • Create new articles
  • Manage existing articles
  • Approve and manage article comments
  • Answer end-user questions
  • Manage images
  • Create and manage Knowledge Base article categories

The KB Client site lets users:

  • Submit questions to Knowledge Base Administrators
  • Quickly view recently added articles or most popular articles
  • Use a tree to navigate KB content by category
  • Search for and access articles directly from the search results
  • Submit ratings and comments on published articles using a 5-star interactive graphic
  • Display a tag cloud to enable users to quickly access the most-viewed articles by keyword
  • Export articles to PDF directly or e-mail articles to other users

Best Practices you may want to consider:

  • Identify an owner for your knowledge base. Whether this person is dedicated to the KB or wears many hats, you need one or two people on your team who are responsible for the KB content. The KB owners are the contacts for the team and can ensure that content is created and is consistent.
  • If you don’t designate people to write content for your KB, then chances are no one will write content for your KB. Creating KB content has to be a priority, and part of the regular responsibilities for specific people or a group.
  • Regardless of who is creating the content, it is vital that articles are clear, concise, and consistent.
  • Content needs to be easily searchable and categorized, but you don’t want your categories to get out of control. If users can’t easily find answers in your KB, they might get frustrated and stop using the KB. Ensure you have categories that are intrinsically useful to multiple groups and easily understood to have a similar meaning across groups.
  • Users trust that they are getting reliable information in a company’s knowledge base. But if they find too many errors or inconsistencies, they won’t trust the information and they won’t use the KB. So it’s important to have content reviewed by subject matter experts before it’s published.
  • Establish regular review processes and consider implementing a SharePoint approval workflow so that all articles go through a reviewer. Using SharePoint permissions, you can set up groups for those who will write content, those who review content, approve it and publish.

Many of the Best Practices listed above and others your organization implements will help your company benefit from a structured approach to knowledge management.

Create the KB Client Site

Create the KB Client Site

Knowledge Base Overview

The KB Client site enables end users to search for articles and content; print or e-mail articles or export them to PDF; submit questions to Knowledge Base Administrators; rate and comment on articles; view the most popular and recently added articles; and more.

Step Action Result
1. Navigate to the top site in the site collection where you want to create the KB Client.
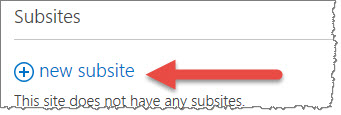
2. Select Site Actions > Site Settings > Site Administration > Sites and workspaces. In SharePoint 2013, navigate to your Create menu and select + new subsite.
SubSites.jpg
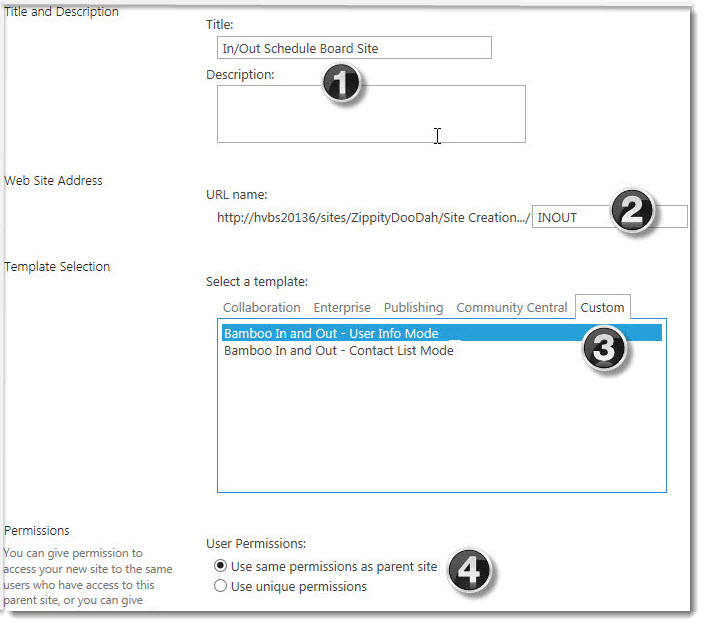
3. Enter a Title, an optional Description and a URL name in the Web Site Address container for your site. Title.jpg
Address.jpg
4.

Under Template Selection > Custom

Select Bamboo KB Client Site Template R2.

CustomTemplate.jpg
5. Choose your permissions and navigation.

Permissions.jpg

NOTE: If you select Use same permissions as parent site, one set of user permissions is shared by both sites. Consequently, you cannot change user permissions on your new site unless you are an administrator of this parent site.
Permissions.jpg

6. Click Create. Creating.jpg
When your site is created, SharePoint opens up your new site, which you need to begin configuring:
NewSite.jpg

After you create the KB Client Site, Create the KB Admin Site.

Note: The default configuration requires that the KB Admin Site be a sub-site to the KB Client Site. If you select an alternative configuration, read Configuring the KB Client Site for information on configuring the KB Client site.

Create the KB Admin Site

Create the KB Admin Site

Knowledge Base Overview

Note: The default configuration requires that the KB Admin Site be a sub-site to the KB Client Site.

Step Action Result
1.

In SharePoint 2013, in the KB Client site that you just created, create the KB Admin site. Navigate to Site Collection Features and ensure the KB Site Templates features are activated.

On SharePoint 2010 or 2007, select Site Actions > New Site.
NewSubSite.jpg
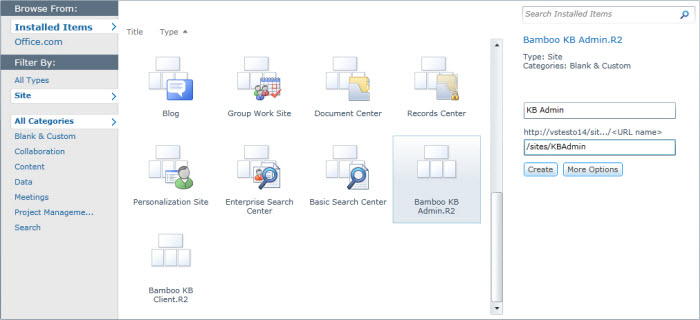
2. Under Sites, select the Bamboo KB Admin.R2 site template. Give the site a name and a URL, then click Create.

Important: The default configuration requires that the KB Admin Site URL end with “/admin/”. For example: http: //Server/ClientSite/admin/

sa05-2010-createadmin1.jpgSharePoint 2010
CustomKBAdmin.jpg
SharePoint 2013
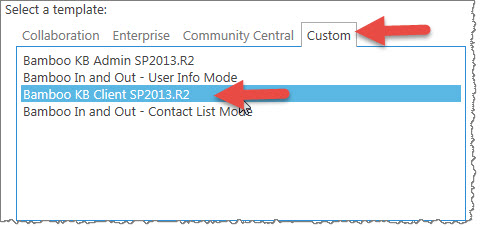
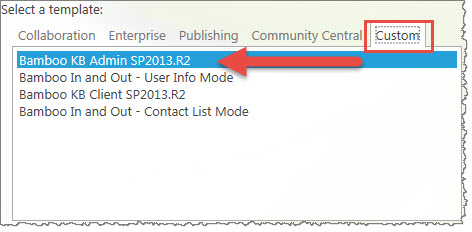
On SharePoint 2013, navigate to your Custom tab and select Bamboo KB Admin SP2013.R2 to create a new KB Admin site.

If you don’t see the site template, navigate to the Site Collection features of the site collection and confirm that the KB Site Templates features are active.

Configure the KB Tree View Web Part

Configure the KB Tree View Web Part

Knowledge Base Overview

One of the first things you will notice when you create a Knowledge Base site is the home page looks quite empty. There are a couple of web parts already added to the page and one of them is the Tree View web part. You need to configure this web part to suit your environment.

From the KB Admin site, edit the Tree View web part.

Step Action Result
1. Enter the site URL for the Bamboo KB Admin site: 1.jpg
This field is already populated for you with the relative path URL. See Using Relative Paths for more information on the syntax for relative paths.
2. Select a Display List: 2.jpg
This field is already preselected for you with the Bamboo KB Articles list.
3. Select Default View: 3.jpg
Select the list view that you would like displayed in the Most Popular Articles list and the Latest Additions list. For now, you can leave this as All Items; later you may want to change this after you have configured other items.
4. Show Tree View: 4.jpg
Toggles showing the category for navigating the Knowledge Base content.
5. Show Edit Buttons: 5.jpg
Toggles showing the Edit button for each article in the Most Popular Articles list and the Latest Additions list.
6. Show Delete Check Boxes: 6.jpg
Toggles showing the check boxes used for selecting and deleting articles in the Most Popular Articles list and the Latest Additions list.
7. Show Most Popular Articles: 7.jpg
Toggles showing the Most Popular Articles list, which shows articles that have had the most views.
8. Show Latest Additions: 8.jpg
Toggles showing the Latest Additions list, which shows the articles that were recently added to the Knowledge Base.
9. Show All Articles: 10.jpg
Select this option to show the All Articles list, which displays all articles in the Knowledge Base with paging according to the Records per Page value. When you select a category in the tree, the All Articles list shows all articles for that category and all of its subcategories.
10. Records per Page: 11.jpg
Enter the number of articles you want listed at a time in the Most Popular Articles list, Latest Additions list and the All Articles list.
11. Automatically expand level: 12.jpg
Choose how many items you want to be displayed by default in the tree view.
12. Enter the URL to the page that contains the Bamboo Display Article Web Part for displaying article content: 14.jpg
This field is used for the KB Client site only. Make sure that you enter a relative path for the URL; for example, /sites/Authors.
13. Select a Language: 13.jpg
Select this option to set the language used on the user interface of this Web Part. See Localize Bamboo Web Parts for your Language for more information.
14. Click Apply and then OK to save your changes.

Configure the KB Display Article Web Part

Configure the KB Display Article Web Part

Knowledge Base Overview

The Display Article Web Part allows articles to be viewed in an attractive format on a page. However, the articles must be selected and viewed from the Tree View on the KB Client site home page.

To configure the KB Display Article Web Part:

Step Action Result
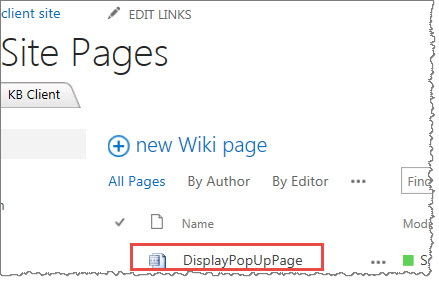
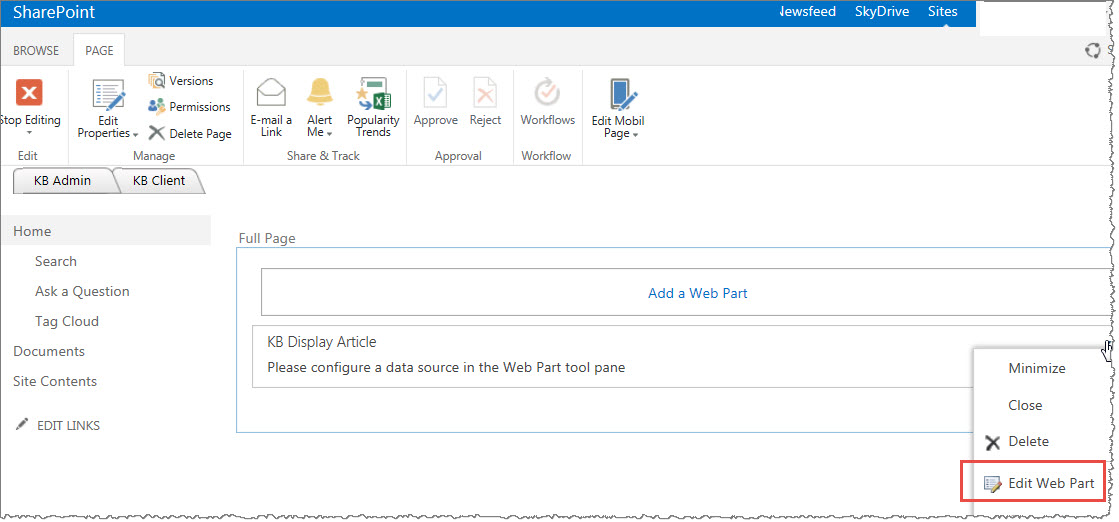
1. Access the Bamboo KB Display Article Web Part by selecting All Site Content from the KB Client site. Under Document Libraries, select Site Pages > Display Page. Edit the DisplayPopUpPage and edit the web part. DisplayPopUpPage.jpg
EditWP.jpg
2. Enter the site URL for the Bamboo KB Admin site: 1.jpg
Enter the relative path to the KB Admin site, then click the green arrow to populate the fields below.
3. Select the KB Articles List: 2.jpg
Select the Bamboo KB Articles List.
4. Select the KB Article View Count List: 4.jpg
Select the Bamboo KB Article View Counts List.
5. Select the KB Configuration List: 3.jpg
Select the Bamboo KB Configuration List.
6. Select the KB Rating and Comments List: 6.jpg
Select the Bamboo KB Rating and Comments List.
7. Custom Related Article Information:

7.jpg
Create a tabbed section following the article content for custom article information such as Review Date, Article Categories or custom columns of your choice. Place your custom information on separate custom-named tabs.

Section Name: Enter in the name of the custom-related article information section.

  • Tab 1 Title: Enter in the name of the first tab.
  • Tab 2 Title: Enter in the name of the second tab.
  • Tab 3 Title: Enter in the name of the third tab.
8. Available Columns:
and
Display Columns:

8.jpg

Available Columns: Select the column data you want to display in a tab. Select a tab name in the Display Columns list box, then click the single right arrow button to move the available column under the tab in the Display Columns list box. Use the Shift+Click or CTRL+Click keys to select multiple columns in the Available Columns list box.

Use the double right arrow button to move all available columns to the selected tab in the Display Columns list box.

Display Columns: Lists the selected columns and their respective tabs. Use the up and down arrow buttons to move the columns up or down within a tab.
To add or remove a column from one tab to another, you must select the column, click the left arrow button to remove it from its current tab, then select the new tab, select the column in the Available Columns list box and click the right arrow button.

9. Use SMTP secure authenticated connection: 9.jpg

Select this check box if you want to enter credentials for SMTP authentication.

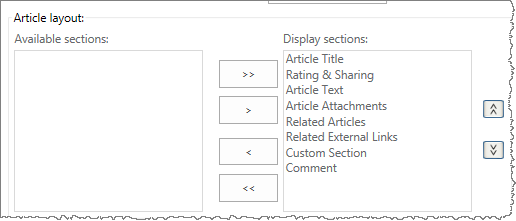
10. Rearrangeable Article Sections Use the arrows to select and arrange how the article parts display. See step 8 for an explanation of the arrow controls.displaywp.png
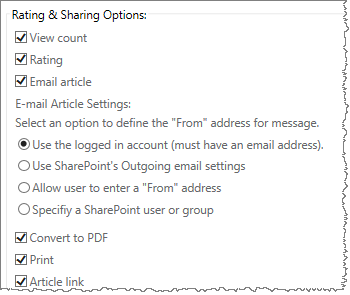
11. Rating & Sharing Options Toggle settings for all sharing options. Read more about using sharing options heredisplaywpsharing.png
12. Select a Language: Select this option to set the language used on the user interface of this Web Part. See Localize Bamboo Web Parts for your Language for more information.
13. Click Apply and then OK to save your changes.

Configure the KB Tag Cloud Web Part

Configure the KB Tag Cloud Web Part

Knowledge Base Overview

The Bamboo KB Tag Cloud Web Part allows end users to locate articles that have been viewed the most times by selecting a commonly used keyword (i.e. tag) from the tag cloud.

To configure the Bamboo KB Tag Cloud Web Part:

Step Action Result
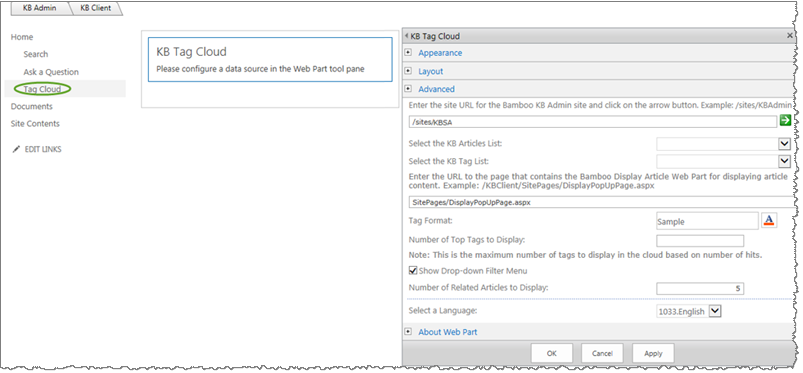
1. From the KB Client site, click the Tag Cloud link. Edit the KB Tag Cloud Web Part. EditTagCloudWP.png
2. Enter the site URL for the Bamboo KB Admin site: Enter the relative path to the KB Admin site and click the green arrow to populate the fields below.

SiteURL.png
By entering a period (.) and a slash (/), you are telling SharePoint to find the lists within the current or relative site.
4. Select the KB Articles List: The drop down menu contains the lists in your site; choose the list that you want to use for your articles.
5. Select the KB Tag Cloud List: Selected the Bamboo KB Tag Cloud List.
6. Enter the URL to the page that contains the Bamboo Display Article Web Part for displaying article content: This field is prepopulated with the relative path to the Bamboo KB Display Article Web Part.
7. Tag Format: Click to select a font type, style, color, background color, alignment, decoration, etc. in the dialog box.
Column Description
Number of Top Tags to Display: Enter the number of tags you want to display in the tag cloud. In the example screenshot above, only 20 of the most viewed (i.e. top) tags will be displayed in the tag cloud.
Show Drop-Down Filter Menu: Select this check box to show a filter drop-down box that allows users to locate tags in the cloud by first letter of the tag name.
Number of Related Articles to Display: Enter the number of related articles you want displayed after selecting a tag in the cloud.
Select a Language: Select this option to set the language used on the user interface of this Web Part. See Localizing SharePoint Knowledge Base Solution Accelerator for more information.
8. Click Apply and then OK to save your changes.

Configure the KB Display Article Web Part

Configure the KB Display Article Web Part

Knowledge Base Overview

The Display Article Web Part allows articles to be viewed in an attractive format on a page. However, the articles must be selected and viewed from the Tree View on the KB Client site home page.

To configure the KB Display Article Web Part:

Step Action Result
1. Access the Bamboo KB Display Article Web Part by selecting All Site Content from the KB Client site. Under Document Libraries, select Site Pages > Display Page. Edit the DisplayPopUpPage and edit the web part. DisplayPopUpPage.jpg
EditWP.jpg
2. Enter the site URL for the Bamboo KB Admin site: 1.jpg
Enter the relative path to the KB Admin site, then click the green arrow to populate the fields below.
3. Select the KB Articles List: 2.jpg
Select the Bamboo KB Articles List.
4. Select the KB Article View Count List: 4.jpg
Select the Bamboo KB Article View Counts List.
5. Select the KB Configuration List: 3.jpg
Select the Bamboo KB Configuration List.
6. Select the KB Rating and Comments List: 6.jpg
Select the Bamboo KB Rating and Comments List.
7. Custom Related Article Information:

7.jpg
Create a tabbed section following the article content for custom article information such as Review Date, Article Categories or custom columns of your choice. Place your custom information on separate custom-named tabs.

Section Name: Enter in the name of the custom-related article information section.

  • Tab 1 Title: Enter in the name of the first tab.
  • Tab 2 Title: Enter in the name of the second tab.
  • Tab 3 Title: Enter in the name of the third tab.
8. Available Columns:
and
Display Columns:

8.jpg

Available Columns: Select the column data you want to display in a tab. Select a tab name in the Display Columns list box, then click the single right arrow button to move the available column under the tab in the Display Columns list box. Use the Shift+Click or CTRL+Click keys to select multiple columns in the Available Columns list box.

Use the double right arrow button to move all available columns to the selected tab in the Display Columns list box.

Display Columns: Lists the selected columns and their respective tabs. Use the up and down arrow buttons to move the columns up or down within a tab.
To add or remove a column from one tab to another, you must select the column, click the left arrow button to remove it from its current tab, then select the new tab, select the column in the Available Columns list box and click the right arrow button.

9. Use SMTP secure authenticated connection: 9.jpg

Select this check box if you want to enter credentials for SMTP authentication.

11. User ID: Enter in the user ID.
12. Password: Enter in the password for the user ID.
13. Port: Enter in the port number.
14. Records per Page: Enter in the number of records to be displayed at a time in the Related Articles, Article Attachments and Related External Links boxes.
15. Allow Article Rating: Select this option to show the Article Rating and Comments box at the bottom of the article content so that users may submit their rating and comment on each article. If you select this box, you must select the rating system to use: Numerical or Star.
16. Numerical Rating or Star Rating: The Allow Article Rating option must be selected in order to select one of these options. Select the Numerical Rating option to display a number rating system at the bottom of an article. Select the Star Rating option to display a graphical 5-star-based rating system at the bottom of an article.
Hide Article Keyword(s) in Article Title Bar: Select this option to hide the article keyword(s) from the title bar of the article.
17. Hide Print Option: Select this option to prevent end users from printing articles.
18. Select a Language: Select this option to set the language used on the user interface of this Web Part. See Localize Bamboo Web Parts for your Language for more information.
19. Click Apply and then OK to save your changes.

Configure the KB Configuration List

Configure the KB Configuration List

KBSA Configuration Overview
Step Action Result
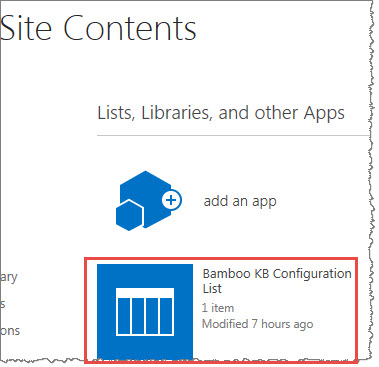
1. From the KB Admin site, select All Site Content. Under Lists, click on Bamboo KB Configuration List. ConfigurationLIst.jpg
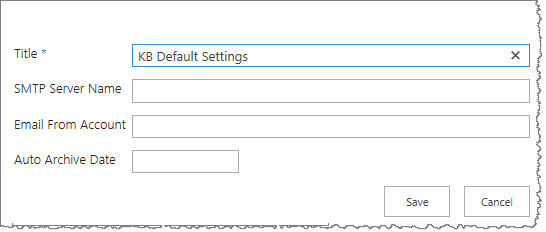
2. Edit the KB Default Settings by selecting Edit from the drop-down list, or use the ribbon by selecting Item > Edit Item.

ConfigListSettings.jpg

3. Enter a Title or leave the default title. This is a required field.
4. In the SMTP Server Name field, enter the name of the SMTP server for sending e-mail.
5. In Email From Account, enter the e-mail address that you want displayed in the From field of the e-mail. This address must be in the correct e-mail address format (i.e. email@domain.com).
6. Leave the Auto Archive Date field blank. This field is reserved for an upcoming feature.
7. Click Save.

Configure the KB Comment Search Web Part

Configure the KB Comment Search Web Part

KBSA Configuration Overview

The KB Comment Search Web Part is used to search comments.

Step Action Result
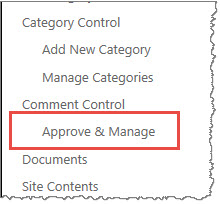
1. Click the Approve & Manage link under Comment Control on the left navigation bar in the KB Admin Site. CommentControl.jpg
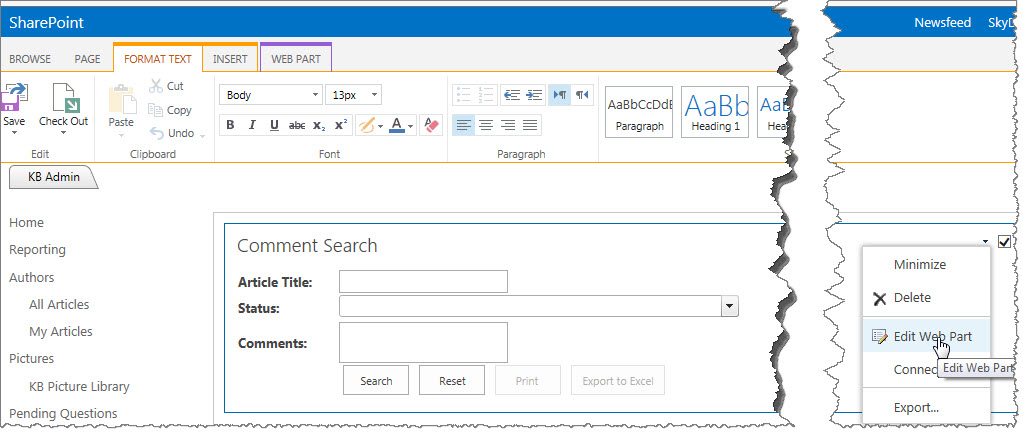
2. Edit the web part (you might need to edit the page first) by clicking the arrow located in the top right corner of the Article Search title bar and selecting Modify Shared Web Part. EditCommentSearch.jpg
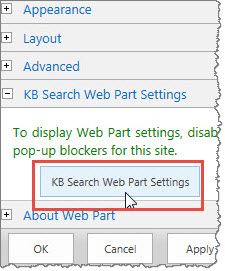
3. In the tool pane, click the KB Search Web Part Settings button to display the Web Part Settings page.
KBSearchSettings.jpg

NOTE: You must disable pop-up blockers for the site to display the Web Part Settings.

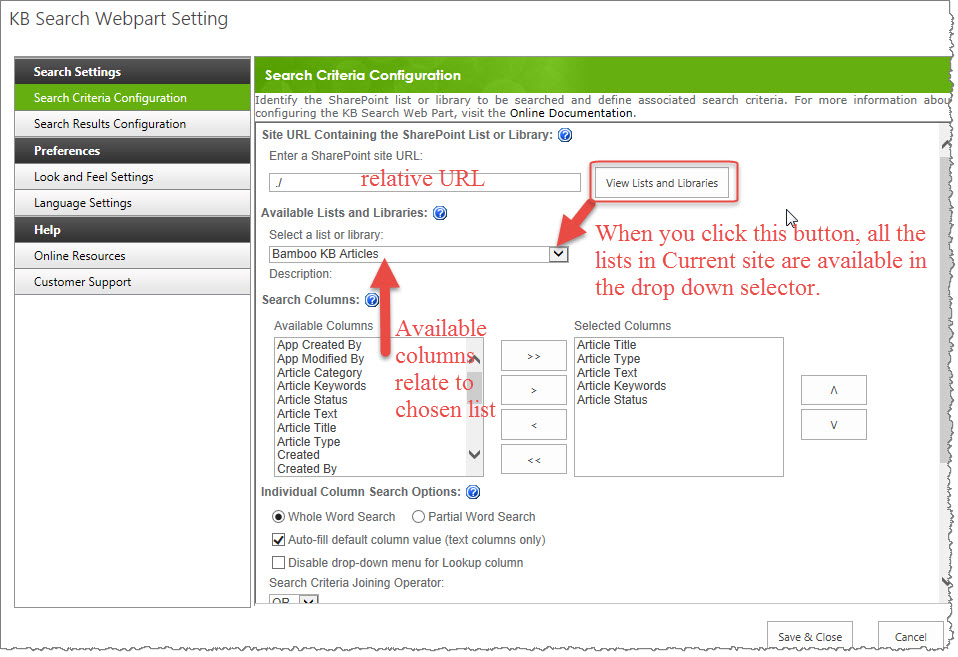
4. Each instance of the KB Search Web Part can search one SharePoint list or library. In the Search Criteria Configuration settings page, identify the list or library to search and define search criteria. More in-depth instructions for configuring your Search Criteria can be found here.

SearchCriteriaConfig.jpg

  1. Input the URL
  2. Click Button-ViewLIstsLIbraries
  3. Pick a list (for your articles, you would select Bamboo KB Articles)
  4. Pick the columns you want users to see and search on
5. Click Save & Close, then click Apply and then OK to save your changes.

Configure the KB Client Site URL

Configure the KB Client Site URL

Knowledge Base Overview

In order to simplify navigation the KB Admin and KB Client sites, the KB Client site URL must be changed in the KB Admin site before the KB Client site can be configured or used.

To change the URL for the KB Client site:

Step Action Result
1. From the KB Admin tab, click All Site Content. Under Lists, select Bamboo Navigators, then click KB Client. Edit.jpg
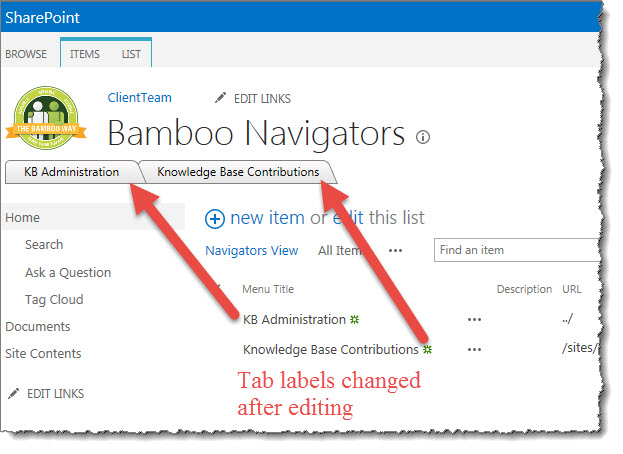
2. Click Edit Item. In the URL field, enter the absolute or relative path for the KB Client site; for example, ../knowledgeBase or whatever you are renaming your KB site to. Bamboo recommends using relative paths. NavigatorChanges.jpg
Icon-Warning IMPORTANT: Do not modify the Titles of the list items in the Bamboo Navigators List. Doing so will affect the Bamboo KB Tree View Web Part; for example, do not change the name of the “Bamboo Navigators” list. You can and we do recommend you change “KB Admin” and/or “KB Client” as those are not meaningful names for your sites.

Configure the KB Category Search Web Part

Configure the KB Category Search Web Part

KBSA Configuration Overview

The KB Category Search Web Part is used to search categories.

Step Action Result
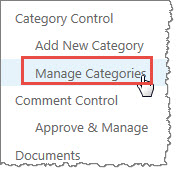
1. Click the Manage Categories link under Category Control on the left navigation bar in the KB Admin Site.
Categories.jpg
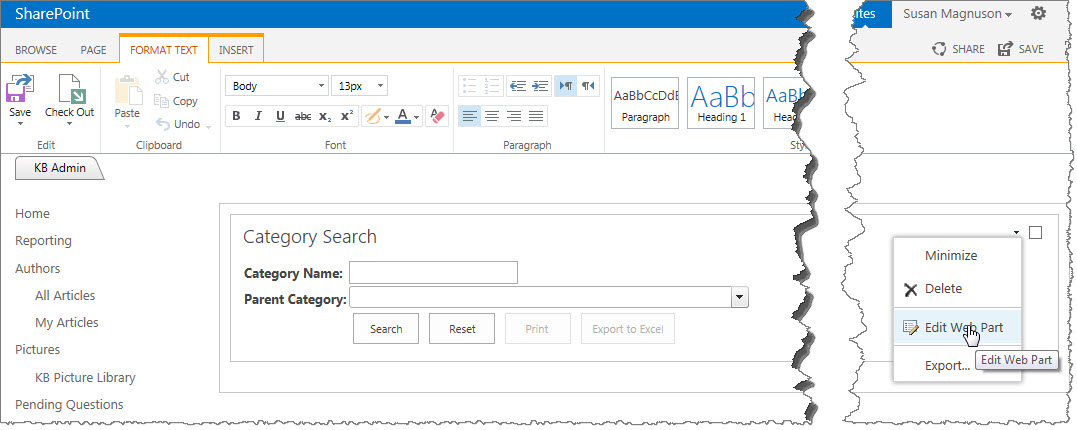
2. Edit the web part (you might need to edit the page first) by clicking the arrow located in the top right corner of the Article Search title bar and selecting Modify Shared Web Part. EditCategorySearch.jpg
3. In the tool pane, click the KB Search Web Part Settings button to display the Web Part Settings page.
KBSearchSettings.jpg

NOTE: You must disable pop-up blockers for the site to display the Web Part Settings.

4. Each instance of the KB Search Web Part can search one SharePoint list or library. In the Search Criteria Configuration settings page, identify the list or library to search and define search criteria. More in-depth instructions for configuring your Search Criteria can be found here.

SearchCriteriaConfig.jpg

  1. Input the URL
  2. Click Button-ViewLIstsLIbraries
  3. Pick a list (for your articles, you would select Bamboo KB Articles)
  4. Pick the columns you want users to see and search on
5. Click Save & Close, then click Apply and then OK to save your changes.

Configure the KB Ask a Question Web Part

Configure the KB Ask a Question Web Part

Knowledge Base Overview

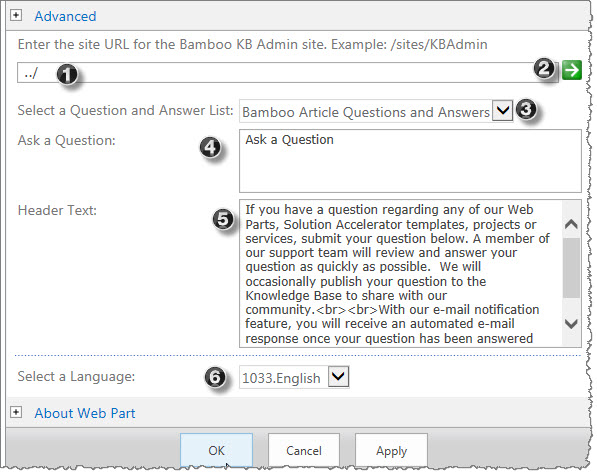
KB_Question.jpgFrom within the KB Client site, edit the web part “KB Ask Question.” You will configure this web part to look for the appropriate site which houses the Bamboo Article Questions and Answers list.

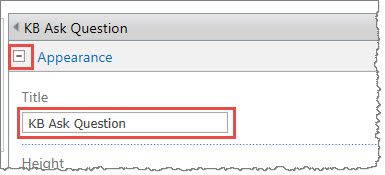
ConfigureWPtitle.jpgBefore leaving the edit screen of this web part, scroll to the top and expand the Appearance section and change the title on the web part from KB Ask Question to something more meaningful to your organization, such as “Ask a Question” or whatever you think will help your end users when they see this web part.

Step Action Result
1. Enter the site URL for the Bamboo KB Admin site: 1.jpg
Enter the relative path to the KB Admin site. You can enter ../ if it is a parent site to your client site.
2. Click the green arrow to populate the Select a Question and Answer List drop-down box with the lists from the KB Admin site. GreenArrow.jpg
You need to click this arrow for the list to populate.
3. Select a Question and Answer List: 2.jpg
Select the Bamboo Article Questions and Answers list.
4. Ask a Question: 3.jpg
Enter instructive text for end users, such as “Ask a question” or “Enter your question here”. This text appears in the top of the Submit a Question box.
5. Header Text: 4.jpg
Enter the instructive text that you want displayed at the top of the Web Part to help users understand how Knowledge Base Administrators will respond to their questions.
6. Select a Language: 8.jpg
Select this option to set the language used on the user interface of this Web Part. See Localizing SharePoint Knowledge Base Solution Accelerator for more information.

Configure the KB Search Web Part

Configure the KB Search Web Part

KBSA Configuration Overview

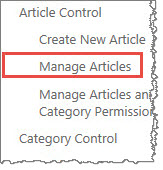
The KB Article Search Web Part is a page that is used to search for KB articles. The Web Part is located by clicking the Manage Articles link under Article Control on the left-hand navigation bar in the KB Admin site.

Step Action Result
1. From the Quick Launch bar, click the Manage Articles link.
MngArticles.jpg
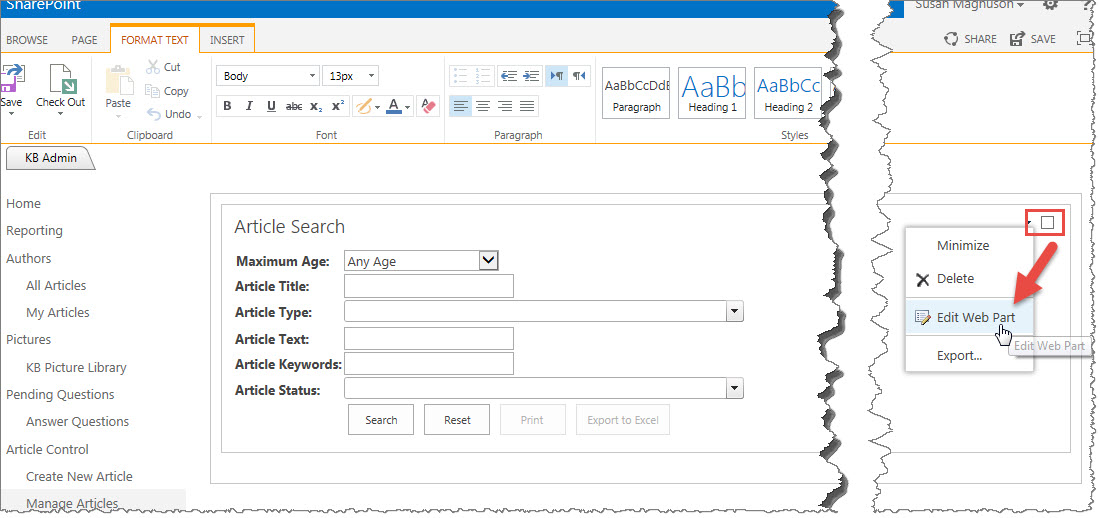
2. Edit the web part (you might need to edit the page first) by clicking the arrow located in the top right corner of the Article Search title bar and selecting Modify Shared Web Part. EditWParticleSearch.jpg
3. In the tool pane, click the KB Search Web Part Settings button to display the Web Part Settings page.
KBSearchSettings.jpg

NOTE: You must disable pop-up blockers for the site to display the Web Part Settings.

4. Each instance of the KB Search Web Part can search one SharePoint list or library. In the Search Criteria Configuration settings page, identify the list or library to search and define search criteria. More in-depth instructions for configuring your Search Criteria can be found here.

SearchCriteriaConfig.jpg

  1. Input the URL
  2. Click Button-ViewLIstsLIbraries
  3. Pick a list (for your articles, you would select Bamboo KB Articles)
  4. Pick the columns you want users to see and search on
5. Click Save & Close, then click Apply and then OK to save your changes.

Configure the KB Answer Questions Web Part

Configure the KB Answer Questions Web Part

Knowledge Base Overview

Follow the directions below to open and configure the Answer Questions Web Part.

Step Action Result
1. From the Quick Launch bar, click the Q & A link. 1.png
2. Edit the Web Part: Click the arrow located next to the web part title bar and select Edit Web Part; or use the ribbon to edit the page and then edit the web part.
3. Select a Question and Answer List: 3.png
This is preconfigured to point to the Bamboo Article Questions and Answers discussion board list.
4. Select a Configuration List: 2.jpg
This is also preconfigured and points to the Bamboo KB Configuration List.
5. Select Picture Library: 3.jpg
This is preconfigured to point to the KB Picture Library. This setting allows you to include images in your response to the end user and/or the discussion board. These images can be inserted directly into your response and no longer have to be uploaded to a Picture Library before you can reference them.
6. Select Default Question View: 6.png
Select the default view for questions. The other views will be available via the Answer Questions navigation menu.
7. Use SMTP Secure Authenticated Connection:

Check this box and the other options become visible so you can enter the credentials for SMTP authentication.
6.jpg

  • User ID: Enter in the user ID.
  • Password: Enter in the password for the user ID.
  • Port: Enter in the port number.
8. Records per Page: 7.jpg
Enter the number of questions you want to display at a time in the KB Answer Questions web part.
9. Select a Language: 8.jpg
Select this option to set the language used on the user interface of this Web Part.
See Localizing Bamboo Products for more information.
10. Click Apply and then OK to save your changes.

Configure the KB Admin Site URL

Configure the KB Admin Site URL

Knowledge Base Overview

In order to centralize the KB Admin and KB Client sites, the KB Client site URL must be changed in the KB Admin site before the KB Client site can be configured or used.

Note: If you have upgraded from a previous version of SharePoint Knowledge Base Solution Accelerator, existing sites are not centralized. You must manually modify the pages using SharePoint Designer.

To change the URL for the KB Client site

  1. From the KB Admin tab, click All Site Content. Under Lists, select Bamboo Navigators, then click KB Client.
  2. Click Edit Item. In the URL field, enter the absolute or relative path for the KB Client site, such as ../sites/kbclient – Bamboo recommends using relative paths.

Icon-Warning IMPORTANT: Do not modify the Titles of the list items in the Bamboo Navigators List; doing so will affect the Bamboo KB Tree View Web Part.

To manually modify the pages to create centralized KB Admin and KB Client sites:

NOTE: These steps require manually modifying the pages using SharePoint Designer to add the Bamboo Navigator Tab Strip.

Step Action Result
1. Open SharePoint Designer. If you have not used SharePoint Designer, do not attempt this until you read this article about using SharePoint Designer to modify master pages. 1.jpg
2. Right-click on the v4.master files in the Allfiles_Catalogsmasterpage folder within the site where SharePoint Knowledge Base Solution Accelerator is installed.
Copy the file and rename it; use your file version keeping v4.master as is.
3. Insert the Bamboo Navigator Tab Strip Web Part into the master page.

  • Under Customization, select Edit File.
  • From the ribbon, select Insert > Web Part > Bamboo Navigator TabStrip.
    2.jpg3.jpg
  • Configure the Web Part by right-clicking on it and selecting Web Part Properties.
    4.jpg
4.

Configure the Web Part as indicated below. Click OK.

  • Select List: Bamboo Navigators
  • Select View: Top
  • Menu Title: Menu Title
  • Description: Description
  • URL Link: URL
  • Parent Menu: Parent Menu:
  • Sort Order: Sort Order:
  • URL Icon: Icon URL
  • Select Skin: Default
5.jpg
5. Save your master page. Follow the instructions above to change the URL for the KB Client site.
6. Return to SharePoint Designer and view the Web Part Properties. Select Navigators View for the Select View option. 6.jpg
7. To hide the title of the Bamboo Navigator TabStrip, select None for Chrome Type under Appearance. 7.jpg

Configure the Group Redirect Web Part

Configure the Group Redirect Web Part

Knowledge Base Overview

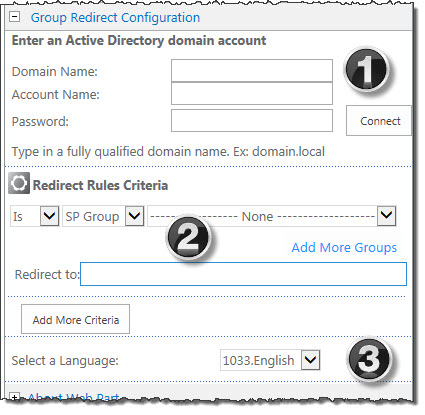
GroupRedirect.jpgWhen you create a KB Admin site, Bamboo adds a hidden Group Redirect web part to the home page. You can configure this so that when users who do not have access to manage lists and libraries within the Admin site will be automatically redirected to the KB Client site. Configuring Group Redirect is optional. If you do not want to use Group Redirect, you can delete the web part from the page. Also note that if you are redirecting users based solely on their membership within a SharePoint group, you do not need to provide any Active Directory information. Group Redirect enables security trimming for the KB Admin site. This is an optional step that allows Knowledge Base Administrators to prevent end users from accessing the KB Admin site.

However, if you want any of your rules criteria (including AND/OR rules) to include Active Directory groups, you must provide login information. If you are redirecting users based on their membership within an Active Directory group, the Group Redirectweb part requires access to an Active Directory account – this is how Group Redirect determines who is redirected and who is not.

End users who attempt to access the KB Admin site will automatically be redirected back to the KB Client site.

To configure the Group Redirect Web Part:

From the KB Admin site, select Site Actions > Edit Page.

Edit the hidden Bamboo Group Redirect Web Part and enter an Active Directory domain account:

Step Column Name Description
1. Domain Name A domain name would be something like domain.local or company.internal.
2. Account Name The account name would be a admin account that can review rules and redirect users who do not have access to the KB Admin site.
3. Password This is the administrator’s password.
4. Set the rules for the Redirect Rules Criteria:
  • Choose Is or Not depending on whether you want the group you add to be included or excluded from the redirect.

For example, if you select Is + SP Group + [Site] Visitors, then the [Site] Visitors SharePoint group will be redirected away from the KB Admin site. If you select Not for this same criteria, then all other groups except the [Site] Visitors will be redirected to the KB Client site.

  • Select SP Group or AD Group from the drop down and choose the group to be included in the rule. To add more groups, click Add More Groups and select AND to include everyone within both groups or OR to include anyone in either group.
5.

Redirect to:

  • Enter the site URL for the KB Client site.
  • Or, choose None for the group, then enter “./” in the Redirect to field to provide the relative path.
Users who do not have permission to view the KB Admin site will be redirected to the KB Client site.
6. Click Add More Criteria to add additional criteria rules, if desired. Click Apply and then OK to save your changes.

See the Group Redirect web part online documentation for more information.

Configure Tab View for KB Client

Configure Tab View for KB Client

The Client site home page is configured to display the Tab View webpart by default. Configure the Web Part using the steps below and see the this article for details on using Tab View

From the KB Admin site, edit the Tab View web part and go to Advanced Settings.

Step Action Result
1. Enter the site URL for the Bamboo KB Admin site: 1.jpg
This field is already populated for you with the relative path URL. See Using Relative Paths for more information on the syntax for relative paths.
2. Select a Display List: 2.jpg
This field is already preselected for you with the Bamboo KB Articles list.
3. Select Default View: 3.png
Select the list view that you would like displayed in the tabs. The views configure which articles you will see and what item columns display in the tab navigation pane. Default is the recommended initial setting.
4. Tabs Displayed: 4.png
Configures which tabs, in what order, will be displayed.
5. Feature Tab Options: 5.png
Toggles display of each category under the features tab.
6. Include Subcategory Articles in Parent Category: 6.png
Toggles displaying articles associated with a subcategory in parent categories as well. For instance, the “Panda Bears” article is filed in Bears > Endangered > Asia. When this feature is turned on “Panda…” will display in the “Bears” and “Endangered” folders, in addition to the “Asia” folder.
7. Records displayed per Category and Page: 7.png
Configures the number of articles that display in each category under the “Features” tab, as well as the records per page for other tabs and searches.
8. Enter Display Article WP URL: 8.png
Enter the URL to the page that contains the Bamboo Display Article Web Part for displaying article content. This field is used for the KB Client site only. Make sure that you enter a relative path for the URL.
9. Select a Language: 9.png
Select this option to set the language used on the user interface of this Web Part. See Localize Bamboo Web Parts for your Language for more information.
10. Click Apply and then OK to save your changes.

Bamboo Knowledge Base Admin Site Lists and Web Parts

Bamboo Knowledge Base Admin Site Lists and Web Parts

Knowledge Base Overview


For the Bamboo KB Admin site, the following lists and web parts are used. All of the Web pages for the web parts are stored in the Site Pages Document Library.

Name Type Description Description
Bamboo Article Questions and Answers List A discussion board list that stores all questions from the KB Client site and answers from the KB Admin site through the Answer Questions link on the Quick Launch bar. N/A
Bamboo KB Answer Questions Web Part Allows KB Administrators to post the answer to end-user questions in the Bamboo Article Questions and Answers discussion board while at the same time e-mailing the answer to the end user. Required
Bamboo KB Article View Counts List Determines the number of views for each article in the Knowledge Base. Do not modify this list. No. Do not modify this list.
Bamboo KB Articles List Stores all articles created for the Knowledge Base. Uses content approval to restrict articles from being published before they are reviewed or approved. Articles are published to the KB Client when the Status column is set to Publish. The Status column must be set manually and does not require the Content Approval Status to be set to Approved in order to publish the item. The Content Approval feature in this instance is meant to be a KB Administrator reviewing tool only. N/A
Bamboo Category Search Web Part Allows KB Administrators to search article categories using specific criteria. Required
Bamboo KB Categories List Stores the categories used to organize the Knowledge Base. N/A
Bamboo KB Configuration List List Designates the name of your e-mail server and the e-mail address from which e-mails will be sent Required
Bamboo KB Ratings and Comments List Stores all ratings and comments for each article submitted by KB Client users along with a status (i.e. Submitted, Rejected, Published) so the KB Admin can review the submitted comments and determine which comments are posted to the KB Client site. N/A
Bamboo KB Search Web Part Allows KB Administrators to search articles or comments and ratings to determine their existence, their publishing status and article content approval status. Required
Bamboo KB Tag Cloud List Stores all tags created for article association, the number of times the tag has been used and in which articles it has been associated. N/A
Bamboo KB Tree View Web Part Displays the category tree on the Home page for navigating the Knowledge Base as well as the Most Popular Articles list and the Latest Additions list. Required
KB Picture Library Library Stores all pictures uploaded during article creation N/A
Workflow Configuration List List The Workflow Configuration List is part of the Workflow Start Feature optional component for users who have Workflow Conductor installed with SharePoint Knowledge Base, or users who wish to use out-of-the-box SharePoint workflows. Use the Workflow Configuration List to create buttons, located in the ribbon, for workflows automated processes, such as article or comment approval or article publishing. See: How to Use Workflow Conductor for Process Automation in SharePoint Knowledge Base Solution Accelerator. Optional, unless Workflow Conductor is installed.

Configure Approval Process for Publishing Articles

Configure Approval Process for Publishing Articles

Applies To:

  • SharePoint Knowledge Base Solution Accelerator R2.0 or newer
  • Workflow Conductor R1.6 or newer
  • SharePoint Server and Foundation 2010
  • MOSS 2007 and WSS v3.0

Icon-Warning IMPORTANT if you are using Workflow Conductor prior to Release2.x: Set up the following workflow processes during off hours. Publishing the workflow templates requires the application pool to be recycled. (Upgrade your WFC product soon so that you won’t need to publish during off hours!)

LIMITATIONS:

To approve workflow tasks, users require the following permissions: Assignee, Initiator, Site Collection Administrator.

NOTE: To complete task forms and to view the Approve, Reject and Submit buttons, users must be able to:

  1. Read the workflow item that the workflow is running on and
  2. Edit items in the Workflow Tasks List that is associated with the workflow.

To create an approval process to publish KB articles:

  1. Install and configure SharePoint Knowledge Base Solution Accelerator. See the KBSolution Accelerator for more information.
  2. Install and configure Workflow Conductor. See Workflow Conductor for more information.
  3. Configure the approval workflow for publishing articles following the steps below.
Import and publish the workflow template
Step Action Result
1.

From the KB Admin site, go to Site Actions > View All Site Content > Bamboo KB Articles List.

  • Use the ribbon to select the List Settings.
  • Under the Workflow Conductor section of the ribbon, select Create or Edit Workflows.
12669-1.jpg
Workflow Conductor Studio opens.
2. Click Import from the Workflow Conductor Studio menu. 12669-2.jpg
3.

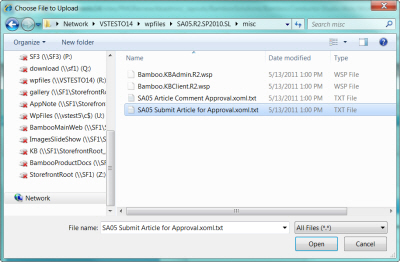
Click Browse and navigate to the SharePoint Knowledge Base Solution Accelerator product extraction folder.

Open the misc folder and select SA05 Submit Article for Approval.xoml.txt.

Click Open, then Import.

12669-3.jpg
4.

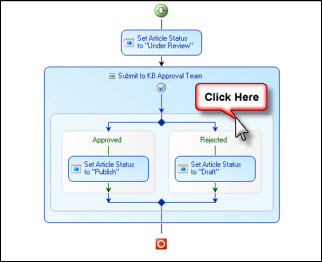
The workflow template is loaded into Workflow Conductor Studio.

In the workflow diagram pane, click on Submit to KB Approval Team.

12669-4.jpg
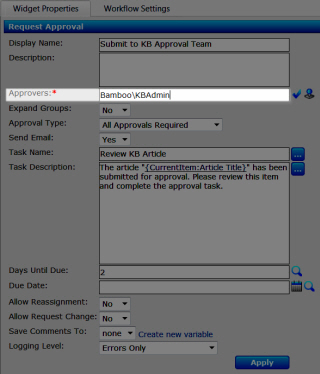
5. In the Widget Properties tab in the settings pane, enter the account(s) for the user(s) who will approve KB articles. 12669-5.jpg
6.

If desired, modify the other widget properties:

  • Approval Type: The default is All Approvals Required. If desired, change the setting to One Approval Required or Multiple Approvals Required.
  • Days Until Due: Enter the number of days until this workflow task is due.
  • Due Date: Enter a due date for the workflow task. Note: If the Days Until Due and Due Date fields both have values, the earliest date will be selected as the due date.
  • Allow Reassignment: The default is No. Choose Yes to allow the workflow task to be assigned to another approver.
  • Allow Request Change: The default is No. Choose Yes to allow the approver to enter a comment for the requester to make changes and resubmit for approval.
  • Logging Level: The default is Errors Only. Choose another option to allow more detailed logging, such as Errors and Warnings or Errors, Warnings and Info.
  • Click Apply.

Workflow Conductor updates the diagram.

7. Select Publish > Deploy from the Workflow Conductor Studio menu. 12669-6.jpg
Icon-Warning IMPORTANT: This action will recycle the application pool, and users will receive a 500 error.
8. Click Yes to save the workflow as a template. 12669-7.jpg
The template is saved to the template gallery, and the application pool is recycled.
12669-8.jpg
10. Click Close to close Workflow Conductor Studio. 12669-9.jpg
12. Configure the Workflow Start Feature. You can start a workflow using the out-of-the-box SharePoint button, located in the ribbon, or you can create your own buttons for the KB workflow approval process (available for SharePoint 2010 only). For SharePoint 2007, start a workflow using the out-of-the-box SharePoint button.
12669-10.jpg
13. From the KB Admin site, navigate to Site Actions > Site Settings > Site Actions > Manage Site Features and activate the Workflow Start Feature. 12669-11.jpg
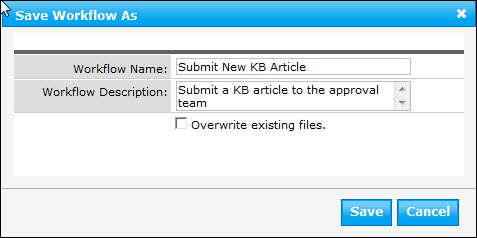
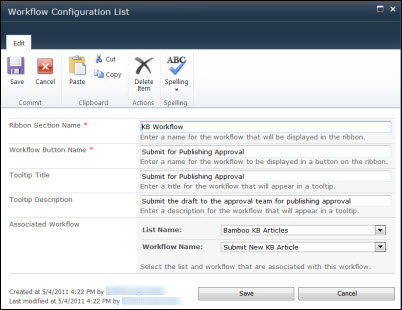
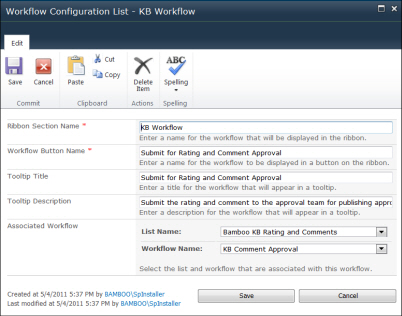
14. Return to the KB Admin site and select the Workflow Configuration List. Complete the following fields.

12669-12.jpg
Make sure to associate the workflow with the correct Bamboo KB Articles List and workflow template.

  • Ribbon Section Name: Enter a name for the section of the ribbon that will contain the workflow button. This is a required field.
  • Workflow Button Name: Enter a name for the button that will be displayed in the ribbon. This is a required field.
  • Tooltip Title: Enter a title for the workflow that will appear in a tooltip.
  • Tooltip Description: Enter a description for the workflow that appear in a tooltip.
  • Associated Workflow: Choose a list and a workflow that is associated with the button.
15.

Start a workflow to approve and publish articles: ◦From the KB Admin site, select Article Control > Manage Articles.

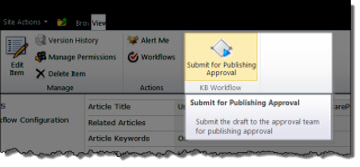
Locate the desired draft article for which you want to start the workflow. The New button is located in the ribbon.

12669-13.jpg
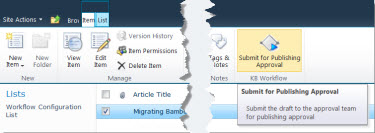
To view the New button, view the draft article in view form, or navigate to the Bamboo KB Articles List, select the desired article, and use the ribbon to select List > Items and click the button.
12669-14.jpg
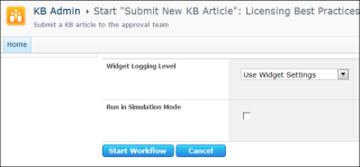
16. Click Submit for Publishing Approval. Workflow Conductor will open. Click Start Workflow. 12669-15.jpg
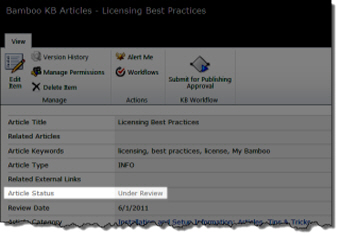
17. Return to the article. The article now has a new field, Article Status, with the value Under Review. 12669-16.jpg
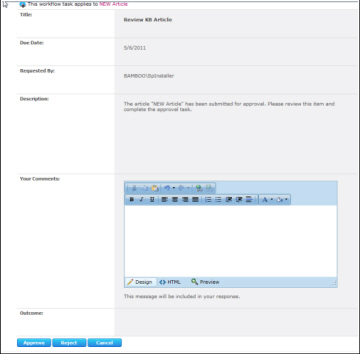
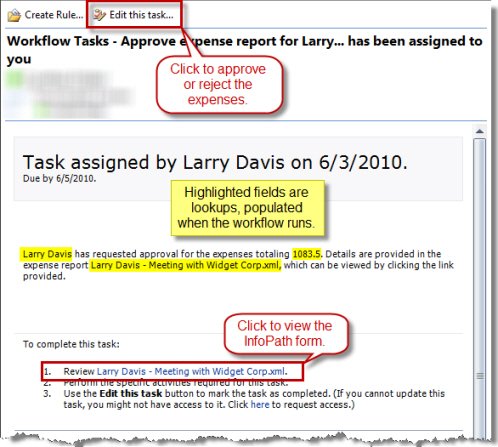
18. The approver will receive an e-mail notification with a link to the article and a link to the approval form. 12669-17.jpg
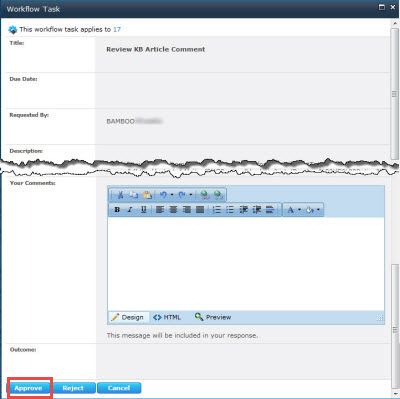
20. The approver can either Approve or Reject the article. If the article has already been approved or rejected, the form only displays the Cancel button. 12669-18.jpg
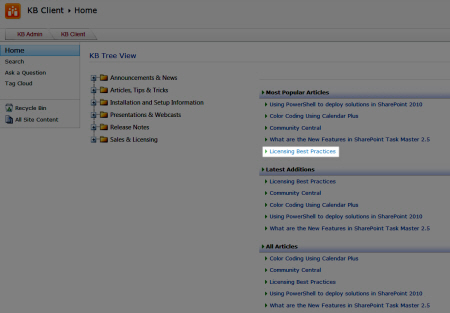
21. Once the article has been approved, the status changes from Draft to Publish, and the article is available to end users in the KB Client site. 12669-19.jpg

See Also:

Configure Approval Process for Publishing Comments

Configure Approval Process for Publishing Comments

Applies To:

  • SharePoint Knowledge Base Solution Accelerator R2.0 or newer
  • Workflow Conductor R1.6 or newer
  • SharePoint Server and Foundation 2010
  • MOSS 2007 and WSS v3.0

Icon-Warning IMPORTANT: Set up the following workflow processes during off hours. Publishing the workflow templates requires the application pool to be recycled.

Icon-Warning LIMITATIONS: To approve workflow tasks, users require the following permissions: Assignee, Initiator, Site Collection Administrator.

NOTE: To complete task forms and to view the Approve, Reject and Submit buttons, users must be able to:

  1. Read the workflow item that the workflow is running on and
  2. Edit items in the Workflow Tasks List that is associated with the workflow.

To create a workflow to approve and publish comments:

  1. Install and configure SharePoint Knowledge Base Solution Accelerator. See the KBSolution Accelerator for more information.
  2. Install and configure Workflow Conductor. See Workflow Conductor for more information.
  3. Configure the approval workflow for publishing comments following the steps below.
Import and publish the workflow template
Step Action Result
1.

From the KB Admin site, go to Site Actions > View All Site Content > Bamboo KB Articles List.

  • Use the ribbon to select the List Settings.
  • Under the Workflow Conductor section of the ribbon, select Create or Edit Workflows.
12669-1.jpg
Workflow Conductor Studio opens.
2. Click Import from the Workflow Conductor Studio menu. 12669-2.jpg
3.

Click Browse and navigate to the SharePoint Knowledge Base Solution Accelerator product extraction folder.

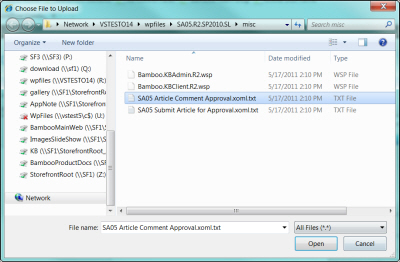
Open the misc folder and select SA05 Article Comment Approval.xoml.txt.

Click Open, then Import.

12669-20.jpg
4.

The workflow template is loaded into Workflow Conductor Studio.

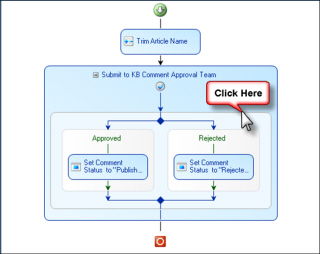
In the workflow diagram pane, click on Submit to KB Comment Approval Team.

12669-21.jpg
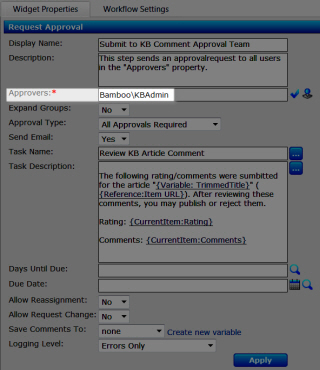
5. In the Widget Properties tab in the settings pane, enter the account(s) for the user(s) who will approve comments. 12669-22.jpg
6.

If desired, modify the other widget properties:

  • Approval Type: The default is All Approvals Required. If desired, change the setting to One Approval Required or Multiple Approvals Required.
  • Days Until Due: Enter the number of days until this workflow task is due.
  • Due Date: Enter a due date for the workflow task.

    NOTE: If the Days Until Due and Due Date fields both have values, the earliest date will be selected as the due date.

  • Allow Reassignment: The default is No. Choose Yes to allow the workflow task to be assigned to another approver.
  • Allow Request Change: The default is No. Choose Yes to allow the approver to enter a comment for the requester to make changes and resubmit for approval.
  • Logging Level: The default is Errors Only. Choose another option to allow more detailed logging, such as Errors and Warnings or Errors, Warnings and Info.
  • Click Apply.

Workflow Conductor updates the diagram.

7. Select Publish > Deploy from the Workflow Conductor Studio menu. 12669-6.jpg
Icon-Warning IMPORTANT: This action will recycle the application pool, and users will receive a 500 error.
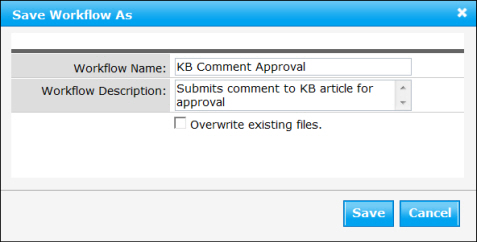
8. Click Yes to save the workflow as a template. 12669-7.jpg
The template is saved to the template gallery, and the application pool is recycled.
12669-23.jpg
9. Configure the Workflow Start Feature. You can start a workflow using the out-of-the-box SharePoint button, located in the ribbon, or you can create your own buttons for the KB workflow approval process (available for SharePoint 2010 only). For SharePoint 2007, start a workflow using the out-of-the-box SharePoint button.
12669-10.jpg
10. From the KB Admin site, navigate to Site Actions > Site Settings > Site Actions > Manage Site Features and activate the Workflow Start Feature. 12669-11.jpg
11. Return to the KB Admin site and select the Workflow Configuration List. Complete the following fields.

12669-22.jpg
Make sure to associate the workflow with the correct Bamboo Comments List and workflow template.

  • Ribbon Section Name: Enter a name for the section of the ribbon that will contain the workflow button. This is a required field.
  • Workflow Button Name: Enter a name for the button that will be displayed in the ribbon. This is a required field.
  • Tooltip Title: Enter a title for the workflow that will appear in a tooltip.
  • Tooltip Description: Enter a description for the workflow that appear in a tooltip.
  • Associated Workflow: Choose a list and a workflow that is associated with the button.

    12669-25.jpg
15.

Start a workflow to approve and publish comments:

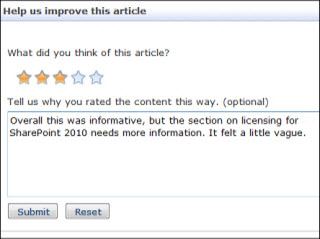
To begin the workflow, an end user or a Knowledge Base Administrator submits a rating or a comment for an article and clicks Submit.

12669-24.jpg
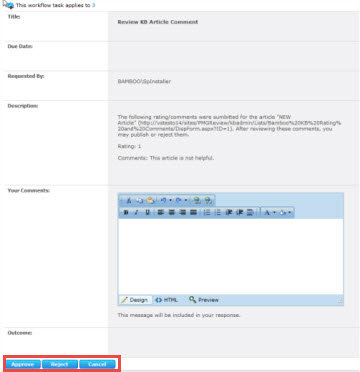
16. The approver receives an email notification with a link to the comment and a link to the form to Approve or Reject the comment.

12669-26.jpg
When the approver clicks the link, a form appears for approving or rejecting the comment.
12669-27.jpg
If the approver has already rejected or approved the comment, the only available option is Cancel.
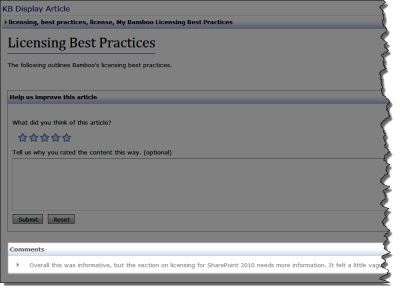
17. Return to the article in the KB Client site. The comment is now published.
12669-28.jpg

NOTE: When publishing comments, users with the appropriate level of permission can publish comments using the Publish button through the Approve & Manage Comments link in the KB Admin site instead of using the workflow to publish comments. However, the KB Comment Approval status for that comment will show as In Progress instead of Completed because the comment was not published through the open workflow. This can lead to many open tasks in the Workflow Tasks List.
12669-37.jpg

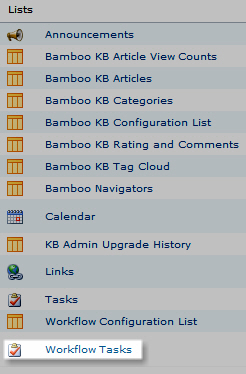
18. To close out workflow tasks, navigate to All Site Content > Lists > Workflow Tasks List. 12669-38.jpg
19. Approve the desired comments. 12669-39.jpg
The item’s status will change to Completed.
Status.jpg

See Also: