WBS Level Format Settings

WBS Level Format Settings

Return to Configuration Overview

You can configure the text for the Work Breakdown Structure (WBS) numbering in the Task Master tool pane. To format a WBS level:

Step Action Result
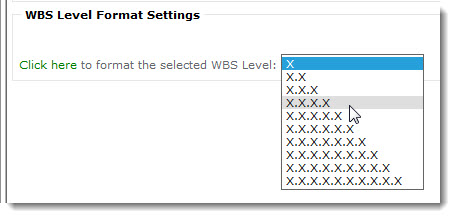
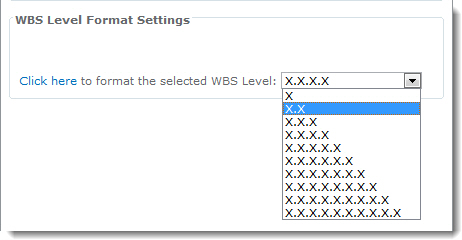
1. In the tool pane under WBS Level Format Settings, choose the WBS level in the WBS Level drop-down list. WBS.jpg
2. Select Click here to format the selected WBS Level.

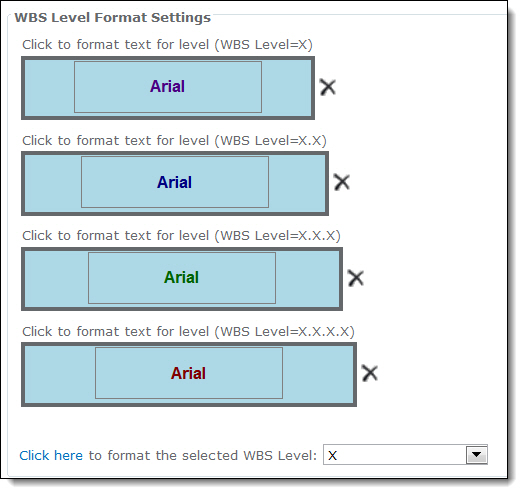
After you select a WBS level and click on the green hyperlink, a blue formatting box is added to the WBS Level Format Settings section.
Settings.jpg
Click the blue box to set the text formatting for that level.

Icon-WarningImportantThe level you pick in the drop down box will be matched in the blue selector box that appears above it. In our screen shot above, we picked X.X.X.X.X and that is the formatting option that appears in the blue box above it.

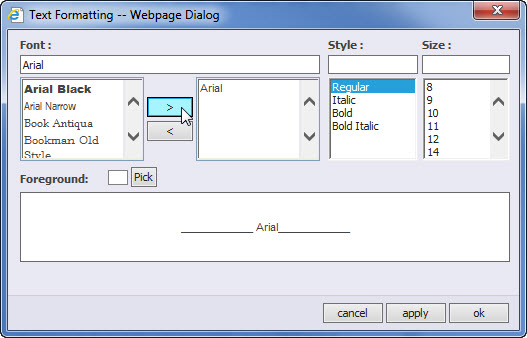
3. A dialog box allows you to choose format the font, font color (i.e. Foreground > Pick), font size and font style. Text.jpg
4. After you finish formatting the text for each level, click Apply and then click OK.

This is an example of how each level is formatted differently:
hw45-2010-chooseWBS1.jpg
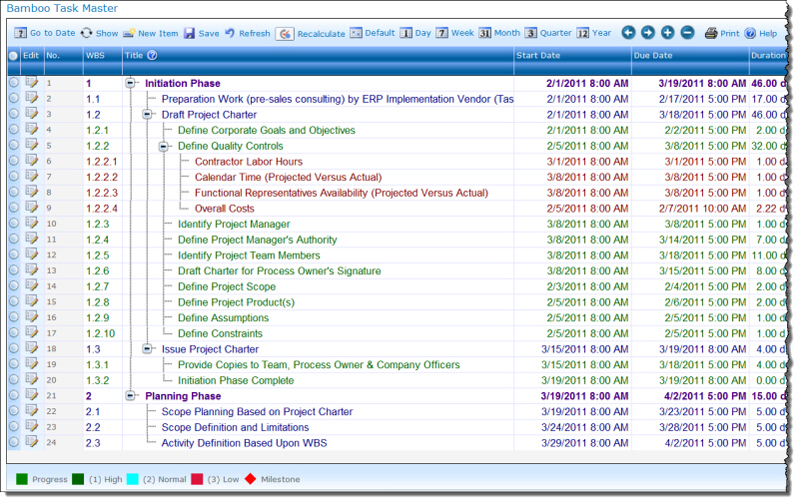
The result of the formatting will appear as follows:
hw45-2010-formattedwbs.jpg

NOTE: If when you are working with Task Master and the text color in the grid changes after you click Recalculate, refresh the browser by clicking F5 to reapply color coding.

Task Master Working Hours Settings

Task Master Working Hours Settings

Return to Configuration Overview

By default, Task Master uses a 24-hour day, 7-day week, 365-day calendar to schedule tasks. Nights, weekends and holidays are not excluded in task schedule calculations, but they can be. If you want to define specific workdays, exclude holidays, or enforce working hours for tasks, you can configure these settings in the Task Master tool pane. The workdays and working hours you select are designated as the only time that tasks can be worked on. Task schedule calculations will only include the days and times you specify in the tool pane settings.

NOTE: In Task Master 3.5 and above for SharePoint 2010/2013, you have the option to exclude lunch breaks.

The following settings can be configured in the Task Master tool pane. Click a setting to learn more.

Additional information about working hours can also be found on these topics:

Return to Task Master Schedule and Calculation Settings

Task Master Task Assignments

Task Master Task Assignments

Return to Configuration Overview

You can calculate task assignments based on three options:

hw45-2010-timeline1.jpg

These options give you more flexibility when assigning tasks and building schedules. They are located in the tool pane under Dependency Settings.

Use the following table to decide which option to choose.

Task Type If Duration is modified If Work is modified If Assignment Units is modified
Fixed Work Task Assignment Units is recalculated Duration is recalculated Duration is recalculated
Fixed Duration Task Work is recalculated Assignment Units is recalculated Work is recalculated

Calculate resources method: In Task Master (Release 3.5 and above), you can choose how task resources are calculated when resources are added or removed from an existing task. These options give you more flexibility when assigning tasks and building schedules. They are located in the tool pane under Dependency Settings.

Task Master Progress Bar Settings

Task Master Progress Bar Settings

Return to Task Master View Settings

hw45-2010-ProgressBarSettings.jpg Use these settings to configure the progress bar for tasks in the Gantt chart.
  • Select progress bar color: Enter in the Hex color number or select a color from the drop-down list.
  • Select Percent Complete Column: Select your column to be displayed. The only columns available in this drop-down list are the Number data-type columns from the list you selected earlier, such as % Complete or Assignment Units.

Task Master Preferences

Task Master Preferences

Return to Configuration Overview

GenSettings.jpg Click on a category name below for details about the options available in the Preferences section of the Web Part Settings. To edit Task Master Web Part Settings, edit the Web Part properties and click the Task Master Web Part Settings button in the Web Part tool pane.
Step Action Result
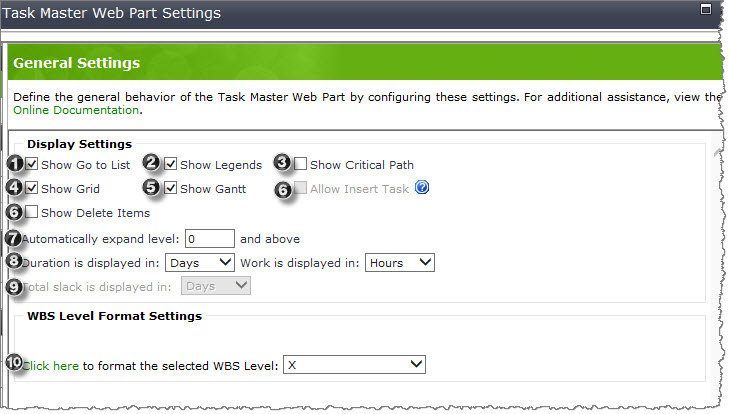
1. Show Go to List When selected, the Go to List button is displayed in the Task Master web part. Go to List opens the task list in a SharePoint list view.
2. Show Legends Allows you to show or hide the legend at the bottom of the Task Master web part. The legend defines the color codes used for items displayed in the Gantt view.
3. Show Critical Path When selected, includes an option in the Task Master web part to highlight tasks that are in the critical path. See: How to Show the Critical Path.
4. Show Grid or Show Gantt

Select whether the Task Master web part displays the task grid, the Gantt chart, or both.

NOTE: You must select at least one.

5. Allow Insert Task

When selected, allows users to insert new tasks above or below existing ones directly in the task grid. When Insert Task is enabled, an Insert Task icon hw45-2010-inserttaskicon.jpg is displayed next to each task in the task list so that users can click the Insert Task icon.

HoverText.jpg
NOTE: Notice this option is disabled. To enable this option, you must deselect the option Save changes to my task list every time a change is made in the Gantt chart in the Dependency Settings section. See Task Master Schedule and Calculation Settings for further clarification.

6. Show Delete Items When selected, the Delete Item button is displayed in the Task Master web part. To delete one or more tasks, select the radio button next to the task(s) and click Delete Item in the toolbar menu. Click OK in the prompt to delete the selected task(s) and its subtasks.
7. Automatically expand level By default this field is set to 0, which means that all of the summary task groups in your task list will be collapsed when you first access Task Master. If you set this field to 1, the summary task groups will be expanded and will show the first level of tasks under the summary task. To view tasks under a first-level task, click the + to expand that level. You can set the level to work with as many levels as you introduce in your task list.
8. Duration and Work Choose how your calculated duration and work are displayed: by days, hours or minutes. After adding a new task, click the Recalculate button to calculate the duration and work for the new task.
9. Total slack is displayed in A Total Slack of zero indicates the task is a critical task, meaning that the amount of time a task finish date can be delayed without affecting the project finish date.
10. WBS Level Format Settings Configure these settings to format the display properties for a Work Breakdown Structure (WBS) level.
hw45-2010-chooseWBS.jpg
For each summary task group, X represents the WBS level for that task and corresponds to the Task Master outline structure. In the example above, Initiation Phase with a WBS of 1 is at level 1 (X), while Contractor Labor Hours with a WBS of 1.2.2.1 is at level 4 (X.X.X.X). Formatting WBS levels does not require that you show the WBS column or maintain the WBS structure. More detailed description can be found here.

Task Master Multiple Predecessor Tasks

Task Master Multiple Predecessor Tasks

Return to Configuration Overview

If your task requires that more than one other task in your project be completed before it can start, you can assign multiple Predecessor Tasks. By default, Task Master is configured to allow only one Predecessor Task per item. To allow multiple Predecessor Tasks, perform the following steps:

Step Action Result
1. Go to Site Actions > View All Site Content. In the Lists section, select the task list configured for Task Master. The default task list is Bamboo Project Task List.
2. In the List Tools > Lists ribbon, click the List Settings button.
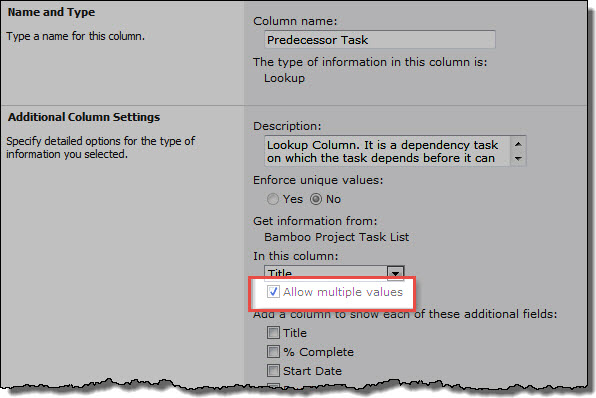
3. In the Columns section, click the Predecessor Task column to edit its settings.
4. In the Additional Column Settings section, select the Allow multiple values option. hw45-2010-allowmultiplepredecessors.jpg
5. Click OK to save the column setting changes.

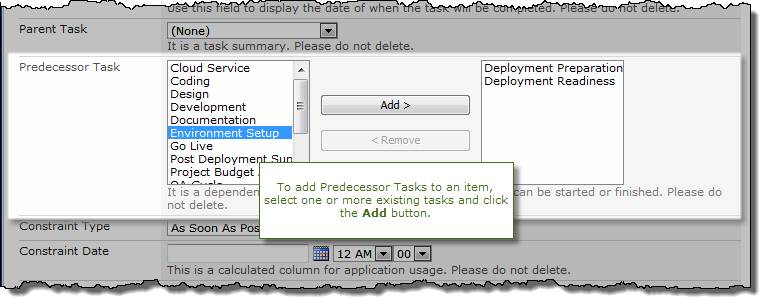
Now when you add or edit a task, you have the option to select one or more Predecessor Task items. The Start Date of the new/updated task will be after the Due Date of the latest Predecessor Task.
hw45-2010-multiplepredecessors.jpg

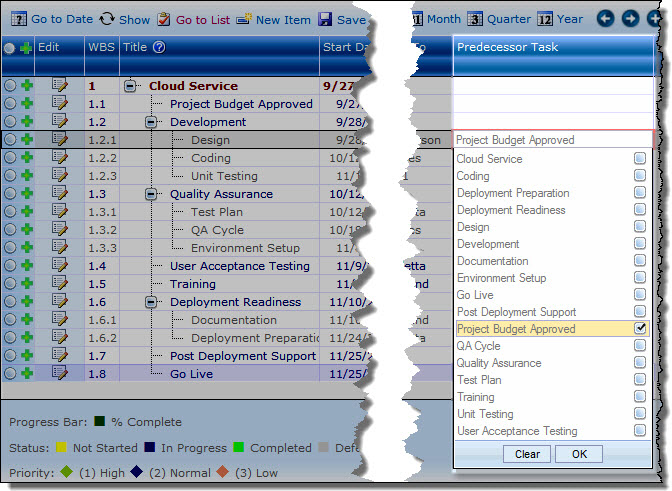
You can also add or edit Predecessor Tasks directly in the grid. Click in the Predecessor Tasks column and check the tasks you want to add to the list.

hw45-2010-multiplepredecessors-example2.jpg

In the example below, notice that Task 1 and Task 2 are assigned as Predecessor Tasks for Task 3. The Start Date of Task 3 is after the Due Date of Task 2, which finishes latest.

hw45-2010-multiplepredecessors-example.jpg

Return to Configuration Overview

Task Master Milestone Settings

Task Master Milestone Settings

Return to Task Master View Settings

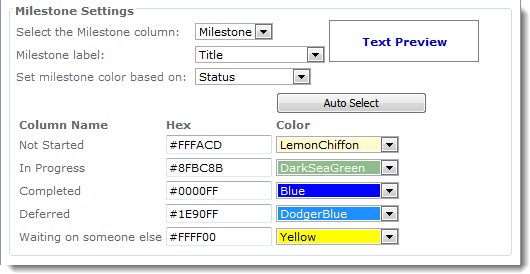
hw45-2010-MilestoneSettings.jpgConfigure the appearance of milestones in the Gantt chart.
  • Select the Milestone column: Select the Milestone column in the task list. If you use a different list, then select the column that contains the Milestone indicator.
  • Milestone label: Select a column to be displayed next to the milestone in the Gantt view.

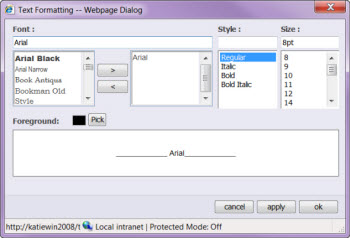
hw45-2010-MilestoneSettings2.jpgClick inside the box next to the Milestone label column drop-down list to set formatting for the Milestone label text. A dialog box is displayed so that you can choose font color (Foreground > Pick), font size and font style.

  • Set milestone color based on: Select a Choice column in the task list to base the milestone color on the value for that column. For example, to base your milestone column color on the current task status, select the Status column and choose a color for each status choice.

NOTE: To use the same color for all milestone tasks (like previous versions of Task Master), select any Choice column and use the same color for all choices.

Task Master Gantt Settings

Task Master Gantt Settings

Return to Task Master View Settings

hw45-2010-GanttBarTextSettings.jpgGantt Bar Text Settings: Configure the settings for the text that is displayed next to the task bar in the Gantt chart.
  • Show Gantt Bar text: Select this option to display text next to the task bar in the Gantt chart.
  • Display text from this column: Select the column that contains the text you want to display.
  • Font color: Enter in the Hex color number or select a color from the drop-down list.

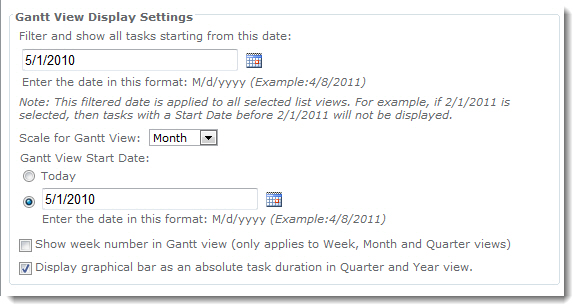
Gantt View Display Settings: Use these settings to configure the appearance of the Gantt chart.

hw45-2010-ganttviewdisplaysettings2.jpg
* Filter and show all tasks starting from this date: Enter the date that you want to use to filter the tasks in the Gantt view. For example, if you enter 6/1/2011, then all tasks with a start date prior to 6/1/2011 will not be displayed in the Gantt view.

NOTE: This filtered date is applied to all selected list views.

  • Scale for Gantt View: Select the default time scale for the Gantt chart (Day, Week, Month, Quarter or Year).
  • Gantt View Start Date: Enter the Start Date for the date interval in the Gantt view, select the Today option to use today’s date, or click to select a date.
  • Show week number in Gantt view: Select this option to display the week numbers in the Gantt view. This option displays the week number in Week, Month and Quarter views only.
  • Display graphical bar as an absolute task duration in Quarter and Year view: Select this option so that the bar in the Gantt view represents the absolute task’s duration when using the Quarter or Year views. If you do not select this option, the bar represents the relative task’s duration.

Task Master Display Columns Settings

Task Master Display Columns Settings

Return to Task Master View Settings

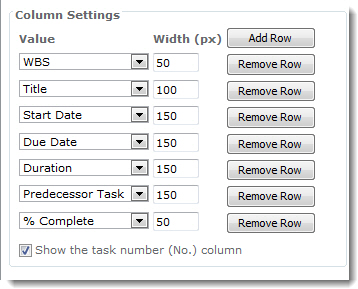
hw45-2010-columnsettings.jpg Column Settings: Configure these settings to display specific columns in the task grid.
  • Value: Select a column from the drop-down list to be displayed in the task grid, such as Title, WBS or Parent Task.
  • Width (px): Type in the width of each column in pixels.
  • Add Row: Click this button to add another column.
  • Remove Row: Click this button to remove a column.
  • Show the task number (No.) column: Select this option to show the No. column. This column only shows the order of the tasks in the grid. It is not the same as WBS numbering.

Task Master Dependency Settings

Task Master Dependency Settings

Return to Configuration Overview

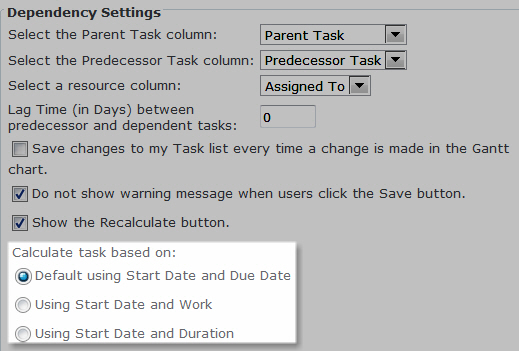
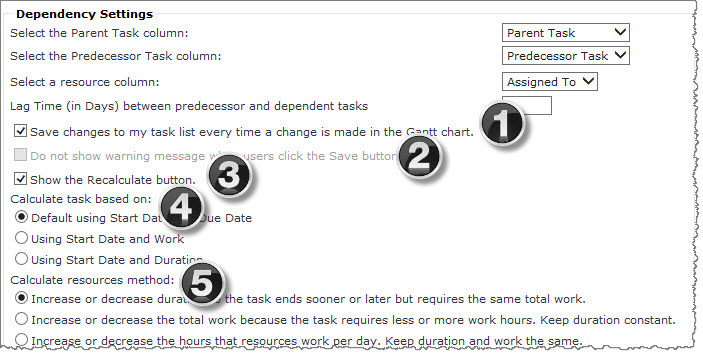
In the tool pane under Task Master Configuration > Dependency Settings, you can select the following Dependency Settings:

hw45-2010-dependencysettings1.jpg

  1. Save changes to my Task list every time a change is made in the Gantt chart: Select this option to save selected changes immediately. If you do not select this option, Save and Refresh are available on the menu. Refresh will undo your changes from the last time that you saved. Save will save the new changes.

  2. Do not show warning message when users click the Save button: You will see this option disabled if you have checked the box in Step 1. If you deselect that check box, then you can see this box enabled and select it so that users receive a warning message each time they click the Save button.

  1. Show the Recalculate button: Select this option to display the Recalculate button on the Task Master toolbar. Clicking Recalculate allows Task Master to recalculate and adjust your schedule after you make changes or add new tasks.

    NOTE: You can disable the Recalculate button in order to turn off Task Master calculations and applied business rules.

    To disable the Recalculation button, deselect Show the Recalculate button. This will remove the Recalculate button from the toolbar menu and Task Master will not re-compute anything until the button is enabled again.

  2. Calculate task based on: With this option, you can assign tasks based on three options:

    • Start Date and Due Date (the default option)
    • Start Date and Work
    • Start Date and Duration
  1. Calculate resources method: With this option, you can choose how task resources are calculated when resources are added or removed from an existing task. Calculate resources methods are as follows:

See also:

Task Master Data Source Settings

Task Master Data Source Settings

Return to Configuration Overview

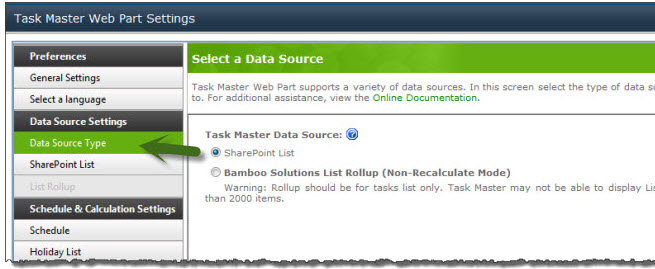
DataSourceType.jpg Click on a category name below for details about the options available in the Data Source Settings section of the Web Part Settings.
Each Task Master instance connects to a single data source. A data source contains the data to be represented in the schedule:

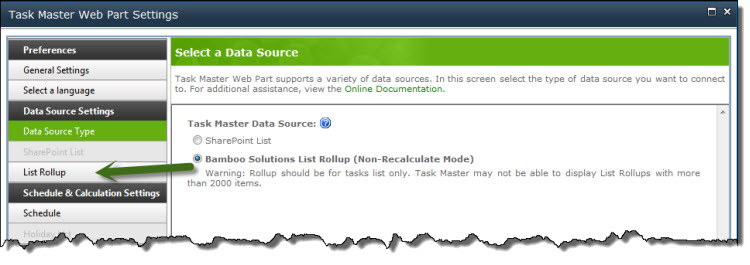
  1. To connect to a data source, first select its type (SharePoint List or Bamboo List Rollup) in the Select Data Source Settings page.
  2. Then click SharePoint or List Rollup in the left menu to configure connection details.

Configure a SharePoint List or Library

Configure Bamboo List Rollup Settings

Task Master Color Coding Settings

Task Master Color Coding Settings

Return to Task Master View Settings

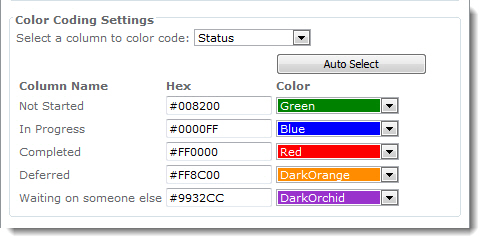
hw45-2010-colorcoding.jpg Configure the color of the Gantt bar for any Choice column in the task list, such as Constraint Type, Priority or Status. Color coding is automatically added to the Task Master legend (if displayed).

  • Select a column to color code: The only columns available in this drop-down box are the Choice data-type columns from the list you selected earlier. After selecting a column, the values are displayed below for color selection.
  • Auto Select: Click this button to randomly select colors for the values.
  • Column Name: This is the choice value as defined by the selected column.
  • Hex: Enter in the Hex color number or select a color from the Color drop-down list.
  • Color: Select a color for each value from the drop-down list.

Switch Between Enforcing Working Hours and Not Enforcing Working Hours

Switch Between Enforcing Working Hours and Not Enforcing Working Hours

Return to Configuration Overview

If you choose to switch back to NOT enforcing working hours, you can clear the Enforce these working hours option in the tool pane:

Step Action
1. On the page where you have placed Task Master, open the configuration tool pane by clicking the arrow to the right of the Task Master title bar and selecting Modify Shared Web Part.
2. In the Working Hours Settings, uncheck Enforce these working hours.
3. Click Apply and then OK to save your changes.
4. Click Recalculate on the Web Part tool bar.
5.

When you click Recalculate, Task Master updates the Due Date of your tasks to use a 24-hour day. The new Due Date is the Start Date + Duration in hours (or Start Date + Work in hours, if tasks are calculated using Start Date and Work).

NOTE: If you display Duration in days, the number of days will change when you return to a 24-hour day, but Duration in hours remains the same. For example, if you have a task with a Duration of 16 hours and you previously had working hours of 9 AM to 5 PM, Duration in days was 2 days (two 8-hour working days). When you stop enforcing working hours, the Duration is still 16 hours, but only 0.67 days (16 hours out of a 24-hour day).

In this example, working hours of 9 AM to 5 PM were previously enforced. Task Duration was 18 hours: May 4th 9 AM to 5 PM (8 hours), May 5th 9 AM to 5 PM (8 hours), and May 6th 9 AM to 11 AM (2 hours).

  • Start Date and Time: May 4, 2010 at 9 AM
  • Due Date and Time: May 6, 2010 at 11 AM

When working hours are no longer enforced, the Start Date remains the same, but a new Due Date is calculated using the Duration of 18 hours and a 24-hour workday :

  • Start Date and Time: May 4, 2010 at 9 AM (15 hours)
  • Due Date and Time: May 5, 2010 at 3 AM (3 hours)

You can also choose to format the Start and Due Date columns as Date Only instead of Date & Time. In the example above, this would change the Start Date to May 4th and the Due Date to May 5th (without a time).

Return to: Task Master Working Hours Settings

Start Date and Work

Start Date and Work

Return to Task Assignments

hw45-2010-assignedto.jpgAssign tasks using Start Date and Work if you know how much work is required to complete the task and when your resource can start working on the task. You can only use this option if the task is assigned to a resource in the Assigned To column.

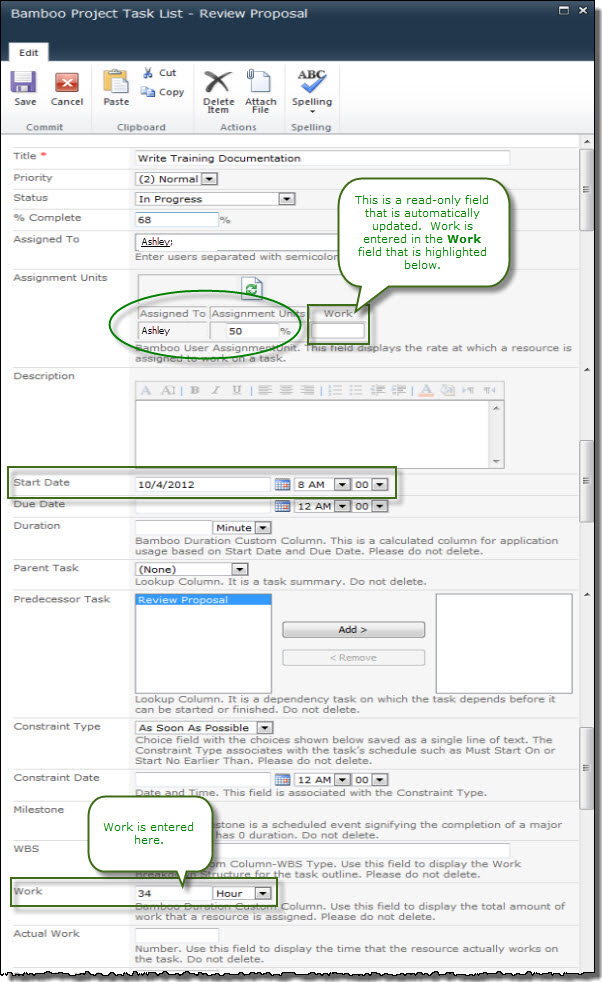
You have two other options:

These options give you more flexibility when assigning tasks and building schedules. They are located in the tool pane under Dependency Settings.

Use Case

Richard has a task for Ashley. She can start the task on October 4, 2012, but can only work on the task half of the time because she has been assigned to another project as well. Ashley estimates that the task will take her 34 hours to complete.

  • Richard needs to create the task using a Start Date of 10/4/2012 at 8:00 AM
  • He sets the amount of Work 34 hours
  • The Assignment Units will be 50%.

In the tool pane under Working Hours Setting, Richard selects the Enforce these working hours option, chooses work hours as 8:00 AM to 5:00 PM and selects Exclude lunch time. He also excludes weekends from task scheduling.
hw45-2010-workhours8-5excludelunch.jpg

Under Dependency Settings, Richard selects the Using Start Date and Work option and the Increase or decrease duration so task ends sooner or later but requires the same total work option.
hw45-2010-taskassign-3.jpg

Richard creates the task as shown below and then clicks Recalculate from the Task Master toolbar.

hw45R35-2010-taskassign-4.jpg

Task Master uses the specified Start Date and Work and updates the task to have a Due Date of 10/16/2012 at 12:00 PM.

Return to: Task Master Task Assignments

Task Master Start Date and Duration

Task Master Start Date and Duration

Return to Task Assignments

Use Start Date and Duration to assign tasks if you know the length of time that it will take to complete the task and when the task can start. You have two other options:

These options give you more flexibility when assigning tasks and building schedules. They are located in the tool pane under Dependency Settings. When you assign tasks based on Start Date and Duration, Work, Assignment Units and Due Date are calculated based on the Duration units.

Use Case

Richard has a task he knows will take about 10 days and will begin on October 4, 2012. He wants to enter the Start Date as 10/4/2012 at 8:00 AM and the Duration as 10 days. He does not want to have to look at his calendar and count out the days in order to determine what the task’s end date will be.

  • In the tool pane under Working Hours Setting, Richard selects the Enforce these working hours option
  • He chooses his work hours as 8:00 AM to 5:00 PM and selects Exclude lunch time
  • He also Excludes weekends from task scheduling
    hw45-2010-workhours8-5excludelunch.jpg

Under Dependency Settings, Richard selects the Using Start Date and Duration option and the Increase or decrease the total work because the task requires less or more work hours. Keep duration constant. option.

hw45-2010-taskassign-5.jpg

Richard creates the task as shown below and then clicks Recalculate on the Task Master toolbar.
hw45R35-2010-taskassign-7.jpg

Task Master uses the specified Start Date and Duration and updates the task to have a Due Date of 10/17/2012 at 5:00 PM.

Return to Task Master Task Assignments

Configure Task Assignments Based on Start & Due Dates

Configure Task Assignments Based on Start & Due Dates

Return to Task Assignments

Why use this option? Use Start Date and Due Date to assign a task when you know when the task will start and when it will finish. You have two other options; see also:

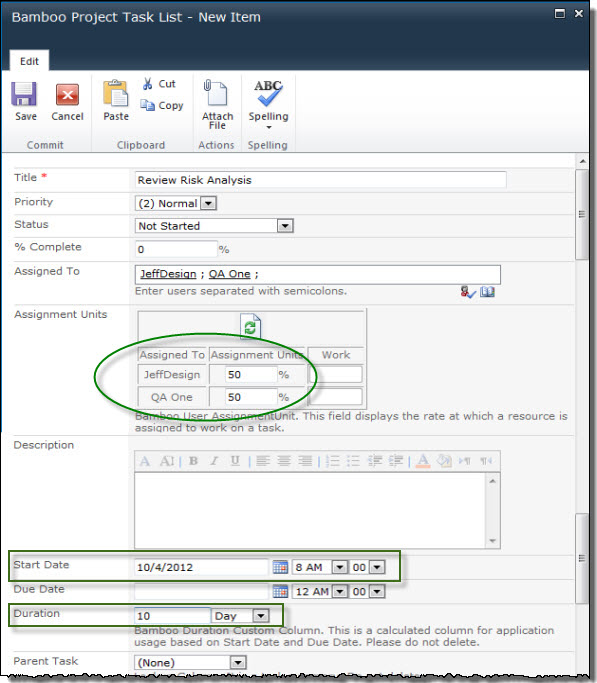
Start Date and Due Date is the default option for assigning tasks. The new Assignment Units allows you to assign multiple resources to a task. You can enter a percentage of time that one or more resources are assigned to the task. In this case, two resources are assigned at 50%.

Use Case

  • Richard Kimble, a project manager, has a task for team members JeffDesign and QA One.
  • JeffDesign and QA One can start the task on October 4, 2012, and finish it on October 6, 2012.
  • JeffDesign and QA One are both able to work on the task 50% of the time.
  • Richard needs to create the task using a Start Date of 10/4/2012 at 8:00 AM and a Due Date of 10/6/2012 at 5:00 PM with Assignments Units of 50% for both JeffDesign and QA One.

In the tool pane under the Working Hours Setting, Richard selects the Enforce these working hours option, chooses his work hours as 8:00 AM to 5:00 PM and selects Exclude lunch time. He also excludes weekends from task scheduling.
hw45-2010-workhours8-5excludelunch.jpg

Under Dependency Settings, Richard selects the Default using Start Date and Due Date option and the Increase or decrease duration so task ends sooner or later but requires the same total work option.

hw45-2010-taskassign-8.jpg

Richard creates the task as shown below and then clicks Recalculate from the Task Master toolbar.
Work.jpg

Task Master updates the task to use the specified Start and Due Dates of 10/4/2012 and 10/6/2012.

Return to Task Master Task Assignments

Increase or decrease working hours in Task Master

Increase or decrease working hours in Task Master

Return to Configuration Overview

Use the Increase or decrease the hours that resources work per day. Keep duration and work the same option when you are adding or removing resources, but you want to keep work and duration the same.

Use Case:

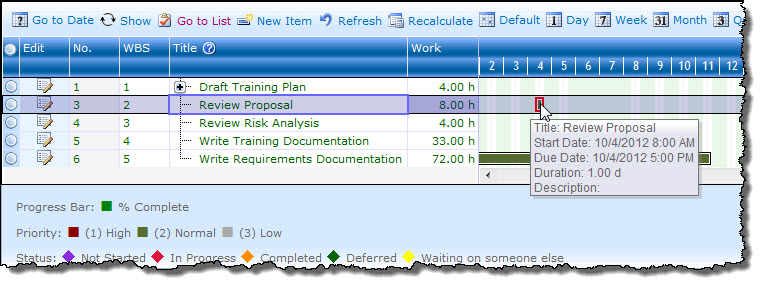
  • Jeff Test has an assigned task – Review Proposal.
  • The task has a Start Date of 10/4/2012
  • The task has a Due Date of 10/4/2012
  • The task has a Duration of 1 day and Work of 8 hours.
  • Richard will assign a resource to the existing task and the Hours will decrease.
  • Duration and Work will remain the same.

hw45-2010-taskmodeuc4.jpg

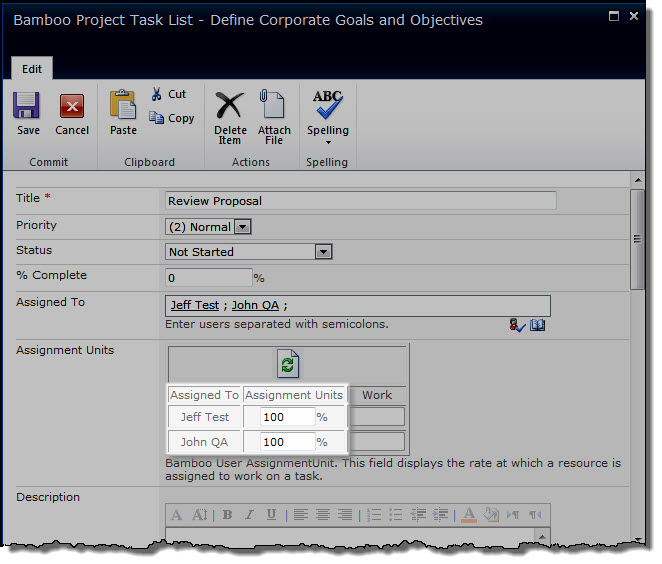
Richard updates the task as shown below. John QA has been assigned to the task at 100%.

hw45-2010-taskmodeuc5.jpg

Richard clicks Recalculate from the toolbar.
Recalc.jpg

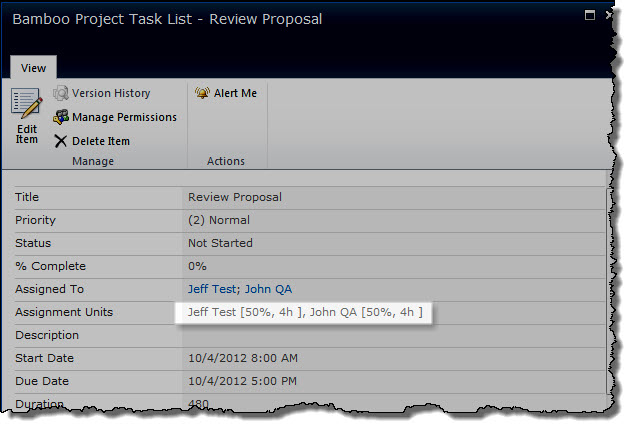
The task now shows Hours decreased by 50% to reflect the work of both Jeff Test and John QA. Duration and Work remain the same.

hw45-2010-taskmodeuc6.jpg

The following table defines which items are recalculated based on the type of task.

Task Type If Duration is modified If Work is modified If Assignment Units is modified
Fixed Work Task Assignment Units is recalculated Duration is recalculated Duration is recalculated
Fixed Duration Task Work is recalculated Assignment Units is recalculated Work is recalculated

Return to Task Master Dependency Settings

Increase or decrease the total work in Task Master

Increase or decrease the total work in Task Master

Return to Configuration Overview

Use the Assign tasks using increase or decrease the total work because the task requires less or more work hours. Keep duration constant option when you are adding or removing resources, but want to keep the due date and duration the same.

Use Case:

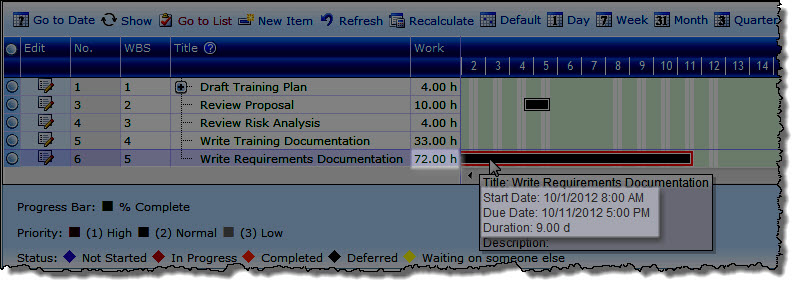
  • JeffDesign has an assigned task – Write Requirements Documentation.
  • The task has a Start Date of 10/1/2012
  • The task has a Due Date of 10/11/2012
  • The task has a Duration of 9.0 days and Work of 72 hours.
  • The task has a Richard will assign a resource to the existing task
  • The Work per resource will increase, but Due Date and Duration will remain the same.

hw45-2010-taskmodeuc1.jpg

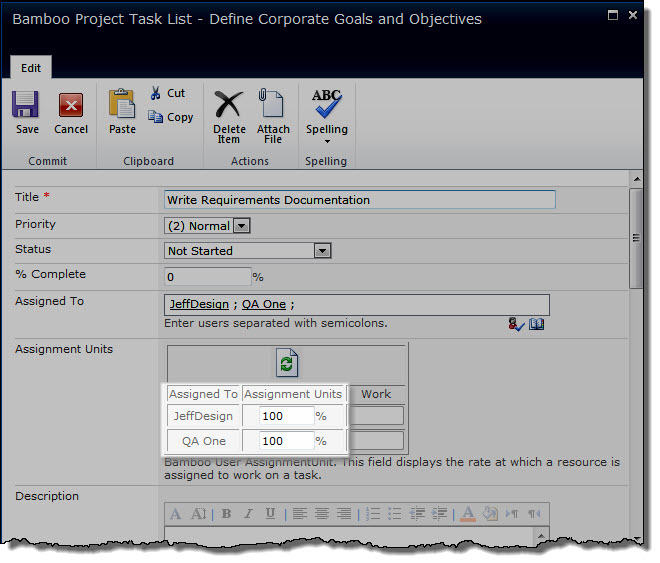
  • Richard updates the task as shown below. QA One has been assigned to the task at 100%.
    hw45-2010-taskmodeuc2.jpg

  • Richard clicks the Recalculate button on the Task Master toolbar.

    hw45-2010-taskmodeuc3.jpg

The task now shows Work updated to reflect the work of both JeffDesign and QA One. Due Date and Duration remain constant.

The following table defines which items are recalculated based on the type of task.

Task Type If Duration is modified If Work is modified If Assignment Units is modified
Fixed Work Task Assignment Units is recalculated Duration is recalculated Duration is recalculated
Fixed Duration Task Work is recalculated Assignment Units is recalculated Work is recalculated

Return to Task Master Dependency Settings

Increase or decrease duration in Task Master

Increase or decrease duration in Task Master

Return to Configuration Overview

Use the Increase or decrease the duration so the task ends sooner or later but requires the same total work option when you are adding or removing resources, but want to keep total work the same.

Use Case:

  • JeffOwner has an assigned task – Define Corporate Goals and Objectives.
  • The task has a Start Date of 10/12/2012
  • The task has a Due Date of 10/14/2012
  • The task has a Duration of 2 days and Work of 16 hours.
  • Richard will assign a resource to the existing task and the End Date and Duration will change.
  • Work will remain the same.

hw45-2010-taskmodeuc7.jpg

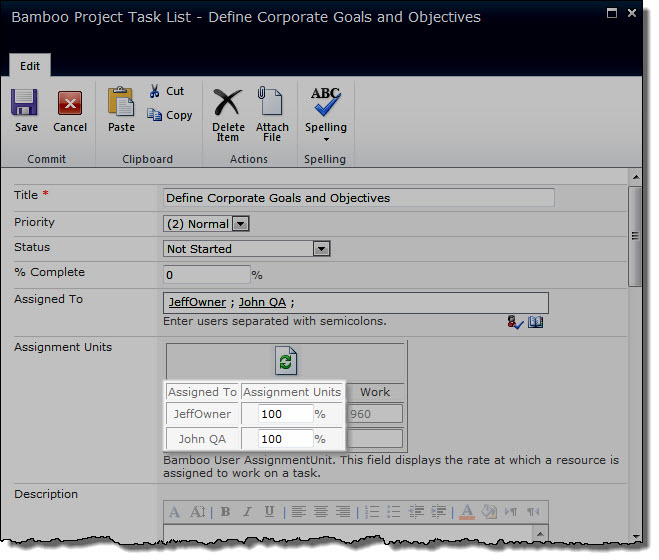
* Richard updates the task as shown below. John QA has been assigned to the task at 100%.
hw45-2010-taskmodeuc8.jpg

* Richard clicks the Recalculate button from the toolbar.

hw45-2010-taskmodeuc9.jpg

The task now shows Due Date of 11/13/2012 and Duration of 1 day. Work remains the same at 16 hours.

The following table defines which items are recalculated based on the type of task.

Task Type If Duration is modified If Work is modified If Assignment Units is modified
Fixed Work Task Assignment Units is recalculated Duration is recalculated Duration is recalculated
Fixed Duration Task Work is recalculated Assignment Units is recalculated Work is recalculated

Return to Task Master Dependency Settings

Configure Task Master Working Hours

Configure Task Master Working Hours

Return to Working Hours Configuration

By default, Task Master uses a 24-hour workday. This means that task Start and Due Dates can fall anytime of the day. To designate certain hours of the day as working hours and exclude all other hours from task scheduling, you must configure Task Master to enforce working hours.

Step Action
1. On the page where you’ve placed Task Master, open the configuration tool pane. Click the arrow to the right of the title bar and select Edit Web Part (or Modify Shared Web Part on SharePoint 2007).
2. In the Working Hours Settings, select Enforce these working hours.
3. Enter the Start and End times for your workday. Tasks will only be scheduled during these hours.
4. If you want to exclude lunch breaks from your working hours, select Exclude lunch time and enter the Start and End times for your lunch break.
5. Click Apply and then OK to save your settings.
6. In the Task Master web part, click the Recalculate button in the toolbar menu. Your task schedule will be updated to only include the hours you specified as working hours.

Icon-Warning Your task list Start and Due Date column format must be configured as Date & Time to support working hours. The Start and Due Date column format in the Bamboo Project Task List included with Task Master is already configured as Date and Time. To check the configuration of your task list (and to update it, if necessary), see Configure a Task List to Support Working Hours.

The example below, using working hours configured for 9 AM to 5 PM, shows how a task is scheduled when working hours are enforced.

NOTE: Task Duration is calculated based on Start Date and Due Date.

In the Task Master Web Part, create a new task with a Start Date and Due Date as shown below. Notice that the Start time falls outside the configured working hours.
HW45_Config_WorkHours_004.png

  • Start Date and Time: May 21, 2013 at 7 AM
  • Due Date and Time: May 21, 2013 at 9 PM

HW45_Config_WorkHours_005A.png

Click the Recalculate button in the toolbar. The Start and Due dates and times of the task become:

  • Start Date and Time: May 21, 2013 at 9 AM
  • Due Date and Time: May 21, 2013 at 5 PM

HW45_Config_WorkHours_005B.png

Since the working hours are 9 AM to 5 PM, Task Master ensures that your tasks are scheduled only during these hours. In this example, the task is moved to the start of working hours the same day.

Return to: Task Master Working Hours Settings

Configure Task Master Workdays

Configure Task Master Workdays

Return to Working Hours Configuration

Task Master uses a 7-day workweek. Saturdays and Sundays are not excluded from task schedules by default. In Task Master R3.0 and higher, you can define the workdays for your project. To configure workdays, edit the Task Master web part settings to select the days of the week your project should include:

Step Action
1. On the page where the web part resides, open the configuration tool pane. Click the arrow to the right of the Task Master title bar and select Edit Web Part (or Modify Shared Web Part in SharePoint 2007).
2. In the Working Hours Settings, select the days of the week that should be considered Workdays.
3. Click Apply and then OK to save your settings.
4. Click the Recalculate button in the toolbar menu. Your task schedule will be updated to only include the days you specified as workdays.

The example below shows how a task is scheduled to exclude weekends.

Task Master is configured with Workdays of Monday through Friday. Task Duration is calculated based on Start Date and Due Date.

hw45-2010-workhours9-5.jpg

Create a new task with a Start Date and Due Date as shown below. Notice that the Due Date falls on a day that is not a workday.

  • Start Date and Time: September 26, 2011 at 9 AM (Monday)
  • Due Date and Time: October 1, 2011 at 5 PM (Saturday)
    hw45-2010-exampleworkday.jpg

Click Recalculate. The Start and Due dates and times of the task become:

  • Start Date and Time: September 27, 2011 at 9 AM (Monday)
  • Due Date and Time: September 30, 2011 at 5 PM (Friday)

hw45-2010-exampleworkday2.jpg

Since the workdays are Monday through Friday, Task Master ensures that your tasks are scheduled only on these days. In this example, the task Due Date is moved to the previous workday.

Return to Task Master Working Hours Settings

Configure Task Master Holiday List

Configure Task Master Holiday List

Return to Working Hours Configuration

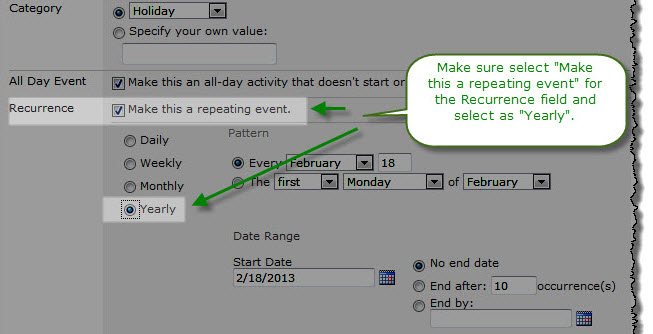
HW45-SP2010holiday.jpg In Task Master R3.0 and higher, holidays can be excluded from task scheduling. To exclude holidays, first configure a SharePoint Calendar list with the holidays observed by your project team. Holidays must be configured as Yearly events; Task Master will ignore any other events on the Calendar.
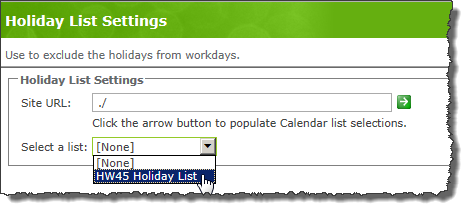
After your holiday list is created, reference the list in Task Master:

Step Action Result
1. On the page where you’ve placed Task Master, open the configuration tool pane. HW45_Config_WorkHours_006B.png
2. In the Holiday List Settings, select the Calendar list that includes your holidays. You can select a holiday list in the same site as the Task Master web part, or you can enter the URL of a different site that contains the holiday list.
3. Click Apply and then OK to save your settings.
4. In Task Master, click the Recalculate button in the toolbar menu. Your task schedule will be updated to exclude holidays. The example below shows how a task is scheduled when a holiday list is configured.

Task Master is configured with a holiday list that includes a 2-day Bank Holiday on July 22nd and July 23rd. Task Duration is calculated based on Start Date and Due Date.

Create a new task with a Start Date and Due Date as shown below. Notice that the Due Date falls on the holiday.

  • Start Date and Time: July 8, 2013 at 8 AM
  • Due Date and Time: July 22, 2013 at 5 PM

HolidayTask.jpg

Click the Recalculate button on the toolbar. The Start and Due dates and times of the task become:

  • Start Date and Time: July 8, 2013 at 9 AM
  • Due Date and Time: July 19, 2013 at 5 PM

HW45_Config_WorkHours_008.png

Since Monday, July 22nd and Tuesday, July 23rd are holidays in this example, Task Master ensures that your tasks are not scheduled on those days. The task Due Date is moved to the previous workday which is not a holiday.

Return to: Task Master Working Hours Settings

Configure a Task List to use with Task Master

Configure a Task List to use with Task Master

Top

Return to Configuration Overview

To select and configure a task list to use with Task Master, follow the instructions below that apply to your scenario:

Configure a new task list

hw45-selecttasklist-default.jpg When you add Task Master to a page, it is automatically configured to use the default Bamboo Project Task List in the current site. If you want to use this list, you do not need to do anything else to select it. See About the Bamboo Project Task List for more information about this default list.

Configure the Bamboo Task Master Web Part for the first time

Top

hw45-selecttasklist-existing.jpg To use an existing task list in the current site, select it in the Select a task list drop-down list and click the Upgrade Task List button. Upgrading the task list adds the columns listed below to the list you selected, which enables Task Master to calculate task schedules properly. For a list of hidden columns that are also added, see About the Bamboo Project Task List.

To use an existing task list in a different site:

Step Action
1.

In the Site URL box, enter the URL of the site that contains the task list you want to use in Task Master. If the task list is in the same site collection or Web application as Task Master, enter the relative URL to the site (./site or /sites/subsite). If the site is in a different Web application, use the absolute URL (http://servername/site).

NOTE: Use a relative URL if the Web application uses Alternative Access Mappings (AAM) or if the Web Part will be saved as part of a site template.

2. Click the arrow button to load lists in the site.
3. In the Select a task list drop-down list, select the task list you want to use.
4. Click the Upgrade Task List button. This action adds the columns listed below to the list you selected, which enables Task Master to calculate task schedules properly. For a list of hidden columns that are also added, see About the Bamboo Project Task List.

Upgrade an instance of an already-configured task list

Top

hw45-upgradeexisting.jpg To upgrade an existing Task Master task list, click the Upgrade Task List button. You do not need to change your list or view. Any new columns included with the new version of Task Master will be added to the task list so you can take advantage of new features. See About the Bamboo Project Task List for a list of Task Master columns in the current product version.
When you click the Upgrade Task List button, the following fields are added to the task list you select to use with Task Master:

New Columns Added Column Type
% Work Complete Number (Percentage)
Actual Work Number
Assignment Units Number (Percentage)
Constraint Dates Date and Time
Days Overdue Bamboo Days Overdue Column
Duration Bamboo Duration Column
Early Start Date and Time
Early Finish Date and Time
Late Start Date and Time
Late Finish Date and Time
Milestone Yes/No
Parent Task Lookup
Predecessor Task Lookup
Remaining Task Lookup
Remaining Work Number
Schedule Status Bamboo Task Status Indicator Column
Total Slack Number
WBS WBS Type
Work Bamboo Duration Column

Top

Configure a Task List to Support Working Hours

Configure a Task List to Support Working Hours

Return to Configuration Overview

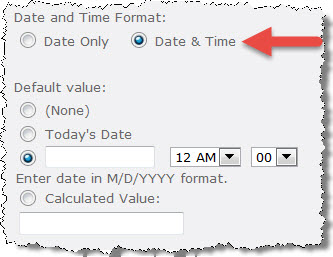
To support working hours, the Start Date and Due Date column formats must be Date & Time, not Date Only. The Bamboo Project Task List is already configured with Date and Time.

NOTE: If you selected a different task list for Task Master, you may need to update your Start Date and Due Date column settings.

To verify and modify column settings to support working hours:

Step Action
1.

Go to Settings icon > Site Contents. In the Lists, Libraries, and other Apps section, click on the task list you configured for Task Master.

For SharePoint 2007 and SharePoint 2010, go to Site Actions > View All Site Content. In the Lists section, click on the task list you configured with Task Master.

2. In the List Tools > List ribbon, click the List Settings button.
The default task list is Bamboo Project Task List.
3. Go to Settings > List Settings.
4. In the Columns section, click the Start Date column.
5. In Additional Column Settings, change the Date and Time Format to Date and Time.
hw45-2010-startdateproperties.jpg
6. Click OK to save the column settings.
6. Repeat these steps for the Due Date column.

After you verify the column formats for your task list, you can configure working hours in the Task Master web part properties. Make sure to click the Recalculate button in the Task Master web part toolbar menu after you change working hours.

Return to: Task Master Working Hours Settings

Configure Bamboo List Rollup Settings

Configure Bamboo List Rollup Settings

Return to Configuration Overview

hw45R35-2010-listrollup.jpg Task Master only works with version 6.0 of List Rollup and List Rollup Schema Designer. For more information about creating Data Views and Schemas, see the List Rollup documentation. Please refer to the Release Notes for more information.

To connect to List Rollup, first select its type in the Data Source Settings page and then click the data source name in the left menu to configure connection details.

List Rollup Settings

  • List Rollup URL: Enter the URL of the page that contains the List Rollup Data View or Schema and click the Load List Rollup Schemas button.
  • List Rollup Schema: Select the List Rollup Schema that contains the data you want to display.

NOTE: List Rollup is useful when you want to show multiple project schedules in one view. List Rollup is “read-only” mode. Task Master will display List Rollup views, but will not update or recalculate.

hw45R35-2010-listrollup.jpg Under Project Schedule Settings, everything will be disabled, as shown below, except for mapping columns such as Parent Task, Predecessor Task, Assigned To, Start Date and Due Date.

Under View Settings, you can configure all of the settings (Display Columns, Color Coding, Progress Bar, Milestone and Gantt) as normal. See View Settings for more information.

Below is an example of a List Rollup view in Task Master.
hw45-2010-rollupview.jpg

About the Bamboo Project Task List

About the Bamboo Project Task List

Return to Configuration Overview

Top

The Bamboo Project Task List is automatically created when you add Task Master to a page. The list is created on the same site where the Task Master web part is added to a page. Any Task Master web parts which are added to a page in a site will reference the same Bamboo Project Task List. There is only one list per site.

NOTE: If you remove Task Master from a page or uninstall Task Master completely, the Bamboo Project Task List will not be removed; it must removed manually.

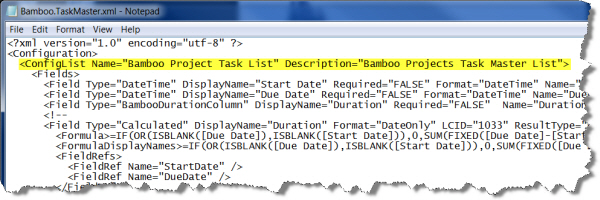
hw45-tm-xml.jpg You can change the name of the Bamboo Project Task List, but you must also update the Bamboo.TaskMaster.xml configuration list with the new name; otherwise, each time that you add Task Master to a page, it will create the Bamboo Project Task List if it does not find a list of the same name in the site. The file may be located in the following location depending on your SharePoint configuration:
<drive>:InetpubwwwrootwssVirtualDirectories<port>wpresourcesBamboo.TaskMasterBamboo.TaskMaster.xml

The Bamboo Project Task List stores the following data. For more information about the column names and descriptions, read Glossary and Help.

Column Description Column Type Customizable
Title Use this field to display the name of the task. Single line of text Yes
Priority Use this field to assign a priority value to the task such as High (1), Normal (2) or Low (3). Choice field with the choices shown below saved as a single line of text Yes
Status Use this field to display the status of the task such as Not Started, In Progress, Completed or Deferred. Choice field with the choices shown below saved as single line of text Yes
% Complete Use this field to display the percentage of completion. Number (percentage) Yes
Assigned To Use this field to assign the task to a resource. Person or Group Yes
Task Group Use this field to assign the task to a specific group. Person or Group Yes
Description Use this field to describe the task. Multiple lines of text Yes
Start Date Use this field to display the date that the task is started. Date and Time Turn on the Date and Time option to use the Working Hours feature
Due Date Use this field to display the date that the task will be completed. Date and Time Turn on the Date and Time option to use the Working Hours feature
Duration This is a custom column for application use based on Start Date and Due Date. This calculation also determines the duration of the Parent Task when the start or due date of one of the Predecessor Tasks assigned to the Parent Task has changed. It is also used to determine how the working hours are applied to the total duration of a task. Duration can be displayed in minutes, hours or days, based on the user’s selection. Bamboo Duration Column Yes (see Duration Column section below)
Parent Task This field displays the summary task. This column looks up the Title column from this list. Lookup column Not recommended
Predecessor Task This is a dependency task on which the task depends before it can be started or finished. For example, Create Design Document is a predecessor task to the Review Design Document task. The Review Design Document task cannot start until the Create Design Document task is completed if the Constraint Type is set to As Soon As Possible. This column looks up the Title column from this list. Lookup column Not recommended
Constraint Type The Constraint Type associates with the task’s schedule such as Must Start On or Start No Earlier Than. With all choices except As Soon As Possible, you must enter a date in the Constraint Date column. Choice field with the choices shown below saved as a single line of text Not recommended
Constraint Date This field is associated with the Constraint Type. It is the date that the task Starts No Earlier Than, Starts No Later Than or Must Start On depending on the selected Constraint Type. Date and Time Not recommended
Milestone Use this field to indicate whether the task is a milestone. A milestone is a scheduled event signifying the completion of a major deliverable. It has 0 duration. Yes/No Not recommended
WBS Use this field to display the Work Breakdown Structure (WBS) for the task outline. WBS Type Not recommended
Work Use this field to display the total amount of work that a resource is assigned. This is a calculated column that is set to the value of the Duration column. Bamboo Duration Column Not recommended
Actual Work Use this field to display the time that the resource actually works on the task. This is a calculated column that shows the result of the following calculation:
Actual Work = [Work] x [% Complete]
Number Not recommended
Remaining Work Use this field to display the work that remains in order to complete a task. This is a calculated column that shows the result of the following calculation:
Remaining Work = [Work] – [Actual Work]
Number Not recommended
Assignment Units Use this field to display the assigned resource’s allocation to a task. Number (Percentage) Not recommended
Days Overdue This is a custom column for application use that displays the number of days an incomplete task is overdue. A task is considered overdue if its % Complete is less than 100% and its Due Date is before the current date. Do not modify this column. Bamboo Days Overdue Column Not recommended
Schedule Status This is a custom column that displays a status indicator based on the number of days an incomplete task is overdue. The indicator threshold and indicator icon type can be configured. Bamboo Task Status Indicator Column Yes (customize threshold and indicator type)
Total Slack This field displays the amount of time a task finish date can be delayed without delaying other tasks or the project finish date. Tasks with zero Total Slack are in the project Critical Path. Number Not recommended
% Work Complete Use this field to display the percentage of work complete. Number (percentage) Yes
Early Finish This column displays the earliest a task can finish based on the Early Finish dates of predecessor and successor tasks and other task constraints. This is the earliest date a task can finish if all predecessor and successor tasks also finish on their Early Finish dates. Date and Time Not recommended
Early Start This column displays the earliest date a task can start based on predecessor and successor tasks and other constraints. Date and Time Not recommended
Late Finish This field displays the latest date a task can finish without delaying the project finish date. Date and Time Not recommended
Late Start This field displays the latest date a task can start without delaying the project finish date. Date and Time Not recommended

Top

If you are using your own Task List with Task Master, or if you are upgrading to a new version of Task Master, the following columns are added after you click Upgrade in the tool pane.

New Columns Added Column Type
% Work Complete Number (Percentage)
Actual Work Number
Assignment Units Number (Percentage)
Constraint Date Date and Time
Constraint Type Choice
Days Overdue Bamboo Days Overdue Column
Duration Bamboo Duration Column
Early Start Date and Time
Early Finish Date and Time
Late Start Date and Time
Late Finish Date and Time
Milestone Yes/No
Parent Task Lookup
Predecessor Task Lookup
Remaining Work Number
Schedule Status Bamboo Task Status Indicator Column
Total Slack Number
WBS WBS Type
Work Bamboo Duration Column

Top

If you are using your own Task List with Task Master, or if you are upgrading to a new version of Task Master, the following hidden columns are added after you click Upgrade in the tool pane. These columns are required in order for Task Master to compute based on the business logic.

New Columns Added Description Column Type
BSC_Start_Minutes Hidden Column Number
BSC_End_Minutes Hidden Column Number
BSC_Working_Hour_Mode Hidden Column Boolean
BSC_IsRecalculated Hidden Column Boolean
BSC_Old_StartDate Hidden Column DateTime
BSC_Old_DueDate Hidden Column DateTime
BSC_Old_Duration Hidden Column Number
BSC_Old_Work Hidden Column Number
BSC_Old_Resource Hidden Column Text
BSC_Old_AssignmentUnits Hidden Column Number
BSC_Old_TotalAllocation Hidden Column Number
BSC_Old_CalculateType Hidden Column Text

Top

Return to Configuration Overview