Skip to content
1.877.226.2662[email protected]
  • Open a Support Ticket
  • View by Category
  • Knowledge Base
  • Ticket Manager
  • Log a Support Ticket

Bamboo Solutions

Product Documentation

Document Category: Common Topics

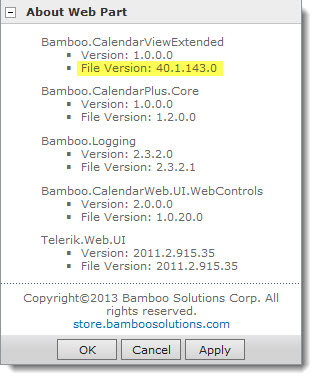
What version of Telerik Components are deployed by Bamboo Products?

What version of Telerik Components are deployed by Bamboo Products?

The Q1 (2017) Cumulative Update for Bamboo products, released in April 2017, updates the Telerik version used in all Bamboo component products that use Telerik:

Telerik Library Version deployed for SP2013/SP2016 Version deployed for SP2010
Telerik.Web.UI 2016.3.1027.45

(previously, version 2012.3.1016.35 was deployed)
2016.3.1027.35

(previously, version 2011.2.915.35 was deployed)
Telerik.Web.UI.Skins 2016.3.1027.45

(previously, version 2012.3.1016.35 was deployed)
2016.3.1027.35

(previously, version 2011.2.915.35 was deployed)

Icon-Warning IMPORTANT: The new Telerik assemblies are deployed from Bamboo.Framework.wsp. Some Bamboo component products may error if there are older and/or newer versions of Telerik assemblies in the SharePoint environment.

To fix errors caused by multiple Telerik versions deployed on your SharePoint farm, add an assembly redirect in your web.config file for each web application. See an example below and refer to How to Add a web.config Modification Using PowerShell for details.

<configuration>
...  
<runtime>
<assemblyBinding xmlns="urn:schemas-microsoft-com:asm.v1">   
...
<dependentAssembly>
<assemblyIdentity name="Telerik.Web.UI" publicKeyToken="121fae78165ba3d4" culture="neutral" /> 
<bindingRedirect oldVersion="2012.3.1016.35" newVersion="2016.3.1027.45" /> 
</dependentAssembly>   
</assemblyBinding>     
</runtime>
...
</configuration>  

What is left behind after uninstalling?

What is left behind after uninstalling?

After uninstalling a Bamboo product, you may see one or more of the following solutions remain on your farm…

SharePoint 2007 SharePoint 2010 SharePoint 2013
What’s left
  • Bamboo.AJAXExtensions.wsp
  • Bamboo.core.wsp
  • Bamboo.core
  • Bamboo.core.v1.wsp
  • Bamboo.core.v2.wsp
Why? Bamboo.core.wsp is left behind because it put specific versions of the Telerik.web.ui and Telerik.web.ui.Skins assemblies into the GAC. You may have other Bamboo products remaining on your farm that use these Telerik assemblies. If this solution is removed, those other products would cease to work properly See the note under SharePoint 2007 See the note under SharePoint 2007
How to get rid of it Please contact Bamboo Support should you wish to perform an AJAX uninstall. See How to uninstall Bamboo.core.v1.wsp from your SharePoint farm

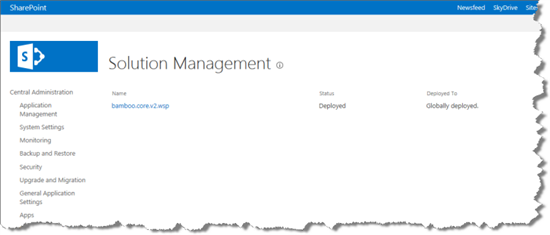
From SharePoint Central Administration, from the Manage Farm Solutions page, Retract the solution and then Remove it.

No additional steps are required.

Using the Setup program to Uninstall

Using the Setup program to Uninstall

Icon-WarningIMPORTANT: As of April 2017, Bamboo no longer includes Setup progra, in product download packages. An updated uninstall script is included instead. Please seeOverview of the Updated Installation Process for Bamboo components and Uninstalling using the updated process for details.

Before uninstalling a Bamboo web part product, be sure to delete the web part from all pages where it was used. If you forget to do this, your users will see errors on those pages after you uninstall.

Step Action
1.

Stop the World Wide Web Publishing Service (W3SVC) of you are not using Claims Based Authentication (CBA) or SP2013. This will ensure that files that need to be removed during the install are not locked.

From the Start menu on the SharePoint server desktop, click Administrative Tools > Services. Scroll down and right-click on World Wide Web Publishing Service and select Stop.

If you are using CBA or SP2013, stop the App Pool(s) to ensure that files are not locked.

2. Locate the installation files used to install the product. Double-click the Setup.bat program included in the main folder. Select the product in the Components section in the Setup program. Verify the installation location and required permissions and then click Install.
3. Click Next to begin the uninstall. Verify that the system checks pass successfully and click Next.
4. In the Repair, Remove or Install screen, select the Remove All option and click Next. Wait while the components are uninstalled.
5. When uninstallation is complete, click Next to review the summary screen and confirm that the product removal was successful. Click Close.
6. If there are additional components in the Components list in the Setup program, follow steps 2-5 above for each component.
7. If you stopped the World Wide Web Publishing Service, restart it.
From the Start menu on the SharePoint server desktop, click Administrative Tools > Services. Scroll down and right-click on World Wide Web Publishing Service and select Start.

Use the provided .lic file to extend your product’s trial period

Use the provided .lic file to extend your product’s trial period

Your Bamboo Account Manager may send you a *.lic file to use to extend your Bamboo product trial. The *.lic file needs to be placed in the folder on each WFE server where the product activation DLL resides. For SharePoint 2010 or SharePoint 2013, this is typically the Global Assembly Cache (GAC).

If you receive one, follow these instructions to install it.

Step Action
1.

It is not possible to copy the *.lic file directly to the GAC. Instead, you will copy it to the gac_msil folder. On the SharePoint WFE server, from the Run command, enter

%systemroot%assemblygac_msil 

Verify that you see the activation DLL for your Bamboo product listed. See Listing of Bamboo Solutions Web Parts and their associated Activation DLLs for details.

2. Copy and paste or drag and drop the .lic file into the gac_msil folder.
3. Repeat steps 1-2 for each WFE server in the farm.
4.

If a trial expired error was surfacing, browse to the site and refresh the page. The error should disappear once the .lic file is copied successfully to each WFE server.

If you weren’t getting a trial expired error, you can verify the license was successfully extended by checking the status of your trial. See How to check the status of your trial license for more information.

Icon-WarningIMPORTANT: When you license this product after purchase, you will need to remove the *.lic file used to extend the trial as it may impact the license activation process.

5. If the expired license message doesn’t go away, it could mean that the assembly file for the product you are trialing is in the Global Assembly Cache (GAC) rather than the /bin. This more typical for SP2010/2013 than for SP2007. In this case, the *.lic file needs to be added to the GAC.

Upgrading your Bamboo Web Part

Upgrading your Bamboo Web Part

Migrating in this documentation refers to moving from one version of SharePoint to another. Upgrading, on the other hand, refers to updating your Bamboo product to a newer release.

IMPORTANT: If you are migrating from one version of SharePoint to another version (i.e., SharePoint 2007 to SharePoint 2010), please see the topics under Migrating to a new SharePoint version…. You may need to upgrade the Bamboo products on your SharePoint farm before migrating.

To upgrade from a previous release of this product, perform the following upgrade procedure:

Step Action
1. Review Best practices for a successful install to learn which servers to install on and what services to stop or restart. These steps apply if you are upgrading or installing for the first time.
2. Locate the product installation files. If you are upgrading, you may have downloaded a new version from the My Bamboo area of the Bamboo Solutions web site. If you just unpacked a new version, the Setup.bat will run automatically. Otherwise, double-click the Setup.bat program included in the root directory of the Installation Files. See About the Installation Files.
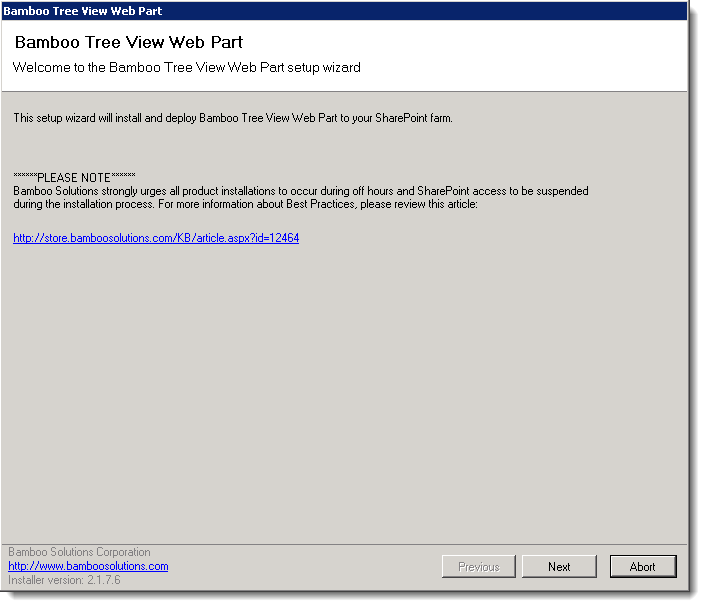
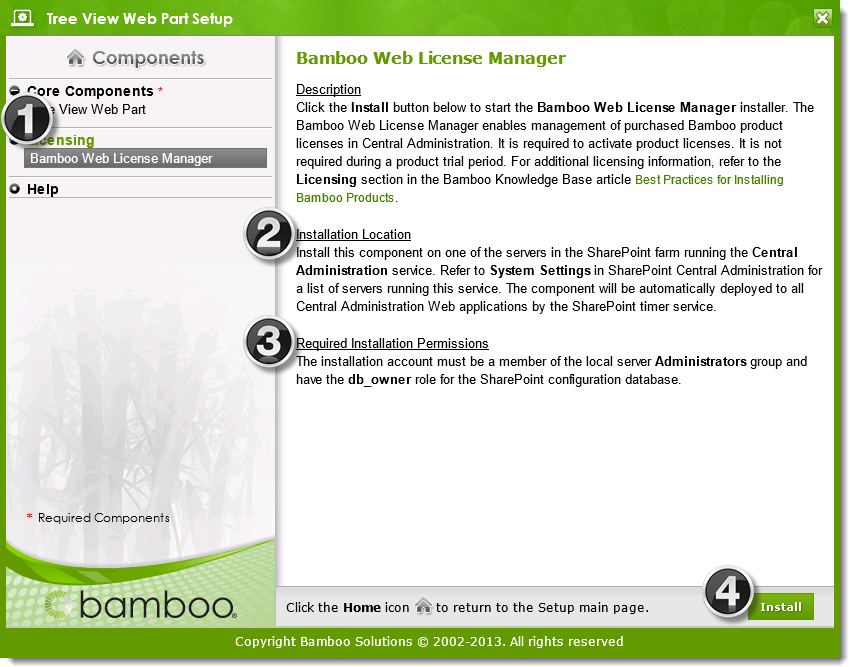
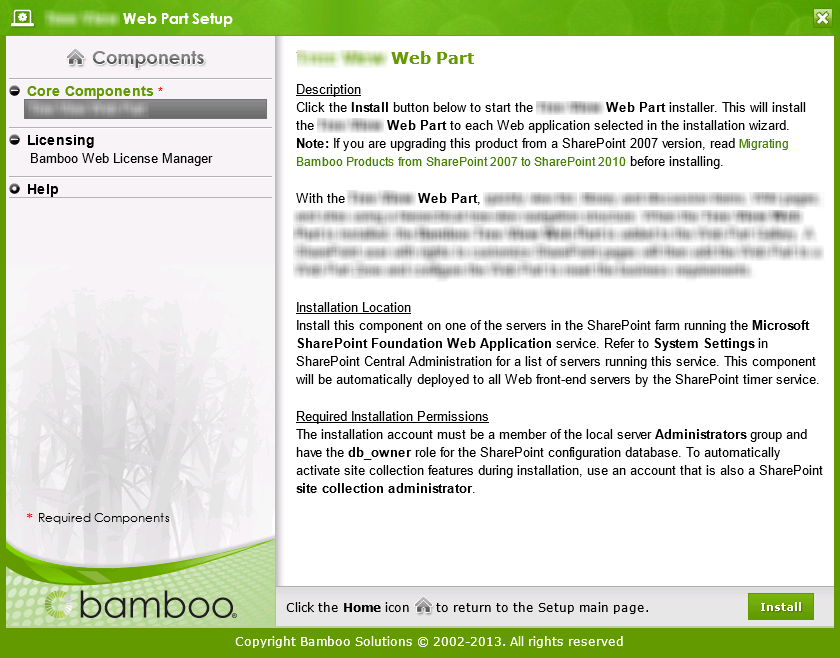
3. web part install screen 1.pngSelect the first product component in the Components section in the Setup program. When a component is selected, information specific to it is displayed on the right side of the interface. Verify the Location of Install Files and Required Installation Permissions. When ready, click Install. The installation program starts. It is a step-by-step wizard. The example screen shot shown is for the Tree View Web Part, but most Bamboo product installs look similar.
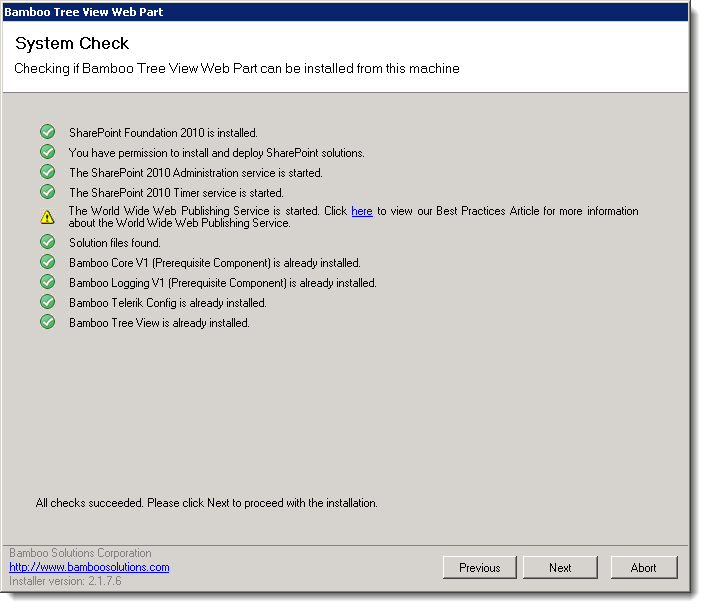
4. web part upgrade screen 2.pngClick Next to begin the upgrade. Verify that the system checks pass successfully and click Next. If the system checks do not pass, you will not be able to proceed.

Notice in the screen shot above that it will be possible to proceed if the World Wide Publishing Service is started, although a yellow warning icon is displayed. If you are running with Claims Based Authentication (CBA) or if you are installing on SharePoint 2013, you need to keep this service on in order to automatically activate features during the install. Other than these scenarios, we strongly recommend that you stop this service before installing or upgrading. See Recommendations for a successful intstall for more information.

5.

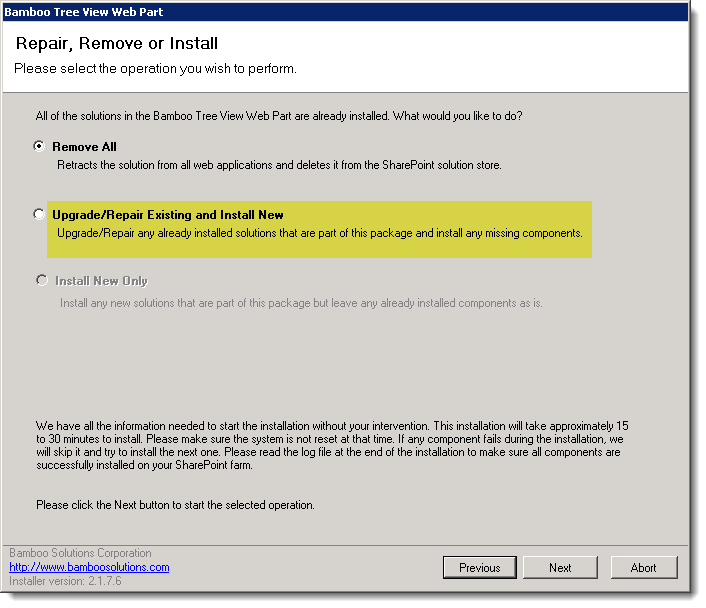
web part upgrade screen 3 with highlight.pngIn the Repair, Remove or Install screen, select the Upgrade/Repair Existing and Install New option and click Next.

Wait while the components are upgraded. You will see progress displayed on the screen.

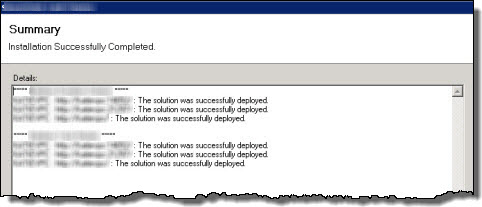
6. kb12464_InstallSummary.jpgWhen the upgrade is complete, click Next to review the Summary screen and confirm that the product upgrade was successful. You may need to scroll up to review the entire summary. When satisfied, click Close.
7. If there are additional components listed in the Setup program, repeat steps 3-6 for each.
8. When all the component upgrades have been completed successfully, be sure to restart the World Wide Web Publishing Service if it was stopped.

Upgrading using the updated process

Upgrading using the updated process

Overview of the Updated Installation Process

In April 2017, with the Q1 Cumulative Update (CU) Bamboo introduced updated install/uninstall processes for component products (web parts). For more information about why this was introduced, please see Overview of the Updated Installation Process for Bamboo components

To upgrade a Bamboo product using the updated install process, please follow these steps (Warning.. Upgrades should be performed in Non-Peak hours as your farm will temporarily go offline)::

No. Function
1. Download the install package from downloaded from My Bamboo.
2. Extract the contents of the package.
3.

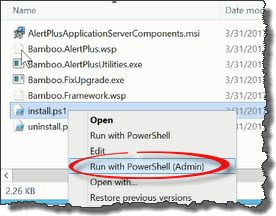
run with PowerShell Admin.jpgRun the Install.ps1 from a WFE server in PowerShell as an admin.

Icon-Tip The install.ps1 script is used to install a new product or uppgrade an existing product.

4.

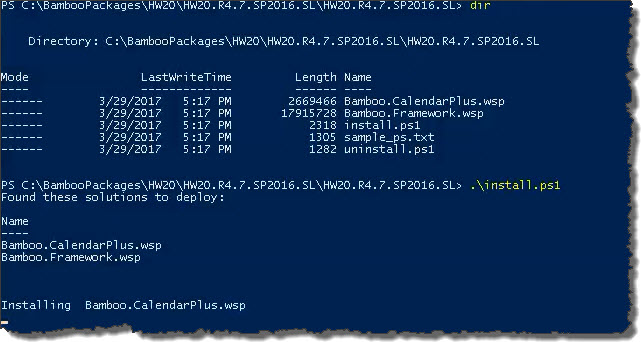
updating Chart Plus1a.jpgThe script will look for WSPs in the install folder and list those found.

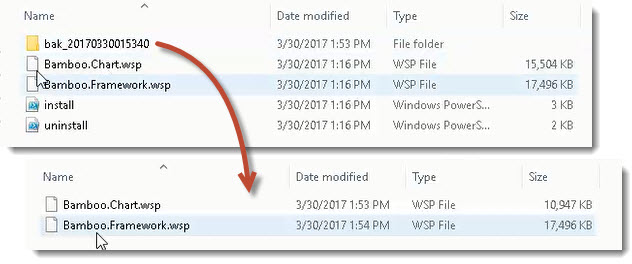
Next, it will check to see if those solutions are already installed on the farm. If so, the installed solutions will be saved to a backup folder before proceeding. The folder will be named bak_2017033015340 where the number represents the datetime the backup was created. This will provide the capability to rollback if the upgrade doesn’t conclude as expected.

Rather than deploying the solution immediately, the script schedules deployment time for 1 minute in the future so multiple upgrades won’t collide.

Icon-Tip If a solution was previously deployed, the script uses Update-SPSolution to update it since that cmdlet is fast and reliable.

5.

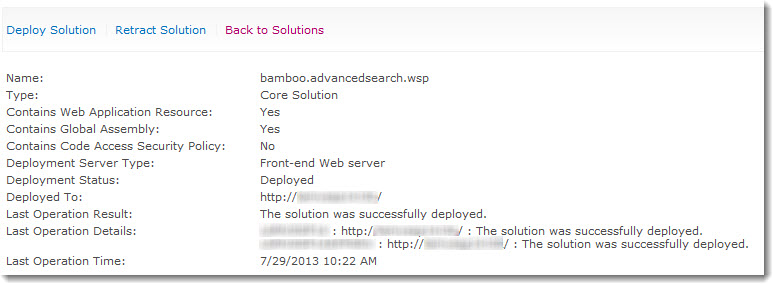
deployment status.jpgWhen the deployment completes, deployment status information will be displayed for each solution.

Check Central Administration to confirm deployment completion.

6. If the upgrade doesn’t conclude as expected, you can easily rollback the install by simply copying the install.ps1 file to the bak folder created during the upgrade and running it from there as an Administrator.

bak folder1.jpg

Uninstalling using the updated process

Uninstalling using the updated process

Overview of the Updated Installation Process

In April 2017, with the Q1 Cumulative Update (CU) Bamboo introduced updated install/uninstall processes for component products (web parts). For more information about why this was introduced, please see Overview of the Updated Installation Process for Bamboo components

To uninstall using the updated process, please follow these steps:

No. Function
1. Download the install package from My Bamboo.
2. Extract the contents of the package.
3. Run the Uninstall.ps1 from a WFE server in PowerShell as an admin.
4.

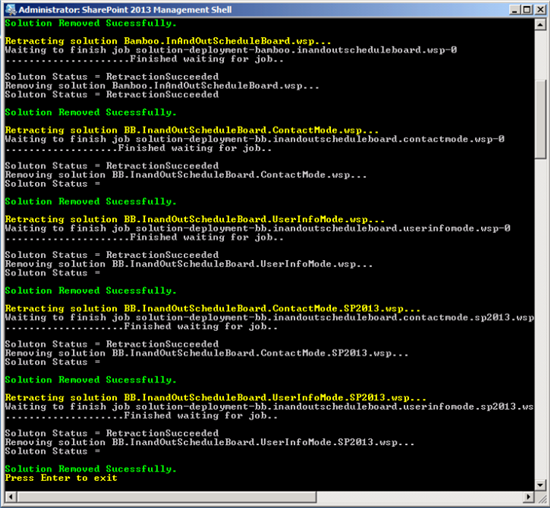
uninstall.jpgThe script will look for WSPs in the install folder and list those found. It will uninstall them in alpha order.

Rather than removing the solution immediately after its retracted, the script schedules deployment time for 1 minute in the future so multiple installs won’t collide.

Icon-Warning IMPORTANT: The script does not uninstall Bamboo.framework.wsp because it is a shared component and needed by other Bamboo components that are still installed. If you do not have other Bamboo products insalled on the farm, you can comment out the part of the script that skips the Bamboo.Framework.wsp.

5. When the retraction completes, check Central Administration to confirm retraction completion.

Uninstalling from SharePoint Central Administration

Uninstalling from SharePoint Central Administration

NOTE: You need to be a machine administrator in order to Retract and remove a solution via Central Administration.

Step Action
1.

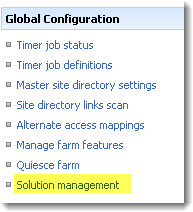
In SharePoint Central Administration, go to the Manage Farm Solutions page (its called Solution Management in SharePoint 2007).

In SP2010, click System Settings > Manage Farm Solutions.
SP2010 manage farm solutions.jpg
In SP2007, click Operations > Solution Management.
2007 solution management.jpg

2. Solutions are listed alphabetically. Find the solution you need to uninstall and click its Name. The solution status will be displayed.
NOTE: The image below is from SharePoint 2010, but solution status from SP2007 and SP2013 look very similar.

SP2010 solution status.jpg
If the solution is deployed, you will see a Retract Solution link at the top of the page. If the solution is not deployed, you will see a Remove Solution link.
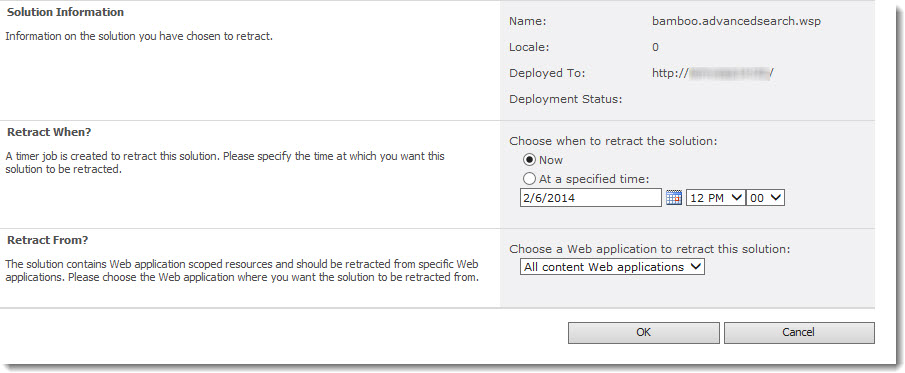
3. Retract the solution from all web applications.
SP2010 solution status1.jpg
Choose to retract now, or schedule it to occur at a particular time. Choose to retract from All content Web applications. Click OK when ready.
NOTE: IF you are not a machine administrator, you may see an Access denied error. Make sure you have the appropriate permission level before attempting to retract a solution.
4. Remove the solution. Once a solution has been retracted, the Remove Solution link is shown.
2010 remove solution.jpg
Click Remove Solution to remove the solution.

Troubleshoot Problems with Deploying Farm Solutions

Troubleshoot Problems with Deploying Farm SolutionsTop

This topic applies to:

  • WSS 3.0 and MOSS 2007
  • SharePoint Foundation 2010/2013 and SharePoint Server 2010/2013/2016

Several issues and their corresponding solutions are described below. Click the link to jump to the appropriate issue.

  • Issue 1: Copying or Removing Assemblies
  • Issue 2: Deployment Fails or Times Out
  • Issue 3: Copying a File Failed
  • Issue 4: Resources Scoped for one Web App must be deployed to more Web Apps
  • Issue 5: Cannot Find a Certain File

Issue 1: Copying or Removing Assemblies

With SharePoint 2010 and 2013, we sometimes see failures when trying to copy assemblies to the Global Assembly Cache (GAC) or remove assemblies or other files from the bin or 14 or 15 hive during solution retraction and/or deployment.

Resolution:

  1. Restart the SharePoint 2010/2013 Administration service on all of the Web Front End servers (all servers on the farm where the Foundation Web Application service is running).
    Restart the SharePoint 2010/2013/2016 Timer service as well.

Icon-Warning NOTE: The SharePoint Administration service carries out the actual removing and adding of files during deployment. Restarting the service works most of the time because the service should release the handle on a file. However, if the Administration service does not release the handle on the file, then deployment can fail. Restarting the timer service on SharePoint 2010/2013 will restart all SharePoint 2010/2013 timer jobs and you will need to delay installation for a while, until all of those jobs have had a chance to complete.

  1. Remove the solution.

  2. Reinstall the solution.

For more information, see:
http://msdn.microsoft.com/en-us/library/aa544500.aspx
Top

Issue 2: Deployment Fails or Times Out

Deployment fails, and the reason is not clear from the error shown in installation feedback (or just shows time out errors), or the Bamboo GUI installer appears to stop in the middle of the deployment, and eventually times out.

The Timer Job Definitions in Central Administration may show one or more persistent “one time” timer jobs listed.

Manual installations using stsadm also fails to complete the installation.

Resolution:

  1. Delete the one-time timer jobs listed in the timer job definition list. Restart the SharePoint 2010/2013 Timer service on each server in the farm running the Foundation Web Application service.
    Try the installation again.

  2. Any solutions that show up in on the Solution Management page in Central Administration with a status of “undeployed” or “error” need to be either deployed manually in Solution Management, or removed, if you are going to run the Bamboo GUI installer. For more information, see Installation stops at the Repair Remove or Install screen

  3. Run the stsadm installation using the -local rather than the -immediate parameter for stsadm -deploysolution. This will not invoke the timer service. As stated in this Technet article:

-local “Deploys the solution synchronously on the local computer only. The timer service is not used.”

  • You will have to run the deploysolution with the -local parameter on each server running the Windows SharePoint Services Web Application service or Foundation Web Application service.

  • For more information about deploysolution, see:
    Deploysolution: Stsadm operation (Office SharePoint Server)

For more information about which server is running the Windows SharePoint Services Web Application Service, look in Central Administration:
– on SP 2007 in Operations > Servers in Farm
– on SP 2010 in System Settings > Manage Servers in this Farm

  1. Clear the SharePoint Configuration cache. The Web Front End servers may be out of sync. For more information and instructions see Clear the SharePoint Configuration Cache for Timer Jobs.

If you experience issues with WSS and MOSS timer jobs failing to complete are receiving errors trying to run psconfig, clearing the configuration cache on the farm is a possible method for resolving the issue. The config cache is where we cache configuration information (stored in the config database) on each server in the farm. Caching the data on each server prevents us from having to make SQL calls to pull this information from the configuration database. Sometimes this data can become corrupted and needs to be cleared out and rebuilt. If you only see a single server having issues, only clear the config cache on that server, you do not need to clear the cache on the entire farm.

To clear the cache a single server, follow the steps below on just the problem server.

  1. Stop the OWSTIMER service on ALL of the MOSS servers in the farm.
  2. On the Index server, navigate to:

    Server 2003 location: Drive:Documents and SettingsAll UsersApplication DataMicrosoftSharePointConfigGUID and delete all the XML files from the directory.
    Server 2008 location: Drive:ProgramDataMicrosoftSharePointConfigGUID and delete all the XML files from the directory.

  3. Delete all the XML file in the directory.

NOTE: ONLY THE XML FILES, NOT THE .INI FILE.

  1. Open the cache.ini with Notepad and reset the number to 1. Save and close the file.
  2. Start the OWSTIMER service on the Index server and wait for XML files to begin to reappear in the directory.
  3. After you see XML files appearing on the Index server, repeat steps 2, 3 & 4 on each query server, waiting for XML files to appear before moving to subsequent servers.
  4. After all of the query servers have all been cleared and new .xml files have been generated, proceed to the WFE and Application servers in the farm, following steps 2, 3, 4 and 5 for each remaining server.
    Top

Issue 3: Copying a File Failed

This is the error message that you get: “Copying of this file failed. This operation uses the SharePoint Administration service (spadmin), which could not be contacted. If the service is stopped or disabled, start it and try the operation again.”

Resolution:

For instructions and more information, see this MSDN article.
Top

Issue 4: Resources Scoped for one Web App must be deployed to more Web Apps

This is the error message that you see: “This solution contains resources scoped for a Web application and must be deployed to one or more Web applications.”

Resolution:

Usually this can be resolved by running the Bamboo GUI installer, removing the product, and then reinstalling it.

We have also found that if the solution is showing up in the Solution Management page as installed but not deployed, you can try to run a manual deployment using stsadm.

See Best Practices for Installing Bamboo Products

Also see MSDN Issues Deploying SharePoint Solution Packages
Top

Issue 5: Cannot Find a Certain File

After an apparently successful deployment, you see errors about not being able to find file(s) when attempting to view products on a page.

Resolution:

Be sure to exclude directories such as %systemroot%Program FilesCommon FilesMicrosoft SharedWeb Server Extensions from file level antivirus scanning, or you may find that files that were deployed in that directory will be removed when the antivirus scan runs.

For more information, see this TechNet article.
Top

The Bamboo Web License Manager does not show up in Central Administration. How do I fix that?

The Bamboo Web License Manager does not show up in Central Administration. How do I fix that?

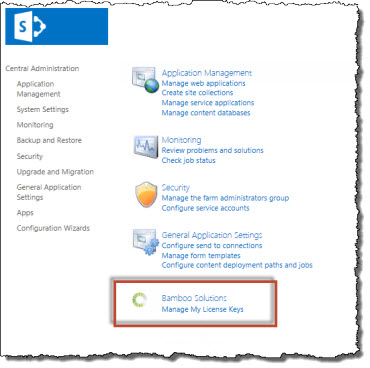
The Manage My License Keys link is only displayed in SharePoint Central Administration if the Bamboo Web License Manager Web application feature has been installed and activated.

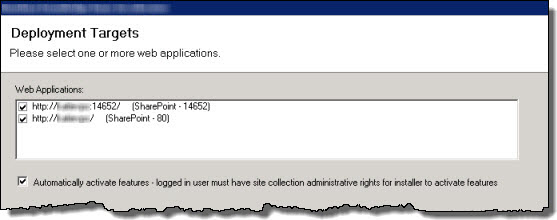
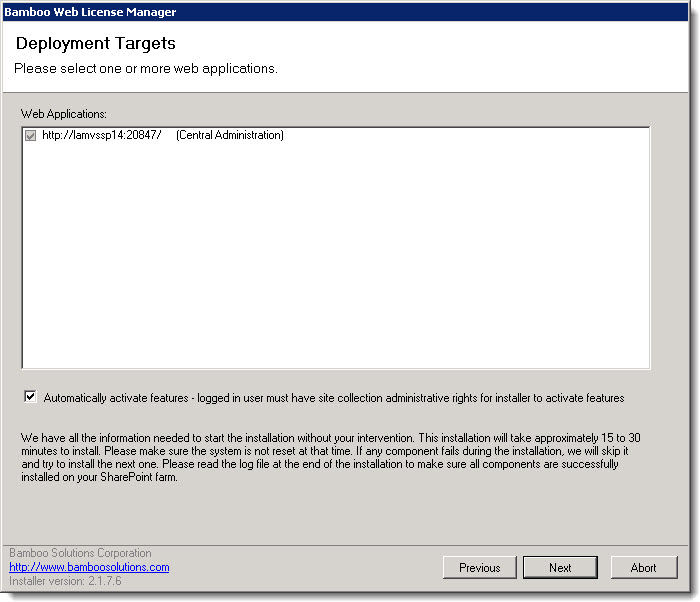
During the installation of the Bamboo Web License Manager, on the Deployment Targets step, the option to automatically activate features is enabled by default. If this checkbox was deselected, the Bamboo Web License Manager feature will not be activated automatically after it is installed and you will need to activate it manually by following the steps below.

Step Action
1. Access SharePoint Central Administration as a member of the SharePoint Farm Administrators group.
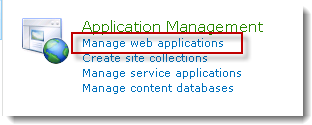
2. On the Central Administration home page, select Manage web applications in the Application Management section.
CA App Mgmt.png
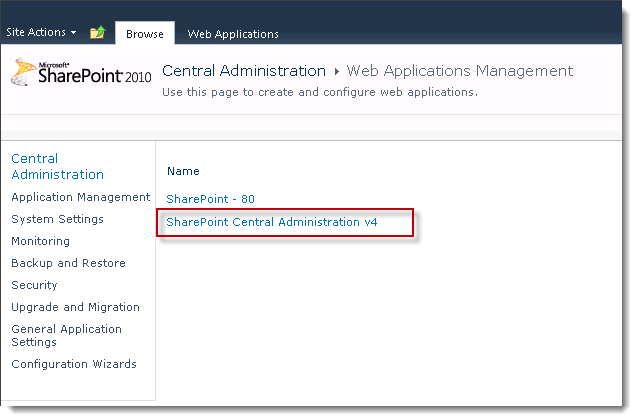
3. In the Web Applications Management page, click the SharePoint Central Administration v4 web application.
CA Web App Mgmt.png
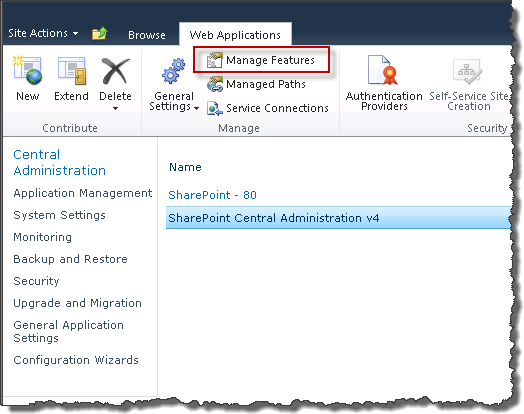
4. Notice that the Web Applications ribbon appears. Click the option Manage Features in the ribbon.

CA Web App features.png
The available features are listed.

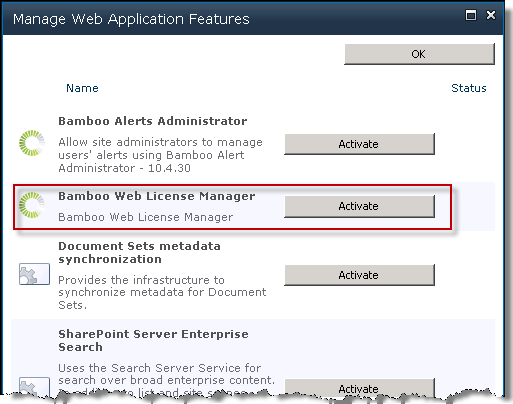
5. Locate Bamboo Web License Manager feature and click Activate.

WLM feature active.png

System Requirements

System Requirements

SharePoint 2010 SharePoint 2013 SharePoint 2016
Operating System Microsoft Windows Server 2008 64-bit edition of Windows Server 2008 R2 Server Pack 1

OR

64-bit edition of Windows Server 2012 Standard or Datacenter

64-bit edition of Windows Server 2012 R2 Standard or Datacenter

For database server: 64-bit edition of Microsoft SQL Server 2014 Service Pack 1 (SP1)

SharePoint Version Microsoft Windows SharePoint Foundation 2010

OR

Microsoft Office SharePoint Server 2010

Microsoft SharePoint Foundation 2013

OR

Microsoft SharePoint Server 2013

Microsoft SharePoint Server 2016
Browser Microsoft Internet Explorer 8 or higher Microsoft Internet Explorer 8 or higher Microsoft IE 10 or higher

Cross Browser Support:

All products are tested to work with IE 8 and higher.

Not all Bamboo products support all browsers that SharePoint 2016 supports. The products listed below offer cross-browser support for the following: Microsoft Edge, latest version of Google Chrome, latest and immediate previous release of Mozilla Firefox, and latest release of Apple Safari.

  • Chart Plus
  • Tree View
  • Discussion Board Plus

Note: Bamboo products are not supported in an IIS Web garden configuration.

Some of our products which are not Web Parts are installed on an individual’s desktop or laptop. Examples are List Bulk Import and User Profile Sync. The requirements for these products are dependent on the operating system on which they are used.

Operating System Windows Vista (32-bit or 64-bit)
Windows 7 (32-bit or 64-bit)
Windows 8 (32-bit or 64-bit)
– Windows Identity Foundation 3.5
Windows Server 2003 or 2008 (32-bit or 64-bit)
Windows Server 2012 (64-bit)
– Microsoft .NET Framework 3.5
Windows 10 (32-bit or 64-bit)
– Windows Identity Foundation 3.5
Server

SharePoint 2013:

  • SharePoint Foundation 2013 or SharePoint 2013

SharePoint 2010:

  • SharePoint Foundation 2010 or SharePoint 2010

SharePoint Release 3:

  • Microsoft Windows SharePoint Services v3 or Microsoft Office SharePoint Server 2007

SharePoint Online

  • Microsoft 365, Multi-Tenant Hosting and Built-in Authentication

What Site Collection Features are associated with my Bamboo product?

What Site Collection Features are associated with my Bamboo product?

For information about how to activate a SharePoint Site Collection Feature, see Activating a Bamboo Site Collection Feature. If you know how to activate, but just aren’t sure which site collection feature goes with which product, see the table below.

If you are wondering about Site Features, rather than Site Collection Features, see How to activate a Bamboo site feature.

See also: Bamboo Feature Needs to be Activated.

Product Site Collection Feature Name Mandatory?
Alert Plus Bamboo Alert Plus Web Part Yes
Calendar Plus Bamboo Calendar Plus Web Part Yes
Chart Plus Bamboo Chart Plus Web Part Yes
Column Level Security Bamboo Column Level Security Column No
Community Central Bamboo Community Central Add Blog Comment Web Part
Bamboo Community Central Content Types
Bamboo Community Central Reporting Web Parts
Bamboo Community Central Search Result
Bamboo Community Central Supporting Web Parts
Yes
Cross List Bamboo Cross List Web Part Yes
Cross Site Display Bamboo Cross-Site Display Web Part Yes
Custom Identifier Column Bamboo Custom Identifier Column No
Data-Viewer Bamboo Data-Viewer Web Part Yes
File Share Library Bamboo File Share Library Yes
Filters Collection Bamboo SharePoint Filters Yes
Grants Management Bamboo Grant Master Site Template
Bamboo Grant Project Site Template
Yes
Group Email Bamboo Group Email Web Part Yes
Group Redirect Bamboo Group Redirect Yes
Hello Bamboo Hello Web Part Yes
In/Out Schedule Board Bamboo In and Out Schedule Board
Bamboo Solutions – SharePoint In/Out Schedule (is this old?)
Yes
Knowledge Base Bamboo KB Accelerator Reporting WebPart
Bamboo KB Admin Site Template
Bamboo KB Admin Site Template R2
Bamboo KB Client Site Template – Meeting Workspace
Bamboo KB Client Site Template – Team Site
Bamboo KB Client Site Template R2
Bamboo Knowledge Base Accelerator
Bamboo SharePoint Secure Trim Web Part
see bolded
KPI Column Bamboo KPI Column
Bamboo KPI Column Display WebPart
see bolded
List Consolidator Bamboo List Consolidator Web Part Yes
List Print Bamboo List Print Yes
List Rollup

Bamboo List Rollup Web Parts
Bamboo List Rollup XSLT Data View

NOTE: In releases prior to R7.x, the farm solutions listed below were included in the List Rollup:

Bamboo List Rollup Classic Edition
Bamboo List Rollup Grid View
Bamboo List Rollup Schema Designer

The individual web parts are still available in R7.x, just now bundled into the single site collection feature called Bamboo List Rollup Web Parts

see bolded
List Rotator Bamboo List Rotator Web Part Yes
List Search Bamboo List Search Advanced Web Part
Bamboo List Search Simple Web Part
Yes
Lookup Selector Column Bamboo Lookup Selector No
Mini-Calendar Bamboo Mini-Calendar Web Part Yes
My Alerts Organizer Bamboo My Alerts Organizer Yes
Navigators Bamboo Navigator Site Action Menu
Bamboo Navigator Web Parts
Yes
Project Management Central

Bamboo Gantt Chart Web Part
Bamboo PM Central Department Level Site – Lite
Bamboo PM Central Projects Site Creation Area
Bamboo PM Central Top Level Site – Lite Template
Bamboo PM Project Site – Lite Template
Bamboo PM Project Site – Stand-alone template
Bamboo Project Central Content Types
Bamboo Project Central Supporting Web Parts

Icon-Tip PM Central installation files include a utility (called the Bamboo Feature Activation Tool) that will automate the activation of Site Collection features needed for PM Central. Using this utility will be MUCH easier than activating everything manually.

see bolded
Poll Bamboo Poll Admin Web Part
Bamboo Poll Voting Web Part
Yes
Project Portfolio Dashboard Bamboo Project Dashboard Data Mapping
Bamboo Project Portfolio Dashboard
see bolded
Rating Column Bamboo Rating Web Part Yes
Rich Text Column Bamboo Rich Text No
Site Creation Plus Bamboo Site Creation Plus Yes
Task Master Bamboo Task Master Yes
Team Calendar Bamboo Team Calendar Yes
Time Tracking and Management Bamboo Time Tracking and Management Reporting Web
Part
Bamboo Time Tracking and Management Site Template
Bamboo Time Tracking and Management Web Parts
Yes
Tree View Bamboo Tree View Web Part Yes
User Account Setup Bamboo User Account Setup Web Part Yes
User Directory Bamboo User Directory Web Part Yes
User Profile Plus Bamboo User Profile Plus yes
User Redirect Bamboo User Redirect Yes
Validator Column Bamboo Validator Column Yes
Virtual Map View Bamboo Virtual Map View Web Part Yes
Visual Indicator Column Bamboo Visual Indicator Yes
Wiki Publisher Bamboo SharePoint Wiki Publisher Yes
Workflow Conductor Bamboo Workflow Conductor Feature Manager
Bamboo Workflow Conductor Studio
Bamboo Workflow Conductor Web Parts
Bamboo Workflow Conductor Widgets
Bamboo.StartWorkFlow.wsp
see bolded
World Clock and Weather Bamboo World Clock And Weather Web Part Yes

Required Installation Permissions

Required Installation Permissions

The installation account must be a member of the local server Administrators group and have the db_owner role for the SharePoint configuration database.

To automatically activate site collection features during installation (optional), use an account that is also a SharePoint site collection administrator.

If the installation account is not a Site Collection Administrator for all site collections in a web application, then you should choose to not automatically activate the solution during the installation. Site Collection Administrators can activate the solution when they are ready to use it in their site collection.

How to modify a web.config file using PowerShell

How to modify a web.config file using PowerShell

Background

Some custom SharePoint products make changes to the web.config file of a web application via SPWebConfigModification calls in order to support particular features. There is a web.config file for each web application on your farm and they reside on each WFE server. If your farm has 3 WFE servers and 2 web applications, you have 6 web.config files.

  • For SharePoint 2010, Bamboo product installs may add entries to the web.confg to support Telerik functionality. Telerik is a 3rd party that provides some user interface controls for some Bamboo products. See Bamboo products that use Telerik for a list.

  • For SharePoint 2007, Bamboo product installs may add entries to the web.confg to support Telerik and AJAX functionality. We use AJAX to allow web applications to send data to, and retrieve data from, a server asynchronously (in the background) without interfering with the display and behavior of the existing page. See Bamboo products that use AJAX for more information.

At times, some of these changes need to be modified (via additions to the web.config), or partially removed for particular web applications on your SharePoint farm.

It is neither recommended nor a best practice to manually update a web.config file. Manual changes are not tracked by SharePoint in the configuration database; as such, they will likely cause future problems for users on the farm. For example, when creating a new web application, the new web.config is generated automatically by SharePoint and the auto-generated file will not include any changes that were made manually.

Resolution

Use PowerShell to programmatically remove or add web.config modifications so that changes are updated in the configuration database as well as on the server(s). An added benefit of making changes via PowerShell is that SharePoint will propagate the changes, so if you have 6 web.config files on your farm, you need to run the PowerShell script only once.

For more information, please see:

  • How to Remove a web.config Modification Using PowerShell
  • How to Add a web.config Modification Using PowerShell

Best Practices for a successful install

Best Practices for a successful install

Follow these guidelines to ensure a successful installation:

No. Function
1. Back up your system.
2. Make sure that your system meets the requirements listed in the System_Requirements section.
3.

Installing PM Central, Community Central, Grants Management, or other applications may upgrade some Bamboo components previously installed in your SharePoint farm. For example, PM Central includes the Data Viewer Web Part (among other things) and installing PM Central may upgrade the Data Viewer Web Part that you may have previously installed.

Before installing PM Central or another Bamboo application, make sure you understand the effect upgrading installed components will have on your existing solutions.

4. Before installing, review information about where to run the Setup program in Location of Install Files and the Required Installation Permissions. This information is shown on the Installation/Setup program interface, but is also available from the links above.
5. If you are upgrading an existing, installed product rather than installing it for the first time, read the information about Upgrading for the product you are interested in. The upgrade process is slightly different than installing for the first time.
6.

On all servers in the SharePoint farm where the solution will be deployed:

Go to Start > Administrative Tools > Services and stop or restart the following services:

  • Stop the World Wide Web Publishing Service on all servers. Do this step first because it prevents users from accessing sites during installation and files that may need to be updated from being locked.

Note: If your SharePoint environment is configured for Claims Based Authentication or is running SharePoint 2013 or SharePoint 2016, you should NOT stop the World Wide Web Publishing Service if you wish to automatically activate product features during installation. Read SharePoint 2010 solution deployment when Claims Based Authentication is configured for more information.

  • Restart the Microsoft SharePoint Foundation Timer service (called SharePoint Timer Service for SharePoint 2013 and 2016, SharePoint 2010 Timer service if you are using SharePoint 2010, or Windows SharePoint Services Timer service if you are using SharePoint 2007) on all servers. Do this step even if the service is currently running. It will ensure no files that may need updating are locked.
  • Restart the Microsoft SharePoint Foundation Administration service (called SharePoint Administration in SharePoint 2013 and 2016, SharePoint 2010 Administration service if you are using SharePoint 2010, or Windows SharePoint Services Administration service if you are using SharePoint 2007) on all servers. Do this step even if the service is currently running. It will ensure no files that may need updating are locked.
7. Review the Options for Installing.

Return to Installing for the first time

Overview of the Updated Installation Process for Bamboo components

Overview of the Updated Installation Process for Bamboo components

Options for Installing

In April 2017, with the Q1 Cumulative Update (CU) Bamboo introduced updated install/uninstall processes for component products (web parts). Instead of the Setup.exe Installation Application, we now supply two PowerShell scripts – one for Install/Upgrade and the other for Uninstall – to be used to install, upgrade, or uninstall the product. The install package downloaded from My Bamboo is now a *.zip file rather than a self-extracting executable.

The installation process was updated based on feedback from our customers. We are excited about the benefits the new processes offer:

Benefits
The processes are now very transparent; you know exactly what happens during the install/upgrade/uninstall. If you want/need to modify the scripts for your farm, you can do that.
If you are upgrading to a new version of a Bamboo product or if a new install updates a shared component used by another Bamboo product installed previously, the installed solution is saved before the upgrade. If the new install fails, you can easily rollback to the previously installed solution.
Rather than deploying each solution individually, deployments are queued which minimizes farm disruption by reducing the IIS Resets on the farm.
By design, the scripts are written to be compatible with PowerShell versions found on an SP2010 WFE server. Written to use the features of the older version of PowerShell, the scripts are simple and should work the same in all environments. If you would prefer to employ some PowerShell features available in new versions (e.g., output results to the grid/table), you can modify the scripts to use the PowerShell features available in your environment.

Please note the following for the new scripts:

  • The script installs all the WSPs found in the installation folder, in alpha order
  • The install/upgrade script deploys to all content web apps. If you would prefer to deploy to a single web app, you can modify the script or deploy via Central Administration.
  • Uses Upgrade instead of Install for existing components.

For additional information about how to use the updated processes:

  • Installing using the updated install process
  • Upgrading using the updated process
  • Uninstalling using the updated process

Overview of the Installation/Setup Program

Overview of the Installation/Setup Program

Options for Installing

Icon-WarningIMPORTANT: As of April 2017, Bamboo no longer includes the Installation/Setup Program in product download packages. Please see Overview of the Updated Installation Process for Bamboo components for details.

There are several areas of note in the Installation/Setup program interface, shown below.

2013_install overview.png
No. Function
1.

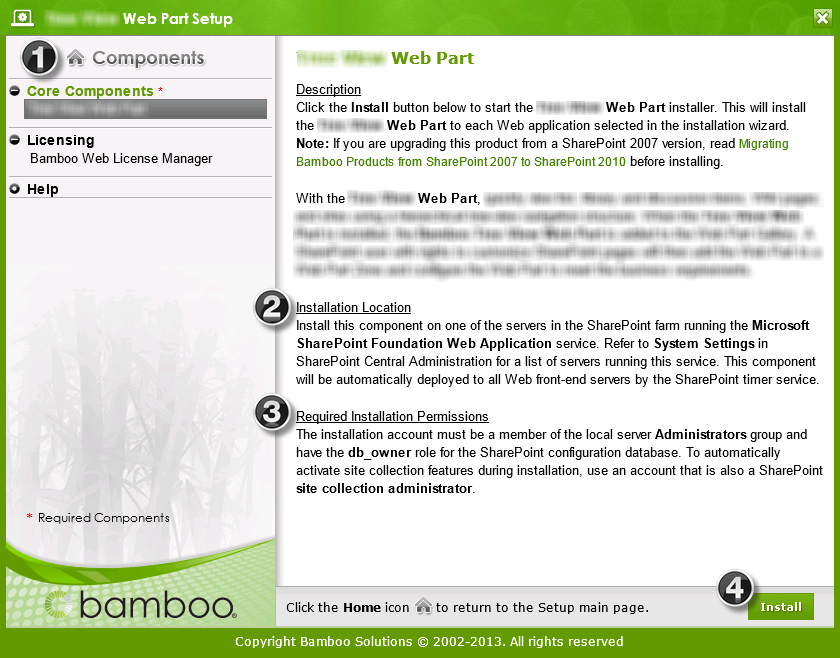
The Setup program contains links to various product components listed under the Components header on the left. Click on any of these links to view additional information about the component on the right.

The product components fall into the following categories:

  • Prerequisites: Some products include prerequisite components that must be installed before the Bamboo product core components. Not all products will have prerequisites. Examples of prerequisites include the Microsoft Exchange Web Services (EWS) Managed API, Shared Assemblies Library, Microsoft AJAX Extensions, and Bamboo AJAX Config. If you have more than one Bamboo product installed on your farm, some of the pre-requisites may already be installed.
  • Core Components: The product will include one or more core components that are required for the Bamboo product to work.
  • Optional Items: Optional items provide additional features or functionality but are not required to use the Bamboo product. Not all products will have optional items.
  • Licensing: All products will include the Bamboo Web License Manager or Bamboo License Manager. Licensing is required to activate a product license. It is not required during 30-day product trials. If you have previously installed the Bamboo Web License Manager with another Bamboo product, it may not be necessary for you to install it again.
  • Help: When clicking the Help component, you will see links for the Online Documentation and other product-related resources.

Click the Home icon (Install Home Icon.png) at the top of the components list to return to the Setup main page.

2. The Installation Location section will tell you where to run the Installation/Setup program for the selected component. Read this information carefully before proceeding.
3. The Required Installation Permissions section will explain required permissions for the selected component. Read this information carefully before proceeding. If the person running the installation/setup doesn’t have the appropriate level of permission, the install will fail.
4.

When ready, click the Install button to begin the installation process. It will

  • do a few system checks,
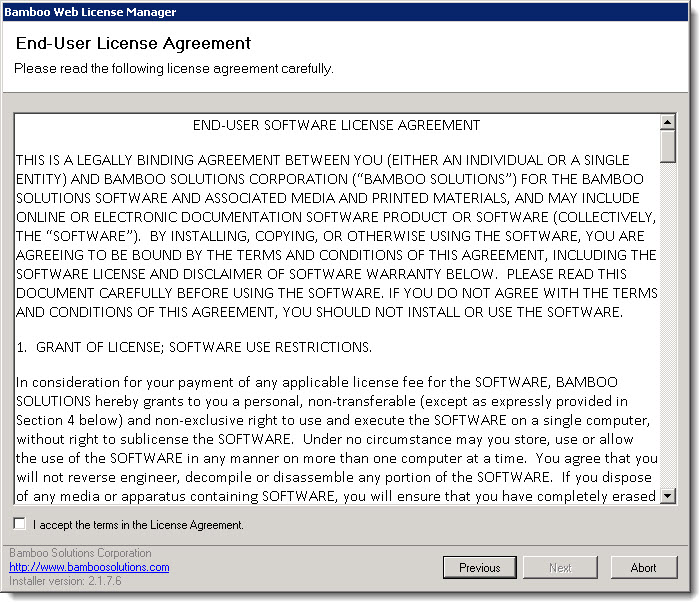
  • ask you to agree to our End User License Agreement,
  • ask which Web Applications you want to install to (you don’t have to pick any), and
  • ask if you want to automatically activate the solution on the selected web apps. kb12464_InstallTargets-AutoActivate.jpg

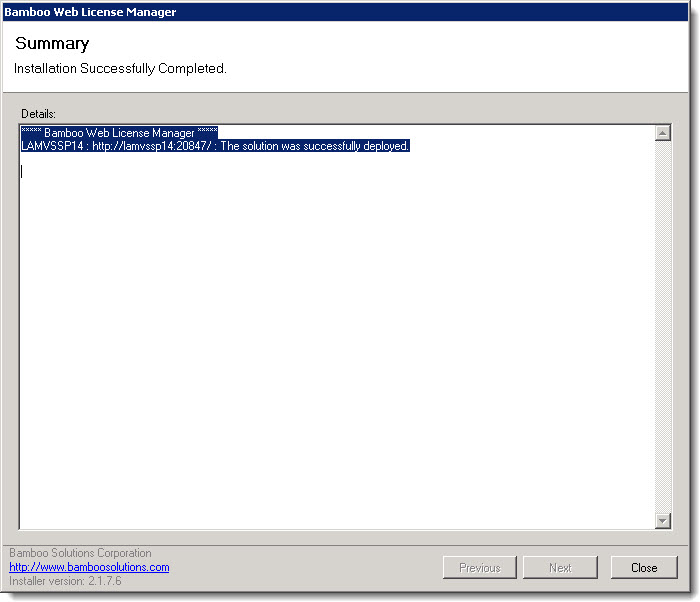
When the install is complete, it will display an Installation Summary that you should review carefully. See an example below.
kb12464_InstallSummary.jpg

Click here for information about running the installation or go back to Installing for the first time… topics.

Overview of Licensing and Product Activation


When to Activate

After you purchase, you receive License Keys to use to activate the product license on each WFE server on your farm. License Keys never expire. See How many License Keys do I need for my SharePoint farm for more information. You can use a license key on only one server at a time. Servers in non-production (i.e., Staging, Test, Dev) farms require licenses too, just like servers in your production farm.

Activating a Standard Product License

For most Bamboo products, license keys are required for each WFE server in the SharePoint Farm. For certain products, such as Alert Plus or List Rollup, additional license keys may be required for application servers as well to use certain features. See Activating Your Bamboo Product License

Suites, Packs, Libraries, and Toolkits

For Bamboo Suites, Packs, Libraries and Toolkits, a single license activates all the products in the suite or pack for a specific WFE server. See Overview of Suite or Pack Licensing.

Keyless Licensing

On very large farms with several Bamboo products installed, it is often difficult to manage so many license keys. Bamboo offers keyless licensing for these scenarios. Please contact your Sales Manager for more information about keyless licensing.

Use the Bamboo Web License Manager to activate Bamboo products install on the SharePoint farm. For additional details, please see

  • Installing the Bamboo Web License Manager
  • Activating Your Bamboo Product License
  • Activating My Bamboo Product License Offline if your server doesn’t have access to the Internet.

Desktop Applications

Some Bamboo products are not installed on the SharePoint farm, but on a PC or server somewhere on your network. To activate the license for these products, please see Activating a Bamboo Desktop Product Using the License Manager.

Moving or Migrating your farm

If you are moving your SharePoint farm to new servers, please see Migrating my Bamboo Product License to a New Server. Licenses are activated to a particular hardware profile of the server. If the profile changes (i.e., you add a hard drive), the license will require migration.

If you have migrated your environment to a new SharePoint version (i.e., from SharePoint 201 to SharePoint 2013), see Migrate your Bamboo Product License Key From one SharePoint version to another. License keys for products running in different SharePoint versions are different. On-Prem Bamboo products on active support are eligible for no-cost upgrades to a newer SharePoint version (2016/2019/2022) as long as the two farms are not running concurrently for more than 60 days. Migrations to Microsoft 365 will require the purchase of new licenses.  However, we do offer a discount for customers on current support for an on-premise product that has a Microsoft 365 equivalent

Trials

For product trials, no license is required. If you are wondering about the status of your trial or when it will expire, please see

  • Overview of Bamboo Product Trials
  • How long do trial versions of Bamboo software last and when do they start?
  • How to check the status of your trial license
  • Can trials be extended


Overview of Bamboo Product Trials

Overview of Bamboo Product Trials

Overview of Licensing and and Product Activation

Try.png
Try our products before you buy!

  • Trials are fully functional for 30 days from the date of installation.

  • Once a 30 day trial of a product has been installed on a server or farm, no further trial copies of the same product will function on the server or farm. When a product license key is purchased and activated (even after the trial has expired), the product will continue to work as it did during the trial.

  • Users who need additional time to evaluate a product will need to request a trial extension from their Bamboo Sales Account Manager (sales@bamboosolution.com).

  • There is no functional difference between the trial and purchased version of our products, with the exception of List Bulk Import and List Bulk Export. When a trial user purchases a license, it is not necessary to install a new version to replace the trial. You simply activate the license of the “trial” copy. Any configuration done on the product during the trial period will remain after the license is activated.

  • The List Bulk Import and the List Bulk Export product trials are limited in the number of items that can be imported/exported. Regardless of the number of items in an import file or in a SharePoint List/Library, only 15 items will be imported/exported with the trial version of these products. Once the license is activated, this restriction is lifted.

Overview of the new Bamboo product Logging

Overview of the new Bamboo product Logging

In April 2017, Bamboo released Bamboo.Logging v3.1.0.0 with the Q1 (2017) Cumulative Update of Bamboo component products.

In response to customer feedback the new logging version uses SharePoint ULS logs by default, instead of the the Bamboo logs. The main benefits of this change are:

  • Bamboo Log files will not fill the C: drive on WFE servers. Previously, Bamboo products reported errors to proprietary log files located in C:WindowsTempBambooSolutions on each web front end server in the farm as described in Error Log Files.
  • SharePoint administrators are very familiar with ULS logs and the ULS Log Viewer. When Bamboo products log to ULS, SharePoint administrators have one less set of logs to review.
  • ULS log files can be more easily managed for size and archived, a feature that was not previously available for Bamboo logs.

Bamboo component products installed or upgraded after April 2017 will have the new Bamboo Logging deployed as part of the Bamboo.Framework.wsp solution, which is common to Bamboo products and globally deployed to the SharePoint farm.

Icon-Warning IMPORTANT:
1) If you have multiple Bamboo products installed on your farm, some Bamboo log files may remain in C:/Windows/Temp/BambooSolutions until you upgrade all of the Bamboo products.
2) Bamboo applications (e.g., PM Central, Workflow Conductor, In/Out Schedule Board) will not have the new Bamboo Logging until their respective CU’s are available in Q2 2017.

Please note the following for the new scripts:

The script installs all the WSPs found in the installation folder, in alpha order
The install/upgrade script deploys to all content web apps. If you would prefer to deploy to a single web app, you can modify the script or deploy via Central Administration.
Uses Upgrade instead of Install for existing components.

For additional information about how to use the updated processes:

Installing using the updated install process
Upgrading using the updated process
Uninstalling using the updated process

My product was licensed yesterday and today there is an error; what happened?

My product was licensed yesterday and today there is an error; what happened?

License keys are tied to the hardware GUID of the WFE server and if the GUID changes, the license will revert to the trial status. You will need to deactivate the license key and then re-activate the license using the same key.

GUIDs may change when a WFE server is dropped from a farm and then re-added.

Icon-WarningIMPORTANT: For products licensed with the Bamboo License Manager (rather than the Web License Manager), the license key is tied to the hardware profile of the PC where the product is installed. If the hardware profile changes (i.e., a hard drive is added), the license will revert to the trial status. You will need to deactivate it and then re-activate it using the original license key. Products that use the Bamboo License Manager include: List Bulk Import, List Bulk Export, and User Profile Sync.

The problem is that the license status will no longer show the license key once the GUID changes, it will show as an expired trial license. See Is there a way to find a lost or unknown Bamboo product license key and then How to move your Bamboo Product License to a new server to resolve this issue.

Overview of moving a Bamboo Product License

Overview of moving a Bamboo Product License

To move a license, you need to deactivate the license key for the old server so you can activate it on the new server. A license key can be used on only one server at a time.

  • If the WFE servers in your SharePoint farm have access to the Internet, see How to move your Bamboo Product License to a new server.

  • If your WFE servers do not have Internet access, you will need to deactivate the license key via My Bamboo. See How to deactivate your Bamboo Product License is your server doesn’t have access to the Internet.

Migrate your Bamboo product from SharePoint 2013 to SharePoint 2016

Migrate your Bamboo product from SharePoint 2013 to SharePoint 2016

Overview

This article outlines how to migrate Bamboo products from SharePoint 2013 to SharePoint 2016.

NOTE: In order to migrate a Bamboo product to SharePoint 2106 from a SharePoint 2013 environment, you need to ensure that the SharePoint 2013 farm has the appropriate version installed. If your Bamboo product version is older, you may need to upgrade the SharePoint 2013 version before migrating to SharePoint 2016. Please refer to information about the specific products that are installed on the farm you are migrating for possible additional steps needed or limitations of the migration.

For additional information about upgrading your existing SharePoint 2013 Farm to SharePoint 2016, read these TechNet articles:

  • Get started with upgrades to SharePoint 2016
  • Overview of the upgrade process to SharePoint 2016
  • Plan for SharePoint 2016
  • Hardware and software requirements for SharePoint 2016
  • Upgrade databases from SharePoint 2013 to SharePoint 2016

Bamboo Solutions supports the Database Attach upgrade method for upgrading to SharePoint 2016. The migration of Bamboo products deployed on SharePoint 2007 or SharePoint 2010 environments directly to SharePoint 2016 Farms is not supported. These environments must be migrated to SharePoint 2013 first.

Migration Steps

Step Description
1. Before migrating, update the Bamboo products you have in SharePoint 2013 to the latest available release.

2. Uninstall any products that are not available on SharePoint 2016. Group Email is an example of a product that was not ported to SharePoint 2016. If you do not remove the Bamboo Group Email from the SharePoint 2013 farm before migrating, the migration will fail because the feature will not be available in the SharePoint 2016 farm.
3.

Retrieve the SharePoint 2016 installation package and license keys for the Bamboo products you are migrating. See Migrate your Bamboo Product License Key From one SharePoint version to another for additional details.

Install the Bamboo products on the SharePoint 2016 farm.

4.

Backup the SharePoint 2013 content database(s) and attach it to the SharePoint 2016 farm. If the database attach fails, see steps 1-3 above.

Icon-WarningIMPORTANT: Follow Microsoft’s Upgrade databases from SharePoint 2013 to SharePoint 2016 article to perform the database-attach migration.

5.

After the 2013 content databases have been successfully attached and upgraded to SharePoint 2016, you MUST retract and redeploy (or uninstall and reinstall) your Bamboo SharePoint 2016 products on the SharePoint 2016 farm.

This process removes the SharePoint 2013 Web Part references and replaces them with SharePoint 2016 references in the newly attached content databases. This is not a Bamboo specific step. It must be performed for most 3rd party SharePoint software installations. If this step is skipped users will usually see errors when adding web parts to pages.

Icon-WarningIMPORTANT: If you have a staged migration that moves content databases in stages, you need to retract and re-deploy after each database (or group of databases are attached.

Migrate your Bamboo product from SharePoint 2010 to SharePoint 2013

Migrate your Bamboo product from SharePoint 2010 to SharePoint 2013

Overview

This article outlines how to migrate Bamboo products from SharePoint 2010 to SharePoint 2013 (SharePoint Foundation 2013 & SharePoint Server 2013).

NOTE: In order to migrate a Bamboo product to SharePoint 2103 from a SharePoint 2010 environment, you need to ensure that the SharePoint 2010 farm has the appropriate version installed. If your Bamboo product version is older, you may need to upgrade the SharePoint 2010 version before migrating to SharePoint 2013. Please refer to information about the specific products that are installed on the farm you are migrating for possible additional steps needed or limitations of the migration (including whether the product is supported on SharePoint 2013 with the SharePoint 2010 look and feel).

For additional information about upgrading your existing SharePoint 2010 Farm to SharePoint 2013, read these TechNet articles:

  • Get started with upgrades to SharePoint 2013
  • Overview of the upgrade process to SharePoint 2013
  • Plan for SharePoint 2013
  • Hardware and software requirements for SharePoint 2013
  • Upgrade from Office SharePoint Server 2007 or Windows SharePoint Services 3.0 to SharePoint Server 2013 or SharePoint Foundation 2013
  • Upgrade databases from SharePoint 2010 to SharePoint 2013

Bamboo Solutions supports the Database Attach upgrade method for upgrading to SharePoint 2013. The migration of Bamboo products deployed on SharePoint 2007 environments directly to SharePoint 2013 Farms is not supported. These environments must be migrated to SharePoint 2010 first. Bamboo also does not support the downgrade of SharePoint editions during a migration. (i.e., SharePoint Server 2010 to SharePoint Foundation 2013)

Migration Steps

Step Description
1. Before migrating, update the Bamboo products you have in SharePoint 2010 to the latest available release.

2. Uninstall any products that are not available on SharePoint 2013. Cross List is an example of a product that was not ported to SharePoint 2013. If you do not remove the Bamboo Cross List from the SharePoint 2010 farm before migrating, the migration will fail because the feature will not be available in the SharePoint 2013 farm.
3.

Retrieve the SharePoint 2013 installation package and license keys for the Bamboo products you are migrating. See Migrate your Bamboo Product License Key From one SharePoint version to another for additional details.

Install the Bamboo products on the SharePoint 2013 farm.

4.

Backup the SharePoint 2010 content database and attach it to the SharePoint 2013 farm. If the database attach fails, see steps 1-3 above.

Icon-WarningIMPORTANT: Follow Microsoft’s Upgrade databases from SharePoint 2010 to SharePoint 2013 article to perform the database-attach migration.

5.

After the 2010 content databases have been successfully attached and upgraded to SharePoint 2013, you MUST retract and redeploy (or uninstall and reinstall) your Bamboo SharePoint 2013 products on the SharePoint 2013 farm.

This process removes the SharePoint 2010 Web Part references and replaces them with SharePoint 2013 references in the newly attached content databases. This is not a Bamboo specific step. It must be performed for most 3rd party SharePoint software installations. If this step is skipped users will usually see errors when adding web parts to pages.

Icon-WarningIMPORTANT: If you have a staged migration that moves content databases in stages, you need to retract and re-deploy after each database (or group of databases are attached.

6.

Perform the permanent Visual Upgrade to upgrade your SharePoint 2010 site collections to the SharePoint 2013 Look and Feel.

Icon-WarningIMPORTANT: Bamboo does not support our SharePoint 2013 products running on a SharePoint 2013 server using the SharePoint 2010 Look and Feel.

Migrate your Bamboo Product License Key From one SharePoint version to another

Migrate your Bamboo Product License Key From one SharePoint version to another

Overview of Licensing and and Product Activation

Bamboo Solutions completed its migration of more than 60 Bamboo products to SharePoint 2013 I the fall of 2013. A few years earlier, we completed the migration of many of those same products from SharePoint 2007 to SharePoint 2010.

Bamboo License Keys for previous versions of SharePoint are not valid for newer versions. If eligible, you can retrieve license keys for newer SharePoint versions through the My Bamboo area of the Bamboo Solutions web site.

When you activate product license keys for a newer SharePoint version, the keys for the older version become invalid after 60 days.

Bamboo Policy for Migrating License Keys

To receive a free SharePoint 2010 or SharePoint 2013 license key, you must have a valid Premium Support Contract for the product you are migrating to SharePoint 2010 or SharePoint 2013.

We support a 1:1 exchange of license keys. If your SharePoint 2007 farm had two WFE servers and your SharePoint 2010 farm has four WFE servers, you will need to purchase two additional SharePoint 2010 license keys. The same requirement holds for SharePoint 2010 farms you are migrating to SharePoint 2013.

How to get your new license keys

If you have a valid Premium Support Contract for the product you intend to migrate, follow these steps:

Step Action
1. Login to My Bamboo with the Bamboo account that made the original SharePoint 2007 Bamboo license key purchase or an account that can see the purchases.

MB-login.png

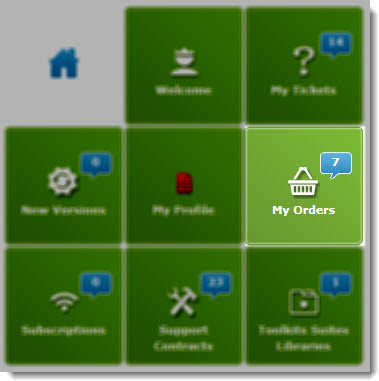
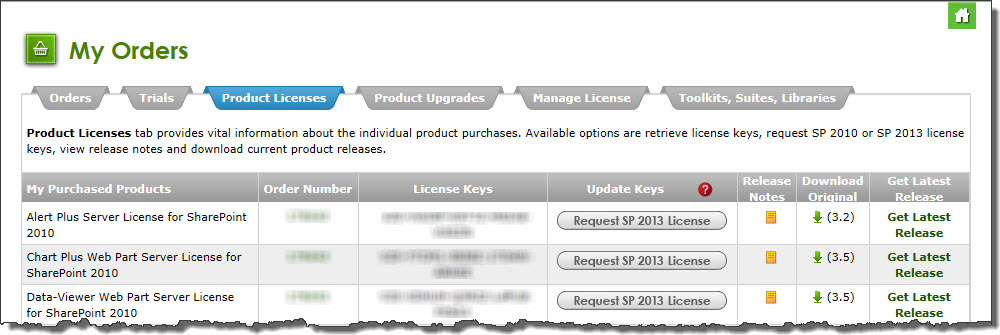
2. Click My Orders Product Licenses under the sectionlocated at the bottom of the page.

Mb-Home squares.jpg

3.

On the Product Licenses tab of the My Orders page, each product purchased is listed. If an update is available, a Request SP 2013 License button is displayed in the Update Keys column.

MB-MyOrders blurred.jpg
Click the button for the product you want to migrate.

NOTES:
1. The Request SP 2010/2013 License button will not be available unless a Premium Support Contract is in place.
2. If you see something you think is wrong with your Product License listing, please contact your Bamboo Sales Representative at Sales@Bamboosolutions.com

4.

An order will be created automatically and you will be redirected to the order completion page, where you can retrieve the installation package. You will also receive an e-mail that provides you the link to the download package and your SharePoint 2013 License Keys.

NOTE: If the text Not Available is displayed, this means either you do not have an active Premium Support contract or there is no SharePoint 2010 version of that product. Please contact your Sales Representative at Sales@bamboosolutions.com for additional assistance.

For information about migrating the product, see these topics.

Manually uninstall using stsadm

Manually uninstall using stsadm

A single Bamboo product may include a combination of one or more SharePoint solutions (WSPs) and components installed using an MSI installer. Refer to the original installation files from your product for information about the components that may have been installed.

To manually uninstall a Bamboo SharePoint solution, follow the steps below. If you need to uninstall a component that was installed using an MSI installed, see Manually Uninstalling a Bamboo .msi.

NOTE: The steps in these instructions use the stsadm.exe command, which can be found in the BIN folder of the 12/14/15 hive of a SharePoint server. For example, on a SharePoint 2010 farm, that would be %PROGRAMFILES%Common FilesMicrosoft SharedWeb Server Extensions14BIN

NOTE: You can also retract and remove a SharePoint solution from SharePoint Central Administration. To uninstall your Bamboo product this way, see Uninstalling from SharePoint Central Admin.

Step Action
1. Locate your stsadm.exe command utility. These instructions use the stsadm.exe command, which can be found in the BIN folder of the 12/14/15 hive of a SharePoint server. For example, on a SharePoint 2010 farm, that would be %PROGRAMFILES%Common FilesMicrosoft SharedWeb Server Extensions14BIN
2.

Schedule the solution Retraction. You can schedule the solution to be retracted from one web application at a time:

 stsadm.exe 
 -o retractsolution 
 -name [Component].wsp 
 -immediate  
 -url [http://WebApplicationUri:Port]

or from all web applications at once:

 stsadm.exe 
 -o retractsolution 
 -name [Component].wsp 
 -immediate 
 -allcontenturls

Where:

  • [Component] is the name of the installed component (i.e., Bamboo.TreeView.wsp), as shown in the cab installation sub-folder or in the list of solutions in the Manage Farm Solutions page of SharePoint Central Administration.
  • [http://WebApplicationUri:portNumber] is the URL and Port for the web application where the solution is installed.
3.

Execute the solution retraction.

NOTE: This command needs to be run on each Web front-end (WFE) server in the farm.

 stsadm.exe -o execadmsvcjobs
4.

Remove the solution. Delete the solution from the SharePoint solution store only AFTER the retraction job is complete.

 stsadm.exe -o deletesolution -name [Component].wsp

Where:

  • [Component] is the name of the installed component (i.e., Bamboo.TreeView.wsp), as shown in the cab installation sub-folder or in the list of solutions in the Manage Farm Solutions page of SharePoint Central Administration.
5.

Repeat steps 2-4 for each solution included in the product.

NOTE: There are two solutions that are common across multiple Bamboo products. They are: Bamboo AJAX Config (SP2007 only) and Bamboo Core. Do NOT uninstall them unless you are sure there are no other Bamboo products remaining on your farm. If there are no other Bamboo products on your farm, uninstall these two solutions last.

Manually Install using stsadm

Manually Install using stsadm

Options for Installing

These instructions use the stsadm.exe command, which can be found in the following location:

  • SharePoint 2007: %PROGRAMFILES%Common FilesMicrosoft SharedWeb Server Extensions12BIN
  • SharePoint 2010: %PROGRAMFILES%Common FilesMicrosoft SharedWeb Server Extensions14BIN
  • SharePoint 2013: %PROGRAMFILES%Common FilesMicrosoft SharedWeb Server Extensions15BIN

NOTE: Your product may include several SharePoint solutions in multiple [Component].wsp installation folders. Follow all steps for each solution to install the product for the first time.

Step Description
1. Review Best practices_for_a_successful_intstall to learn which servers to install on and what services to stop or restart.
2.

Add the solution to the SharePoint solution store. Run this command on the appropriate server in your farm and be sure you are running the command with an account that is a member of the local server Administrators group.

The appropriate servers are typically those running the Foundation Web Application service or the Microsoft SharePoint Foundation Web Application service (or Windows SharePoint Services Web Application if you are using SharePoint 2007). Refer to Location of Install Files for more information.

 stsadm.exe -o addsolution -filename [path][Component].wspcab[Component].wsp

where:

  • [path] – the path to the extracted installation folders
  • [Component] – the name of the component you are installing, as shown in the installation folder. The name of the component in the cab sub-folder may be slightly different than the installation folder name.
3.

Deploy the SharePoint solution. After adding the solution to the SharePoint solution store on your farm, it must be deployed to one or more Web Applications. This can be accomplished via Central Administration (see Deploying a Bamboo solution to a new Web Application for more information) or by running one of the following commands on the same server where you added the solution in Step 1 above.

To deploy to a specific Web Application, run this command:

stsadm.exe 
-o deploysolution 
-name [Component].wsp 
-immediate 
-url [http://WebApplicationUri:portNumber] 
-allowGacDeployment 
-allowCasPolicies

where:

  • [Component] – the name of the component you installed, as shown in the cab installation sub-folder
  • [http://WebApplicationUri:portNumber] – the URL and Port for the target Web Application. Repeat this command for each web app you need to deploy to.

OR

To deploy to all Web applications EXCEPT the Central Administration Web application, run this command:

stsadm.exe 
-o deploysolution 
-name [Component].wsp 
-immediate 
-allcontenturls 
-allowGacDeployment 
-allowCasPolicies

where:

  • [Component] – the name of the component you installed, as shown in the cab installation sub-folder
4.

Execute the deployment job(s). This is an optional step. The SharePoint Timer job will take care of the deployment eventually, but if you don’t want to wait for it, you can run this command.

NOTE: This command needs to be run on every server on the farm that runs the Foundation Web Application service (or the Windows SharePoint Services Web Application service if you are using SharePoint 2007):

stsadm.exe -o execadmsvcjobs
5.

Manually Activate the Product Feature(s) in the appropriate Site Collection

After the Bamboo product solution is deployed to a Web Application, it must be activated in the site collection before it can be used. When you are ready to activate the site collection feature, please see Activating a Bamboo Site Collection Feature.

NOTE: You must be a Site Collection Administrator to activate site collection features.

Manually Install using PowerShell

Manually Install using PowerShell

Options for Installing

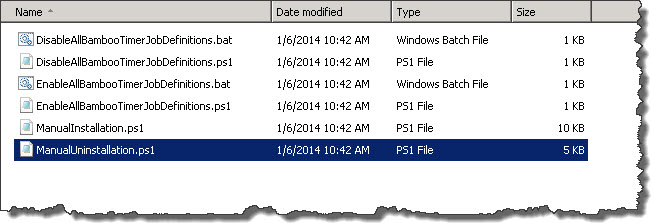
Icon-WarningIMPORTANT: As of April 2017, Bamboo no longer includes ManualInstallation.ps1 or DisableAllBambooTimerJobDefinitions.bat in product download packages. An updated uninstall script is included instead. Please seeOverview of the Updated Installation Process for Bamboo components and Uninstalling using the updated process for details.

Perform the actions below to manually install or repair a product.

NOTE: Pay close attention to where a command should be run. Some commands must be run on either ONE or ALL Web front-end servers (WFE). A WFE is a server running the Microsoft SharePoint Foundation Web Application service. Refer to the System Settings > Manage Servers on this farm page in Central Administration for a list of servers running this service.

Step Action
1.

Shut down the application pools for each Web application where you are installing the product. This will prevent other users from accessing sites and locking files that the installation script needs to update.

NOTE: If you are using SharePoint 2010 and not Claims Based Authentication (CBA), instead of shutting down the app pools, you can stop the World Wide Web Publishing Service to prevent users from accessing sites and locking files. You should NOT stop the WWW Publishing service in SP2013 or in a CBA environment.

2.

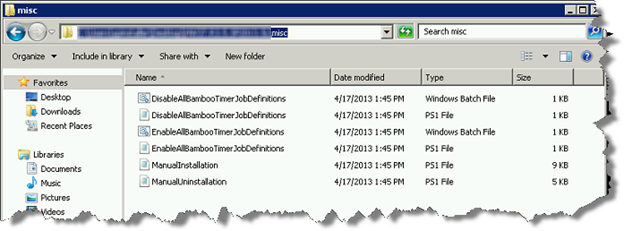
On one Web front-end server (WFE), run the product .EXE file to extract its installation files. Browse to the misc folder.

NOTE: If you do not see the misc folder or a file called ManualInstallation in this folder, your Bamboo product does not support this type of install.
ManualInstallation001.png

3.

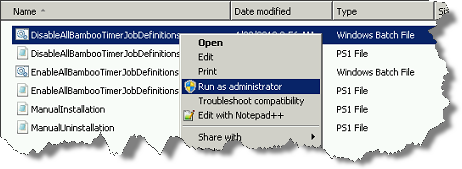
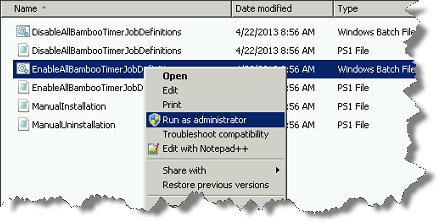
ManualInstallation_RunAs_001.pngRight-click on the file DisableAllBambooTimerJobDefinitions.bat and choose Run as administrator. This script stops the timer job services for all Bamboo products installed on the farm, helping to put the farm in a quiescent state for the install.

NOTE: If this script is not present in the misc folder for your Bamboo product, skip this step.

4.

On all WFE servers in the farm, perform the following actions:

  1. Run the command iisreset.
  2. Restart the SharePoint 2013 Timer (or SharePoint 2010) service.
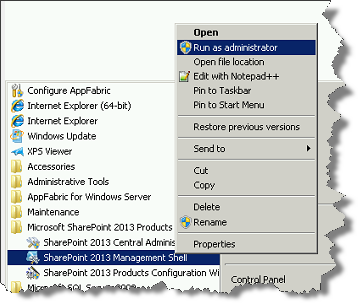
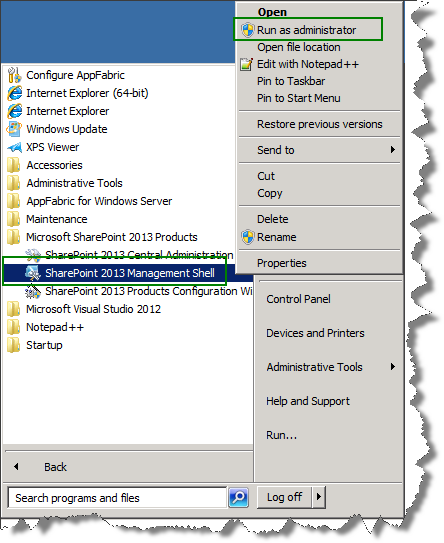
5. ManualInstallation_RunAs_002.pngOn the WFE where you extracted the product folders, right-click on the PowerShell application in the Start menu and choose Run as administrator. You can use Windows PowerShell or SharePoint 2013 Management Shell.
6.

Change to the misc folder in the extracted product installation files and enter the following command to start the manual installation script:

.ManualInstallation.ps1

ManualInstallation_002.png

7.

When prompted, enter the Web application URL and choose whether you want to automatically activate the product features in the site collection(s).

ManualInstallation_003.png

NOTE: To allow the installation script to run without prompting for input, edit the miscManualInstallation.ps1 script file and replace Read-Host with the highlighted text shown below:
linesto supress input.jpg

The script file installs Bamboo.Core.V2.wsp and Bamboo.Logging.V2.wsp, if they are not already in the solution store, and any required product components.

8.

ManualInstallation_004.pngReturn to the misc folder. Right-click on EnableAllBambooTimerJobDefinitions.bat and choose Run as administrator. This enables all Bamboo timer job services.

NOTE: If this script is not present in the misc folder for your Bamboo product, skip this step.

9. Re-start the Application pools.
10.

Manually Activate the Product Feature(s) in the appropriate Site Collection(s)

If you didn’t choose to activate site collection features automatically in step 7 above, don’t forget to activate those features in the site collections where you want to use them.

After a Bamboo product solution is deployed to a Web Application, it’s feature(s) must be activated in the site collection before it can be used. When you are ready to activate the site collection feature, please see Activating a Bamboo Site Collection Feature.

NOTE: You must be a Site Collection Administrator to activate site collection features.

Location of Installation

Location of Installation

Icon-WarningIMPORTANT: As of April 2017, Bamboo has changed the installation process for Bamboo components. The Setup Program has been replaced by an updated process. Please see Overview of the Updated Installation Process for Bamboo components and Uninstalling using the updated process for details.

If you are installing a Bamboo product in a SharePoint farm environment, make sure to start the installation on the correct server. The required installation location is listed in the Setup/Installation program interface in the description for each component. See Overview of the Setup Program from more information.

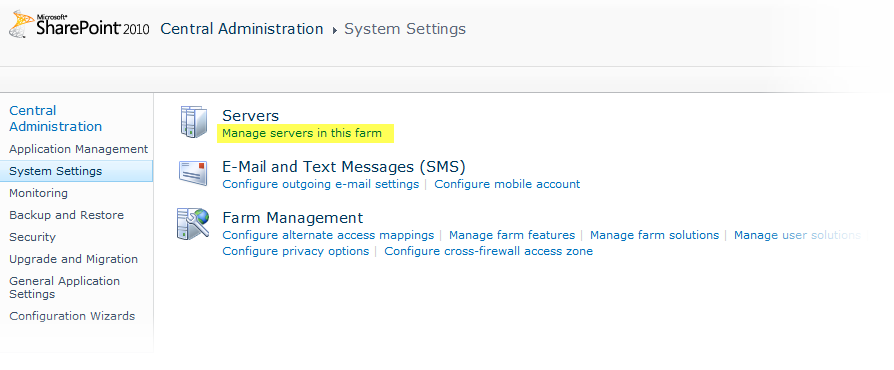
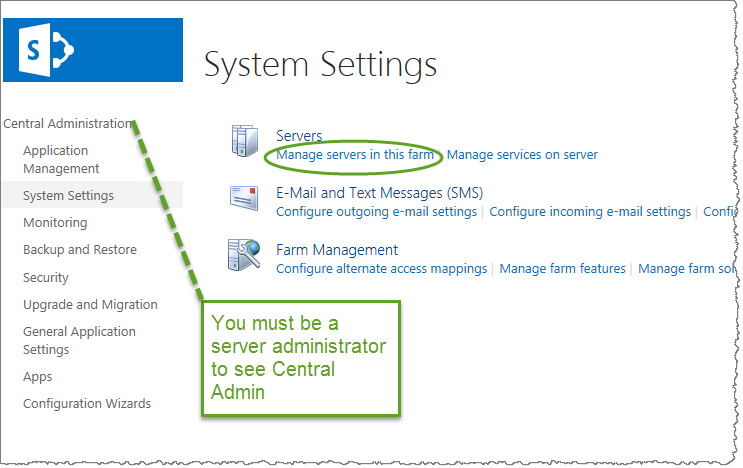
Most Bamboo products are installed on a farm server running the Microsoft SharePoint Foundation Web Application service (or the Windows SharePoint Services Web Application if you are using SharePoint 2007), but some are installed on a farm server running the Central Administration service. Refer to SharePoint Central Administration -> System Settings -> Servers -> Manage servers on this farm for a list of farm servers running these services. If you are using SharePoint 2007, find the list of farm servers in Central Administration > Operations > Servers in Farm.

CA-Manage Servers on this farm.png
During the install process, the component will be automatically deployed to all Web front-end servers by the SharePoint Timer service via SharePoint Solution Deployment. There is no need to run the Setup/Installation program on more than one server in the farm.

Refer to Required Installation Permissions for information about the level of permission the installation account requires.

Localize Bamboo Web Parts for your Language

Localize Bamboo Web Parts for your Language

Overview of the localization process for Bamboo Products

Languages.png

Applies to:

  • All Bamboo Web Part components
  • Windows SharePoint Services 3.0 and Microsoft Office SharePoint Server 2007
  • SharePoint Foundation 2010 and SharePoint Server 2010
  • SharePoint Foundation 2013 and SharePoint Server 2013

Bamboo products can be configured to display product menus, user interface text, and settings in your local language. You can also customize the default text provided with the product. To change the language or text a product displays, perform the steps described in this page. Click a link below for detailed information about each step.

  • About the Language Files
  • Editing Text in Language Files
  • Selecting a New Language File for a Product

Top

About the Language Files

There are four language files included with Bamboo products. Their name and location may differ by product.

Setting Older Products Newer Products
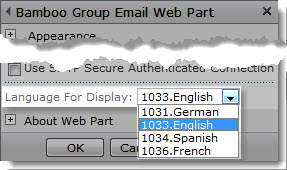
Web Part Language Settings Common_2010_LanguageSettingsToolPane.jpg Newer products will show the language choices in the Web Part settings using the abbreviated [language]-[COUNTRY] format (e.g. “en-US”)

NewLanguageSettings.jpg

Language File Names
  • 1033.English.xml (the default)
  • 1031.German.xml
  • 1034.Spanish.xml
  • 1036.French.xml
  • Bamboo.[Product].en-US.resx (the default)
  • Bamboo.[Product].de-DE.resx
  • Bamboo.[Product].es-ES.resx
  • Bamboo.[Product].fr-FR.resx
Language File Location

These files are located in the wpresources folder. This folder and its associated language files may be located under one of the following paths on each SharePoint server:

  • servernamedriveInetpubwwwrootwss
    VirtualDirectoriesportwpresources[Product]
  • servernamedriveInetpubwwwrootwss
    VirtualDirectoriesportwpresources[Product] LanguageFiles
  • servernamedriveProgram FilesCommon FilesMicrosoft Sharedweb server extensionswpresources[Product]

Depending on your version of SharePoint, your localization files may be found in the following locations.

  • servernamedriveProgram FilesCommon Filesmicrosoft sharedWeb Server Extensions15CONFIGAdminResources (SharePoint 2013)
  • servernamedriveProgram FilesCommon Filesmicrosoft sharedWeb Server Extensions14CONFIGAdminResources (SharePoint 2010)

The German, Spanish and French files have not yet been translated; although the file name suggests otherwise, their content is English. Edit these files to provide your own text or translation of the product user interface and settings.

Icon-WarningIMPORTANT: If you do not rename the files you modify, your customizations will be overwritten when you upgrade to a new Bamboo product release.

To make sure that your customizations do not get overwritten when you upgrade the product, follow these steps:

Step Action
1.

Copy the default file for the appropriate language and rename the copy. For example, you might save a localized French language file as CompanyName.1036.French.xml or Copy.Bamboo.ProductName.fr-FR.resx.

NOTE: When you next upgrade the product, the default file (i.e., 1036.French.xml) will be overwritten with the new version. Your file will not. You can use any file name, as long as the file extension is .xml (or .resx for newer products).

To create language files for languages other than German, English, Spanish, or French, copy one of the existing language files and rename it. Then edit the file to provide your own translation.

2.

When you upgrade your Bamboo product, the installation/setup application will not remove or overwrite language files you created if you saved them with a name other than the default. However, product upgrades may require that you merge new resource strings for the new product release.

NOTE: If you forget to add new resource strings to your custom language file, you may see strange things in the user interface. The product will display missing resource string IDs instead of text.

Copy these new resource string IDs from a default language file to your custom file and make any desired translations.

Top

Editing Text in Language Files

Icon-WarningIMPORTANT: Before making any changes to any file, back up your original file and put it in a safe place.

To change text in a language file, follow these steps:

Step Action
1. Open the language file in a text editor and locate the text you want to change.
2.

Edit the text between the <resource></resource> tags but do not edit the tags.

NOTE: Do NOT modify the resource id value. Modify only the text between the <resource></resource> tags.

If you want to remove text completely, delete only the text; do not delete the <resource> entry from the file, or the product interface will display an error message. In the example below, the text you can modify is highlighted in gray.

Edit XML Resource

3. When you are finished with your changes, save the file and copy it to the appropriate resources folder on all Web front-end servers in your SharePoint farm.
4. Follow the instructions below to select your new language file in the product settings.

Top

Selecting a New Language File for a Product

The instructions below for changing language file settings apply to Bamboo products with settings configured in the Web Part tool pane or Web Part Settings pop-up page. If you have multiple instances of a product in your portal, you must make the same change for each instance that requires the change.

Change the Language Settings in the Web Part Tool Pane:

Step Action
1. Modify Shared Web PartClick the edit drop-down menu on the Web Part title bar and select Edit Web Part (or Modify Shared Web Part if you are using SharePoint 2007). See the example from the Group Email Web Part.
2. Common_2010_LanguageSettingsToolPane.jpgIn the Language Settings section of the Web Part tool pane, select the language file you want to use. See the example from the Group Email Web Part. If you have created a new file (i.e., Copy.Bamboo.ProductName.fr-FR.resx), it should appear in the list as a valid selection.
3. Click Apply and then OK in the Web Part tool pane to apply your changes.

Change the Language Settings in the Web Part Settings Pop-up Page:

Step Action
1. Modify Shared Web PartClick the edit drop-down menu on the Web Part title bar and select Edit Web Part (or Modify Shared Web Part if you are using SharePoint 2007).
2. Modify Web Part SettingsClick the [Product] Settings button in the Web Part tool pane.
3. Click Language Settings in the Web Part Settings page and select the language file you want to use. If your product does not have a Language Settings section, look for the Select a Language drop-down list in General Settings instead.

Language Settings

If you have created a new language file (i.e., Copy.Bamboo.ProductName.fr-FR.resx), it should appear in the list as a valid selection.

4. Click the Save & Close button to save the Web Part settings.
5. Click Apply and then OK in the Web Part tool pane to apply your changes.

Is there a way to find a lost or unknown Bamboo product license key?

Is there a way to find a lost or unknown Bamboo product license key?

If your Bamboo Product License is invalidated because of a change to the hardware profile of a server, the license key used to activate it previously will not be shown in the Bamboo Web License Manager in SharePoint Central Administration.

You should be able to find the license keys associated with your purchase in the My Bamboo area of the Bamboo Solutions web site.

Step Action
1. Login to My Bamboo.

MB-login.png

2. Click the My Orders link from the Home page.

Mb-Home squares.jpg

3.

On the Product Licenses tab of the My Orders page, the license keys associated with the products you’ve purchased are listed.

MB-MyOrders blurred.jpg

NOTE: If you don’t see your orders listed on the page, please contact your Bamboo Sales Representative at Sales@bambooosolutions.com

Installing using the updated install process

Installing using the updated install process

Overview of the Updated Installation Process

In April 2017, with the Q1 Cumulative Update (CU) Bamboo introduced updated install/uninstall processes for component products (web parts). For more information about why this was introduced, please see Overview of the Updated Installation Process for Bamboo components

To install using the updated install process, please follow these steps (Warning.. Installs should be performed in Non-Peak hours as your farm will temporarily go offline):

No. Function
1. Download the install package from My Bamboo.
2. Extract the contents of the package.
3. run with PowerShell Admin.jpgRun the Install.ps1 from a WFE server in PowerShell as an admin.
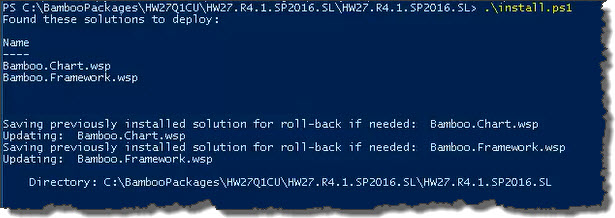
4.

install script.jpgThe script will look for WSPs in the install folder and list those found. It will install them in alpha order.
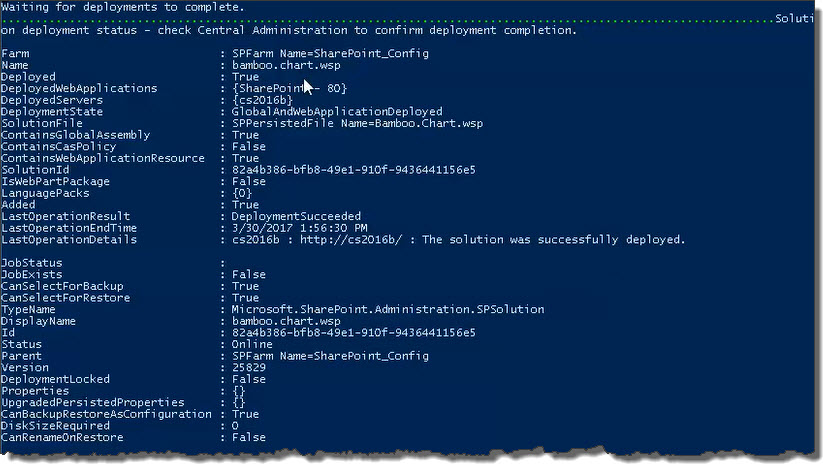
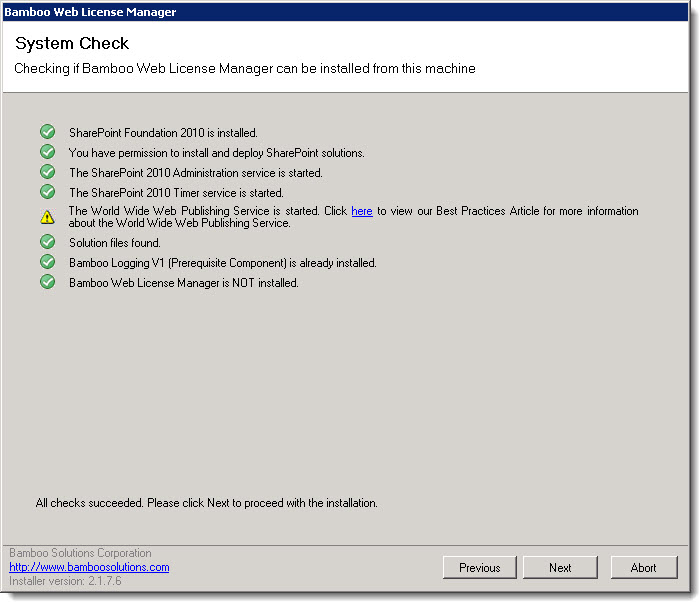
Rather than deploying the solution immediately after its installed, the script schedules deployment time for 1 minute in the future so multiple installs won’t collide.

Icon-WarningIMPORTANT: By default, the script deploys solutions to all content web applications. If you don’t want to do this, please update the script for your needs.

5. When the deployment completes, check Central Administration to confirm deployment completion.
6. Activate in the desired Site Collections. See Activating a Bamboo Site Collection Feature for details.

Installing the Bamboo Web License Manager

Installing the Bamboo Web License Manager

Overview of Licensing and and Product Activation

If you need to activate your Bamboo product license, you most likely need the Bamboo Web License Manager installed on your farm. If you need to activate a Bamboo Desktop application, please see Activating a Bamboo Desktop Product Using the License Manager

NOTE: If you are running with a free trial license, there is no need to install this component.

Install the Bamboo Web License Manager on one of the servers in the SharePoint farm that is running the Central Administration service. The component will be automatically deployed to all Central Administration Web applications by the SharePoint timer service.

NOTE: You must be a member of the local server Administrators group and have the db_owner role for the SharePoint configuration database to install and run the Bamboo Web License Manager.

Step Action
1.

On the server running the Central Administration service, run the Setup program for any Bamboo product.

NOTES:
1. Refer to System Settings in SharePoint Central Administration for a list of servers running this service.
2. Although every product Setup package includes the Web License Manager, it is necessary to install it only once on the farm.

2.

From the Setup interface,

  1. click the Bamboo Web License Manager component.
  2. Verify that the installation location is correct.
  3. Verify that the you have the required installation permissions.
  4. Click the Install button.

WLM install1.png
The installation for the Web License Manager will begin.

3. Click Next to continue.
WLM install2.jpg
4.

The install will run through some system checks. If they pass, click Next.WLM install3syscheck.jpg

NOTE: The Web License Manager expects Bamboo Logging V1 to have been previously installed. If you have installed a Bamboo product before installing the Web License Manager, this Prerequisite Component will already be installed.

5. Read and accept the Bamboo End-User License Agreement. When you check the box labeled “I accept the terms in the License Agreement”, the Next button will be enabled. Click it to continue.

WLM install4.jpg
6.

The Web Application where Central Administration is running should be displayed in the Deployment Targets page. Check the box at the bottom to automatically activate the feature during the install.

NOTE: If desired, you can always activate the feature manually in Central Administration.

WLM install5.jpg

7. Monitor the progress of the install. When its complete, click Next.
WLM install6.jpg
8. A Summary of the installation is presented. Click Close to complete the process.WLM install7.jpg
9. After a successful installation of the Web License Manager, you should see a Bamboo Solutions entry on the main page of SharePoint Central Administration on the main page.
CA-WLM2013.jpg

Options for Installing

Options for Installing

Option When or Why to use this?
Use the Updated Installation Process for Bamboo components

Based on feedback from our customers, Bamboo introduced updated install/uninstall processes for component products (web parts). Instead of the Setup.exe Installation Application, we now supply two PowerShell scripts – one for Install/Upgrade and the other for Uninstall – to be used to install, upgrade, or uninstall the product.

For more information, see Overview of the Updated Installation Process for Bamboo components.

Use the Bamboo Installation/Setup program

Icon-WarningIMPORTANT: As of April 2017, Bamboo no longer includes the Installation/Setup program in product download packages.

This is an easy option for small to medium sized farms with not too many web applications and/or WFE servers. The program will automatically check certain conditions, ask which Web Applications you want to deploy to, and then ask if you want to automatically activate site collection features. These are things that are easy to forget when installing any other way.

For more information, see Overview of the Setup Program and How to run the Installation/Setup program.

NOTE: You may decide NOT to use the Installation/Setup Program if your farm has several web front end servers (WFEs) or Web Applications. The installation and/or the solution deployment may timeout trying to deploy to a very large farm. In this case, it may be best to manually install the product on your farm.

Manually Install

Extra care must be used when installing a product manually because the series of automated checks performed by the Bamboo Installation program will not be available. Unexpected behavior during product configuration, licensing, or use may occur if some steps are skipped.

  • About the Installation Files
  • Important Notes About Manual Installation
  • How to use the Installation-Setup program to install a single WSP
  • Manually Install using PowerShell
  • Manually Install using stsadm
  • Manually Installing a Product MSI

Generating Activation Keys using My Bamboo

Generating Activation Keys using My Bamboo

All Bamboo products that deploy to SharePoint can be activated online and the license(s) managed using Bamboo Web License Manager. Bamboo Web License Manager is included with the Setup program for every Bamboo product. You only need to install it once on your farm to manage all Bamboo products that have been or will be installed. After installation, it is accessed via SharePoint Central Administration.

If you are activating a Bamboo product on a server that does not have Internet access, you can activate your license offline and send the License Key and Machine Key to the Bamboo Support Team.
Alternatively, you can generate the Activation Key yourself via the My Bamboo area of the Bamboo Solutions website.

To generate the Activation Code yourself, follow these instructions.

Step Action
1. On a computer with Internet access, log in to My Bamboo with any valid account. In the My Orders tab, click Manage License.
2.

On the Manage License tab, enter the License Key and Machine Key.

NOTE: See Activating My Bamboo Product License Offline to get the Machine Key.

MB Manage Lic tab.jpg
Click the Generate button to generate the activation key. Copy this key and put it in a safe place. You will need it in the next step.

NOTE: If you are unable to successfully generate an activation key, send the License Key and the associated Machine Key to the Bamboo Support Team via Support@bamboosolutions.com. They will send the Activation Key to you via Email.

3. Return to the Bamboo Web License Manager Offline Activation page in SharePoint Central Administration. Paste the activation key in the Activation Key box, and then click Activate.

ket in activatoin key.jpg

4. Your Bamboo product is now Active and is ready for use, as shown by the Status column.

SP2010ActSuccess.jpg
If you ever need to check which license key you used to activate each server, the license key used is shown on this status page.

How to uninstall Bamboo.core.v1.wsp from your SharePoint farm

How to uninstall Bamboo.core.v1.wsp from your SharePoint farm

APPLIES TO:

  • Bamboo Farm deployed products that use Telerik. See Bamboo products that use Telerik for a list.
  • SharePoint Foundation 2010 and SharePoint Server 2010 have Bamboo.core.wsp and Bamboo.core.v1.wsp.
  • SharePoint 2007 has Bamboo.core.wsp

SYMPTOM:

Errors occur and you can not access your sites after manually retracting and removing bamboo.core.v1.wsp or Bamboo.core.wsp from your SharePoint farm.

CAUSE:

If you need to remove all of your Bamboo products from the farm, and you run the installers that come with the products and select the option to “remove”, the bamboo.core.wsp and/or bamboo.core.v1.wsp is intentionally left behind.

This is because during installation and deployment, the bamboo.core.v1.wsp (or bamboo.core.wsp) solution puts specific versions of the Telerik.web.ui and Telerik.web.ui.Skins assemblies into the Global Assembly Cache (GAC). The associated bamboo.telerik.config.wsp solution programmatically adds Telerik-related entries into the web.config for the web application(s) selected during the install. These entries refer to specific versions of Telerik.web.ui* assemblies. Web.config files should not be modified manually.

When the product(s) and solutions are uninstalled, the changes to the web.config file regarding Telerik.web.ui are not removed. This is because there may be other SharePoint solutions from sources other than Bamboo that use this version of Telerik. For the same reason, the bamboo.core.v1.wsp (or bamboo.core.wsp) is left deployed because uninstalling it removes some specific versions of Telerik.web.ui* assemblies from the GAC.

If you remove bamboo.core.v1.wsp (either manually via Central Administration, PowerShell, or stsadm), then the Telerik.web.ui* assemblies will be removed from the GAC but the entries will remain in the web.config files. This may leave you unable to access your web pages.

If you are sure there are no other solutions that rely on Telerik on your farm, it will be OK to retract and remove the bamboo.core.v1.wsp (or bamboo.core.wsp) solution. However, you must be sure to also remove the Telerik entries from the various web.config files where they have been added.

RESOLUTIONS:

Leave the bamboo.core.v1.wsp deployed. Do not uninstall it.

OR

If you must remove the bamboo.core.v1.wsp (or bamboo.core.wsp), remove it by retracting and then removing the solution from the Manage Solutions page in Central Admin. See Uininstalling from SharePoint Central Administration for more information.

After it is successfully removed, please use PowerShell to remove the Telerik entries from the web application(s) web.config file. This will ensure that changes to the web.config are saved in the database. For more information, see How to Remove a web.config Modification Using PowerShell

How to run the Installation/Setup Program

How to run the Installation/Setup Program

Options for Installing

Icon-WarningIMPORTANT: As of April 2017, Bamboo no longer includes the Installation/Setup program in product download packages. Please Overview of the Updated Installation Process for Bamboo components for information about the updated process.

To access the Setup program:

Note: The minimum screen resolution to view the Setup program is 1024×768.

Step Action
1. Download the self-extracting product EXE (i.e., HW03.R1.7.SP2010.SL.exe) and save it to a local folder on the appropriate SharePoint server (see Location of Install Files if you are unsure about which SharePoint server to install on).
2.

2013_install.pngDouble-click the product EXE file to extract the contents of the product download.
The Setup program will automatically start (see example screen shot below). See Overview of the Setup Program for more information.

If you aren’t ready to install, click the X in the upper right corner to close it. To start the Setup program manually later, double-click the Setup.bat file in the root folder where the product files were extracted.

To Run the Setup:

Step Action
1. Review Recommendations for a successful install
2. Run the Installation/Setup program and highlight a component to install. It’s best to install components in the order they are listed, if more than one is listed.
3. Verify the installation location and required permissions for the selected component. They will be listed on the right side of the screen and could change for different selected components.
4.

Click the Install button that appears in the lower right corner. The install process will begin.
During the install process, you will be asked:

  • to verify that the system checks pass successfully. Some products have more checks than others. If some checks display an error, you will not be able to proceed until the error is resolved. Abort the install and try again once the issue is resolved.
  • to read and accept the Bamboo Solutions End-User License Agreement (EULA).
  • In the Deployment Targets screen, select the Web Application(s) on the farm where you want to deploy the product. If you are a Site Collection Administrator for all the site collections in the selected Deployment Targets (web apps), it’s OK to leave the Automatically activate features… option checked, otherwise uncheck it.
    kb12464_InstallTargets-AutoActivate.jpg

NOTE: If you prefer that Site Collection Administrators activate product features as they are needed, uncheck the Automatically activate features option, then read How to activate a Bamboo Site Collection Feature to understand how to manually activate these features at a later time.

5.

When the installation is complete, a Summary will be displayed. Some Bamboo product components install several features. The install routine does not abort the installation if one feature fails to install. It continues to install the next feature. For this reason, be sure to review this summary carefully to make sure the install completed without error. You may need to scroll up to review the entire summary.

kb12464_InstallSummary.jpg

NOTE: If one or two features failed, you can reinstall the failed features individually at a later time (after resolving any issues described in the log file). This may save you time if the installation was successful for all but a few components. See How to use the Installation-Setup program to install a single WSP for more information.

6.

Repeat Steps 2-5 for each required component listed. Required components are designated with a red asterix. Install optional components as needed.

NOTE: It is not necessary to install the Bamboo Web License Manager if it is already installed on your SharePoint farm. This component is included with every Bamboo product, but only needs to be installed once.

7. When all desired components are installed, restart the World Wide Web Publishing Service or the App Pools, depending on which you may have stopped.
8. If you didn’t automatically activate features in site collections during the install, be sure to activate the site collection feature(s) in the appropriate site collection before adding the web part to a page. See Activating a Bamboo Site Collection Feature
for more information.

Return to Options for Installing

How to Remove a web.config Modification Using PowerShell

How to Remove a web.config Modification Using PowerShell

Background

Some custom SharePoint products make changes to the web.config file for a Web application via SPWebConfigModification objects to support their features. Bamboo products sometimes make changes like this during installation. Please see How to modify a web.config file using PowerShell for some additional background information.

You may need to remove these changes for a particular Web application, if the product is no longer used on that Web application. It’s not a good idea to manually edit the file to remove the text, because the web.config would no longer match what has been set in the SharePoint configuration database and might cause future problems on your farm.

Resolution

Follow the steps below to remove web.config settings using PowerShell.

NOTE: The commands in this article work with both SharePoint 2010 Foundation and Server. Be extra careful when making changes to the web.config. Back up the file before making any changes. Do not remove a modification unless you are absolutely sure what it is.

Step Action
1. First, open SharePoint 2010 Management Shell. From the Start menu on a SharePoint WFE Server, select All Programs > Microsoft SharePoint 2010 Products > SharePoint 2010 Management Shell
2.

Next, list all of the SPWebConfigModification objects that have been applied to the Web application. These objects are stored in the WebConfigModifications property of the Web application.

 1: $webApp = Get-SPWebApplication WebApplicationURL
 2: $webApp.WebConfigModifications

In this example, you can see some of the modifications added by Bamboo products to support Telerik:
webconfigModifications.jpg

3.

Now, we can identify a particular modification and remove it using the commands shown below.

 1: $config = $webApp.WebConfigModifications | Where-Object {condition_to_identify_the_object}
 2: $webApp.WebConfigModifications.Remove($config)
 3: $webApp.Update()
 4: $webApp.Parent.ApplyWebConfigModifications()

In this example, we’ll remove the modification with the name “add[@name=[‘Session’]” and path “configuration/system.webServer/Modules”.
example remove.jpg

4.

The ApplyWebConfigModifications() method applies this change across the farm for the specific web application, so we don’t need to worry about each physical web.config file at the server-level. That is one of the main advantages of using PowerShell to update web.config modifications.

If there are multiple modifications we need to remove, we can use a loop to do that. The following example removes all of the modifications added by Bamboo Telerik Config in a particular Web application (they all have the same Owner value):

 1: $BambooConfigs = $webApp.WebConfigModifications | 
    Where-Object {$_.Owner -eq "Bamboo.SP2010.Config"}
 2: foreach ($config in $BambooConfigs) {
 3:     $webApp.WebConfigModifications.Remove($config)
 4: }
 5: $webApp.Update()
 6: $webApp.Parent.ApplyWebConfigModifications()

How to move your Bamboo Product License to a new server

How to move your Bamboo Product License to a new server

Overview of Licensing and and Product Activation

You must have a Bamboo product license for each Web Front-end (WFE) server in the SharePoint farm that serves web content. If you replace a server with another physical device, you can move the license from the old server to a new one. To do so, first deactivate the license and then re-activate by following the instructions below.

Step Action
1.

Go to Central Administration and under the Bamboo Solutions section, click Manage My License Keys.

NOTE: If you are using SharePoint 2007, in Central Administration, go to the Bamboo Solutions Corporation heading on the main page and click Bamboo Web License Manager.

Locate the product that you need to deactivate and click the product name link. The license Status Page will be displayed.

WLM-GMSApack status.jpg
Each server that is licensed for that product is listed on the page.

NOTE: If the License Key is not listed on the license status page, see Is there a way to find a lost or unknown Bamboo product license key.

2. In the Status Page, copy the license key from the server that will be deactivated to a safe location so you can use it on the new server (see Step 4 below). Then, click the Active status link. The Activation Page will be displayed.
3.

On the Activation Page, click the Deactivate button. Your license is now deactivated on that server.

NOTE: If your SharePoint WFE server doesn’t have access to the Internet, you will not be able to deactivate from this page. However, it is important to deactivate the license. Please see How to deactivate your Bamboo Product License if your server doesn’t have access to the Internet for a way to deactivate from a PC that does have access to the Internet.

4. When the new server is ready, see Activating Your Bamboo Product License for information about activating the license key for that server. Use the license key you copied to a safe location in Step 2 above to activate the product on the new server.

How to Migrate a Bamboo Web Part from SharePoint 2007 to SharePoint 2010 using the In-Place Upgrade Method

How to Migrate a Bamboo Web Part from SharePoint 2007 to SharePoint 2010 using the In-Place Upgrade Method

When you run an in-place upgrade from SharePoint 2007 to SharePoint 2010, the configuration data for the farm and all the content in the farm is upgraded on the existing hardware, in a fixed order. When you start the in-place upgrade process, Setup takes the Web server offline and the Web sites are unavailable until the upgrade is finished, and then Setup restarts the Web server.

Using the In-place Upgrade method, the following Bamboo products migrate to SP2010 with no errors or additional steps:

  • Alert Plus
  • Alerts Administrator
  • Chart Plus
  • Cross List
  • Column Level Security
  • Custom Identifier Column
  • Group Redirect
  • Group Email
  • In/Out Schedule Board
  • KPI Column
  • List Consolidator
  • List Rollup
  • List Search Simple
  • List Search Advanced
  • Lookup Selector Column
  • Mini-Calendar
  • My Alerts Organizer
  • Navigators
  • Password Expiration
  • Poll
  • Tree View
  • Site Creation Plus
  • Rich Text Column
  • Visual Indicator Column
  • Validator Column
  • Video Library
  • Task Master
  • User Manager for Sites
  • User Redirect
  • Virtual Map View
  • Wiki Publisher
  • World Clock and Weather

NOTE: If you are using a Bamboo product that is not on the above list and you are considering using the In-Place Upgrade method to migrate your farm, refer to the specific migration information for your product to learn more about possible limitations before proceeding with a migration.

Step Action
1.

Follow Microsoft’s Upgrade In Place to SharePoint 2010 article to perform the in-place upgrade.

NOTE: When running the SharePoint Products Configuration Wizard, be sure to select the option Change existing SharePoint sites to use the new user experience. Administrators control the user experience for end users and can decide which sub-option is then selected in this step.

2. During the upgrade process or before, retrieve the installation package and license keys for the SharePoint 2010 version of the Bamboo products you are migrating. See Migrate My Existing Bamboo Product License Key From SharePoint 2007 to SharePoint 2010 for additional details.
3.

After successfully upgrading to SharePoint 2010 and after all sites have completed their conversion to the new user experience, run the SharePoint 2010 Bamboo product installation package that you retrieved in Step 2.

On the Repair, Remove or Install screen, choose to Upgrade/Repair Existing and Install New. For more information, refer to Upgrading your Bamboo Web Part.

4.

Select and upgrade the Bamboo Web License Manager component provided in the same installation package. On the Repair, Remove or Install screen, choose to Upgrade/Repair Existing and Install New.

NOTE: The Bamboo Web License Manager only needs to be installed once per farm. Skip this step for subsequent Bamboo product installations on the farm.

5. Activate the SharePoint 2010 versions of Bamboo products. See Install and Activate a License for Bamboo Products in SharePoint 2010 for more information.
6. Refer to specific migration steps for the Bamboo product(s) you are migrating. There may be some extra steps required to overcome a known migration issue.

How to Migrate a Bamboo Web Part from SharePoint 2007 to SharePoint 2010 using the Database Attach Upgrade Method

How to Migrate a Bamboo Web Part from SharePoint 2007 to SharePoint 2010 using the Database Attach Upgrade Method

When you upgrade by using database attach upgrade, you detach the databases in the old farm and then attach them to the new farm. When you attach a database to the new farm, the SharePoint upgrade process runs and upgrades the whole database. The database attach upgrade process is similar to the in-place upgrade process. The difference is that the database attach upgrade process is performed manually, and is performed in a separate environment.

Using the Database Attach Upgrade method, the following products migrate to SP2010 with no errors or additional steps:

  • Chart Plus
  • Cross List
  • Column Level Security
  • Custom Identifier Column
  • Data-Viewer
  • Group Email
  • Group Redirect
  • List Search Simple
  • List Search Advanced
  • Mini-Calendar
  • Site Creation Plus
  • Task Master
  • Tree View
  • User Manager for Sites
  • Password Expiration
  • User Redirect
  • Validator Column
  • Visual Indicator Column
  • Wiki Publisher
  • World Clock and Weather

NOTE: If you are using a Bamboo product that is not on the above list and you are considering using the Database Attach Upgrade method to migrate your farm, refer to the specific migration information for your product to learn more about possible limitations before proceeding with a migration.

Step Action
1. The first step in the process is to set up a new environment to host the upgraded content. See Prepare the new SharePoint Server 2010 environment for a database attach upgrade for additional information from Microsoft.
2.

After you set up the new environment, use the procedures in Microsoft’s Attach Databases and Upgrade to SharePoint 2010 article to detach and then reconnect the databases to perform the actual upgrade.

NOTE: When attaching the databases, you must choose to update to the new user experience. Your Bamboo products will not perform correctly if you choose to remain in the old user experience after upgrade.

3. During the upgrade process or before, retrieve the installation package and license keys for the SharePoint 2010 release of the Bamboo product(s) you are migrating. See Migrate My Existing Bamboo Product License Key From SharePoint 2007 to SharePoint 2010 for additional details.
4.

After successfully upgrading to SharePoint 2010 and after all databases have been attached and converted, run the SharePoint 2010 Bamboo product installation package that you retrieved in Step 3.

Since this will be a new install on new hardware, you will be asked to choose the Web Applications to deploy to. Be sure to select the same Web Applications where the Bamboo product was deployed on the old farm. For more information about installation, refer to How to run the Installation-Setup Program.

5.

Install the Bamboo Web License Manager provided in the same installation package.

NOTE: The Bamboo Web License Manager only has to be installed once. Skip this step for subsequent Bamboo product installations.

6. Activate the SharePoint 2010 versions of Bamboo products. See Activating Your Bamboo Product License for more information.
7. Refer to specific migration steps for the Bamboo product(s) you are migrating. There may be some extra steps required to overcome a known migration issue.

Manually uninstall using PowerShell

Manually uninstall using PowerShell

Icon-WarningIMPORTANT: As of April 2017, Bamboo no longer includes ManualUninstallation.ps1 file in product download packages. An updated uninstall script is included instead. Please see Overview of the Updated Installation Process for Bamboo components and Uninstalling using the updated process for details.

Typically, Bamboo products are uninstalled from a server simply by selecting the Uninstall button for the product components in the Setup program. If you choose, however, you may also uninstall our products via another simple method. In this article, I will show you how to manually uninstall a Bamboo product with PowerShell.

Step Action
1.

Access the installation files for the product you want to uninstall. They are usually on the WFE Server where you installed.

Go to the Misc folder and locate the file ManualUninstallation.ps1

ManualUninstall on SP2010.jpg

This is a PowerShell script.

NOTE: Not all Bamboo products include a PowerShell script for uninstalling.

2. Next, open the SharePoint 2013 Management Shell program and Run as administrator:

mgmt shell app.png

3.

In the SharePoint 2013 Management Shell, go to the Misc folder of the Bamboo product installation files. Then run the script by entering:

.ManualUninstallation.ps1

cmd2.png

4.

A warning is displayed telling you to do the following before proceeding:

  • Deactivate the site collection feature for the product you are uninstalling. This script does not deactivate the features. They must be deactivated on all site collections where they have been activated.
  • Recycle the App Pool or reset IIS on all WFE servers before continuing.

    cmd3.png

5. Press Enter when ready, and the script will start. Wait for it to report Solution Removed Successfully, and then press Enter to exist.

cmd4.png

6. Check that the solution is successfully removed. In Site Collection features, the solution should no longer appear.
site collection features - nothing there.png
In Solutions Management in Central Administration, the solution should no longer be listed.
CA-soln mgmt.png
7.

Notice that the Bamboo.Core.v2.wsp solutions remains on the list in Solution Management. This solution is part of other Bamboo products and is left intentionally.

If you have no other Bamboo products on your farm, please see What is left behind after uninstalling to learn how to remove the Bamboo.core.v2.wsp also.

How to find the release number of a Bamboo web part

How to find the release number of a Bamboo web part

NOTE: Since you need to access the web part tool pane, you must be user with Design permissions on the site in order to determine the web part version.
Not all of Bamboo’s products are Web Parts; some products are custom columns for SharePoint and some are desktop programs, so this information does not apply to those particular components.

Step Action
1. Navigate to the SharePoint page where the web part is used. It can be any page, on any site. Because web parts are installed on your farm, the version is the same in all web apps, site collections, and sites.
2. Access the Web Part’s configuration tool pane. In edit mode (select Edit Page from the Site Actions menu), select Edit web part from the web part menu in the upper right corner.
edit web part menu.jpg
3. Locate the About Web Part section of the tool pane and expand it. The most important version is the File Version number for the first component listed. This is the current product version installed.
about web part contents.jpg
See About Bamboo product Version Numbers for more information about how our products are versioned.

How to deactivate your Bamboo Product License if your server doesn’t have access to the Internet

How to deactivate your Bamboo Product License if your server doesn’t have access to the Internet

If your SharePoint WFE server does not have Internet access, you will not be able to deactivate a Bamboo product license from Central Administration. Instead, you can access the My Bamboo area of the Bamboo Solutions web site to deactivate any Bamboo product license key.

Follow the steps below:

Step Action
1.

Determine the license key you want to move or deactivate. Go to Central Administration and under the Bamboo Solutions section, click Manage My License Keys.

NOTE: If you are using SharePoint 2007, in Central Administration, go to the Operations tab to see the Bamboo Solutions section and the Manage My License Keys link.

Locate the product that you need to deactivate and click the product name link. The license Status Page will be displayed.

WLM-GMSApack status.jpg
Each server that is licensed for that product is listed on the page.

NOTE: If you don’t see the License Key on this page see Is there a way to find a lost or unknown Bamboo product license key.

2.

Log in to My Bamboo from a computer with an Internet connection.

MB-login.png

NOTE: If you don’t have a login account, you can create one quickly. All you need is a valid email address.

3. At the bottom of any My Bamboo page in the My Orders tab, locate the Manage License link and click it. The Manage License page will be displayed.

Mb-Manage Lic link.png

4. On the Deactivate Your License side of the Manage License page, enter your license key and then click the magnifying glass (Mb-magnify.jpg). The Assembly Name licensed with this key will be displayed. Ensure it is the product you expect and then click Deactivate.
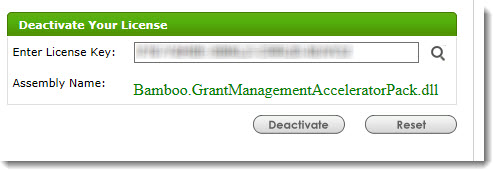
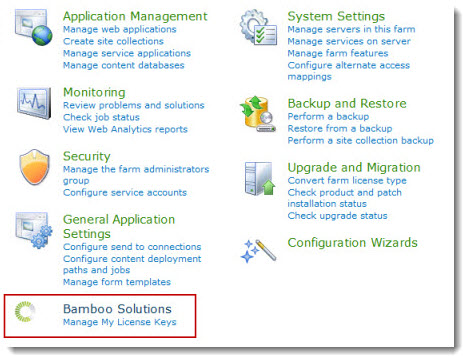
MB-deactivate with lic key.jpg
Once deactivated, the license key can be re-used on your new or changed server. A license key can be used on only one server at a time. Please see Activating Your Bamboo Product License for more information.

How to check the status of your trial license

How to check the status of your trial license

Overview of Licensing and and Product Activation

To check the status of your trial, follow these steps:

NOTE: If you are trialing a Bamboo Desktop application, please see Checking the status of a Bamboo Desktop application trial.

Step Action
1. Open SharePoint Central Administration. Notice the Bamboo Solutions heading on the page with the Manage My License Keys link beneath it.
CA2010BambooSolutions.jpg
2. Click Manage My License Keys. On the page that appears, expand the Individual Products section and locate the product you are trialing.
3. Click the product name or select Status from the associated menu to view the license status.

WLMIndividual Products.jpg

4. If you are running a trial, your license status will be Trial. The status page will show when your trial started and when it will end. Bamboo Product Trials last 30 days from when the product is installed on your SharePoint farm.

WLMLicStatus.jpg

How many License Keys do I need for my SharePoint farm?

How many License Keys do I need for my SharePoint farm?

Overview of Licensing and and Product Activation

For most products, you will need one Bamboo product License Key per Web Front End (WFE) server. A WFE server is any farm server running the Microsoft SharePoint Foundation Web Application (or Windows SharePoint Services Web Application in WSSv3/MOSS).

CA-servers on farm.jpgTo determine which servers on the farm run these services, go to Central Administration > System Settings > and then Manage servers in this farm. If you are using WSSv3/MOSS, this page is accessed in Central Administration through Operations > Servers in Farm. In this example, there are two WFE servers on the farm.

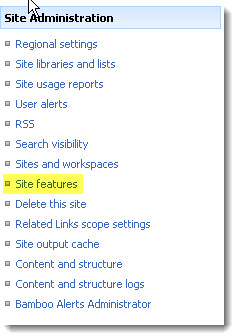
Some SharePoint farms have WFE servers that do not serve content to users, even though they are running the Microsoft SharePoint Foundation Web Application. You will not need a license key for WFEs that do not deliver content to end users.

Desktop applications, such as List Bulk Import and List Bulk Export require only one license per instance.

Some products, such as List Rollup and Alert Plus may include optional components that run on application servers in addition to WFE servers. To use these product features, you may need an additional server license for each separate (non-WFE) application server on which you would like to run the associated service for that product. Using application server features on already licensed WFE servers does not require any additional licensing.

See also:

  • System Requirements for Bamboo Web Parts
  • System Requirements for Bamboo Desktop Applications

How to Add a web.config Modification Using PowerShell

How to Add a web.config Modification Using PowerShell

Background

Please see How to modify a web.config file using PowerShell for some additional background information about why you should modify your web.config file(s) programmatically.

Many Bamboo products implement Telerik controls and install a specific version of Telerik.Web.UI assembly to the SharePoint farm. If the farm already has a different version of Telerik.Web.UI assembly, this may cause a conflict and you may see errors on SharePoint pages where you use these controls.

Resolution

To resolve this problem, we need to add an assembly binding to the web.config to specify which version to use. However, adding text by manually editing a web.config file is not recommended because it is not synced across the servers in the farm and is not saved in the SharePoint configuration database.

The best way to modify a web.config file programmatically is via PowerShell.

NOTE: Be extra careful when making changes to the web.config. Backup your file before changing it. Do not add or remove something unless you are absolutely sure what it is.

To demonstrate, we will use an example with Telerik controls. Consider this scenario:
Before a Bamboo product is installed, a server has Telerik.Web.UI version 2012.3.1016.35 previously installed. During the Bamboo product installation process, Telerik.Web.UI version 2011.2.915.35 was installed. Although it is OK to have multiple Telerik versions on a single server, it may cause a conflict in SharePoint.

We need to add an assembly binding to the web.config to tell the assemblies looking for version 2011.2.915.35 to use version 2012.3.1016.35. The assembly binding addition to the web.config file will look like this:

<dependentAssembly>
    <assemblyIdentity name "Telerik.Web.UI" publickKeyToken "121fae78165ba3d4" culture "neutral" />
    <bindingRedirect oldVersion "2011.2.915.35" newVersion "2012.3.1016.35" />
</dependentAssembly>

NOTE: Always redirect all versions found to the newest version of Telerik.Web.UI on the system, for backwards compatibility of functionality.

Step Action
1. First, open the SharePoint 2010 Management Shell. From the Start menu, select All Programs > Microsoft SharePoint 2010 Products > SharePoint 2010 Management Shell.
2.

Next, create the SPWebConfigModification object for the assembly binding
ConfigModProps.jpg
Where:

  • Path: A string that contains an XPath expression that specifies the node. If the Type property specifies EnsureChildNode, the Path property contains the XPath expression for the parent node under which the node is created. In this example, the runtime element of the web.config file is placed in another xml-namespace, so we have to identify the namespace. Otherwise, that element will not be found.
  • Name: A string that contains the name of the attribute or section node. When the type of web.config modification is EnsureChildNode, the Name property refers to an XPath expression that uniquely identifies the node under the parent node, as identified by the Path property.
  • Sequence: A 32-bit unsigned integer between 0 and 65536. This property throws an InvalidOperationException if the number is outside this range. A sequence is used only if there is more than one modification of the same type to the same node or attribute. In this case, modifications with lower sequence numbers are applied first.
  • Owner: A string that specifies the owner of the modification. You can use the Owner property to track ownership of modifications.
  • Type: An SPWebConfigModification.SPWebConfigModificationType value that specifies the type of modification. There are 3 types:
    • EnsureChildNode: Specifies that the web.config modification must ensure the existence of a child node of the node to which the XPath expression points. Value = 0.
    • EnsureAttribute: Specifies that the web.config modification must ensure that there is a value for a particular attribute. Value = 1.
    • EnsureSection: Ensures a singleton node. This node is only written once, even if multiple entities register multiple instances of EnsureSection to ensure the existence of a section. Value = 2.
  • Value: If the Type property specifies EnsureChildNode, the Value property contains an XML string that represents the node to be populated as a child of the specified parent node. If the type is EnsureSection, Value contains the name of the section. If the type is EnsureAttribute, Value contains the value set in the attribute.
3.

Then, apply the modification to the Web application (replace ‘WebApplicationURL’ with the actual URL of the Web application).
apply mods.jpg

NOTE: Bamboo products are only tested with the Telerik version that they install. Therefore, if a newer Telerik version is used, there might be some unexpected problem.

How to activate a Bamboo Site Feature

How to activate a Bamboo Site Feature

NOTE: In order to activate a site feature, you need to have at least the Manage Hierarchy level of permission for the site.

Step SharePoint 2007 SharePoint 2010/2013
1. From a page on the site where you want to activate the feature, click Site Actions > Site Settings > Modify All Site Settings. In the Site Administration columnn of the Site Settings page, click Site features.
sp2007 site features.jpg
From a page on the site where you want to activate the feature, click Site Actions > Site Settings. In the Site Actions section of the Site Settings page, click Manage site features.
site settings - site actions2010.png
2.

Find the appropriate feature. If it hasn’t yet been activated, click the Activate button.
sp2010 site features.jpg

The features available depend on the Bamboo products installed on your farm and deployed to your web application.

How long do trial versions of Bamboo software last and when do they start?

How long do trial versions of Bamboo software last and when do they start?

Overview of Licensing and and Product Activation

Currently, trials for Bamboo products run for 30 days, and begin when the product is installed. So if you download the software today, but don’t actually install for two weeks, that’s OK.

If you need an extension to a trial, contact your Bamboo Sales Representative (Sales@bamboosolutions.com).

Error Log Files

Error Log Files

Applies To

  • Bamboo Products
  • Windows SharePoint Services v3 and Microsoft Office SharePoint Server 2007
  • SharePoint Foundation 2010 and SharePoint Server 2010
  • SharePoint Foundation 2013 and SharePoint Server 2013—Standard Edition
  • SharePoint Server 2016

While troubleshooting issues, the Bamboo support team may request a copy of the log files for your Bamboo product(s). Many licensing, functionality and access issue information is captured in the log files found in the BambooSolutions file folder.

This directory is located at C:WindowsTempBambooSolutions

The log files are named in this format: bsc_bamboo_{processID}.log

  • where {processID} is the ID of the w3wp.exe process which was handling the request at the time of the error

NOTE: These files will be created on any farm server running the Microsoft SharePoint Foundation Web Application (on SharePoint 2010 or SharePoint 2013) or the Windows SharePoint Services Web Application (on SharePoint 2007).

To determine which servers on the farm run these services:

SharePoint 2007:

  • Go to the page Central Administration > Operations > Servers in Farm

SharePoint 2010:

  • Go to the page Go to the page Central Administration > System Settings > Manage Servers in this Farm

CentralAdmin.pngSharePoint 2013:

  • Go to the page Central Administration > System Settings > Manage Servers in this Farm

There may be many log files. When reporting a problem to support, attach the most recent file(s) to your support ticket. If you know the time at which the error occurred, choose the file with the corresponding date/time.

Refer to Topology and Services in SharePoint Central Administration for a list of servers running this service. Learn more…

Posts pagination

1 2 Next
Getting Started
The Bamboo Way
About Our Documentation
About the Installation Files
Glossary of Bamboo and SharePoint Terms
TechLib Subscription
References
BambooSolutions.com
Bamboo Nation
Webinars and Events
Bamboo Solutions Support on YouTube
My Bamboo
Contact
FAQ
About Product Release Numbers
Activating Your License
A Bamboo Feature Needs to be Activated
Resetting Your Password
Retired Bamboo Products
Bamboo Configuration Tool panes
How to Enter and Manage Support Requests
See All Products
Administration Toolkit
Product Page
Installing
Activating License
Release Notes
Alerts Administrator
Product Page
Installing
Release Notes
All Topics
Alert Plus
Product Page
Installing
Configure
Release Notes
All Topics
Bamboo Premier
Product Page
Installing
Activating License
Release Notes
Bamboo Select
Product Page
Installing
Activating License
Release Notes
Calendar Plus
Product Page
Installing
Configure
Release Notes
All Topics
Calendar Plus App
Product Page
Installing
Configure
Release Notes
Chart Plus
Product Page
Installing
Configure
Release Notes
All Topics
Column Level Security
Product Page
Installing
Configure
Release Notes
All Topics
Community Central
Product Page
Installing
Configure
Release Notes
All Topics
Community Management Suite
Product Page
Installing
Activating License
Release Notes
All Topics
Cross Site Display
Product Page
Installing
Configure
Release Notes
All Topics
Cross List
Product Page
Installing
Configure
Release Notes
All Topics
Custom Identifier Column
Product Page
Installing
Configure
Release Notes
All Topics
Data Viewer
Product Page
Installing
Configure
Release Notes
All Topics
Discussion Board Plus
Product Page
Installing
Configure
Release Notes
All Topics
DWG Parser
Product Page
Installing
Configure
Release Notes
All Topics
Essentials Plus Suite
Product Page
Installing
Activating License
Release Notes
Essentials Suite
Product Page
Installing
Activating License
Release Notes
File Share Library
Product Page
Installing
Configure
Release Notes
All Topics
Grants Management
Product Page
Installing
Configure
Release Notes
All Topics
Group Email
Product Page
Installing
Configure
Release Notes
All Topics
Group Redirect
Product Page
Installing
Configure
Release Notes
All Topics
In/Out Schedule Board
Product Page
Installing
Configure
Release Notes
All Topics
Knowledge Base
Product Page
Installing
Configure
Release Notes
All Topics
Knowledge Management Suite
Product Page
Installing
Activating License
Release Notes
All Topics
KPI Column
Product Page
Installing
Configure
Release Notes
All Topics
List Bulk Export
Product Page
Installing
Configure
Release Notes
All Topics
List Bulk Import
Product Page
Installing
Configure
Release Notes
All Topics
List Consolidator
Product Page
Installing
Configure
Release Notes
All Topics
List and Forms Extensions Toolkit
Product Page
Installing
Activating License
Release Notes
All Topics
List Print
Product Page
Installing
Release Notes
All Topics
List Rotator
Product Page
Installing
Configure
Release Notes
All Topics
List Rollup
Product Page
Installing
Configure
Release Notes
All Topics
List Search Advanced
Product Page
Installing
Configure
Release Notes
All Topics
List Search Simple
Product Page
Installing
Configure
Release Notes
All Topics
Lookup Selector Column
Product Page
Installing
Configure
Release Notes
All Topics
Mini Calendar
Product Page
Installing
Configure
Release Notes
All Topics
My Alerts Organizer
Product Page
Installing
Release Notes
All Topics
Navigators
Product Page
Installing
Configure
Release Notes
All Topics
Password Change
Product Page
Installing
Configure
Release Notes
All Topics
Password Expiration
Product Page
Installing
Configure
Release Notes
All Topics
Password Reset
Product Page
Installing
Configure
Release Notes
All Topics
Password Management Toolkit
Product Page
Installing
Activating License
Release Notes
All Topics
Project Management Central
Product Page
Installing
Configure
Release Notes
All Topics
PM Central Mobile
Product Page
Installing
Configure
Release Notes
All Topics
Project Management Suite
Product Page
Installing
Activating License
Release Notes
All Topics
Poll
Product Page
Installing
Configure
Release Notes
All Topics
Project Portfolio Dashboard
Product Page
Installing
Configure
Release Notes
All Topics
Quick Add
Product Page
Installing
Configure
Release Notes
All Topics
Quick Add App
Product Page
Installing
Configure
Release Notes
Rating Column
Product Page
Installing
Configure
Release Notes
All Topics
Rich Text
Product Page
Installing
Configure
Release Notes
All Topics
Send Message
Product Page
Installing
Configure
Release Notes
All Topics
Site Creation Plus
Product Page
Installing
Configure
Release Notes
All Topics
SQL View
Product Page
Installing
Configure
Release Notes
All Topics
Task Master
Product Page
Installing
Configure
Release Notes
All Topics
Team Calendar
Product Page
Installing
Configure
Release Notes
All Topics
Time Tracking & Management
Product Page
Installing
Configure
Release Notes
All Topics
Tree View
Product Page
Installing
Configure
Release Notes
All Topics
User Account Setup
Product Page
Installing
Configure
Release Notes
All Topics
User Directory
Product Page
Installing
Configure
Release Notes
All Topics
User Manager for Sites
Product Page
Installing
Configure
Release Notes
All Topics
User Profile Plus
Product Page
Installing
Configure
Release Notes
All Topics
User Profile Sync
Product Page
Installing
Configure
Release Notes
All Topics
User Redirect
Product Page
Installing
Configure
Release Notes
All Topics
User Registration Accelerator
Product Page
Installing
Configure
Release Notes
All Topics
Validator
Product Page
Installing
Configure
Release Notes
All Topics
Video Library
Product Page
Installing
Configure
Release Notes
All Topics
Virtual Map View
Product Page
Installing
Configure
Release Notes
All Topics
Visual Indicator
Product Page
Installing
Configure
Release Notes
All Topics
Wiki Publisher
Product Page
Installing
Configure
Release Notes
All Topics
Workflow Conductor
Product Page
Installing
Configure
Release Notes
All Topics
World Clock & Weather App
Product Page
Installing
Configure
Release Notes

CORPORATE HEADQUARTERS

Bamboo Solutions
12110 Sunset Hills Rd. Suite 600
Reston, Virginia 20190 USA

Toll Free: +1 .877.226.2662

Tel: +1 703.964.2002

CONNECT WITH US

SALES INQUIRES

Toll Free: +1 .877.226.2662
Email: Bamboo Solutions Sales

TECHINCAL SUPPORT

Visit our support site
Talk to our Bamboo Nation community
Bamboo Solutions and its related brands is the copyright of SharePointXperts, LLC. ©2002-2025Theme by Puro
  • Privacy Policy
  • Terms of Use