Using Views in Discussion Board Plus

Using Views in Discussion Board Plus

Return to Configuration Overview

Discussion Board Plus (SharePoint 2010 only) provides a default view for the topic list (Forum view) and two different views (Flat and Thread) for discussion threads. Click on a view name for more details about each view.

Step Action Result
1. To switch between the two available discussion thread views, click on a discussion topic in the Forum view, and click Forum Settings in the List ribbon. sa75breadcrumb.png

Verify an Answer or Suggest as Answer in Discussion Board Plus

Verify an Answer or Suggest as Answer in Discussion Board Plus

Any reply can be marked as a Verified Answer, whether it was first marked as a Suggested Answer or not. There can be only one Verified Answer. The steps are slightly different depending on which version of SharePoint you are using.

SharePoint 2010:

Decision Action Result
Mark a reply as the Verified Answer

In the Forum view of the discussion board within the reply you want to verify, click on Verify Answer.
SP10-001.png

NOTE: If you do not have the required permissions to verify an answer or if the Verify Answer feature is not enabled in the Forum Settings, you will not see the option in the toolbar at the top of the post.

After you click Verify Answer, the post will be shaded yellow and your name will appear at the top of the replies to show that it was “Verified by [Your Name]”.

The reply will also be moved to the top of the list, directly under the original post.
If another post was previously marked as the Verified Answer, it will be unmarked and returned to its normal position in the thread.

Verified.png
Suggest as Answer To suggest a reply as an answer, in the Forum view of the discussion board within the reply, click on Suggest as Answer.
Suggest.png

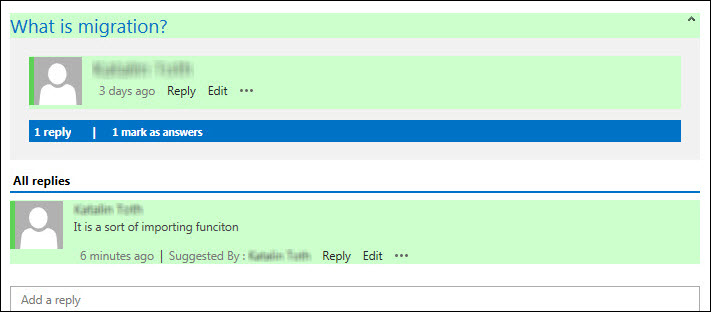
After you click Suggest as Answer, the reply will be shaded green and your name will appear at the top of the post to show that it was “Suggested by [Your Name]”.

Suggest2.png

NOTE: If you do not have the required permissions to suggest an answer or if the Suggest as Answer feature is not enabled in the Forum Settings, you will not see the option in the toolbar at the top of the post.

Undo Verify as Answer If you are the topic creator or a forum moderator and decide that the post is not really the answer, use Mark as Not Answer to remove the suggestion or click Verify Answer on a different post.
UndoVerify.png

If the post had been a Verified Answer, it will be removed from the top of the list and returned to its normal position in the thread.

NOTE: Only the user who marked the post as Suggested or Verified, the topic creator, or a forum moderator can Mark as Not Answer. For more information, see Permissions in Discussion Board Plus.

Delete an Answer

Discussion Board Plus uses the built-in SharePoint permissions to determine what actions a user can perform in a Discussion Board Plus list. For a description of permissions required to perform actions in forums, see Permissions in Discussion Board Plus. In addition to the default permissions provided by Discussion Board Plus:

  • Administrators and Moderators can add, update or delete any forum topic or post.
  • Members can add topics and posts, but can only edit or delete their own topics/posts.
  • If a read-only account is configured in the Forum Control Panel, anonymous users can read topics and posts but cannot add new topics or posts.

SharePoint 2013:

Decision Action Result
Mark a reply as the Verified Answer

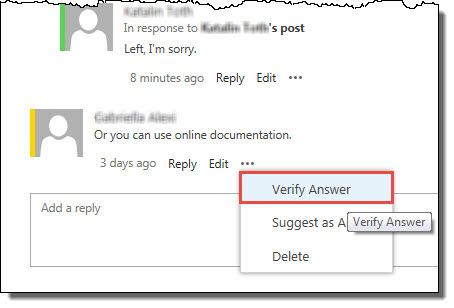
In the Forum view of the discussion board within the reply you want to verify, click on the ellipsis (…) and select the option Verify Answer in the Context Menu pop-up.

VerifyAnswer.jpg

NOTE: If you do not have the required permissions to verify an answer or if the Verify Answer feature is not enabled in the Forum Settings, you will not see the option in the toolbar at the top of the post.

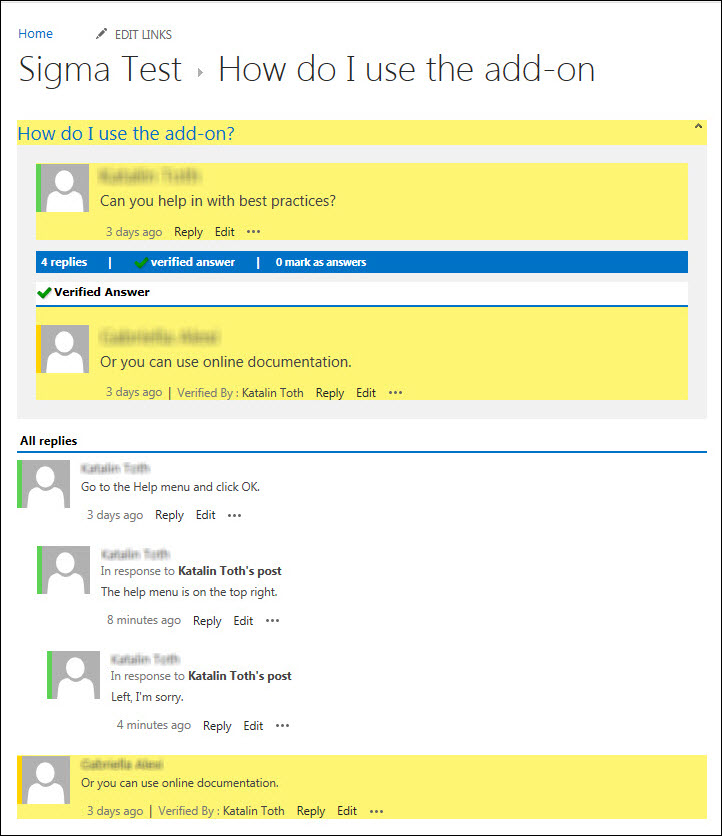
After you click Verify Answer, the post will be shaded yellow and your name will appear at the top of the replies to show that it was “Verified by [Your Name]”.

The reply will also be moved to the top of the list, directly under the original post.
If another post was previously marked as the Verified Answer, it will be unmarked and returned to its normal position in the thread.

VerifiedAnswer.jpg
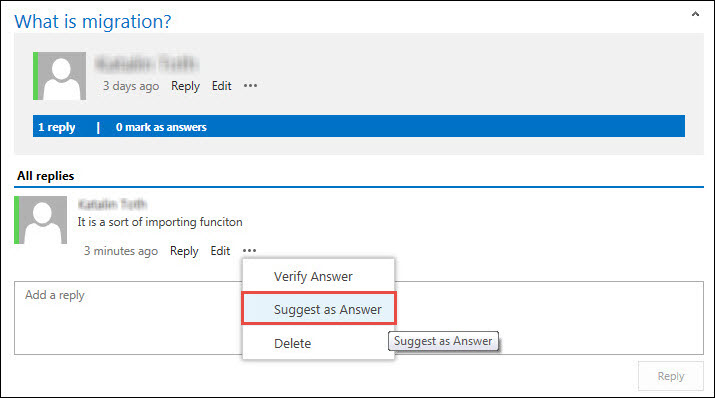
Suggest as Answer To suggest a reply as an answer, in the Forum view of the discussion board within the reply, click on the ellipsis (…) and select the option Suggest as Answer in the Context Menu pop-up.
SuggestAsAnswer.jpg

After you click Suggest as Answer, the reply will be shaded green and your name will appear at the top of the post to show that it was “Suggested by [Your Name]”.

SuggestedAnswerGreen.jpg

NOTE: If you do not have the required permissions to suggest an answer or if the Suggest as Answer feature is not enabled in the Forum Settings, you will not see the option in the toolbar at the top of the post.

Undo Verify as Answer If you are the topic creator or a forum moderator and decide that the post is not really the answer, use Unmark Verified Answer. Click on the ellipsis (…) within the reply you want to change and select the option Unmark Verified Answer in the Context Menu pop-up. The post will no longer be highlighted yellow in the thread.
Delete an Answer

Discussion Board Plus uses the built-in SharePoint permissions to determine what actions a user can perform in a Discussion Board Plus list. For a description of permissions required to perform actions in forums, see Permissions in Discussion Board Plus. In addition to the default permissions provided by Discussion Board Plus:

  • Administrators and Moderators can add, update or delete any forum topic or post.
  • Members can add topics and posts, but can only edit or delete their own topics/posts.
  • If a read-only account is configured in the Forum Control Panel, anonymous users can read topics and posts but cannot add new topics or posts.

Using List Search Simple Web Part to Search a Discussion Board List

Using List Search Simple Web Part to Search a Discussion Board List

Using List Search Simple Web Part to Search a Discussion Board List

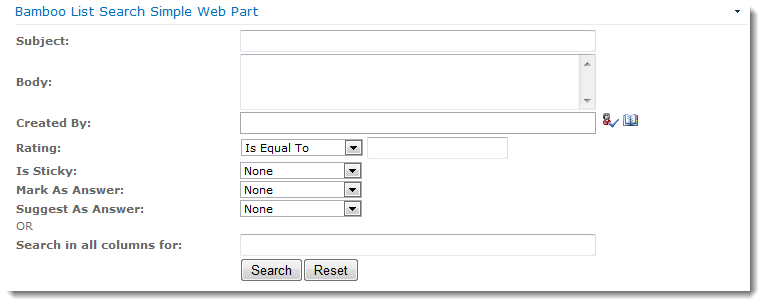
After successfully configuring List Search Simple Web Part, you are now ready to begin searching your Discussion Board Plus list. To search the posts in a Discussion Board Plus list, enter search words or phrases or select options in the List Search Simple Web Part and click the Search button. If Print and Export to Excel options are enabled for the List Search Simple Web Part, these options are displayed below the search criteria.
SA75_DiscussionBoardPlusSearch.png

The following information describes how to use individual Discussion Board Plus search fields to obtain effective search results. For general search tips, including tips for combining search terms and using search operators, see How to Use the List Search Simple Web Part.

Search Field Search Tips
Subject Searches the Subject field of discussion topics. A single result is returned for each matching topic; results are not repeated for individual replies in the thread. For search term tips, see Using the List Search Simple Web Part.
Body Searches the Body field of all discussion posts. Results are returned for all posts that contain matches. For search term tips, see Using the List Search Simple Web Part.
Created By Searches the Created By field of all discussion posts to identify topics and replies posted by a specific user. Enter a name and click the Check User button or use the Browse feature to search for a user.
Note: You can only search for one Created By user.
Rating Column Available if a Bamboo Rating column was added to the Discussion Board Plus list and the column was added to the Search Columns in the List Search Simple Web Part Settings. Can match topics or replies with ratings Equal To, Less Than, Greater Than, or Between the specified rating.
Is Sticky When Yes, matches posts that are marked as Sticky. When No, matches posts that are not Sticky.
Mark as Answer When Yes, matches posts that are Verified Answers. When No, matches posts that are not Verified Answers.
Suggest as Answer When Yes, matches posts that are marked as Suggested Answers. When No, matches posts that are not Suggested Answers.
Search in all columns for:

Available search option if the SharePoint Search service is configured and the option to Allow search in all columns is checked in the List Search Simple Web Part Settings. Search terms entered in the Search in all columns for field will be matched in any Discussion Board List column. Entering search terms here overrides any search criteria entered in other fields. For search term tips, see Using the List Search Simple Web Part.

Note: For an item to be found using a Search in all columns for search, you must also be able to find it in SharePoint Search.

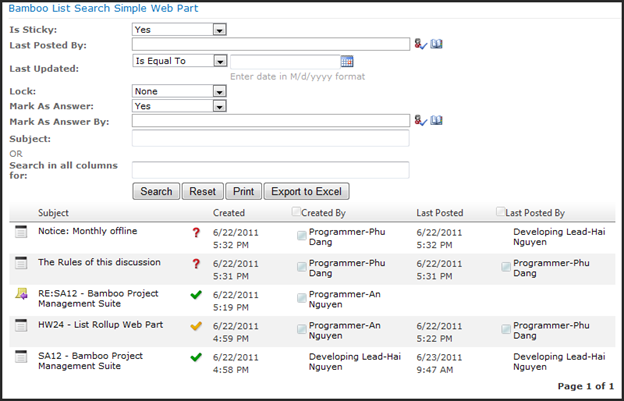
After you click Search, search results are displayed using a view optimized for Discussion Board Plus.
sa75search2.png

The following columns are included in the search results:

Result Field Description
Topic/Reply icon

Indicates whether the search result is a topic SA75_TopicSearchIcon.png or a reply SA75_SearchReplyIcon.png.

  • Clicking the Subject link for a topic will display the entire thread.
  • Clicking the Subject link for a Reply will display only the reply post.
Subject

Click on a Subject link to display the entire discussion thread.

  • If the result is a topic, hover over the Subject to view the Body of the topic post.
  • If the result is a reply, hover over the Subject to view the reply, who entered it and when it was entered, and the Subject and Body of the original topic post.

Click the item drop-down menu for the result to display additional options for the topic or post.

Status Indicates whether the post has been Suggested as Answer sa75_icon_suggested.png, is a Verified Answer sa75_icon_verifyanswer.png, or neither sa75_icon_unanswer.png.
Created By Displays who entered the topic or reply.
Last Posted Displays when a reply was last posted for the topic (topic results only).
Last Posted By Displays who posted the last reply to the topic (topic results only).

Using Discussion Board Plus

Using Discussion Board Plus

After you create a new Discussion Board Plus
application, you can start adding and replying to posts just like you would in an out-of-the-box SharePoint Discussion Board.

SharePoint 2010:

Step Action Result
1. To add a new post, click New Item in the Items ribbon. By clicking the drop-down arrow, you can select to create a BambooDiscussion or a Discussion. 001.png
2. To view all the posts in a topic (thread), click the Topic name. 2010-01.png
2010-02.png
3. To reply to a post, click the Reply in the top right section of the post.

Compose your reply and click Save.

2010-03.png
2010-04.png
4. To edit an existing post that you posted, click View Properties and select Edit Item in the View ribbon. View.png
Edit.png
5. After editing your post click Save to save your changes or Cancel to return to the post unchanged.

005.png

NOTE: Anonymous users can view Discussion Board Plus posts, but cannot add new posts or reply to existing ones.

SharePoint 2013:

Step Action Result
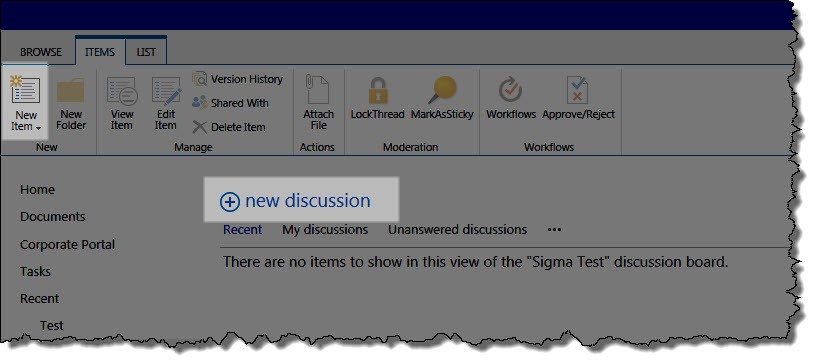
1. To add a new post, click the + new discussion link or click New Item in the Items ribbon. By clicking the drop-down arrow, you can select to create a BambooDiscussion, a BambooMessage, or a Discussion. New.jpg
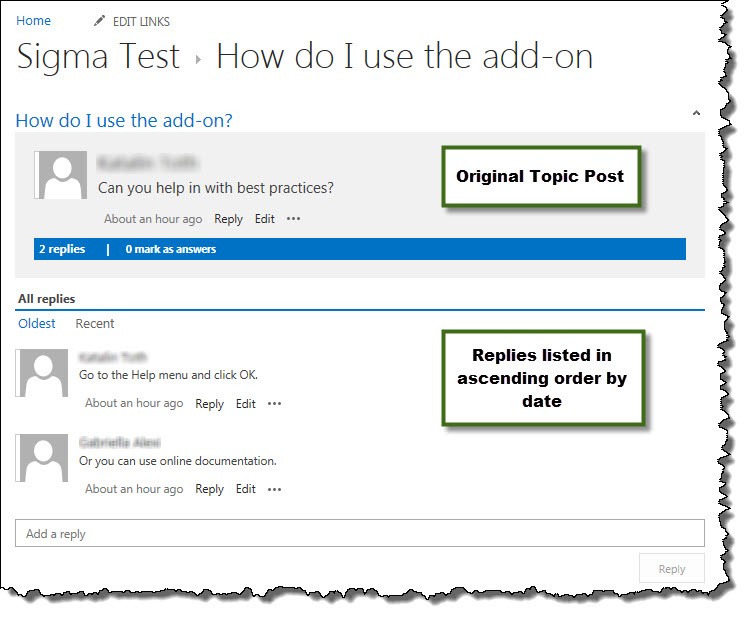
2. To view all the posts in a topic (thread), click the Topic name. TopicName.jpg
OrigReplies.jpg
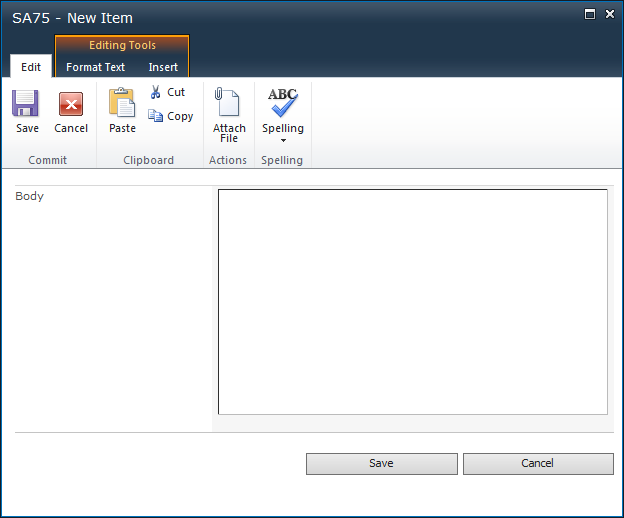
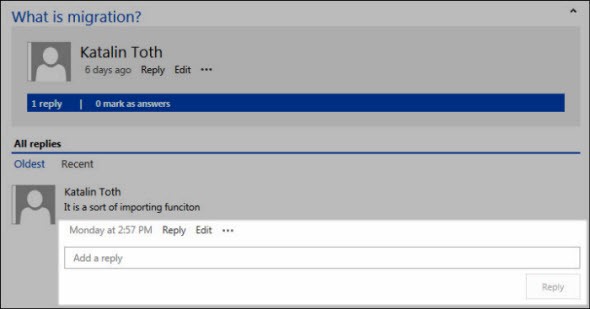
3. To reply to a post, click the Reply in the ribbon under the topic owner’s name or click in the Add a reply field and start writing your reply. Click Reply and your reply is sent and appears in the thread. ReplyToPost.jpg
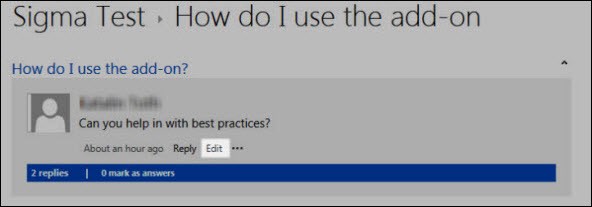
4. To edit an existing post that you posted, click the topic name and click Edit in the ribbon under your name and start writing. 2013-Edit.jpg
5. After editing your post click Save to save your changes or Cancel to return to the post unchanged.

005.png

NOTE: Anonymous users can view Discussion Board Plus posts, but cannot add new posts or reply to existing ones.

See also:

Discussion Board Plus Thread View

Discussion Board Plus Thread View

Discussion Board Plus provides a default view for the topic list (Forum view) and two different views for discussion threads. Click on a view name for more details about each view.

ThreadView.png

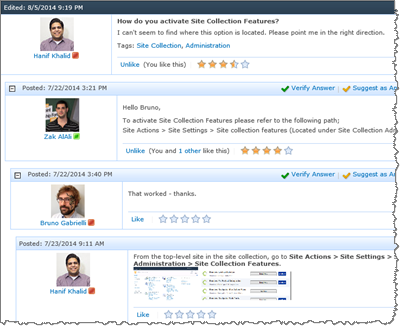
Thread view provides the same features as Flat view, with one difference: In Thread view, posts are displayed in a nested view.

NOTE: Thread View available in SharePoint 2010 only at this time.

Replies to a parent post are listed as child posts.

A Verified Answer is listed immediately after the original post, no matter when it was originally posted.

As with Flat view, the original post in the thread will always be listed at the top.

Return to: Using Views in Discussion Board Plus

Release Notes for Discussion Board Plus

Release Notes for Discussion Board Plus

NOTE: Release Notes will open in a new browser tab

WSSv3/MOSS SharePoint 2010 SharePoint 2013 SharePoint 2016
Product not available Release Notes Release Notes Release Notes
Microsoft ended mainstream support for SharePoint 2007 in October 2012. See Microsoft’s Lifecycle Support Policy.
At that time, Bamboo stopped enhancements to our SharePoint 2007 product line, but continues to provide support and bug fixes to customers with active support contracts until October 2017. Previously purchased licenses will continue to function after October 2017, but support for these products will end, and no additional bug fixes will be provided beyond that time. Bamboo plans to cease selling new licenses and annual support contacts for its SharePoint 2007 products in October 2016 to ensure customers will be eligible to receive support for at least one year after purchase.
Microsoft plans to end mainstream support for SharePoint 2010 in October 2015. See Microsoft’s Lifecycle Support Policy. At that time, we will stop any enhancements for our SharePoint 2010 product line but will continue to provide support and bug fixes for our SharePoint 2010 products to customers with active support contracts until October 2020. Previously purchased licenses will continue to function after October 2020, but support for these products will end, and no additional bug fixes will be provided beyond that time. Bamboo plans to cease selling new licenses and annual support contacts for its SharePoint 2010 products in October 2019 to ensure customers will be eligible to receive support for at least one year after purchase.

Visit our website where you can get the latest info about each of our products for SharePoint 2013.

A separate installation package and license key is required for SharePoint 2013 deployment. For additional details, review the following knowledge base articles:

Bamboo Solutions has also begun releasing products for SharePoint 2016. For additional details, check the product release notes in the link above, or contact us.

For details on migration, see the Knowledge Base Article “Migrate Bamboo Products from SharePoint 2013 to SharePoint 2016”

Understanding Bamboo Releases:

  • Bamboo offers Trial, Basic and Premium support.
    • Free Trial support expires after 30 days.
    • For more information about Basic and Premium support, please see the Support Plans page.
    • There may be a fee to upgrade from a major version to another.

See Also:

Permissions in Discussion Board Plus

Permissions in Discussion Board Plus

Return to Overview of the Configuration Toolpane

Top

Discussion Board Plus uses the built-in SharePoint permissions to determine what actions a user can perform in a Discussion Board Plus list. We’ve divided up the sections of Discussion Board Plus to provide you a helpful way to understand the variations in permissions and settings for the tool.

General Permissions

The table below describes the permission or permission level required to perform each action.

Discussion Board Plus Action
Manage Lists
Full Control
Topic Creator1
Site Collection Administrator2
Verify Answer
No
Yes
Yes
Yes
Move Topic
Yes
Yes
Yes*
Yes
Suggest as Answer
Yes
Yes
Yes
Yes
Mark as Not Answer
Yes**
Yes
Yes
Yes
Lock/Unlock Topic
Yes
Yes
Yes*
Yes
Mark/Unmark Topic as Sticky
Yes
Yes
Yes*
Yes
Access Forum Settings
Yes
Yes
Yes
Yes
Edit/Reply
No
Yes
Yes***
Yes
After topic is locked:
Edit/Reply/Suggest or Verify Answer/
Mark as Not Answer
No
No
No
Yes
After topic is locked:
Mark or Unmark as Sticky/Unlock Topic
Yes
Yes
Yes*
Yes

1The user who created the topic (does not apply to anonymous users).
2SharePoint site collection administrators.
*Yes, if the creator has the Manage Lists permission, Full Control permission level, or is a site collection administrator.
**Yes, if the user suggested or verified the answer originally.
***Yes, if the user has the Edit Items permission.

To set up your own SharePoint permission levels to use with Discussion Board Plus, refer to the following information from Microsoft: Edit, create, and delete permission levels.

Top


Private Topic Permissions

Discussion Board Plus Action
Recipient/ Topic Owner
Contribute
Design
Full Control
Site Collection Administrator
System Account
Create Topic
No
No
Yes
Yes
Yes
Share With
Yes*
No
No
Yes
Yes
Yes
Access Topic
Yes
No
No
Yes
Yes
Yes
Get Alert Notification
Yes
No
No
No
No
No

*Yes, if the user has Full Control permission level.
**Yes, alert sent to the Recipients only.

Top

Private Reply Permissions

Discussion Board Plus Action
Recipient
Contribute
Design
Full Control
Site Collection Administrator
System Account
Create Reply
Yes
Yes
Yes
Yes
Yes
Access Reply
Yes
No
No
Yes
Yes
Yes
Get Alert Notification
Yes
No
No
No
No
No

Top

Move Topic Permissions

Discussion Board Plus Action
Source List
Target List
Allow Move Topic?
If Topic in List:
Is a Locked Topic?
No
Yes
Yes
No
Is a Sticky Topic?
No
Yes
Yes
No
Is a Private Topic?
No
Yes
Yes
No
Contains a Private Reply?
No
Yes
Yes
No
Inherits List Permissions from Parent?
Yes
Yes
Yes
Yes
No
No
No
No
No
No
Yes
No
Inherits Site Permissions from Parent?
Yes
Yes
Yes
Yes
No
No
No
No
No
No
Yes
No

Top

Forum Settings for Discussion Board Plus List

Forum Settings
Source List
Target List
Allow Move Topic?
Verify Answer
Enabled
Enabled
Yes
Disabled
Enabled
Yes
Disabled
Disabled
Yes
Enabled
Disabled
No
Suggest as Answer
Enabled
Enabled
Yes
Disabled
Enabled
Yes
Disabled
Disabled
Yes
Enabled
Disabled
No
Tagging
Enabled
Enabled
Yes
Disabled
Enabled
Yes
Disabled
Disabled
Yes
Enabled
Disabled
No
Like
Enabled
Enabled
Yes
Disabled
Enabled
Yes
Disabled
Disabled
Yes
Enabled
Disabled
No

Top

Permissions for Forum Actions

Forums use the general permissions by default. And in addition to the permissions provided by Discussion Board Plus, please note the following for Community Central forums:

  • Administrators and Moderators can add, update or delete any forum topic or post.
  • Members can add topics and posts, but can only edit or delete their own topics/posts.
  • If a read-only account is configured in the Forum Control Panel, anonymous users can read topics and posts but cannot add new topics or posts.

Permissions for Blog Actions

Community Central uses the default SharePoint settings to determine who can perform actions in a blog site. For a list of default permissions for basic blog actions, see the table below. For information about customizing blog site permissions, see the following article:

Configure permissions and settings for a blog (From office.microsoft.com)

Blog Action
Administrators
Moderators
Members
Visitors
Anonymous
Users
Read Blog Posts and Comments
Yes
Yes
Yes
Yes
Yes
Create Blog Posts
Yes
Yes
Yes
No
No
Edit Blog Posts
Yes
Yes
Yes*
No
No
Add Comments
Yes
Yes
Yes
No1.
No1.
Edit Comments
Yes
No
Yes*
No
No
Approve Blog Posts and Comments
Yes
Yes
No
No
No
View Draft Posts and Pending Comments
Yes
Yes
**
No
No
Manage Blog Categories
Yes
Yes
Yes
No
No

* Members can edit any blog post or comment by default (not just their own post/comment).

1. Allow visitors and anonymous users to add comments by modifying list permissions.

** Members can view their own draft posts and comments pending approval, but not posts/comments created by other Members.

Top

Configuring Anonymous Access

By default, anonymous access is not enabled in SharePoint 2013. SharePoint administrators may want to enable anonymous users to have access to Community Central content without having to provide authentication credentials. Anonymous access is permitted or denied based on the permissions for the site. Additional configuration is needed for anonymous users to access Community Central content.

For example:

  • Viewing locked topics – In order for anonymous users to view locked topics in forums, you must configure a read-only forum access account in each forum site’s Forum Control Panel. All other forum content is visible if the site is configured to allow anonymous access.
  • Viewing avatars – In order for anonymous users to be able to see avatars (the SharePoint user profile picture), additional configuration steps are needed. For instructions, see this blog.
  • Adding blog comments – In order for anonymous users to add blog comments, the administrator must modify the list permissions for the Comments list in each blog site. For instructions, see this blog.

For more information about configuring SharePoint for anonymous access, see:

  • Using ideas from this article from Microsoft, decide whether to allow access for anonymous users.
  • This article from Microsoft covers configuring anonymous access.
  • For SharePoint 2010-specific configuration, see this blog.

Alternatively, you can configure SharePoint for anonymous access for forms-based authentication where the accounts can be created from the database. For more information on configuring anonymous users for forms-based authentication, see:

See also:

Top

Overview of the Discussion Board Plus Configuration Toolpane

Overview of the Discussion Board Plus Configuration Toolpane

There are several areas that need to be configured before you open Discussion Board Plus to your users. Areas that need configuration are illustrated in the topics linked below.

Getting Started

One of the first things you need to consider after creating a new Discussion Board Plus is who will have permissions to the boards and forums.

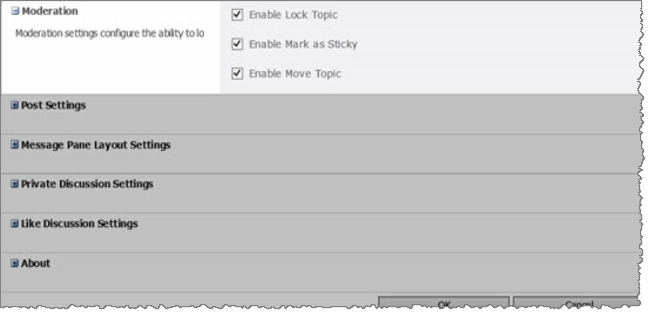
Forum Moderation Settings

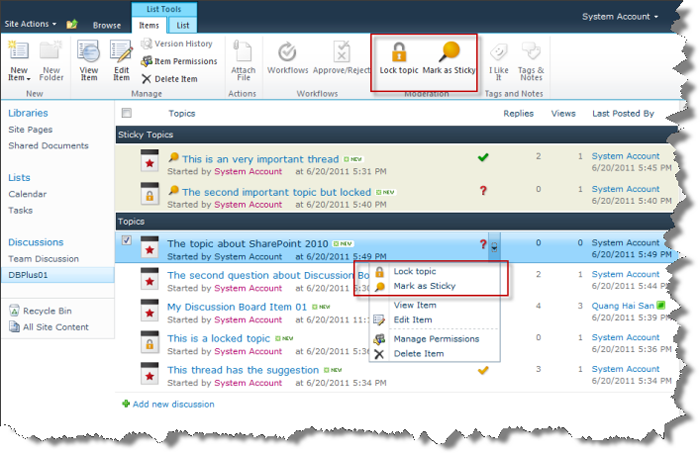
Moderating forums includes locking topics and marking topics as “sticky” so they float to the top of a list of topics in a forum. You can also control whether or not topics can be moved around from one forum to another.
ModSetting.png

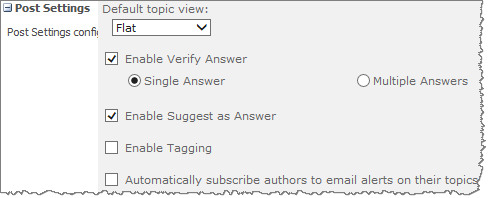
Post Settings

You have a variety of choices as to how posts are configured.
postsettings.png

Message Pane Layout Settings

This is one setting that controls whether the message window pane sits on the left or right of a forum.
MsgPane.png

Private Discussion Settings

Whether or not you want to enable private topics and/or private replies is set within this section.
PrivateDiscSettings.png

Like Settings

Social media today is liked and you can enable your board to use the Like feature.
LikeSettings.png

Other Configuration Topics

Lastly, there are a few other options that you can configure that can enhance the experience for your users.

Move a Topic to a Different Discussion Board Plus List

Move a Topic to a Different Discussion Board Plus List

If enabled by your site admin, you can a topic from one Discussion Board Plus list to a different Discussion Board Plus list.

Step Action Result
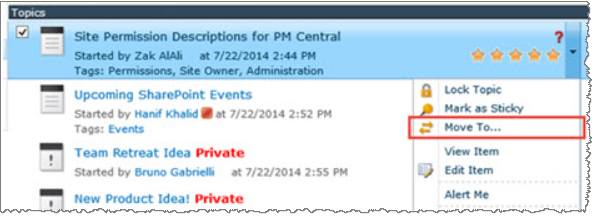
1. In the Forum view of the discussion board, select the topic you want to move.

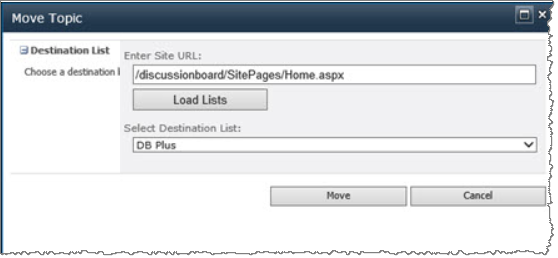
In the Items ribbon or from the item drop-down menu, select Move To.
RibbonMove.png
ForumView.png

NOTE: If you do not have the required permissions to Move Topic or if the Move Topic feature is not enabled in the Forum Settings, you will not see the option in the ribbon or item menu.

2. In the Items ribbon or from the item drop-down menu, select Move To and enter the Site URL of the Discussion Board Plus List to which the topic will be moved. MoveToList.png

this text won’t be displayed, but this #notification will be searchable.

Email Notification after Topic Moved

MoveAlert.pngMoving a topic triggers an email alert to the topic’s author and participants.

The body of this email contains the following information:

  1. Source list Site and Topic name (Subject)
  2. Name of user who moved the Topic
  3. Link to the Destination forum
  4. Link to the Destination topic

NOTE: An alert is not sent to users who rated content or marked answers but did not post a reply in the discussion thread. If you do not have the required permissions to move a topic or if the Move Topic feature is not enabled in the Forum Settings, you will not see the option in the ribbon or item menu.

Migrating a SharePoint Discussion Board to Discussion Board Plus

Migrating a SharePoint Discussion Board to Discussion Board Plus

MTicon.pngYou can migrate existing SharePoint Discussion Board lists to Discussion Board Plus using the Discussion Board Plus Tool, included with the Discussion Board Plus Setup program. The Migration Tool allows you to migrate all existing discussion board topics and posts to a Discussion Board Plus list so you can take advantage of features like Sticky, Lock Topic, Suggest as Answer and Verify Answer.

There are three migration options available in the Discussion Board Plus Migration Tool. Select a migration function, complete the required information, and click Run. The SharePoint Discussion Board list will be migrated to the target Discussion Board Plus list.

For more details about each of the migration options, click an option in the list below.

The Migration Tool has the following features and limitations:

  • All discussion board topics and posts are migrated.
  • Attachments to posts are migrated.
  • Existing SharePoint alerts can be migrated.
  • Images in existing SharePoint Discussion Board list posts will be visible in the new Discussion Board Plus list in most cases:
    • If the image is a link to an external URL and the URL is reachable from the source and target list, the image will be visible.
    • If the image is in a SharePoint Picture Library and was inserted using the Insert Picture function, the image will be visible (the image link path is relative the root of the site collection).
    • If the image link was inserted manually and the image source is an absolute path or is a relative path that is the same in relation to both the source and target lists, the image will be visible.
    • If the image link was inserted manually and is a relative path that is not valid in the target list, the image will not be visible.
  • SharePoint User and Group permissions from the source site are copied to the target site (only applicable if the source or target site does not inherit permissions).
  • The source and target lists must be in the same site collection.
  • The Migration Tool migrates one list at a time.

Migrate Discussion Board Plus from SharePoint 2010 to SharePoint 2013

Migrate Discussion Board Plus from SharePoint 2010 to SharePoint 2013

NOTE: In order to migrate a Bamboo product to SharePoint 2103 from a SharePoint 2010 environment, you need to ensure that the SharePoint 2010 farm has the appropriate version installed. If your Bamboo product version is older, you may need to upgrade the SharePoint 2010 version before migrating to SharePoint 2013. Please refer to information about the specific products that are installed on the farm you are migrating for possible additional steps needed or limitations of the migration. Please note that Discussion Board Plus does not support “SharePoint 2010 look and feel” on SharePoint 2013.

For additional information about upgrading your existing SharePoint 2010 Farm to SharePoint 2013, read these TechNet articles:

Bamboo Solutions supports the Database Attach upgrade method for upgrading to SharePoint 2013. Bamboo does not support the downgrade of SharePoint editions during a migration (i.e., SharePoint Server 2010 to SharePoint Foundation 2013).

Migration Steps

Step Action Description
1. Follow Microsoft’s Upgrade databases from SharePoint 2010 to SharePoint 2013 article to perform the database-attach migration. NOTE: Install the Discussion Board Plus Upgrade Console to upgrade the site collection containing your migrated Discussion Board Plus lists. Please follow the additional migration instruction outlined in Step 4.
2. During the migration process, retrieve the SharePoint 2013 installation package and license keys for the Bamboo products you are migrating.
See Migrate your Bamboo Product License Key From one SharePoint version to another for additional details.
3.

After successfully migrating your farm to SharePoint 2013 (the Microsoft bits), run the SharePoint 2013 Bamboo product installation package(s) downloaded in Step 2 above. During the installation, under Deployment Targets, be sure to select the appropriate Web Applications where the Bamboo product was deployed in the old environment.
For more information about installation, refer to How to run the Installation-Setup Program.

NOTE: The Bamboo Web License Manager only has to be installed once. Skip this step for subsequent Bamboo product installations. If you are installing multiple Bamboo products, you only need to install the Web License Manager once on the new farm.

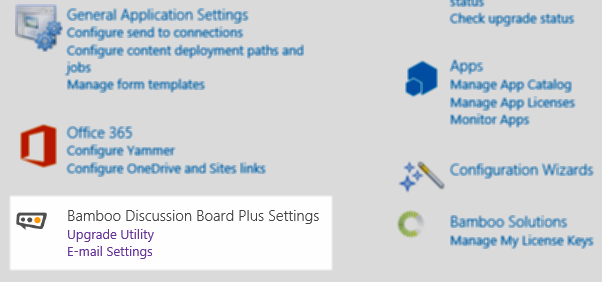
4. Discussion Board Plus Upgrade Utility:
After installing Discussion Board Plus, access the Central Administration site for SharePoint 2013 and click Upgrade Utility under Bamboo Discussion Board Plus Settings –

sa75centraladminsettings.png

4A. Upgrade Site Collection:
Enter the root Site Collection URL to upgrade Discussion Board Plus lists in a single site collection.
sa75upgradesitecollection.png
4B. (or) Upgrade Web Application:
Enter the Web Application URL to upgrade Discussion Board Plus lists in the web application.
sa75webapp.png
5. Activate the SharePoint 2013 versions of Bamboo products.

Migrate All (Export and Import)

Migrate All (Export and Import)

Migration Tool Overview

The All function in the Migration Tool exports existing SharePoint Discussion Board data and then imports it into a Discussion Board Plus list.

This option is appropriate for most migration scenarios.

To perform an export and import using the All function:

Step Action Result
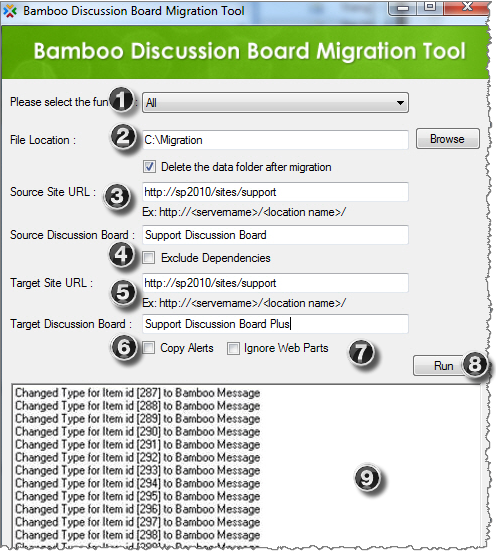
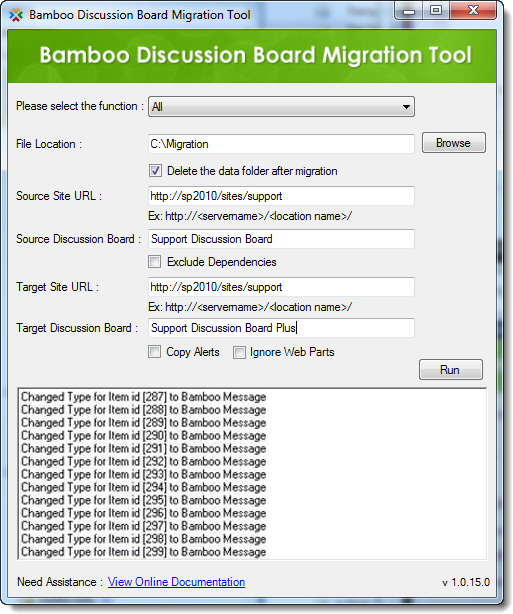
1. In the Discussion Board Plus Migration Tool, select the All function. MigrationTool.png
2. File Location: Enter the location where data and log files should be saved. If you want the Migration Tool to delete the data file after the migration is complete, check the option Delete the data folder after migration.
3. Source Site URL: Enter the URL for the site where the existing SharePoint Discussion Board list is located.
4. Source Discussion Board: Enter the list name of the SharePoint Discussion Board list that contains the data you want to migrate.
5. Exclude Dependencies: Excludes export of item dependencies such as images, master pages and page layouts. These items can sometimes cause problems during import and do not need to be imported if the source and target discussion boards are on the same site. Use this option if previous import attempts have failed, and only if the source and target discussion boards are on the same site.
6. Target Site URL: Enter the URL for the site where the target Discussion Board Plus list is (or will be) located.
7. Target Discussion Board: Enter the list name of the Discussion Board Plus list you want to migrate data to. If the Discussion Board Plus list does not yet exist in the target site, the Migration Tool will create it.
8.

Copy Alerts: If you want to copy SharePoint alerts from the SharePoint Discussion Board list to the Discussion Board Plus list, check the Copy Alerts option.

Icon-Warning WARNING Use this option with caution. Users who have alerts configured on the old discussion board will get new alerts when posts are copied to the new discussion board. SharePoint treats the new copy of the discussion board posts as “changed” or “new”. For large discussion boards, this could generate hundreds or thousands of alert e-mails.

9. Ignore Web Parts: Excludes the import of web parts associated with list forms. Importing these web parts can sometimes cause problems during import and is not required when the source and target discussion boards are on the same site. Use this option if previous import attempts have failed, and only if the source and target discussion boards are on the same site.

Message Pane Layout

Message Pane Layout

Return to Configuration Overview

These settings let you configure the default Layout displayed in Discussion Board Plus list views.

Right Layout
LayoutRight.pngWhen the Right layout radio button is selected, the message container is displayed on the right of the user information as shown here.

Bottom Layout
LayoutBottom.pngWhen you select this option, the message container is displayed below the user information.

NOTE: Message Pane Layout settings available in SharePoint 2010 only at this time.

Insert Video Options in Discussion Board Plus

Insert Video Options in Discussion Board Plus

Top

When creating or replying to threads in Discussion Board Plus, authors can share video (if the file format is supported) by using the From Embed Code option. Discussion Board Plus paired with Video Library gives authors three additional ways to upload and insert video in their posts:

You can choose to select a video from one of four locations:

Sharing videos allows users to view video thumbnails in the body of discussion threads. See a list of Bamboo’s Supported File Formats.

Sharing a Video in Discussion Board Plus

Step Action Result
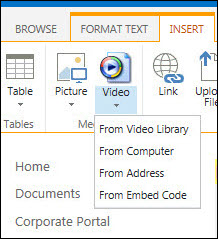
1. To share a video when creating or replying to a post, click the Insert tab in the Editing Tools section and then the Video icon to view the drop-down menu of methods for sharing videos.
2.

Choose one of the four sources for your video (each is described below; just click the link to follow the instructions):

SA75_2013_video.jpg
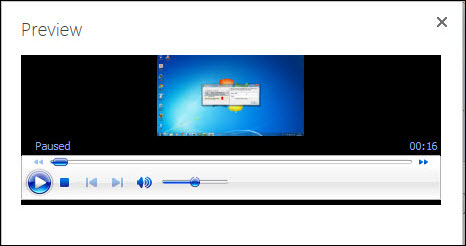
3. Click the Preview button to see the video before insertion. SA75_2013_video_preview.jpg
4. Once the video file is selected and inserted in the Body field, click Save to publish the content.

Top

Sources for videos

From Video Library

Step Action Result
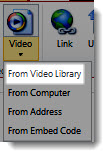
1. FromVideoLibrary.jpg On the Video drop-down menu, select From Video Library.
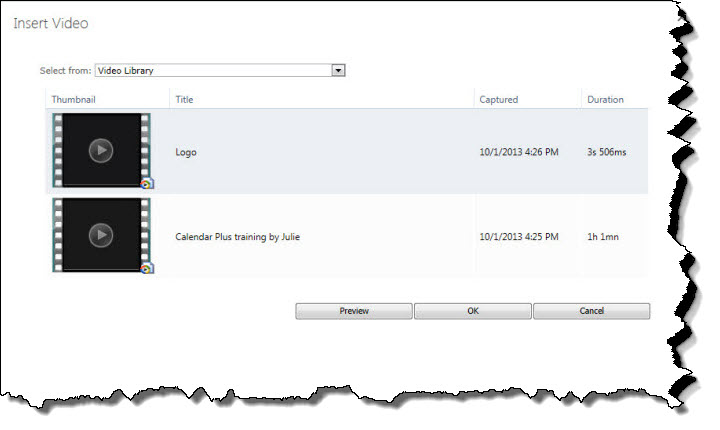
2. Choose the Video Library, where the video is stored, from the drop-down menu. SA75_2013_video_library.jpg
3. Select the video to upload and click OK.

NOTE: For additional help about installing, configuring, and using Video Library, see Video Library Online Documentation.

Top

From Computer

Step Action Result
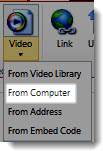
1. FromComputer.jpgOn the Video drop-down menu, select From Computer.
2. From the drop-down menu, choose the Video Library where your video is stored. SA75_2013_video_computer.jpg
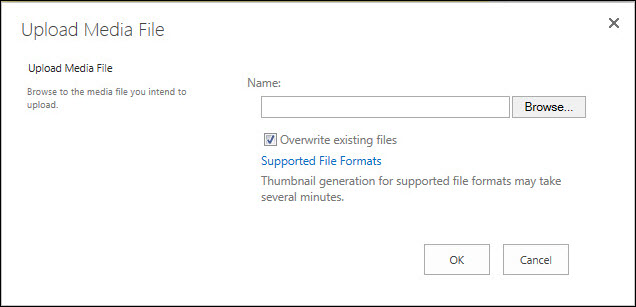
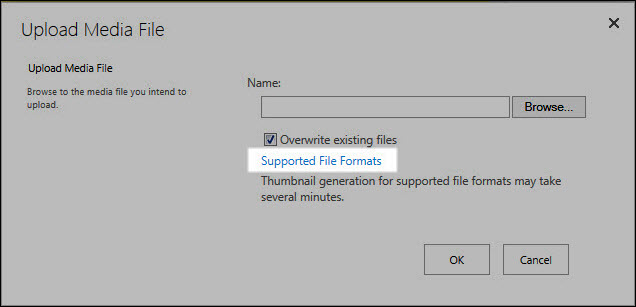
3. Choose the file to upload by clicking Browse… from the Upload Media File window. SA75_2013_video_computer_suported.jpg
4. Select the file from your computer and click OK.

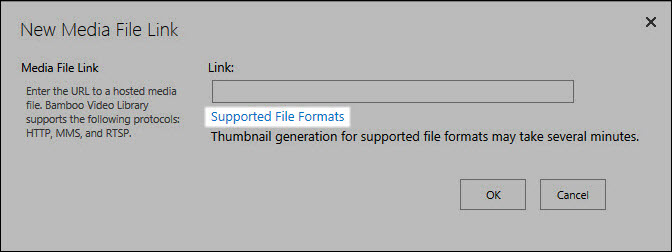
NOTE: When uploading or linking to a video, click the Supported File Formats link for a list of compatible file extensions. A new browser window will open with a table listing the file type in the left column and the extension in the right column.

Top

From Address

Step Action Result
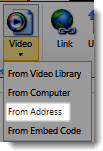
1. FromAddress.jpgOn the Video drop-down menu, select From Address.
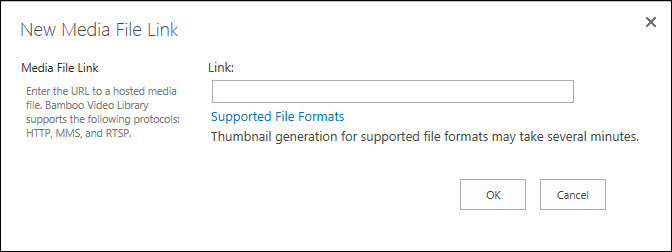
2. Type the URL in the Link field. Bamboo supports the following URL protocols: HTTP, MMS and RTSP. video_address.jpg
3. Click OK.

video_address_supported.jpg

NOTE: When uploading or linking to a video, click the Supported File Formats link for a list of compatible file extensions. A new browser window will open with a table listing the file type in the left column and the extension in the right column.

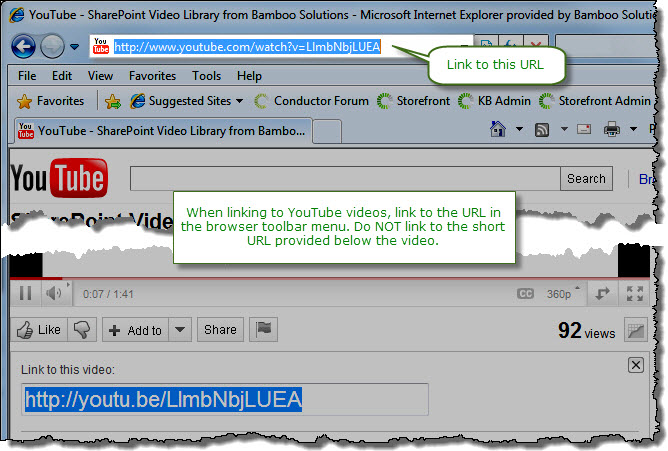
YouTubeURL.jpg

NOTE: Video Library has been designed and tested to work with YouTube. Links to files on other Internet media services may work, but are not officially supported and may not be able to provide metadata to Video Library. For YouTube video links, use the full URL listed in the browser toolbar instead of the shortened URL provided for social media sharing.

Top

From Embed Code

Step Action Result
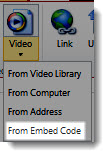
1. FromEmbedCode.jpg On the Video drop-down menu, select From Embed Code.
2. Enter the code in the From Embed Code window.

Example Code :

 <iframe width="560" height="345"        
  src="http://www.youtube.com/embed/YAu83f-6-RM?  
 rel=0" frameborder="0" allowfullscreen></iframe>
3. Click OK. video_embed.jpg

Top

Supported Video File Extensions

Container File Extension
Windows Media Video
  • WMV
  • WM
  • ASF
MPEG 4 Part 2 and Part 10
  • MP4
Flash Video
  • FLV
Audio Video Interleave
  • AVI
MPEG-1/MPEG-2 Part 2
  • MPEG
  • MPG
  • MPE
  • MPV2
Other Audio Containers
  • MPA
  • MP2
  • MP3
  • WMA
  • WAV

Top

Import SharePoint Discussion Board list data

Import SharePoint Discussion Board list data

Migration Tool Overview

The All function in the Migration Tool exports existing SharePoint Discussion Board data and then imports it into a Discussion Board Plus list.

This option is appropriate for most migration scenarios.

To perform an export and import using the All function:

Step Action Result
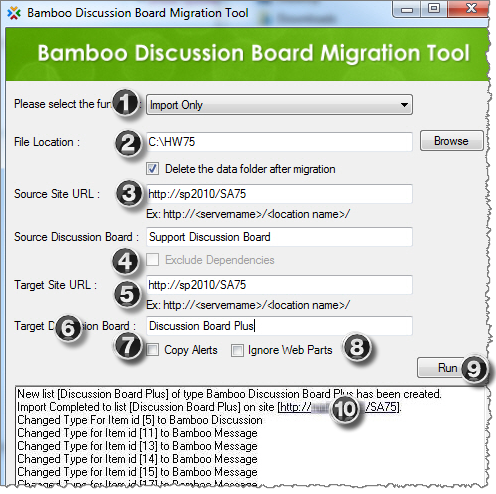
1. In the Discussion Board Plus Migration Tool, select the Import Only function. ImportOnly.png
2.

File Location: Enter the location where the .CMP data file is saved. The Migration Tool will also log import results to a file in this location.

NOTE: If you want the Migration Tool to delete the data file after the migration is complete, check the option Delete the data folder after migration.

3. Source Site URL: Enter the URL for the site where the existing SharePoint Discussion Board list is located.
4.

Source Discussion Board: Enter the list name of the SharePoint Discussion Board list that contains the data you want to migrate.

Exclude Dependencies: Excludes export of item dependencies such as images, master pages and page layouts. These items can sometimes cause problems during import and do not need to be imported if the source and target discussion boards are on the same site. Use this option if previous import attempts have failed, and only if the source and target discussion boards are on the same site.

5. Target Site URL: Enter the URL for the site where the target Discussion Board Plus list is (or will be) located.
6. Target Discussion Board: Enter the list name of the Discussion Board Plus list you want to migrate data to. If the Discussion Board Plus list does not yet exist in the target site, the Migration Tool will create it.
7.

Copy Alerts: If you want to copy SharePoint alerts from the SharePoint Discussion Board list to the Discussion Board Plus list, check the Copy Alerts option.

Icon-Warning WARNING Use this option with caution. Users who have alerts configured on the old discussion board will get new alerts when posts are copied to the new discussion board. SharePoint treats the new copy of the discussion board posts as “changed” or “new”. For large discussion boards, this could generate hundreds or thousands of alert e-mails.

8. Ignore Web Parts: Excludes the import of Web Parts associated with list forms. Importing these Web Parts can sometimes cause problems during import and is not required when the source and target discussion boards are on the same site. Use this option if previous import attempts have failed, and only if the source and target discussion boards are on the same site.
9. After completing all import settings, click Run to begin the import.
10.

The migration tool will import data from the .CMP file created from the existing SharePoint Discussion Board list to the target Discussion Board Plus list. SharePoint Alerts are also copied if the Copy Alerts option was checked. Migration results are displayed in the Migration Tool status window and are also logged to a file in the folder you specified in the File Location setting.

NOTE: The amount of time the import takes will depend on the amount of data being imported.

Icons used in Discussion Board Plus

Icons used in Discussion Board Plus

You can view the status of a topic at a glance via the icon or tooltips

Topic Status
sa75_icon_sticky.png
sa75newthread.png
sa75_icon_readthread.png
sa75_icon_locked.png
PrivateTopic.png
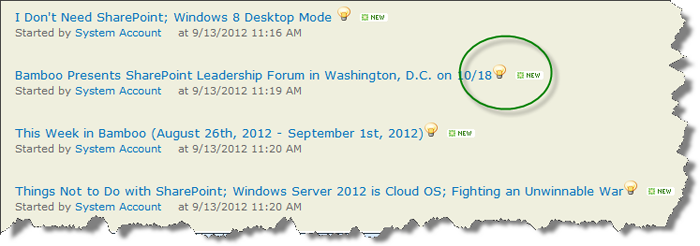
Topic is Sticky and will always be displayed at the top of the Topic list.
Topic has a new reply or update.
Topic has no recent replies or updates.
Topic is Locked and can only be edited by users with specific permissions.
Topic is shared privately; users who have not been invited to see this topic will not see the contents.
Moderation
LockTopic.png
MarkAsSticky.png
Move.png
ShareTopic.png
ForumSettings.png
Lock a Topic
Mark a Topic as Sticky
Move a Topic
Share a Topic
Forum Settings
Post Status Indicators
sa75_icon_suggested.png
sa75_icon_verifyanswer.png
sa75_icon_unanswer.png
Answer Suggested
Answer Verified
Unanswered
Highlight Multiple Replies as Suggested or Verified *
Suggest.png
sa75_suggestnotanswer.png
sa75_verifyanswer.png
sa75_verifynotanswer.png
Suggest as Answer
Unmark Answered
Verify Answer
Unmark Verified
Multiple Rating Options
sa75_fivestars.png
10Point.png
TrueFalse.png
Like.png
5-Star
10-Point Scale
True/False
Like/Unlike Button
Topic Navigation*
Move between topics using the Previous and Next functions: PreviousNext.png
Pagination*
Navigation across forums or threads with clickable page numbers: Pagination.png

How to Perform Effective Searches with Discussion Board Plus

How to Perform Effective Searches with Discussion Board Plus

When you install Discussion Board Plus for SharePoint, List Search Simple is also installed.

List Search Simple lets you configure a search page for your Discussion Board Plus list so users can search discussion board posts for relevant content. The search page is not created automatically. Follow the instructions below to configure and use List Search Simple to search Discussion Board Plus for SharePoint lists.

Configuring List Search Simple

Step Action Result
1. Follow the instructions for Adding the List Search Simple to a Page. You can add the Web Part to any page in the same Web application as Discussion Board Plus for SharePoint.
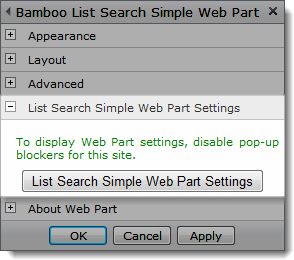
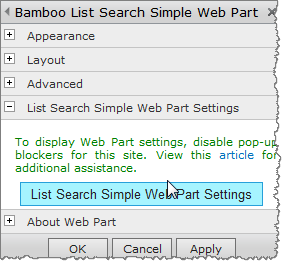
2. Edit the Web Part and click List Search Simple Settings button. LSS01.jpg
LSS02.jpg
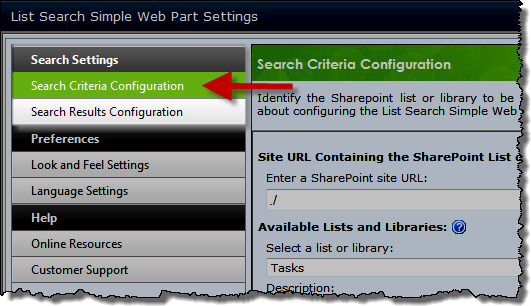
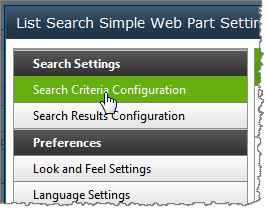
3. In the List Search Simple Settings page, click the Search Criteria Configuration tab. LSS03.jpg
4. In the Enter a SharePoint site URL box, type the path to the SharePoint site that contains the Discussion Board Plus list you want to search. The Discussion Board Plus list can reside in the same site, a different site, or a site in another site collection, as long as it is in the same Web application. Site URLs can be absolute (http ://servername/site) or relative (./site). Bamboo recommends using a relative URL if the Web application has multiple access points using Alternative Access Mappings (AAM) or if the Web Part will be saved as part of a site template.
5. Click the View Lists and Libraries button to populate the Available Lists and Libraries drop-down list.
6. In the Select a list or library drop-down list, select the Discussion Board Plus list you want to search. LSS04.png
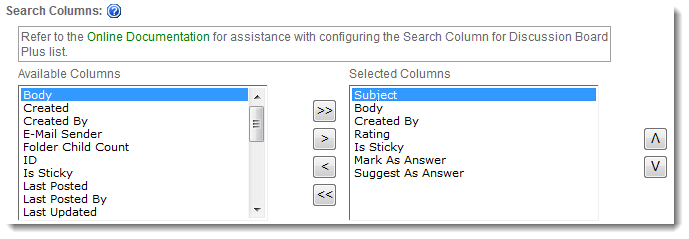
7. In the Search Columns section, select the following columns and click the > button to move them to the Selected Columns list. Hold down the CTRL key to select multiple columns. To reorder how the columns are displayed in the List Search Simple search page, click on a column name and click the up or down arrow.

LSS05.png
A suggested order is included below:

  • Subject
  • Body
  • Created By
  • Rating Column (if a Bamboo Rating column was added to the Discussion Board Plus list)
  • Is Sticky
  • Mark as Answer
  • Suggest as Answer
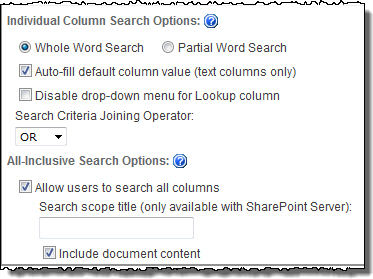
8. Review the remaining settings in the Search Criteria Configuration tab. For more information about each setting, see the Search Criteria Configuration section of Configuring the List Search Simple.
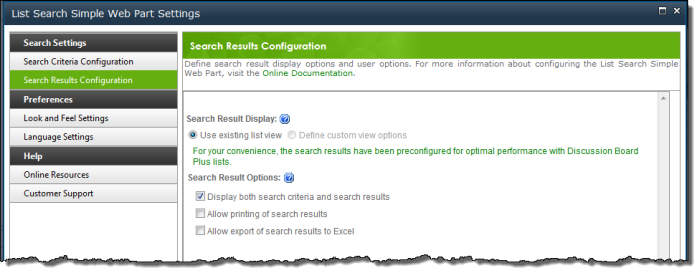
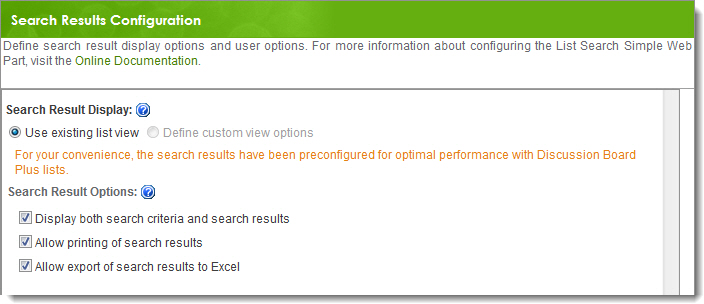
9. Click the Search Results Configuration tab. The Search Results Display settings are preconfigured for optimal performance with Discussion Board Plus lists and cannot be changed. Review the Search Result Options and make any changes to options available when viewing search results. For more information about each setting, see the Search Results Configuration section of Configuring the List Search Simple. LSS06.png
10. When you have reviewed all settings, click Save & Close in the List Search Simple Settings page. Click OK in the Web Part tool pane. List Search Simple is now configured and ready to search the Discussion Board Plus list.

How to Customize the User Interface

How to Customize the User Interface

DBP01.png
Discussion Board Plus is a useful tool for enhancing collaboration and sharing information in SharePoint without bombarding your team with email. We recognize, however, that the default HTML output of Discussion Board Plus may not meet the needs of all companies. For this reason, Bamboo provides the ability to modify the layout and information displayed to meet your business needs. By modifying the CSS file, you can make a variety of changes, including, but not limited to: text color; change location between text and symbol; and embed an image/icon. Below are a few illustrations of how you can control styling and HTML output in Discussion Board Plus by modifying the CSS and XSL files.

Step Action
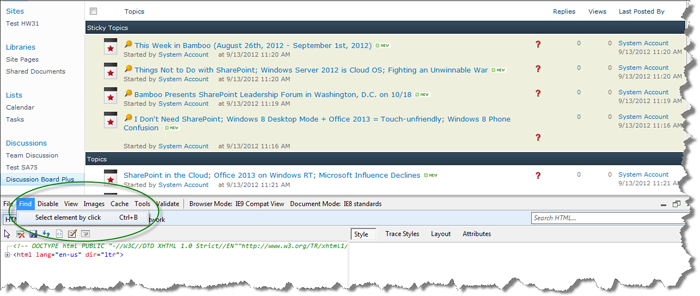
1. From the Discussion Board Plus list, press F12.
In the Menu bar, choose the Select element by clicking an item menu. This means the HTML page will automatically focus on the element when you click on any location in the Discussion Board Plus list.

DBP03.png

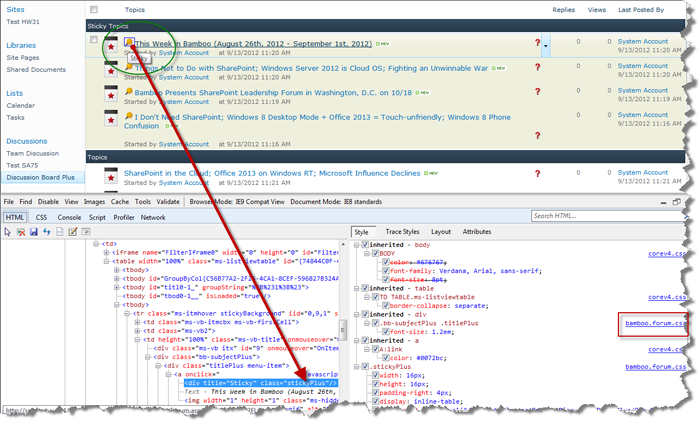
2. In the screen shot here, note the HTML page is highlighting the Sticky element. Remember to copy the class name for later use. The class name can be found near the CSS file name on the Style pane.
DBP04.png

For example: class = “stickyPlus” with bamboo.forum.css

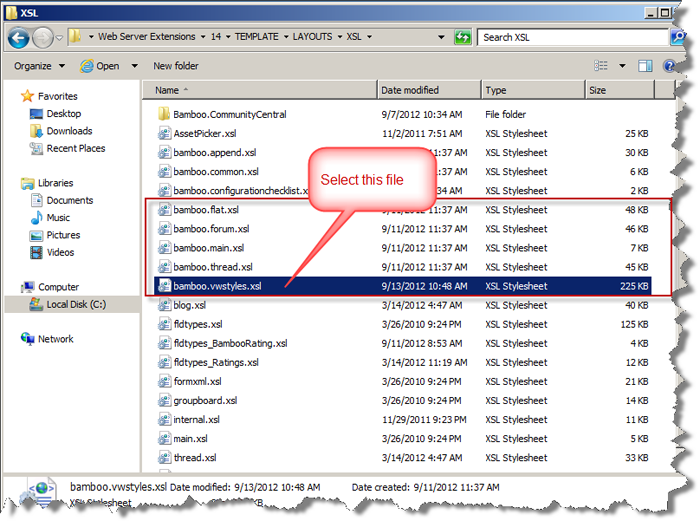
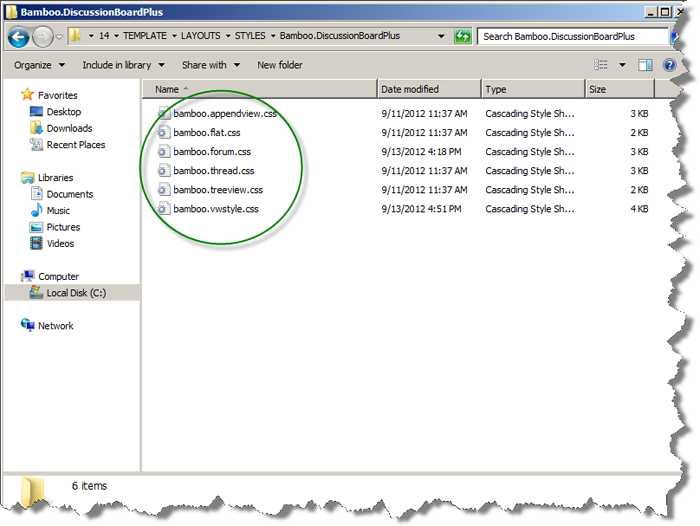
3. Next, you need to go to C: Program FilesCommon FilesMicrosoft SharedWeb Server Extensions14TEMPLATELAYOUTSXSL, where you will find some XSL files related to the Views in Discussion Board Plus list, including: bamboo.flat.xsl; bamboo. append.xsl; bamboo. forum.xsl; bamboo.thread.xsl, and bamboo.vwstyles.xsl.

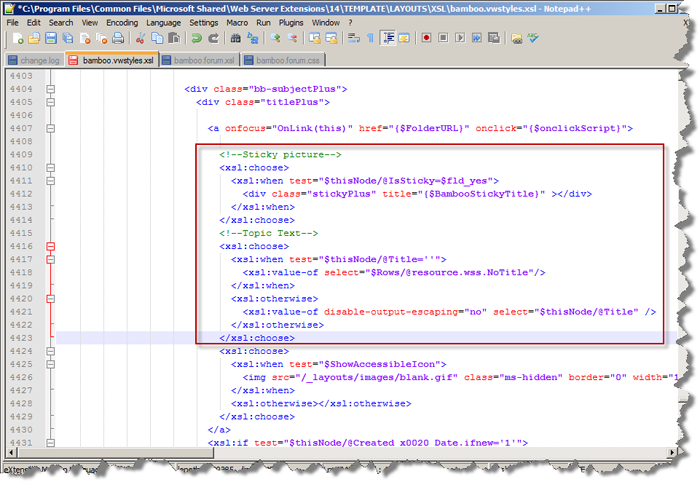
From there, open the bamboo.vwstyles.xsl file and find the class name = “stickyPlus”

DBP05.png

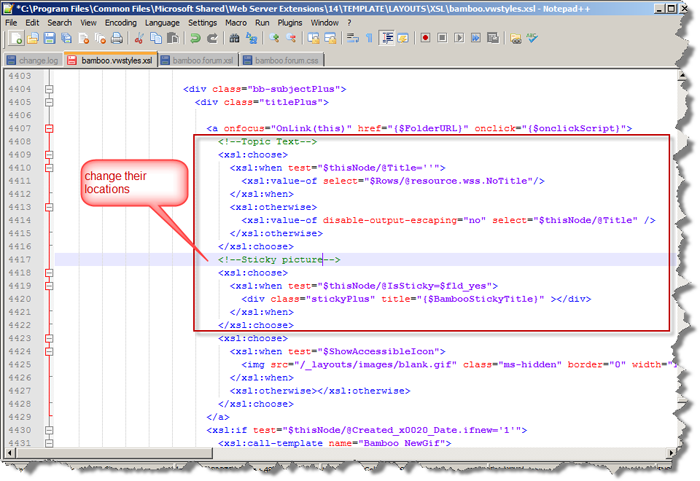
4. We have 2 locations for class name = “stickyPlus”; you can change the location between text and symbol for them as shown here.

Before changing:

DBP06.png

After changing:

DBP07.png

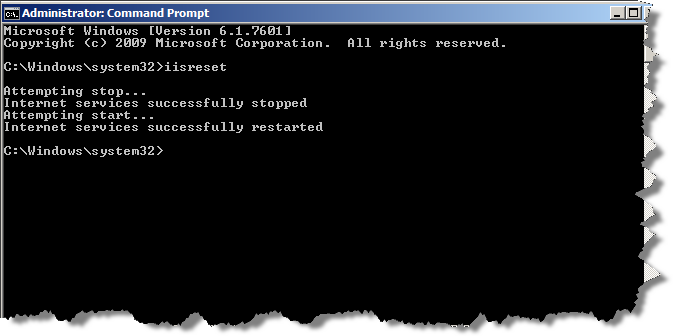
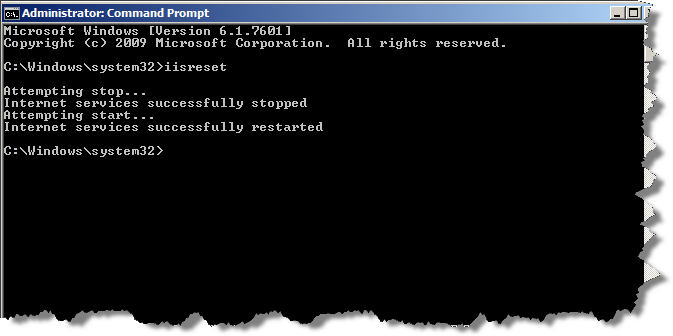
5. Remember to run the iisreset command line in Command Prompt program:

DBP08.png

6.

Go to your site and click refresh page, and you will see your changes.
Also, you can change text color or symbols by going to the path
C:Program FilesCommon FilesMicrosoft SharedWeb Server Extensions14TEMPLATELAYOUTSSTYLESBamboo.DiscussionBoardPlus.

You will see some CSS files related to the Views in Discussion Board Plus including: bamboo.flat.css; bamboo. append.css; bamboo. forum.css; bamboo.thread.css, and bamboo.vwstyles.css files.

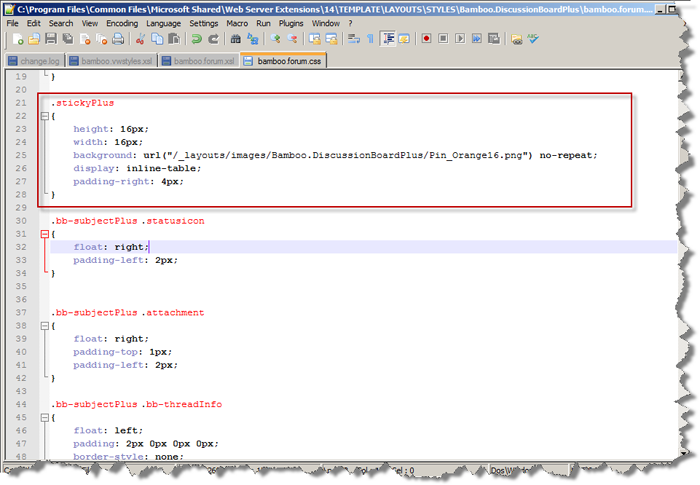
For class name = “stickyPlus”, we have the related bamboo.forum.css file.

DBP09.png

NOTE: When opening the bamboo.forum.css file, you must find the class name that you want to change such as height, width, background, display, or padding-right:

DBP10.png

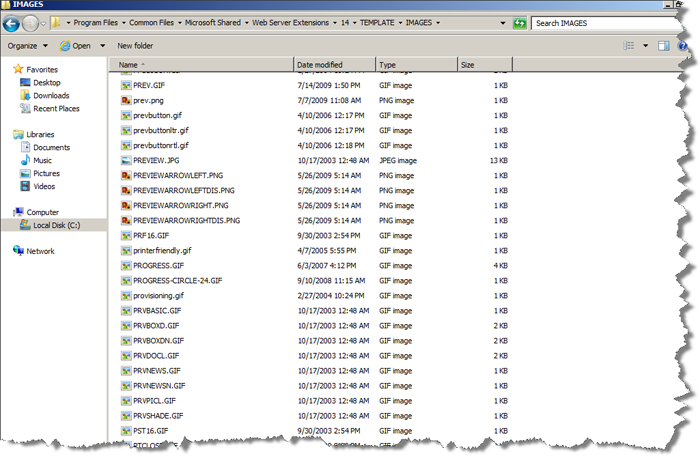
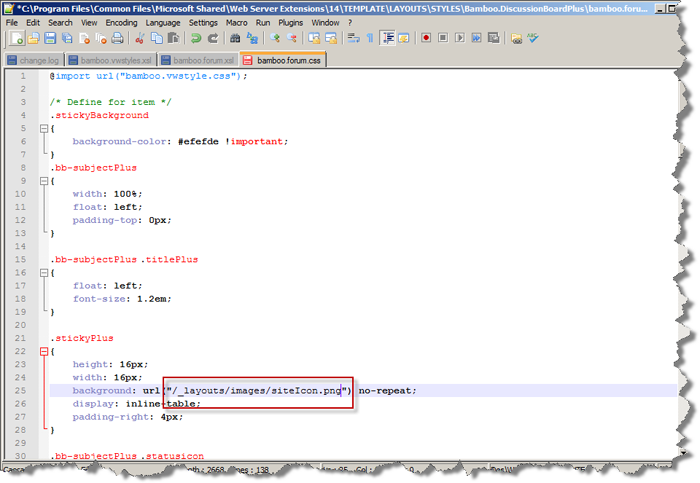
7. If you want to change the Symbol, go to “C: Program FilesCommon FilesMicrosoft SharedWeb Server Extensions14TEMPLATEIMAGES” where you can choose an image and copy the path into CSS file.

DBP11.png

After the change:

DBP12.png

8. Remember to run the iisreset command line in Command Prompt:

DBP13.png

9. Now, go to your site to see your changes:

DBP14.png

How to automatically subscribe authors to receive email alerts on their topics.

How to automatically subscribe authors to receive email alerts on their topics.

Enabling Auto Subscribe allows Discussion Board Plus authors to receive notifications when a new topic is created and when current posts receive a reply. Turning this feature ON will alert authors who participate in the discussion when there is a new post or new reply.

Auto Subscribe enables three types of notifications:

  • When your Administrator Enables Auto Subscribe
  • When a New Post is Created
  • When a Reply is Posted

The table below identifies discussion board actions and the corresponding email recipients when Auto Subscribe is enabled:

Action Alert Recipient(s)
A new topic is created The post creator
A reply is posted The post creator and the author of the reply

NOTE: Only an Author* receives Auto Subscribe alerts.

See Also:

Highlights of Discussion Board Plus

Highlights of Discussion Board Plus

DiscussionBoardPlus.pngWritten once, read often: Enable your users to ask questions and receive Verified Answers from the experts with Discussion Board Plus.

Take the out-of-the-box Discussion Board to the next level with Discussion Board Plus.

Available now for SharePoint 2013/2010, Discussion Board Plus allows users within your organization to move beyond simply asking and answering questions in a forum by adding game-changing features, such as the ability to:

  • Elevate the most important topics to the top of the Board via the sticky option;
  • Mark the most accurate answer as correct;
  • Suggest a reply as possibly being the correct answer;
  • Rate a topic or post based on the content via the Rating Column (included);
  • Search and find answers quicker via List Search Simple (included);
  • Visually identify the status of posts via icons.
  • Automatically subscribe authors to receive email alerts on their topics.
  • Include and play videos in topics and posts via the Insert video option in the menu.

Discussion Board Plus Forum View

Discussion Board Plus Forum View

Discussion Board Plus for SharePoint provides a default view for the topic list (Forum view) and two different views for discussion threads. Click on a view name for more details about each view.

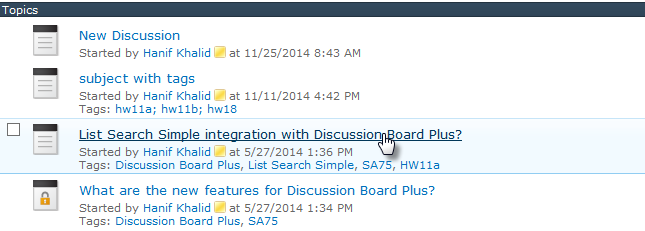
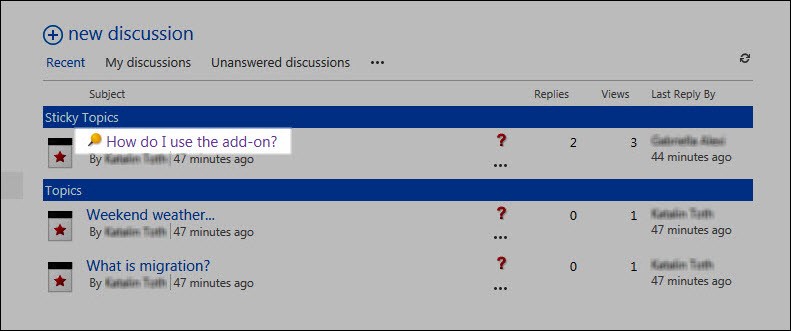
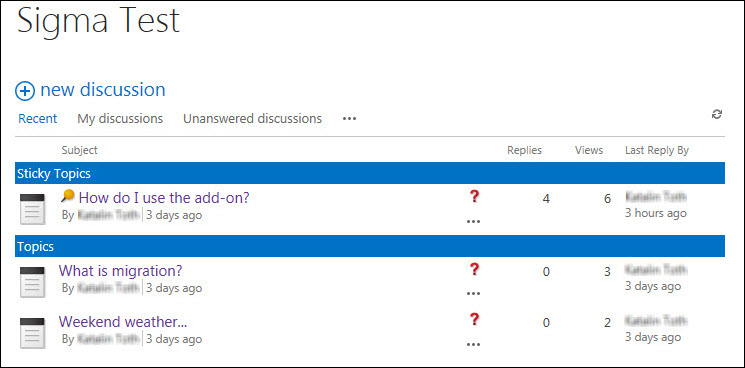
Forum view displays a list of all discussion threads in the discussion board. Sticky topics are displayed first, followed by all other topics, in ascending order of the last update to the discussion thread.

The view includes basic information about each discussion topic, including the following two summary columns:

  • Replies – Displays a count of the number of replies to the original post.
  • Views – Displays a count of the number of times the topic was viewed. Logged-in users who view a topic repeatedly will increase the Views count once per day. Anonymous users will increase the Views count once per day per computer name.
Step Action Result
1. Clicking on any topic in Forum view will display the discussion thread in the default discussion thread view. For a description of the icons displayed next to a topic in Forum view, see About Discussion Board Plus Icons. SA75_2013_ForumView.jpg

Return to: Using Views in Discussion Board Plus

Discussion Board Plus Flat View

Discussion Board Plus Flat View

Discussion Board Plus for SharePoint provides a default view for the topic list (Forum view) and two different views for discussion threads. Click on a view name for more details about each view.

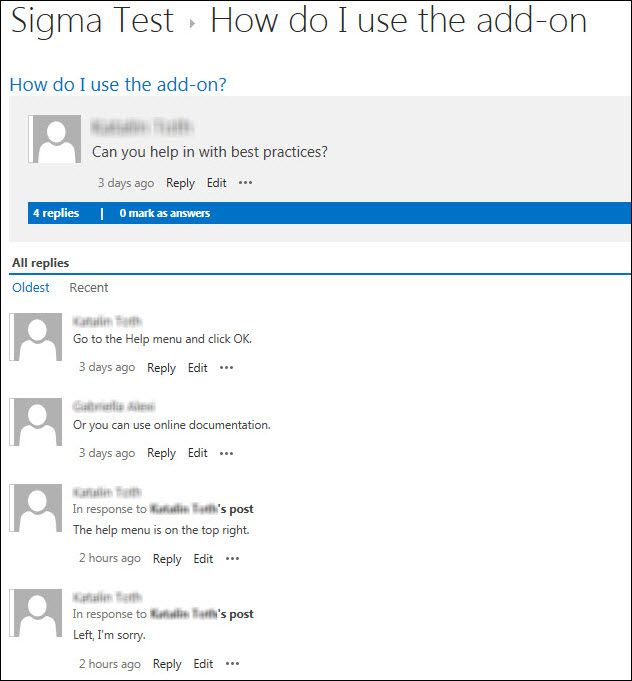
Flat view is the default view for Discussion Board Plus discussion threads. This view provides the standard View Properties and Reply features available with out-of-the-box SharePoint discussion boards, as well as the following additional features only available with Discussion Board Plus:

Item Description
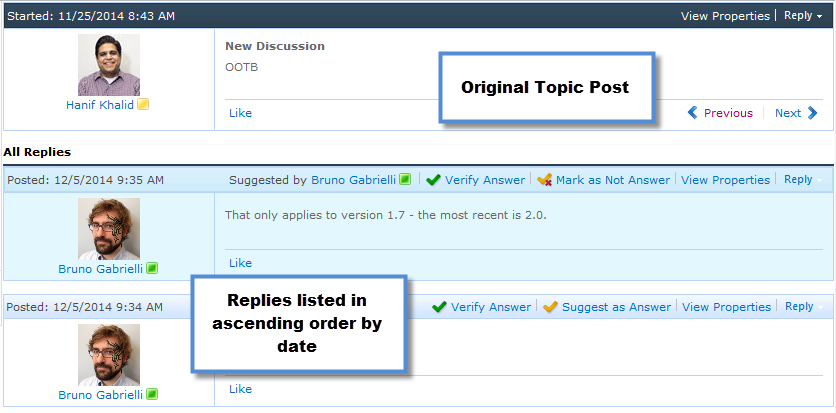
Suggest as Answer Users can suggest one or more posts as an answer to the original post. Suggested answers are shaded in blue. For more information, see Using Suggest as Answer and Verify Answer. SA75_2013_Flat.jpg
Verify Answer

Forum moderators can select a suggested answer and mark it as the Verified Answer. Verified Answers are shaded in yellow. There can be only one Verified Answer. A Verified Answer is listed immediately after the original post, no matter when it was originally posted.

NOTE:Suggested Answers and Verified Answers are color-coded in Flat view to help them stand out from the other posts. All posts (except Verified Answers) are listed in descending order by date, with the original post listed at the top.

For details about who can use the features available in this view, see Permissions in Discussion Board Plus.

Return to: Using Views in Discussion Board Plus

Export SharePoint Discussion Board list data

Export SharePoint Discussion Board list data

Migration Tool Overview

The Export Only option will export SharePoint Discussion Board list data to a .CMP file. This file can later be imported using the Import Only function. You may want to use this option if you your SharePoint Discussion Board list is large and you want to split the export and import functions.

To export SharePoint Discussion Board list data using the Export Only function:

Step Action Result
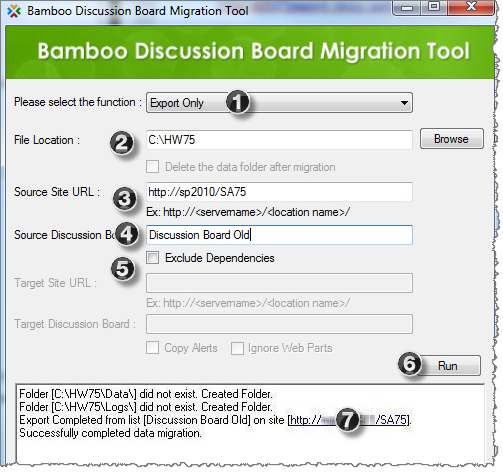
1. In the Discussion Board Plus Migration Tool, select the Export Only function. ExportMigrTool.png
2. File Location: Enter the location where data and log files should be saved.
3. Source Site URL: Enter the URL for the site where the existing SharePoint Discussion Board list is located.
4. Source Discussion Board: Enter the list name of the SharePoint Discussion Board list that contains the data you want to export.
5. Exclude Dependencies: Excludes export of item dependencies such as images, master pages and page layouts. These items can sometimes cause problems during import and do not need to be imported if the source and target discussion boards are on the same site. Use this option if previous import attempts have failed, and only if the source and target discussion boards are on the same site.
6. After completing all export settings, click Run to begin the export.
7.

The migration tool will export all data from the existing SharePoint Discussion Board list and save it to a .CMP file in the folder you specified in the File Location setting in Step 2.

Export results are displayed in the Migration Tool status window and are also logged to a file in the folder in the File Location setting.

NOTE: The amount of time the export takes will depend on the amount of data being exported.

Enabling Additional Video Options

Enabling Additional Video Options

Return to Configuration Overview

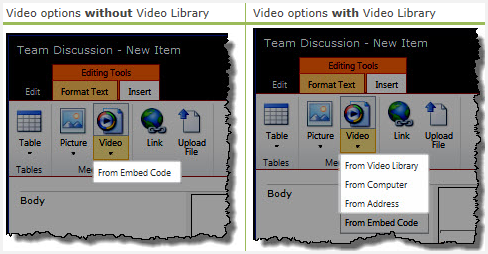
Discussion Board Plus allows users to insert video into threads using the From Embed Video option. In addition, if you install Video Library (sold separately) and enable Bamboo Video Feature for Discussion Board Plus, three other options to insert video become available to users:

  • Selecting a video from your Video Library
  • Uploading a video from your computer
  • Linking a video from another page

BeforeAfter.png

You must perform two steps before you can use the three additional video options in Discussion Board Plus threads:

Step Action Result
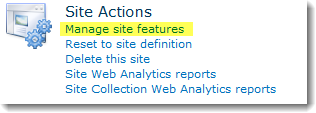
1. Activate the Bamboo Media Upload feature, which allows authors to insert and play videos in discussion board posts. Activate.png
Find this option in the Manage site features in the Site Actions section of your site.
2. Verify Video Library is installed and activated in the same site collection as Discussion Board Plus. Follow the Video Library Installation instructions to install and Activation instructions to activate Video Library.

Enable Move Topic between Discussion Board Plus lists

Enable Move Topic between Discussion Board Plus lists

Return to Configuration Overview

Move.png When Move Topic is enabled, users with the required permissions can move one Discussion Board Plus topic to a different Discussion Board Plus list.

Topics can be moved using the Move To button.You will find this button in the List Tools > Items ribbon of the Discussion Board Plus list.

Or you can also find the function in the item drop-down menu for a topic.

When this feature is disabled, the Move To option is not available to users.

ModSetting.pngBy default this feature is not enabled. Should you prefer to allow users to move topics, go to the Moderation settings within the Forum Settings option in the ribbon and check the Enable Move Topic option.

NOTE: Users can move topics only between Discussion Board Plus lists!

  • Users cannot move topics between SharePoint out-of-the-box discussion board lists.
  • Users cannot move a topic from a SharePoint out-of-the-box discussion board list to a Discussion Board Plus list.
  • Users cannot move from Discussion Board Plus lists to SharePoint out-of-the-box discussion board lists.

Enable Emoji

Enable Emoji

Return to Configuration Overview

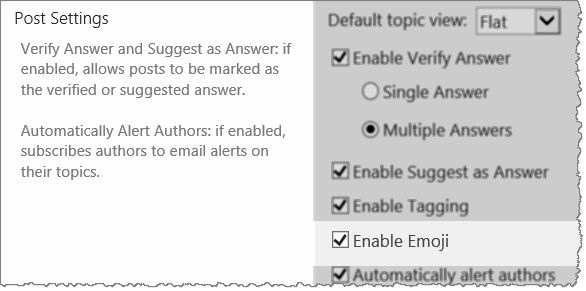
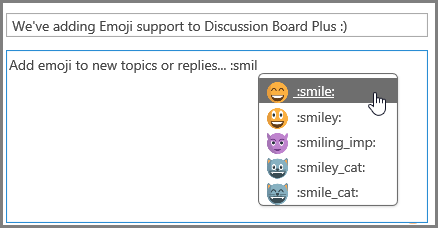
enableemoji.pngDiscussion Board Plus supports emoji for discussion topics and replies.

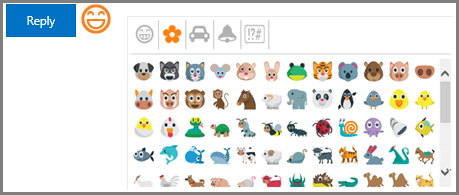
By default, emoji are not enabled. Check the Enable Emoji box in the configuration tool pane to allow users to post topics and replies by either using the emoji picker control or by typing an emoji command into the body field.

For a full list of emoji commands, click here.

addemoji-a.png

addemoji-1.png

NOTE: Emoji are not visible in the Forum and Management views.

Enable Like Topic or Reply

Enable Like Topic or Reply

Return to Configuration Overview

LikeSettings.pngLike Discussion Settings controls whether the Like Topic or Reply feature is enabled.

Enable Like Topic or Reply

  • When Like is enabled, users can like and unlike topics and replies.

  • When this feature is disabled, the Like option is not available to users.

Enable Private Settings

Enable Private Settings

Return to Configuration Overview

PrivateDiscSettings.pngPrivate Discussion Settings controls whether the Private Topic and Private Reply features are enabled.

Enable Private Topic

  • When Private Topic is enabled, users with the required permissions can create and share a private topic with a specific user or groups.

  • When this feature is disabled, the Private Topic and Share With options are not available to users.

Enable Private Reply

  • When Private Reply is enabled, users with the required permissions can post a private message directly to the recipient of the reply.

  • When this feature is disabled, the Private Reply option is not visible to users when replying.

Enable Tagging

Enable Tagging

Return to Configuration Overview

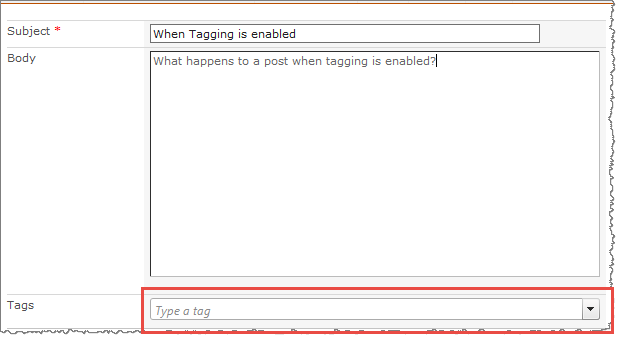
PostSettings.pngBy default, Tagging is not enabled. When you check this box in the configuration tool pane, users with the required permissions can apply Tags when creating new topics.

Tag.pngUsers see a text box on screen where they can type in tags for this topic. When tagging is enabled, users can search for content that has that tag.

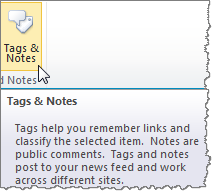
What is different about using the Tags & Notes function from SharePoint out of the box versus Bamboo’s tagging function?TagsNotes.png
A couple of key differences is when a user is writing a new topic or editing a topic, there is no access to tag the topic while writing it. You have to completely finish editing and then check on the topic in order to tag it. Tags work in a similar way although Bamboo tags do not appear in news feeds or work across multiple sites.

NOTE: When this feature is disabled, the Tags option is not visible to a user when creating a New Item.

Discussion Board Plus Migration Tool

Discussion Board Plus Migration Tool

You can migrate existing SharePoint Discussion Board lists to Discussion Board Plus for SharePoint using the Discussion Board Plus Migration Tool, included with the Discussion Board Plus for SharePoint Setup program. The Migration Tool allows you to migrate all existing discussion board topics and posts to a Discussion Board Plus list so you can take advantage of features like Sticky, Lock Topic, Suggest as Answer and Verify Answer.

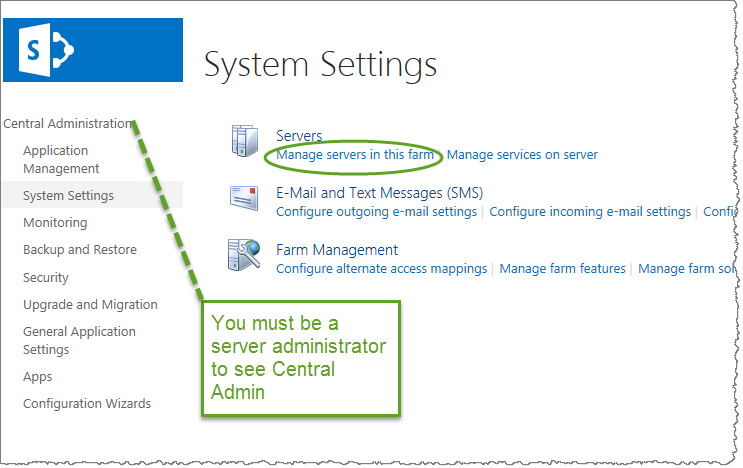
Install this component on one of the servers in the SharePoint farm running the Microsoft SharePoint Foundation Web Application service. Refer to System Settings in SharePoint Central Administration for a list of servers running this service.

Icon-Warning IMPORTANT: The installation account must be a member of the local server Administrators group, have the db_owner role for the SharePoint configuration database, and be a site collection administrator for each site collection where the product will be available. Site collection administrator permission is required to activate the site collection feature.

Step Action Result
1. Click the Install button (Button-Install) to start the Discussion Board Plus for SharePoint Migration Tool installer. This will install the Discussion Board Plus Migration Tool.
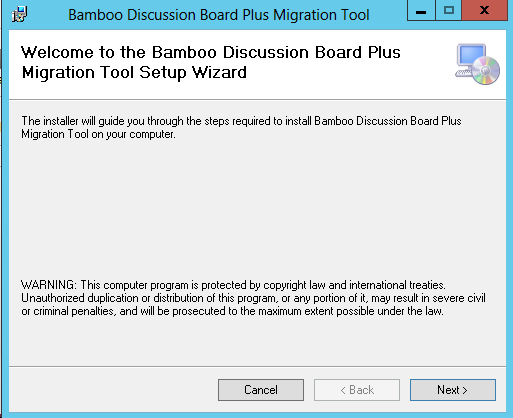
2. When you click Install, you will see the Welcome dialog pane open. This is an informational screen only. Click Next to go to the next screen. MigToolInstall.png
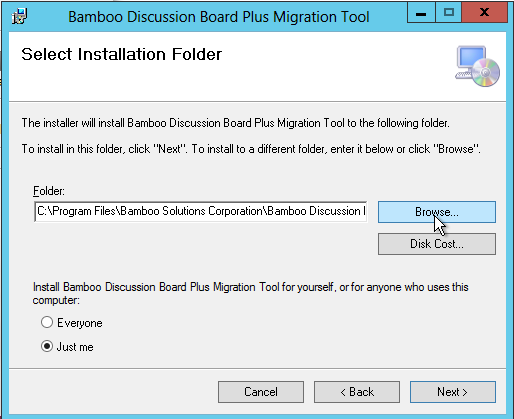
3. This dialog defines where the tool will be installed; you have the option to select a different folder if you prefer. Just click the Browse button and navigate to select a different folder than the default one and then click Next. ChooseFolder.png
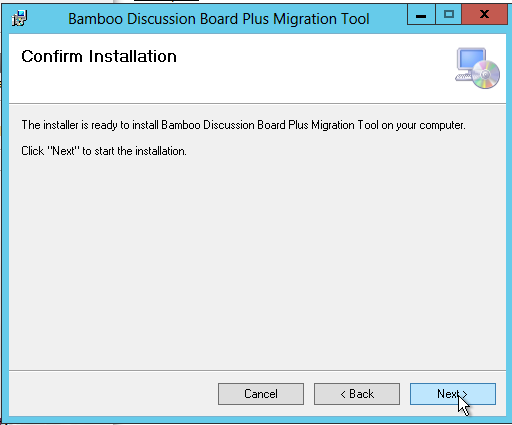
4. Once you have selected the folder where you want the tool to be housed, you are presented with a “Ready” dialog letting you know the tool is about to be installed. When you are ready, click Next. ReadyPage.png
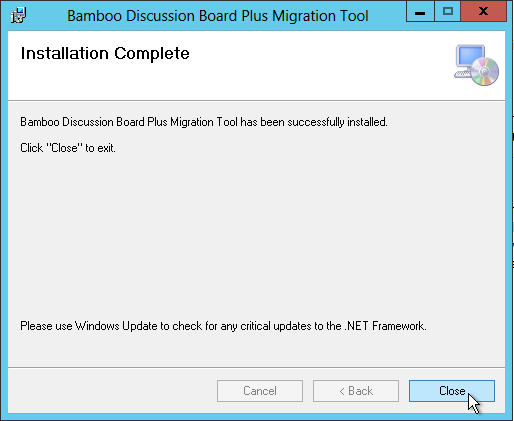
5. The install does not take very long and when it completes, you will see a Success dialog CloseInstall.png
6. You have the option here to automatically activate features for site collections.

This can be run as the final installation step after the solutions are deployed to the selected web applications. If automatic activation features are not selected in the required installation steps, users can enter site collection URL(s) to activate all required features of Discussion Board Plus. This step does not install any new components. It simply finds, deactivates, then reactivates all required Discussion Board Plus specific features for the site collection(s).

NOTE: If you choose not to run this option, site collection administrators will need to activate the Discussion Board Plus features at their site collection level.

Discussion Board Plus Features

Discussion Board Plus Features

SA75creating.png When Discussion Board Plus is installed, a new list type called Bamboo Discussion Board Plus is added to the SharePoint Create screen. A SharePoint user with rights to create new lists and libraries can select Bamboo Discussion Board Plus to create a new discussion board. In addition, the List Search Simple is added to the Web Part Gallery and Rating Column is added to the site collection features.

See also:

Create a New Topic or Reply to a Post via Email

Create a New Topic or Reply to a Post via Email

If enabled by your SharePoint admin, you can create a new Discussion Board Plus topic or reply to a post directly via email.

Create a Topic using Email:

Action Result
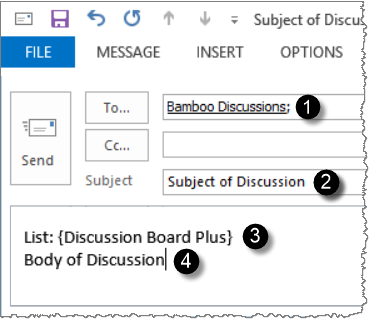
To create a topic via email, send an email to the email account configured in the Discussion Board Plus Mail Settings with the following information:createtopicemail.png
1. To: Enter the email account configured in the Discussion Board Email Settings in the Send To field

2. Subject: Enter the topic for the discussion in the Subject field

3. List: In the email body, provide the list name or URL to post to new topic to in the following format:
List: {list name}
–OR–
List: {http://listURL}

4. Topic Body: In the email body, enter the topic body for the discussion.

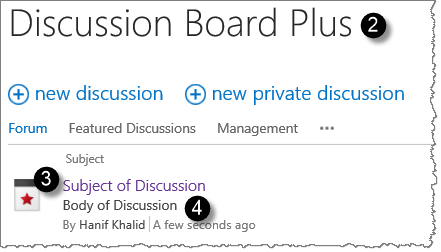
Below is how the new topic appears in the Discussion Board Plus list –

createtopicdb.png

NOTE: The Bamboo Push Email Service Timer Job is used to post topics and replies via email. This Timer Job is scheduled to run every 10 minutes by default.

Reply to a Topic using Email:

Action Result
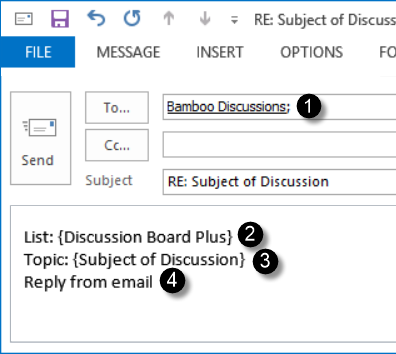
To reply to a topic via email, send an email to the email account configured in the Discussion Board Plus Mail Settings with the following information:replyviaemail.png
1. To: Enter the email account configured in the Discussion Board Email Settings in the Send To field

2. List: In the email body, provide the list name or URL to post to new topic to in the following format:
List: {list name}
–OR–
List: {http://listURL}

3. Topic: In the email body, provide the Topic name or URL to post a reply in the following format:
Topic: {Topic name}
–OR–
Topic: {http://topicURL}

4. Reply Body: In the email body, enter the topic body for the discussion.

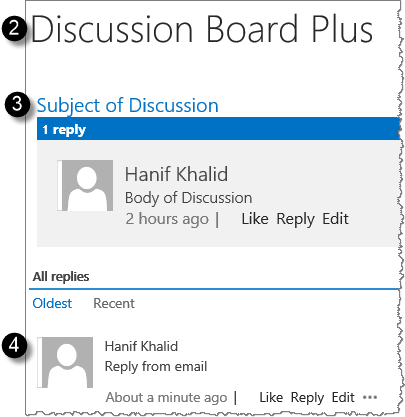
Below is how the reply appears in the Discussion Board Plus list –

replyviaemaildbpst1.png

NOTE: The Bamboo Push Email Service Timer Job is used to post topics and replies via email. This Timer Job is scheduled to run every 10 minutes by default.

See also:

Create a New Discussion Board Plus List

Create a New Discussion Board Plus List

Top

Return to Configuration Overview

After Discussion Board Plus is installed, a new application called Discussion Board Plus is added to the SharePoint Site Contents. Users with rights to add applications can create a new Discussion Board Plus list.

NOTE: If you do not see Discussion Board Plus in any category in the Create window, verify that the Bamboo Discussion Board Plus for SharePoint site collection feature is activated.

SharePoint 2010

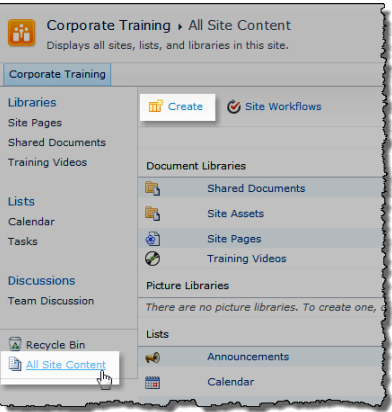
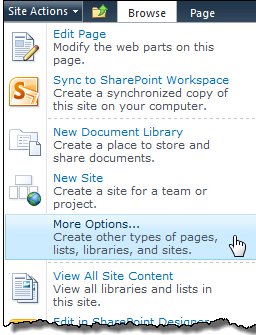
You have two ways to create content:

  1. From the Quick Launch menu
  2. From the More Options in the Site Actions menu

Both methods end up with the same result.

  1. From the Quick Launch menu choose View All Site Content
CreateMenu.png
  1. Click the More Options in the Site Actions menu.
MoreOptions.png
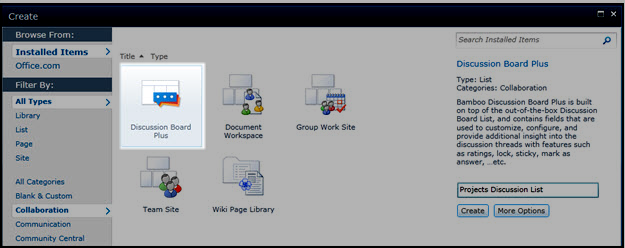
Using either method in the Create screen, click the Collaboration filter and select Discussion Board Plus.

sa75creating.png

NOTE: If you do not see the Discussion Board Plus among the available applications, verify that the Bamboo Discussion Board Plus site collection feature is activated.

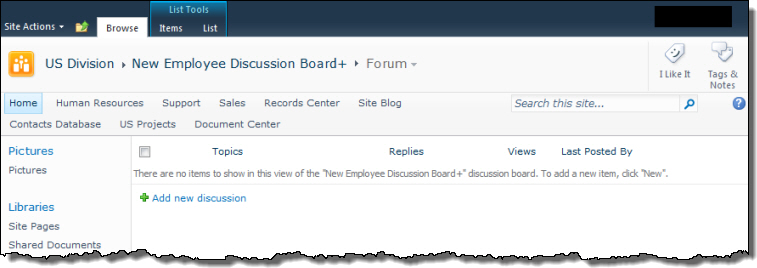
Give the discussion board list a name.
To set lists options, such as a description or navigation settings, click the More Options button and make your selections.
SA75_2010_NewDiscBoard.jpg

Top

SharePoint 2013

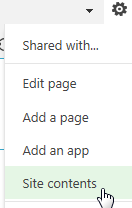
Click Site Contents from the Gear icon menu in the upper right of your site. SiteContents.png
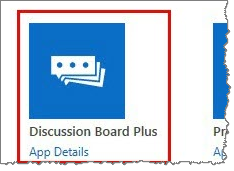
Click the add an app icon and select Discussion Board Plus in the list of apps

DBcreate.png

NOTE: If you do not see the Discussion Board Plus among the available applications, verify that the Bamboo Discussion Board Plus for SharePoint site collection feature is activated.

Give the discussion board list a name in the following pop-up window displayed below and click the Create button. AddDBP.png

Top

Configure List Search Simple for Discussion Board Plus

Configure List Search Simple for Discussion Board Plus

Return to Configuration Overview

LSSWPS.pngWhen you install Discussion Board Plus for SharePoint, List Search Simple is also installed. List Search Simple lets you configure a search page for your Discussion Board Plus list so users can search discussion board posts for relevant content. The search page is not created automatically. Follow these instructions to add the web part to a page and modify the properties to configure the web part to search Discussion Board Plus.

Click the List Search Simple Web Part Settings button to display the Web Part Settings page.

Icon-Warning IMPORTANT: You must disable pop-up blockers for the site to display the Web Part Settings.

Step Action Result
1. In the List Search Simple Web Part Settings page, click the Search Criteria Configuration tab.
LSSSCC.png
2. In the Enter a SharePoint site URL box, type the path to the SharePoint site that contains the Discussion Board Plus list you want to search.

SA75_ListSearchSelectDBPList.png

NOTE: The Discussion Board Plus list can reside in the same site, a different site, or a site in another site collection, as long as it is in the same Web application. Site URLs can be absolute (http://servername/site) or relative (./site). Bamboo recommends using a relative URL if the Web application has multiple access points using Alternative Access Mappings (AAM) or if the Web Part will be saved as part of a site template.

In the Select a list or library drop-down list, select the Discussion Board Plus list you want to search.

4. In the Search Columns section, select the following columns and click the > button to move them to the Selected Columns list.

SearchCol.png
Hold down the CTRL key to select multiple columns. To reorder how the columns are displayed in the List Search Simple Web Part search page, click on a column name and click the up or down arrow. A suggested order is included in the list below.

  • Subject
  • Body
  • Created By
  • Rating Column (if a Bamboo Rating column was added to the Discussion Board Plus list)
  • Is Sticky
  • Mark as Answer
  • Tags (if Tagging was enabled in the Forum Settings)
  • Suggest as Answer
5. Review the remaining settings in the Search Criteria Configuration tab.
SA75_OtherListSearchConfigOptions.jpg
6. Click the Search Results Configuration tab. The Search Results Display settings are preconfigured for optimal performance with Discussion Board Plus lists and cannot be changed. Review the Search Result Options and make any changes to options available when viewing search results.

SA75_OtherSearchResultsConfigOptions.jpg

When you have reviewed all settings, click Save & Close in the List Search Simple Web Part Settings page. Click OK in the Web Part tool pane.

List Search Simple is now configured and ready to search the Discussion Board Plus list. For more information about each List Search Simple configuration setting, review the List Search Simple Configuration Tool Pane Overview.

Complementary Products for Discussion Board Plus

Complementary Products for Discussion Board Plus

sharepointsolutions.pngYou will find many of our products complement each other quite nicely saving you the time and trouble to write custom code. With Bamboo at the heart of your SharePoint investment, you gain access to a huge catalog of enhancements, components, and accessories that add the critical functionality your business requires.
The same components can be easily used in future applications and they all come from a single, trusted vendor, ensuring an easy purchase process and support you can count on. That’s the Bamboo Way!


PMC
Project Management Central
Paired with Project Management Central, Discussion Board Plus is an easy way to manage ideas, thoughts, or concerns surrounding your project through threaded discussions.
Learn more about Project Management Central

Register for a 1-hour Webinar today and see Project Management Central in action!

Want to set up a private demonstration?
Contact Bamboo Sales


Automatically Subscribe Authors to Email Alerts

Automatically Subscribe Authors to Email Alerts

Return to Post Settings

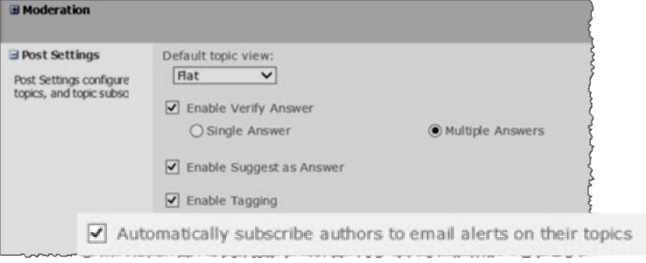
EnableAutoEmail.pngEnabling Automatically Subscribe Authors to Email Alerts allows users to receive email notifications each time there is activity in a discussion thread. Users can also request that notifications are sent immediately after new posts, or in a scheduled summary email.

To enable this option, you must perform two steps: enable the feature in the forum settings and configure the outgoing email settings.

1. Enable the Auto Subscribe Feature in Forum Settings

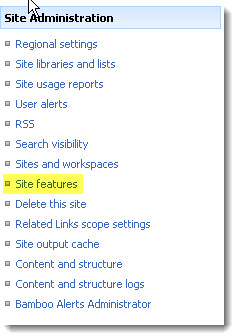
  1. Click the Forum Settings icon on the List tab of the ribbon.

  2. Select the checkbox to enable “Automatically subscribe authors to email alerts on their topics” to send email alerts to the associated author address.

2. Configuring Outgoing Email Settings

From the Central Administration > Site Settings > Configure email settings page, enter the required email settings:

  • Outbound SMTP server
  • From address
  • Reply-to address
  • Character set

NOTE: For detailed instructions on configuring email settings go to this Microsoft TechNet article.
All (Export and Import) Using Discussion Board Plus Migration Tool

All (Export and Import) Using Discussion Board Plus Migration Tool

The All function in the Migration Tool exports existing SharePoint Discussion Board data and then imports it into a Discussion Board Plus list. This option is appropriate for most migration scenarios.

Step Action
1. In the Discussion Board Plus Migration Tool, select the All function.
2. WARNING: Use this option with caution. Users who have alerts configured on the old discussion board will get new alerts when posts are copied to the new discussion board. SharePoint treats the new copy of the discussion board posts as “changed” or “new”. For large discussion boards, this could generate hundreds or thousands of alert e-mails!

  • Ignore Web Parts: Excludes the import of Web Parts associated with list forms. Importing these Web Parts can sometimes cause problems during import and is not required when the source and target discussion boards are on the same site. Use this option if previous import attempts have failed, and only if the source and target discussion boards are on the same site.
3. After completing all migration settings, click Run to begin the migration.

sa75migrationall.jpg

4.

The migration tool will export all data from the existing SharePoint Discussion Board list and import it into the target Discussion Board Plus list. SharePoint Alerts are also copied if the Copy Alerts option was checked. Migration results are displayed in the Migration Tool status window and are also logged to a file in the folder you specified in the File Location setting.

NOTE: The amount of time the migration takes will depend on the amount of data being exported and imported. If you have thousands of posts and want to perform the export and import separately, consider using the Export Only migration function followed by the Import Only function.

Append view

Append view

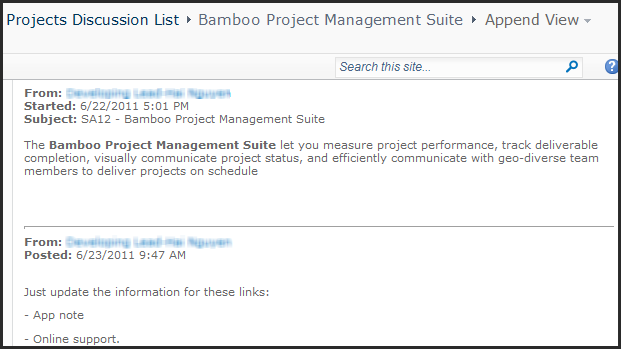
sa75breadcrumb.png Append view (available for SharePoint 2010 only) is a printer-friendly view that simply appends replies to the original post.

This view does not allow replies, Suggest/Verify Answer, or other functionality available in Flat or Thread views. It is intended as a simple summary or print view only.

sa75appendview.png

See also: