Which Trigger Type Should You Use?

Which Trigger Type Should You Use?

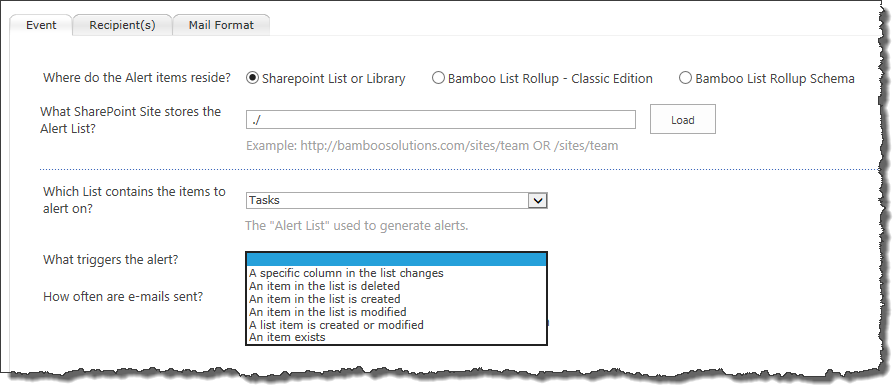
When configuring an alert, one of the most important considerations is the trigger type. The trigger type determines how the alert is triggered. The available options are shown in the screen shot below.

trigger types.png

While all trigger types are available when alerting on SharePoint Lists or Libraries, some are not available when alerting on the contents of the List Rollup. Refer to the table below for more information about each trigger type. The List Rollup column indicates whether the trigger is or is not available for List Rollups.

Type Description List Rollup?
A specific column in the list changes

Use this trigger type when alerting on a SharePoint List or Library when you want to watch the value of a specific column (or a few columns).

When an alert with this trigger is created, an event handler is added to the list and every change to items in the list are tracked in the Alert+ AlertchangeList list.

Icon-Tip See an example of how to create an alert using this trigger type here.

No
An item in the list is deleted

Use this trigger type when alerting on a SharePoint List or Library when you want to send an alert when an item is deleted.

When an alert with this trigger is created, an event handler is added to the list and every time an item is deleted, the action is tracked in the Alert+ AlertchangeList list.

No
An item in the list is created. Use this trigger type to send an alert when an item is added to a SharePoint List or Library or to the lists/libraries included in a Bamboo List Rollup. Yes
An item in the list is modified. Use this trigger type to send an alert when an existing item in a SharePoint List or Library or in any of the lists/libraries included in a Bamboo List Rollup is modified. Yes
An item in the list is created or modified

Rather than create a separate alerts of when items from the same source (SharePoint List/Library or Bamboo List Rollup) are created and modified, use this trigger type to create only one alert.

NOTE: Alerts with this trigger type can be configured with separate email messages for when items are created and when they are modified.

Yes
An item exists

Use this trigger to type to send reminder emails. This type of message isn’t triggered when data changes, but when an item exists under certain conditions. It is not currently possible to send these types of alerts from SharePoint out-of-the-box.

When this trigger type is selected, the number of Follow-up Wait Days must be entered. Because alerts with this type of trigger are often processed by the As Soon As Possible timer job, it is important to specify how long to wait between successive email messages. Enter the number of days to wait before alerting on the same item again.

NOTE: Fractional days are not supported for the Follow-up Wait Days value. Please enter a whole number.

followup wait days.jpg

Icon-Tip See an example of how to create an alert using this trigger type here.

Yes

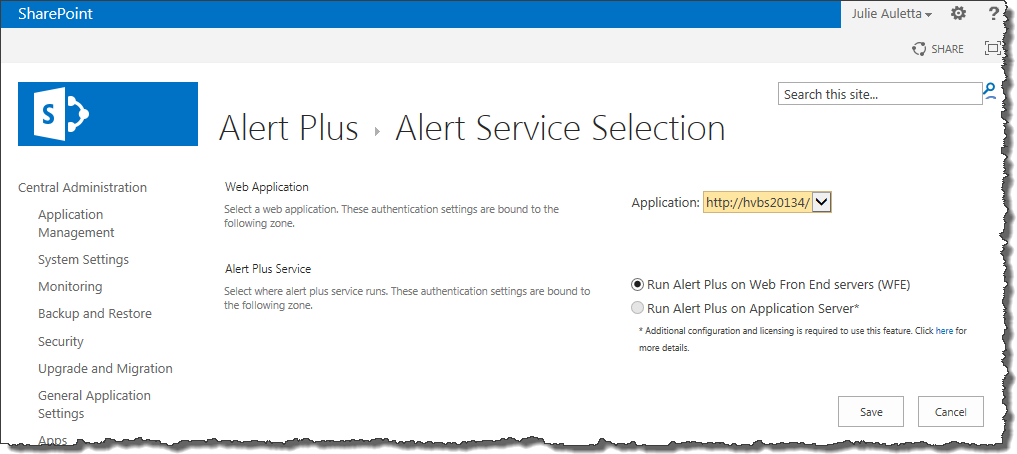
Why is the Run Alert Plus on Application Server radio button grayed out?

Why is the Run Alert Plus on Application Server radio button grayed out?

You have just upgraded to or installed Alert Plus R4 and you want to specify that the Alert Plus services run on certain application servers in your farm. However, when you go to the Alert Service Selection page in SharePoint Central Administration, the radio button is disabled.

app server selection grayed out.png

This is probably because you have not installed and configured the Alert Plus Service Components on your farm. Please see Run Alert Plus from an Application Server for more information.

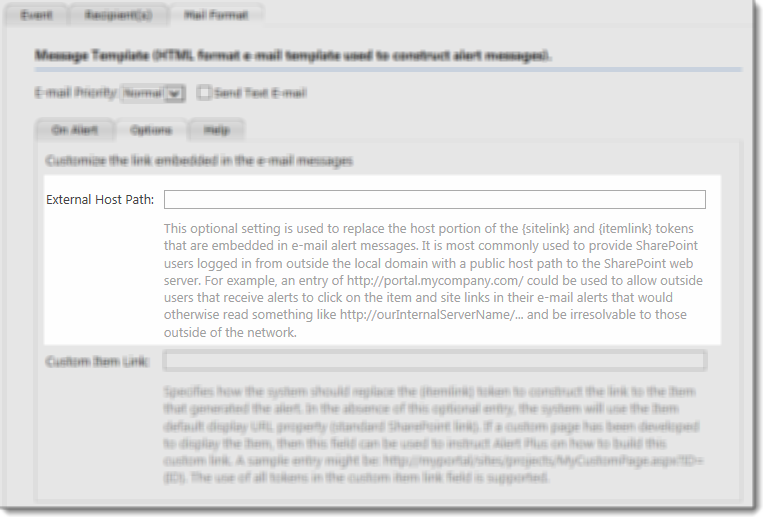
What is an External Host Path

What is an External Host Path

options tab-external host path.pngConfigure an External Host Path on the Options page of the Mail Format tab.

You may consider configuring it if you have external SharePoint users who may access SharePoint using a different URL than internal users.

View Alert Status

View Alert Status

Overview of the Alert Plus Web Part

Alert Plus displays the list of configured alerts, including important information about the current status of each.

alert list status.png

Use this list to periodically check the status of the alerts.

Column What is it showing?
Alert Status This column shows you if the alert is enabled. If it is disabled, no alerts will be sent.
Last Run Date

This column shows you the date the timer job last processed this alert.

NOTE: This date isn’t necessarily the last time an email was sent. An email is not always sent every time an alert is processed. Sometimes no items match the alert criteria when an alert is processed and therefore no emails are sent.

Icon-Tip If you never see a value in the Last Run Status column even though the alert is enabled, the timer jobs aren’t running for some reason. Check to make sure they were installed. See The Last Run Date Column is Blank for more information.

Last Run Status

This column shows you the current status of the alert. It will report:

  • Running when the timer job is running.
  • Success when the timer job completes with no errors.
  • Failure or an Error Code when the timer job stops due to an error. Generally, the specific error will be listed here to help troubleshoot.

NOTE: Sometimes you may notice that an alert is reporting Running for an unusually long time. This may be an indication of an error with the timer job and no error was reported. This happens when the job times out – no error is reported, but the alert status is never updated to indicate that the job is stalled. As long as the status is running, the job will not run again. See My Alert Seems to be Stuck in a Running Status to address this issue.

Using Tokens in your Alert Plus Email Message

Using Tokens in your Alert Plus Email Message

One of the great features of the Alert Plus Web Part is that it allows you to specifically format the email message for each alert you create. This way the Email recipients know exactly why they are getting the message.

You are not limited to static text in the subject or message body. The use of special tokens allows you to include references to dynamic objects such as Alert List columns, the alert item, or the site where the Alert List resides. As part of that formatting, you can use special tokens in the subject or the body of the HTML-based template. These special tokens are replaced with Alert List column values and other constructs when the message is created and sent.

Available Tokens in Alert Plus are described in the table below.

Token Description Use in a Hyperlink tag?
{[Column Display Name]}

Add the value of any Alert List column name to the Email message. For example, the token {Due Date} will insert the value of the item’s Due Date column into the subject or message (wherever you have placed the token).

Icon-WarningIMPORTANT: These tokens are case-sensitive! If the column name is Title and you use the token {title}, no values will appear in the email message.

Icon-WarningIMPORTANT: In Alert Plus v4.x and higher, if you are alerting on a view of a list, each token must be included in the view. If its not in the view, it’s value wil not appear in the Email message.

Yes
{[Column Display Name]/Old}

Add the previous value of any Alert List column name to have the old item value for that column inserted. For example: The token {Title/Old} will insert the value of the Title column BEFORE the change.

Icon-WarningIMPORTANT: These tokens are available only if the alert Trigger Type is A specific column in the list changes.

No
{[Comment Column Display Name]/New}

This applies only to multiline text fields that allow appended data. The /New switch will show only the most recently appended content.

Icon-WarningIMPORTANT: These tokens are available only if the alert Trigger Type is A specific column in the list changes.

NOTE: This feature is only available in Alert Plus version 4.0 and later.

No
{ItemURL} Inserts a link to the item that generated the alert. Yes
{SiteURL} Inserts a link to the site where the item that generated the alert resides. Yes
{itemlink}

Inserts a link to the item that generated the alert.

Icon-Tip The link construction method is dictated by the contents of the External Host Path and Custom Item Link fields on the Mail Format – Options tab.

No
{sitelink}

Inserts a link to the site containing the Alert List.

Icon-Tip The link construction method is dictated by the contents of the External Host Path and Custom Item Link fields on the Mail Format – Options tab.

No
{FolderName} Inserts the name of the folder where the alert item resides. Yes
{FolderPathName}

Inserts the names of nested folders where the alert item resides. In other words, if the item resides in a folder that is in another folder, the {FolderPathName} includes the names of all the folders in the path to reach the alert item.

Icon-Tip Use this token when building a Custom Item Link on the Mail Format – Options tab.

Yes
Images

Images can also be inserted into the e-mail Message Templates through the use of the HTML IMG element. Type in the image element and the source path to the image file to insert.

NOTE: The image file to be shown must exist at a location that can be resolved with a relative or fully-qualified URL path. On subsequent edits of the message template you will not see the IMG element, but rather the picture itself. If you desire to change the linked image, then you will first need to delete the existing picture.

No

Using the Alert Plus Subscriber Web Part

Using the Alert Plus Subscriber Web Part

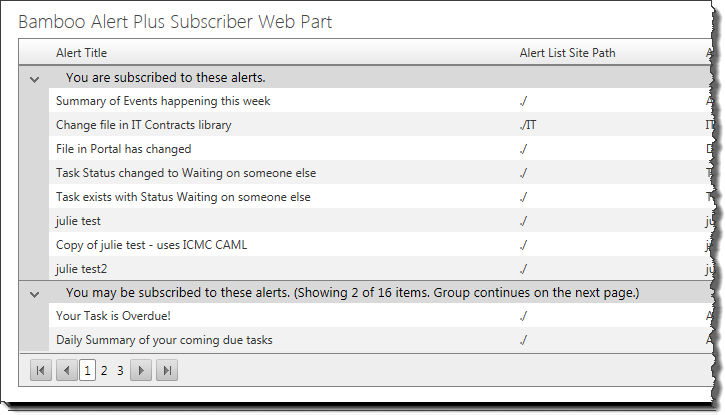
Alert Plus Subscriber Web Part displays a list of Bamboo Alerts the current user is subscribed to, either directly or through membership in a SharePoint Group.

NOTE: This web part doesn’t show SharePoint alerts the user subscribed to, it shows alerts that are sent from the Bamboo Alert Plus Web Part. If you are interested in seeing or managing the SharePoint Alerts you or your team is subscribed to, see the Bamboo Alerts Administrator Web Part.

To use Alert Plus Subscriber Web Part, first add the web part to a page. see Configuring the Alert Plus Subscriber Web Part for details.

The Alert Plus Subscriber Web Part automatically displays the Bamboo Alerts for the current user. The main group heading, You are subscribed to these alerts, includes the alerts the logged in user is specifically identified as a recipient.

HW05_2010_SubscriberWP.jpg

Alert Subscriber for Julie - cropped.pngSome users may see a grouped view, as shown here. The group called You may be subscribed to these alerts appears if alerts are configured for items like Tasks where the alert is sent to the task assignee. In other words, the recipient is not specifically defined.
By default, Alert Plus Subscriber Web Part displays alerts in groups of 10. You can change the number of items displayed per page by making a selection in the Page size drop-down list at the bottom of the web part. Scroll between pages using the page navigation controls in the lower left corner.

NOTE: The Page size control is not available when using the web part in SharePoint 2013 environments.

Use the ‘An Item Exists’ Trigger Type

Use the ‘An Item Exists’ Trigger Type

The following outlines how to quickly configure a reminder alert. This alert uses the trigger type An item exists and a Bamboo List Rollup Schema as the Data Source.

Go to the page in your Portal, where the Alert Plus Web Part exists. If it hasn’t been added to a page yet, see How to add a web part to a SharePoint wiki page.

Icon-Tip It is not necessary to add an Alert Plus Web Part to a page in each site. Because you specify the URL for the site where the alert items reside, you can consolidate your alerts in one web part on a single page in your site collection.

Step Action
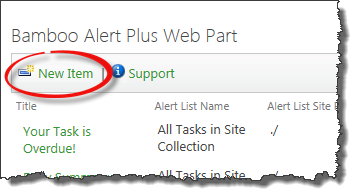
1. click new item in alert plus.pngFrom the Alert Plus toolbar, click New Item.
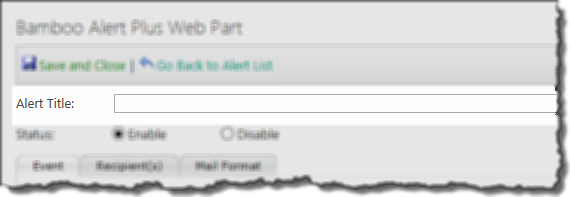
2. alert title.pngGive the new alert a title. You won’t be able to save the alert without a title.
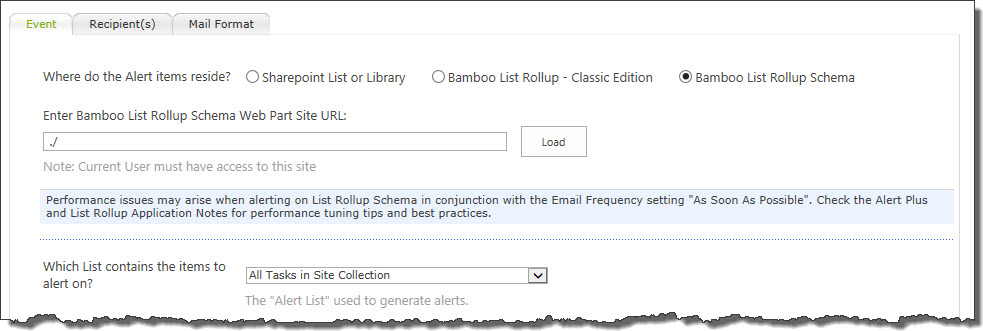
3.

Identify the site where the items that will trigger an alert reside. First choose whether they are in a SharePoint List or Library or a Bamboo List Rollup. For this example, we will choose Bamboo List Rollup Schema *

Next, enter the URL for the site where the List Rollup Schema was defined. After entering the URL, click the Load button to load the available schemas into the What List contains the items to alert on? box. For this example, we will choose the schema called All Tasks in Site Collection.

select lr schema as data source.jpg

Icon-Tip When possible, use relative URLs. For example, if the List Rollup Schema was defined on the current site, enter ./ in the Enter Bamboo List Rollup Schema Web Part Site URL box.

4. Choose a What triggers the alert? option. For an alert that is sent as a reminder what a Task is overdue, we choose An item exists.

lr - what triggers the alert.jpg

For the Follow-up Wait Days, enter the number of days to wait before sending another email about the same overdue item. In other words, this type of alert has an automatic escalation. Reminder emails will continue to be sent as long as the item continues to meet the alert criteria.
5.

Choose How often are e-mails sent? For this example, choose As Soon As Possible so the email recipient receives the message as soon as we realize the task is overdue. Since the As Soon As Possible emails are processed every two minutes, this means the reminder emails will be sent shortly after midnight.

Icon-Tip Processing emails shortly after midnight is a good time to process reminder emails since it is typically not a busy time for your SharePoint server(s).

For information about the other options, including Combining multiple alerts into summary notification, see How often should E-mails be Sent.

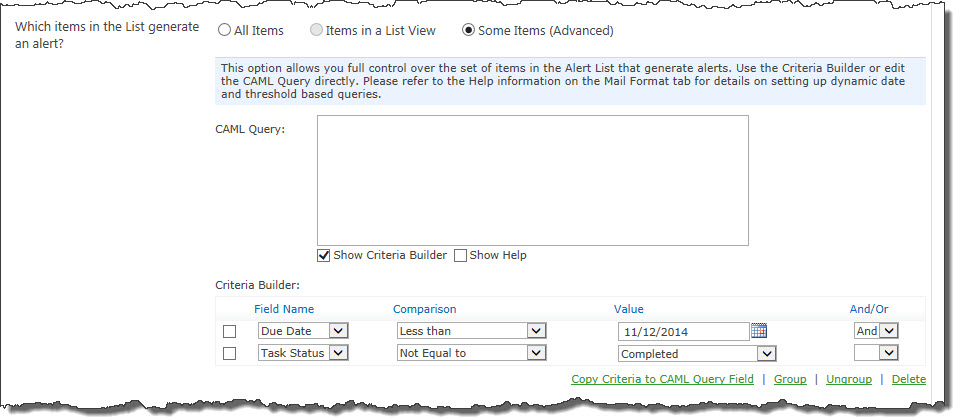
6. What column values should generate an alert? For this example, we will use the CAML Criteria Builder. Select the Some Items (Advanced) option and enter the criteria as shown in the screen below. The specific date chosen as the Value for Due Date is not important since we will be changing it to use the current date. Click Copy Criteria to CAML Query Field when ready. The CAML Query will appear in the CAML Query box.

LR CAML builder.jpg


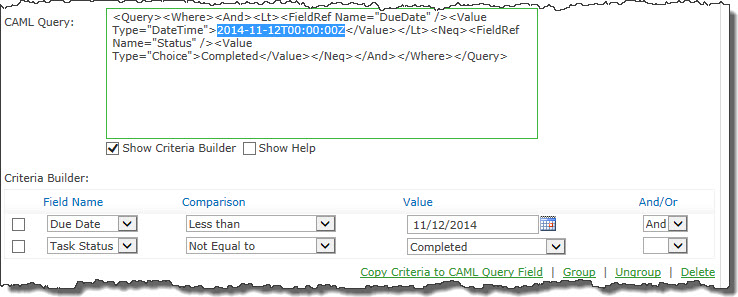
LR CAML edit1.jpgHighlight the date value entered, as shown here:
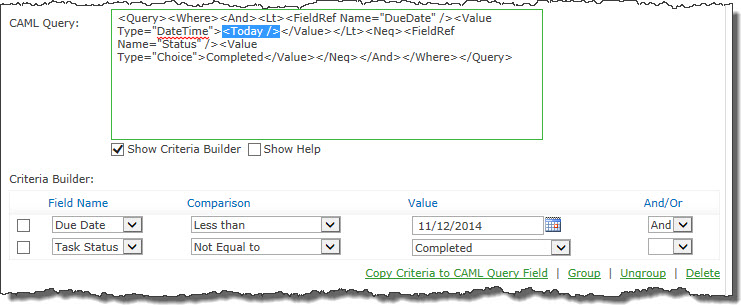
LR CAML edit2.jpgEnter <Today /> where the date value was, as shown here:
This results in a query that will automatically find all overdue tasks.

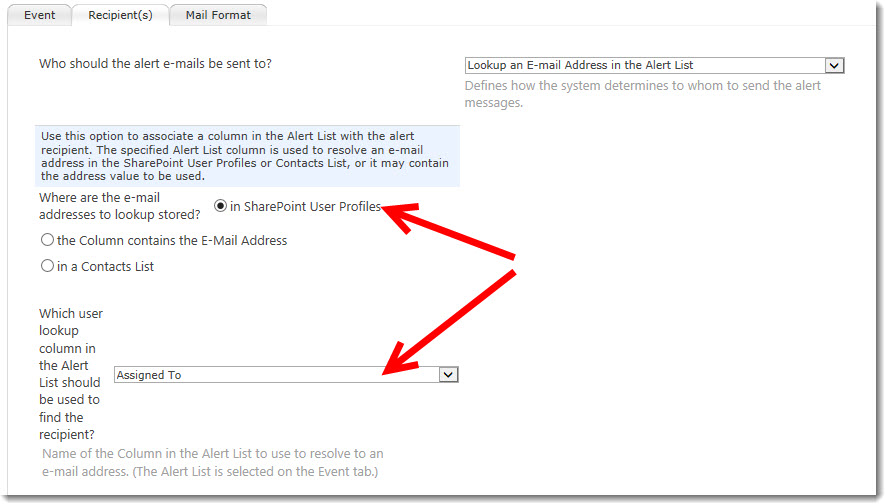
7.

Click the Recipient(s) tab and choose the recipient of the email alert. For this example, we will send the reminder emails to the Task assignee by selecting the Lookup an E-mail Address in the Alert List option. The Assigned To column is in the Tasks list, but it includes the person’s name, not an email address. Select the in SharePoint User Profiles to tell Alert Plus where to find the email address associated with the person.

lr recipient.jpg

See Overview of Alert Plus Recipient Tab for more information.

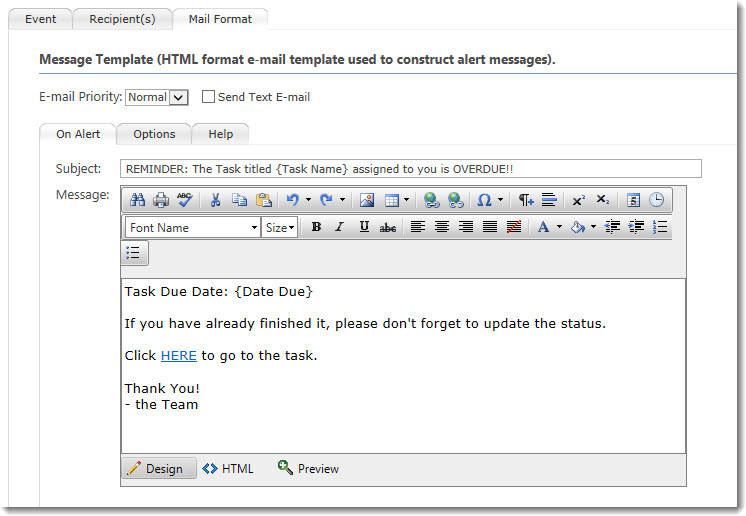
8. Click the Mail Format tab and compose your message. To include columns values from or a link to the alert item, use tokens. For our example, we will compose a message like this:

lr mail format.jpg


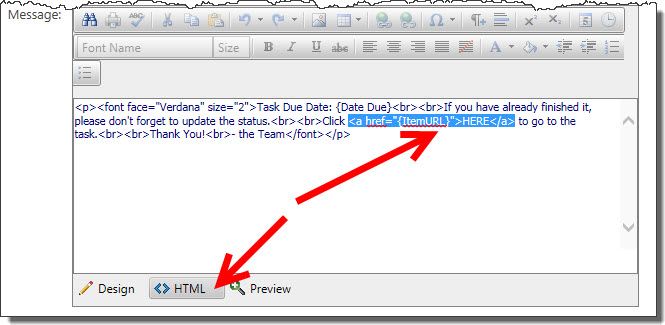
To see how the hyperlink to the task was composed, see the HTML view below:

lr mail format html.jpg

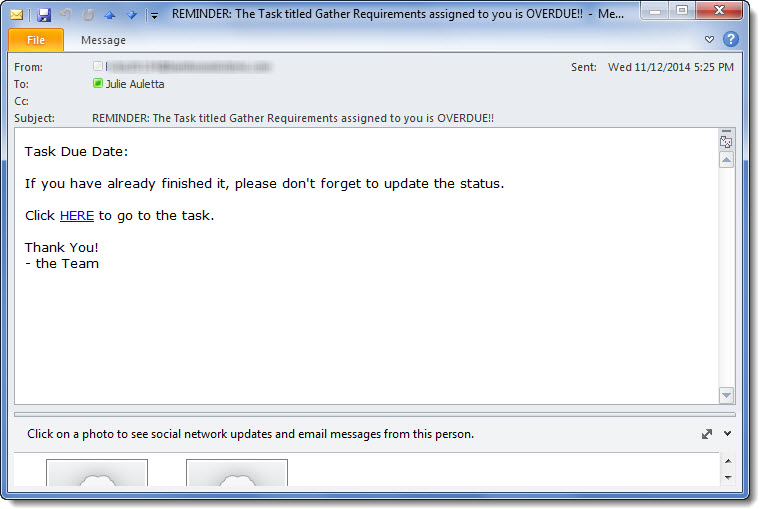
For more information about using tokens in mail formats, see Using Tokens in your Alert Plus Email Message. The email below is how this message will look. Notice that a blank due date in SharePoint will appear blank in the email message also.

sample email.jpg
9. Click the Save and Close button on the toolbar to save the new alert.

*Bamboo’s List Rollup web part is sold separately.

Use the Alert Plus Utility to Register Sites

Use the Alert Plus Utility to Register Sites

Overview of the Alert Plus Utilities

NOTE: Use the Register Site tab of the Alert Plus Utility when upgrading from Alert Plus Release 2.8 or earlier. It is not needed if you are upgrading from a later release.

Background

Alert Plus Release 3.0 replaced the Web Service architecture of previous Alert Plus releases with SharePoint timer jobs. Alert Plus Release 2.8 and earlier registered sites to the Alert Plus Web Service using a file called data.xml. This file was located on the server where the Bamboo.AlertPlusService was installed (often an application server instead of a SharePoint Web front-end server). In order to “register” a site with the Alert Plus service, you needed to visit the page where the Alert Plus Web Part resided, which typically happened when you created your first alert. The data.xml file contained information about each site where an Alert Plus Web Part was used.

Alert Plus Release 3.0 and higher registers sites using site collection properties, so the data.xml is no longer required. Site registration is still updated by visiting the web part page where the Alert Plus Web Part resides, and is a step in the Upgrading Alert Plus from Release 2.x to 3.1 process. No alerts will be sent until the site where alerts reside is registered.

If you have several sites using Alert Plus, visiting every one to register the web part may take some time. The Alert Plus Utility can update site registrations for Alert Plus from a central place, eliminating the need to visit multiple sites. There are two different methods the utility uses. If you are upgrading from release 2.x, it can reference the old data.xml file to know where Alert Plusresides. Otherwise, you can enter the specific site URL you want to register.

Steps

Follow the instructions below to update site registration using the Alert Plus Utility:

Step Action
1.

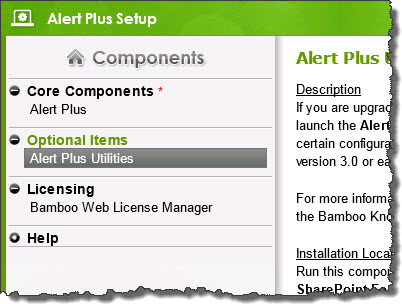
Alert Plus Utility InstallFrom the Alert Plus product installation, start the install by clicking Setup.bat and highlight the Alert Plus Utilities. Verify the location and required permissions for the application and then click the Install button to launch it.
NOTE: Although the button says Install, there is nothing to install. The Install button launches the application directly from the Bamboo.AlertPlusUtilities folder of the Install package. An alternative way to start the application is to go to that folder and double-click the EXE file.

2.

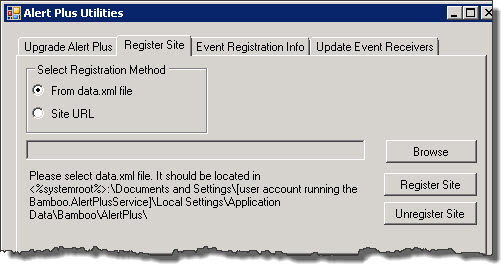
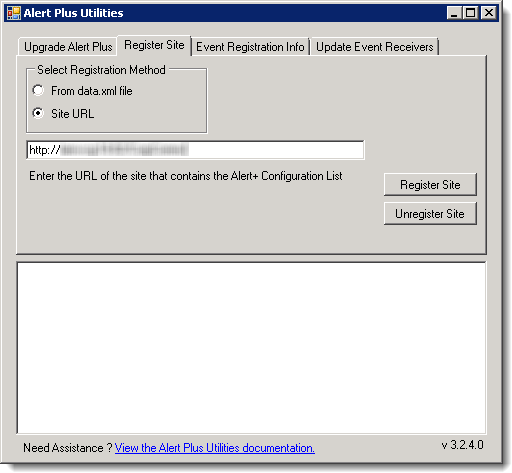
In the Register Site tab, choose whether to register:

register sites tab data xml.jpg
All Alert Plus sites at once using the Alert Plus Release 2.x data.xml file. If you choose this method, browse to the location of the data.xml file.

NOTE: You might consider copying the data.xml file to the server where you are running the Alert Plus Utilities.

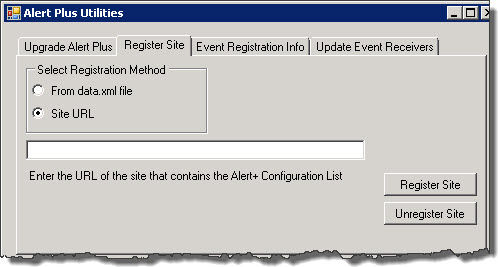
ORregister site using singel url.jpg

A single site. If you choose this method, enter the URL of the site to register.

NOTE: If you have the data.xml file available, it is much faster to register sites using it. The data.xml file is on the server where the Bamboo.AlertPlusService for Alert Plus Release 2.x was running. Bamboo recommends copying this file to the server location where the Alert Plus Utility is running.

3.

After selecting a registration method and entering required information for that method, click the Register Site button.

NOTE: The Register Site tab of the Alert Plus Utility also allows you to unregister sites. You may want to unregister a site if an Alert Plus Web Part is removed from a site. See Use the Alert Plus Utility to Unregister Sites for more information.

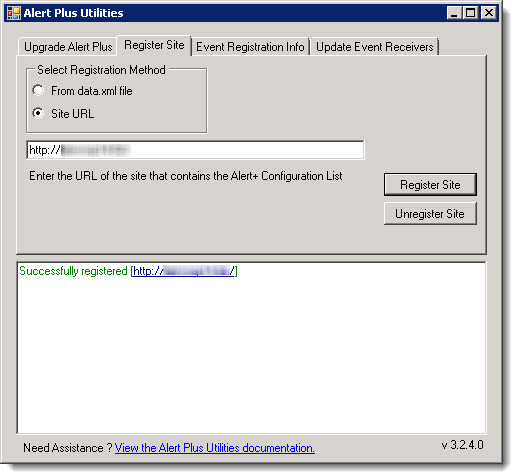
4. register sites result.jpgReview the results of the registration activities in the status box. For any errors or warnings, read the information provided for important troubleshooting steps.
5. Repeat steps 2-4 for other sites that need to be registered.

Return to Overview of the Alert Plus Utilities

Use the Alert Plus Utility to Unregister Sites

Use the Alert Plus Utility to Unregister Sites

Overview of the Alert Plus Utilities

NOTE: Use Alert Plus Utilities to unregister a site if you are using Release 3.1 or later on any SharePoint version.

Background

Registering sites tells the Alert Plus timer job what sites may have alerts to process. If your site is not registered, no alerts will be processed. There are a few ways to register your site:

  • Visit the page where the Alert Plus web part resides.
  • Use the Alert Plus Utilities to register a site.

You may have an Alert Plus web part that you no longer use on a site. If you remove the Alert Plus Web Part from the site, you should unregister the site. Unfortunately, removing the web part does not automatically unregister the site. Removing the lists associated with the web part (Alert+ Configuration List and Alert+ AlertChangeList) will not unregister the site either. You need to use the Alert Plus Utilities to unregister a site.

NOTE: If you remove the Alert Plus web part from a site, the two lists (Alert+ Configuration List and Alert+ AlertChangeList) will remain. If the site is registered, enabled alerts will be processed.

Leaving a site registered, if there are no alerts to process, does not cause problems. However, it does generate log messages that you may not want cluttering your SharePoint logs.

Steps

Follow the instructions below to unregister a site using the Alert Plus Utilities:

Step Action
1.

Alert Plus Utility InstallFrom the Alert Plus product installation, start the install by clicking Setup.bat and highlight the Alert Plus Utilities. Verify the location and required permissions for the application and then click the Install button to launch it.

NOTE: Although the button says Install, there is nothing to install. The Install button launches the application directly from the Bamboo.AlertPlusUtilities folder of the Install package. An alternative way to start the application is to go to that folder and double-click the EXE file.

2.

utility-unregister site1.pngIn the Register Site tab, select the Site URL radio button and enter the URL for the site to unregister.
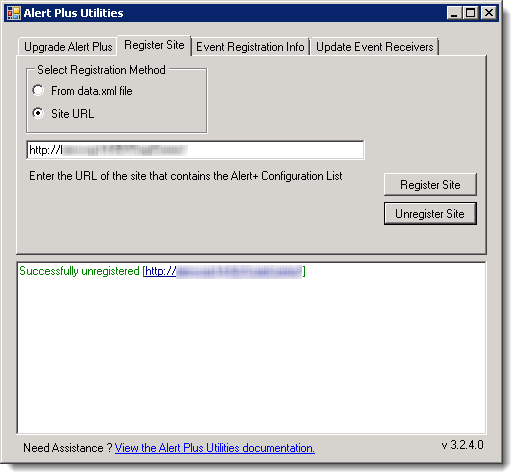
NOTE: The URL entered for the Site URL must be valid. If you have migrated your SharePoint farm to new servers with a new URL, you will not be able to unregister the sites with the old URLs because the old URLs are no longer valid. You will need to use the Bamboo.FixUpgrade.exe utility to unregister those sites. The Bamboo.FixUpgrade.exe utility can also be used to register the sites with the new URLs. See Use the Bamboo.FixUpgrade utility to resolve broken links for more information.

3. Click the Unregister Site button.
4. utility-unregister site2.pngReview the results of the unregistration activity in the status box. For any errors or warnings, read the information provided for important troubleshooting steps.
Return to Overview of the Alert Plus Utilities

Use the Alert Plus Utility to Upgrade Sites

Use the Alert Plus Utility to Upgrade Sites

Overview of the Alert Plus Utilities

Use the Upgrade Alert Plus tab of the Alert Plus Utilities when upgrading Alert Plus Release 3.1 or later to the latest version.

As new features are added to Alert Plus, the Alert Plus Utilities is used to update your existing alerts to leverage the new features. As an example, for Release 3.1 the utility included configuration updates to custom alert schedules, event receiver architecture, List Rollup Schema CAML query structure, and new columns in the Alert+ Configuration List. These updates are not performed automatically when the Alert Plus Web Part is upgraded via the Installation/Setup. They must be made by running the Alert Plus Utilities for each individual site after the Installation/Setup upgrade is completed.

NOTE: If you moved or migrated SharePoint to a new farm with a different URL as part of your upgrade, you should ensure that all the sites using the Alert Plus web part are properly registered before running the utility to upgrade the sites. The utility depends on the registration information. See Use the Alert Plus Utilities to Register Sites for more information.

Follow these steps to use the Alert Plus Utility to upgrade a site:

Step Action
1.

Alert Plus Utility InstallFrom the Alert Plus product installation, start the install by clicking Setup.bat and highlight the Alert Plus Utilities. Verify the location and required permissions for the application and then click the Install button to launch it.

NOTE: Although the button says Install, there is nothing to install. The Install button launches the application directly from the Bamboo.AlertPlusUtilities folder of the Install package. An alternative way to start the application is to go to that folder and double-click the EXE file.

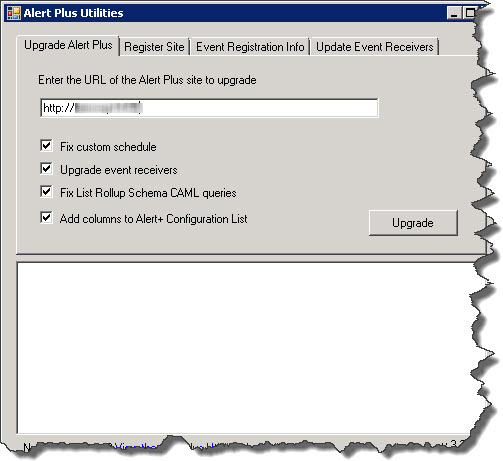
2. In the Upgrade Alert Plus tab, verify that all four upgrade options are checked. Enter the URL of a site containing the Alert+ Configuration List and click the Upgrade button.

Alert Plus Utility - Enter URL and click Upgrade

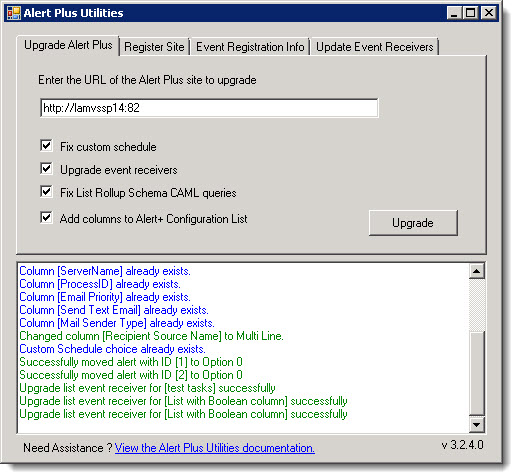
3. Review the results of the upgrade activities in the status box. For any errors or warnings, read the information provided for important troubleshooting steps.

Alert Plus Utility Results Summary

4.

Repeat steps 2 and 3 for each site that contains an Alert+ Configuration List.

NOTE: The Alert Plus Utilities option to fix custom schedules may not work for certain custom schedules. Alert IDs with schedules that could not be updated are listed in the status box after the Upgrade is completed. To fix those schedules manually, modify the specified alert in the Alert Plus Web Part and update the Custom Schedule setting in the Event tab. For more information about available Custom Schedule updates, see Setting a Custom Schedule for an alert.

If Alert Plus is installed on several sites, you should consider using one of the available automation methods to upgrade all sites in a site collection or web app at once. If you are using

Return to Overview of the Alert Plus Utilities

Use the Alert Plus Utility to see information about registered Event Receivers

Use the Alert Plus Utility to see information about registered Event Receivers

Overview of the Alert Plus Utilities

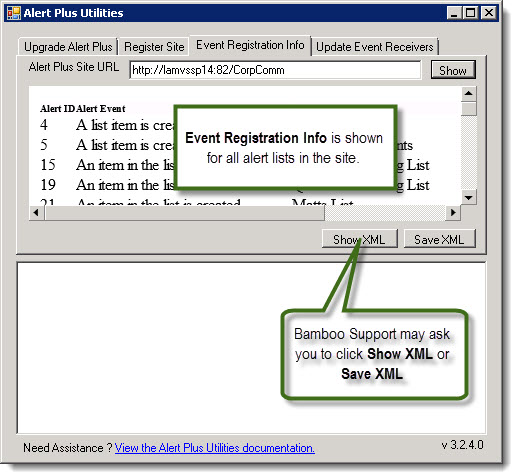
event reg info for all sites.jpgThe Event Registration Info tab of the Alert Plus Utilities displays event receiver information. There are two types of alerts that use Event Receivers on the SharePoint List or Library. They are:
  • An item in the list is deleted
  • A specific column in the list changes.

The Event Registration Info utility lists all event receivers registered for any list or library on a given site. Bamboo Support can use this diagnostic information when troubleshooting problems with alerts.

Bamboo Support may request that you use the Show XML and Save XML buttons; these should be used only when prompted by Bamboo Support.

Return to Overview of the Alert Plus Utilities

Use the Alert Plus Utility to update Event Receiver information

Use the Alert Plus Utility to update Event Receiver information

Overview of the Alert Plus Utilities

Use the Update Event Receivers tab of the Alert Plus Utilities only when prompted to do so by Bamboo Support.

The Update Event Receivers tab allows event receiver configuration to be manually updated. Event receivers should never be modified with this tool unless prompted by Bamboo Support.

Return to Overview of the Alert Plus Utilities

Use the Bamboo.FixUpgrade utility to resolve broken links

Use the Bamboo.FixUpgrade utility to resolve broken links

Background

Because Alert Plus uses a combination of Web properties, event receivers and SharePoint lists to store URLs, the SharePoint Administrator must run this special command-line utility to update the static URLs associated with Alert Plus alert jobs that existed on the old farm. Until the utility is run, no existing alerts will work on the new farm.

Specifically, the Bamboo.FixUpgrade utility updates:

  • Web Properties (Alert registration information)
  • URLs in the Alert+ Configuration List
  • URLs stored in Event Receivers on Alert lists

NOTE: The Bamboo.FixUpgrade utility is needed when you migrate your SharePoint farm using the Database Attach Upgrade Method (and the URL of the new farm is different than the URL of the old one), regardless of whether you are migrating to a new version of SharePoint or not.

Steps

To run the utility, follow these steps:

Step Action
1.

On the SharePoint server in the new SharePoint Farm where Alert Plus was installed, locate the Bamboo.FixUpgrade.exe file. It is located in the Alert Plus product extraction folder in the /misc folder.

NOTE: This utility is run at the command prompt; it doesn’t have a user interface, so don’t bother double-clicking the .exe.

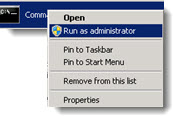
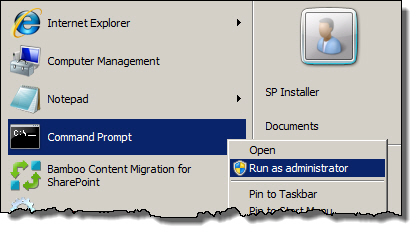
2. fixUpgrade-img1.jpgFrom the Start button on the server, select the Command Prompt and choose Run as administrator.
3.

Change the directory in the Command Prompt to the directory that contains the Bamboo.FixUpgrade.exe file. Enter the following command:

Bamboo.FixUpgrade "[CurrentAlertPlusSiteURL]" "[OldDomainName]" "[NewDomainName]"

where:

  • [CurrentAlertPlusSiteURL] is the site URL where Alert Plus resides in your new SharePoint Farm.
  • [OldDomainName] is the domain name part of the URL you need to change.
  • [NewDomainName] is the domain name part of the URL where your new SharePoint site resides.

See the example below:
fixUpgrade-img2.jpg

4.

Make sure that the alerts are updated successfully by completing the following verification:

  1. Navigate to the site on the new farm that you processed in Step 3.
  2. Select View all Site Contents > Alert+ Configuration List
  3. Verify that the values for the Alert List Site Path and Recipient List Site Path columns have the URL of the new farm.
    fixUpgrade-img4.jpg
    fixUpgrade-img5.jpg
  4. Navigate to the Alert Plus Web Part on the site and click Support from the top menu.
    fixUpgrade-img6.jpg
  5. Under Alert Plus Event Handlers in the Registration Information section, click View. Make sure the information listed includes the URL of the new farm.
    fixUpgrade-img7.jpg
5.

Repeat Steps 3 and 4 for each instance of Alert Plus that was migrated to the new farm.

NOTE: Only repeat for Alert Plus instances that existed BEFORE the migration. There is no need to process alerts that are newly created on the new farm.

Upgrading Alert Plus from Release 3.0 to 3.1

Upgrading Alert Plus from Release 3.0 to 3.1

To upgrade Alert Plus from version 3.0 to 3.1 or newer, you must perform these activities:

  • Upgrade the Alert Plus component
  • Restart the SharePoint Timer Service
  • Run the Alert Plus Utilities

Instructions for these activities are provided below. Make sure to follow ALL instructions carefully to ensure a successful upgrade.

Step Action
1. Upgrade the Alert Plus components by following Upgrading your Bamboo Web Part
2.

Because some updates to the Alert Plus timer service were included in this upgrade, be sure to restart the SharePoint Timer service on all Web front-end servers after completing the upgrade of the Alert Plus components.

NOTE: The SharePoint Timer Service has slightly different names on the different versions of SharePoint.
* SharePoint 2007: Windows SharePoint Services Timer
* SharePoint 2010: SharePoint 2010 Timer
* SharePoint 2013: tbd

3.

Run the Alert Plus Utilities. Alert Plus Release 3.1 and higher includes configuration changes to custom alert schedules, event receiver architecture, List Rollup Schema CAML query structure, and the Alert+ Configuration List.

NOTE: These changes are not performed automatically when the Bamboo Alert Plus Web Part components are upgraded or when Alert Plus is accessed on a web page. They must be made by running the Alert Plus Utility upgrade.

Follow these steps to use the utility to upgrade a site:

  1. From the Alert Plus product installation, start the install by clicking Setup.bat, or if you have it running already from Step 1 above, highlight the Alert Plus Utilities. Verify the location and required permissions for the application and then click the Install button to launch the application.

    alertplusutilin install.jpg

    NOTE: Although the button says Install, there is nothing to install. The Install button launches the application directly from the Bamboo.AlertPlusUtilities folder of the Install package.

  2. In the Upgrade Alert Plus tab, verify that all four upgrade options are checked. Enter the URL of a site containing the Alert+ Configuration List and click the Upgrade button.

    utili-step1 with blurred url.jpg

NOTE: The Alert+ Configuration List resides on any site where an Alert Plus Web Part has been added to a page. You may need to run this upgrade for several sites, depending on your use of the web part.

  1. Review the results of the upgrade activities in the status box. For any errors or warnings, read the information provided for important troubleshooting steps.

    utili-step2 review results.jpg

4.

Repeat steps 2 and 3 for each site that contains an Alert+ Configuration List.

NOTE: The Alert Plus Utilities option to fix custom schedules may not work for certain custom schedules. Alert IDs with schedules that could not be updated are listed in the status box after you click Upgrade. To fix those schedules manually, modify the specified alert in the Alert Plus Web Part and update the Custom Schedule setting in the Event tab. For more information about available Custom Schedule updates, see Setting a Custom Schedule for an alert.

If Alert Plus is installed on many sites or if you have a large number of alerts with custom schedules or many List Rollup Schema alerts, the Alert Plus Utilities can perform these changes without having to visit every site or update individual alerts. Please see xxx for more information.

TBD: why do we mention custom schedules and Schema alerts in the above paragraph??? If they are all on the same site, we would just run the utility once?

Upgrading Alert Plus from Release 2.x to 3.1

Upgrading Alert Plus from Release 2.x to 3.1

To upgrade Alert Plus from version 2.x to 3.1, you must perform these activities:

  • Stop and uninstall existing Alert Plus services
  • Upgrade the Alert Plus component
  • Run the Alert Plus Utilities

Instructions for all activities are provided below. Make sure to follow ALL instructions carefully to ensure a successful upgrade.

Step Action
1.

Remove existing Alert Plus services. Alert Plus R3.1 and newer use timer jobs instead of services. You must remove the old services since they will not longer be used.

On the SharePoint server where you installed the Alert Plus 2.x services, go to Administrative Tools > Services and stop the following services:

  • Bamboo.AlertPlusService
  • Bamboo.SchedulerService

In Add or Remove Programs (or Programs and Features if you are running Windows Server 2008), uninstall the following programs:

  • Bamboo Alert+ Subscriber Web Service
  • Bamboo.Alert+ Services

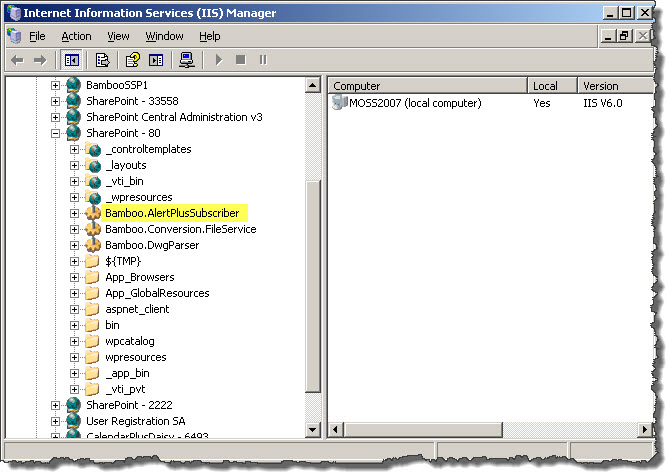
In Internet Information Services (IIS) Manager, view the Web application where the Alert Plus Web Service was installed. Delete the Bamboo.AlertPlusSubscriber virtual directory (the virtual directory is now orphaned).

virtual directory to remove.jpg

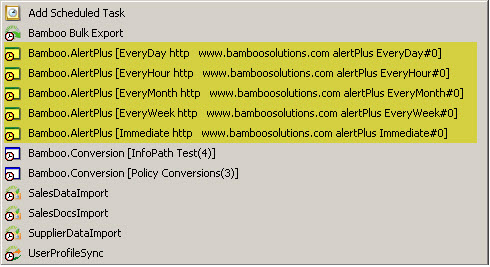
Go to Control Panel > Scheduled Tasks and delete all tasks for Bamboo.AlertPlus. See a typical list in the screen shot below.

scheduled tasks for Bamboo Alert with highlight2.jpg

2.

Upgrade the Alert Plus components by following Upgrading your Bamboo Web Part. Restart the SharePoint Timer service on all Web front-end servers.

NOTE: The SharePoint Timer Service has slightly different names on the different versions of SharePoint.
* SharePoint 2007: Windows SharePoint Services Timer
* SharePoint 2010: SharePoint 2010 Timer

3.

Open a web browser and access the page containing the Alert Plus Web Part to register the site with Alert Plus. You can verify that the site was registered successfully by clicking the Support button in the Alert Plus Web Part toolbar.

Repeat for all sites that contain an Alert+ Configuration List.

If you have several sites that have an Alert Plus web part, it will be easier and much faster to use the Register Site tab of the Alert Plus Utility to upgrade them. Please see Use the Alert Plus Utility to Register Sites.

4.

Run the Alert Plus Utilities. Alert Plus Release 3.1 and higher includes configuration changes to custom alert schedules, event receiver architecture, List Rollup Schema CAML query structure, and the Alert+ Configuration List.

NOTE: These changes are not implemented automatically when the Bamboo Alert Plus Web Part components are upgraded or when the Alert Plus Web Part is accessed on a web page. They must be implemented by running the process found on the Upgrade Alert Plus tab of the Alert Plus Utility.

Please see Use the Alert Plus Utility to Upgrade Sites.

Upgrade all the Alert Plus Sites in a Site Collection or Web Application via PowerShell

Upgrade all the Alert Plus Sites in a Site Collection or Web Application via PowerShell

Running the Alert Plus Utility is one of the steps you need to do when upgrading Alert Plus to newer releases. This utility will update existing alerts to use new features that may be available.

The Alert Plus Utility is run on a SharePoint Web Front End (WFE) server and has a user interface. However, when running from the user interface you can update alerts in only one site at a time. If Alert Plus is used on several sites on your SharePoint farm, upgrades site-by-site can be tedious. To save time, you can automate the utility via PowerShell to process all the alerts in a web application or site collection.

Follow the steps below to run the utility via PowerShell:

Step Action
1. The Alert Plus Utility is part of the Alert Plus installation files. It is located in the /misc ** folder.
Alert Plus Utility install

2.

Download the *.ps1 file below and put it in the same folder as the Bamboo.AlertPlusUtilities.exe on a farm server. This is usually the Bamboo.AlertPlusUtilities folder included in the Alert Plus installation files.

Bamboo.AlertPlusUtilitySP2010.ps1

NOTE: This PowerShell script will not run on a SharePoint 2007 farm. If you are using SharePoint 2007, you can save time by running the utility from the command line. See Running the Alert Plus Utility via the Command Line for more information.

3.

Open Windows PowerShell as an administrator and navigate to the location of the Alert Plus Utility. Set the execution policy to unrestricted by entering:

Set-executionpolicy unrestricted

When prompted, enter “Y” for YES.
Setting PowerShell Execution Policy

4.

Run the script by entering:

.Bamboo.AlertPlusUtilitySP2010.ps1 -[Scope] "[URL]"

Where:

  • [Scope] can be:
    • webappurl – Run the utility for all Sites in the Web Application
    • siteurl – Run the utility for all Sites in the Site Collection
    • weburl – Run the Utility in a specific Web (Subsite)
  • [URL] is the URL for the Web Application, Site Collection, or Web

Example:

   .Bamboo.AlertPlusUtilitySP2010.ps1 -webappurl 'http://acsp2010'

As each site in the web application is run, you’ll see feedback in the PS window:
PshellUI1.jpg

5.

When the script is finished, you’ll be returned to the command prompt.

A log called trace.log will be written to the local directory. Review the log file for errors. If you find error messages and have questions about how to address them, please open a support ticket via My Bamboo, and attach the trace.log file as part of the information.

Return to Use the Alert Plus Utility to Upgrade Sites

Troubleshooting Alert Plus Using the Support Page

Troubleshooting Alert Plus Using the Support Page

Overview of the Alert Plus Web Part

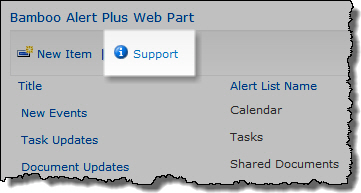
HW05_2010_SupportButton.jpgTo access the Support page, click the Support link from the toolbar of the Alert Plus web part. This page includes options for testing the most common issues for Alert Plus and e-mail server functionality.

Alert Plus Registration

The Alert Plus Registration section tests that the site containing the Alert Plus Web Part is successfully registered so the Alert Plus Standard Timer Jobs know to check for alerts on it. When you access the Support page, a message is displayed telling you if the current site is registered. To check the registration for other sites, enter the absolute or relative path to the site and click Check Registration.

Icon-WarningIMPORTANT: If you upgraded Alert Plus from version 2.8 or earlier, the site is re-registered with Alert Plus when you view the Web Part after upgrading (a step in the upgrade instructions). If a site shows as not registered when you check its registration, visit the Alert Plus Web Part page in that site to register it.

HW05_TestRegistrationCurrentSite.jpg

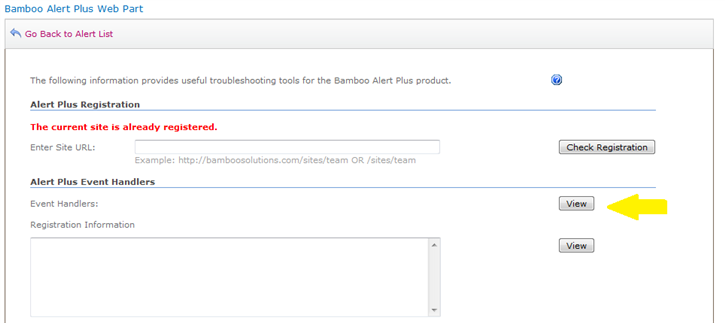
Alert Plus Event Handlers

Click View to see the event receivers/handlers used by Alert Plus. Specifically review the Reg. Info column to see the
registered events for each alert. There should not be any events listed in this column unless the Alert Event is A specific column in the list changes or An item in the list is deleted.

event receivers.jpg

Disabling an alert will remove the Event Receiver(s) from the alert list. Enabling an alert will add the Event Receiver(s) to the alert list.

Registration Information

Registration.jpgFrom the Registration Info box, click View to view the XML code for the Web Part registration. This information is helpful to our Support staff if you experience a problem with Alert Plus.
Alert Plus E-mail Support

  1. Click Send Email to test the configured e-mail settings for Alert Plus and display the results in the Test Result box.

    Support.jpg

Test Result

  1. The Test Result box shows the results from the Alert Plus E-mail Support test. The results are cleared each time the Web Part Page is loaded, or you can click Clear to clear the results.

You will also receive an email if your email server test is successful.

Success.jpg

Troubleshooting Alert Plus Event Handlers

Troubleshooting Alert Plus Event Handlers

The alert that sends an email when a column value changes uses an Event Handler. This handler is created on the event list when the alert is created. If this event handler is missing or corrupted, our Support team may advise you to go to the Support tab of your Alert Plus web part. On the Support tab, click View to see the Event Handlers as shown in the screen shot below.

CheckEventHandler.png

The Event Handlers section provides diagnostic information for Alert Plus event configuration. If you are working with Bamboo Support to resolve an Alert Plus issue, you may be directed to provide results from this section to Support during the troubleshooting process.

The Last Run Status Column is Blank

The Last Run Status Column is Blank

Issue

You installed Alert Plus, added the web part to a page, and created a few alerts. The problem is that nobody receives the email messages. When you check Alert Status, you see that the Last Run Status and Last Run Date columns are blank. What’s wrong?

no last run status.png

Resolution

This typically occurs when the Alert Plus Timer Jobs haven’t been installed, deployed, and/or activated. To check if they are present on the farm, go to Central Administration and perform the following checks:

Check Action
Job Definitions In Central Administration, click Monitoring > Review Job Definitions in the Timer Job section. In the list of definitions, you should see the following Bamboo Alert Plus jobs (with the exception of the Custom Timer Job). Make sure they are deployed to the web application where you configured your alerts.
alert plus timer jobs.jpg
Alert Schedule

If the standard timer jobs are job definitions on your farm, check to see if the alert you are having trouble with is running under a custom schedule. If so, a custom timer job should have been created for it (see an example above – the job called Bamboo Alert Plus Custom Timer Job – Daily at 05:00:00… is a job created for a custom schedule).

Custom Jobs are created by the Bamboo Alert Plus Maintenance Job (before Alert Plus R4.x, they were created by the Bamboo Alert Plus As Soon As Possible Timer Job). Make sure that job has run since you created your new custom-scheduled alert. By default, it runs every 30 minutes, but the schedule may have been altered by a System Administrator.

Farm Solutions

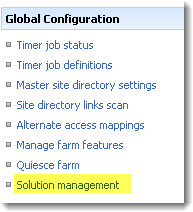
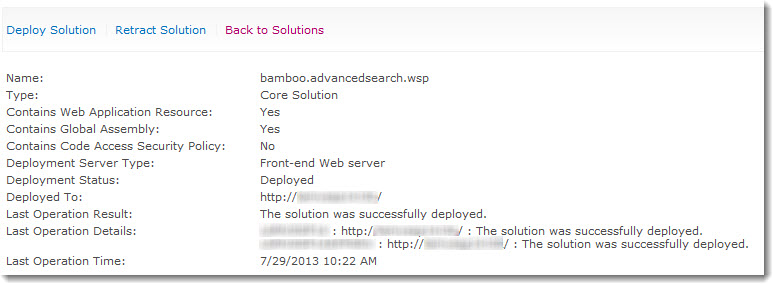
If you do not see the Alert Plus Job Definitions, go to Central Administration > System Settings > Manage Farm Solutions. Check for the following solutions:

  • bamboo.alertplus.mastertimerjob.wsp (no longer there in R4.x, has been merged with bamboo.alertplus.wsp)
  • bamboo.alertplus.wsp
  • bamboo.alertsubscriberwebpart.wsp (no longer there in R4.x, has been merged with bamboo.alertplus.wsp)

Make sure they are successfully deployed to the appropriate web application in your farm.

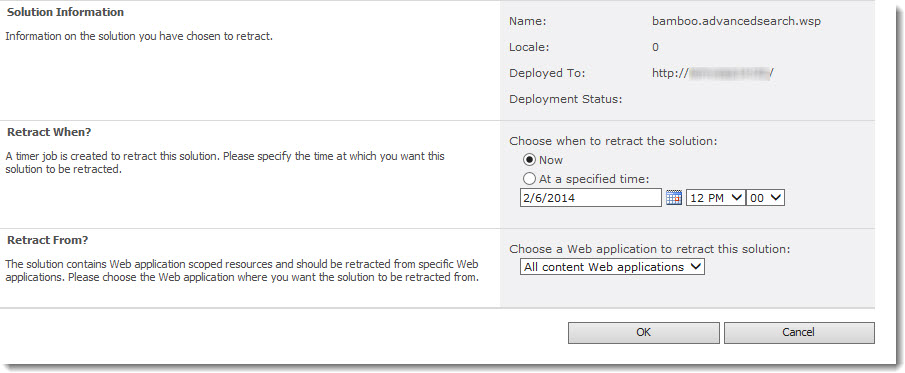
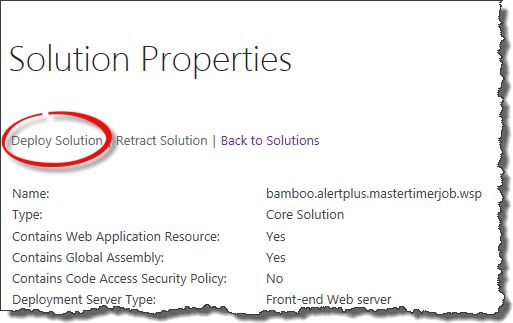
HW05 deploy solutions.pngIf they are there, but not deployed to the web application you need, deploy them to the appropriate web application. Click the solution name link, and on the Solution Properties page, click Deploy Solution.
If you do not see the solutions, especially the bamboo.alertplus.mastertimerjob.wsp, re-run the Alert Plus installation.

Web App Feature

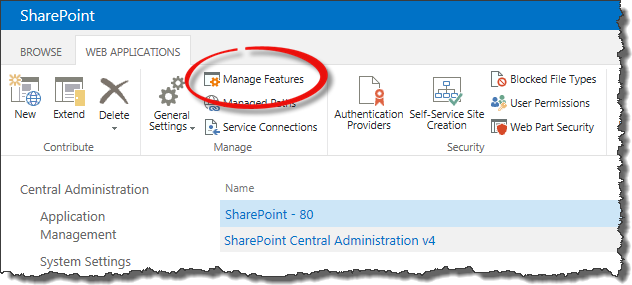
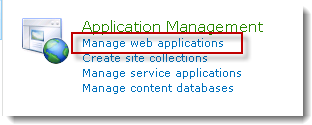
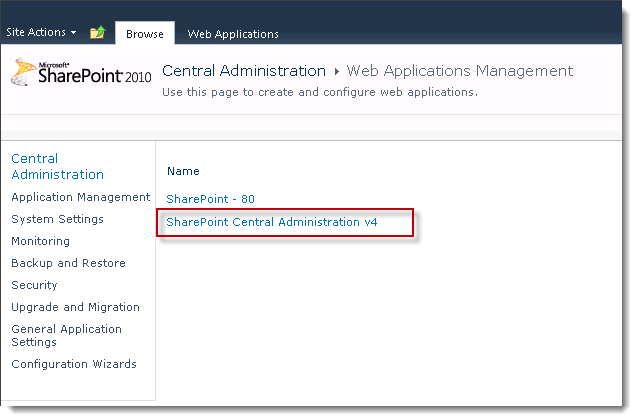
click manage features for your web app.pngIf the farm solutions are there and successfully deployed, go to Central Administration > Manage web applications. Click the web application you are using and when the ribbon appears, click Manage Features.
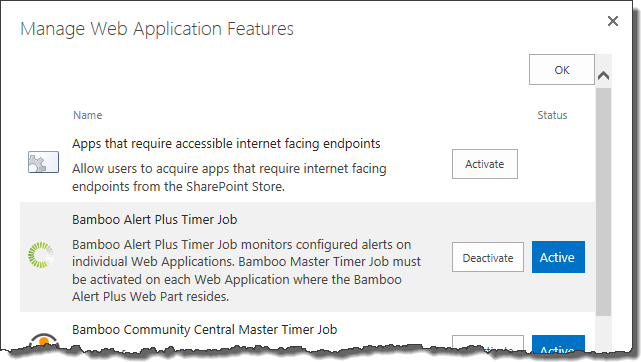
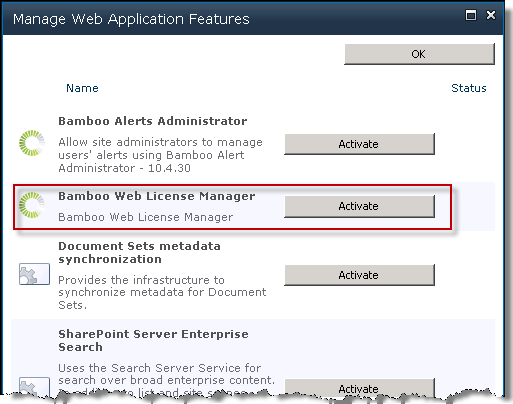
HW05 - web app feature.pngA list of features will be displayed. Bamboo Alert Plus Timer Job should be listed if the solution was deployed successfully to the web application.
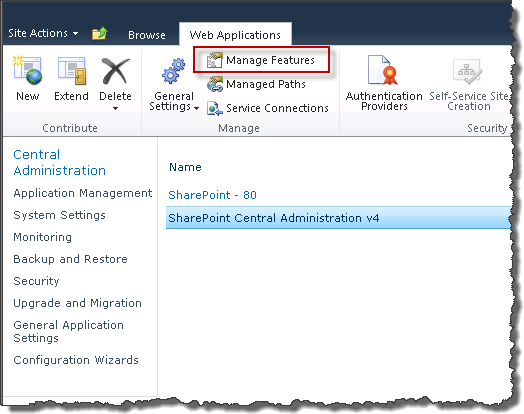
Make sure Bamboo Alert Plus Timer Job is Active. If it’s active, but the timers jobs aren’t there, try deactivating it and then reactivating.

The Value of the Token Does Not Appear in the Email Message

The Value of the Token Does Not Appear in the Email Message

Issue

You configured the Email message sent for your alert to include the values from several different columns in your alert list. When users receive the Email, some of the information they expect to see is missing.

Background

In Alert Plus v4.x and higher, you might see Emails with missing information if your alert is configured to alert on a list view.

A current limitation of Alert Plus is that columns defined as Site Columns are not displayed in the Email message.

Resolution

In Alert Plus version 4.x and higher, when you alert on a list view, the columns included as tokens must be included in the list view. If they are not, modify the list view to make sure those columns are included.

Unfortunately, there is no current resolution for the display of Site Columns in Alert Plus Emai messages.

Setting up a Tasks List with an escalation of reminder alerts to the Task assignee

Setting up a Tasks List with an escalation of reminder alerts to the Task assignee

This use case is another extension of Alert on a Tasks List, and send alerts for every task to the assigned person. You want to set up an escalation of notification process for a Tasks List. Rather than sending the normal notification e-mails when items change, you want to be able to send overdue alerts when items are overdue, and send reminder e-mails 5 days before the due date. This actually requires two alerts to be defined: one for the overdue alerts and one for the reminder e-mails. Let’s refer to these two alerts in our discussion that follows as the Overdue Alert and Reminder Alert. The general alert parameters are defined as follows:

Alert List – What list contains the items to alert on? Tasks List
Event Type – What triggers the alert? An item exists.
E-mail Frequency – How often are e-mails sent? As Soon As Possible
Item Criteria – What items in the list generate an alert? Some Items (Advanced)
CAML Query (see below)
Who should the alert e-mails be sent to? Lookup an E-Mail Address in the Alert List
Where is the e-mail address to lookup stored? In SharePoint User Profiles
Which user lookup column in the Alert List should be used to find the recipient? Assigned To

Overdue Alert – CAML Query

After setting the general alert parameters you will need to define the CAML Query that is used to filter for overdue items. The criteria for our query will be to get all Task items where the Due Date field is greater than today and the Status of the Task item is not complete. Let’s start by using the Alert Plus Web Part Criteria Builder to provide us with the base of our CAML query that we will modify later.
hw05084.jpg

To enable the Criteria Builder, click on the Show Criteria Builder Tool checkbox below the CAML Query field in the “What items in the list generate an alert?” section of the UI. Use the UI controls to build the base query as show in Figure 16. You can pick any date value for the Due Date. We will need to change that value later manually to make comparisons to the constantly changing today’s date.

Click the “Copy Criteria to CAML Query Field” button.

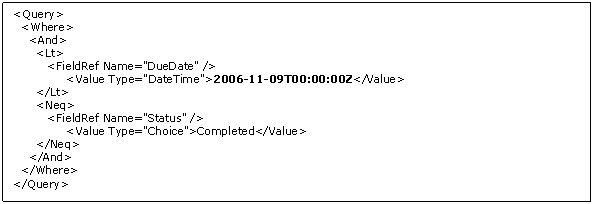
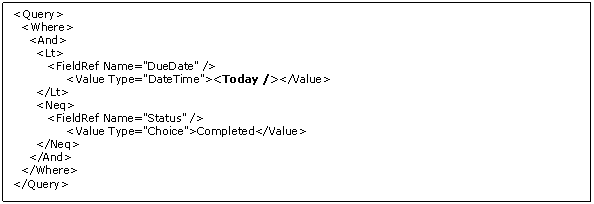
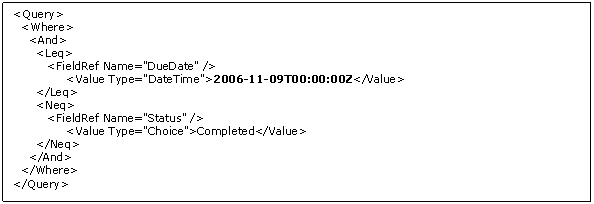
Find the text shown in Figure 17 that has been copied to the CAML Query field. The text in bold is the text you need to edit manually. Change the date time value in bold to ““. Figure 18 shows how the CAML Query should look after editing.

hw05085.gif
Figure 17: Overdue CAML Query Before

hw05086.gif

Figure 18: Overdue CAML Query After

Configuration of the Overdue Alert Event tab is then complete.

Reminder Alert – CAML Query

After setting the general alert parameters you will need to define the CAML Query that is used to filter for items that are approaching their due date. Our use case specified the requirement to notify users when their Tasks were within 5 days of their due date. The criteria for our query will be to get all Task items where the Due Date field is less than or equal to 5 days from today and the Status of the Task item is not complete. Let’s start by using the Alert Plus Web Part Criteria Builder to provide us with the base of our CAML query that we will modify later.
hw05088.jpg

Figure 19: Criteria Builder Reminder

  • To enable the Criteria Builder, click on the Show Criteria Builder Tool check box below the CAML Query field in the “What items in the list generate an alert?” section of the UI.

Use the UI controls to build the base query as show in Figure 19. You can pick any date value for the Due Date value. We will later need to change that value manually to make comparisons to the constantly changing today’s date.

Click the “Copy Criteria to CAML Query Field” button.

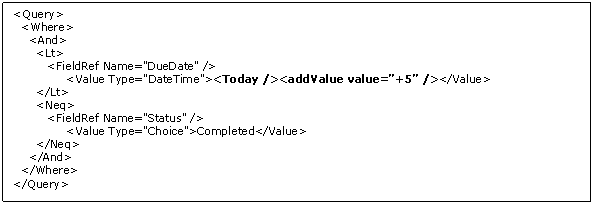
Find the text shown in Figure 20 that has been copied to the CAML Query field. The text in bold is the text you will need to edit manually. Change the date time value in bold to ““. The special addValue token next to the “Today” text will direct the Alert Plus system to add a number of days (or subtract in the case of negative numbers) to today’s date. Please see Figure 21 for how the CAML Query should look after editing.

hw05089.gif
Figure 20: Reminder CAML Query Before

hw05090.gif
Figure 21: Reminder CAML Query After

Configuration of the Reminder Alert Event tab is then complete.

Set up an alert for a Bamboo List Rollup Data View or Schema

Set up an alert for a Bamboo List Rollup Data View or Schema

NOTE: To setup alerts on Data Views created by the Bamboo List Rollup Web Part, you must have the Alert Plus Web Part version 2.2.0 and the List Rollup Web Part version 2.0.1 or higher. To set up alerts on Schemas created with the List Rollup Schema Designer Web Part, you must have Alert Plus 3.0 or higher and List Rollup 5.0 or higher.

Please note that Alert Plus Web Part versions prior to version 2.2.0 are not compatible with List Rollup Web Part version 3.0.0 or higher. All products are sold separately unless purchased as part of a suite or toolkit.

Step Action
1. From the Alert Plus Web Part, click New Item.HW05_UC8.jpg
2. Enter a Title for your alert.
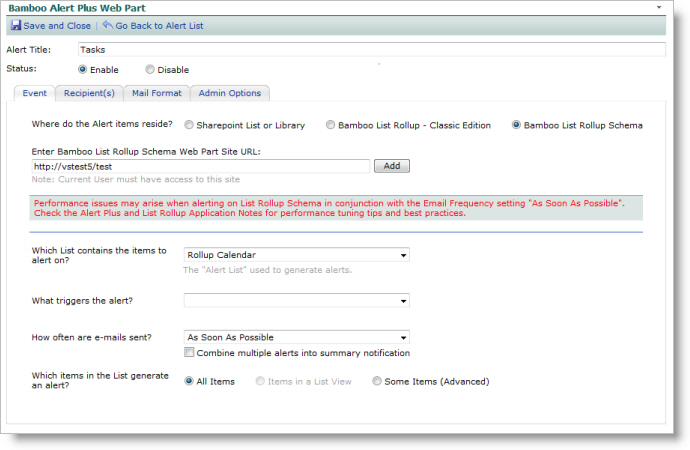
3. On the Event Tab, select the check box labeled Bamboo List Rollup – Classic Edition or Bamboo List Rollup Schema depending on the version of List Rollup you used to create the rollup. Enter a page URL for List Rollup – Classic Edition or a site URL for the List Rollup Schema option. (Hint: The easiest way to get this entry is to navigate to the Data View or Schema location in another browser tab or window and copy the URL.)
4. Click Add to load the data views or schemas into the Which List contains the items to alert on? drop-down box for selection as the alert list.
5. In the Which list contains the items to alert on? drop-down box, select the Data View you want.
6. In the What triggers the alert? drop-down box, select whether the alert is sent when an item is created, modified, or exists.
7. In the How often are e-mails sent? drop-down box, select the frequency with which you would like to send the alerts: as soon as possible, every hour, every day, or every week. WARNING: Please keep in mind the number of lists that are included in the Data View you have selected. If you have rolled up more than 15 lists with a large amount of data in each list, you should consider setting your alerts to be sent every hour, day or week, rather than “as soon as possible”. See Alert Plus Performance Considerations for more information on performance tuning.
8. In the What Items in the list generate an alert? drop-down box, select All Items or Some Items (Advanced). See Event Tab for more information on these options.
9. Set up the Recipient(s) and Mail Format tabs as described in the respective sections above (see Recipient(s) Tab and Mail Format Tab for more information).
10. On the Admin tab, you can specify how often you want the alert to be sent for the same alert item in the E-mail Follow-up Wait Days box. The default is set to 1 day. If you want the alerts to be sent regardless of when the last one was sent, set this option to 0. See Admin Options Tab for more information.
11. In the Use Custom Schedule option, set the start time, end time, frequency value and unit. It is recommended that for rolled up data views with more than 15 lists with a large amount of data in each list that you set the service to check for updates to this list every 5, 8 or 10 minutes or more as needed to enhance maintain reasonable performance. See Alert Plus Performance Considerations for more information on performance tuning.
12. Click Save and Close. Your alerts will start processing according to your start time in the custom schedule.

Configure the Alert Plus Event Tab

Configure the Alert Plus Event Tab

Create a new alert

3Tabs.gifAlert Plus has three tabs where parameters for an alert need to be configured.
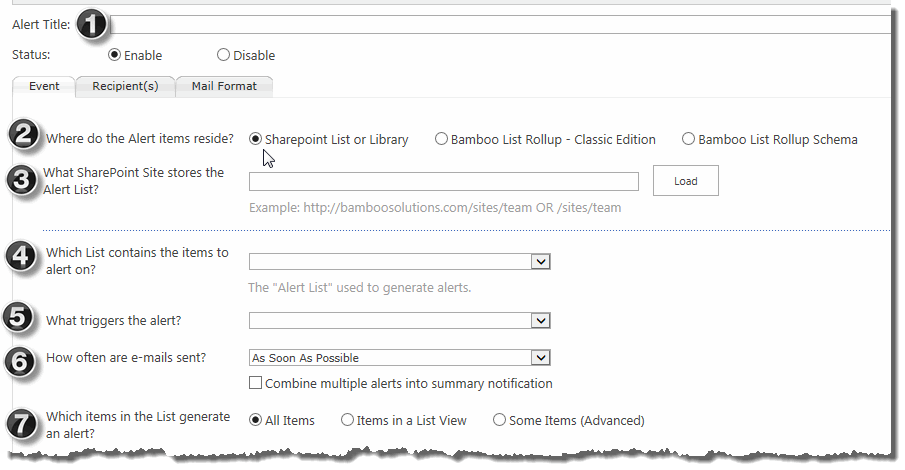
We will discuss the Event Tab here. For information on the other tabs, click the links below.

B – Recipients Tab
C – Mail Format Tab

Event Tab

AlertPlusSteps.gifAlert Plus is very flexible and has a variety of ways you can set up alerts. Configure the Alert Plus Event Tab following the steps below.
Step Action Result
1. Give your Alert a title and set its status (e.g., Enable or Disable).

The information you type into the Title box is saved into the web part. The default status is Enable. If you switch to Disable, the alert will not be triggered, but all configurations will be saved.

Icon-Tip You won’t be able to save your alert without a title.

2. Decide where the items that trigger the alert reside. Choose a SharePoint List or Library or a Bamboo List Rollup. Your selection dictates the source of the data for your alert.
3. Enter the URL of the site where your list/library resides or where your List Rollup is defined. Click the “Load” button to load the available lists/libraries or List Rollups.

Icon-Tip Whenever possible, enter a relative URL rather than an absolute path to a site.

4.

Pick the list that stores the items that you want to alert on.

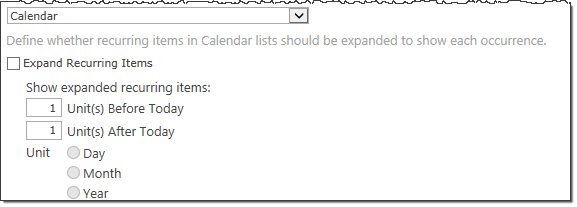
NOTE: If you pick a Calendar list, you will specify how you want to handle recurring events.

CalendarSelections.gif

5. Select the alert trigger type.
EventTriggers.gif
Your selection dictates how the alert will be processed. See Which Trigger Type Should You Use for more information about trigger types and some examples.
6. Decide how frequently an email will be sent.

EmailFrequency.gif

In addition to the frequency of the alerts, you also have the option to combine multiple alerts into a summary notification. See How often should E-mails be Sent and Combine Alerts into a Summary Alert for more information.
7.

Pick which items in the list can generate the alert. Depending on your choice, the interface may change.

  1. All items: This generates an alert on all items in the list based on the trigger type selected in Step 5 above. For example, if the trigger type is An item in the list is created, and All Items is selected here, an email will be generated for all new items when they are created.
  2. Items in a List View opens a drop down selection containing available views for the list selected. If you choose this option with the An item in the list is created trigger type, an email will be generated whenever an item is created and appears in the selected view.
    ListView.png

  3. Some Items (Advanced) opens the Crtieria Builder to allow you to build filter criteria that determines which items generate an alert. See CAML Criteria Builder for more information.

Running the Alert Plus Utility via the Command Line

Running the Alert Plus Utility via the Command Line

The Alert Plus Utility has four tabs:

  • Upgrade Alert Plus
  • Register Site
  • Event Registration Info
  • Update Event Receivers

When you run the utility via the Command Line, the utilities on the Upgrade Alert Plus tab are run. No other tabs can be processed via Command Line at this time. When you run the utility from the interface, you can process only one site at a time. Running from the Command Line allows you to process multiple sites at once.

NOTE: This is targeted to SharePoint 2007 users because there is a PowerShell script available for SharePoint 2010/2013. See Upgrade all the Alert Plus Sites in a Site Collection or Web Application via PowerShell for more information.

To run the Alert Plus Utility via Command Line follow these steps:

Step Action
1.

The Alert Plus Utility is part of the Alert Plus installation files. It is located in the Bamboo.AlertPlusUtilities folder.

Alert Plus Utility install

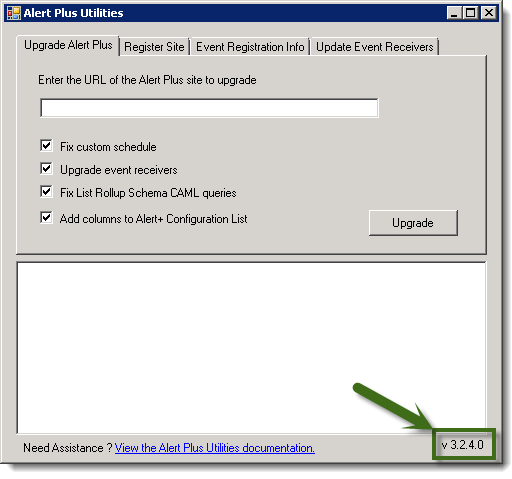
NOTE: Use release 3.2.4.0 or newer of this utility if you want to run it from the command line. The version is shown on the user interface.

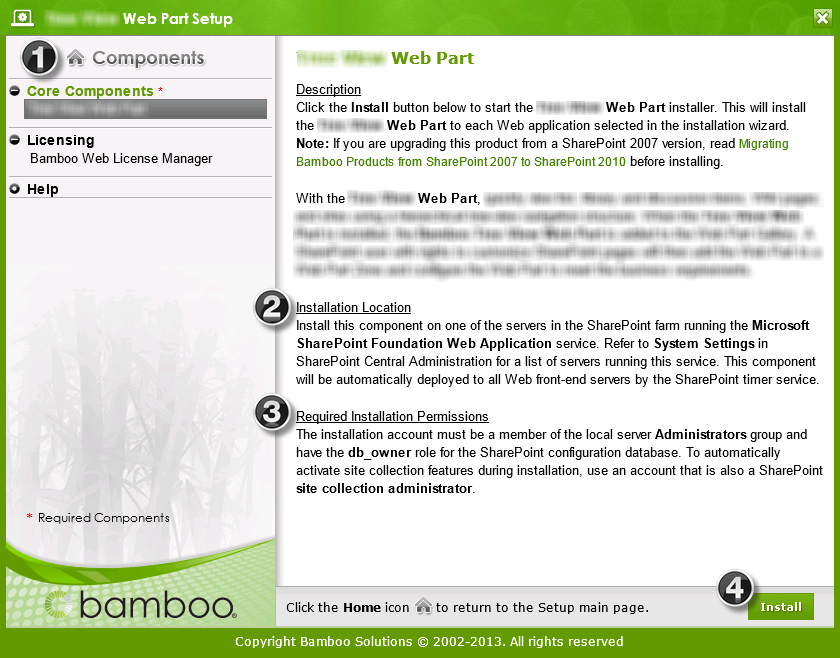
2. Run as AdministratorFrom a SharePoint Web Front End (WFE) server where the Alert Plus installation files reside, go to Start > Command, and run the command prompt as administrator.
3.

Change the directory to where the utility resides and run:

Bamboo.AlertPlusUtility -[Scope] "[URL]"

Where:

  • [Scope]
    • webappurl – Run the utility for all Sites in the Web Application
    • siteurl – Run the utility for all Sites in the Site Collection
    • weburl – Run the utility in a specific Web (Subsite)
  • [URL] The URL for the Web App, Site Collection, or Web

Example:

Bamboo.AlertPlusUtility -webappurl "http://sharepoint/"
4.

A log will be written to the local directory. The log will contain urls and feedback for all of the sites containing the Alert+ Configuration list.

NOTE: If the log file contains errors you are unable to resolve, please create a Support Ticket via My Bamboo and send a copy of the log file

Return to Use the Alert Plus Utility to Upgrade Sites

Run Alert Plus from an Application Server

Run Alert Plus from an Application Server

In versions 4.0 and higher, the backend services for Alert Plus can be run from a SharePoint Application Server as an alternative to running on the SharePoint Web Front End (WFE) servers. This option also allows you to distribute the workload for different Web Applications across different Application Servers.

NOTE: A separate Application Server license is required each non-WFE server on which you decide to run the Alert Plus service. The related Web Parts will still be installed and licensed for all Web Front End servers. Please contact Bamboo Solutions directly for more details.

To run the Alert Plus services on an Application Server, you must perform the following steps:

Option Description
1. Install Application Server Add-in Components

From the product installer, select and install the Application Server Add-In. This will install the necessary components to run Alert Plus on a SharePoint Application Server.

NOTE: This step is only required if you are trying to use an Application Server that is not also a Web Front End Server. If you want to use the Application Server functions on a WFE, skip this step.

2. Install the Service Components

Go to Central Administration>Application Management>Bamboo Alert Plus Service Administration and click the Install button to install the required components for the Alert Plus Service and Alert Plus Service Proxy to your farm.

NOTE: If the page returns an error saying “Could not find any resources appropriate for the specified culture or the neutral culture”, you may need to run the Install-SPApplicationContent command as an administrator from the SharePoint Management Shell. For more information, see the following knowledge base article: https://store.bamboosolutions.com/KB/Article.aspx?id=11785

3. Start the Service

Start the service on one or more servers:

  • Click Manage next to one of the servers in the Service Instance Status section of the page. This will take you to the list of available services on your Application Server.
  • Find the Bamboo Alert Plus Service in the list of available services and click the Start link to the right of it.

Starting the service on one or more servers will start the Alert Plus service instance on those servers. If more than one server runs this instance, then the load will be shared by all these instances with the use of the load balancer

4. Add the Alert Plus Service and Alert Service Proxy

Create instances of the Alert Plus Service and Alert Plus Service Proxy:

  • Click on the Manage Service Applications link that is now visible at the bottom of the Alert Plus Service Administration page, or go to Central Administration>Application Management>Service Applications.
  • At the top of the page, click New and select the Alert Plus Service Application from the list of available services.
  • Enter a service application name such as “Alert Plus Service Application”.
  • Create a new application pool or use an existing one.
  • Define the security account under which the service will run. This account will determine the data that can be accessed by Alert Plus.
  • Check the option for adding to the Default Proxy Group.
  • Click OK to save the settings.
5. Set Alert Plus to Run on Application Servers
  • From Central Administration, click Alert Service Selection from the Alert Plus section.
  • Choose the desired Web Application and choose Run Alert Plus on Application Server to move processing functions for Alert Plus from the Web Front End Servers to the configured Application Servers.
6. Map Web Applications to Application Servers Assign Alert Plus processing for different Web Applications to specific Application Servers. This allows you to split processing across different servers are desired to handle and prioritize system load.

Performance Considerations

Performance Considerations

Alert Plus Highlights

Alert Plus Performance Tuning

As a general rule, Alert Plus does not require special performance tuning after installation. Because some organizations may have special performance considerations, the suggestions included in this section are intended to provide users with configuration guidance for specific scenarios that may affect Alert Plus performance. In particular, the section discussing Bamboo List Rollup Web Part tuning provides recommendations to achieve the best performance when rolling up large amounts of data monitored by Alert Plus.

Distributed Architecture

Alert Plus is designed to scale automatically based on your existing SharePoint infrastructure. By using SharePoint timer jobs, SharePoint distributes the alert processing workload across all available Web front-end servers in the SharePoint farm to minimize the impact on a single server.

Since it is possible to configure an alert in any list on any site from the Alert Plus Web Part, it is best to consider consolidating alerts to minimize the number of web parts used. Not only will it be easier for your staff to maintain alerts configured in a single web part per site collection, it will minimize the number of timer job instances as well.

See Overview of the Alert Plus Solution Components for additional information.

SharePoint List and Library Performance Tuning

Similar to the Microsoft advisement that SharePoint lists containing a large set of data should be filtered using list views that result in 2,000 items or fewer, Bamboo Solutions suggests that Alert Plus jobs running on SharePoint lists or libraries should be configured to filter alert items to 2,000 items or fewer for the best Alert Plus performance. To filter alert items, select an appropriate list view or create a CAML query to filter on specific criteria. For more information, read the Event Tab topic and Creating Alerts topic.

List Rollup Performance Tuning

With the List Rollup Web Part, users can combine multiple lists or libraries into a single view and then create a single alert on the resulting rollup, saving time and effort for managing alerts. The following are recommended best practices for reducing the number of alerts users might receive when alerting on rollups that contain a large number of items:

  • Do not select As Soon As Possible for the alert frequency. Instead, use Every Hour, Every Day, Every Week, or create a custom schedule.

Icon-Tip For very large rollups, creating a custom schedule is best because it causes the creation of a custom SharePoint timer job for this specific alert. The standard Alert Plus timer jobs could be used to process multiple alerts, but a custom timer job is responsible for only one alert. See How often should E-mails be Sent for more information.

An Item Exists Alert Trigger Recommendation

If you are using the alert trigger An item exists, it is recommended that you set the Follow-up Wait Days setting to 1 day or greater so that users do not receive frequent alerts on the same item. This setting tells Alert Plus not to send another e-mail about the same item for the specified number of days. See Which Trigger Type Should You Use for more information.

Overview of the Alert Plus Web Part

Overview of the Alert Plus Web Part

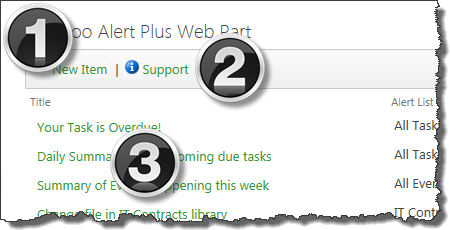
alert WP overview with nums.pngFrom the main interface of the Alert Plus Web Part, you have three options.

NOTE: Two lists associated with the Alert Plus will appear in your site when you add the Alert Plus to a page. Don’t delete these lists, as the web part uses them. They are called:

  • Alert+ AlertChangeList
  • Alert+ Configuration List

For details about each option, see the table below:

Option Description
1. New Item Click New Item to create a new alert. See Create a new alert for more information.
2. Support Click the Support link to troubleshoot issues you may experience with your alerts. See Troubleshooting Alert Plus Using the Support Page for more information.
3. List of Alerts

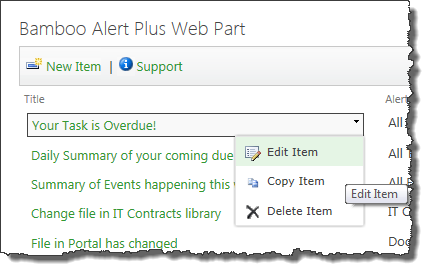
alert menu.pngUse the list of alerts to manage existing alerts through the context menu shown. It is possible to:
  • Enable/Disable. Clicking on the Enable option item will enable a disabled alert. Clicking on the Disable options will disable an enabled alert.

NOTE: This feature can be found in Alert Plus version 4.0 or later.

  • Edit. Choose Edit Item from the context menu or just click the hyperlink associated with the alert Title to access the alert for editing.
  • Copy. Choose Copy Item to quickly create a second alert similar to the first. Once the copy is created, edit it to change any parameters. This is a useful tool if you want to copy an existing alert so you can send it to another group while keeping all the other parameters the same.
  • Delete. Choose Delete Item to delete the alert.

    Icon-WarningIMPORTANT: Be sure to Disable the alert before deleting it. If there are event handlers or custom timer jobs associated with the alert, disabling the alert will remove these before you delete the alert.

The list of alerts is also used to present the current status of the alerts. See View Alert Status for more information.

Overview of the Alert Plus Solution Components

Overview of the Alert Plus Solution Components

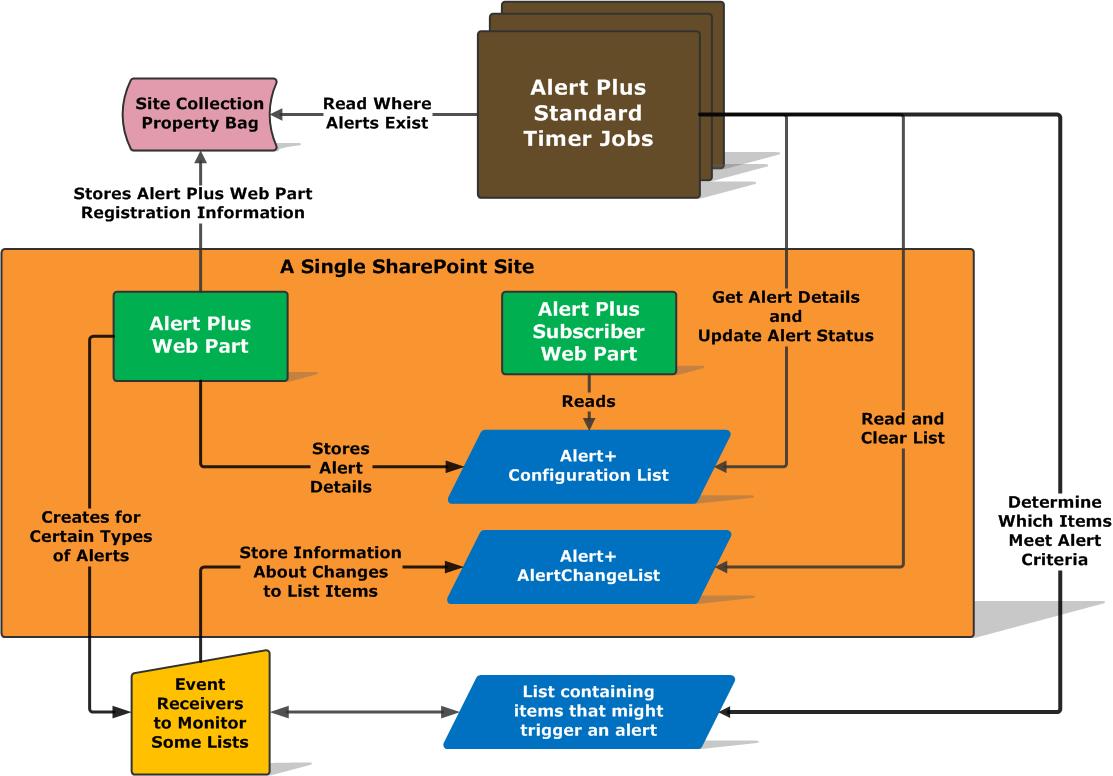
overview of alert plus solution.jpg

Component Description
Site Collection Property Bag

When an Alert Plus Web Part is added to a page on a SharePoint site, the Alert+ Configuration List and the Alert+ AlertChangeList are created if they do not exist already. These are both regular SharePoint lists. The web part is also registered in the Site Collection Property Bag. The registration information is accessed by the Alert Plus Standard Timer Jobs.

If the web part fails to register, none of its alerts will be processed. Check registration on the Support page of the web part.

Alert Plus Standard Timer Jobs

Alert Plus includes the following Standard Timer Jobs:

  • As Soon As Possible
  • Every Hour
  • Every Day
  • Every Week
  • Every Month

These jobs process alerts as scheduled. Monitor the progress/status of timer jobs via SharePoint Central Administration.

The As Soon As Possible timer job has an extra duty. It creates the Custom Timer Job when a new alert using a Custom Schedule is created. It also updates or removes that custom timer job when the alert is modified. An Alert Plus Custom Timer Job is responsible for processing one specific alert and does not reference the Site Collection Property Bag, like the standard timer jobs do.

See How often should E-mails be Sent for more information about scheduling alerts.

Alert Plus Web Part The Alert Plus Web Part is used to create, modify, monitor, and troubleshoot the status of alerts. See Overview of the Alert Plus Web Part for more information.
Alert Plus Subscriber Web Part The Alert Plus Subscriber Web Part shows the logged in user the alerts they should be receiving email messages from. The web part will include alerts that are configured in any site in the Web application. See Using the Alert Plus Subscriber Web Part for more information.
Alert+ Configuration List

When an Alert Plus Web Part is added to a page on a SharePoint site, the Alert+ Configuration List is created if it does not exist already. It is a regular SharePoint list used to store the configuration information for each alert displayed in the Alert Plus Web Part. The Alert Plus Standard and Custom Timer Jobs reference this list when an alert is processed.

Icon-WarningIMPORTANT: Don’t edit alert configuration information from the SharePoint list form unless specifically instructed to do so.

Alert+ AlertChangeList

When an Alert Plus Web Part is added to a page on a SharePoint site, the Alert+ AlertChangeList is created if it does not exist already. It is a regular SharePoint list used to temporarily store information about items that may generate alert messages from alerts triggered when A specific column in the list changes or when An item in the list is deleted. When an alert that uses either of these trigger types is processed, the Alert Plus Timer Job references this list and deletes entries specific to the alert being processed.

NOTE: If you do not have any alerts triggered when A specific column in the list changes or when An item in the list is deleted, you will not see any items in this list.

Event Receivers

Event Receivers are added to alert lists for alerts triggered when A specific column in the list changes or when An item in the list is deleted. They cause items to be added in the Alert+ AlertChangeList so these alerts can be processed.

Icon-WarningIMPORTANT: They are never used for alerts that use a Bamboo List Rollup as a data source.

List containing items that might trigger an alert

This list is where the alert items reside. Alert Plus can alert on items in any SharePoint List or Library. It can also alert on items in a Bamboo List Rollup Schema or Classic Edition, which is an aggregated list of items from multiple lists or libraries.

Icon-Tip Alerting on a Bamboo List Rollup is beneficial because you can create one rollup that alerts on items in multiple lists and the rollup can auto-discover new content. This means that an alert configured yesterday will be able to alert on items in a list created today without any updates to the alert; as long as it alerts on a rollup configured to auto-discover new content.

Icon-WarningIMPORTANT: When alerting on items in a Bamboo List Rollup (of either type), the following two trigger types are NOT available:

  • A specific column in the list changes
  • An item is the list is deleted

Overview of the Alert Plus Utilities

Overview of the Alert Plus Utilities

Applies To

  • Upgrading from Alert Plus Release 2.* or Release 3.0 or lower to Release 3.1 and higher
  • Upgrading from Alert Plus Release 3.1 or lower to Release 3.2 and higher
  • Maintaining lists and site configuration for Alert Plus Release 3.1 and higher
  • This should be run after a new installation of Alert plus Release 3.1 or higher (check this…)

Supported SharePoint versions

  • WSS 3.0 and MOSS 2007
  • SharePoint Foundation 2010 and SharePoint Server 2010
  • SharePoint Foundation 2013 and SharePoint Server 2013

Summary

The Alert Plus Utilities application first appeared with the Alert Plus in release 3.1 and has been included in every release since. It includes the following tools, each on a separate tab:

version of Alert Plus utilities.png

  • The Alert Plus Utilities (no version number) for Alert Plus Release 3.1 will only work correctly with Alert Plus Release 3.1.
  • The Alert Plus Utilities (no version number) for Alert Plus version Release 3.2.38 will only work correctly with Alert Plus Release 3.2.38.
  • The Alert Plus Utilities v3.2.2.0 for Alert Plus Release 3.2.52 will only work correctly with Alert Plus Release 3.2.52 and above.
  • The Alert Plus Utilities v3.2.4.0 for Alert Plus Release 3.2.52 will only work correctly with Alert Plus Release 3.2.52 and above.

NOTE: Use the Alert Plus Utilities included with the installer for your version of Alert Plus.

One email to each recipient or one email to all recipients?

One email to each recipient or one email to all recipients?

Issue:

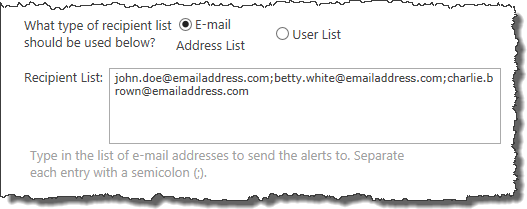
You have two alerts that you set up. Both send email messages to a list of email addresses (or a list of Users). In other words, the Recipient tab is configured like shown.

list of email addresses.png

The first alert sends a single email to all three recipients. The other email sends an email to each recipient. The Recipient tab looks exactly the same for both alerts. Why is the number of emails sent different?

Resolution:

summary notification.pngThe difference between the two alerts is most likely on the Event tab. The alert that sends a separate email message to each recipient is configured to Combine multiple alerts into summary notification. The alert that sends one email to the entire list is not configured this way.