Skip to content
1.877.226.2662[email protected]
  • Open a Support Ticket
  • View by Category
  • Knowledge Base
  • Ticket Manager
  • Log a Support Ticket

Bamboo Solutions

Product Documentation

Document Category: User Account Setup

How to Remove a web.config Modification Using PowerShell

How to Remove a web.config Modification Using PowerShell

Background

Some custom SharePoint products make changes to the web.config file for a Web application via SPWebConfigModification objects to support their features. Bamboo products sometimes make changes like this during installation. Please see How to modify a web.config file using PowerShell for some additional background information.

You may need to remove these changes for a particular Web application, if the product is no longer used on that Web application. It’s not a good idea to manually edit the file to remove the text, because the web.config would no longer match what has been set in the SharePoint configuration database and might cause future problems on your farm.

Resolution

Follow the steps below to remove web.config settings using PowerShell.

NOTE: The commands in this article work with both SharePoint 2010 Foundation and Server. Be extra careful when making changes to the web.config. Back up the file before making any changes. Do not remove a modification unless you are absolutely sure what it is.

Step Action
1. First, open SharePoint 2010 Management Shell. From the Start menu on a SharePoint WFE Server, select All Programs > Microsoft SharePoint 2010 Products > SharePoint 2010 Management Shell
2.

Next, list all of the SPWebConfigModification objects that have been applied to the Web application. These objects are stored in the WebConfigModifications property of the Web application.

 1: $webApp = Get-SPWebApplication WebApplicationURL
 2: $webApp.WebConfigModifications

In this example, you can see some of the modifications added by Bamboo products to support Telerik:
webconfigModifications.jpg

3.

Now, we can identify a particular modification and remove it using the commands shown below.

 1: $config = $webApp.WebConfigModifications | Where-Object {condition_to_identify_the_object}
 2: $webApp.WebConfigModifications.Remove($config)
 3: $webApp.Update()
 4: $webApp.Parent.ApplyWebConfigModifications()

In this example, we’ll remove the modification with the name “add[@name=[‘Session’]” and path “configuration/system.webServer/Modules”.
example remove.jpg

4.

The ApplyWebConfigModifications() method applies this change across the farm for the specific web application, so we don’t need to worry about each physical web.config file at the server-level. That is one of the main advantages of using PowerShell to update web.config modifications.

If there are multiple modifications we need to remove, we can use a loop to do that. The following example removes all of the modifications added by Bamboo Telerik Config in a particular Web application (they all have the same Owner value):

 1: $BambooConfigs = $webApp.WebConfigModifications | 
    Where-Object {$_.Owner -eq "Bamboo.SP2010.Config"}
 2: foreach ($config in $BambooConfigs) {
 3:     $webApp.WebConfigModifications.Remove($config)
 4: }
 5: $webApp.Update()
 6: $webApp.Parent.ApplyWebConfigModifications()

How to move your Bamboo Product License to a new server

How to move your Bamboo Product License to a new server

Overview of Licensing and and Product Activation

You must have a Bamboo product license for each Web Front-end (WFE) server in the SharePoint farm that serves web content. If you replace a server with another physical device, you can move the license from the old server to a new one. To do so, first deactivate the license and then re-activate by following the instructions below.

Step Action
1.

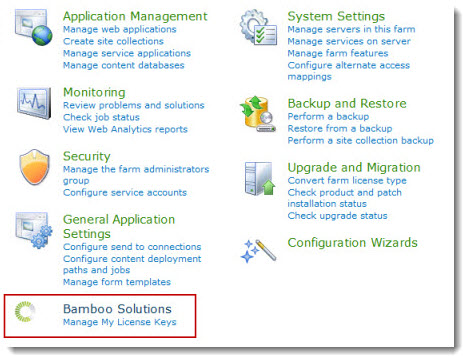
Go to Central Administration and under the Bamboo Solutions section, click Manage My License Keys.

NOTE: If you are using SharePoint 2007, in Central Administration, go to the Bamboo Solutions Corporation heading on the main page and click Bamboo Web License Manager.

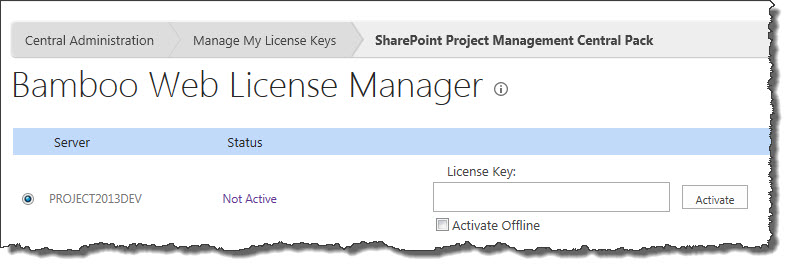
Locate the product that you need to deactivate and click the product name link. The license Status Page will be displayed.

WLM-GMSApack status.jpg
Each server that is licensed for that product is listed on the page.

NOTE: If the License Key is not listed on the license status page, see Is there a way to find a lost or unknown Bamboo product license key.

2. In the Status Page, copy the license key from the server that will be deactivated to a safe location so you can use it on the new server (see Step 4 below). Then, click the Active status link. The Activation Page will be displayed.
3.

On the Activation Page, click the Deactivate button. Your license is now deactivated on that server.

NOTE: If your SharePoint WFE server doesn’t have access to the Internet, you will not be able to deactivate from this page. However, it is important to deactivate the license. Please see How to deactivate your Bamboo Product License if your server doesn’t have access to the Internet for a way to deactivate from a PC that does have access to the Internet.

4. When the new server is ready, see Activating Your Bamboo Product License for information about activating the license key for that server. Use the license key you copied to a safe location in Step 2 above to activate the product on the new server.

How to Migrate a Bamboo Web Part from SharePoint 2007 to SharePoint 2010 using the In-Place Upgrade Method

How to Migrate a Bamboo Web Part from SharePoint 2007 to SharePoint 2010 using the In-Place Upgrade Method

When you run an in-place upgrade from SharePoint 2007 to SharePoint 2010, the configuration data for the farm and all the content in the farm is upgraded on the existing hardware, in a fixed order. When you start the in-place upgrade process, Setup takes the Web server offline and the Web sites are unavailable until the upgrade is finished, and then Setup restarts the Web server.

Using the In-place Upgrade method, the following Bamboo products migrate to SP2010 with no errors or additional steps:

  • Alert Plus
  • Alerts Administrator
  • Chart Plus
  • Cross List
  • Column Level Security
  • Custom Identifier Column
  • Group Redirect
  • Group Email
  • In/Out Schedule Board
  • KPI Column
  • List Consolidator
  • List Rollup
  • List Search Simple
  • List Search Advanced
  • Lookup Selector Column
  • Mini-Calendar
  • My Alerts Organizer
  • Navigators
  • Password Expiration
  • Poll
  • Tree View
  • Site Creation Plus
  • Rich Text Column
  • Visual Indicator Column
  • Validator Column
  • Video Library
  • Task Master
  • User Manager for Sites
  • User Redirect
  • Virtual Map View
  • Wiki Publisher
  • World Clock and Weather

NOTE: If you are using a Bamboo product that is not on the above list and you are considering using the In-Place Upgrade method to migrate your farm, refer to the specific migration information for your product to learn more about possible limitations before proceeding with a migration.

Step Action
1.

Follow Microsoft’s Upgrade In Place to SharePoint 2010 article to perform the in-place upgrade.

NOTE: When running the SharePoint Products Configuration Wizard, be sure to select the option Change existing SharePoint sites to use the new user experience. Administrators control the user experience for end users and can decide which sub-option is then selected in this step.

2. During the upgrade process or before, retrieve the installation package and license keys for the SharePoint 2010 version of the Bamboo products you are migrating. See Migrate My Existing Bamboo Product License Key From SharePoint 2007 to SharePoint 2010 for additional details.
3.

After successfully upgrading to SharePoint 2010 and after all sites have completed their conversion to the new user experience, run the SharePoint 2010 Bamboo product installation package that you retrieved in Step 2.

On the Repair, Remove or Install screen, choose to Upgrade/Repair Existing and Install New. For more information, refer to Upgrading your Bamboo Web Part.

4.

Select and upgrade the Bamboo Web License Manager component provided in the same installation package. On the Repair, Remove or Install screen, choose to Upgrade/Repair Existing and Install New.

NOTE: The Bamboo Web License Manager only needs to be installed once per farm. Skip this step for subsequent Bamboo product installations on the farm.

5. Activate the SharePoint 2010 versions of Bamboo products. See Install and Activate a License for Bamboo Products in SharePoint 2010 for more information.
6. Refer to specific migration steps for the Bamboo product(s) you are migrating. There may be some extra steps required to overcome a known migration issue.

How to Migrate a Bamboo Web Part from SharePoint 2007 to SharePoint 2010 using the Database Attach Upgrade Method

How to Migrate a Bamboo Web Part from SharePoint 2007 to SharePoint 2010 using the Database Attach Upgrade Method

When you upgrade by using database attach upgrade, you detach the databases in the old farm and then attach them to the new farm. When you attach a database to the new farm, the SharePoint upgrade process runs and upgrades the whole database. The database attach upgrade process is similar to the in-place upgrade process. The difference is that the database attach upgrade process is performed manually, and is performed in a separate environment.

Using the Database Attach Upgrade method, the following products migrate to SP2010 with no errors or additional steps:

  • Chart Plus
  • Cross List
  • Column Level Security
  • Custom Identifier Column
  • Data-Viewer
  • Group Email
  • Group Redirect
  • List Search Simple
  • List Search Advanced
  • Mini-Calendar
  • Site Creation Plus
  • Task Master
  • Tree View
  • User Manager for Sites
  • Password Expiration
  • User Redirect
  • Validator Column
  • Visual Indicator Column
  • Wiki Publisher
  • World Clock and Weather

NOTE: If you are using a Bamboo product that is not on the above list and you are considering using the Database Attach Upgrade method to migrate your farm, refer to the specific migration information for your product to learn more about possible limitations before proceeding with a migration.

Step Action
1. The first step in the process is to set up a new environment to host the upgraded content. See Prepare the new SharePoint Server 2010 environment for a database attach upgrade for additional information from Microsoft.
2.

After you set up the new environment, use the procedures in Microsoft’s Attach Databases and Upgrade to SharePoint 2010 article to detach and then reconnect the databases to perform the actual upgrade.

NOTE: When attaching the databases, you must choose to update to the new user experience. Your Bamboo products will not perform correctly if you choose to remain in the old user experience after upgrade.

3. During the upgrade process or before, retrieve the installation package and license keys for the SharePoint 2010 release of the Bamboo product(s) you are migrating. See Migrate My Existing Bamboo Product License Key From SharePoint 2007 to SharePoint 2010 for additional details.
4.

After successfully upgrading to SharePoint 2010 and after all databases have been attached and converted, run the SharePoint 2010 Bamboo product installation package that you retrieved in Step 3.

Since this will be a new install on new hardware, you will be asked to choose the Web Applications to deploy to. Be sure to select the same Web Applications where the Bamboo product was deployed on the old farm. For more information about installation, refer to How to run the Installation-Setup Program.

5.

Install the Bamboo Web License Manager provided in the same installation package.

NOTE: The Bamboo Web License Manager only has to be installed once. Skip this step for subsequent Bamboo product installations.

6. Activate the SharePoint 2010 versions of Bamboo products. See Activating Your Bamboo Product License for more information.
7. Refer to specific migration steps for the Bamboo product(s) you are migrating. There may be some extra steps required to overcome a known migration issue.

Manually uninstall using PowerShell

Manually uninstall using PowerShell

Icon-WarningIMPORTANT: As of April 2017, Bamboo no longer includes ManualUninstallation.ps1 file in product download packages. An updated uninstall script is included instead. Please see Overview of the Updated Installation Process for Bamboo components and Uninstalling using the updated process for details.

Typically, Bamboo products are uninstalled from a server simply by selecting the Uninstall button for the product components in the Setup program. If you choose, however, you may also uninstall our products via another simple method. In this article, I will show you how to manually uninstall a Bamboo product with PowerShell.

Step Action
1.

Access the installation files for the product you want to uninstall. They are usually on the WFE Server where you installed.

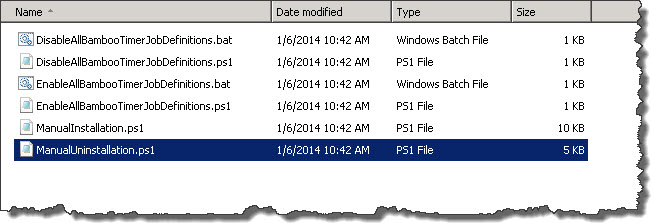
Go to the Misc folder and locate the file ManualUninstallation.ps1

ManualUninstall on SP2010.jpg

This is a PowerShell script.

NOTE: Not all Bamboo products include a PowerShell script for uninstalling.

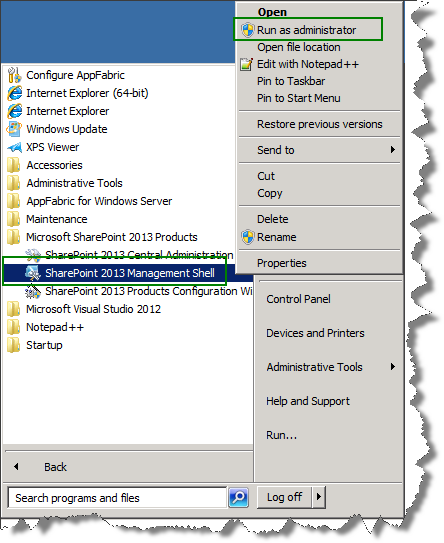
2. Next, open the SharePoint 2013 Management Shell program and Run as administrator:

mgmt shell app.png

3.

In the SharePoint 2013 Management Shell, go to the Misc folder of the Bamboo product installation files. Then run the script by entering:

.ManualUninstallation.ps1

cmd2.png

4.

A warning is displayed telling you to do the following before proceeding:

  • Deactivate the site collection feature for the product you are uninstalling. This script does not deactivate the features. They must be deactivated on all site collections where they have been activated.
  • Recycle the App Pool or reset IIS on all WFE servers before continuing.

    cmd3.png

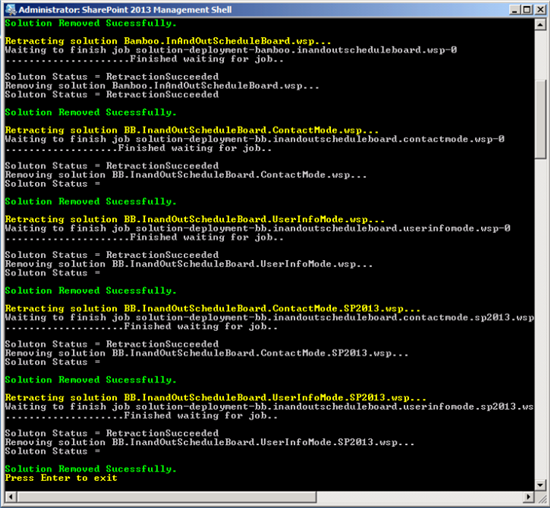
5. Press Enter when ready, and the script will start. Wait for it to report Solution Removed Successfully, and then press Enter to exist.

cmd4.png

6. Check that the solution is successfully removed. In Site Collection features, the solution should no longer appear.
site collection features - nothing there.png
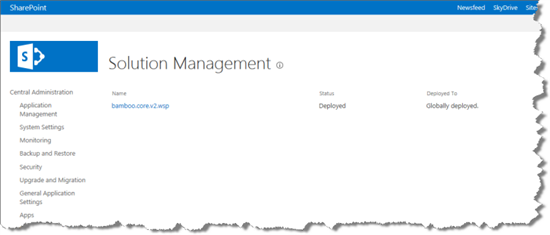
In Solutions Management in Central Administration, the solution should no longer be listed.
CA-soln mgmt.png
7.

Notice that the Bamboo.Core.v2.wsp solutions remains on the list in Solution Management. This solution is part of other Bamboo products and is left intentionally.

If you have no other Bamboo products on your farm, please see What is left behind after uninstalling to learn how to remove the Bamboo.core.v2.wsp also.

How to find the release number of a Bamboo web part

How to find the release number of a Bamboo web part

NOTE: Since you need to access the web part tool pane, you must be user with Design permissions on the site in order to determine the web part version.
Not all of Bamboo’s products are Web Parts; some products are custom columns for SharePoint and some are desktop programs, so this information does not apply to those particular components.

Step Action
1. Navigate to the SharePoint page where the web part is used. It can be any page, on any site. Because web parts are installed on your farm, the version is the same in all web apps, site collections, and sites.
2. Access the Web Part’s configuration tool pane. In edit mode (select Edit Page from the Site Actions menu), select Edit web part from the web part menu in the upper right corner.
edit web part menu.jpg
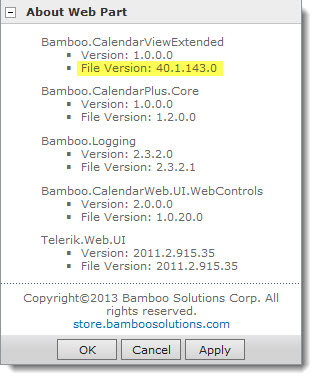
3. Locate the About Web Part section of the tool pane and expand it. The most important version is the File Version number for the first component listed. This is the current product version installed.
about web part contents.jpg
See About Bamboo product Version Numbers for more information about how our products are versioned.

How to deactivate your Bamboo Product License if your server doesn’t have access to the Internet

How to deactivate your Bamboo Product License if your server doesn’t have access to the Internet

If your SharePoint WFE server does not have Internet access, you will not be able to deactivate a Bamboo product license from Central Administration. Instead, you can access the My Bamboo area of the Bamboo Solutions web site to deactivate any Bamboo product license key.

Follow the steps below:

Step Action
1.

Determine the license key you want to move or deactivate. Go to Central Administration and under the Bamboo Solutions section, click Manage My License Keys.

NOTE: If you are using SharePoint 2007, in Central Administration, go to the Operations tab to see the Bamboo Solutions section and the Manage My License Keys link.

Locate the product that you need to deactivate and click the product name link. The license Status Page will be displayed.

WLM-GMSApack status.jpg
Each server that is licensed for that product is listed on the page.

NOTE: If you don’t see the License Key on this page see Is there a way to find a lost or unknown Bamboo product license key.

2.

Log in to My Bamboo from a computer with an Internet connection.

MB-login.png

NOTE: If you don’t have a login account, you can create one quickly. All you need is a valid email address.

3. At the bottom of any My Bamboo page in the My Orders tab, locate the Manage License link and click it. The Manage License page will be displayed.

Mb-Manage Lic link.png

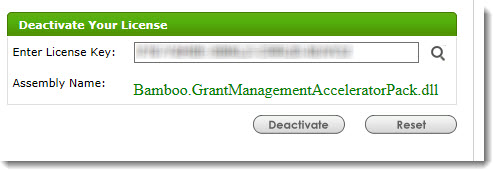
4. On the Deactivate Your License side of the Manage License page, enter your license key and then click the magnifying glass (Mb-magnify.jpg). The Assembly Name licensed with this key will be displayed. Ensure it is the product you expect and then click Deactivate.

MB-deactivate with lic key.jpg
Once deactivated, the license key can be re-used on your new or changed server. A license key can be used on only one server at a time. Please see Activating Your Bamboo Product License for more information.

How to check the status of your trial license

How to check the status of your trial license

Overview of Licensing and and Product Activation

To check the status of your trial, follow these steps:

NOTE: If you are trialing a Bamboo Desktop application, please see Checking the status of a Bamboo Desktop application trial.

Step Action
1. Open SharePoint Central Administration. Notice the Bamboo Solutions heading on the page with the Manage My License Keys link beneath it.
CA2010BambooSolutions.jpg
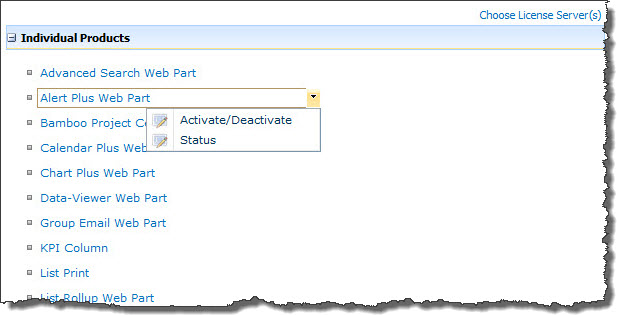
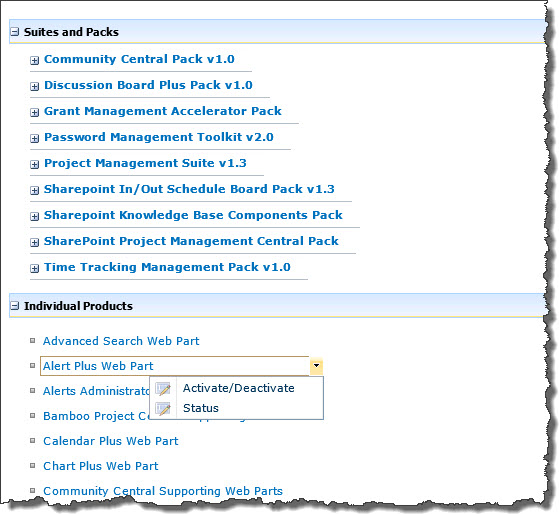
2. Click Manage My License Keys. On the page that appears, expand the Individual Products section and locate the product you are trialing.
3. Click the product name or select Status from the associated menu to view the license status.

WLMIndividual Products.jpg

4. If you are running a trial, your license status will be Trial. The status page will show when your trial started and when it will end. Bamboo Product Trials last 30 days from when the product is installed on your SharePoint farm.

WLMLicStatus.jpg

How to activate a Bamboo Site Feature

How to activate a Bamboo Site Feature

NOTE: In order to activate a site feature, you need to have at least the Manage Hierarchy level of permission for the site.

Step SharePoint 2007 SharePoint 2010/2013
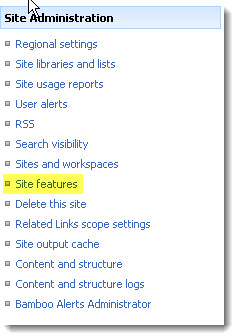
1. From a page on the site where you want to activate the feature, click Site Actions > Site Settings > Modify All Site Settings. In the Site Administration columnn of the Site Settings page, click Site features.
sp2007 site features.jpg
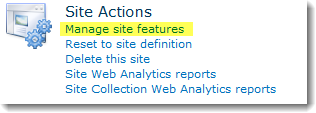
From a page on the site where you want to activate the feature, click Site Actions > Site Settings. In the Site Actions section of the Site Settings page, click Manage site features.
site settings - site actions2010.png
2.

Find the appropriate feature. If it hasn’t yet been activated, click the Activate button.
sp2010 site features.jpg

The features available depend on the Bamboo products installed on your farm and deployed to your web application.

How to Add a web.config Modification Using PowerShell

How to Add a web.config Modification Using PowerShell

Background

Please see How to modify a web.config file using PowerShell for some additional background information about why you should modify your web.config file(s) programmatically.

Many Bamboo products implement Telerik controls and install a specific version of Telerik.Web.UI assembly to the SharePoint farm. If the farm already has a different version of Telerik.Web.UI assembly, this may cause a conflict and you may see errors on SharePoint pages where you use these controls.

Resolution

To resolve this problem, we need to add an assembly binding to the web.config to specify which version to use. However, adding text by manually editing a web.config file is not recommended because it is not synced across the servers in the farm and is not saved in the SharePoint configuration database.

The best way to modify a web.config file programmatically is via PowerShell.

NOTE: Be extra careful when making changes to the web.config. Backup your file before changing it. Do not add or remove something unless you are absolutely sure what it is.

To demonstrate, we will use an example with Telerik controls. Consider this scenario:
Before a Bamboo product is installed, a server has Telerik.Web.UI version 2012.3.1016.35 previously installed. During the Bamboo product installation process, Telerik.Web.UI version 2011.2.915.35 was installed. Although it is OK to have multiple Telerik versions on a single server, it may cause a conflict in SharePoint.

We need to add an assembly binding to the web.config to tell the assemblies looking for version 2011.2.915.35 to use version 2012.3.1016.35. The assembly binding addition to the web.config file will look like this:

<dependentAssembly>
    <assemblyIdentity name "Telerik.Web.UI" publickKeyToken "121fae78165ba3d4" culture "neutral" />
    <bindingRedirect oldVersion "2011.2.915.35" newVersion "2012.3.1016.35" />
</dependentAssembly>

NOTE: Always redirect all versions found to the newest version of Telerik.Web.UI on the system, for backwards compatibility of functionality.

Step Action
1. First, open the SharePoint 2010 Management Shell. From the Start menu, select All Programs > Microsoft SharePoint 2010 Products > SharePoint 2010 Management Shell.
2.

Next, create the SPWebConfigModification object for the assembly binding
ConfigModProps.jpg
Where:

  • Path: A string that contains an XPath expression that specifies the node. If the Type property specifies EnsureChildNode, the Path property contains the XPath expression for the parent node under which the node is created. In this example, the runtime element of the web.config file is placed in another xml-namespace, so we have to identify the namespace. Otherwise, that element will not be found.
  • Name: A string that contains the name of the attribute or section node. When the type of web.config modification is EnsureChildNode, the Name property refers to an XPath expression that uniquely identifies the node under the parent node, as identified by the Path property.
  • Sequence: A 32-bit unsigned integer between 0 and 65536. This property throws an InvalidOperationException if the number is outside this range. A sequence is used only if there is more than one modification of the same type to the same node or attribute. In this case, modifications with lower sequence numbers are applied first.
  • Owner: A string that specifies the owner of the modification. You can use the Owner property to track ownership of modifications.
  • Type: An SPWebConfigModification.SPWebConfigModificationType value that specifies the type of modification. There are 3 types:
    • EnsureChildNode: Specifies that the web.config modification must ensure the existence of a child node of the node to which the XPath expression points. Value = 0.
    • EnsureAttribute: Specifies that the web.config modification must ensure that there is a value for a particular attribute. Value = 1.
    • EnsureSection: Ensures a singleton node. This node is only written once, even if multiple entities register multiple instances of EnsureSection to ensure the existence of a section. Value = 2.
  • Value: If the Type property specifies EnsureChildNode, the Value property contains an XML string that represents the node to be populated as a child of the specified parent node. If the type is EnsureSection, Value contains the name of the section. If the type is EnsureAttribute, Value contains the value set in the attribute.
3.

Then, apply the modification to the Web application (replace ‘WebApplicationURL’ with the actual URL of the Web application).
apply mods.jpg

NOTE: Bamboo products are only tested with the Telerik version that they install. Therefore, if a newer Telerik version is used, there might be some unexpected problem.

How many License Keys do I need for my SharePoint farm?

How many License Keys do I need for my SharePoint farm?

Overview of Licensing and and Product Activation

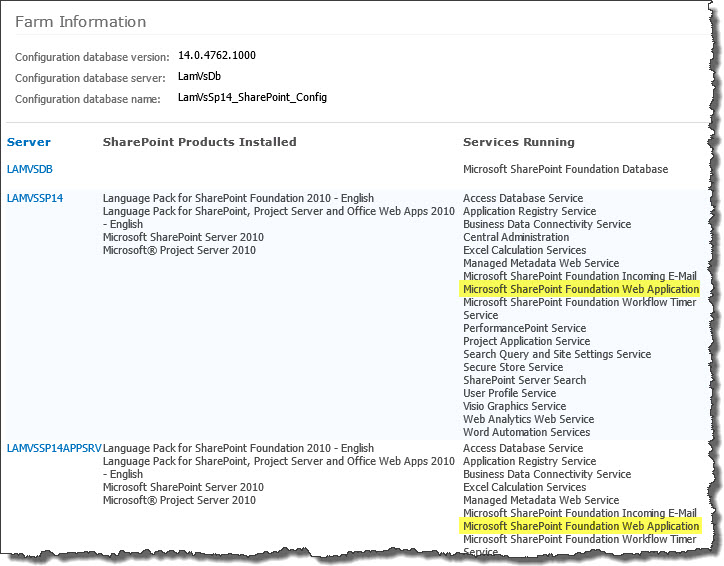
For most products, you will need one Bamboo product License Key per Web Front End (WFE) server. A WFE server is any farm server running the Microsoft SharePoint Foundation Web Application (or Windows SharePoint Services Web Application in WSSv3/MOSS).

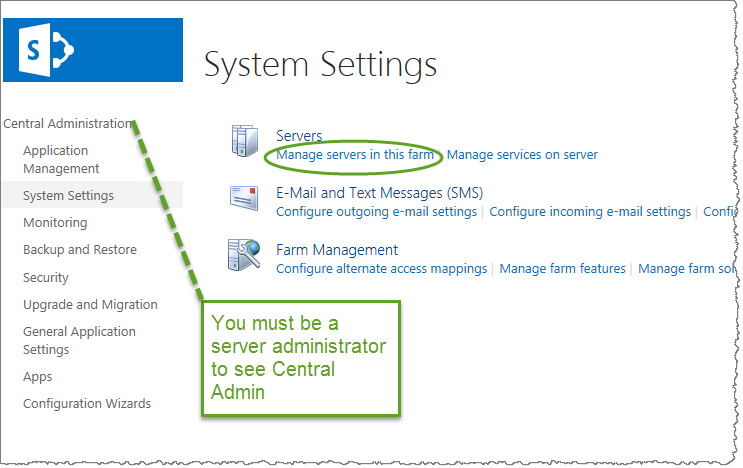
CA-servers on farm.jpgTo determine which servers on the farm run these services, go to Central Administration > System Settings > and then Manage servers in this farm. If you are using WSSv3/MOSS, this page is accessed in Central Administration through Operations > Servers in Farm. In this example, there are two WFE servers on the farm.

Some SharePoint farms have WFE servers that do not serve content to users, even though they are running the Microsoft SharePoint Foundation Web Application. You will not need a license key for WFEs that do not deliver content to end users.

Desktop applications, such as List Bulk Import and List Bulk Export require only one license per instance.

Some products, such as List Rollup and Alert Plus may include optional components that run on application servers in addition to WFE servers. To use these product features, you may need an additional server license for each separate (non-WFE) application server on which you would like to run the associated service for that product. Using application server features on already licensed WFE servers does not require any additional licensing.

See also:

  • System Requirements for Bamboo Web Parts
  • System Requirements for Bamboo Desktop Applications

How long do trial versions of Bamboo software last and when do they start?

How long do trial versions of Bamboo software last and when do they start?

Overview of Licensing and and Product Activation

Currently, trials for Bamboo products run for 30 days, and begin when the product is installed. So if you download the software today, but don’t actually install for two weeks, that’s OK.

If you need an extension to a trial, contact your Bamboo Sales Representative (Sales@bamboosolutions.com).

Highlights of User Account Setup

Highlights of User Account Setup

UserAccountSetup.pngUser Account Setup allows SharePoint users designated by an IT administrator to add users on their own rather than relying on IT personnel to create the accounts. You can create a new authentication provider account (ADS, NT, and SQL Membership) and at the same time add the account to defined SharePoint groups in different sites. With the Active Directory authentication provider, you also can customize the information collected by defining additional attributes to be populated in both ADS and SharePoint.
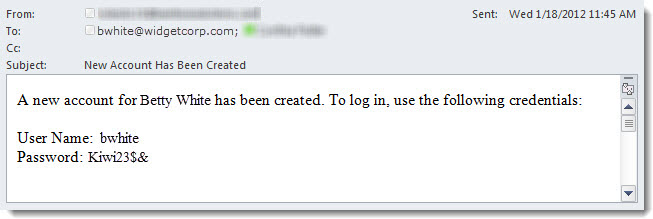
Seeking the ability to approve individual account creation? No problem. User Account Setup provides the ability to submit account creation requests for approval prior to creation. User Account Setup also stores all transactions into a custom SharePoint list, allowing IT personnel the ability to track all new accounts created.

Error Log Files

Error Log Files

Applies To

  • Bamboo Products
  • Windows SharePoint Services v3 and Microsoft Office SharePoint Server 2007
  • SharePoint Foundation 2010 and SharePoint Server 2010
  • SharePoint Foundation 2013 and SharePoint Server 2013—Standard Edition
  • SharePoint Server 2016

While troubleshooting issues, the Bamboo support team may request a copy of the log files for your Bamboo product(s). Many licensing, functionality and access issue information is captured in the log files found in the BambooSolutions file folder.

This directory is located at C:WindowsTempBambooSolutions

The log files are named in this format: bsc_bamboo_{processID}.log

  • where {processID} is the ID of the w3wp.exe process which was handling the request at the time of the error

NOTE: These files will be created on any farm server running the Microsoft SharePoint Foundation Web Application (on SharePoint 2010 or SharePoint 2013) or the Windows SharePoint Services Web Application (on SharePoint 2007).

To determine which servers on the farm run these services:

SharePoint 2007:

  • Go to the page Central Administration > Operations > Servers in Farm

SharePoint 2010:

  • Go to the page Go to the page Central Administration > System Settings > Manage Servers in this Farm

CentralAdmin.pngSharePoint 2013:

  • Go to the page Central Administration > System Settings > Manage Servers in this Farm

There may be many log files. When reporting a problem to support, attach the most recent file(s) to your support ticket. If you know the time at which the error occurred, choose the file with the corresponding date/time.

Refer to Topology and Services in SharePoint Central Administration for a list of servers running this service. Learn more…

Display Settings for User Account Setup

Display Settings for User Account Setup

Return to User Account Setup Configuration

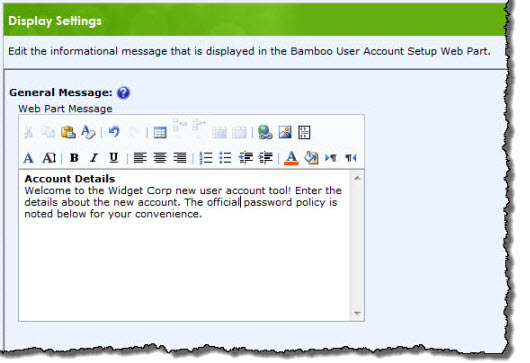
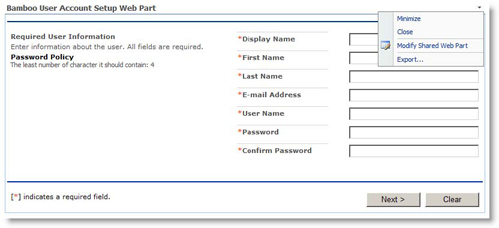
By default, User Account Setup displays an informational message to users about how to use the web part, followed by details about the password policy for the authentication provider where accounts will be created. This informational message can be customized.

To customize the informational message:

Step Action Result
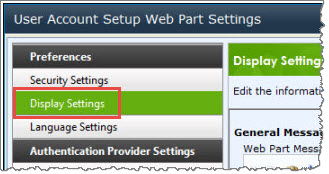
1. Edit the web part and click the User Account Setup Web Part Settings button. On the page that appears, click “Display Settings” option on the left side navigation menu. DisplaySettings.jpg
2. Edit the General Message text as desired. Rich text formatting, images and hyperlinks are all supported through the formatting tools ribbon within the web part. DisplayMessage.jpg

Deploying a Bamboo solution to a new Web Application

Deploying a Bamboo solution to a new Web Application

Note: Perform these steps using an account that is a member of the SharePoint Farm Administrators group.

Step for SharePoint 2007 for SharePoint 2010/2013
1. In SharePoint Central Administration, click the Operations link. In the Global Configuration section, click the Solution Management link. A list of installed solutions is displayed. In SharePoint Central Administration, click System Settings link. In the Farm Management section shown on the page, click the Manage farm solutions link. A list of installed solutions is displayed.
2. Click on the name of the solution you want to deploy. Click on the name of the solution you want to deploy.
3. Click the Deploy Solution link. Click the Deploy Solution link.
4. Select the Web application to deploy to and a deployment schedule, and then click OK. Select the Web application to deploy to and a deployment schedule, and then click OK.

CSS Overview

CSS Overview

Classes for customizing CSS in your environment are provided by Bamboo so that you can customize web parts to match your branding. We also provide skins that change the look and feel but these are used discretely. See the topic Skins Overview for more information.

Calendar Plus

  • CSS for Calendar Plus

Chart Plus

  • Chart Plus: Chart Appearance
  • Chart Plus: Legend
  • Chart Plus: Title

Cross List

  • CSS for Cross List – this topic covers the classes you would need to modify for Cross List.

Data-Viewer

  • CSS for Data Viewer

List Rotator

  • CSS for List Rotator

List Search

  • CSS for List Search

Mini Calendar

  • CSS for Mini Calendar

Navigators

  • CSS for Navigators Menu
  • CSS for Navigators Tabstrip
  • CSS for Navigators Treeview

Password Change

  • CSS for Password Change Web Part

PM Central

  • PMC Skin Templates

Team Calendar

  • CSS for Team Calendar

Virtual Map View

  • CSS for Virtual Map View

Configuring User Account Setup

Configuring User Account Setup

Step Action Result
1. Select Modify Shared Web Part from the menu accessed at the upper right corner of the Web Part. This menu is only accessible by users with authority to modify the page. hw07006.jpg
2. The tool pane for User Account Setup is displayed on the right side of the screen. Expand each section to configure. hw07008.jpg
3. Select the Zone hw07008'.jpg
User Account Setup affects, either Default, Intranet, or Internet. As pictured here, the Web Part will display the selected zone’s Authentication Mode, (and, where applicable, the Membership Provider) as well as a URL example for that mode.
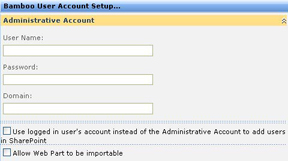
4. Configure the Administrative Account

hw07010.jpg

  • Administrator User Name:
    • Active Directory Service: Enter the user name for the domain administrator who has the appropriate rights for creating Active Directory users.
    • Local Server User Group: Enter the user name for the machine administrator (i.e. member of the Administrators group on the local NT machine).
    • This Administrator account must have the permission to add users to the selected SharePoint groups.
  • Administrator Password: Enter the password for the administrative account that will be used to actually create the user account in Active Directory or Local NT Server User Group.

NOTE: Passwords are generally case-sensitive.

  • Administrator Domain: Enter the domain where this Administrator account resides.
  • Use logged in user’s account instead of the Administrative Account to add users in SharePoint: Select this check box to use the logged in user’s account (i.e. impersonation) to add users in SharePoint. The logged in user must have permission to add users to the selected SharePoint groups.
  • Allow Web Part to be importable: Select this check box to allow this Web Part to be exported and imported (i.e. added to a page or site) with all the configuration settings intact in the DWP file that is created upon export. By default, this check box is not selected so that the User Account Setup Web Part cannot be exported and imported to another page or site with all the configuration information intact. Checking this option also enables you to include this Web Part as part of a site template so that this configured Web Part is automatically available to users when creating a new SharePoint site.
5. Configure Users and Groups

hw07012.jpg

  • Directory Services Provider: Select either Active Directory Services or NT Directory Services.
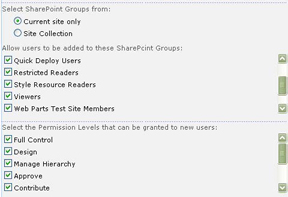
  • Where are new users added?: Expand this section to configure whether users are created in SharePoint Groups, Permission Levels or both.
    hw07014.jpg
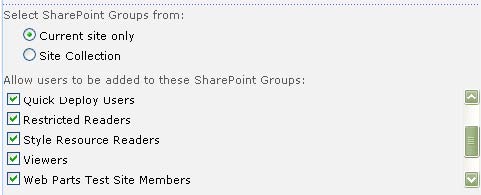
    If you select SharePoint Groups only, then you must select where you want to get the SharePoint groups (including custom groups) from (the current site or the entire site collection), then select the groups the Web Part user can add users to.
    hw07018.jpg
    If you select SharePoint Groups and Permission Levels, then you must select where you want to get the SharePoint groups (including custom groups) from (the current site or the entire site collection), select the groups the Web Part user can add users to, then select the Permission Level(s) that can be granted to new users.
    hw07022.jpg
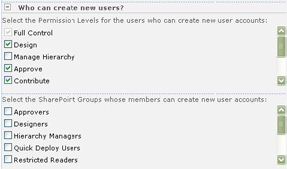
    Who Can Create New Users?: Expand this section to configure the groups (including custom groups) and permission levels required for Web Part users to create new users.
    hw07030.jpg
6.

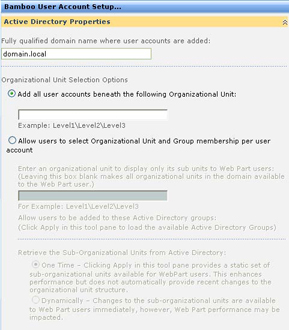
If you selected Active Directory as your directory services provider, then the Active Directory Properties section is available for you to configure.
hw07034.jpg

  • Domain Name: Enter the full qualified domain name where the new accounts will be added to. For example: marketing.company.com or domain.local
  • Cannot Change Password: If this option is selected, users created via the Web Part will not be able to change their password.
  • Password Never Expires: If this option is selected, users created via the Web Part will never be forced to change their password.
  • Change Password at Next Login: If this option is selected, users created via the Web Part will be required to change their password the first time they log in. This option cannot be selected if either Cannot Change Password or Password Never Expires is active.
  • Disable Account: If this option is selected, new accounts will be disabled by default.
    Organizational Unit Selection Options.

    • Add all user accounts beneath the following Organizational Unit: Enter the path to the Organizational Unit where you want to create new users.

      NOTE: If you have organizational units within organizational units, enter with back slashes between the units starting with the parent unit. For example, if you have a unit called Users and then you have Reston under that and then Sunset Hills Office under the Reston unit, then it would be entered in as follows: UsersRestonSunset Hills Office.

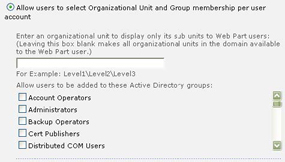
    • Allow users to select Organizational Unit and Group membership per user account: Enter the path to the Organizational Unit that contains sub units to display to Web Part users as they create new users. Web Part users will be able to select from the sub-units for a location for adding new users. If you leave this text box blank, all organizational units in the domain are available for selection to the Web Part user.
      hw07038.jpg
    • Allow users to be added to these Active Directory Groups: Click the Apply button on the tool pane to retrieve the list of Active Directory groups. You must enter in a fully qualified domain name prior to this step.
  • Retrieve the Sub-Organizational Units from Active Directory
    hw07040.jpg

    • Select the One Time option to provide a static set of sub-organizational units for use by Web Part users. This option may enhance Web Part performance but does not provide automatic updates to changes to the sub-organizational units list.
    • Select the Dynamically option to have the Web Part continuously update the sub-organizational units, ensuring that the latest changes to the units are available to Web Part users. This option may impact performance.


If you selected NT Directory as your directory services provider, then the NT Directory Properties section is available for you to configure.
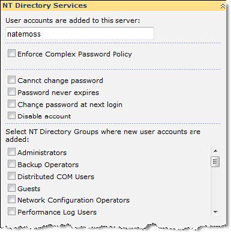
hw07042.jpg

  • User accounts are added to this server: Enter the server name of where the new user accounts will be added to. For example: MyServerName

  • Enforce Complex Password Policy: The User Account Setup Web Part cannot determine whether the SharePoint server requires a complex password policy when using NT Directory Services as you directory provider. Select this check box if you want to enforce a complex password policy based on Active Directory Services complex password policy and display this policy in the Web Part.

  • Cannot Change Password: If this option is selected, users created via the Web Part will not be able to change their password.
  • Password Never Expires: If this option is selected, users created via the Web Part will never be forced to change their password.
  • Change Password at Next Login: If this option is selected, users created via the Web Part will be required to change their password the first time they log in. This option cannot be selected if either Cannot Change Password or Password Never Expires is active.
  • Disable Account: If this option is selected, new accounts will be disabled by default.
  • Select NT Directory Groups where new user accounts are added: Select an NT Directory group(s) where new user accounts will be added to.
7. Configure E-mail Notification

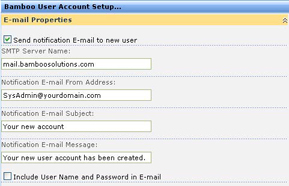
hw07044.jpg

  • Send notification E-mail to new user: Select this check box to have an email automatically sent to the new user notifying them that their account has been created. The Web Part will send the e-mail to the email address in the newly created user account. When you check this box, additional email properties are displayed for further configuration.
  • SMTP Server Name: Enter the name of the SMTP server.
  • Notification E-mail From Address: Enter the email address that you want the email to be sent from.
  • Notification E-mail Subject: Enter the subject for the email notification.
  • Notification E-mail Message: Enter the body text for the email notification. Click in the text box and then click the icon to the right of the text box to expand the field to write the text.
  • Include User Name and Password in E-mail: Select this check box to include the user name and password in the E-mail notification.

Configure the Settings Menu in User Manager for Sites

Configure the Settings Menu in User Manager for Sites

Return to Overview of Web Part Configuration

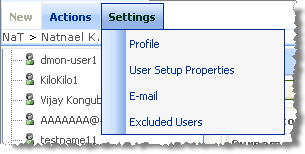
HW59_WebPart_Settings.jpgUser Manager for Sites also has a Settings menu on its tool bar. This button is only available to Site Collection administrators. It is hidden for all other users. Once these settings are configured, they are global for all User Manager for Sites web parts within a Site Collection.
This menu contains the following options:

Column Description Image
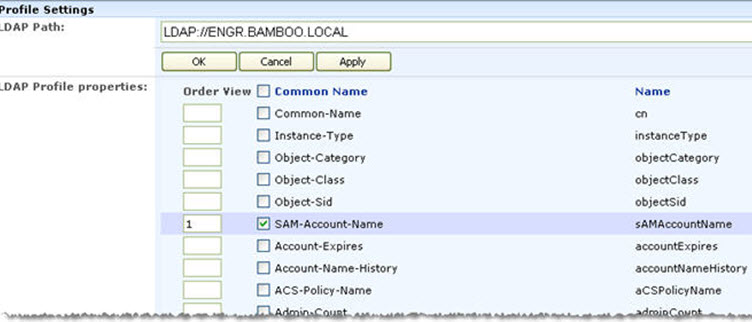
Profile Enter the LDAP path to acquire the Active Directory user schema (i.e. LDAP://ENGR.BAMBOO.LOCAL), and click OK. You only need the fully qualified domain name here – not the LDAP path that includes organizational units that you entered into the tool pane. Then select from the list of Active Directory properties to be displayed in user profiles. HW59_WebPart_Settings_Profile.jpg
User Setup Properties Enter in the Active Directory Property Name and then a user friendly Property Display Name, and click the Add Property button to create user setup properties. These properties are stored per Site Collection in SharePoint and displayed for input during user account creation. Use the Order column to set the order in which these properties are displayed on the first screen in user account setup, then click OK. Click the trash can icon to the right of the property to delete it. You can use this setting if you want to create SharePoint users at the same time that you create an Active Directory user.

HW59_WebPart_Settings_UserSetupProp.jpg

NOTE: The LDAP path entered into the Active Directory Services Settings in the Web Part tool pane is used when creating a new user in order to attain the appropriate organizational units from Active Directory in which to create the user’s account.

E-mail Here you need to configure the SMTP server name and the e-mail address from which all e-mails from User Manager for Sites will be sent. The system uses this mail server to send notification and e-mails to users. Note that some mail servers require the From address to be a valid e-mail address in order for mail to be sent correctly. HW59_WebPart_Settings_Email.jpg
Excluded Users Exclude certain user profiles from being displayed in any view. Separate users by semicolon. Click the Check Names icon to verify the user exists or select the address book icon to search for users. HW59_WebPart_Settings_ExclUsers.jpg

Complementary Products for User Account Setup

Complementary Products for User Account Setup

sharepointsolutions.pngYou will find many of our products complement each other quite nicely saving you the time and trouble to write custom code. With Bamboo at the heart of your SharePoint investment, you gain access to a huge catalog of enhancements, components, and accessories that add the critical functionality your business requires.
The same components can be easily used in future applications and they all come from a single, trusted vendor, ensuring an easy purchase process and support you can count on. That’s the Bamboo Way!


Choosing which farm servers to license

Choosing which farm servers to license

Bamboo products are deployed to all servers in the farm running the Microsoft SharePoint Foundation Web Application service (or Windows SharePoint Services Web Application in WSSv3/MOSS), which may include servers that do not serve Web content. For most products, only servers that serve Web content need a license key (Alert Plus is an exception), but all servers that run the Microsoft SharePoint Foundation Web Application service will appear on the Web License Manager Status and Activation pages by default.

If you would like to see only certain servers displayed in the Web License Manager, follow these steps:

Step Action
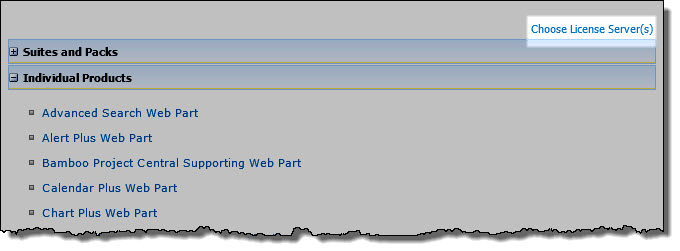
1. Click the Choose License Server(s) link on the Bamboo Web License Manager main page.

SP2013ChooseLicenseServers3.jpg

2.

Although this step is optional, it makes it easier for SharePoint Administrators to see which servers in the farm need a license key, if not all do.

On the page displaying the list of servers, check the box for each server functioning as a Web Front End (WFE).

Some products, such as Alert Plus or List Rollup, may include optional features that require licensing of a SharePoint application server as well. If so, these servers can also be selected.

WLM-choosing license servers2.jpg

Can trials be extended?

Can trials be extended?

Overview of Licensing and and Product Activation

Once you have installed a Bamboo product on your farm and the trial period has passed, you cannot install a second trial. Instead, you need to extend the original trial period. Contact your Bamboo Sales Account Manager (Sales@bamboosolutions.com) for a trial extension.

Before you uninstall

Before you uninstall

Icon-WarningIMPORTANT: Before you uninstall a Bamboo product, make sure that it is no longer in use on any site in your farm. If a web part resides on a page and you uninstall the web part, an error will be displayed for users that visit that page. The uninstall process does not update individual pages in your SharePoint portal.

Also, if you uninstall Workflow Conductor (WFC) and some workflows built with WFC are still active, those workflows will fail.

You have several choices for how to uninstall your Bamboo product:

Option Comment
Use the Updated Uninstall Process for Bamboo components

Based on feedback from our customers, Bamboo introduced updated install/uninstall processes for component products (web parts). Instead of the Setup.exe Installation Application, we now supply two PowerShell scripts – one for Install/Upgrade and the other for Uninstall – to be used to install, upgrade, or uninstall the product.

For more information, see Overview of the Updated Installation Process for Bamboo components.

Bamboo Installation Package

Icon-WarningIMPORTANT: As of April 2017, Bamboo no longer includes the Installation/Setup program in product download packages.

You can use the Bamboo product installation package that you used to install the product to uninstall. This is the preferred method, because it performs some automated system checks to help ensure the uninstall will be successful. It also steps you through each component, so its easier to make sure everything is uninstalled. See Using the Setup program to Uninstall for more information.

SharePoint Central Administration Many Bamboo products are deployed as SharePoint solutions, so you can retract and remove them from Central Administration. See Uininstalling from SharePoint Central Administration for more information.
PowerShell Some Bamboo products are packaged with a PowerShell script that you can use to uninstall. See Manually uninstall using PowerShell for more information.
stsadm If you prefer, you can use stsadm commands to retract and delete Bamboo SharePoint solutions. See Manually uninstall using stsadm for more information.
Add/Remove Programs Some Bamboo products include components that are installed using an EXE or MSI installer. See Uninstalling a Bamboo .msi or .exe for more information.

Depending on the uninstall method you choose, there may be a solution left behind after the install. This is intentional, as several Bamboo products use some of the same components. See What is left behind after uninstalling? for more information and steps for how to uninstall completely.

Before you Migrate from SharePoint 2007 to SharePoint 2010 Read This

Before you Migrate from SharePoint 2007 to SharePoint 2010 Read This

Overview

Microsoft recommends that you use one of two basic approaches when you upgrade from SharePoint 2007 to SharePoint 2010:

  • In-place upgrade. An in-place upgrade is used to upgrade all Microsoft SharePoint sites on the same hardware. See How to Migrate a Bamboo Web Part from SharePoint 2007 to SharePoint 2010 using the In-Place Upgrade Method for details.
  • Database attach upgrade. A database attach upgrade enables you to move your content to a new farm or new hardware. See How to Migrate a Bamboo Web Part from SharePoint 2007 to SharePoint 2010 using the Database Attach Upgrade Method for details.

You can also combine these two types of upgrade in hybrid approaches that reduce downtime during an upgrade. For more information about these approaches, see Determine upgrade approach (SharePoint Server 2010) from Microsoft TechNet.

General Migration Restrictions for Bamboo Products

  1. Regardless of the upgrade method you choose, you MUST change existing SharePoint sites to use the new user SharePoint 2010 experience. If you don’t, some features of your Bamboo products will not work as expected.
  2. You need to make sure that you are running the latest available Bamboo product release in your SP2007 environment before migrating. Review information specific to the product(s) you are migrating to learn the minimum product release to migrate. See Bamboo product releases that are supported for migration from SharePoint 2007 to SharePoint 2010 for details.
  3. Bamboo Solutions does not support the migration of Bamboo products deployed on WSSv2/SharePoint 2003 environments to SharePoint 2010 farms.
  4. Bamboo Solutions does not support the downgrade of SharePoint editions when migrating from SharePoint 2007 to SharePoint 2010. For example, Bamboo products are not supported when migrating from MOSS 2007 to SharePoint Foundation 2010.

Migration Restrictions for Specific Bamboo Products

Before following the instructions for the method you choose, review information specific to the product(s) you are migrating. The In-Place Upgrade method is sometimes easier, but it takes longer. Some Bamboo products do not support the In-Place upgrade method and we recommend a hybrid In-Place Upgrade method as an alternative.

Bamboo products that use Telerik

Bamboo products that use Telerik

Product Uses Telerik?
Alerts Administrator Yes
Alert Plus Yes
Bulk Export No
Bulk Import No
Calendar Plus Yes
Chart Plus Yes
Column Level Security Yes
Community Central Yes
Cross List No
Cross Site Display No
Custom Identifier No
Data Viewer Yes
Discussion Board Plus Yes
File Share Library No
Filters Collection Yes
Grants Management Yes
Group Email Yes
Group Redirect Yes
In/Out Schedule Board Yes
Knowledge Base Solution Accelerator Yes
KPI Column Yes
List Consolidator Yes
List Print No
List Rollup Yes
List Rotator No
List Search Yes
Lookup Selector No
Mini Calendar No
My Alerts Organizer No
Navigators Yes
Password Change Yes
Password Expiration No
Password Reset No
Password Management Toolkit Yes
PM Central Yes
Poll Yes
Project Portfolio Dashboard Yes
Rating Yes
Rich Text Yes
Site Creation Plus No
SQL View No
Task Master Yes
Team Calendar Yes
Time Tracking and Management Yes
Tree View Yes1
No2
User Account Setup Yes
User Directory Yes
User Manager for Sites Yes
User Profile Plus No
User Profile Sync No
User Redirect No
User Registration Accelerator No
Validator column No
Video Library No
Virtual Map View No
Visual Indicator column No
Wiki Publisher No
Workflow Conductor Yes
World Clock and Weather No

1SharePoint 2007 and SharePoint 2013
2SharePoint 2010

Bamboo product releases that are supported for migration from SharePoint 2010 to SharePoint 2013

Bamboo product releases that are supported for migration from SharePoint 2010 to SharePoint 2013

The table below shows the minimum required Bamboo product version required when migrating Bamboo products from SharePoint 2010 to SharePoint 2013. If you have an earlier version installed than the one listed, please upgrade that product before migrating to SharePoint 2013.

For additional information:

  • How to find the version/release number of a Bamboo Web Part
  • Upgrading your Bamboo Web Part
  • Migrating…
Product minimum SP2010 version minimum SP2013 version
Alert Plus 30.2.115 30.2.121.2013
Alerts Administrator 10.4.52 10.4.62.2013
Calendar Plus 40.1.143 40.1.155.2013
Chart Plus 30.5.109 30.5.143.2013
Column Level Security 10.3.34 10.3.48.2013
Community Central 10.1.91 10.5.76.2013
Cross List 10.5.20 N/A
Cross Site Display 10.2.26 10.2.40.2013
Custom Identifier Column 10.0.45 10.0.57.2013
Data-Viewer 30.5.67 30.5.57.2013
Discussion Board Plus 10.5.22 20.0.57.2013
DWG Parser
SharePoint 2007 Only
N/A N/A
Filters Collection 10.3.25 10.3.35.2013
File Share Library 20.0.60 20.0.81.2013
Grants Management 10.5.20 N/A
Group Email 10.7.43 10.7.46.2013
Group Redirect 20.3.27 20.3.33.2013
Hello 20.1.9 N/A
In/Out Schedule Board 10.4.56 10.4.57.2013
Knowledge Base 20.2.47 20.2.75.2013
KPI Column 10.3.65 10.3.78.2013
List Bulk Export 1.4.12 20.0.18.1
List Bulk Import 2.5.105 30.0.29.2013
List Consolidator 10.0.79 10.0.107.2013
List Print 10.4.31 10.4.35.2013
List Rollup 60.0.64 60.0.70.2013
List Rotator 20.5.82 20.5.99.2013
List Search Advanced 10.8.93 10.8.121.2013
List Search Simple 20.1.140 20.1.167.2013
Lookup Selector Column 20.3.61 20.3.88.2013
Mini-Calendar 20.8.67 20.8.86.2013
My Alerts Organizer 10.4.43 10.4.51.2013
Navigators 10.3.47 10.3.57.2013
Password Change 40.1.65 40.1.68.2013
Password Expiration 10.6.43 10.6.49.2013
Password Reset 20.4.51 20.4.70.2013
Poll 10.4.53 10.4.63.2013
Project Management Central 40.1.135 40.1.109.2013
Project Portfolio Dashboard 10.8.58 10.8.80.2013
Quick Add 10.0.29.0 10.0.29.2013
Rating Column 10.2.43 10.1.54.2013
Rich Text Column 10.3.27 10.3.28.2013
Site Creation Plus 10.4.66 10.4.71.2013
SQL View 10.6.26 N/A
Task Master 30.5.117 30.5.116.2013
Team Calendar 10.7.18 10.7.36.2013
Time Tracking and Management 1.6.46 10.6.88.2013
Tree View 10.7.83 10.8.23.2013
User Account Setup 40.0.107 40.0.148.2013
User Directory 10.7.53 10.7.81.2013
User Manager for Sites 10.3.46 10.3.62.2013
User Profile Plus 10.4.39 10.4078.2013
User Profile Sync 1.6.10 20.0.20.2013
User Redirect 10.5.16 10.5.27.2013
User Registration Accelerator 10.3.24 10.3.35.2013
Validator Column 10.3.20 10.3.35.2013
Video Library 20.0.87 20.0.106.2013
Virtual Map View 10.9.46 10.9.42.2013
Visual Indicator Column 10.3.59 10.3.79.2013
Wiki Publisher 10.0.65 10.0.85.2013
Workflow Conductor 30.0.0 30.0.1.2013
World Clock and Weather 20.4.47 20.4.52.2013

Bamboo product releases that are supported for migration from SharePoint 2007 to SharePoint 2010

Bamboo product releases that are supported for migration from SharePoint 2007 to SharePoint 2010

The table below shows the minimum required Bamboo product release required when migrating Bamboo products from SharePoint 2007 to SharePoint 2010. If you have an earlier release installed than the one listed, please upgrade that product before migrating to SharePoint 2010.

For additional information:

  • How to find the version/release number of a Bamboo Web Part
  • Before you Migrate from SharePoint 2007 to SharePoint 2010 Read This
Product minimum SP2007 release minimum SP2010 release
Alert Plus 3.0.62 30.0.59
Alerts Administrator 1.4.12 10.4.30
Calendar Plus 4.0.96 40.0.36
Chart Plus 2.5.43 20.5.25
Column Level Security 1.3.4 10.3.7
Cross List 1.5.5 10.5.6
Custom Identifier Column 1.0.35 10.0.35
Data-Viewer 3.3.59 30.3.67
DWG Parser N/A N/A
Filters Collection 1.3.5 10.3.13
File Share Library
Grants Management TBD TBD
Group Email 1.7.4 10.7.11
Group Redirect 2.3.11 20.3.14
Hello TBD TBD
In/Out Schedule Board
Knowledge Base

2.0.71

NOTE: Releases earlier than 1.2 are no longer supported for upgrade or migration.

20.0.56
KPI Column 1.2.40 10.3.33
List Bulk Export N/A N/A
List Bulk Import N/A N/A
List Consolidator 1.0.87 10.0.62
List Print 1.4.5 10.4.18
List Rollup Classic: 5.0.55
Schema: 5.0.77
Classic: 40.5.13
Schema: 50.0.85
List Rotator 2.5.24 20.5.44
List Search Advanced 1.8.51 10.8.48
List Search Simple 1.8.64 10.8.60
Lookup Selector Column 1.3.24 20.3.15
Mini-Calendar 2.7.8 20.7.11
My Alerts Organizer 1.4.13 10.4.40
Navigators 1.3.11 10.3.12
Password Change 3.5.8 30.5.14
Password Expiration 1.5.11 10.5.19
Password Reset 2.4.11 20.4.31
Project Management Central 2.1.21 20.1.12
Rich Text Column 1.3.9 10.3.14
Site Creation Plus 1.4.31 10.4.18
SQL View 1.6.17 10.6.23
Task Master 2.0.150 20.0.34
Team Calendar 1.5.4 10.5.11
Tree View 1.7.29 10.7.27
User Account Setup 3.4.8 30.4.31
User Directory 1.7.1 10.7.2
User Manager for Sites 1.3.1 10.3.19
User Profile Plus 1.4.7 10.4.35
User Profile Sync N/A N/A
User Redirect 1.5.3 10.5.14
Validator Column 1.3.1 10.3.12
Virtual Map View 1.9.25 10.9.9
Visual Indicator Column 1.3.7 10.3.19
Wiki Publisher 1.0.26 10.0.25
Workflow Conductor 1.5.1 1.5.1
World Clock and Weather 2.3.15 20.3.15

Authentication Providers and Required Permissions

Authentication Providers and Required Permissions

Return to User Account Setup Configuration

User Account Setup can be configured to add accounts to the following authentication providers:

  • Active Directory Services (Windows)
  • NT Directory Services (Windows)
  • Forms Based Authentication using the following membership providers:
    • SQL Server membership provider
    • Active Directory membership provider

Authentication providers not specifically listed here are not supported with User Account Setup.

The Authentication Provider Administrator Account configured in the Authentication Providers settings must have the following minimum permissions to create accounts in Active Directory Services or NT Directory Services:

  • The Create User Objects permission for an organizational unit or the domain is required to create accounts and set some account properties.
  • The Reset Password permission on the User Object is required to set account passwords.
  • The Write All Properties permission on the User Object is required to set remaining account properties.
  • The Write All Properties permission on a Security Group is required to add an account to a group.

NOTE: If the Authentication Provider Administrator Account permissions are not set as described above, User Account Setup users will not be able to create and configure all account properties allowed in the web part.

Sometimes we see customers attempt to enter the fully qualified domain name for the Domain field; this should be the NetBIOS (pre-Windows 2000) name of the domain. For example, the Domain field should be the “domain” portion of the account’s logon – “bambooadmin” should enter “bamboo” in the Domain field, not “bamboo.local”.

The SharePoint Administrator Account configured in the Authentication Providers settings is used to add users to SharePoint groups and to modify the SharePoint User Information List (Windows SharePoint Services 3.0 and SharePoint Foundation 2010 only). The SharePoint Administrator Account should be a site collection administrator.

Audit Log Configuration

Audit Log Configuration

Return to User Account Setup Configuration

User Account Setup provides the ability to log the details for all new accounts. When auditing is enabled, log entries are written to the User Account Setup – Audit Logs list. There is one audit log list per site. Only successful account creations are logged.

The audit log list will inherit permissions from the site by default, but you can (and should) customize permissions depending on how you protect sensitive account information. There are no minimum required list permissions for auditing to work, since entries are written using the account configured for the application pool.

To configure auditing edit the web part and click the User Account Setup Web Part Settings button:

Step Action Result
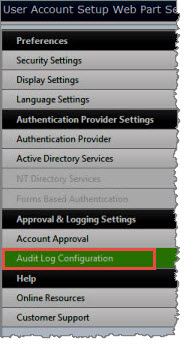
1. In the Approval & Logging Settings section of the Web Part Settings page, click the Audit Log Configuration tab. Auditing.jpg
2. Select the option to Log all account creations. Logging.jpg
3. To log extended account attributes, such as address or phone number information, click on the attribute name in the Available Attributes list and use the arrow buttons to move it to the Selected Attributes list. All basic attributes are logged by default and are not listed here. If you add new extended attributes, they will be listed in the Available Attributes list the next time you open the Web Part Settings page.

The following details are stored in the audit list for each completed account request:

Column Description
User Name The user name requested for the new account.
Requestor’s Name The identity of the person who submitted the new account request.
Authorized By If account approval is configured, the identity of the person who approved the new account request.
First Name, Last Name, Display Name The identifying information entered for the new account in the User Account Setup Web Part form.
E-mail Address The email address entered for the new account in the User Account Setup Web Part form. If account approval is configured, a confirmation email was sent to this address when the account was created.
Extended Attributes If User Account Setup is configured to audit extended account attributes, such as address or phone number, the values entered for those attributes in the User Account Setup form are logged in this column.

Active Directory Settings Security Groups

Active Directory Settings Security Groups

Return to ADS Settings

hw07-adservices-adsecgroups.jpgWhen a new account is created, User Account Setup can assign the new account to Active Directory security groups at the same time. Check the option Add user to Active Directory security group to enable this feature. When you select this option, the following additional settings are available:
  • Enter Active Directory security groups: To automatically assign users to one or more AD security groups, enter the group name in the Enter Active Directory security groups box. Separate multiple group names with a semicolon (;). Start typing a group name to match existing groups.
  • Allow requestor to select security groups: Check this option to allow requestors to select which groups to add the new user to instead of assigning them automatically. The groups listed in the Enter Active Directory security groups box will be displayed in the User Account Setup Web Part for the requestor to choose from.
  • Requestor must select at least one security group: Check this option to force the requestor to select at least one group from the list.

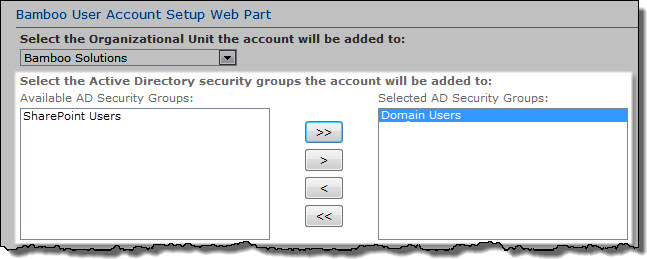
In the example below, the User Account Setup Web Part is configured to Allow requestor to select security groups. Two groups are listed, and one group is currently selected for the new user.

hw07-adservices-selectadgroups.jpg

Active Directory Settings Organizational Unit

Active Directory Settings Organizational Unit

Return to ADS Settings

Accounts must be added to an Active Directory organizational unit (OU). You can specify the organizational unit to add all accounts to, or you can provide a list of possible OUs for the requestor to choose from when submitting the account request.

Allow requestor to select organizational unit

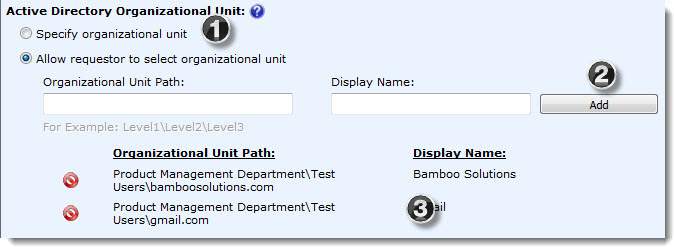
hw07-adservices-oulist.jpg Check this option to allow the requestor to choose the OU to add the account to. You can provide a list of several possible OUs.
To add an entry to a list of available OUs:

Step Action
1. Click the second option to “Allow requestor to select organizational unit” and enter the Organizational Unit Path and a Display Name for the OU in the Web Part.
2. Click the Add button to add the OU to the list. The OU will display below.
3. To delete an OU from the list, click the delete icon hw07-deleteicon.jpg. The OU will be removed from the displayed list.

In the User Account Setup Web Part, the OUs you configure will be listed for the user to choose from.
hw07-adservices-selectou.jpg

Active Directory Settings SharePoint Groups

Active Directory Settings SharePoint Groups

Return to ADS Settings

When a new account is created, User Account Setup Web Part can assign to the new account to SharePoint groups at the same time.

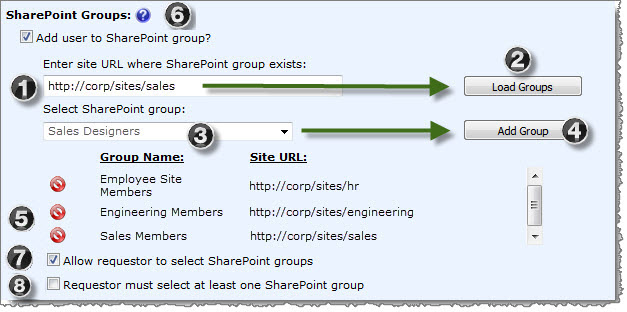
hw07-adservices-spgroups.jpg

Step Action
1. Enter a site URL to search for SharePoint groups in the Enter site URL where SharePoint group exists box. The URL can be entered as a relative path (./site) or an absolute path (http://server/site).
2. Click the Load Groups button to load the list of groups in that site.
3. Select a group from the list and click the Add Group button.
4. Repeat the above steps for additional groups. Groups do not have to be from the same site.
5. To delete a group from the list, click the Delete (Icon-Delete-1) button.
6. When you check the option Add user to SharePoint group (at the top of the web part), the following additional settings are available:
7. Allow requestor to select SharePoint groups: Check this option to allow requestors to select which groups to add the new user to instead of assigning them automatically. The groups in the SharePoint Groups list will be displayed in the User Account Setup Web Part for the requestor to choose from.
8. Requestor must select at least one SharePoint group: Check this option to force the requestor to select at least one group from the list.

In the example below, User Account Setup is configured to Allow requestor to select SharePoint groups. Three groups are listed, and one group is currently selected for the new user.
hw07-adservices-selectspgroups.jpg

Active Directory Settings SharePoint Permission Levels

Active Directory Settings SharePoint Permission Levels

Return to ADS Settings

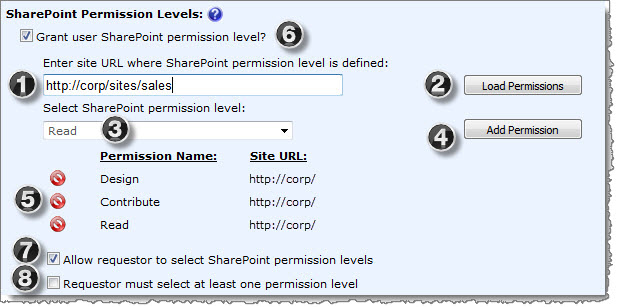
When a new account is created, User Account Setup can grant one or more SharePoint permission levels to the new account at the same time.

Check the option Grant user SharePoint permission level to enable this feature.

Enter a list of one or more permission levels to grant the account. Note that the account will also inherit the permission levels of any SharePoint groups it is assigned to.

The SharePoint Permission Level setting grants additional permissions to the account directly.

hw07-adservices-permlevel.jpg

Step Action
1. Enter a site URL to search for SharePoint permission levels in the Enter site URL where SharePoint permission level is defined box. The URL can be entered as a relative path (./site) or an absolute path (http://server/site).
2. Click the Load Permission button to load the list of permissions defined in that site.
3. Select a permission level from the list.
4. Click the Add Permission button.
5. To delete a permission level from the list, click the Delete {Icon-Delete-1) button.
6. When you check the option Grant user SharePoint permission level, the following additional settings are available:
7. Allow requestor to select SharePoint permission levels: Check this option to allow requestors to select which permission levels to grant the new user instead of assigning them automatically. The permission levels in the SharePoint Permission Levels list will be displayed in the User Account Setup Web Part for the requestor to choose from.
8. Requestor must select at least one SharePoint permission level: Check this option to force the requestor to select at least one permission level from the list.

PermissionsGranted.jpg

Active Directory Settings Auto Create Columns

Active Directory Settings Auto Create Columns

Return to ADS Settings

hw07-adservices-createuserprofilecol.jpgThe Automatically Create Columns in SharePoint User Information List option is enabled only if the User Account Setup Web Part instance is installed on a SharePoint Foundation 2013 site. When User Account Setup Web Part creates an account, it will attempt to copy account attributes in the Account Details list to a column with the same name in the SharePoint User Information List. The account information is then visible in the SharePoint profile. If a column with the same name does not exist, User Account Setup Web Part can create the column automatically in the User Information List.
  • To enable this feature, select Yes.
  • If you select No, account attributes with no matching column in the User Information List will be skipped.

NOTE: If User Account Setup Web Part is installed on a SharePoint Server 2013 site, this setting is not applicable. Configure synchronization options for user properties by managing the User Profile Sync Service in SharePoint Central Administration.

Active Directory Settings Account Details

Active Directory Settings Account Details

Top

Return to ADS Settings

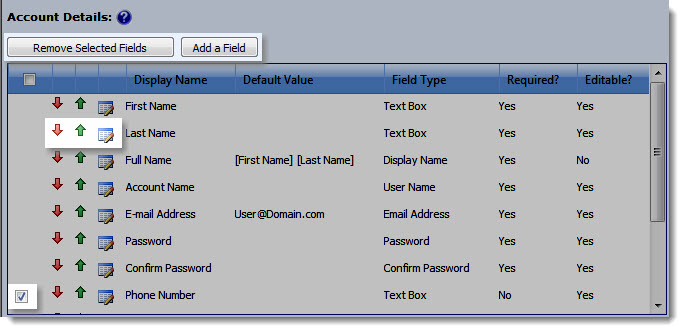
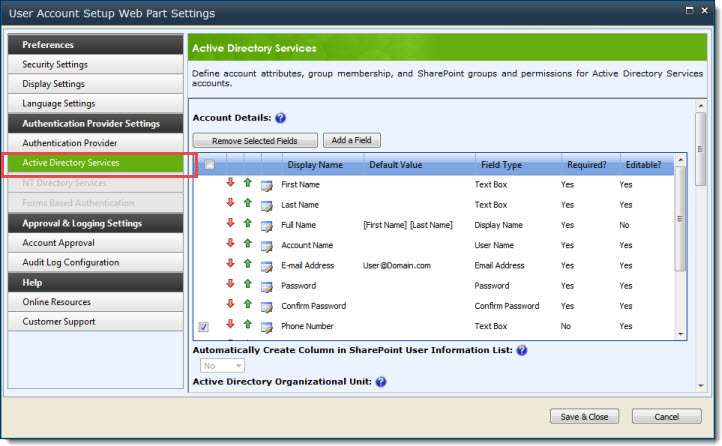
hw07-adservices-accountdetails.jpg The Account Details section lets you define the account attributes to enter in User Account Setup. The minimum attributes required to create an account in Active Directory are configured by default.
  • To change the settings for attributes in the Account Details list, use the features described in the Editing Attribute Properties section below.
  • For details about adding new attributes, see the Adding An Attribute section below.

Editing Attribute Properties

Action Description
Changing display order To change the order attributes are listed in the form, click the up and down arrows in front of the attribute name.
Editing the display name To change the display name for the attribute in the User Account Setup Web Part, click the Edit button and update the Display Name field.
Adding or changing a default value

To add or update a default value for an attribute, click the Edit button and update the Default Value field.

  • If your default value is intended to be only an example, enter text and leave the Editable option in the Field Settings section selected. For example, you could describe the required format for an email address using the default text [email protected].
  • To base the default value on another attribute, enter the display name of the attribute you want to include. Use the format [Display Name] (including the brackets). The value will be updated as text is typed in the Web Part field you referenced. When using this feature, you must also deselect the Editable option in the Field Settings section.
  • Multiple attribute name tokens are allowed, and text and tokens can be combined. For example, a default email address can be constructed using [First Name].[Last Name] @company.com
    [First Name] and [Last Name] will be replaced as values for those attributes that are typed in the Web Part.
Making an attribute required To change whether an attribute is required in the User Account Setup Web Part form, click the Edit button next to the attribute name, and then select or deselect the Required option in the Field Settings section. If an attribute is required by Active Directory, you cannot deselect the Required option.
Making an attribute read-only If you do not want a user to be able to edit an attribute in the User Account Setup Web Part form, click the Edit button next to the attribute name, and then deselect the Editable option in the Field Settings section. You must do this if you defined a default value based on other attributes.
Removing an attribute Several non-required Active Directory attributes are configured by default. If you do not want users to complete these optional attributes when creating a new account, you can remove them from the list. To remove an attribute, select the checkbox in front of it and click the Remove Selected Fields button above the attribute list.

Top

Adding an Attribute

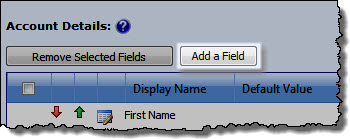
hw07-adservices-addfield.jpg To add a new attribute to the User Account Setup Web Part form, click the Add a Field button above the attribute list and define the attribute properties.
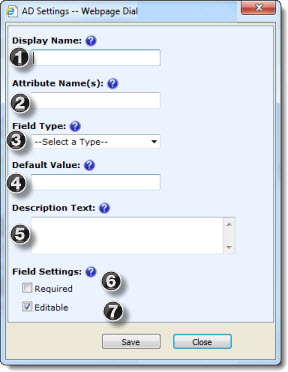
hw07-adservices-newattribute.jpg No. Property Description
1. Display Name Enter the display name for the attribute in the User Account Setup form.
2. Attribute Name(s) Enter the name of one or more Active Directory attributes where this data should be copied. To copy the same data to multiple attributes, separate each name with a semicolon (;).
3. Field Type Select the field type for data in this attribute.
4. Default Value (optional) To enter a default value as editable text, type sample text. To enter a default value that is completed based on other attributes, enter the name of the attribute you want to include. Use the format [Display Name] (including the brackets). Text and tokens can be combined. For example, a default email address can be constructed using [First Name].[Last Name] @mycompany.com. If you use attribute tokens in the default value, uncheck the Editable option in the Field Settings section.
5. Description Text Enter text to be displayed below the display name in the User Account Setup form.
6. Required If you want the attribute to be required in the User Account Setup form, select the Required option.
7. Editable To allow users to enter data for this attribute, select the Editable option. If you entered attribute tokens in the Default Value field, deselect this option.

Top

Active Directory Services Settings

Active Directory Services Settings

hw07-adservices.jpg If User Account Setup is configured to use the Active Directory Services authentication provider, the Active Directory Services settings tab is active in the Web Part Settings page, and the following additional settings are available to define account attributes, group membership, and SharePoint groups and permissions for Active Directory Services accounts:
  • Active Directory Settings Account Details
  • Active Directory Settings Auto Create Columns
  • Active Directory Settings Organizational Unit
  • Active Directory Settings Security Groups
  • Active Directory Settings SharePoint Groups
  • Active Directory Settings SharePoint Permission Levels

When all Active Directory Services settings have been configured, continue configuring User Account Setup Web Part by reviewing the Account Approval Settings.

Activating Your Bamboo Product License

Activating Your Bamboo Product License

Overview of Licensing and and Product Activation

Licenses for Bamboo products that are installed on SharePoint servers are activated in SharePoint Central Administration using the Bamboo Web License Manager. Follow these instructions to activate a Bamboo product license.

NOTE: Licenses for desktop/server applications such as List Bulk Import, User Profile Sync, and List Bulk Export are activated using a standalone version of the licensing application, called Bamboo License Manager. See Activating a Bamboo Desktop Product Using the License Manager for more information.

Before performing the steps listed below, be sure you have installed the Bamboo Web License Manager on your SharePoint farm. See Installing the Bamboo Web License Manager for more information.

Step Action
1.

From SharePoint Central Administration, click Manage My License Keys under Bamboo Solutions.

NOTE: If you don’t see this option listed, see Why isn’t Manage My License Keys displayed in SharePoint Central Administration?

2.

You may see two groupings on the page, Suites and Packs or Individual Products. When activating a Web Part or Application, expand the Individual Products section.

Locate the product you need to activate. Hover over a product name to see a drop-down menu associated with the product. Select Activate/Deactivate from the menu.

CA-WLM2010 but generic.jpg

3.

On the displayed page, the available servers in your SharePoint farm will be listed. You will need an individual License Key for each Web Front End server.

Certain products, such as Alert Plus and List Rollup include features that can be run on application servers as well. In these cases, separate licenses may also be required for one or more application servers.

NOTE: If some of the servers listed do not receive web traffic, or if there are application servers that do not need a license, you can remove them from the list. Please see Choosing which farm servers to license for more information.

To activate a license for a server, type or copy and paste the License Key into the field provided and click Activate.

activatelicimg3.jpg

NOTE: If your SharePoint server does not have Internet access, you may get an error when you click Activate. If you experience this, see Activating My Bamboo Product License Offline for more information.

4. Your Bamboo product is now Active and is ready for use, as shown by the Status column.

SP2010ActSuccess.jpg
If you ever need to check which license key you used to activate each server, the license key used is shown on this status page.

Activating Your Bamboo Product License Offline

Activating Your Bamboo Product License Offline

Overview of Licensing and and Product Activation

Licenses for Bamboo products that are installed on SharePoint servers are activated in SharePoint Central Administration using the Bamboo Web License Manager. Licenses are normally activated online, but sometimes SharePoint servers do not have access to the Internet. If this is the case with your servers, follow these instructions to activate a Bamboo product license offline.

NOTE: Before performing the steps listed below, be sure you have installed the Bamboo Web License Manager on your SharePoint farm. See Installing the Bamboo Web License Manager for more information.

Step Action
1.

From SharePoint Central Administration, click Manage My License Keys under Bamboo Solutions.

NOTE: If you don’t see this option listed, see The Bamboo Web License Manager does not show up in Central Administration. How do I fix that

2.

You may see two groupings on the Manage My License Keys page, Suites and Packs and Individual Products depending on what Bamboo products you’ve installed on the farm. When activating a Web Part or Application, expand the Individual Products section.

Locate the product you need to activate. Hover over a product name to see a drop-down menu associated with the product. Select Activate/Deactivate from the menu.

WLMIndividual Products.jpg

3.

All servers in your SharePoint farm that are running the Microsoft SharePoint Foundation Web Application service will be listed. The license status for each will be Not Active or Trial. You will need an individual License Key for each server.

If some of the servers listed do not receive web traffic, you can remove them from the list. Please see Choosing which farm servers to license for more information.

To activate a license for a server, type or copy and paste the License Key into the field provided, check the Activate Offline box, and then click Activate.

activatelicimg3.jpg

4.

On the page displayed, a Machine Key will be displayed with the License Key and a space to enter the Activation Key.

NOTE: Eight spaces are shown if you are running WSSv3/MOSS. If you are running SharePoint 2010 or 2013, there is just one space.

ket in activatoin key2.jpg
Copy the License Key and the Machine Key to an email and send it to Bamboo’s Support Team at Support@bamboosolutions.com. They will reply via Email with the Activation Key. If you have several servers in your farm, you can send the License Key-Machine Key combinations for all of them in one Email message to the Support Team.

Alternatively, you can generate the Activation Key yourself via the My Bamboo area of the Bamboo Solutions website. See Generating Activation Keys using My Bamboo for more information.

Once you have the Activation Key, enter it in the space provided and click Activate.

NOTE: The Machine Key, as you may have guessed, is tied to the HW profile of the server. As such, the Activation Key is also tied to the HW profile. If the HW profile of a server changes, the License will fail and need to be deactivated and then re-activated, similar to what is required when you move your farm to new servers. See Migrate your Bamboo Product License Key From one SharePoint version to another for more information on what to do when this happens.

5. After the license is activated, it’s status will be displayed on the page.

SP2010ActSuccess.jpg

How to activate a Bamboo Site Collection Feature

How to activate a Bamboo Site Collection Feature

Product feature activations can be done automatically at the site collection level when the product is installed using the Bamboo Installation/Setup program. However, there are a few reasons why you may need to manually activate (or deactivate) Bamboo product features:

  • You are using the updated installation process for Bamboo components.
  • You opted out of automatic feature activation during installation using the older Setup program.
  • You added a new site collection and want to add Bamboo features to it.
  • You want to remove Bamboo product features from an existing site collection.

To manually activate (or deactivate) Bamboo product features, follow the instructions below.

Icon-WarningIMPORTANT: Perform these steps using an account that is a Site Collection Administrator.

Step Action
1.

From a page on the top level site of a site collection, click Site Actions and then Site Settings. In the Site Collection Administration section of the page displayed, click Site collection features.

Icon-Tip If you don’t see this section, you may not be a Site Collection Administrator. If you don’t see the link, you may not be on the top level site of the collection.

A list of available features will be listed.
SCA-Active SCFeatures.png

2.

Find the appropriate feature. The status column indicates if the feature is currently active. If it hasn’t yet been activated, click the Activate button. If it’s activated and you need to Deactivate, click Deactivate.

For information about which feature to activate for a particular product, please see this article.

Account Approval Settings

Account Approval Settings

Return to User Account Setup Configuration

User Account Setup can be configured to submit new account requests for approval before the account is created. Account approval includes the following features and benefits:

  • Automatically sends an email to the configured approvers with a link to the new account request.
  • Multiple approvers can be configured, but only one approver has to respond.
  • Can send a confirmation email to the original requestor, as well as to the new account, when the account is created.
  • Customizable approval and confirmation email templates, which support substitution variables for account properties.
  • Supports plain-text email.

Account approval is disabled by default. To configure account approval:

Step Action Result
1. Edit the Web Part and click the User Account Setup Web Part Settings button. hw07-2010-editwebpart.jpg
2. In the Approval & Logging Settings section of the web part settings page, click the Account Approval tab. ClickHere.jpg
3. Select the Administrator approval process option. Settings.jpg
4. Configure one or more approvers. All approvers in the list will receive the approval request. The first approver to respond approves or denies the request. The account will be created only if the request is approved.
5. You also have the optional to customize the approval and confirmation email templates. Supported substitution variables are listed to the right of each template.

hw07-accountapproval-email.jpg

For example, to include the display name of the new account in the email body, enter the substitution variable {Display Name} (including the brackets) in the text. To send approval and confirmation messages without HTML formatting, select the Send e-mail in plain text option.

6. Define email recipients. A confirmation email is sent to the new account by default. To also send a confirmation to the person who requested the account, select the Requestor option. hw07-accountapproval-recipients.jpg

For a step-by-step example of the account approval process, read About the Account Approval Process for End Users.

About the Installation Files

About the Installation Files

Options for Installing

image showing install files for Tree View web partWhen you extract the product EXE to a location on your SharePoint server, several folders are created that contain installation files and Setup program configuration files. The root level of the extracted file system includes the file Setup.bat, which launches the Setup program. The list below shows the installation files for the Tree View Web Part, as an example.
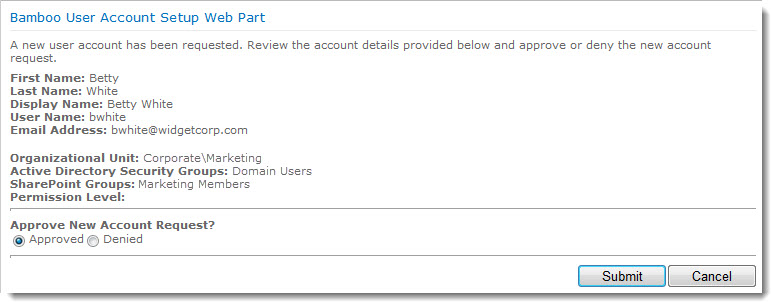
For manual installation, you will access the following folders that contain installation files:

  • Component.wsp: There may be several folders with names ending in .wsp, depending on your product. Each WSP folder contains the installation files for a specific SharePoint Solution. One or more SharePoint Solutions may be installed for each product component.
  • docs: Contains the Installation and Licensing Quick Start Guide.
  • misc: The MISC folder includes miscellaneous files, including PowerShell scripts for manually installing or uninstalling the product.
  • msi: If a MSI folder exists for your product, it could contain multiple files ending in .msi. Each is an installation executable. Some MSI installers in the msi installation folder have both a 32-bit and a 64-bit version. The 64-bit version will include .x64 in the file name. Run the version of the MSI that is appropriate for your operating system. Do not install both.
  • res: Contains files required by the Setup program but not necessarily needed during a manual install.

About the Account Approval Process

About the Account Approval Process

If an approval process is configured for new accounts, requests are forwarded to one or more approvers for review. If the reviewer approves the request, the account is created.

A step-by-step example of the approval process is provided below.

Step Action Result
1. After the account request is submitted, all approvers configured in the Account Approval settings receive an email with a link to approve the request.

hw07-approvalemail.jpg

NOTE: This email template can be customized in the web part settings.

If you are an approver, click on the link provided in the email to review the request.

2. Make a selection to approve or deny the new account. hw07-approvalform.jpg
3. Click the Submit button.

hw07-approvalform-approve.jpg

NOTE: If multiple approvers click on the request, only the first response is accepted.

4. If a request is approved, the account is created. A verification email is sent to the new account.

hw07-approvalverify.jpg

NOTE: The verification email template can be customized.

An email can also be sent to the original requestor, if that option is selected in the web part settings.

A license error occurs after successful license activation

A license error occurs after successful license activation

SYMPTOM

You followed the directions in Activating Your Bamboo Product License successfully activated your license. However, when you go to a page where the web part is used you see a license error:

license error on web part page.png

CAUSE

If this happens immediately after successful activation, the error is typically that one or more WFE servers on the farm do not have an activated license. If you are sure all servers have been successfully activated, another cause could be that a trial extension file (.lic) remains on one of the WFE servers in the farm and is causing a conflict.

If the license error happens after you have been using your activated product for some time, the cause for the issue could be that the hardware profile of one of your WFE servers has changed. Bamboo product licenses are tied to the hardware profile. If that profile changes (i.e., you add a new hard drive), the license needs to be re-activated. See How to move your Bamboo Product License to a new server for resolution information.

RESOLUTION

Confirm that there are no Bamboo trial extension files (Bamboo.lic) on the any of the WFE servers. Follow these steps:

Step Action
1. From the SharePoint server, use Windows Explorer to drill down the inetpub folder structure to locate and access the appropriate virtual directory for the web application where the license error appears.
1. Locate the ‘bin’ folder where the Bamboo product’s DLL should be found.
1.

Search for files that start with “Bamboo” and have a .lic extension. If one exists for the product with the license issue, delete it.

NOTE: Be sure to check all WFE servers for the .lic file.

About Bamboo product Release Numbers

About Bamboo product Release Numbers

Overview

Bamboo products have several releases throughout the year. To understand more about the type of releases available, see the Bamboo Solutions Upgrade Policy.

Its important to know what release you have installed on your farm because:

  • You can better follow the Release Notes for the product, which tell you about new features and known limitations for each version/release.
  • If you are planning to migrate to a new version of SharePoint, you need to make sure you have a certain minimum version/release installed.
  • If you need to report an issue to our Support Team, they will need to know what version/release you are using.

Where to find Release Notes

ReleaseNotes.pngAs you look at each product’s documentation page, you will see there is a link to the Release Notes for that product at the top of the page.

Bamboo produces different version numbers of our products for the different SharePoint platforms.

SharePoint 2007 (WSSv3/MOSS) Release Numbers

If you are running SharePoint 2007, the version/release number consists of 4 parts, such as:

R1.2.3.0
  • The first digit indicates the Major Release. In the case above, this is “1”.
  • The second digit indicates the Minor Release (2 in the example above).
  • The third number indicates the build number.
  • The fourth number will always be 0 unless you are using SharePoint 2013 (see explanation below).

SharePoint 2010 Release Numbers

If you are running SharePoint 2010 (SharePoint Foundation 2010 or SharePoint Server 2010), the Major Release digit of the installed product’s file version includes a zero (0) in the digit such as:

10.2.3.0

To match your current installed product with the release notes, remove the first zero (0). The end result is version 1.2.3.0.

SharePoint 2013 Release Numbers

If you are running SharePoint 2013 (SharePoint Foundation 2013 or SharePoint Server 2013), the Major Release digit of the installed product’s file version includes a zero (0) and the fourth digit is “2013” such as:

10.2.3.2013

To match your current installed product with the release notes, remove the first zero (0) and the 2013. The end result is version 1.2.3.0.

Posts pagination

Previous 1 2
Getting Started
The Bamboo Way
About Our Documentation
About the Installation Files
Glossary of Bamboo and SharePoint Terms
TechLib Subscription
References
BambooSolutions.com
Bamboo Nation
Webinars and Events
Bamboo Solutions Support on YouTube
My Bamboo
Contact
FAQ
About Product Release Numbers
Activating Your License
A Bamboo Feature Needs to be Activated
Resetting Your Password
Retired Bamboo Products
Bamboo Configuration Tool panes
How to Enter and Manage Support Requests
See All Products
Administration Toolkit
Product Page
Installing
Activating License
Release Notes
Alerts Administrator
Product Page
Installing
Release Notes
All Topics
Alert Plus
Product Page
Installing
Configure
Release Notes
All Topics
Bamboo Premier
Product Page
Installing
Activating License
Release Notes
Bamboo Select
Product Page
Installing
Activating License
Release Notes
Calendar Plus
Product Page
Installing
Configure
Release Notes
All Topics
Calendar Plus App
Product Page
Installing
Configure
Release Notes
Chart Plus
Product Page
Installing
Configure
Release Notes
All Topics
Column Level Security
Product Page
Installing
Configure
Release Notes
All Topics
Community Central
Product Page
Installing
Configure
Release Notes
All Topics
Community Management Suite
Product Page
Installing
Activating License
Release Notes
All Topics
Cross Site Display
Product Page
Installing
Configure
Release Notes
All Topics
Cross List
Product Page
Installing
Configure
Release Notes
All Topics
Custom Identifier Column
Product Page
Installing
Configure
Release Notes
All Topics
Data Viewer
Product Page
Installing
Configure
Release Notes
All Topics
Discussion Board Plus
Product Page
Installing
Configure
Release Notes
All Topics
DWG Parser
Product Page
Installing
Configure
Release Notes
All Topics
Essentials Plus Suite
Product Page
Installing
Activating License
Release Notes
Essentials Suite
Product Page
Installing
Activating License
Release Notes
File Share Library
Product Page
Installing
Configure
Release Notes
All Topics
Grants Management
Product Page
Installing
Configure
Release Notes
All Topics
Group Email
Product Page
Installing
Configure
Release Notes
All Topics
Group Redirect
Product Page
Installing
Configure
Release Notes
All Topics
In/Out Schedule Board
Product Page
Installing
Configure
Release Notes
All Topics
Knowledge Base
Product Page
Installing
Configure
Release Notes
All Topics
Knowledge Management Suite
Product Page
Installing
Activating License
Release Notes
All Topics
KPI Column
Product Page
Installing
Configure
Release Notes
All Topics
List Bulk Export
Product Page
Installing
Configure
Release Notes
All Topics
List Bulk Import
Product Page
Installing
Configure
Release Notes
All Topics
List Consolidator
Product Page
Installing
Configure
Release Notes
All Topics
List and Forms Extensions Toolkit
Product Page
Installing
Activating License
Release Notes
All Topics
List Print
Product Page
Installing
Release Notes
All Topics
List Rotator
Product Page
Installing
Configure
Release Notes
All Topics
List Rollup
Product Page
Installing
Configure
Release Notes
All Topics
List Search Advanced
Product Page
Installing
Configure
Release Notes
All Topics
List Search Simple
Product Page
Installing
Configure
Release Notes
All Topics
Lookup Selector Column
Product Page
Installing
Configure
Release Notes
All Topics
Mini Calendar
Product Page
Installing
Configure
Release Notes
All Topics
My Alerts Organizer
Product Page
Installing
Release Notes
All Topics
Navigators
Product Page
Installing
Configure
Release Notes
All Topics
Password Change
Product Page
Installing
Configure
Release Notes
All Topics
Password Expiration
Product Page
Installing
Configure
Release Notes
All Topics
Password Reset
Product Page
Installing
Configure
Release Notes
All Topics
Password Management Toolkit
Product Page
Installing
Activating License
Release Notes
All Topics
Project Management Central
Product Page
Installing
Configure
Release Notes
All Topics
PM Central Mobile
Product Page
Installing
Configure
Release Notes
All Topics
Project Management Suite
Product Page
Installing
Activating License
Release Notes
All Topics
Poll
Product Page
Installing
Configure
Release Notes
All Topics
Project Portfolio Dashboard
Product Page
Installing
Configure
Release Notes
All Topics
Quick Add
Product Page
Installing
Configure
Release Notes
All Topics
Quick Add App
Product Page
Installing
Configure
Release Notes
Rating Column
Product Page
Installing
Configure
Release Notes
All Topics
Rich Text
Product Page
Installing
Configure
Release Notes
All Topics
Send Message
Product Page
Installing
Configure
Release Notes
All Topics
Site Creation Plus
Product Page
Installing
Configure
Release Notes
All Topics
SQL View
Product Page
Installing
Configure
Release Notes
All Topics
Task Master
Product Page
Installing
Configure
Release Notes
All Topics
Team Calendar
Product Page
Installing
Configure
Release Notes
All Topics
Time Tracking & Management
Product Page
Installing
Configure
Release Notes
All Topics
Tree View
Product Page
Installing
Configure
Release Notes
All Topics
User Account Setup
Product Page
Installing
Configure
Release Notes
All Topics
User Directory
Product Page
Installing
Configure
Release Notes
All Topics
User Manager for Sites
Product Page
Installing
Configure
Release Notes
All Topics
User Profile Plus
Product Page
Installing
Configure
Release Notes
All Topics
User Profile Sync
Product Page
Installing
Configure
Release Notes
All Topics
User Redirect
Product Page
Installing
Configure
Release Notes
All Topics
User Registration Accelerator
Product Page
Installing
Configure
Release Notes
All Topics
Validator
Product Page
Installing
Configure
Release Notes
All Topics
Video Library
Product Page
Installing
Configure
Release Notes
All Topics
Virtual Map View
Product Page
Installing
Configure
Release Notes
All Topics
Visual Indicator
Product Page
Installing
Configure
Release Notes
All Topics
Wiki Publisher
Product Page
Installing
Configure
Release Notes
All Topics
Workflow Conductor
Product Page
Installing
Configure
Release Notes
All Topics
World Clock & Weather App
Product Page
Installing
Configure
Release Notes

CORPORATE HEADQUARTERS

Bamboo Solutions
12110 Sunset Hills Rd. Suite 600
Reston, Virginia 20190 USA

Toll Free: +1 .877.226.2662

Tel: +1 703.964.2002

CONNECT WITH US

SALES INQUIRES

Toll Free: +1 .877.226.2662
Email: Bamboo Solutions Sales

TECHINCAL SUPPORT

Visit our support site
Talk to our Bamboo Nation community
Bamboo Solutions and its related brands is the copyright of SharePointXperts, LLC. ©2002-2025Theme by Puro
  • Privacy Policy
  • Terms of Use