Installing using the updated install process (PMC)

Installing using the updated install process

Overview of the Updated Installation Process

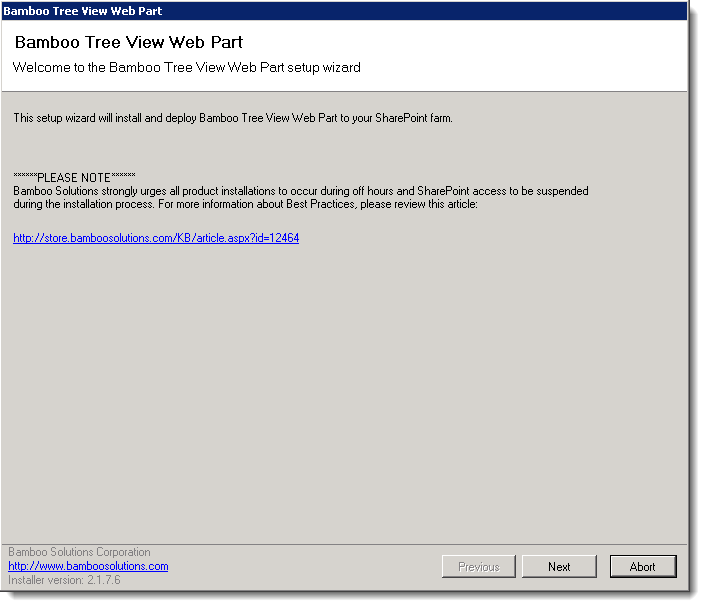
In April 2017, with the Q1 Cumulative Update (CU) Bamboo introduced updated install/uninstall processes for component products (web parts). For more information about why this was introduced, please see Overview of the Updated Installation Process for Bamboo components

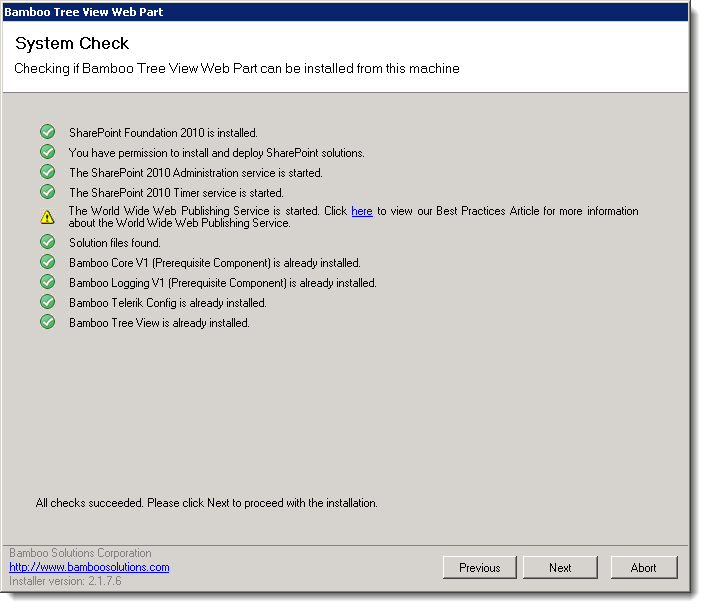
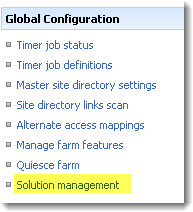
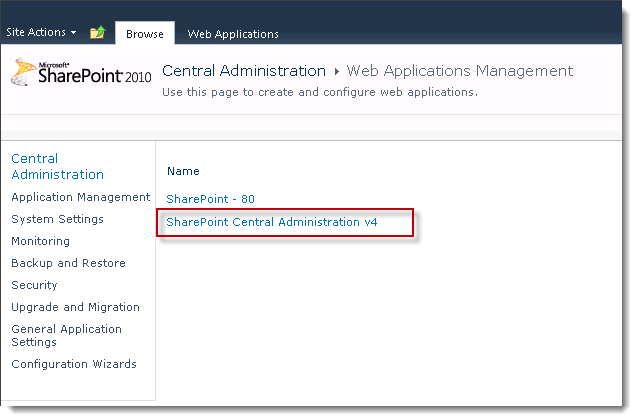
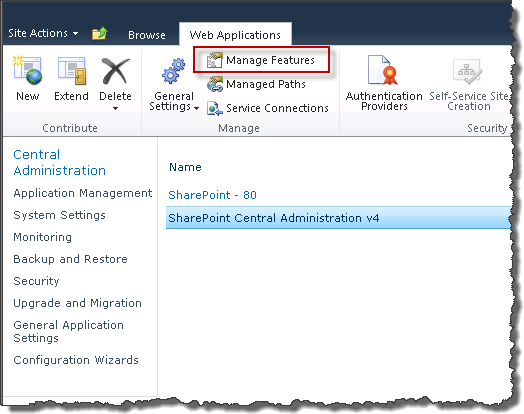
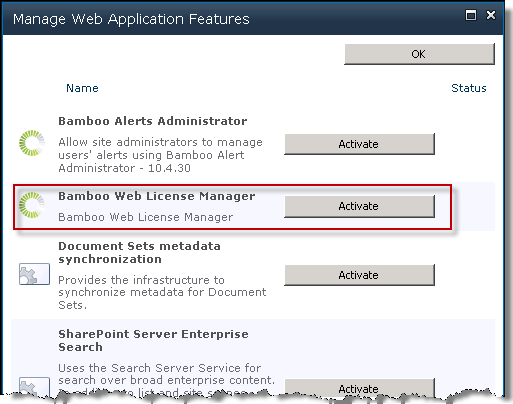
To install using the updated install process, please follow these steps (Warning.. Installs should be performed in Non-Peak hours as your farm will temporarily go offline):

No. Function
1. Download the install package from My Bamboo.
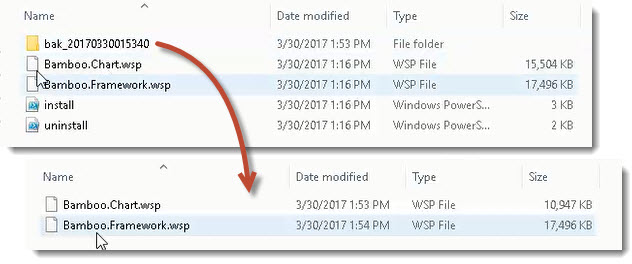
2. Extract the contents of the package.
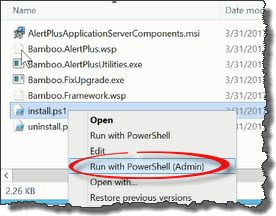
3. run with PowerShell Admin.jpgRun the Install.ps1 from a WFE server in PowerShell as an admin.
4.

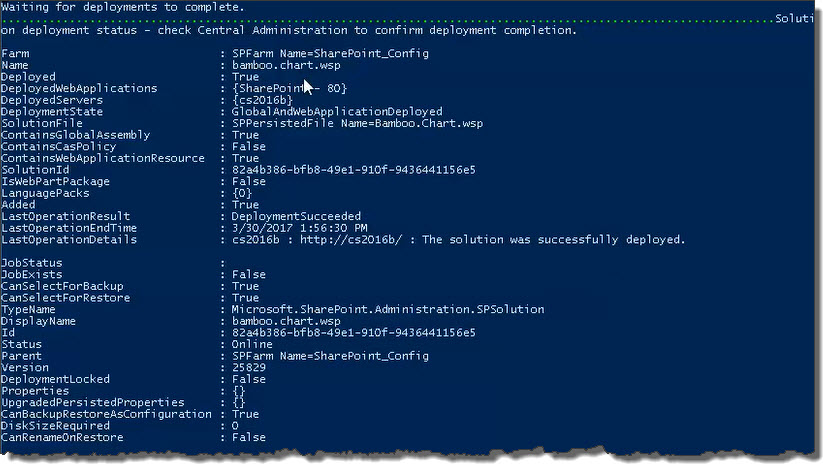
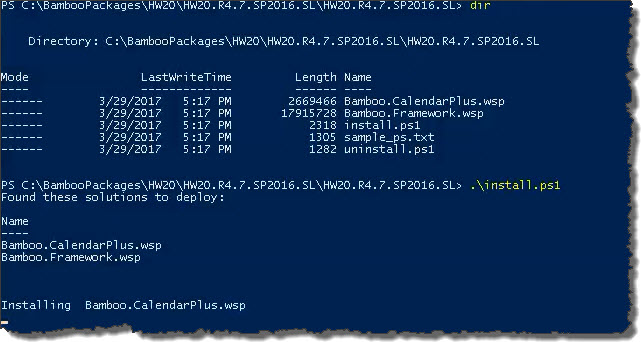
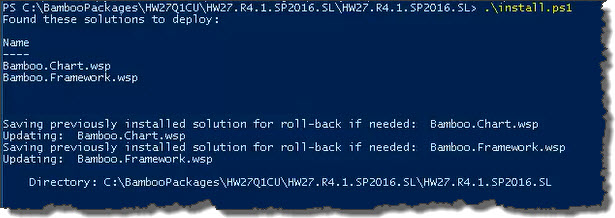
install script.jpgThe script will look for WSPs in the install folder and list those found. It will install them in alpha order.

Rather than deploying the solution immediately after its installed, the script schedules deployment time for 1 minute in the future so multiple installs won’t collide.

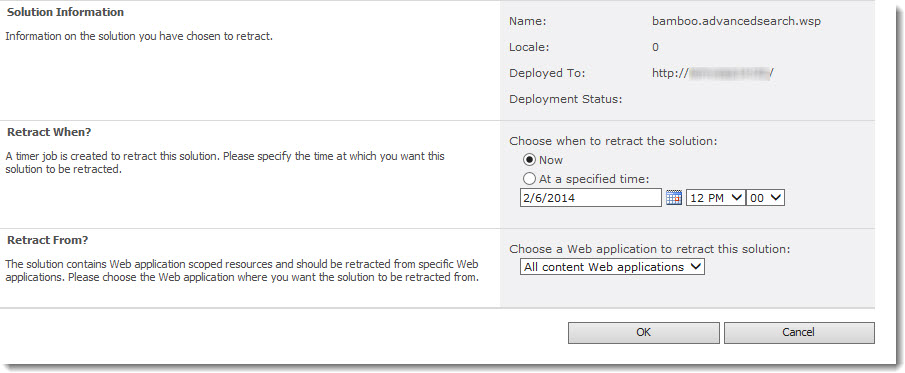
Icon-WarningIMPORTANT: By default, the script deploys solutions to all content web applications. If you don’t want to do this, please update the script for your needs.

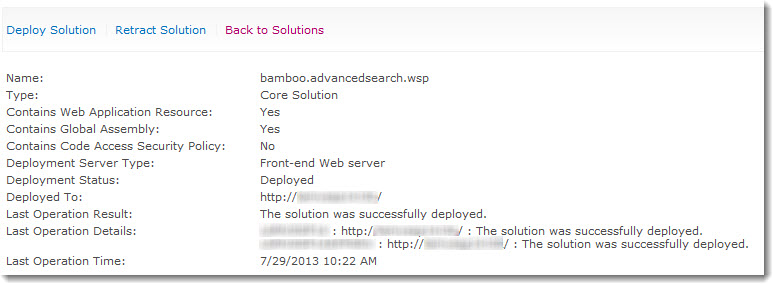
5. When the deployment completes, check Central Administration to confirm deployment completion.
6. Activate in the desired Site Collections. See Activating a Bamboo Site Collection Feature for details.

View actual cost in PM Central

View actual cost in PM Central

If you elected to copy actual cost from TTM to PM Central when you configured cost tracking options, you can view the cumulative actual cost per task and for the entire project in PM Central. You can also view reports that compare actual cost from timesheets with planned and actual cost from the project.

Viewing Actual Cost Per Task

To view the total actual cost entered in timesheets for a task, add the Actual Cost (Time Entry) field to the project Tasks list. This field contains the cumulative cost of all work approved for a task to date, and is updated each time a timesheet that has the task is approved. You must follow the steps below for EACH project in your PM Central portfolio where you want to view the Actual Cost (Time Entry) field.

Step Action Result
1. In the PM Central project site, click the Tasks tab and go to the All Tasks view. _taskmastereditwp.jpg
2. Edit the Task Master Web Part
3. In the Column Settings section of the Web Part configuration tool pane, click Add Row and add the Actual Cost (Time Entry) field to the list of fields displayed in the Web Part. _taskmasteractualcost.jpg
4. Click Apply and then OK to save your changes. You can add the Actual Cost (Time Entry) field to any instance of Task Master, including the Overdue Tasks and My Tasks views.

Viewing Actual Cost Per Project

To view the sum of the Actual Cost (Time Entry) field for all project tasks, look at the Project Actual Cost (Time Entry) field in the Project Health list. To access this list, go to the Project Home page and click the project name in the Project Info section.

You can also add the Project Actual Cost (Time Entry) field to the Update Project Cost & Schedule web part so you can compare Actual Cost calculated in TTM with other budgeted and actual values. To add additional fields to the Web Part, follow these steps:

Step Action Result
1. In the project site, go to Tasks > Progress Management.
2. In the Progress Management page, edit the Project Cost & Schedule web part.
3. In the Web Part settings tool pane, scroll to the bottom of the View Fields list and select Project Actual Cost (Time Entry). Click the right arrow (>) to add it to the Display Fields list, and use the up and down arrows to order the field where you want it. -pmc-projectcostschedulewp-actualwork.jpg
4. Click Apply and then OK to save your changes. -pmc-projectcostschedulewp.jpg

Actual Cost Reports

When you connect PM Central to a TTM site, several additional reports are enabled in PM Central to allow you to view actual cost data from timesheets and compare it to cost data from projects. To view these reports, click the Reporting tab in the portfolio site. The following cost-related reports are available:

  • Actual Cost (Project Tracking vs. Time Entry): Compares Actual Cost calculated based on % Complete in the project to the calculated cost for Actual Work entered in resource timesheets.
  • Cost (Planned) vs. Actual Cost (Time Entry): Compares the total planned Cost value in the project to the calculated cost for Actual Work entered in resource timesheets.
  • Actual Cost (Time Entry): Displays the calculated cost for Actual Work entered in resource timesheets.

-pmcreports-cost.jpg

Verifying the PM Central Upgrade

Verifying the PM Central Upgrade

Before using portfolio, department, and project sites, verify that all upgrade processes have completed successfully.

Step Action
1. Go to SharePoint Central Administration. In the Monitoring page, under Timer Jobs, click Check job status.
2.

sa12-2010-upgrade-updateprojectsitesjob.jpgThe Bamboo Update Project Sites job is triggered when you click the Upgrade button from the Project Central Upgrade Monitoring Page.
Verify that this job is listed in the Job History list with a status of Succeeded.

3.

Verify that the timer jobs listed below are shown in the Job History list with a status of Succeeded.

  • Bamboo Update Dashboard List.
  • Bamboo Update Summary Project List
  • Bamboo Update Task, Issues, Project Health List.
  • Bamboo Reporting Calculation Timer Job V4
  • Bamboo Reporting Top Site Calculation Timer Job
  • Bamboo Gantt Chart Timer Job.

See Overview of PM Central Timer Jobs for more information about what these timer jobs do.

NOTE: If you see these jobs listed in the Running Jobs list, wait until they have finished before continuing. The portfolio site home page will not display any data until the Bamboo Update Summary Project List job has completed.

4.

After the timer jobs have run successfully, verify the upgrade status of all portfolio, department, and project sites.

  • Go to the first portfolio or project site.
    Go to Site Actions > View All Site Content.
    Click on the Configuration Checklist list.
    Ten minutes after all upgrade processes are complete, you should see a new item called Upgrade Project Central in the View All Items view.
    If the upgrade was successful, the description reads: “Upgrade to PM Central 4.0/4.1/4.2 was successfully completed on: PM.”
    If the upgrade was not successful, the description reads: “Upgrade to PM Central 4.0/4.1/4.2 was NOT successful. Upgrade was attempted on PM.”

The Bamboo Update Project Sites job is triggered when you click the Upgrade button in the Project Central Upgrade Monitoring Page. Verify that this job is listed in the Job History list with a status of Succeeded.
Update Project Sites timer job

Verify that the following timer jobs are listed in the Job History list with a status of Succeeded. If you see these jobs listed in the Running Jobs list, wait until they have finished before continuing. The portfolio site home page will not display any data until the Bamboo Update Summary Project List job has completed.

Attention: During the Verifying the PM Central Upgrade step, if you do not see the Bamboo Reporting Calculation Timer Job V4, deactivate and then reactivate the Bamboo Reporting Services feature. See Monitoring the Timer Jobs for the troubleshooting instructions.
Note: PM Central timer jobs are scheduled to run at a frequency designed to maximize performance. If the Project Central Upgrade Monitoring Page shows that all your sites are upgraded, but the timer jobs listed below have not yet run, you can run them manually (see instructions below).

Using the Project Site Creation Request list

Using the Project Site Creation Request list

Project stakeholders who do not have the SharePoint permissions required to create sites, can submit requests for new project sites using the Project Site Creation Request list. Requests entered into the list are displayed under the portfolio site’s Overview tab.

Items entered into the list can then be approved using either:

  • Your organization’s internal approval process

  • An automated approval process created with Workflow Conductor (sold separately).

Note: A sample workflow is included with the PM Central installation package. The approval workflow notifies a list of approvers that a new site has been requested. When the request is approved, the workflow notifies a list of people authorized to create project sites that a new site can be created. For more information about using the sample workflow included with PM Central, click here read KB.12789:

Step Action Result
1.

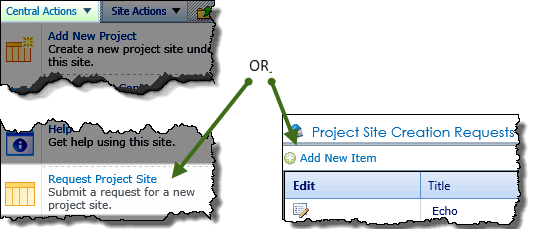
From the Central Actions drop down menu, click the Request Project

OR

On the portfolio site’s Overview tab, click the
Add New Item link above Project Site Creation Requests

Links to Add a new project
Keep in mind:
1.The Request Project Site link is available by default, but this Central Actions Enhanced Menu feature may have been disabled by your administrator.
2.Requests created using either the Request Project Site and/or the Request Project Site Lite will be displayed in the Project Site Creation Request data view found on the Overview tab of the portfolio site
2.

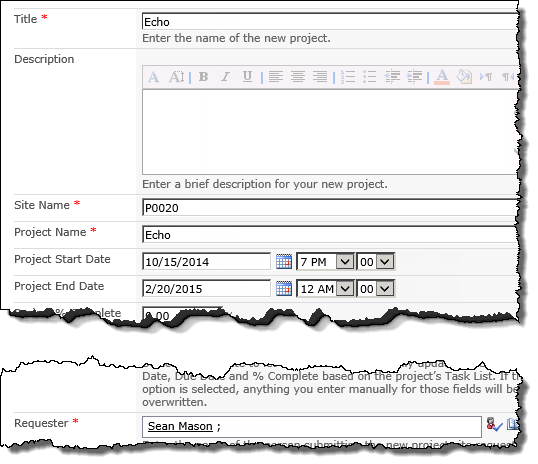
Enter a Title, Site Name and Project Name

Note: These fields are referenced by the sample workflow is included with the PM Central installation package.

The Project Request form
3. Identify the sites Requester
4. Enter any other known information about the project, including Project Manager, Project Department, Project Type.
5. Click Save The item will be displayed in the Project Site Creation Requests web part pending manual approval, or automatic approval and site creation if you are using Workflow Conductor.

Using the Bamboo Feature Activation tool to activate features

Using the Bamboo Feature Activation tool to activate features

The Bamboo Feature Activation tool can be run as the final installation step after the solutions are deployed to the selected web applications. If automatic activation features are not selected in the required installation steps, users can enter site collection URL(s) to activate all required features of SharePoint Project Management Central. This step does not install any new components. It simply finds, deactivates, then reactivates all required SharePoint Project Management Central’s specific features for the site collection(s).

It is also a useful tool if you create a new site collection for a new PM Central portfolio site. Rather than having to activate all the site collection features manually, use this tool to automate the activation. It will save you some time.

To run the tool, follow these steps:

Step Action
1.

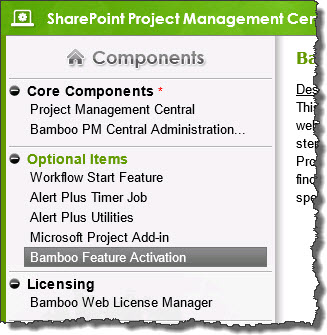
PMC bamboo feature activation component with torn edge.jpgRun the PM Central installation/setup program on the WFE server where you installed originally. Highlight Bamboo Feature Activation in the Optional Items section of the Components.
If you don’t have the install files around anymore, you can download them again from the My Bamboo area of the Bamboo website.

NOTE: Be sure to run this tool as a user who is a Site Collection Administrator for the site collection where you want to activate the features.

2. Click the Install button in the lower right corner of the installation/setup interface.

3.

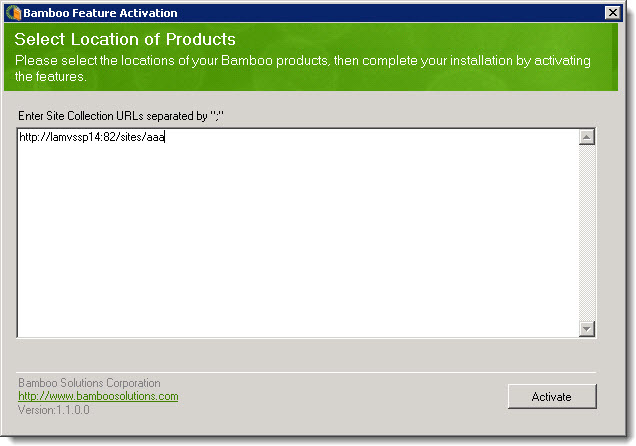
Bamboo Feature Activation screen 2b.jpgEnter the URL of the site collection where you want to activate the PM Central features. See the sample below.
NOTE: Don’t include the page name in the URL or you will get an error that the tool could not find the site collection.

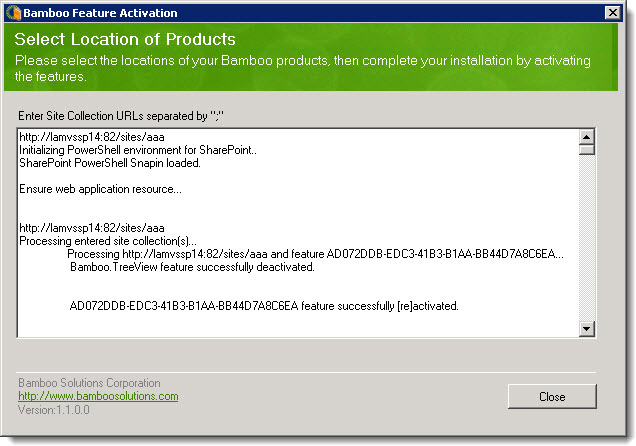
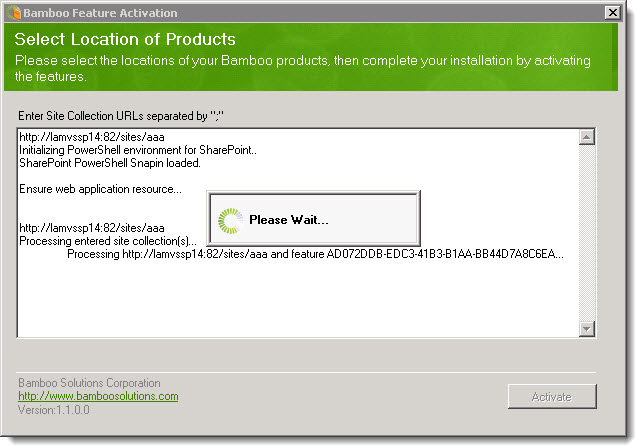
4. Bamboo Feature Activation screen 3 processing.jpgWatch as the process continues.
4. Bamboo Feature Activation screen 3 processing 3.jpgWhen all features are activated, the Close button is enabled. Check that all features were successfully deactivated and then reactivated before closing the tool.
Using PM Central My Favorites

Using PM Central My Favorites

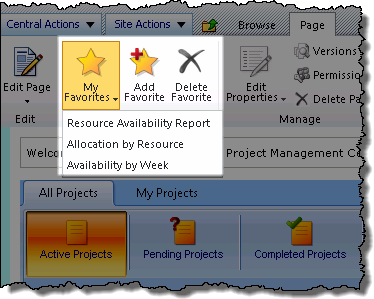
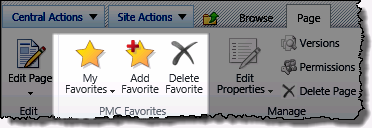
Screen shot of PMC My Favorites section in the Page tab of the ribbon
The PM Central My Favorites feature lets you create links to the PM Central pages you most frequently access.

NOTE: This feature is available by default, but may have been disabled by your administrator.

To Add a Favorite

Step Action
1. From the page that you want to save as a PMC Favorite access the Page tab in the ribbon and click Add Favorite
Add new favorite pop up screen
2. Enter a Name for the favorite
Add new favorite pop up screen
3. Click Save. The new link will be available from the My Favorites drop down selector in the ribbon.
My Favorites drop down selector

Using the User Profiles Import utility to populate the Enterprise Resource Pool

Using the User Profiles Import utility to populate the Enterprise Resource Pool

Overview of Portfolio PMC Control Panel Overview of Resource Management

With User Profile Import in PM Central, you can map and import users and their profiles, in bulk from the SharePoint User Profile Database to the Enterprise Resource Pool (ERP).

When using User Profiles Import keep in mind:

  • You must configure a Search Service application on the SharePoint server for the User Profiles Import utility to successfully search existing user profiles on SharePoint Server 2010. If the User Profiles Import Utility is unable to find users, verify that you are able to find the same users in a Search Center site before contacting Bamboo Support.

  • Information will be copied from the SharePoint User Profile Database

For more information, including links to instructions on how to configure a Search service application, see this article

Step Action
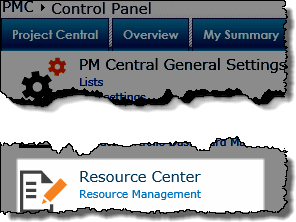
1. From the PM Central Control Panel on the Portfolio site, click Resource Management to access the Resource Center.
Resource Management link in the Control Panel
2. Click User Profiles Import tab to access the tool
3.

Enter the desired criteria in some or all of the Search fields, then click Search
User Profile Import tool

Note: The fields displayed can be modified in the Configuration Web Part Settings.

4. From the search results, select the users you want to import into the Enterprise Resource Pool, or click the top checkbox to Select All
User Profile Import tool
5. Click Import User Profiles.
User information will be imported into the ERP using the defined field mappings.

Upgrading PM Central from R3.0 or R3.5 to R4.0/4.1/4.2

Upgrading PM Central from R3.0 or R3.5 to R4.0/4.1/4.2

Upgrading is what you do when you want a new PMC release on your existing farm. If you are interested in migrating from one version of SharePoint to another version (i.e., SharePoint 2007 to SharePoint 2010 or SharePoint 2010 to SharePoint 2013), please see the topics under Migrating to a new SharePoint version….

NOTE: Only PMC R3.0 or R3.5 can be upgraded directly to R4.0/4.1/4.2. R4.1/4.2 is similar to 4.0 except some components—such as Calendar Plus, SharePoint Navigators, and Data-Viewer Web Part—have new features. If you have an earlier release, you will need to upgrade to R3.0 or R3.5 before upgrading to R4.x.

To upgrade to R4.0/4.1/4.2 follow these steps:

Step Action
1.

Follow the instructions for a generic Bamboo product upgrade. See Upgrading your Bamboo Web Part for more information.

There are two PM Central core components to install:

  • Project Management Central
  • Bamboo PM Central Administration

If you already have R4.0 installed and are upgrading to R4.1 or R4.2, you can skip upgrading the Bamboo PM Central Administration Pages component.

If you installed any of the optional components originally, be sure to upgrade them as well.

2.

After all components are upgraded successfully, restart the Microsoft SharePoint Foundation Timer service on all Web front-end servers in the farm. Go to Start > Administrative Tools > Services. Select the service and click Restart.

NOTE: This service is called SharePoint 2010 Timer in a SharePoint 2010 environment and Windows SharePoint Services Timer in a SharePoint 2007 environment.

3.

Upgrade existing PM Central sites to take advantage of new features.

WARNING: Project, department, and portfolio sites will not work correctly until they have been upgraded. Unlike in previous versions of PM Central, this extra step is required.

sa12-2010-upgrade_monitoring_page.jpg
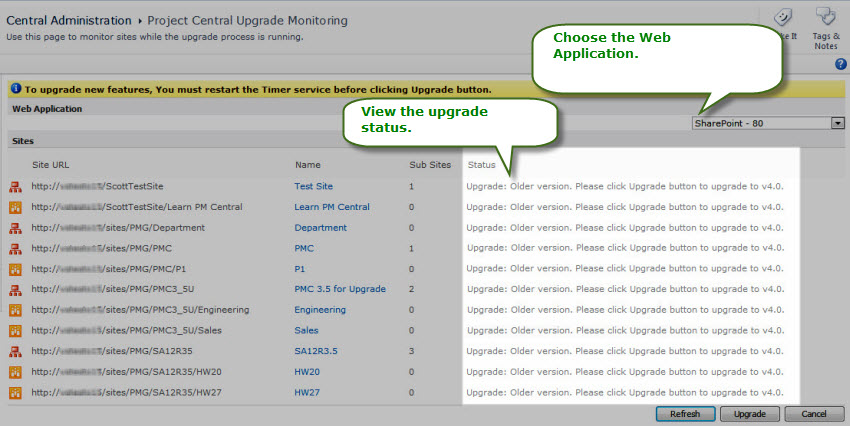
Go to SharePoint Central Administration and click Project Central Upgrade Monitoring Page.

NOTE: If you have already upgraded your PMC sites, the Upgrade button will be grayed out and the Status column will report Upgrade to v4.0 completed on… and give the date and time the upgrade was completed.

4. Select the Web application where existing PM Central sites are located. A list of all PM Central sites is displayed. Each site will have a status of Upgrade. Older version. Please click Upgrade button to upgrade to v4.0/4.1/4.2.

SA12-SP2010UpgradeMonitoring2.jpg

5.

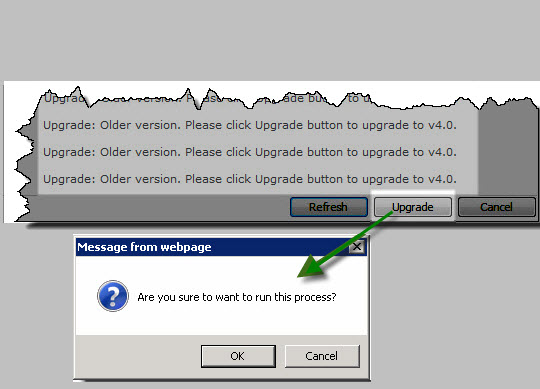
SA12-SP2012Upgrade2.jpgClick the Upgrade button to start the upgrade on all sites in the selected Web application.
You must confirm to proceed. Unlike in previous versions of PM Central, upgrading does not start automatically when the product is installed. You must click the Upgrade button to upgrade project sites.

While a site is being upgraded, its status will be listed as Upgrade in Progress. After a site upgrade is complete, its status will change to Upgrade to v4.0/4.1/4.2 completed on [MM/DD/YYYY 0:00 AM/PM].

The amount of time needed for the upgrade depends on the number of sites being upgraded.

6. When the upgrade is completed for all sites, verify that the upgrade was successful. See Verifying the PM Central Upgrade for more information.

Upgrade to PM Central 4.3

Upgrade to PM Central 4.3

Upgrading is what you do when you want a new PMC release on your existing farm. If you are interested in migrating from one version of SharePoint to another version (i.e., SharePoint 2007 to SharePoint 2010 or SharePoint 2010 to SharePoint 2013), please see the topics under Migrating to a new SharePoint version….

NOTE: Only PMC R3.0 or R3.5 can be upgraded directly to PM Central 4.x release (4.0/4.1/4.2/4.3) If you have an earlier release, you will need to upgrade to R3.0 or R3.5 before upgrading to R4.x.

To upgrade to PM Central 4.3 follow these steps:

Step Action
Part A: Upgrade PM Central Core Components
1. Before starting the PM Central upgrade review the best practices for a successful install
2. Restart the SharePoint Timer Service and SharePoint Administrative Services on any server in the farm running the Microsoft Foundation Web Application service. This will ensure files that need to be updated are not locked by these services
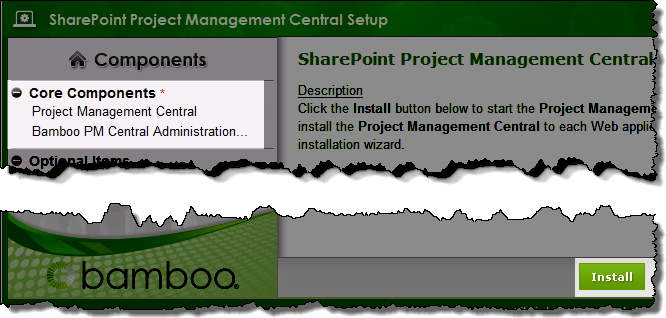
3. From the PM Central Installer, select the Project Management Central Components, then click Install PM Central Installer core components

Icon-WarningImportant: Both of the core components, Project Management Central and Bamboo PM Central Administration Pages will need to be installed before you move on to Part B of the upgrade process.

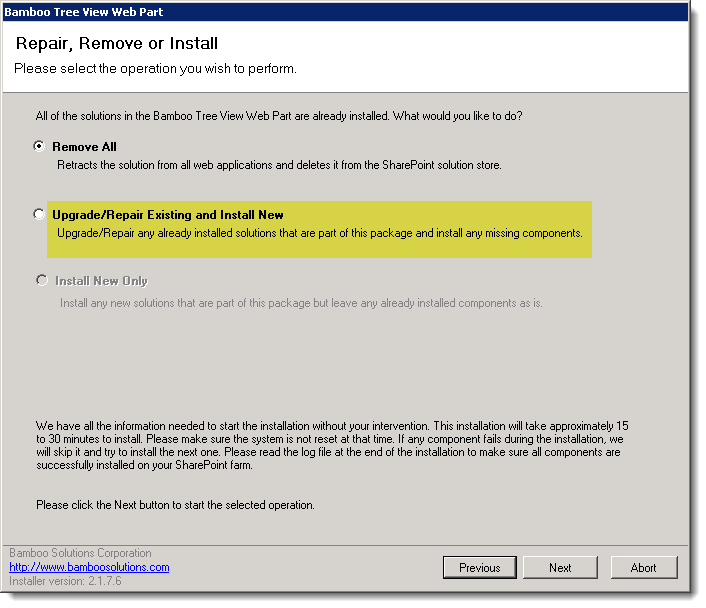
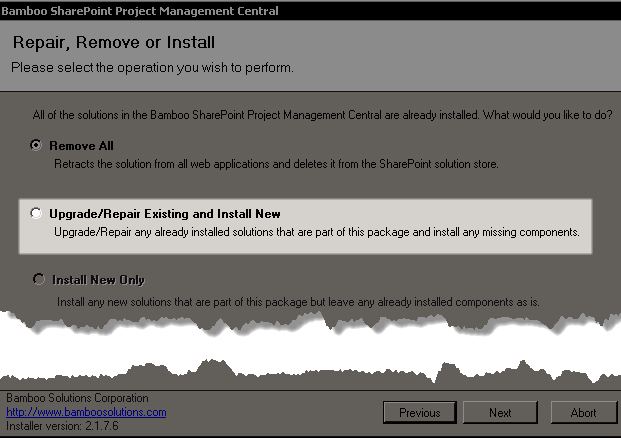
4. Click through the Systems Check and from the Repair, Remove or Install screen, click Upgrade/Repair Existing and Install New Remove, Repair Screen in the Installer wizard
5.

Review the final screen to confirm that all PM Central components were upgraded successfully.

NOTE: If there are any error messages, capture a copy of the error to submit to the Bamboo Support team.

Part B: Upgrade your existing PM Central sites
1. Following the installation of the Project Management Central core component, PM Central sites will display the following message indicating that the existing sites need to be upgraded.
Upgrade warning message on PM Central site
2.

Bamboo Project Management links in PM Central
From Central Administration, click the Project Central Upgrade Monitoring Page link

NOTE: If you do not see the PM Central logo (shown) in Central Administration next to the Bamboo Project Management Central header, stop and upgrade the Bamboo PM Central Administration Pages before continuing.

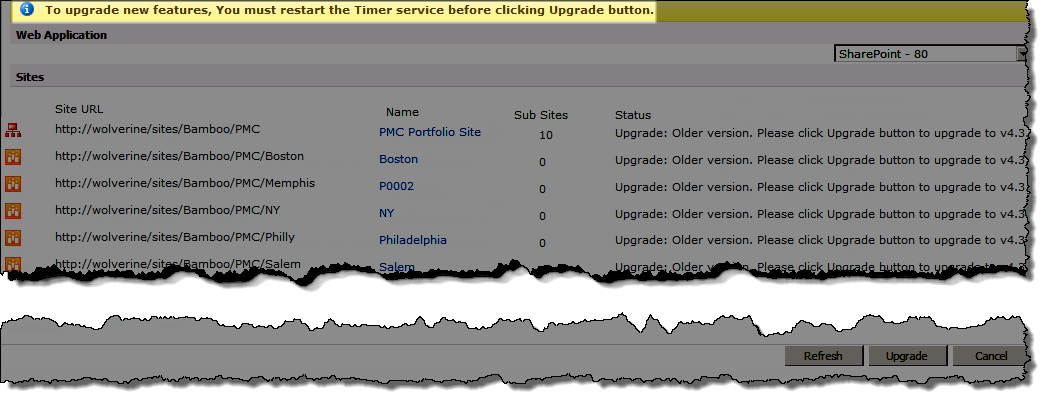
3. Restart the SharePoint Timer Service, to prepare for the site upgrade.
PM Central Site Upgrade Screen
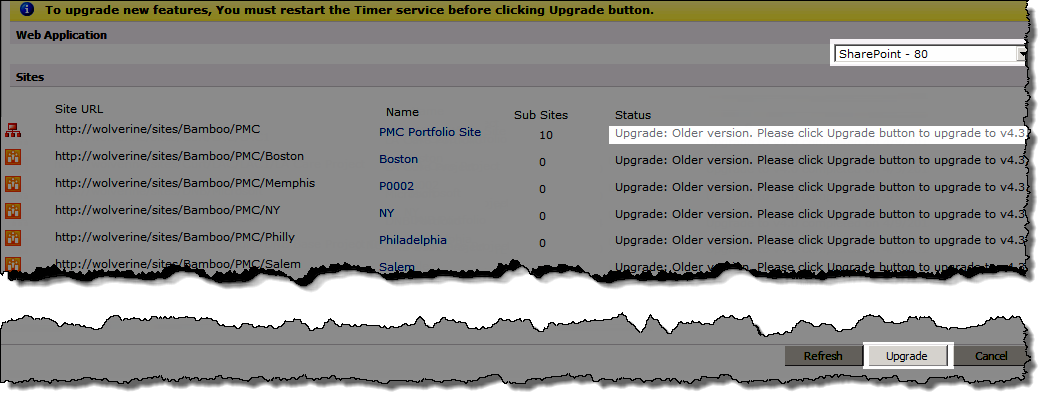
4. Use the drop down to select the web application that houses PM Central Sites, then click Upgrade
PM Central Site Upgrade screen
5. The amount of time needed for the upgrade will depend on the number of sites being upgraded.

PM Central template features

PM Central template features

Getting started with PM Central

PM Central come with three site templates that provide differing project management capabilities:

  • PMC Standard/Full templates

  • PMC Lite templates

  • PMC Stand-alone template

Feature Description Standard/Full Template Lite Template Standalone Template
Portfolio site A top site summary level Icon-VerifyAnswer Icon-VerifyAnswer
Department sites Optional sites that display a filtered view of the Portfolio based on user specified criteria Icon-VerifyAnswer Icon-VerifyAnswer
Enterprise Resource Pool and Resource Management The Enterprise Resource Pool (ERP) is a centralized list of users who are available to work on projects associated with the Portfolio. The associated Resource Center provides comprehensive resource reporting based on user task assignments Icon-VerifyAnswer
Report Center Pre-defined reports to provide additional information about the management of the portfolio Icon-VerifyAnswer
Timeline Gantt Display of all active projects Displays the project timelines and associated milestones Icon-VerifyAnswer Icon-VerifyAnswer
Project Summary Dashboards Aggregated display of Project Health information at the portfolio site, and applicable department sites Icon-VerifyAnswer Icon-VerifyAnswer
Predefined Alerts

Pre-defined alerts that notify users of tasks and/or issue assignments that are coming due, or are overdue.

Note: Alerts must be enabled by the Portfolio Administrator.

Icon-VerifyAnswer Icon-VerifyAnswer
MS Project Integration (2010 & 2013) Works with the Bamboo MS Project Add In to provide an integration point with PM Central Icon-VerifyAnswer Icon-VerifyAnswer Icon-VerifyAnswer
Capture Baselines Ability to baseline the project, tasks, and costs for improved schedule management. Icon-VerifyAnswer
Enhanced schedule and cost tracking Additional schedule and cost tracking views that display Cost and Schedule Key Performance Indicators Icon-VerifyAnswer

PM Central Portfolio – Schedules Tab

PM Central Portfolio – Schedules Tab

Overview of the PM Central Hierarchy Overview of the Portfolio Site

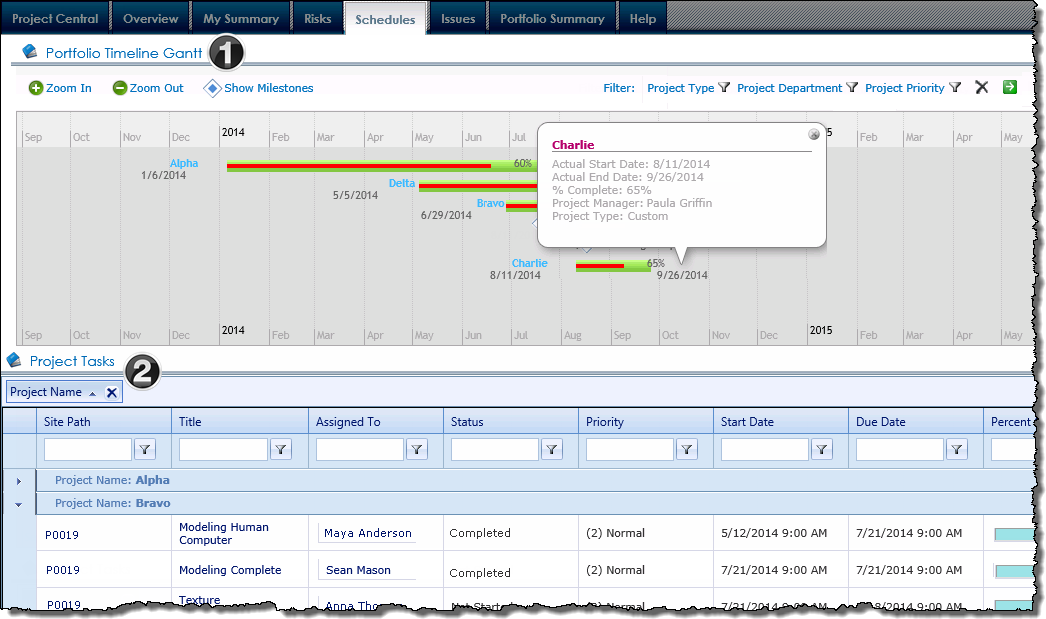
The Schedules tab on the portfolio site displays a Timeline Gantt of active projects as well as a data view of the project tasks associated with active projects.

NOTE: The Web Parts shown on the Schedules page of department sites are the same as those on the portfolio site. The content displayed in the Web Parts will be determined by the department site’s filter configuration.

Schedule tab

Name / Web Part Description
1. Timeline Gantt

Custom PM Central Web Part

The Timeline Gantt Web Part displays a Gantt summary of projects, showing the project timeline of Active projects in the portfolio, and project’s % complete. Clicking a Project timeline or Milestone will provide additional information about the item.

The Timeline Gantt Web Part will not display any content by default. Use the provided toolbar to determine what project timelines will be displayed. TSTimelineGanttdefaul2t.png

  1. To display a filtered view of the active projects in the portfolio, click the filter icon next one or more of the filter types and select the project type, status and/or department you want to display, then click the green arrow.

  2. To display all active projects in the portfolio, simply click the green arrow next to the filter settings.

  3. To clear the filters, click the delete icon.

  4. The default time scale in the Timeline Gantt is months. To change the scale, click Zoom In or Zoom Out in the toolbar menu.

  5. Display project milestones by clicking the Show Milestones option. Click Hide Milestones* to remove them from the Gantt.

  6. Milestones are stacked vertically, or wrapped, by default. To display milestones horizontally, click Unwrap Milestones. To display them vertically again, click Wrap Milestones.

Information on configuring the Timeline Gantt web part is available here

2. Project Summary

Bamboo Data-Viewer Web Part

The Project Tasks list is a display of all project tasks associated with Active projects, that have an Active Phase Status.

  • Tasks with the status Not Started, Completed, Deferred and Waiting on Someone else will be included in this display.

Overview of the PM Central Hierarchy Overview of the Portfolio Site

PM Central Portfolio – Risks Tab

PM Central Portfolio – Risks Tab

Overview of the PM Central Hierarchy Overview of the Portfolio Site

NOTE: The Web Parts shown on the Risks page of department sites are the same as those on the portfolio site. The content displayed in the Web Parts will be determined by the department site’s filter configuration.

Risks tab

Name / Web Part Description
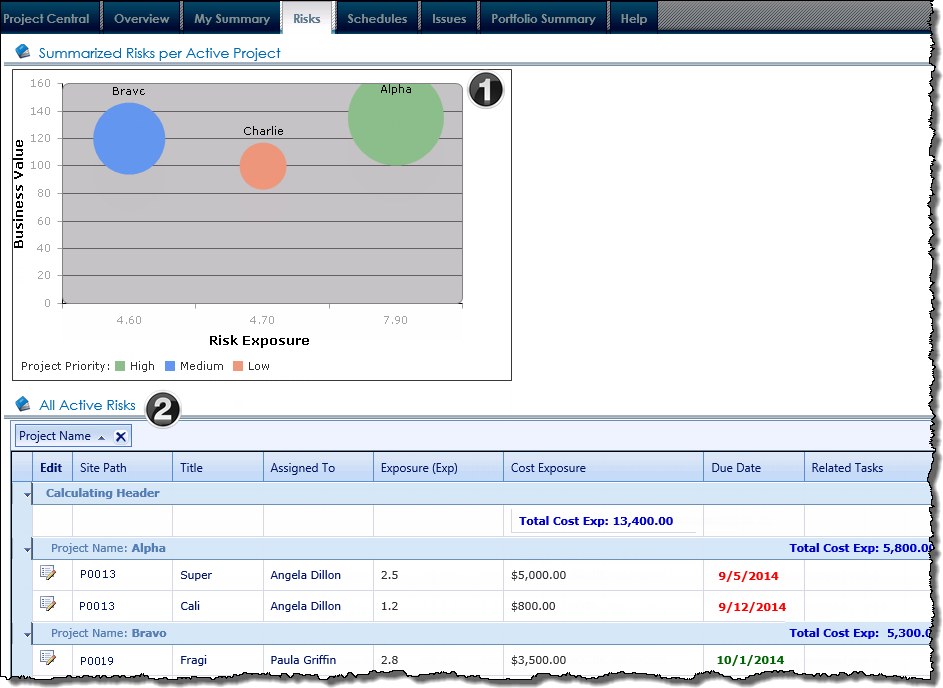
1. Summarized Risks per Active Project

PM Central Custom Web Part

The Risks chart allows you to view the sum of the risk exposure and the sum of the cost exposure for each project. Based on this information, you can identify at-risk projects that may require a contingency plan or additional evaluation.

The enhanced Risk Chart shown was included in PMC 4.3

Keep in mind:
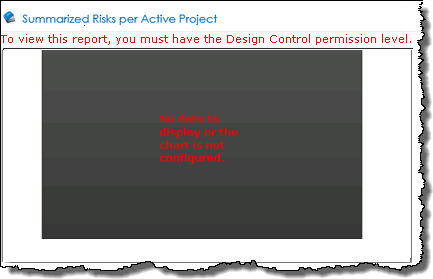
Unless the default configuration settings are modified by the administrator, users must have Design permissions or higher to see the Risk Summary.
RiskChartDenied1.png

2. All Active Risks

Bamboo Data Viewer Web Part

Displays the active risks associated with Active projects in the portfolio.

  • Risks that have not been addressed by the designated Due Date will be highlighted in red

Overview of the PM Central Hierarchy Overview of the Portfolio Site

PM Central Project Resource Reports

PM Central Project Resource Reports

Overview of Project PMC Control Panel Overview of Project Resource Center

ProjectResourceReportsTab.png

When working with the Resource Allocation and Capacity Planning Reports keep in mind:

  • Only Users with Full Control or Design permissions can configure access the Resource Center to view resource reports.

  • By default, resource reports will be updated daily, starting at 11:45 AM.

The following options are available when working with the PM Central Resource Reports:

Resource report toolbar

  • Change the report year displayed

  • Save report information to the Resource Work Allocation Summary list on the portfolio site

  • Print the reports or export to Excel

Resource Allocation and Capacity Planning Reports:

Report Name Description
All Assignment Allocations All Assignment Allocations displays the resources’ total allocation per month for the project, grouped by year. This lets you track how much work all of your resources are accumulating across the portfolio.
By Resource Allocation By Resource Allocation shows the total allocation per month for each resource assigned to the project, grouped by year.
Resource Availability

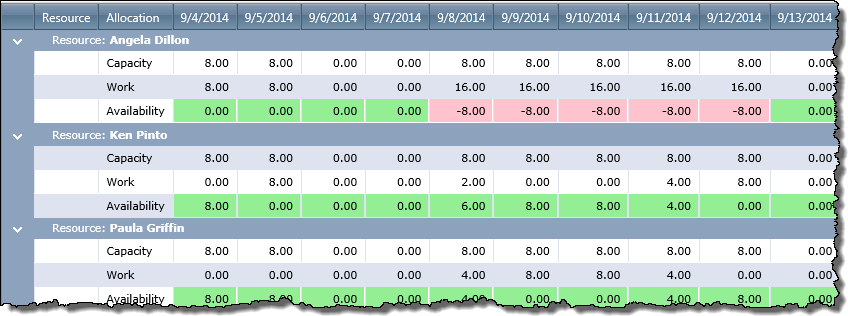
Resource Availability displays the resources’ remaining availability. Availability is determined by deducting a users task assignments from their capacity per month.

  • Capacity is determined by the Work Hours and Holidays entered in the Resource Center Settings, and the Maximum Unit value associated with each resource.

  • If the resource has available time, the number of available hours is shown in green.

  • If the resource has too many tasks, the resource’s availability is shown as a negative number in red.

Find Available Resources

Find Available Resources lets you find available resources that you can request and assign to task for your projects.

  • A user’s role is specified in the Resource Pool

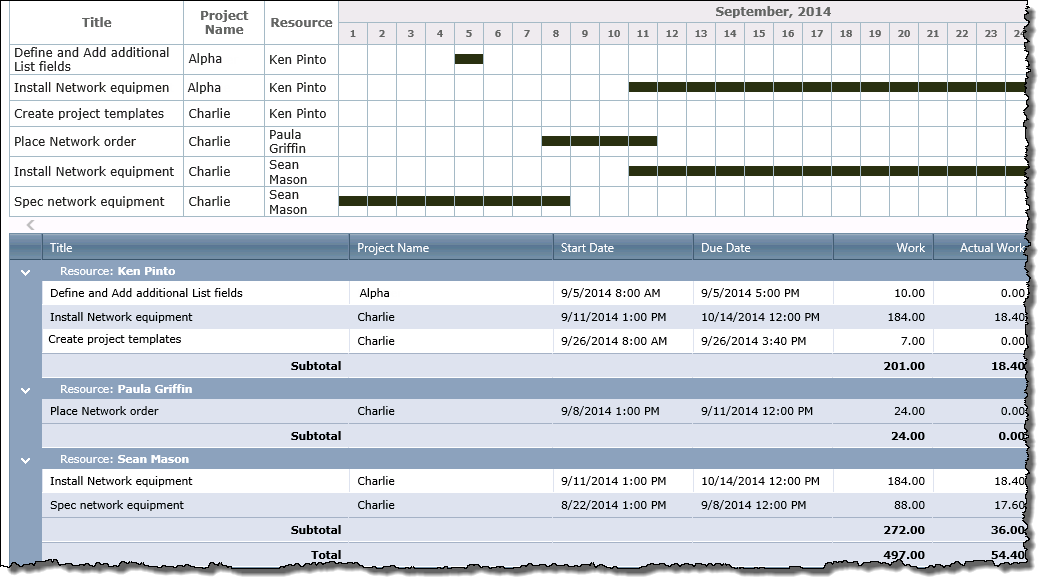
Using the Resource Assignments Gantt chart

Using the Resource Assignments Gantt chart

The Resource Assignments Gantt Chart provides a visual summary of resource assignments.

When working with the Resource Assignments Gantt report keep in mind:

  • Only users with Full Control or Design permissions can access the Resource Center by way of the site’s PM Central Control Panel.

  • Assignments are only displayed when a resource has been associated with a task, using with the Assigned To or Resource fields in the task.

  • The information in this Web Part will be updated automatically by a timer job that is scheduled to run on a daily basis, or when you select the Run Now button.

  • The scope of the information displayed in the report will depend on where the Resource Assignment page is accessed:
    ResourceAssignmentHierarchy.png

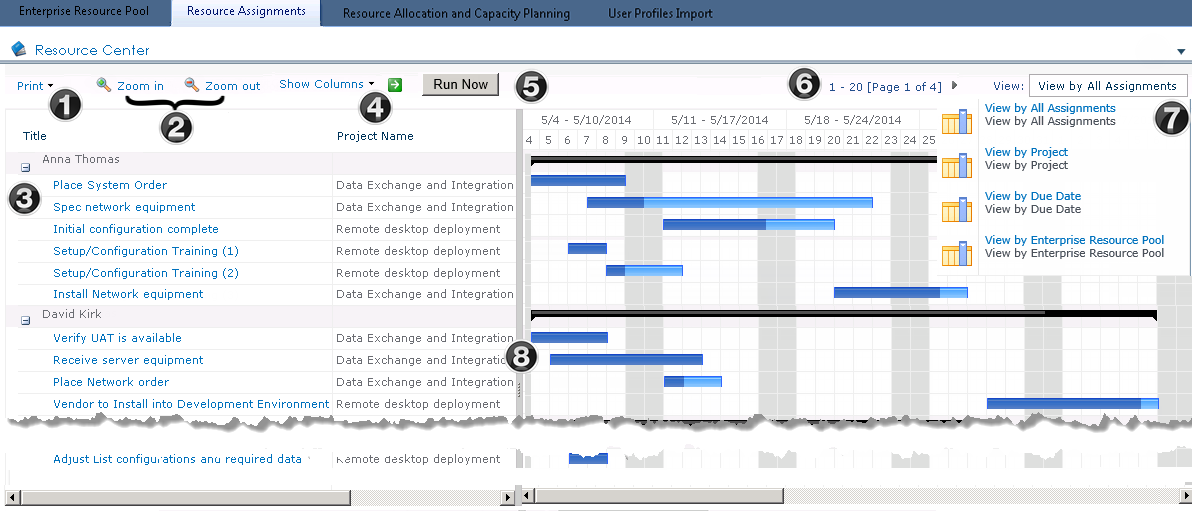
The Resource Assignments Gantt Chart

Function
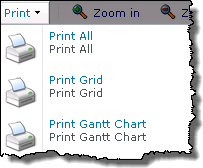
1. Print the grid with the task information, just the Gantt chart, or both from the drop down menu.
Drop down print menu options
2.

Use the Zoom In and Zoom Out buttons to view tasks in the Gantt view from daily (Zoom In) to monthly (Zoom Out).

NOTE: After you click the Zoom In or Zoom Out buttons, there may be a brief delay as the Gantt view is rendering the appropriate view.

3. Click + or to expand or collapse information in the assignment grid. When collapsed only the black summary bar depicting the total duration of the resource’s assignments will be displayed. Assignment Summary bar
4.

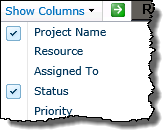
Show column selectorChoose which columns to display in the left-hand pane by selecting the desired columns from the Show Columns drop-down list, then click the green arrow to update the display.
Selecting and already checked box will remove it from the grid

Note: The drop down menu will refresh after each selection.

5. Click Run Now to force the Bamboo Gantt Chart Timer job to run immediately, updating the contents of the report.
6. Page through the tasks and resources by clicking the arrow.
The number of items shown per page can be changed in the web parts configuration tool pane.
7.

Choose your view using the drop-down list to the right of the Web Part toolbar:

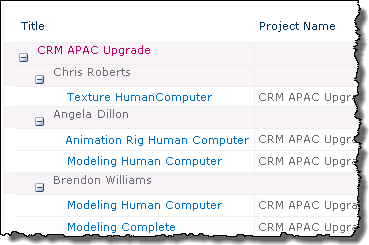
  • View by All Assignments: This default view displays tasks grouped by Assignment.

  • View by Project: Assignments are grouped by Project, then by the Assigned user Resource Assignment Gantt grouped by project

NOTE: View by Project is not available when accessing the Resource Assignments Gantt chart from a project site.

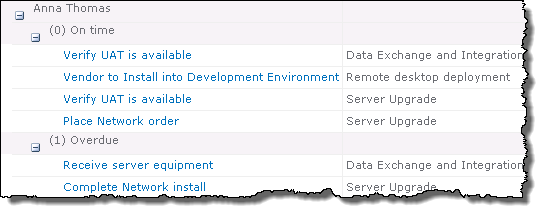
  • View by Due Date: Assignments are arranged by their completion status (On Time, Overdue, or a future due date).
    Resource Assignment Gantt grouped by Due Date

  • View by Enterprise Resource Pool: Resources are grouped by their SharePoint Membership as it is defined on the project site. If the user has not been granted permissions to a project site through a SharePoint group, tasks associated with that site will show under the heading No GroupResource Assignment Gantt grouped by site groups

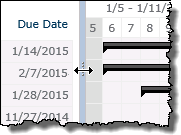
8. moving the grid linePlace your cursor over the gray vertical bar between the assignment grid and the Gantt chart to show or hide either side.
Report Center- Resource Work By Project

Report Center- Resource Work By Project

Overview of Portfolio PMC Control Panel Overview of Report Center

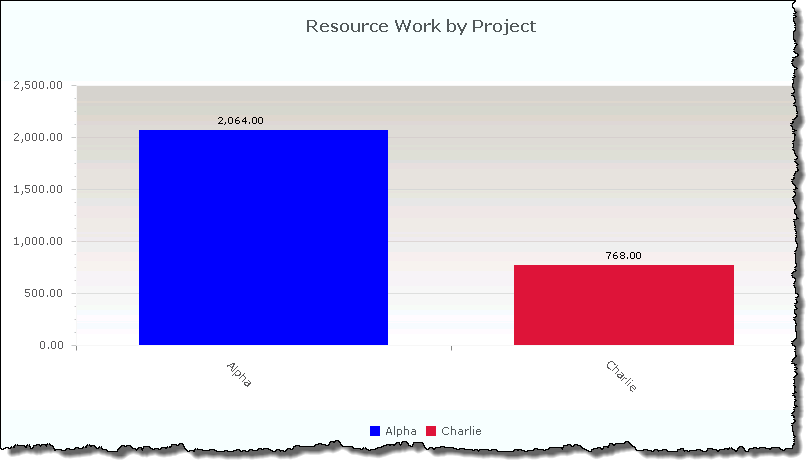
Resource Work by Project displays all the resource hours per project.

Define report data

Step. Action
1. In the Project field, use the drop-down list to select one or more projects, or click All to select all projects.
2. In the Values in field, use the drop-down list to choose how you want the work displayed: Hours or Days.
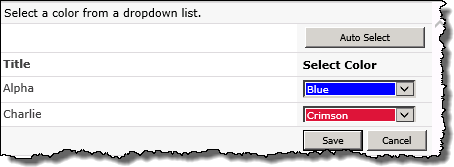
3. Click Custom Color to select a different color for each project you want to view in the report.Color picker
4.

Click View Report to display the report. When you click View Report, the query is saved in the Report Information list. When the Bamboo Reporting Calculation Timer Job V4 runs, it will use the query to pull data from the List Rollup to display in the report. By default, the timer job is set to run daily.

OR

To view immediately, click the Run Now button. If you check this option, the application will go directly to the List Rollup to obtain the data for the report.

NOTE: This may impact performance.

5. To export or print the report data, click the Action menu on the Web Part toolbar. Click the forward and back arrows to move from one page of report information to the next or to the first or last page of the report.

Report result

Resource Work By Project Bar Graph

Report Center – Resource Work by Project Department

Report Center – Resource Work by Project Department

Overview of Portfolio PMC Control Panel Overview of Report Center

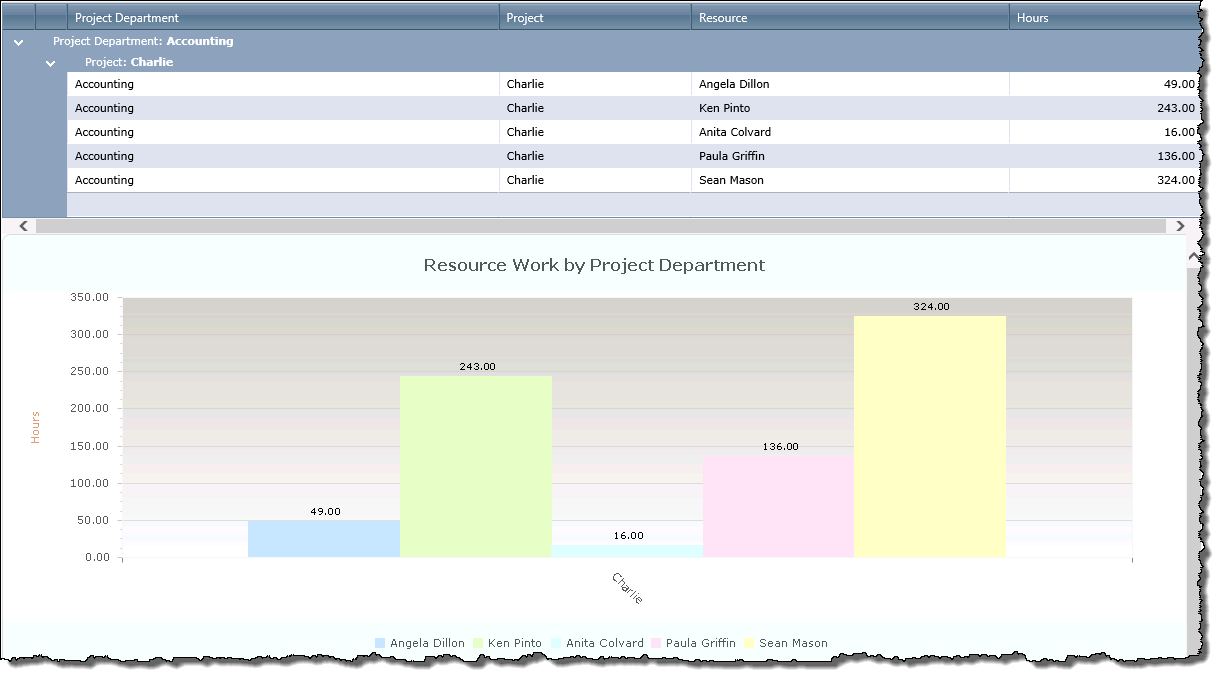
Resource Work by Project Department displays the hours or days per month that resources are assigned to work on projects filtered by selected project departments.

Note: The report filters by the department assigned to the project, not the department assigned to individual resources in the resource pool.

Define report data

Step. Action
1. In the Project Department field, use the drop-down list to select one or more project departments, or click All to select all projects.
2. In the Project field, use the drop-down to select one or more projects, or select Check All to select all projects.
3. In the Resource field, use the drop-down list to select a resource, or select Check All to select all resources.
4. Click Custom Color to select a different color for each project you want to view in the report.
5.

In the Values in field, use the drop-down list to choose how you want the work displayed: Hours or Days.

NOTE: In Day View only a month duration can be displayed.

6.

Click View Report to display the report. When you click View Report, the query is saved in the Report Information list. When the Bamboo Reporting Calculation Timer Job V4 runs, it will use the query to pull data from the List Rollup to display in the report. By default, the timer job is set to run daily.

OR

To view immediately, click the Run Now button. If you check this option, the application will go directly to the List Rollup to obtain the data for the report.

NOTE: This may impact performance.

7. To export or print the report data, click the Action menu on the Web Part toolbar. Click the forward and back arrows to move from one page of report information to the next or to the first or last page of the report.

Report result

Resource Work by Project Department grid and chart

Report Center – Actual Cost Per Month

Report Center – Actual Cost Per Month

Overview of Portfolio PMC Control Panel Overview of Report Center

Actual Cost Per Month displays the actual monthly cost for the project(s) based on the resource allocation, % complete and the standard rate.

Define report data

Step. Action
1. Change the year to display a different report.
2. To export or print the report data, click the Action menu on the Web Part toolbar. Click the forward and back arrows to move from one page of report information to the next or to the first or last page of the report.

Report Center – Cost Allocation per Month

Report Center – Cost Allocation per Month

Overview of Portfolio PMC Control Panel Overview of Report Center

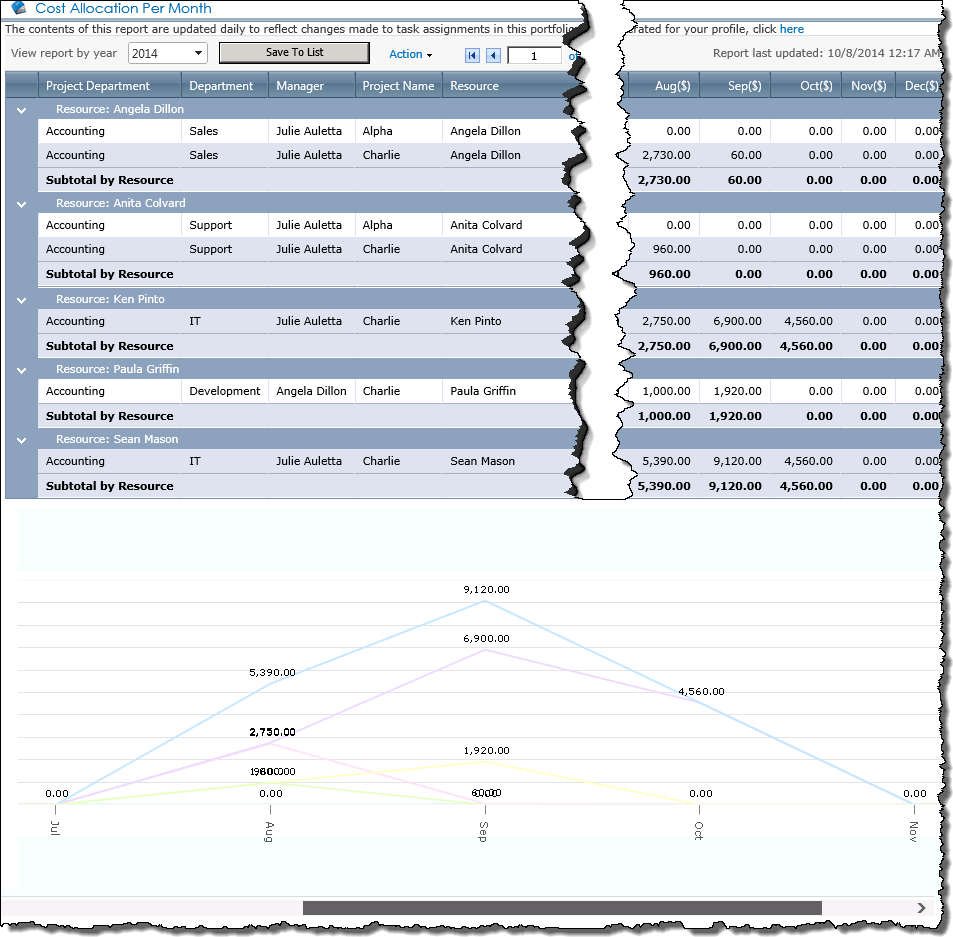
Cost Allocation Per Month displays the monthly cost for the project(s) based on resource allocation and the standard rate configured for each resource.

Define report data

Step. Action
1. Change the year to display a different report.
2.

Click View Report to display the report. When you click View Report, the query is saved in the Report Information list. When the Bamboo Reporting Calculation Timer Job V4 runs, it will use the query to pull data from the List Rollup to display in the report. By default, the timer job is set to run daily.

OR

To view immediately, click the Run Now button. If you check this option, the application will go directly to the List Rollup to obtain the data for the report.

NOTE: This may impact performance.

3. To export or print the report data, click the Action menu on the Web Part toolbar. Click the forward and back arrows to move from one page of report information to the next or to the first or last page of the report.

Report result

Report Grid and Chart

Report Center – Resource Availability

Report Center – Resource Availability

Overview of Portfolio PMC Control Panel Overview of Report Center

Resource Availability displays the capacity, allocation and availability of resources during a certain period.

Define report data

Step. Action
1. In the Project field, use the drop-down list to select a project.
2. In the Resource field, use the drop-down list to select one or more resources, or select All to choose all resources.
3. In the View By field, use the drop-down list to select the time period to show: Day, Week, Month, Quarter or Year.
4. In the From and To fields, enter the start and end dates for the period of time you want to view, or use the calendar icon to choose your dates.
5.

In the Values in field, use the drop-down list to choose how you want the work displayed: Hours or Days.

NOTE: In Day View only a month duration can be displayed.

6.

Click View Report to display the report. When you click View Report, the query is saved in the Report Information list. When the Bamboo Reporting Calculation Timer Job V4 runs, it will use the query to pull data from the List Rollup to display in the report. By default, the timer job is set to run daily.

OR

To view immediately, click the Run Now button. If you check this option, the application will go directly to the List Rollup to obtain the data for the report.

NOTE: This may impact performance.

7. To export or print the report data, click the Action menu on the Web Part toolbar. Click the forward and back arrows to move from one page of report information to the next or to the first or last page of the report.

Report result

Values in green indicate positive availability. Values in pink indicate the resource is overallocated.

ResourceAvailability2.png

Report Center – Resource Task Timeline

Report Center – Resource Task Timeline

Overview of Portfolio PMC Control Panel Overview of Report Center

The Resource Task Timeline displays the tasks, timeline, work and actual work assigned to a resource.
ResourceTimeline1.png

Define report data

Step. Action
1. In the Resource field, use the drop-down list to select one or more resources, or select All to see all task timelines for all resources.
2. In the View By field, use the drop-down list to choose how you want to display the timeline: Day, Month, Year or Interval. If you select Interval, then you can enter To and From dates to show in the report timeline.
3. In the From field, enter in the day, month or year you want to show, or use the calendar icon to select a date.
4. In the Values in field, use the drop-down list to choose how you want the work displayed: Minutes, Hours or Days.
5.

Click View Report to display the report. When you click View Report, the query is saved in the Report Information list. When the Bamboo Reporting Calculation Timer Job V4 runs, it will use the query to pull data from the List Rollup to display in the report. By default, the timer job is set to run daily.

OR

To view the report immediately, click the Run Now button. If you check this option, the application will go directly to the List Rollup to obtain the data for the report.

Note: This may impact performance.

6. To export or print the report data, click the Action menu on the Web Part toolbar. Click the forward and back arrows to move from one page of report information to the next or to the first or last page of the report.

Report result

ResourceTimeline2.png

Report Center – Resource Work Allocation Per Month

Report Center – Resource Work Allocation Per Month

Overview of Portfolio PMC Control Panel Overview of Report Center

Resource Work Allocation Per Month displays the hours or days per month that resources are allocated to the project(s). To track monthly resource work allocation, compare this report to the By Resource Allocation report in the Resource Center

Define report data

Step. Action
1. Change the year to display a different report.
2. To export or print the report data, click the Action menu on the Web Part toolbar. Click the forward and back arrows to move from one page of report information to the next or to the first or last page of the report.

Report Center – Resource Work by Department

Report Center – Resource Work by Department

Overview of Portfolio PMC Control Panel Overview of Report Center

Resource Work by Department displays the hours or days per month that resources are assigned to work on projects filtered by selected departments that the resources belonged to. The report filters by the department assigned to individual resources in the resource pool, not the department assigned to the project.

Define report data

Step. Action
1. In the Manager field, use the drop-down list to select one or more resource managers, or click All to select all projects.
2. In the Project field, use the drop-down to select one or more projects, or select All to select all projects.
3. In the Resource field, use the drop-down list to select a resource, or select All to select all resources.
4. Click Custom Color to select a different color for each project you want to view in the report.
5. In the Values in field, use the drop-down list to choose how you want the work displayed: Hours or Days.
6.

Click View Report to display the report. When you click View Report, the query is saved in the Report Information list. When the Bamboo Reporting Calculation Timer Job V4 runs, it will use the query to pull data from the List Rollup to display in the report. By default, the timer job is set to run daily.

OR

To view immediately, click the Run Now button. If you check this option, the application will go directly to the List Rollup to obtain the data for the report.

NOTE: This may impact performance.

7. To export or print the report data, click the Action menu on the Web Part toolbar. Click the forward and back arrows to move from one page of report information to the next or to the first or last page of the report.

Report Center – Resource Work by Manager

Report Center – Resource Work by Manager

Overview of Portfolio PMC Control Panel Overview of Report Center

Resource Work by Manager displays the hours or days per month that resources are assigned to work on projects filtered by selected resource managers.

Note: The report filters by the manager assigned to the resource in the resource pool. 

Define report data

Step. Action
1. In the Manager field, use the drop-down list to select one or more resource managers, or click All to select all managers.
2. In the Project field, use the drop-down to select one or more projects, or select All to select all projects.
3. In the Resource field, use the drop-down list to select a resource, or select All to select all resources.
4. Click Custom Color to select a different color for each project you want to view in the report.
5. In the Values in field, use the drop-down list to choose how you want the work displayed: Hours or Days.
6.

Click View Report to display the report. When you click View Report, the query is saved in the Report Information list. When the Bamboo Reporting Calculation Timer Job V4 runs, it will use the query to pull data from the List Rollup to display in the report. By default, the timer job is set to run daily.

OR

To view immediately, click the Run Now button. If you check this option, the application will go directly to the List Rollup to obtain the data for the report.

NOTE: This may impact performance.

7. To export or print the report data, click the Action menu on the Web Part toolbar. Click the forward and back arrows to move from one page of report information to the next or to the first or last page of the report.

Report result

Release Notes for Project Management Central

Release Notes for Project Management Central

NOTE: Release Notes will open in a new browser tab

WSSv3/MOSS SharePoint 2010 SharePoint 2013
Release Notes Release Notes Release Notes
Microsoft ended mainstream support for SharePoint 2007 in October 2012. See Microsoft’s Lifecycle Support Policy.
At that time, Bamboo stopped enhancements to our SharePoint 2007 product line, but continues to provide support and bug fixes to customers with active support contracts until October 2017. Previously purchased licenses will continue to function after October 2017, but support for these products will end, and no additional bug fixes will be provided beyond that time. Bamboo plans to cease selling new licenses and annual support contacts for its SharePoint 2007 products in October 2016 to ensure customers will be eligible to receive support for at least one year after purchase.
Microsoft plans to end mainstream support for SharePoint 2010 in October 2015. See Microsoft’s Lifecycle Support Policy. At that time, we will stop any enhancements for our SharePoint 2010 product line but will continue to provide support and bug fixes for our SharePoint 2010 products to customers with active support contracts until October 2020. Previously purchased licenses will continue to function after October 2020, but support for these products will end, and no additional bug fixes will be provided beyond that time. Bamboo plans to cease selling new licenses and annual support contacts for its SharePoint 2010 products in October 2019 to ensure customers will be eligible to receive support for at least one year after purchase.

Bamboo Solutions has also begun releasing Bamboo Apps to the SharePoint Store, for additional details, see the SharePoint Apps & Mobile products page where you can get the latest info about each of our Apps as they release to the Microsoft Store.

A separate installation package and license key is required for SharePoint 2013 deployment. For additional details, review the following knowledge base articles:

Understanding Bamboo Releases:

  • Bamboo offers Trial, Basic and Premium support.
    • Free Trial support expires after 30 days.
    • For more information about Basic and Premium support, please see the Support Plans page.
    • There may be a fee to upgrade from a major version to another.

See Also:

Read this before upgrading PM Central

Read this before upgrading PM Central

Before upgrading PM Central:

  • Always back up your sites before upgrading.
  • Keep a detailed log of your changes.

Bamboo recommends that you perform the upgrade during off hours and that you either lock down the sites or render them unavailable by stopping the World Wide Web Publishing Service on all Web front-end servers or stop the App Pool(s) to prevent access. Doing so prevents the software assemblies from being locked by a process which sometimes prevents a successful upgrade.

ATTENTION: You must have PM Central R2.0 or higher to upgrade to R3.0 or R3.5 before upgrading to PM Central R4.0/4.1/4.2 from a previous version. It is not possible to upgrade from PM Central R2.x to R4.x directly. If you have an older version of PM Central (R1.x), contact Bamboo Support or your Bamboo Account Manager to obtain the correct prerequisite version.

The table below lists several customizations and whether you will lose the customizations after an upgrade. For more information, read Customization Best Practices.

Customization Can I make the customization in the current version? (PM Central 4.2/4.1/4.0 or older version) Will the customization be retained after I upgrade to the current version (R4.0/4.1/4.2)? (PM Central 3.0 or newer version)
1. Add new Web Parts to the pages Yes, new web parts can be added to pages in the current or older version.

Yes, the new web parts will be retained when you upgrade from R3.0 or higher to R4.0.

NOTE: You need to upgrade from R2.x to R3.0 or R3.5 first before upgrading to R4.0/4.1.

However, If you upgrade from a pre-R3.0 version, web parts added to pages will not be retained.

2. Add additional columns and/or views to existing lists or add new lists (e.g., project tasks list, status reports, custom lists, etc.) and/or libraries (wiki, collaboration, translation, Shared Documents folders, etc.) to sites. Yes, you can add additional columns or views to existing lists as well as add new lists or libraries to sites in the current or older version. Yes, the additional columns, views, lists, and/or libraries will be retained after the upgrade.
3. Change the look and feel of themes and graphics.

Yes, you can modify graphics and themes in the current or older version.

NOTE: In R2.x or higher, be sure to follow the Customization Best Practices and use the nested master page and the nested CSS files for modification as recommended.

Yes, these modifications will be retained when you upgrade from R3.0 or higher to R4.0/4.1/4.2 if you used the nested master page and the nested CSS files for modifications in R2.x.

However, if you upgrade from a pre-R3.0 version, modifications to graphics or themes will not be retained.

(need to check this one…)

4. Add new navigation tabs on portfolio, department, and/or project sites Yes, you can add new navigation tabs in the current or older version. Yes, the new navigation tabs will be retained after the upgrade.
5. Create new web part pages in the portfolio, department, and/or project sites.

Yes, you can create new web part pages in the current or older version.

NOTE: Be sure to store the new pages in the PMCentralPages library.

Yes, new web part pages will be retained after the upgrade, as long as the new pages are stored in the PMCentralPages Document Library.
6. Modify the master page and CSS files with or without SharePoint Designer.

Yes, you can modify the master page and CSS files with or without SharePoint Designer in the current or older version.

NOTE: In R2.x or higher, follow the Customization Best Practices to use the nested master page and the nested CSS files for modification.

Yes, these modifications will be retained when upgrading from R3.0 or higher to R4.0/4.1/4.2 if you used the nested master page and the nested CSS files for modifications in the previous version. Follow our policies for customization in Customization Best Practices.

NOTE: If you upgrade from a pre-R3.0 version, modifications to the master page or CSS files will not be retained.

7. Modify some properties in the web part tool panes Yes, you can modify some properties in the web part tool panes in the current or older version.

Changes to Chart Plus Web Part and Data-Viewer Web Part configuration properties will not be retained. All other Web Part configuration properties will be retained when you upgrade from R3.0 or higher to R4.0/4.1/4.2.

If you upgrade from a pre-R3.0 version, modifications to Web Part properties will not be retained.

8.

Add additional columns and views to existing lists; add new lists; add documents to the document libraries; change logos; and save the template as a standard site template for creating other project sites.

}

Yes, you can add additional columns and views to existing lists; add new lists; add documents to the document libraries; change logos; and save the template as a standard site template in the current or older version. Yes, these modifications will be retained after the upgrade.

Work with the project site’s Project Resource Pool

Work with the project site’s Project Resource Pool

Project Manager’s Checklist Overview of Project Resource Center

Users with Full Control or Design permissions to a project site can access the Report Center to add users to the site’s Contacts list (Project Resource Pool), which acts as a repository of information about project team members.

To access the Report Center:

Step Action Result
1. Access the PM Central Control Panel from the Central Actions menu
PM Central Control Panel link
PSControlPanel_ResourceCenterLinkspng.png
Keep in mind:
Access to the Control Panel is security trimmed, requiring either Full Control or Design permissions
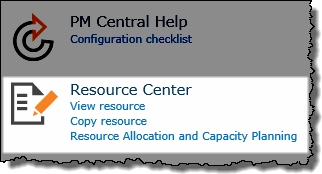
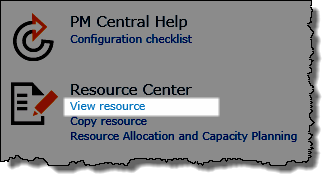
2. Under Resource Center select View resource or
Copy resource
Based on your selection, you will be taken to a specific page in the Resource Center
Link options

From the Resource Center you can:

  • Copy multiple users from the Enterprise Resource Pool into the Project Resource Pool.

  • Update user information in the Project Resource Pool with the current information maintained in the Enterprise Resource Pool

Update user profile’s in the Project Resource Pool

Update user profile’s in the Project Resource Pool

Overview of Project Resource Center Working with the Project Resource Pool

User information that is modified or updated in the Enterprise resource pool will not automatically get updated on the project site. This update process can be manually initiated on an “as needed” basis.

Individual user update

Step Action Result
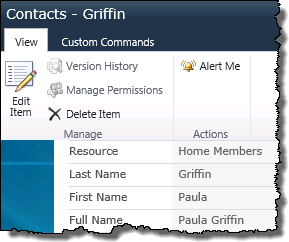
1. From the Project Team Info page of the project Resource Center, select the user whose information you want to update You will be taken to the display view of the user’s contact information
UpdateDisplayView.png
2.

Click Edit Item
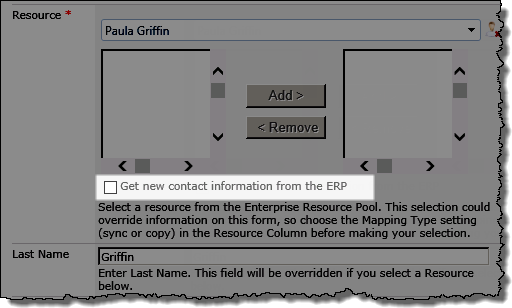
and then click the checkbox to Get new contact information from the ERP

Icon-WarningImportant: User information that was modified after the initial copy from the Enterprise Resource Pool may be lost. Click here for additional information

UpdateUserInfo.png
3. Click Save The user’s information will be re-copied from the Enterprise Resource Pool into the local Contacts list.

Add individual resources from the ERP to the Project Resource Pool

Add individual resources from the ERP to the Project Resource Pool

Overview of Project Resource Center Working with the Project Resource Pool

When you select the View resource link under the Resource Center Heading you will be taken to the Project Team Info page where you can:

  • Add users individually to the Project Resource Pool (Contacts list) from the Enterprise Resource Pool

  • View a display of the current Project Team Resources

  • Update user information to reflect the current contents of the Enterprise Resource Pool

  • Enter resources into the Project Resource Pool who are not part of the Enterprise resource pool. This option will require changing the default behavior of the Bamboo Role column.

NOTE: When users are added individually to the Project Resource pool, SharePoint permissions can be simultaneously assigned by users with the Full Control permission level on the site.

Add an individual resource to the Project Resource Pool from the Enterprise Resource Pool

Step Action Result
1. Access the PM Central Control Panel from the Central Actions menu drop down PM Central Control Panel link PSControlPanel_ResourceCenterLinkspng.png
Keep in mind:
Access to the Control Panel is security trimmed, requiring either Full Control or Design permissions
2. Click View resource
View Resource link
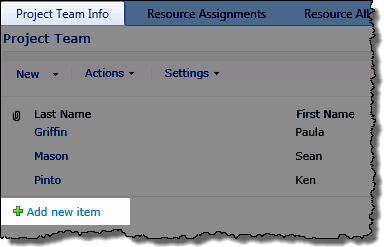
You will be taken to the Project Team Info page of the Resource Center
Project Team Info page
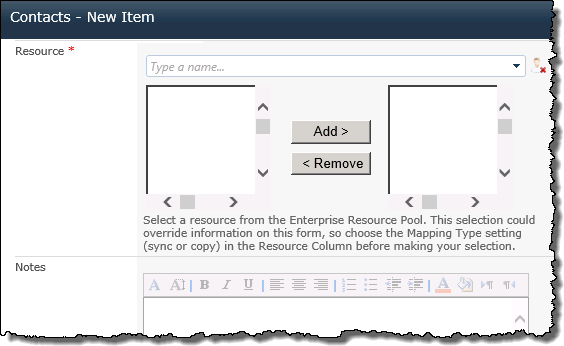
3. From the Project Team Info page, click Add New Item New Contacts form
4. Click the drop-down arrow to see all the resources in the Enterprise Resource Pool

OR

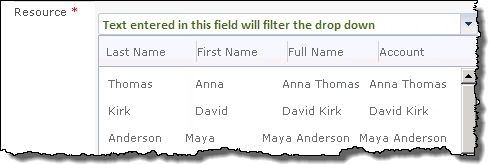
Type the user name into the Resource field to filter the drop-down’s contents

Resource drop down selector
5.

Optional:
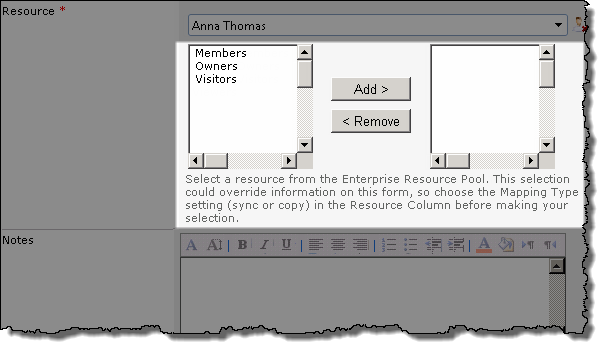
Assign the Project Team member to a SharePoint group to provide access to the site

NOTE: Full control permissions are required to add a user to a SharePoint group

Group selector boxes

NOTE: Users with Design permissions can add users to the project team, but will not be able to assign users to SharePoint groups.

6. Click Save All information associated with the selected user in the Enterprise Resource Pool will be copied to the Project site’s contact list and displayed under the Project Team Info tab of the Resource Center.

Using the PM Central Risks list

Using the PM Central Risks list

Using PM Central Overview of the Project Site

When working with Risks keep in mind:

  • Active risks associated with active projects are rolled up and displayed on the portfolio site, and applicable department sites.

  • By default, the number of overdue risks will be used by the Risk Status Key Performance Indicator in the Project Health list.

  • The My Active Risks display, found under the My Summary tab at all levels of the PM Central hierarchy, will show risks the logged in user has been Assigned To

To create a new risk:

Step Action Result
1. Click
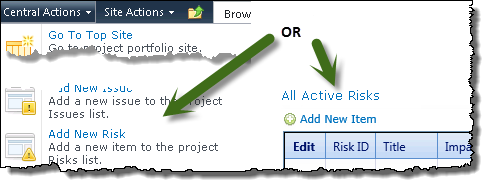
Add New Risk in the Central Actions drop down

Or

From the Risks tab, under Issues and Risks, click Add New Item above the All Active Risks data view.

Links to Add New Isssue
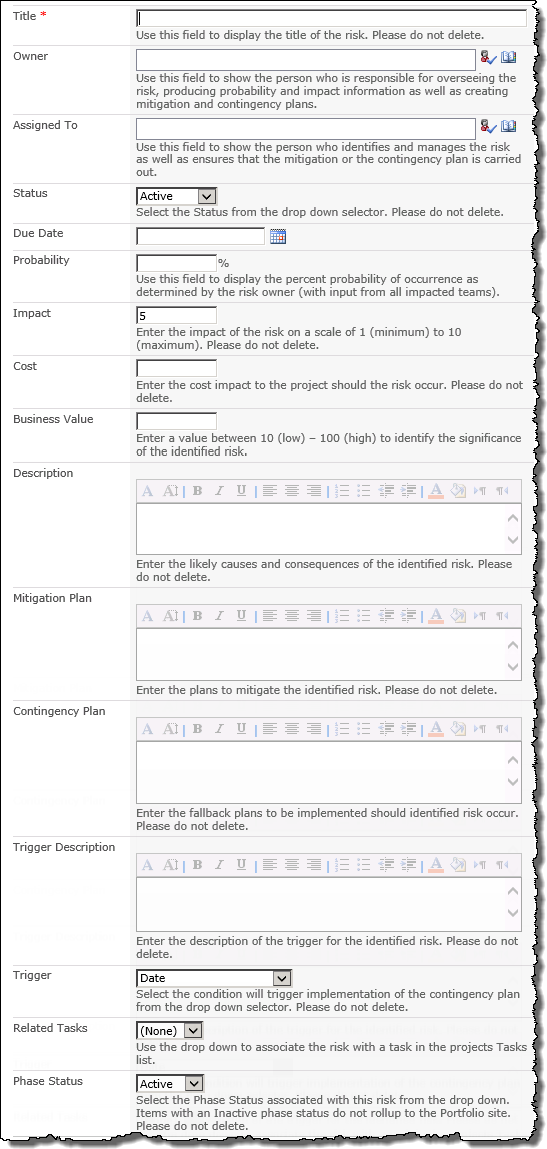
2. Enter a Title, Owner and Assigned To New Risks form
3. Enter a Due Date for the risk.
4.

Enter:
The Probability that the risk will occur

The Impact the event will have on the project using a scale of 1 (low) – 10 (high)

Probability x Impact will be used to calculate the risk’s Exposure.

5.

The Cost that will be incurred should the risk occur

This value will be used when calculating cost of risks for the project displayed in the Summarized View of Project Risks on the Portfolio site

6.

The Business Value on a scale of 10 (low) -100 (high)

This value will determine the size of the risk bubbles displayed in the Risk Summary chart

The Business Value column was added in PMC 4.3

7. Describe the risk, and the associated Contingency and Mitigation plans, along with the Trigger Description.
5. Click Save Risks with an Active Status will be displayed in the All Active Risks data-view on the Risks page

Using PM Central Overview of the Project Site

PM Central Project – Risks Tab

PM Central Project – Risks Tab

Overview of PM Central Hierarchy Overview of the Project Site

The Risks page displays the active risks associated with the project.

When working with Risks keep in mind:

  • All Risks with an active phase status that are associated with active projects will be rolled up and displayed under the Risk tab of the portfolio, and applicable department sites.

  • By default, the number of overdue risks will be used by the Risk Status Key Performance Indicator in the Project Health list.

  • Starting with PM Central 4.3 the Business Value field in the Risk form must be populated for the risk to be displayed in the Risk Summary chart.

The Issues and Risks pages were separated under the Issues and Risks tab in PM Central 4.3

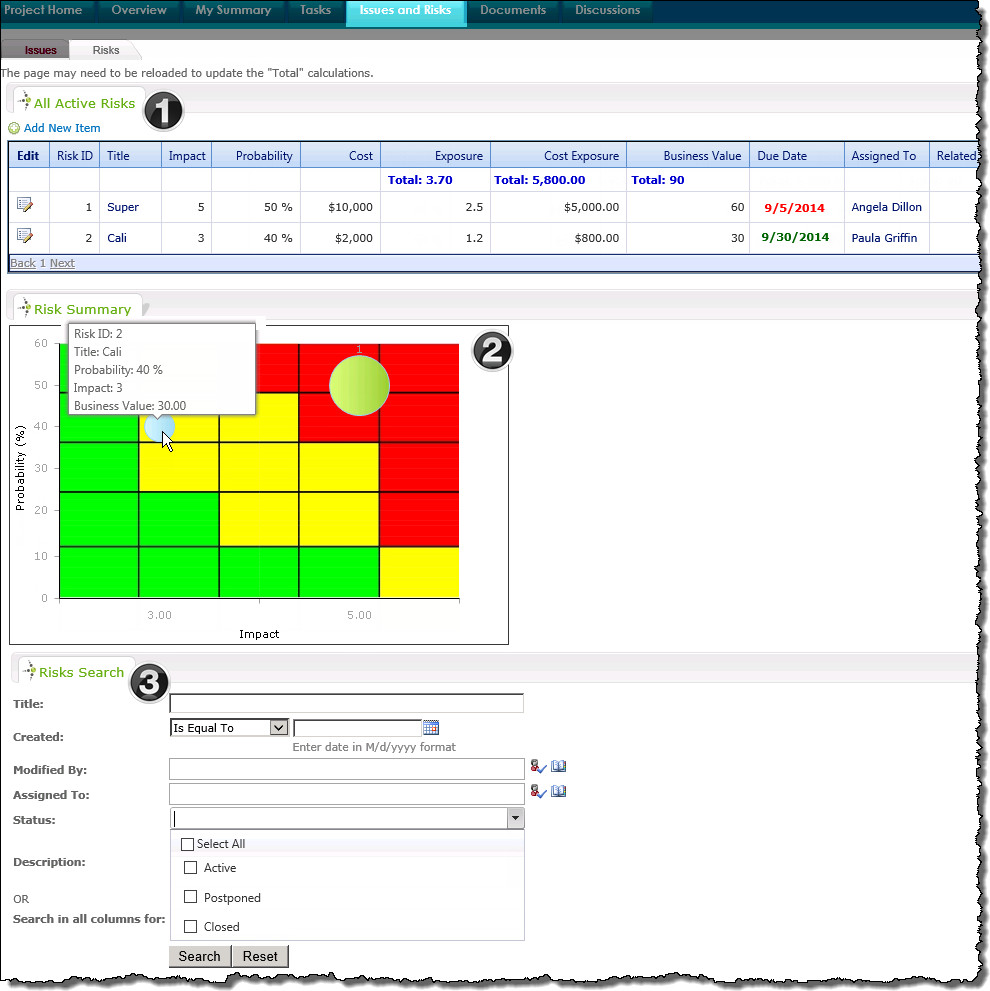
Risks tab

Name / Web Part Description
1. All Active Risks

Bamboo Data Viewer Web Part

Displays the active risks associated with Active projects in the portfolio.

  • Risks that have not been addressed by the designated Due Date will be highlighted in red

  • The total Exposure, Cost Exposure and Business Value of the Active items will be calculated by the Data-Viewer Web Part.

NOTE: It may be necessary to reload the page to update the column totals.

2. Risk Summary

PM Central Custom Web Part

The Risk Summary chart enables project managers to identify risks that pose a threat to the project at a glance.

  • Only Active Risks will be displayed in the chart with consists of three zones; Red: high risk, Yellow: medium risk,Green: low risk

  • A risks placement on the chart will be determined by the identified Probability and Value

  • The size of the bubble will be determined by the Business Value
    The Business Value column was added in PMC 4.3

Keep in mind:
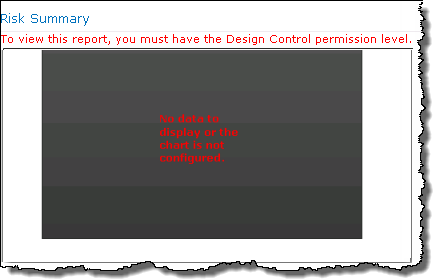
Unless the default configuration settings are modified by the administrator, users must have Design permissions or higher to see the Risk Summary.
RiskChartDenied.png

3. Risks Search

Bamboo List Search Simple

Use the Risks Search Web Part to search the project site’s Risks list for items according to specific criteria.

Keep in mind:

  • The Web Part is configured by default to use an AND joiner. If you enter more than one criterion, all criteria must be met for a result to be returned.

  • The Status “choice” selector will list the valid choices in the drop-down selector (Active, Postponed, Cancelled) and a Select All option.

  • Search in all columns for: leverages SharePoint Search and allows searching in all list or library columns using a single search field.

  • Click the links for additional information on using or configuring the Risks Search Web Part.

Overview of PM Central Hierarchy Overview of the Project Site

Overview of the PM Central Project Site

Overview of the PM Central Project Site

Overview of PM Central Hierarchy

The Project Site is a sub site of the portfolio site and is designed to have its data rolled up to the portfolio site for a comprehensive status of all projects in your portfolio. Its enhanced template supports uniform project data input, visualization of task, issue and risk status, along with a file explorer-type interface for document management, and a built in discussion board.

On each page of the project site you will see:

The 7 default navigation tabs for the project site

Name / Web Part Description
1. Project Site Navigators

SharePoint Navigators

The seven default items in the Project Site Navigator view of the Project Site Navigators list make up the project site’s top level navigation.

The tabs take users to different aspx pages that contain Web Parts that are used to display specific content relevant to the project.

2. Central Actions Menu

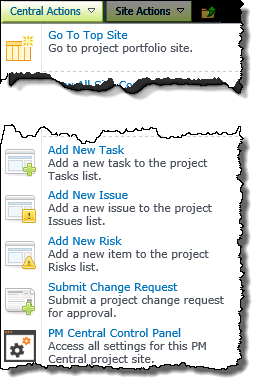
Central Actions drop down menuThe Central Actions menu provides quick access to areas where common activities are performed on the site, including Adding a New Task and the PM Central Control Panel.

Keep In Mind:
1. Use the bulls eye icon Bullseye iconto access Central Actions in 2013
2. Users must have Design permissions or higher on the site to see the PM Central Control Panel in the Central Actions menu
3. Quick links to commonly accessed forms are part of the Enhanced Central Actions menu.

3. Site Actions Menu

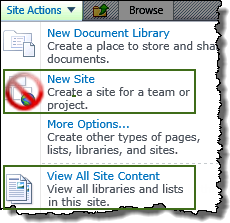
Site Actions drop down menuThe SharePoint Site Actions menu provides shortcuts to commands commonly used when working with SharePoint sites. The command options you see depend on your permissions on the site.
Notes:
1. New Sites should be created using the PM Central Site Creation Plus tool NOT from SharePoint’s New Site page
2. A list of Site Contents is available here

Overview of PM Central Hierarchy

Project Site Lists and Libraries

Project Site Lists and Libraries

Overview of the Project Site Overview of PM Central General Settings

Icon-WarningIMPORTANT: DO NOT delete any of the default lists and Libraries. Changes to the default lists should be made with caution due dependencies in the application. Please refer to the Customization Guide before making any changes

Libraries
PMCentral Pages The PMCentralPages library stores all PM Central Web Part pages for the site. The pages in this library should not be deleted or renamed as that will impact navigation in the site
Pics A picture library that stores the default site images and logos
PM Central Skins By default, there will be no items found in this document library. Items will only be added to the library if the template skin is changed
Project Documents Library Used to store documents associated with the project
Lists
Announcements Announcements for the project are displayed on the Project Home page
Bamboo Project Task List Created automatically when the Task Master Web Part is added to a page. This list is not used by PM Central.
Calendar Contains the calendar information used by the Calendar Plus Web Part on the Project Home page.
Change Requests This list stores all the Change Request submitted for the project. Change requests will be rolled up and displayed in the portfolio site, and applicable department sites.
Configuration Checklist This list is pre-populated on site creation and provides instructions for final configuration steps. The Warning Web Part pulls its configuration status from this list.
Contacts The Contacts list (aka Project Resource Pool) is a list of users available to work on the project as resources.
Favorites The Favorites list stores favorite links added from the PMC Favorites section of the page ribbon.
Gantt Chart Information This list is used for the system to store the task’s information (Title, Start Date, Due Date, Assigned To… etc.) to display data in the Resource Assignments report. Do not delete or modify any of the columns in this list.
Issues The Issues List is used to track issues. An issue is an unfavorable circumstance that has already occurred or is currently occurring and that is affecting the project’s cost, schedule or quality. Active issues will be rolled up and displayed in the portfolio site, and applicable department sites.
Lessons Learned Documenting lessons learned helps the project team discover the root causes of problems that occurred and avoid those problems in later project stages or future projects. Lessons learned will be rolled up and displayed in the portfolio site, and applicable department sites.
Modified Pages This list is used to track and save all the changes to the pages at the top site by the applications or by the users to prepare for future upgrades.
Monthly Resource Actual Cost Allocation Summary This list is used to store the monthly resource actual cost allocation for the resources of all the projects.
Objectives Maintains the project objective’s which are displayed on the Project Home page
Project Baseline The Project Baseline list is used to track information for multiple baselines in the Project Baseline Web Part.
Project Health List The Project Health List stores key information about the project including Project Manager, Project Start Date, Project End Date, % Complete and key performance indicators. Project Health information will be rolled up and displayed in the portfolio site, and applicable department sites.
Project Managers Checklist This checklist provides project managers with steps for setting up a project in PM Central.
The Project Managers Checklist was added in PM Central 4.3
Project Site Navigators The Project Site Navigators List is used to create the tabs and provide navigation links throughout the site. It contains columns such as Menu Title, Description, URL, Parent Menu and Sort Order. This list is pre-populated with data.
Project Status Report The Project Status Report list is used by project managers to report the weekly status of the project, including accomplishments and issues for that week. Project Status Reports will be rolled up and displayed in the portfolio site, and applicable department sites.
Report Settings The Report Settings list stores options for PM Central reports.
Risks The Risks List is used to track risks. A risk is an uncertain event or condition that, if it occurs, has a negative effect on the project’s objectives. Risks will be rolled up and displayed in the portfolio site, and applicable department sites.
Tasks Baseline The Task Baseline list is used to track information for multiple baselines in the Task Baseline Web Part.
Tasks The Tasks List is used to track the timeline, work and resource assignment for the tasks. Tasks will be rolled up and displayed in the portfolio site, and applicable department sites.

Project Health Overview

Project Health Overview

The PM Central Project Health list contains basic information about the project, the contents of which are visible throughout the PM Central hierarchy.

Project Summary dashboard showing Project Health details

When working with the Project Health list keep in mind:

  • There will only be one item with project health information in the Project Health list

  • Project Health information for all projects is rolled up and displayed in Project Summary dashboards found on the project, and applicable department sites.

  • Project Health information for the current project is is displayed Project Info display on the Project Home page

  • To view all the Project Health information, or to edit the project details, click the link found under Project Name

  • Some columns in the Project Health list, including the Key Performance Indicators, cannot be manually edited.

Project Health related topics:

PM Central Project – Project Home Tab

PM Central Project – Project Home Tab

Overview of PM Central Hierarchy Overview of the Project Site

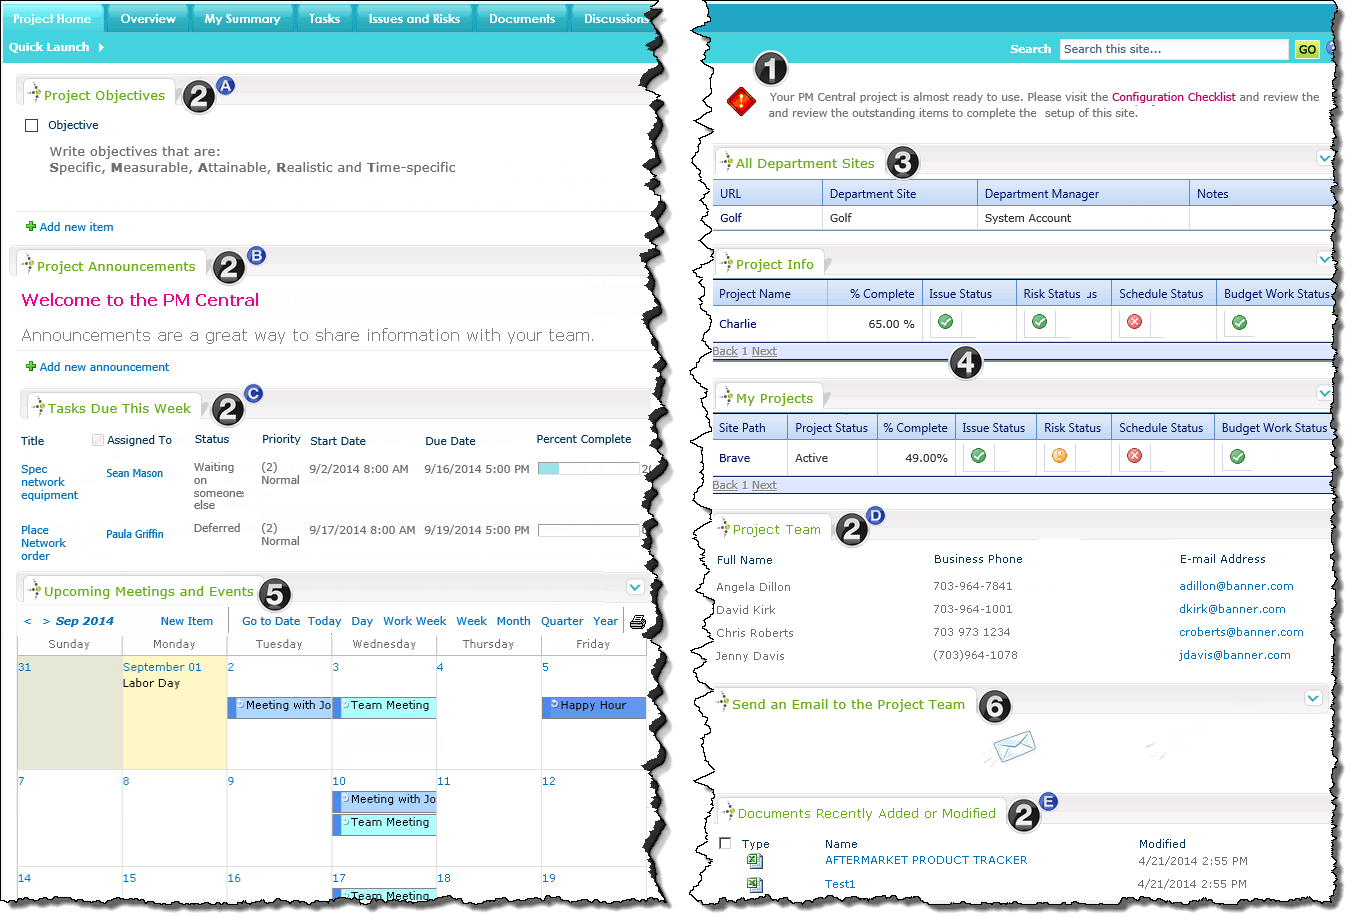
Project Home is the default home page of the Project site.

Image of the Project Home Page

Name /Web Part Description
1. PMC Message Configuration Web Part

PM Central Custom Web Part

The Warning message displayed in the custom PMC Message Configuration web part provides a reminder to complete the site’s Configuration Checklist. The warning text will remain on the page until all Mandatory items in the checklist have a Closed status. A Complete welcome message will be displayed when all Mandatory items are closed.

  • The message displayed in the web part can be easily modified.

  • The Complete text will include a link to the Project Managers Checklist

2. A.Objectives
B.Announcements
C.Tasks Due This Week
D. Project Team
E.Documents Recently Added or Modified

SharePoint List Views

SharePoint list views display useful information about the project

Keep in mind:

  • Announcements will not be displayed after their due date

  • To add users to the Project Team you must access the Resource center via PM Central Control Panel

  • The ten most recently added or modified documents will be displayed in this view. All other documents can be accessed from the Documents tab

3. Department Sites

PM Central Custom Web Part

The Department Sites custom web part will only be displayed on the page if the project site meets the filter criteria of an existing department site
4. Project Info and My Summary

Bamboo Data Viewer Web Part

The Project Info and My Summary data views display high-level Project Health information for each project including % Complete, and health status KPI’s
Keep in mind:

  • Project Info – pertains to the current project

  • My Projects – offers the same health information but only for projects where the logged-in user has been assigned as the project manager

  • Select the link under the Project Name header to access the Project Health list to view/edit additional project related data.Link to the Project Health form

5. Upcoming Meetings and Events

Bamboo Data Viewer Calendar Web Part

Displays items entered into the site’s Calendar list.

  • The Calendar can configured to reference a Holiday list to display your organization’s designated holidays.
6. Send an Email to the Project Team

Bamboo Group Email Web Part

Group Email iconClicking the envelope icon will generated a mail form pre populated with the email address information of all project team members.

NOTE: 1.Emails are not saved to the project site.

Overview of PM Central Hierarchy Overview of the Project Site

PM Central Project – Issues Tab

PM Central Project – Issues Tab

Overview of PM Central Hierarchy Overview of the Project Site

An issue is an unfavorable circumstance that has already occurred or is currently occurring and that is affecting the project’s cost, schedule or quality.
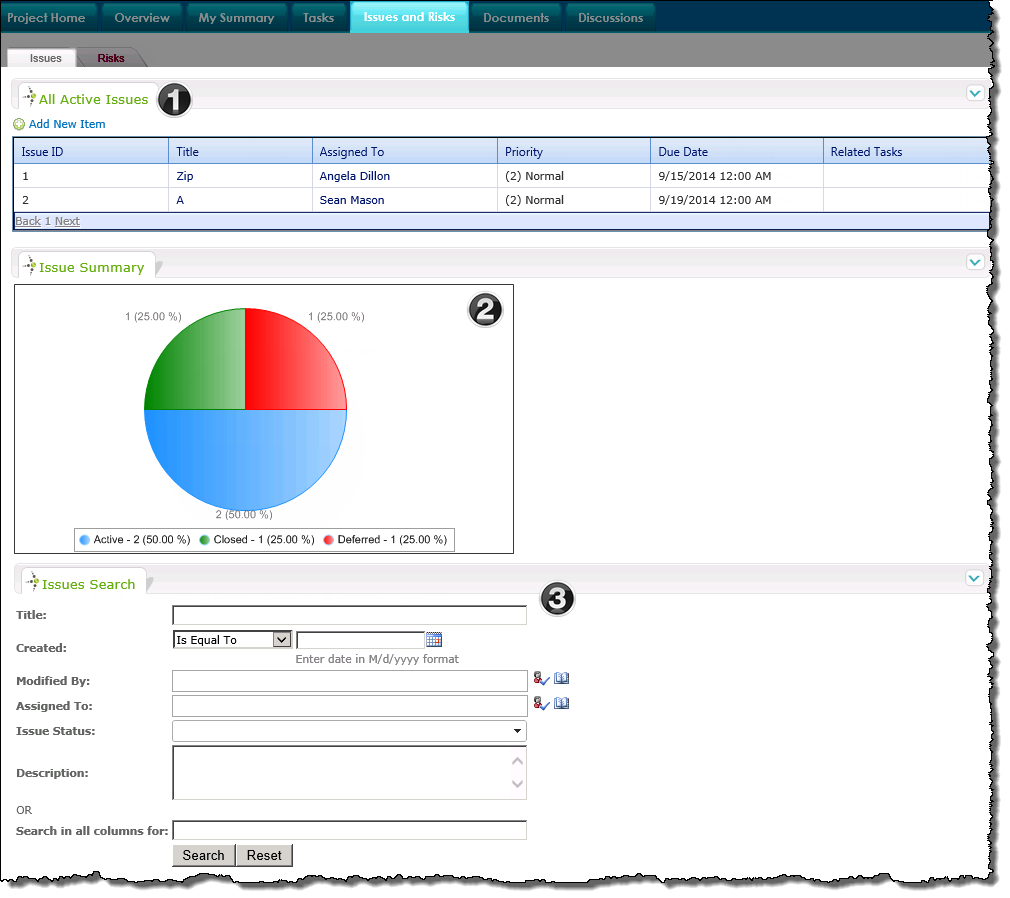
The Issues page displays the active issues associated with the project, along with a chart summarizing all the issues created.

When working with Issues keep in mind:

  • All issues with an active phase status that are associated with active projects will be rolled up and displayed under the Issues tab of the portfolio, and applicable department sites.

  • By default, the number of overdue issues will be used by the Issues Status Key Performance Indicator in the Project Health list.

  • Information about creating a new issue is available here

The Issues and Risks pages were separated under the Issues and Risks tab in PM Central 4.3
Issues tab on the project site

Name / Web Part Description
1. All Active Issues

Bamboo Data-Viewer Web Part

  • The Issues tab shows the active issues associated with the project.
2. Issue Summary

Bamboo Chart Plus Web Part

  • The Issue Summary displays, in chart form, the number and percentage of issues by status (Active, Deferred and Closed).
3. Issues Search

Bamboo List Search Simple

Use the Issues Search Web Part to search the project site’s Issues list for items according to specific criteria.

Keep in mind:

  • The Web Part is configured by default to use an AND joiner. If you enter more than one criterion, all criteria must be met for a result to be returned.

  • The Status “choice” selector will list the valid choices in the drop-down selector (Active, Deferred, Closed) and a Select All option.

  • Search in all columns for: leverages SharePoint Search and allows searching in all list or library columns using a single search field.

  • Click the links for additional information on using or configuring the Issues Search Web Part.

Overview of PM Central Hierarchy Overview of the Project Site