PM Central template features

PM Central template features

Getting started with PM Central

PM Central come with three site templates that provide differing project management capabilities:

  • PMC Standard/Full templates

  • PMC Lite templates

  • PMC Stand-alone template

Feature Description Standard/Full Template Lite Template Standalone Template
Portfolio site A top site summary level Icon-VerifyAnswer Icon-VerifyAnswer
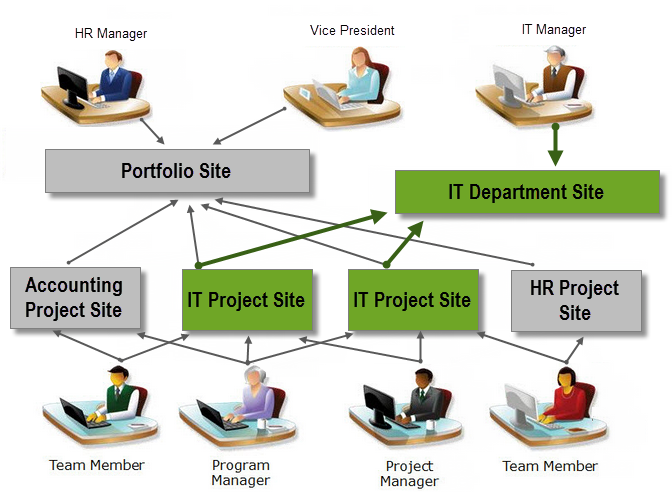
Department sites Optional sites that display a filtered view of the Portfolio based on user specified criteria Icon-VerifyAnswer Icon-VerifyAnswer
Enterprise Resource Pool and Resource Management The Enterprise Resource Pool (ERP) is a centralized list of users who are available to work on projects associated with the Portfolio. The associated Resource Center provides comprehensive resource reporting based on user task assignments Icon-VerifyAnswer
Report Center Pre-defined reports to provide additional information about the management of the portfolio Icon-VerifyAnswer
Timeline Gantt Display of all active projects Displays the project timelines and associated milestones Icon-VerifyAnswer Icon-VerifyAnswer
Project Summary Dashboards Aggregated display of Project Health information at the portfolio site, and applicable department sites Icon-VerifyAnswer Icon-VerifyAnswer
Predefined Alerts

Pre-defined alerts that notify users of tasks and/or issue assignments that are coming due, or are overdue.

Note: Alerts must be enabled by the Portfolio Administrator.

Icon-VerifyAnswer Icon-VerifyAnswer
MS Project Integration (2010 & 2013) Works with the Bamboo MS Project Add In to provide an integration point with PM Central Icon-VerifyAnswer Icon-VerifyAnswer Icon-VerifyAnswer
Capture Baselines Ability to baseline the project, tasks, and costs for improved schedule management. Icon-VerifyAnswer
Enhanced schedule and cost tracking Additional schedule and cost tracking views that display Cost and Schedule Key Performance Indicators Icon-VerifyAnswer

Project Site Lists and Libraries

Project Site Lists and Libraries

Overview of the Project Site Overview of PM Central General Settings

Icon-WarningIMPORTANT: DO NOT delete any of the default lists and Libraries. Changes to the default lists should be made with caution due dependencies in the application. Please refer to the Customization Guide before making any changes

Libraries
PMCentral Pages The PMCentralPages library stores all PM Central Web Part pages for the site. The pages in this library should not be deleted or renamed as that will impact navigation in the site
Pics A picture library that stores the default site images and logos
PM Central Skins By default, there will be no items found in this document library. Items will only be added to the library if the template skin is changed
Project Documents Library Used to store documents associated with the project
Lists
Announcements Announcements for the project are displayed on the Project Home page
Bamboo Project Task List Created automatically when the Task Master Web Part is added to a page. This list is not used by PM Central.
Calendar Contains the calendar information used by the Calendar Plus Web Part on the Project Home page.
Change Requests This list stores all the Change Request submitted for the project. Change requests will be rolled up and displayed in the portfolio site, and applicable department sites.
Configuration Checklist This list is pre-populated on site creation and provides instructions for final configuration steps. The Warning Web Part pulls its configuration status from this list.
Contacts The Contacts list (aka Project Resource Pool) is a list of users available to work on the project as resources.
Favorites The Favorites list stores favorite links added from the PMC Favorites section of the page ribbon.
Gantt Chart Information This list is used for the system to store the task’s information (Title, Start Date, Due Date, Assigned To… etc.) to display data in the Resource Assignments report. Do not delete or modify any of the columns in this list.
Issues The Issues List is used to track issues. An issue is an unfavorable circumstance that has already occurred or is currently occurring and that is affecting the project’s cost, schedule or quality. Active issues will be rolled up and displayed in the portfolio site, and applicable department sites.
Lessons Learned Documenting lessons learned helps the project team discover the root causes of problems that occurred and avoid those problems in later project stages or future projects. Lessons learned will be rolled up and displayed in the portfolio site, and applicable department sites.
Modified Pages This list is used to track and save all the changes to the pages at the top site by the applications or by the users to prepare for future upgrades.
Monthly Resource Actual Cost Allocation Summary This list is used to store the monthly resource actual cost allocation for the resources of all the projects.
Objectives Maintains the project objective’s which are displayed on the Project Home page
Project Baseline The Project Baseline list is used to track information for multiple baselines in the Project Baseline Web Part.
Project Health List The Project Health List stores key information about the project including Project Manager, Project Start Date, Project End Date, % Complete and key performance indicators. Project Health information will be rolled up and displayed in the portfolio site, and applicable department sites.
Project Managers Checklist This checklist provides project managers with steps for setting up a project in PM Central.
The Project Managers Checklist was added in PM Central 4.3
Project Site Navigators The Project Site Navigators List is used to create the tabs and provide navigation links throughout the site. It contains columns such as Menu Title, Description, URL, Parent Menu and Sort Order. This list is pre-populated with data.
Project Status Report The Project Status Report list is used by project managers to report the weekly status of the project, including accomplishments and issues for that week. Project Status Reports will be rolled up and displayed in the portfolio site, and applicable department sites.
Report Settings The Report Settings list stores options for PM Central reports.
Risks The Risks List is used to track risks. A risk is an uncertain event or condition that, if it occurs, has a negative effect on the project’s objectives. Risks will be rolled up and displayed in the portfolio site, and applicable department sites.
Tasks Baseline The Task Baseline list is used to track information for multiple baselines in the Task Baseline Web Part.
Tasks The Tasks List is used to track the timeline, work and resource assignment for the tasks. Tasks will be rolled up and displayed in the portfolio site, and applicable department sites.

Update key Project Health fields with “Auto Update”

Update key Project Health fields with “Auto Update”

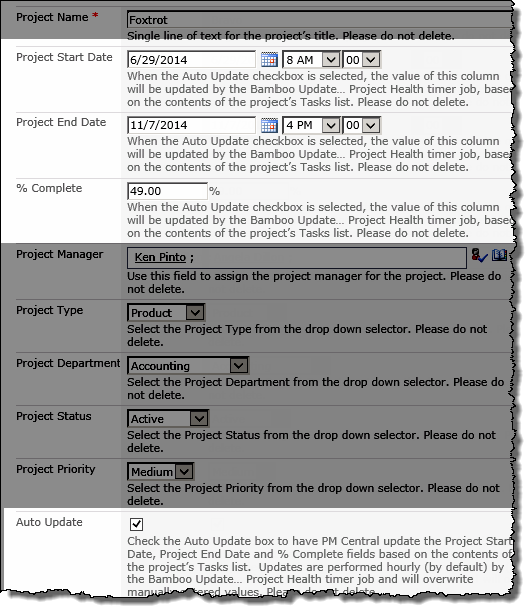
Project Health list Edit form
When the Project Health list’s Auto Update field is checked, the lists Project Start Date, Project End Date and % Complete fields, will be automatically updated based on information in the project’s Task list.

When working with Auto Update keep in mind:

  • The Project Start Date will be determined by the item in the project’s task list with the earliest Start Date

  • The Project End Date will be determined by the item in the project’s task list with the latest End Date

  • Auto Update is completed by the Bamboo Update Project Health… Timer job which, by default, runs every 59 minutes.

  • The Bamboo Update Project Health…timer job can be forced to run from the Update Data page accessed from the portfolio site’s PM Central Control Panel.

NOTE: The Bamboo Update Project Health..timer job will also update the Project Name field in lists that have content rolled up and displayed on the Portfolio site.

The Auto Update field is unchecked by default, but can be easily checked from one following locations:

PM Central Control Panel – Auto Update Settings

Administrators can set the default value of the Auto Update field to Yes from the portfolio site’s PM Central Control Panel > Auto Update Settings.
The setting will be applied to all new sites created in the Portfolio.
Auto Update screen
Portfolio Auto Update Settings were added in PMC. 4.3.

NOTE: When this option is selected, the Auto Update field will not be displayed in the PM Central Site Creation tool

PM Central Site Creation tool

Site Creation formCheck the Auto Update checkbox in the Project Health section of the site setup screen.

NOTE: The Auto Update checkbox is not available from this screen in PM Central 4.3

Project Health list Change the setting directly from the Edit form of the project’s Project Health list

Project General Settings

Project General Settings

Overview of Project PMC Control Panel

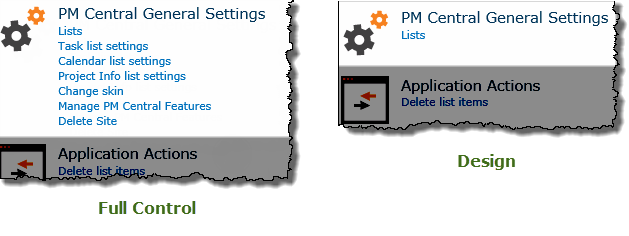
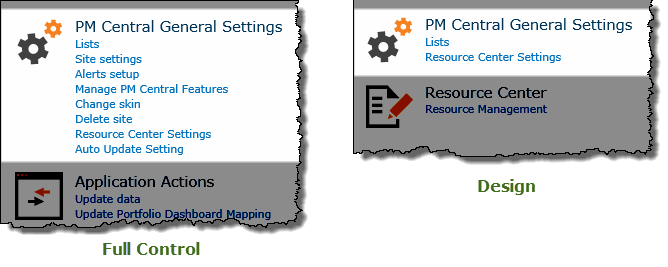
Like everything in PM Central the options presented under PM Central General Settings are security trimmed. The features available to users working with a standard PM Central project site will depend on whether they have Full Control or Design permissions on the site.

Image: PM Central General Settings in project site Control Panel

Link Permissions Function
Lists Full Control / Design

Provides access to the list of all lists, libraries and sites on the site. For a summary of the default List and Libraries included in the project site click here.

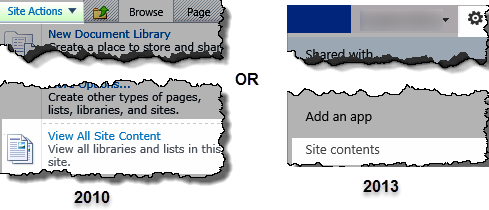
NOTE: This page can also be accessed by selecting View All Site Content under Site Actions

Task list Settings Full Control only Provides a link to the Task’s List Settings page
Calendar list settings Full Control only Provides a link to the Calendar’s List Settings page
Project Info List Settings Full Control only Provides a link to the Project Health’s List Settings page.
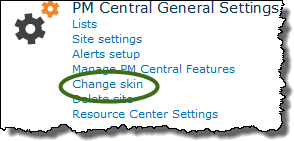
Change Skin Full Control only Five site skins are provided for the project site to allow the apperance of the site to be quickly changed.
Manage PM Central Features Full Control only There are several optional features that can be activated or deactivated from the Manage PM Central Features page of the Portfolio site.
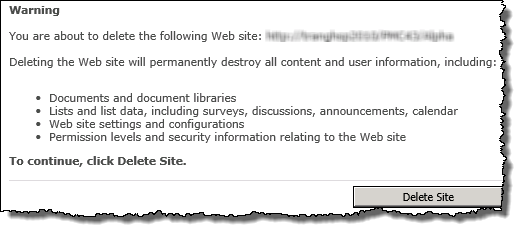
Delete Site Full Control only Using the Delete Site link in the Portfolio’s Control Panel will delete the project site and all related site content.
Icon-Warning IMPORTANT: You cannot undo this action
Delete site screen

Project Control Panel – Manage Features

Project Control Panel – Manage Features

Overview of Project PMC Control Panel Overview of PM Central General Settings

Manage PM Central Features, found under PM Central General Settings in the project’s PM Central Control Panel, allows administrators to enable or disable optional site features with the click of a button.

Image of the manage features options available from the project control panel

Function
1. Bamboo PM Central My Favorites
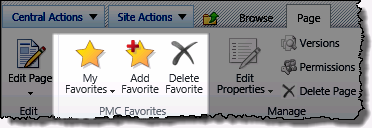
This option is activated by default and allows users create favorite links to frequently accessed PM Central pages using the PMC Favorites section of the Page ribbon.
PMC Favorites in the ribbon
2. Enhanced Central Actions Menu
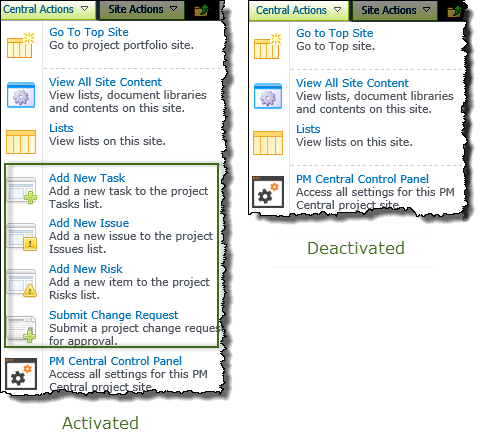
The Enhanced Central Actions menu is activated by default. Deactivating this option will remove the quick links from the drop down menu.
Image of Central Action menu with the feature activated and deactivated
3.

Resource Management and Reporting
A project site created using the PM Central Lite template can be upgraded to a standard PM Central site by clicking Enable. This will activate Resource Management and Reporting features on the site.

Icon-Warning IMPORTANT: You cannot undo this action

NOTES: 1.If the project site was created using a Standard template this option will be grayed out and the Status will be On.
2. This option is not available on project sites created with a Stand-alone template

4.

Schedule Management (Progress Update & Baseline Option)
Select this option to activate enhanced Schedule Management,including the option to create baselines and have access to additional views of the Tasks list, on a project site created with Lite template

Icon-Warning IMPORTANT: You cannot undo this action

NOTE: This option is not available on project sites created with a Stand-alone template

Overview of Project PMC Control Panel Overview of PM Central General Settings

Completing the PM Central Project Configuration Checklist

Completing the PM Central Project Configuration Checklist

Getting started with PM Central Overview of Project PMC Control Panel

The Configuration Checklist associated with the project site provides administrators with instructions on how to prepare the site for use. A link to the Configuration Checklist will be available in the warning message displayed at the top of the project home page.

Image of the warming configuration message with link to the Configuration Checklist

When working with the Configuration Checklist keep in mind:

  • You will need Full Control permission on the project site to complete items in the checklist.

  • The Warning message on the Project Home page will be displayed until all Mandatory items associated with the Configuration Checklist have a been closed.

  • A link to a separate Project Manager’s Checklist will be displayed as part of the Complete message text

Open item in the configuration checklist

NOTE: The contents of the project site’s Configuration Checklist changed in PMC 4.3

Action Description
Review Task Master Work Week settings

Task Master is configured to define working hours as Monday – Friday, 8AM – 5PM with lunch between 12-1PM, resulting in an 8 hour work day and 40 hour work week.
Working hours will be enforced when the project is Recalculated from the Task Master toolbar.

If your organization officially uses a longer or shorter standard work week you will need to update Task Master’s Work Week Settings.

  • Navigate to the Tasks tab, or click this item’s action link to access the main Task page
  • Click the gear icon on the right of the toolbar to access Project Schedule Settings.

  • Make the necessary modifications and click Update.

    Icon-WarningImportant:
    The working days and hours defined on the project site must be consistent with the settings defined in Report Center Settings on the Portfolio site.

Associate Task Master with the Holiday list

If your organization is using a “Holiday” list you will need to associate it with the Task Master web part to prevent work being scheduled on the identified “holidays”.

  • Navigate to the Tasks tab, or use this this item’s action link, to access the main Tasks page
  • Edit the All Tasks web part
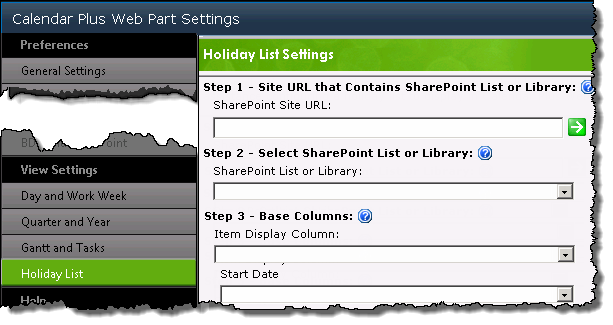
  • Click the Task Master Web Part Settings button
  • Click Holiday List on the left navigation pane
  • Enter the URL of the SharePoint site that maintains the Holiday list, then select the list from the drop down.

Note: The same holiday list must be used throughout a PM Central Portfolio and associated sites, and must be created using a SharePoint Calendar list.

Validate the Report & Schedule settings

Standard templates only

The working days, hours, and holidays specified in Resource & Schedule Settings will be referenced by PM Central when generating the project site’s Resource Allocation and Capacity reports.

  • From the PM Central Control Panel, or this item’s action link, access Resource & Schedule Settings and validate the work schedule is consistent with the schedule used in Task Master.

    Icon-WarningImportant: The working days, hours, and holidays, identified here must be consistent with those defined in Report Center Settings at the Portfolio site.

Determine how the Group Email Web Part should send messages

The Group Email Web Part is configured to send notifications to identified project team members using your email client. This option does not require additional configuration, but it is subject to a limitation that prevents more than 2083 characters being passed across a query string.

If you think the number of characters in the email addresses of project team members will exceed this limit, or if you want to have the email form load in the SharePoint page, make the following changes to the default Group Email configuration:

  • Navigate to the Project Home page, or click the action link associated with this item.
  • Edit the Send an Email to Project Team web part
  • In the configuration tool pane, under Bamboo Group Email, select the Use SMTP radio button
  • Enter the SMTP Server Name used by SharePoint, (this information is available from Configure Outgoing Email Settings in Central Administration) and a Notification Email From address

Note: Group Email will not save a history of the messages sent.

Expose the Budget Cost Status KPI in the Project Info dashboard (Optional)

Standard templates only

When Standard Rates are associated with user profiles in the Project Resource Pool, and tasks are assigned to Project Team Resources, PM Central can calculate the human resource cost of the project. The calculated Project (Human) Cost can then be compared with the Budget (Estimated) Cost value entered in the Project Health list, and the budget health of the project displayed in the Budget Cost Status KPI.

The Budget Costs Status column is not displayed in the Project Info dashboard by default. To display this column you will need to complete the following steps:

  • From the Project Home page (Project Home tab) edit the Project Info web part
  • Click the Data-Viewer Web Part Settings button
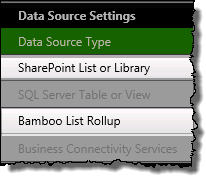
  • Click SharePoint List or Library on the left navigation pane
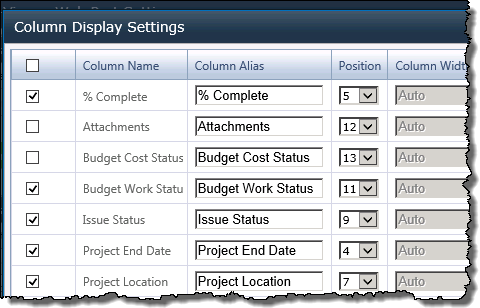
  • Click the Column Display Settings button and check the Budget Cost Status box
  • Click Save & Close and OK to exit the configuration tool pane

Note: The Budget Cost Status column was removed from the default display in PM Central 4.3

Hide fields in the Project Health and Tasks forms (Optional)
  • From the PM Central Control Panel on this site, or this item’s action link, access Show or Hide columns…
  • Under List Name select either the Project Health list or the Tasks list
  • Uncheck the boxes associated with fields that should not be displayed in the associated list forms.

    Icon-WarningImportant: This is the only supported method for hiding fields in PM Central.

Save your site configuration in a template (Optional)

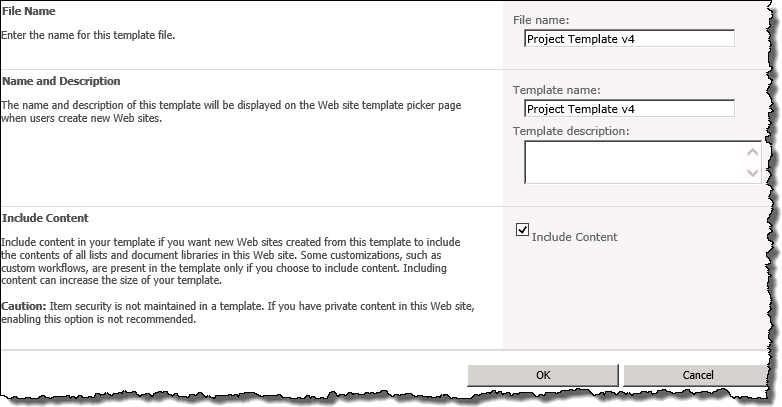
You don’t want to have to complete these configuration steps for every site, so consider creating a custom project template.

When the template is available in the Solutions gallery completing the following steps on the Portfolio site will make the project site template available in PM Central’s site creation tool:

  • Navigate back to the Portfolio site
  • Click the Create New Project/Department button. You will need to be a member of the Owners group to see this button on the page
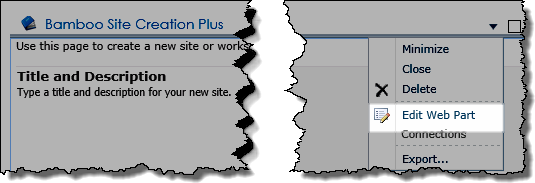
  • Edit the Page to access the configuration tool pane of the Bamboo Site Creation Plus Web Part.
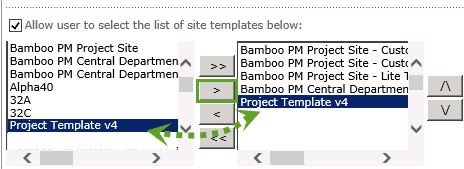
  • Scroll to the template selection boxes under Allow user to select … and use the > button to add the custom project template to the display box on the right
  • Use the up arrow to position the custom project template at the top of the available templates.

    Icon-WarningImportant: It is recommended that the template only be used in the site collection where it was created.

Portfolio Control Panel – Resource Center

Portfolio Control Panel – Resource Center

Overview of Portfolio PMC Control Panel

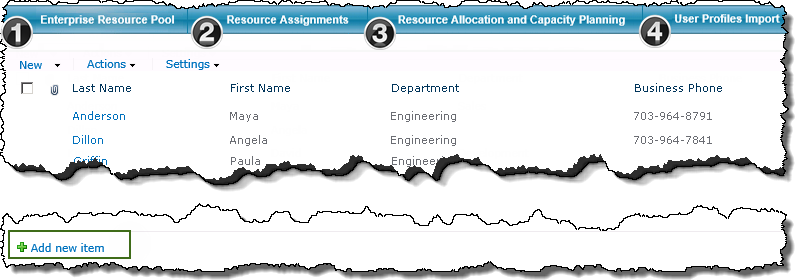
The Resource Management link in the portfolio’s PM Central Control Panel, provides access to the Resource Center which consists of 4 separate subsections.

The Resource Center in PMC

Function
1.

The contents of the portfolio’s Enterprise Resource Pool (ERP) list are displayed on the landing page of the portfolio Resource Center.

When working with the ERP keep in mind:

To add users to the ERP:

  1. Manually add user information into the list list by selecting the Add New Item link found on the page and completing the associated form.

    OR

  2. Import users with the User Profile Import utility (see #4)

2.

Under the Resource Assignments tab you will find a Gantt display of all tasks for all projects sorted by resource.

  • For information on using the web part click here.

  • For information on changing the number of items per page, click here.

3.

The Resource Allocation and Capacity Planning tab provides access to a number of reports detailing resource capacity, allocation by resource, project, resource availability and others.

  • Click here for a summary of the PM Central Resource reports available
  • For information on how to generate a resource report, click here

  • For information on configuring the PM Central resource reports, click here

4. User Profile Imports provides a tool to import resource information into the Enterprise Resource Pool from the SharePoint User Profile Database.

Portfolio Control Panel – Update Data

Portfolio Control Panel – Update Data

Overview of Portfolio PMC Control Panel

Screen shot of the Central Actions drop down menu.
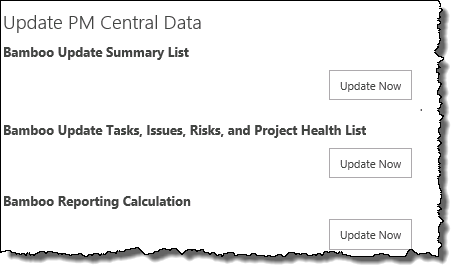
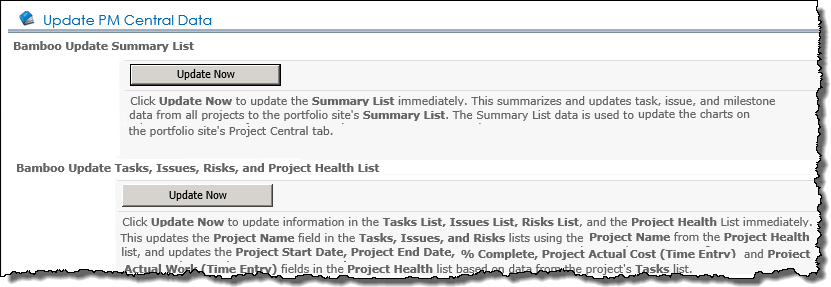
The Update Data page lets users with Full Control permissions to the portfolio site initiate actions that will update specific PM Central data.

Option Updates
Bamboo Update Summary List

Clicking the Update Now button updates data from project sites’ Tasks, and Issues lists to the portfolio site’s Summary List which updates the sums and counts of the tasks issues, and milestones from all projects. The Summary List is the data source for the portfolio site’s Tasks, Issues, and Milestones charts, and is used by PM Central to determine what department sites a project may be associated with.

NOTES:
1. Only the local Summary List is updated by this action.
2. By default, the Bamboo Summary List Timer Job is scheduled by default to run every 59 minutes and will update all Summary Lists associated with portfolio sites found in the specified web application.

Bamboo Update Tasks, Issues, Risks and Project Health List

This process updates fields in the Tasks, Issues and Risks lists with project information found in the Project Health list.

The Project Name field, found in all three lists, will be updated, along with any other default project information fields (Project Department, Project Manager, Project Type, etc.) found in the list.

The process also updates the following fields in the Project Health list, if the Auto Update box is checked:

  • Project Start Date
  • Project End Date
  • % Complete

NOTES:
1. Only the projects in the local portfolio will be updated by this action.
2.The Bamboo Update Tasks, Issues, and Risks Timer Job is scheduled by default to run every 59 minutes and will update all projects found in the specified web application.

Bamboo Reporting Calculation

Initiates a process that will update items in the Report Info lists on each project site based on data calculated from the project site’s Task’s list. The process then queries the Report Info lists based on the report query item found in the portfolio site’s Report Information List. The query results are attached to the original request, and the Report Status is changed to Done, at which time the report is made available to the requesting user.

This option was added in PM Central 4.4

Icon-Warning IMPORTANT: Item limit thresholds may limit your ability to use this option. See your Sharepoint Administrator for additional information.

NOTES:
1. Only data in the local portfolio will be updated by this action.
2.The Bamboo Reporting V4 timer job is scheduled by default to run daily, starting at 11:45 PM and will update all PM Central sites in the specified web application.

Overview of Portfolio PMC Control Panel

Portfolio Control Panel – General Settings

Portfolio Control Panel – General Settings

Overview of Portfolio PMC Control Panel

Like everything in PM Central the options presented under PM Central General Settings are security trimmed. The features available to users working with a standard PM Central portfolio will depend on whether they have Full Control or Design permissions on the portfolio site.

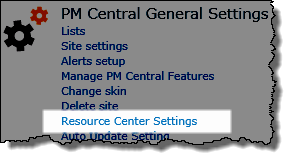
Image: PM Central General Settings in portfolio site Control Panel

NOTES:
1. The images in the Function column show the default configuration settings.
2. The Resource Center Settings link will not be available under PM Central General Settings if the portfolio was created using a Lite template.

Link Permissions Function
Lists Full Control / Design

Provides access to the list of all lists, libraries and sites on the site. For a summary of the default List and Libraries included in the portfolio site, click here.

NOTE: This page can also be accessed by selecting View All Site Content under Site Actions

Site Settings Full Control only Provides access to the standard SharePoint Site Settings page
Alerts Setup

Referenced in the portfolio’s Configuration Checklist

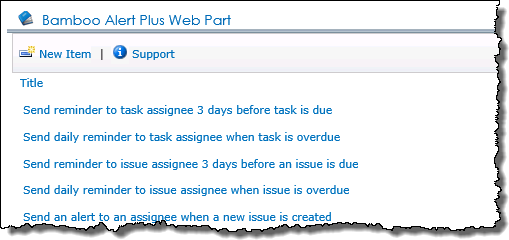
Full Control only The Alerts Setup link provide access to the Alert Plus Web Part where the predefined alerts can be enabled and/or modified, and new alerts created.
image of the default alerts in Alert Plus
Manage PM Central Features Full Control only There are several optional features that can be activated or deactivated from the Manage PM Central Features page of the portfolio site.
Change Skin Full Control only Five site skins are provided for the portfolio site to allow the look and feel of the site to be quickly changed.
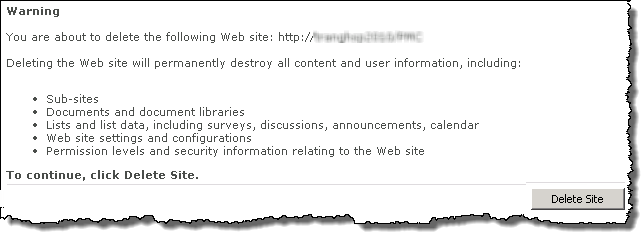
Delete Site Full Control only Using the Delete Site link in the portfolio’s Control Panel will delete the portfolio site and all the portfolio’s sub sites (project sites).
Icon-Warning IMPORTANT: You cannot undo this action
Delete site screen
Resource Center Settings

Referenced in the portfolio’s Configuration Checklist

Full Control/ Design

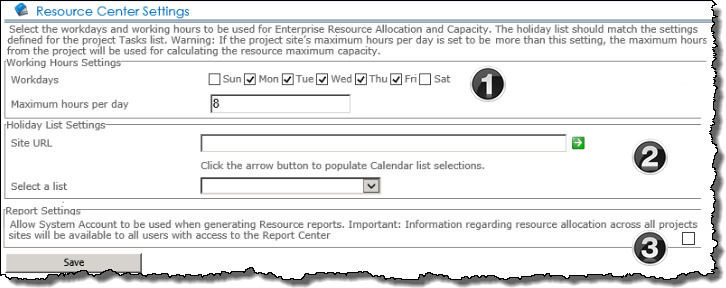
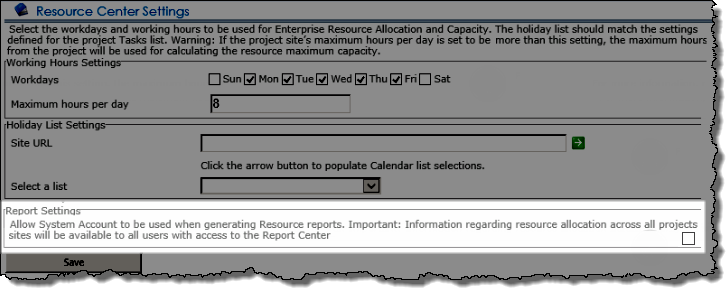
Image of the Resource Settings Screen in the Portfolio Control Panel

1. Working Settings
Define the Working Days and Hours that will be used in PM Central. The settings here should be consistent with the settings specified when completing the project site’s Configuration Checklist

Icon-Warning IMPORTANT: If a project site in the portfolio was configured to use a greater number of working hours than those identified here at the portfolio site, the project’s working hours will be used to calculate the capacity of all resources assigned to tasks on that site. More information is available here

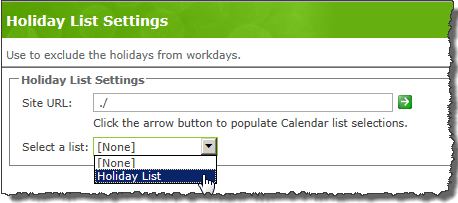
2. Holiday List Settings
Associate the Resource Center with a holiday list so your company’s designated holidays are not included in resource capacity calculations.

  • Enter in the URL to the site where the holiday list is located

  • Click the green arrow button to populate the drop down selector with the list found on the site.

  • Select the desired list and click Save

Icon-WarningImportant: The same holiday list will need to be referenced by other Web Parts in PM Central. Click here to find out more.

3. Report Settings
By default all resource reports are security trimmed so users with access to the Resource Center will only see resource information pertaining to projects they have permissions to access.
To allow all users with access to the Report Center to see reports generated by the System Account that will contain comprehensive information on all resource allocation across the portfolio, click the Report Settings check box.
The Report Settings feature was added in PM Central 4.3

Auto Update Settings

Referenced in the portfolio’s Configuration Checklist

Full Control only Administrators can set the default value of the Project Health list’s Auto Update field to Yes by checking the Auto Update box. This default setting will be applied to all new sites created in the portfolio.
Auto Update screen

Auto Update Settings were added in PMC. 4.3.

Overview of Portfolio PMC Control Panel

PM Central Portfolio Site – Lists and Libraries

PM Central Portfolio Site – Lists and Libraries

Overview of the Portfolio Site Overview of PM Central General Settings

Icon-WarningIMPORTANT: DO NOT delete any of the default lists and Libraries. Changes to the default lists should be made with caution due dependencies in the application. Please refer to the Customization Guide before making any changes

Libraries
PMCentral Pages The PMCentralPages library stores all PM Central Web Part pages for the site. The pages in this library should not be deleted or renamed as that will impact navigation in the site
Pics A picture library that stores the default site images and logos
PM Central Skins By default, there will be no items found in this document library. Items will only be added to the library if the template skin is changed
Lists
Alert Plus Configuration List Alert Plus Configuration List – Holds alert configurations for the Alert Plus service. It is recommended that edits or new alerts be created from the Alert Plus Web Part
Bamboo List Rollup Configuration list
Bamboo Project Dashboard Data Mapping Maps the Project Health data to the associated fields in the Project Dashboard list for the Gantt View of Active Projects. The contents of this list must be manually refreshed.
Change Requests This list is referenced by List Rollup Schema to rollup items entered in Change Request lists on project sites. This list will not contain content at the portfolio site
Configuration Checklist This list is pre-populated on site creation and provides instructions for final configuration steps. The Warning Web Part pulls its configuration status from this list.
Department Site The Department Site list is used to store information related to the URL, the Department Manager and the Site ID. Items are added to this list automatically when a Department Site is created using the provided Site Creation Plus tool
Enterprise Resource Pool The Enterprise Resource Pool List is used by project managers for resource management and allocation.
FAQs Used to store any desired FAQ content for the Help page. Comes with sample content. Should be updated with real content prior to deployment.
Favorites The Favorites list stores favorite links added from the PMC Favorites section of the Page ribbon.
Gantt Chart Information This list is used for the system to store the task’s information (Title, Start Date, Due Date, Assigned To…etc.) to display data in the Resource Assignments report. Do not delete or modify any of the columns in this list.
Issues This list is referenced by List Rollup Schema to rollup items entered in Issues lists on project sites. This list will not contain content at the portfolio site
Lessons Learned This list is referenced by List Rollup Schema to rollup items entered in Issues lists on project sites. This list will not contain content at the portfolio site
Modified Pages This list is used to track and save all the changes to the pages at the top site by the applications or by the users to prepare for future upgrades.
Monthly Resource Actual Cost Allocation Summary This list is used to store the monthly resource actual cost allocation for the resources of all the projects.
Monthly Resource Cost Allocation Summary This list is used to store the monthly resource cost allocation for the resources of all the projects
Monthly Resource Work Allocation Summary This list is used to store the monthly resource work allocation for the resources of all the projects.
Portfolio Dashboard list The Portfolio Dashboard List comes with the Bamboo Project Portfolio Dashboard Web Part. It stores data about all of the projects, including project status, start and due dates, project health and more, and populated by the Update Dashboard list timer job.
Project Creation Request The Project Creation Request list is used to submit a request for a new project site for approval.
Project Creation Workflow Configuration This list defines settings for project creation workflows used with Workflow Conductor (sold separately)
Project Health The Project Health List stores key information about the project including Project Manager, Start Date, Due Date, % Complete and key performance indicators. This list is referenced by List Rollup Schema to rollup Project Health information from the project sites. This list will not contain content at the portfolio site
Report Information This list is used for the system to store histories of the reporting requests submitted for background processing. Do not delete or modify any of the columns in this list.
Report Settings This list stores options for PM Central reports.
Risks This list is referenced by List Rollup Schema to rollup items entered in Risks lists on project sites. This list will not contain content at the portfolio site
Summary list The Summary List is a list that PM Central uses to update the counts of tasks, issues and milestones from all projects. This list is used to display tasks, issues and milestone charts from all projects. The list is updated by the Bamboo Update Summary List timer job
Tasks This list is referenced by List Rollup Schema to rollup items entered in Tasks lists on project sites. This list will not contain content at the Portfolio Site
Timesheet Links The Timesheet Links liststores the Time Tracking and Management site URL, if Time Tracking and Management is integrated with PM Central.
Top Site Navigators The Top Site Navigators List is used to create the tabs. It contains columns such as Menu Title, Description, URL, Parent Menu and Sort Order. This list is pre-populated with data.

Portfolio Control Panel – PM Central Help

Portfolio Control Panel – PM Central Help

Overview of Portfolio PMC Control Panel

.

Link Permission Function
Configuration Checklist Full Control / Design

The portfolio site’s Configuration Checklist provides instructions for completing the configuration of the Portfolio site. When there are Mandatory items in the list with an “Open” status, a warning message will be displayed on the Portfolio home page.
Open item in the Configuration check list

Icon-Warning IMPORTANT: While users with Full Control and Design permissions can see the configuration checklist, Full Control permissions are required to complete the associated steps.

Health Check

Referenced in the portfolio’s Configuration Checklist

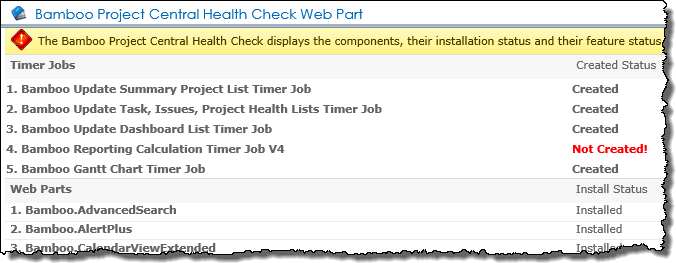
Full Control / Design Use the Health Check to make sure that PM Central’s Web Parts, timer jobs and other components have been installed correctly.
PMC Health Check Web Part
Information on troubleshooting components that were not correctly installed is available here
Product Version

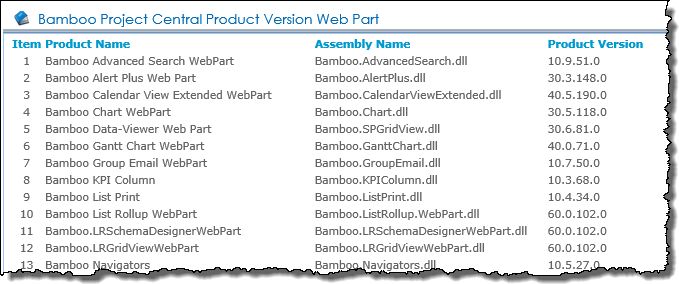
Full Control / Design Provides a list of all PM Central’s components and Web Parts, their assembly names, and their product version.
Project Version display

Overview of Portfolio PMC Control Panel

Completing the PM Central Portfolio Configuration Checklist

Completing the PM Central Portfolio Configuration Checklist

Getting started with PM Central Overview of Portfolio PMC Control Panel

The Configuration Checklist associated with the portfolio site provides administrators with instructions on how to prepare the site for use. A link to the Configuration Checklist will be available in the warning message displayed at the top of the Portfolio home page.

Image of the warming configuration message with link to the Configuration Checklist

When working with the Configuration Checklist keep in mind:

  • You will need Full Control permission on the Portfolio site to complete items in the checklist.

  • The Warning message on the Portfolio Home page will be displayed until all Mandatory items associated with the Configuration Checklist have a been closed.

Open item in the Configuration checklist

NOTE: The contents of the Portfolio Configuration Checklist changed in PMC 4.3

Action Description
Verify the successful installation of all PM Central components
  • Review the Health Check display, accessed from the PM Central Control Panel or from the item’s action link, to confirm PM Central Timer Jobs and Web Parts were successfully installed.

  • If a specific web part did not install successfully, run the setup.exe for the specific component found in the SA12 folder on the SharePoint server.

Review the Resource Center settings

Standard templates only

The working days, hours, and holidays defined in the Resource Center settings will be referenced by PM Central when generating Resource Allocation and Capacity reports.
By default, resource reports are created individually for each user with access to the PM Central Control Panel, and the report contents are security trimmed.

  • From the PM Central Control Panel, or this item’s action link, access Resource Center Settings and validate the work schedule.

  • Check the Report Settings box if you want to use the System Account to generate reports, making all resource allocation information available to users with access to the Resource Center.
    (Feature added in PM Central 4.3)

    Icon-WarningImportant:
    The working days, hours, and holidays identified here must be consistent with the settings used on the project sites. If using a holiday list it must be created with a SharePoint Calendar list, and the same list must be used throughout the PM Central Portfolio and associated sites.

Determine if projects should “Auto Update” by default

When the Project Health list’s Auto Update check box is checked, a regularly scheduled timer job will update the Project Start Date, Project End Date and % Complete fields, based on the contents of the project’s associated Tasks list.

If you want to enable Auto Update by default on newly created project sites complete the following step:

  • From the PM Central Control Panel on this site, or this item’s action link, access Auto Update Settings and set the value to Yes.

    (Feature added in PM Central 4.3)
Enable Alert Plus notifications

PM Central uses Alert Plus to send automated reminder notifications to users. Each of the 6 pre-defined alerts will send a notification to assigned users when specific criteria are met; a task or issue is due in 3 days, a task or issue is overdue, etc. By default, these alerts are configured to be sent daily as a summarized notification.

  • From the PM Central Control Panel, or this item’s action link, access Alert Plus web and change the status of the desired alerts from disabled to Enable.

  • Optional modifications to Event frequency, Mail format, etc. can also be applied.

NOTE: PM Central Lite Portfolio sites will have 5 pre-defined alerts.

Populate the Enterprise Resource Pool

Standard templates only

The Enterprise Resource Pool (ERP) is a centralized list of users who are available to work on projects created under the Portfolio site. User information can then be easily copied from the ERP into the Project Resource Pool on each project site.

  • Click the Resource Management link under Resource Center in the PM Central Control Panel, or this item’s action link, and populate the ERP using one of the two available methods:

    1. Click Add New and enter user information directly into the provided form.
    2. Go to the User Profile Import tab and use the provided tool to copy user information from the SharePoint User Profile Database.

    NOTE: This option requires specific SharePoint services to be available and the use of SharePoint Server or Enterprise.

Decide if resource reports will be complied on page load

Standard templates only

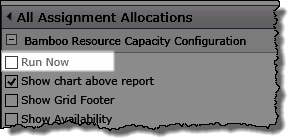
Resource reports on the Portfolio site are compiled, by default, every evening at 11:45 PM. Specific reports, however, provide a Run Now option in the configuration tool pane that when checked will generate the associated report on page load.

To change the default setting on a report you will need to complete the following steps:

  • Go to Resource Management in the PM Central Control panel for this site, or use this item’s action link, to access the resource reports under Resource Allocation and Capacity Planning.

  • Navigate to the appropriate report and edit the report web part

  • Check the Run Now check box

Icon-WarningImportant: Administrators should monitor pages using the Run Now option as request timeout errors can occur.

Run Now is a configuration option associated with the following reports:

  • All Allocations
  • By Resource
  • By Project
  • By Project Department
  • Allocation by Manager
  • Resource Availability
  • By Department
  • Risk Chart (accessed from the Risks tab)

    NOTE: By default, the Risk Chart is only available to users with Design permissions or higher on the Portfolio site. To make the chart available to all users, check Allow View Report in the Risk Chart configuration tool pane.

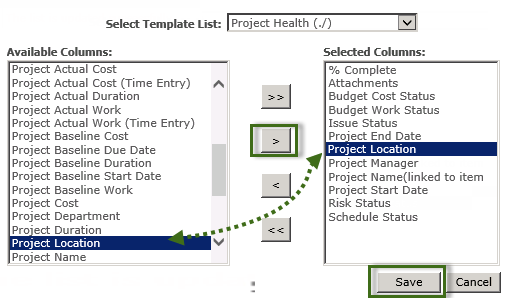
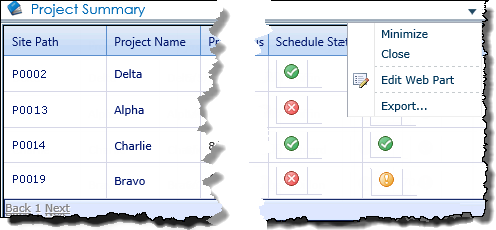
Expose the Budget Cost Status KPI in the Project Summary dashboard

Standard templates only

When Standard Rates are associated with user profiles in the Enterprise Resource Pool, and tasks are assigned to Project Team Resources, PM Central can calculate the human resource cost of the project. The calculated Project (Human) Cost can then be compared with the Budget (Estimated) Cost value entered in the Project Health list, and the budget health of the project displayed in the Budget Cost Status KPI.

The Budget Costs Status column is not displayed in the Project Summary dashboard by default. To display this column you will need to complete the following steps:

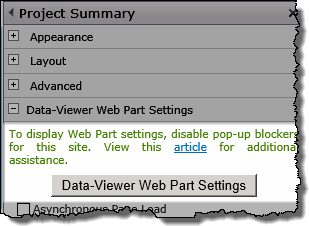
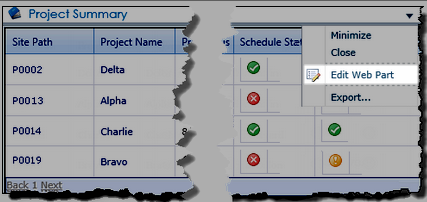
  • From the Portfolio home page (Project Central tab) edit the Project Summary web part
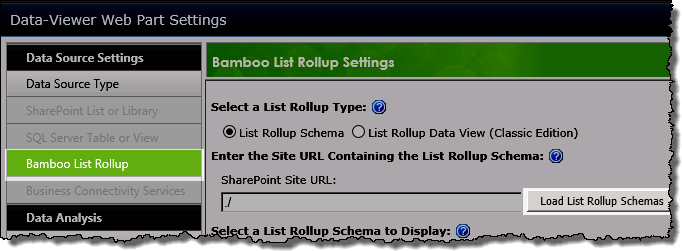
  • Click the Data-Viewer Web Part Settings button
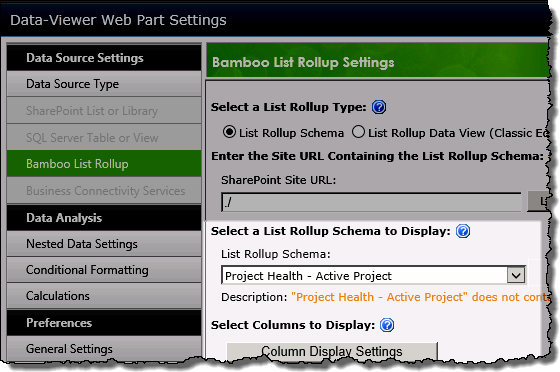
  • Click Bamboo List Rollup on the left navigation pane
  • Click the Column Display Settings button and check the Budget Cost Status box
  • Click Save & Close and OK to exit the configuration tool pane

Note: The Budget Cost Status column was removed from the default display in PM Central 4.3

Site skins available in PM Central

Site skins available in PM Central

Configuring PM Central Using PM Central

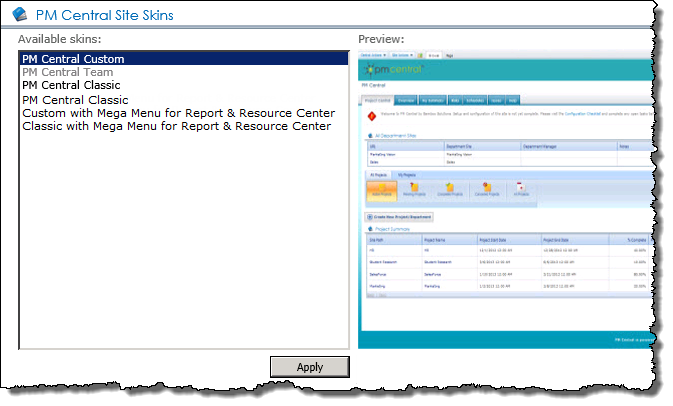
A variety of skins are available to allow you to quickly and easily change the appearance of PM Central Sites. Users with Full Control permissions can change skins from the PM Central General Settings section of the PM Central Control Panel.

NOTES:
1. PM Central Custom, Team and Classic skins are available for all sites.
2. Skins with the Mega Menu feature are only available for the Portfolio and Department sites
3. Mega Menu skins were introduced in PM Central 4.2

Portfolio and Department Sites

PM Central Custom
This color scheme is associated with the Bamboo PM Central Top Site – Custom TemplatePreview of the Custom PM Central skin
PM Central Team
This color scheme is associated with the Bamboo PM Central Top Site TemplatePreview of the Default Team Site skin
PM Central Classic
Preview of the PM Central Classic skin
Custom with Mega Menu for Report & Resource Center
Preview of the Custom skin with Mega Menu feature
Classic with Mega Menu for Report & Resource Center
Preview of the Classic skin with Mega Menu feature

Project Sites

PM Central Custom
Preview of the Custom PM Central skin
PM Central Team
Preview of the Default Team Site skin
PM Central Classic
Preview of the PM Central Classic skin
Blue
Preview of the Blue skin
Sky Blue
Preview of the Sky Blue skin
Yellow Green
Preview of the Yellow Green skin

Overview of Portfolio PMC Control Panel Overview of PM Central General Settings

Configuring PM Central’s site creation tool

Configuring PM Central’s site creation tool

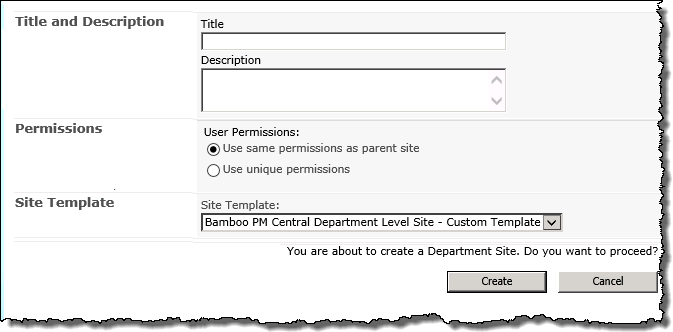
Site Creation Plus is configured to simplify the overall site creation process in PM Central. No additional configuration of the Web Part is required, however you may want to modify the configuration settings to use another default template, or to predefine the permissions that will be used on the site.

When working with Site Creation Plus keep in mind:

  • You can configure the web part to display PM Central templates that were customized for your organization.

  • Customized “Lite” PM Central templates will not be displayed in Site Creation Plus, due to a known limitation. Click here for information on creating sites from a customized Lite template.

  • The columns available for display in the Project Health section of the Site Creation Plus Web Part are hard coded. Custom columns created in the Project Health list will not be displayed in this Web Part.

  • When used in PM Central the Site Creation Plus Web Part has configuration options that are specific to the application, such as the inclusion of Project Health information.

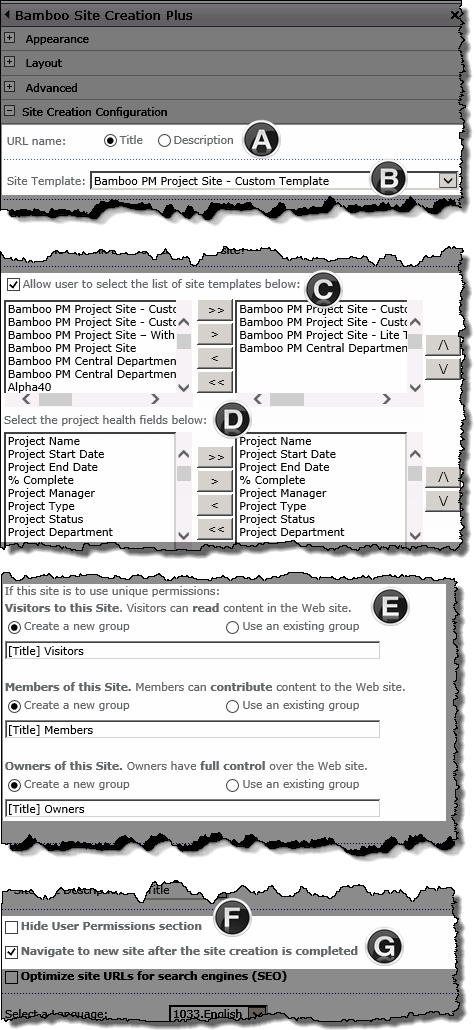
The Site Creation Plus Configuration tool pane

Site Creation PLus configuration tool pnae
Function

A. Site Creation Plus is configured to use the text entered into the Title field as the site URL.


B. The Site Templates drop-down presents all the site templates available in the site collection


C. The Available template selector will only PM Central project or department templates. This will include any custom templates created for your organization.

Use the < or > arrows to add or removed templates from the Selected template box
Icon-Tip Consider removing the Bamboo Project Site – Custom with Sample Data from the selected templates. For more information about the template options click here.


D. Use the selector to remove any Project Health columns that are not used by your organization


E. If the site creator chooses to use Unique Permissions, three new user groups will be created. The naming convention can include either the Title or Description entered by the end user.


F. Administrators can remove the permissions section of the user display and predefine if sites will use inherited or unique permissions.Hide permissions radio buttons


G. By default, users will be taken to the new site on creation.

Configure Site Creation Plus to use a custom PM Central template

1. Use the Add New Project link under the Central Actions menu or the Create New Project… button on the portfolio home page to access the Site Creation Plus Web Part page

Links to create a new PMC site

NOTE: The page will need to be in edit mode for you to access the Web Part’s configuration tool pane.

2. Use the selector arrows to add the customized PM Central template(s) to the list of available templates and remove templates that should not be used. (C)

3. Arrange the available templates so the desired default PM Central project template is at the top of the list (C)

4. Optional: Determine which Project Health columns will be available from this web part (D.)

5. Optional: Predefine what permissions will be associated with the site on creation (F & E)

6. Click Save & Close and stop editing the page to see your changes.

Read this BEFORE you create a PM Central site

Read this BEFORE you create a PM Central site

Getting started with PM Central

While PM Central is easy to implement, there are some best practices that should be observed:

  • Make sure that you have a root site collection on the web application where PM Central sites will be created.
    You do not have to use the root site collection for PM Central, it just has to be there.

  • The PM Central Portfolio sites (or any other PM Central sites) should not be created at the top of the site collection.
    PM Central site templates have been hidden in Central Administration in PM Central 4.0 and later releases, but it is worth emphasizing the point.

  • The top site of the site collection should be a SharePoint Team Site.
    Do not use a Publishing template for the root site of the site collection where PM Central sites will be created.
  • It is recommended (but not required) that PM Central be created is its own site collection. This allows greater administrative flexibility when it comes to backing up content, migrations etc.
    You should strongly consider using a separate site collection if changes have made to Master Pages and/or the Themes, Look and Feel are inherited by other sites in the site collection
  • Sites in PM Central should not be created using SharePoint’s New Site dialog box.
    Use the PM Central specific tools to create Portfolio, Department and Project sites. Information about accessing and using these tools is part of the Getting Started.. guide.
  • Icon-WarningDo not delete any of the columns in the default PM Central lists, or delete any of the lists themselves.
    Doing so will impact your ability to upgrade to newer versions of this product. It may also render some functionality inoperable. Review the Customization guide before making changes in the application.

PM Central’s Site Collection features

PM Central’s Site Collection features

Configuring PM Central Getting Started with PM Central

BambooFeatureActivation.pngWhen PM Central is deployed there are a number of features that need to be activated at the Site Collection level before PM Central will be operable.

Accessing the provided Bamboo Feature Activation and entering in the site collection URL, will ensure that all the required features are activated.

Note: Enter the URL to site. Do not include library and page (eg: /SitePages/Home.aspx)or the utility will return an error message

Below is a list of the PM Central Site collections features that can be activated on an as-needed basis.

Bamboo PM Central Projects Site Creation Area Use this feature to activate/deactivate the option under the Site Actions and the projects area for creating Bamboo Project Management Central portfolio site or stand-alone project site.
Icon-WarningImportant: This feature must be activated to allow you to create a portfolio site
Bamboo Project Central Content Types. Activating this feature will make the Bamboo Project Central site columns available under Site Gallaries, making it easy to modify choice values for the Project Type and Project Department columns.

Icon-WarningImportant:
1. Not all choice columns can have their values modified. Please refer to the customization guide before making changes.
2. Activating the feature will expose the Bamboo PM Central Content Types. The structure of these content types should not be modified

Site Templates
Bamboo PM Central Department Level Site – Lite Template Activating this feature make the Bamboo PM Central Department Level Site — Lite Template available in the drop-down selector in PM Central’s Site Creation Plus tool
Bamboo PM Central Top Level Site – Lite Template Activating this feature make the Bamboo PM Central Top Level Site – Lite Template available in the drop-down selector of the Create New Site dialog box.
Bamboo PM Project Site – Discussion Board Plus Template

Activating this feature will allow users to create PM Central project sites with Discussion Board Plus integration.

NOTE: A licensed copy of Discussion Board Plus (sold separately) is required.

PM Central Discussion Board Plus template was added in PMC 4.3

Bamboo PM Project Site – Lite Template Activating this feature make the Bamboo PM Central Project Site — Lite Template available in the drop-down selector in PM Central’s Site Creation Plus tool
Bamboo PM Project Site – Stand-alone template Activating this feature make the Bamboo PM Central Department Level Site — Lite Template available in the drop-down selector in PM Central’s Site Creation Plus tool

Using a Holiday list in PM Central

Using a Holiday list in PM Central

Creating and using a Holiday list allows ensures that your organizations designated holidays are excluded from task scheduling and resource capacity calculations in PM Central.

When using a Holiday list keep in mind:

  • Only one holiday list can be used per PM Central Portfolio

  • The holiday list must be created from a SharePoint Calendar list

  • Holidays need to be created as Yearly events

If you use a holiday list there are several Web Part in PM Central that will need to be configured to reference the list:

Portfolio Site
Resource Center

Required

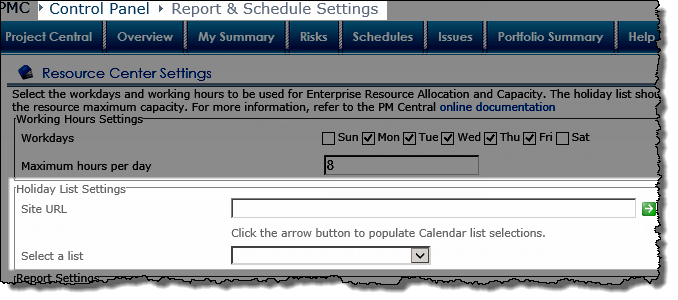
From the Resource Center link in the portfolio site’s PM Central Control Panel, associate the Resource Center with the holiday list so your company’s designated holidays are not included in resource capacity calculations.
Holiday list configuration in the resource center

  • Enter in the URL to the site where the holiday list is located

  • Click the green arrow button to populate the drop down selector with the list found on the site.

  • Select the desired list and click Save

Project Site
Resource Center Settings

Required

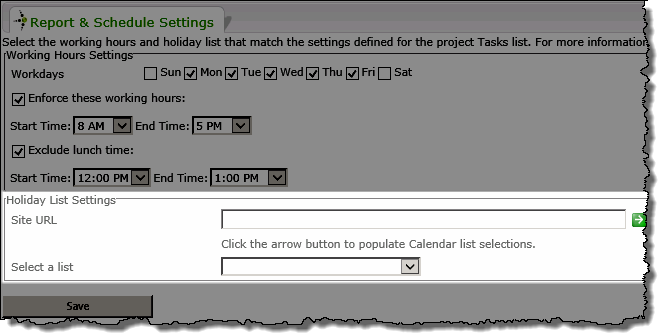
From the Resource Center link in the project site’s PM Central Control Panel,point to the Holiday list
PSReportCenterSettings.png
Task Master Web Part

Required

When configured with a holiday list, Task Master will not allow work to be scheduled on the designated holidays.

NOTE: The project must be Recalculated before the scheduling rules will be enforced.

Holiday list configuration in Task Master
Click here for more information on configuring the Web Part.

Calendar Plus Web Part

Optional

When Calendar Plus is configured to reference a Holiday List, items from the list will be displayed in all Calendar Plus views.
Holiday View Settings configuration screen

NOTE: This configuration has no impact scheduling or reporting in PM Central and is for display purposes only.

Click here for more information on configuring the Web Part.

A quick guide to setting up PM Central

A quick guide to setting up PM Central

Configuring PM Central

Follow these steps so you can quickly start using PM Central to manage your projects:

Note: You will need to be logged in to an account that has the SharePoint Full Control permission level to complete many of the steps below.

Step Action
1. Icon-WarningImportant:
Read this before you create a PM Central Portfolio or Stand-alone site.
2.

Determine which of the PM Central Template options will best meet the needs of your organization.

NOTES:
1. PM Central uses StandardFull templates by default.
2. If you elect to use the Lite or Stand-alone templates you will need to activate the related Site Collection feature.

3. Create the Portfolio (or Stand-alone) site.
4.

Complete the Portfolio site’s Configuration Checklist.

NOTE: If you created a Stand-alone site in the step above, complete the site’s configuration check list then skip ahead to Step 7.

5. Create a Project Site.
6. Complete the Project Site’s Configuration Checklist.
8. Optional:
Create and configure PM Central department sites to provide a filtered view of the portfolio.

PM Central Timer Jobs

PM Central Timer Jobs

Screen shot of the PM Central alerts in Job Definitions view of Central Admin

Six timer jobs are deployed with the PM Central solution, with additional timer jobs being deployed as part of the Alert Plus Master timer job.

You can verify that all timer jobs were successfully installed from the Health Check display in the portfolio site’s PM Central Control Panel.

Timer Job Description
Bamboo Gantt Chart

Updates the lists used as a data source for the Resource Assignments report at the portfolio site.

When the Bamboo Gantt Chart Timer Job runs for the first time, it will create the Gantt Chart Information list and extract data from the tasks list of all the projects, save the items, and display them in the report. The next timer job will extract and copy the data from the Bamboo Gantt Chart Information list to the Bamboo Gantt Chart Information Backup list, add new items to the list, and then delete the Bamboo Gantt Chart Information list.

When the Bamboo Gantt Chart Timer Job runs again, the data from the Bamboo Gantt Chart Information Backup list will be copied into the Bamboo Chart Information list; new items will be added to the Bamboo Chart Information list; and the Bamboo Gantt Chart Information Backup list will be deleted this time.

Note: While the timer job runs, you will see two lists because the report is still required to show old data. This process is repeated every time the Bamboo Gantt Chart Timer Job runs where only one list is used at any one time to display data in the Resource Assignments report.

Runs daily at 12:00AM by default

Bamboo Reporting Calculation V4

Updates information in the Report Info Cost Project Site list and in the Report Info Project Site list. These lists are used to collect data for some of the resource allocation and cost reports. When a report is configured to use the timer job, data for that report will be generated at the timer job interval instead of each time the report is viewed. When it runs, it will update the items within the Report Info Cost Project Site list and Report Info Project Site list on each project site based on data calculated from the Tasks list within the project site. Upon completion, the reports within the project site pulls the data from these two lists.

Runs daily at 11:45PM by default

Bamboo Reporting Top Site Calculation

When the Bamboo Reporting Top Site Calculation Timer Job runs, it will query the Report Info Cost Project Site and Report Info Project Site lists based on the report query the user originally submitted in the Report Center and attaches the results of the query to the original request within the Reporting Information list found in the portfolio site.

NOTE: This timer job will only be visible in Job Definitions after the Bamboo Reporting Calculation V4 timer job has run. Once this timer job completes it will no longer display.

Runs 30 minutes after the completion of the Reporting calculation V4 timer job

Bamboo Update Dashboard List

Updates changes made to the items in the Portfolio Dashboard List, which stores data about all of the projects, including project status, actual start and due dates, project health and more.

Runs every 30 minutes by default

Bamboo Update Summary List

Updates data from the project sites’ Task, Issues and Risks lists to the portfolio site’s Summary List, which in turn updates the sums and counts of the tasks, issues and milestones from all the projects.

The Summary List is the data source for the portfolio site’s Task, Issues and Milestones charts on the Project Central tab

Runs every 59 minutes by default

Bamboo Update Task, Issues and Project Health

Updates information in the Tasks List, Issues List, Risks List, and the Project Health List. This updates the Project Name field in the Tasks, Issues, and Risks lists using the Project Name from the Project Health list.

It also updates the Project Start Date, Project End Date, % Complete, Project Actual Cost (Time Entry) and Project Actual Work (Time Entry) fields in the Project Health list based on data from the project’s Tasks list.

Runs every 59 minutes by default

Overview of the Portfolio’s PM Central Control Panel

Overview of the Portfolio’s PM Central Control Panel

Getting started with PM Central Overview of the Portfolio Site

Screen shot of the Central Actions drop down menu.
The PM Central Control Panel for portfolio sites provides a central location for users to manage the administrative functions of PM Central.

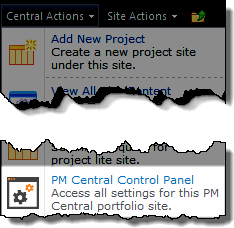
Users with Full Control or Design permissions can access the PM Central Control Panel from the Central Actions drop down menu.

When working with the PM Central Control Panel keep in mind:

  • The contents of the control panel are security trimmed so not all options will be visible to users with Design permissions. The table below identifies the permission level required to see specific links.

  • Portfolio sites created using the PM Central Lite template will not include links relating to the Reporting and Resource Management features. Additional information on the differences between the Full and Lite templates is available here

NOTE: The PM Central Control Panel was introduced with PM Central 4.0

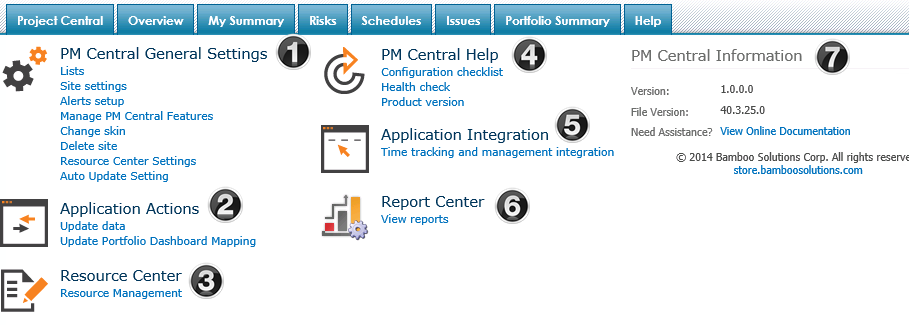
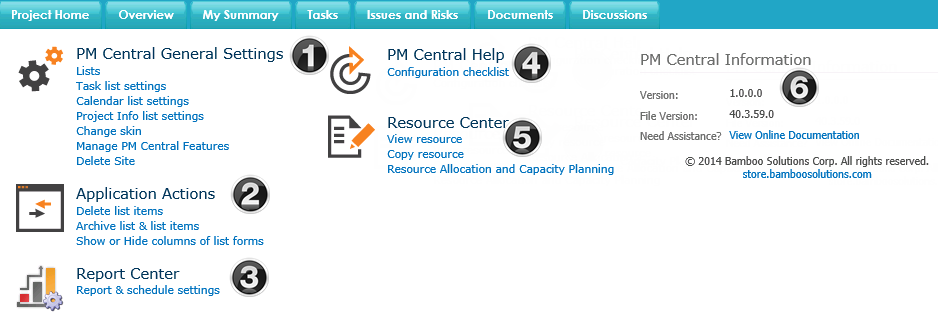
PMC Control Panel – Full Control display

PM Central Control panel as seen by a user with Full Control

Visible to users with… Section
1. Full Control/ Limited options for users with Design Permissions PM Central General Settings
The links under PM Central General Settings allow the Administrator to configure alerts, change the site’s appearance and update general settings.
2. Full Control only

Application Actions
Screen shot of the Update Data page
The Update Data page lets site administrators run processes to update PM Central data that are otherwise updated by scheduled timer jobs.

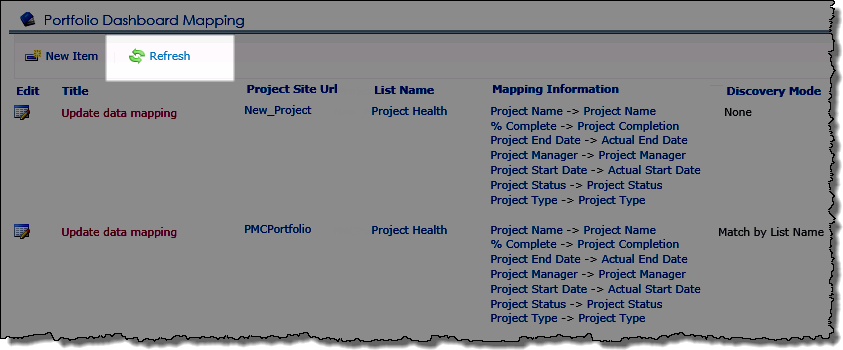
From Update Portfolio Dashboard Mapping, click Refresh so the Gantt View of Active Projects
widget, found on the Overview tab, will be updated.
Image of the Portfolio Dashboard Mapping Refresh button
Icon-Warning IMPORTANT: You must manually refresh the Portfolio Dashboard mapping to update the Gantt View of Active Projects.

3. Full Control / Design Resource Center
The Resource Management link takes users into the Resource Center giving access to the Enterprise Resource Pool, Resource Allocation and Capacity Planning reports and Resource Assignments.
4. Full Control/ Design The links under PM Central Help provides general information to aid the administrator with the configuration and maintenance of PM Central.
5. Full Control only

Application Integration
Time tracking and management integration will only be available if the Bamboo Time Tracking and Management (TTM) application is installed on your farm. Integrating the applications will allow users to create timesheets for the hours worked on project tasks.

Enter the URL to the existing TTM site that will be used for tracking time against tasks.
Image of the TTM site URL field
An additional page, My Timesheets, will be available under the My Summary tab when the PM Central and TTM are integrated.

NOTES:
1.If the TTM site is in the same site collection, enter the URL as a relative page reference(./site of ../site). If the site is in another site collection of Web application, enter an absolute page reference (http://server/site)
2. Additional configuration will be required in TTM to complete the connection to PM Central.
3. The Time Tracking and Management application is sold separately.

6. Full Control / Design Report Center
The View Reports link takes users to the Reports Center where a number of predefined reports are available
7. Full Control / Design PM Central Information
Look at the File Version to determine what version of PM Central is installed in your farm.

Overview of the Project’s PM Central Control Panel

Overview of the Project’s PM Central Control Panel

Getting started with PM Central Overview of the Project Site

Screen shot of the Central Actions drop down menu.
The PM Central Control Panel for project sites provides a central location for users to manage the administrative functions of the site.

Users with Full Control or Design permissions can access the PM Central Control Panel from the Central Actions drop down menu.

When working with the PM Central Control Panel keep in mind:

  • The contents of the control panel are security trimmed so not all options will be visible to users with Design permissions. The table below identifies the permission level required to see specific links.

  • Project sites created using the PM Central Lite template will not include links relating to the Reporting and Resource Management features. Additional information on the differences between the Full and Lite templates is available here

NOTE: The PM Central Control Panel was introduced with PM Central 4.0

PMC Control Panel – Full Control display

PM Central Control panel as seen by a user with Full Control

Visible to users with… Section
1. Full Control / Limited options for users with Design Permissions PM Central General Settings
The links under PM Central General Settings allow the Administrator to access key lists, and change the site’s appearance.
2. Full Control / Limited options for users with Design Permissions Application Actions
The links under Application Actions allow administrators to hide columns from the Project Health and Tasks forms, and manage list content.

Icon-WarningImportant: The Show or Hide Columns in lists tool is the only supported method for hiding columns in PM Central. Do not delete default columns from PM Central lists.

3. Full Control / Design

Referenced in the project’s Configuration Checklist

Report Center
1. Working Settings
By default, PM Central defines a work week as Monday – Friday, 8AM – 5PM with lunch between 12-1PM, resulting in an 8 hour work day and 40 hour work week. If your organization officially uses a longer or shorter standard work week you will need to update Task Master’s Work Week Settings when completing the project site’s Configuration Checklist and make changes here in the work week center
Project center Report Settings screen

Icon-WarningImportant:
If a project site in the portfolio is configured to use a greater number of working hours than those identified in the portfolio site, the project’s working hours will be used to calculate the capacity of all resources assigned to tasks on that site. More information is available here

2. Holiday List Settings
Associate the Report Center with a holiday list so your company’s designated holidays are not included in resource capacity calculations.

  • Enter in the URL to the site where the holiday list is located

  • Click the green arrow button to populate the drop down selector with the list found on the site.

  • Select the desired list and click Save

Icon-WarningImportant: The same holiday list will need to be referenced by other Web Parts in PM Central. Click here to find out more

4. Full Control / Design Provides access to the site’s Configuration Checklist
5. Full Control / Design Resource Center
The provided links take users into the Resource Center giving access to the Project Resource Pool, Resource Allocation and Capacity Planning reports and Resource Assignments.
6. Full Control / Design PM Central Information
Look at the File Version to determine what version of PM Central is installed in your farm.

Modifying the PMC Message Configuration web part

Modifying the PMC Message Configuration web part

PMC's portfolio warning message
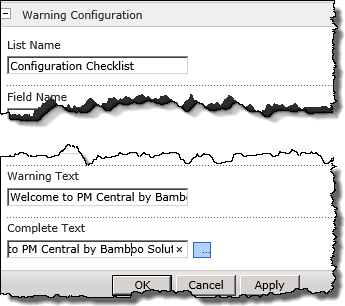
The message displayed in the PMC Message Configuration Web Part, found on the home pages of the Portfolio and Project sites, is tied to mandatory items in the site’s Configuration Checklist.

When working with the PMC Message Configuration Web Part, keep in mind:

  • When there are Open items with a Mandatory priority in the Configuration Checklist the web parts Warning Message will be displayed.

  • When all mandatory items have been marked Completed the web part will display the Completed text.

  • The message text found on the home page of Department sites is not displayed with the PMC Message Configuration web part and cannot be modified.

Step Action
1. Click Edit Page in the ribbon on the site’s home page
2. From the PMC Message Configuration Web Part click Edit Web Part.
Prior to PMC 4.3 this web part was called the Bamboo Project Central Configuration Warning Message Web Part.
3. Expand the Warning Configuration section in the tool pane.
Warning Configuration tool pane
4. Click the desired text field, then click the ellipsis to open the text editor.
5. Make the desired edits and click OK to close the pop up window.
6. Click OK to save your changes and close the configuration tool pane.

Localize Bamboo Applications or Custom Columns

Localize Bamboo Applications or Custom Columns

Overview of the localization process for Bamboo Products

Bamboo applications and custom columns are slightly different than web parts when it comes to localizing/translating. The user interface isn’t confined to a web part, but can exist as site definitions or other custom pages. For example, the configuration of a Bamboo custom column is within the SharePoint list settings area.
The text strings that require translation are located in different files than the strings that appear in a web part.

Changing the language or text for an application or custom column is a multi-step process:

Top

About the Language Files

Text displayed in a Bamboo application may be included in one or both of the following locations:

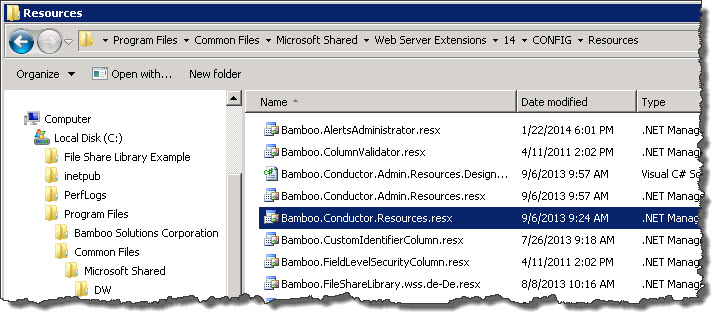
  • Provisioning Resources. These resources are located in the 12, 14, or 15 “Hive”, in the Resources folder. The number of the Hive depends on the version of SharePoint you are using (e.g., SP2007 has a 12 Hive, SP2010 has a 14 Hive, and SP2013 has a 15 Hive). 14Hiveresources.jpg
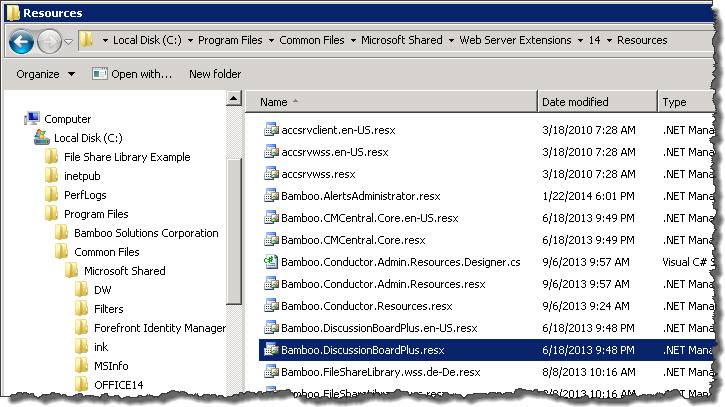
    The Bamboo.*.resx files include text used in site features, site definitions, list definitions, and other provisioning resource elements. Any changes you make in these files will apply to new product instances only.

  • Application/Runtime Resources. These are also located in the 12, 14, or 15 Hive, but in the CONFIGResources folder.The Bamboo.*.resx file in the CONFIG folder is different than the one included in the Resource folder.14HiveCONFIGResources.jpg This one includes text used in application pages, custom site menu actions, navigation elements, and other runtime resources. Any changes you make will apply to new and existing product instances only.

In each location, there may be multiple versions of Bamboo.*.resx files with identical content. The different files are provided for English (en-US), German (de-DE), French (fr-FR), and Spanish (es-ES). The content of all files is in English until you translate it to your language. If your site is configured to use a language that does not have a corresponding Bamboo product .resx file, copy an existing file and rename it to include the culture name for that language pack. For example, create a file for Italian by saving the default file as Bamboo.[Product].it-IT.resx. Make your changes to this new file. If your site is configured to use a specific language but you do not have a culture-specific file, the product will use the default Bamboo.[Product].resx file instead.

Icon-WarningIMPORTANT: If you customize one of the default resource files provided with the product, your changes will be overwritten when you upgrade.

To avoid losing customizations, copy the customized file to a different location (not the same folder) before upgrading. After the upgrade is finished, compare the new file with your customized file to incorporate any new entries. Then copy the merged file to the Resources folder. Culture-specific files created for languages that are not provided with the product will not be overwritten during an upgrade, but you still need to incorporate new resource entries.

Top

Editing text in resource files

Icon-WarningIMPORTANT: Before making any changes, back up your original file to a different folder.

To change text in a resource file, open it in a text editor and locate the text you want to change. Editable text is usually found between the <value></value> tags, as shown in the screen shot below. Do not modify the data tag. If you want to remove text completely, delete only the text; do not delete the <data> or <value> entries from the file, or the server will display an error message. In the example below, the editable text is highlighted in gray.

Common_resxEdit.jpg

When you are finished with your changes, save the file and copy it to the appropriate Resources *folder on *all Web front-end servers in your SharePoint farm. Follow the instructions below to make your changes take effect.

Top

Applying Language File Updates

To apply changes to Provisioning Resource Files:

If you modified the provisioning resources file, apply your changes by restarting Web services with the following command on all Web front-end servers.

iisreset

NOTE: changes to provisioning resources affect new instances of the Bamboo product only; existing instances of the product are not updated.

To apply changes to Application/Runtime Resource Files:

If you modified the application/runtime resources file, apply your changes by executing the following stsadm command on all Web front-end servers. This command copies the updated resource file to the App_GlobalResources folder of each Web application. Changes apply to existing product instances and any new instances you create.

stsadm -o CopyAppBinContent

NOTE: Changes apply to EXISTING product instances AND any new instances you create.
Overview of the Gantt View of Active Projects

Overview of the Gantt View of Active Projects

Found on the Overview tab on the Portfolio and Department sites, the Gantt View of Active Projects (Gantt View) displays the timeline of the active projects as well as the color code for the progress bar.

Gantt View Basics

  • The Gantt View of Active Projects is a widget in the Project Portfolio Dashboard (PPD) solution.
  • The Gantt View uses the Project Portfolio Dashboard list found on the Portfolio site as its data source

  • When the Project Portfolio Dashboard list is empty, or there are no active projects identified in the Portfolio Dashboard list, the Gantt View of Active Projects will not display any content.
    Gantt View widget with no content to display

To have content displayed in the widget the following events need to occur:

Description
1.

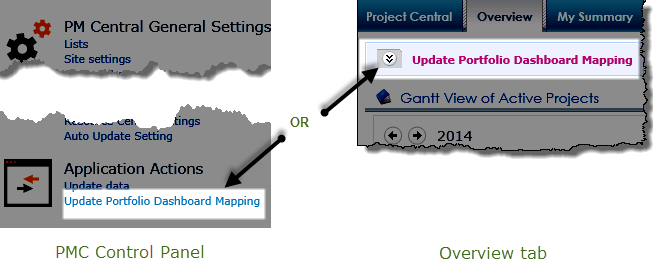
From the Portfolio sites PM Central Control Panel click the Update Portfolio Dashboard Mapping link
OR
Click the Update Portfolio Dashboard Mapping button found on the Overview page of the Portfolio site
Image of links to Update Portfolio Dashboard Mapping in the PMC Control Panel and on the Overview tab

NOTE: The Update Portfolio Mapping links are not available on Department sites.

Prior to PMC 4.3 the Update Portfolio Dashboard Mapping button/link was labelled Refresh data on Gantt View

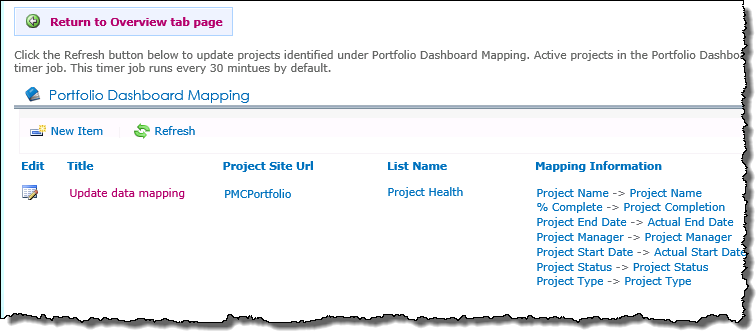
2. The destination page displays the contents of the Bamboo Project Dashboard Data Mapping list. By default this list will contain a single item that references the current Portfolio site.

Porfolio Mapping Display page

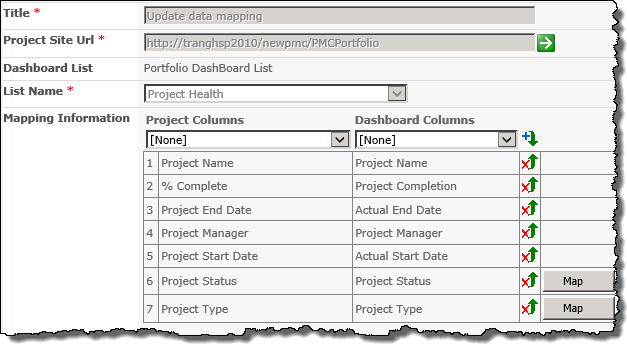
Pre configured mappings between fields in the Project Health list and the Portfolio Dashboard list are defined in this default item
Field Mappings

3. Click Refresh to update the contents of the Bamboo Project Dashboard Data Mapping list with any recently added projects.

Icon-WarningImportant: You must manually click the Refresh button to update the contents of the mapping list
Refresh icon in toolbar and update list view

4. With all the projects identified in the Bamboo Project Dashboard Data Mapping list wait for the next runtime of the Update Dashboard List timer job.
This timer job runs every 30 minutes by default.
6. When the timer job runs it will populate/update the Project Portfolio Dashboard list. Projects with an Active status will be displayed in the Gantt View of Active Projects.
Gantt view with content displayed

Create a PM Central Portfolio/Top Level site

Create a PM Central Portfolio/Top Level site

Configuring PM Central Getting Started with PM Central

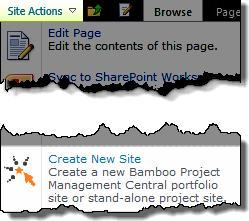
SiteActions_NewSiteX.pngWhen creating a PM Central Portfolio or Stand-alone site keep in mind:

  • PM Central’s portfolio site templates are not available from SharePoint’s New Site tool.

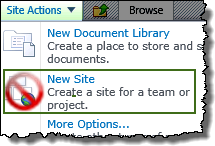
  • To create a portfolio site administrators, must use the Create New Site link from the Site Actions menu.

Step Description
1.

Image: Create New Site link in the Site actions menuFrom the site where you want to create the PM Central portfolio site click Create New Site in the Site Actions drop-down menu.

NOTE: If this option is not available under Site Actions you will need to activate the PM Central Create Site site collection feature.

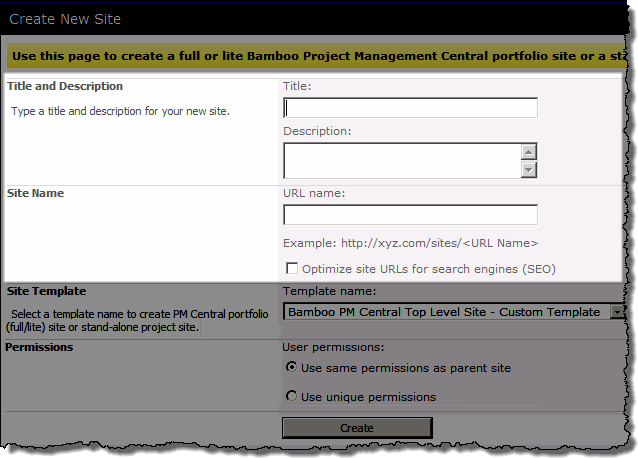
2. Enter the Title, Description and the URL for the new site
Create New Site Pop up1.png
3.

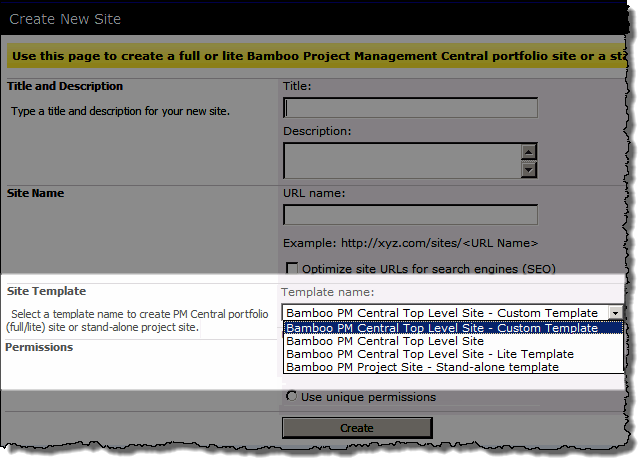
Select a template for the site from the Template Name drop down menu.
Create New Site Pop up2.png

NOTES
1. The Bamboo PM Central Top Level Site – Custom Template and the Bamboo PM Central Top Level site templates are made available in the drop down menu by default.
Icon-Tip There is NO difference in the functionality offered by these templates. The sole difference is the appearance of the site on creation. Click here for a preview.

2. Other templates, such as the Stand Alone template, and Portfolio Site Lite can be made available when the respective features are activated in Site Collection features.

4. Choose what permissions will be associated with the site
5. Click Create. Wait while the Portfolio site is created.

Create a PM Central Project site

Create a PM Central Project site

Getting started with PM Central

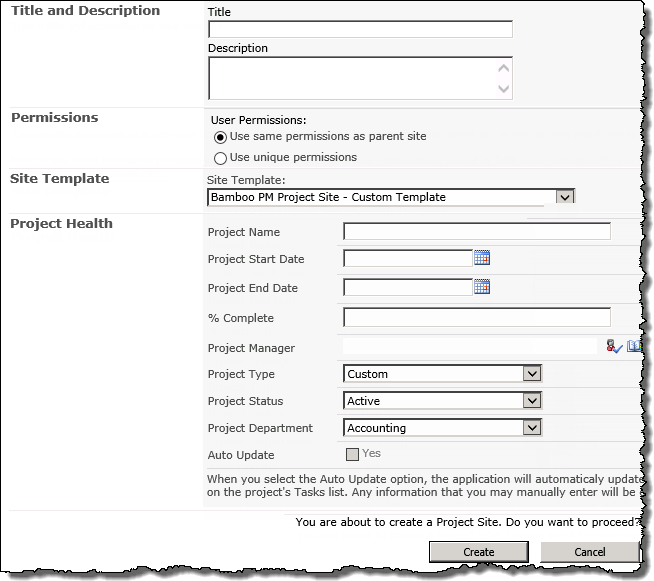
SiteActions_NewSiteX.png PM Central uses Site Creation Plus to create project and department sites in a portfolio to simplify the site creation process.

Keep in mind:

  • PM Central project and department sites should not be created using the SharePoint New Site dialog box

To create a PM Central project site:

Step Action Result
1.

On the Portfolio site click the
Create New Project… button on the Portfolio home page

OR

From the Central Actions drop down menu, click Add New Project

These options will only be visible to users with Full Control permission levels or the Create Sub site permission Links to Add a new project
2.

Enter a Title for the site

The text entered here will become the URL for the site.

Fields in Site Creation Plus
3.

Choose the permissions for the site.

NOTE: This area may have been hidden.

4. Select the template from the available options.
5. Enter any other known information about the project into the Project Health list
6. Click Create You will be taken to the home page of the new project site

Create a PM Central Department site

Create a PM Central Department site

Getting started with PM Central

SiteActions_NewSiteX.png PM Central uses Site Creation Plus to simplify the process of creating the project and department sites that will be associated with a PM Central portfolio.

Keep in mind:

  • PM Central project and department sites should not be created using the SharePoint New Site dialog box

  • After the first department site is created the All Department Sites Web Part will be visible on the Portfolio home page

The All Department Sites Web Part

To create a PM Central Department site:

Step Action Result
1.

On the Portfolio site click the
Create New Project… button on the Portfolio home page

OR

From the Central Actions drop down menu, click Add New Project

These options will only be visible to users with Full Control permission levels or the Create Sub site permission Links to Add a new project

On SharePoint 2013 click the bullseye icon icon to access the Central Actions menu.

2.

Enter a Title for the site

The text entered here will become the URL for the site.

Fields in Site Creation Plus
4. Select the template from the available options.
5. Click Create You will be taken to the home page of the new department site where you can configure the site to display details about specific projects.

Create a customized PM Central site template

Create a customized PM Central site template

Creating a project site template allows you to reuse sites that have already been configured and/or “lightly” customized to help ensure standardization across project sites, and reduce administrative overhead.

When creating a customized PM Central project template keep in mind:

  • When a newer version of PM Central is installed your existing PM Central sites will be updated, but your customized template, stored as a .wsp file in the Solutions gallery, will not get updated.

  • We strongly recommend that the project site that is modified in the steps below for the purpose of creating the project template be maintained strictly for the purpose of creating future templates.

How to create a template:

Step Action
1. Create a new PM Central project site
2.

Configure the project site to meet your business requirement. This can include, but is not limited to:

  • Completing the sites configuration checklist

  • Modifying the site’s welcome message

  • Defining the structure of the site’s document library

  • Adding new columns to existing lists

  • Creating new lists

Icon-Warning IMPORTANT: It is strongly recommended that you review the PM Central customization guidelines before making changes to the out-of-the-box PM Central application.

3. Select Site Settings from the Site Actions drop down menu on the project site
4. Click Save Site as Template
5. Enter a File Name and a Template Name
Save as template screen
6. Select the checkbox to Include Content and click OK
7. Recommended:
Verify that the project status in the Project Health list is not Active and enter text in the Project Name field to advise that the site should not be deleted e.g., Project Template Site – DO NOT DELETE.
8.

Access the Create new Site page
Navigate to the PM Central Portfolio Site and click the
Create New Project… button on the Portfolio home page

OR

From the Central Actions drop down menu, click Add New Project

9. Edit the page and access the Bamboo Site Creation Plus configuration tool pane
Web part drop-down menu
10.

Select the new template from the Site Template drop down selector.
Site Template drop-down selector

NOTE: The drop-down will display all templates available in the Site Collection

11.

From the Allow user to select the list of site templates below selector box, add the newly created project site template to the list of available site templates on the right.
Available template selector boxes

NOTE: It is recommended that the Bamboo PM Central – Custom Template – With Sample Data be removed from the available site templates selection in production environments.

12. Click Save.
You will need to stop editing the page to see the changes in the Bamboo Site Creation Plus web part. Additional information on how to configure Site Creation Plus is available here.

Configure the PM Central Resource Reports

Configure the PM Central Resource Reports

Overview of Portfolio PMC Control Panel Overview of Portfolio Resource Center

The following configuration options are available for PM Central Resource Reports.

Option 1: Generate resource reports using the System Account:
By default, all resource reports are security trimmed so users with access to the Resource Center will only see resource information pertaining to projects they have permissions to access.

PM Central provides the option of displaying reports generated for the System Account, providing a comprehensive, portfolio-wide, reports to all users with access to the Report Center.
The Report Settings feature was added in PM Central 4.3

Step Action
1. From the portfolio site’s PM Central Control Panel, click the Report Center Settings linkReport Settings link in the PMC Control Panel
2. Check the Report Settings check box Resource Center Settings screen

Option 2. Configure the reports to “Run Now”
This option removes the wait time associated with the default report generation method by referencing content from List Rollup rather than the Report Information list.

Run Now is a configuration option associated with the following reports on the Portfolio and Department sites:

  • All Allocations
  • By Resource
  • By Project
  • By Project Department
  • Allocation by Manager
  • Resource Availability
  • By Department
  • Risk Chart (accessed from the Risks tab)

    Icon-WarningImportant: This option can result in page time out errors.

Step Action
1. Navigate to the report page Run Now checkbox
2. Edit the Report web part
3. Click the Run Now checkbox and Save.

Overview of PM Central Configuration Parameters

Overview of PM Central Configuration Parameters

PMC Banner1.png

blackbullet.png Set up PM Central

  • Work through the Getting Started guide to create a new PM Central Portfolio or Stand-alone site, and create project and department sites.

blackbullet.png General PM Central Information:

blackbullet.png Explore the PM Central Sites:

blackbullet.png Configure PM Central Web Parts:

Configure the PM Central Resource Assignments Gantt chart

Configure the PM Central Resource Assignments Gantt chart

The Resource Assignments Gantt Chart displays information from lists that are populated by a scheduled timer job, the Bamboo Gantt Chart Timer Job, which by default, runs daily.

When the Bamboo Gantt Chart Timer Job runs for the first time, it will create the Gantt Chart Information list and extract data from the tasks list of all the projects, save the items, and display them in the report. The next timer job will extract and copy the data from the Bamboo Gantt Chart Information list to the Bamboo Gantt Chart Information Backup list, add new items to the list and then delete the Bamboo Gantt Chart Information list. The web part will display information from the updated list.

When working with the Resource Assignments Gantt report keep in mind:

  • Only users with Full Control or Design permissions can access the Resource Center by way of the PM Central Control Panel.

  • Assignments are only displayed when a resource has been associated with a task, using with the Assigned To or Resource fields in the task.

  • By default, 20 items will be displayed per page.

To change the number of items in a page view:

Step Action
1. From the PM Control Panel, click the Resource Management link
2. Go to the Resource Assignments report, and edit the Resource Assignments web part
3. Under the header Bamboo Gantt Chart Configuration, change the page size to the desired setting.

Icon-WarningImportant: It is not recommended that you change any other attribute under the Bamboo Gantt Chart Configuration section as this could effect the Web Part’s ability to display aggregated data from multiple project sites.

4. Click Apply and then OK

Configure PM Central Department sites

Configure PM Central Department sites

Getting Started with PM Central Create a PM Central Department Site

Department sites allow project managers and administrators to view, track and manage a subset of the portfolio’s projects according to specific filtering criteria that you provide.

PMC_Dept_Hierarchy.pngWhen working with Department sites keep in mind:

  • Department sites will not display project information until a project site has been created that meets the filter criteria defined.

  • Department sites will be filtered by columns associated with the Project Health list

  • By default, you can only filter on values found in specific columns of the Project Health list (see image below). For information on how to filter a department site using the contents of a custom column added to the Project Health list click here

To configure a PM Central Department site

Step Action
1.

Click the Configuration settings link that is available on the home page of the department siteConfiguration Message

NOTE: Configuration Settings can also be accessed from the PM Central Control Panel on the department site.

2.

Use the drop down selectors to specify the filter criteria for the department site.
The Bamboo Project Site Filtering Settings Web Part.  By default, only the Project Name, Project Start Date, Project End Date, % Complete, Project Manager, Project Type, Project Status and Project Department columns are available for filtering

Icon-WarningImportant: Only the Project Health list columns shown above will be available by default in the Column drop-down selector. Information on how to add custom columns to the drop-down is available here

NOTE: The available operators may vary based on the type of column selected.

3. Click OK
Project Filter Web Part after the filter was applied
The Summary list timer job, which runs every 59 minutes by default, will continually update the List Rollup filters to ensure the contents of the department site are an accurate reflection of the specified filter.

Getting Started with PM Central Create a PM Central Department Site

Change the Site Skin of PM Central sites

Change the Site Skin of PM Central sites

Overview of Portfolio PMC Control Panel Overview of PM Central General Settings

PM Central includes a variety of skins that can be applied to change the color scheme and style of sites, providing an easy way to customize the appearance of PM Central sites without manually modifying master pages and style sheets.

Step Description
1. Image: PM Central Control Panel link in the Central Actions menuFrom the site where you want to change the skin go to Central Actions > PM Central Control Panel
2.

Under PM Central General Settings, click Change SkinChange skins link in the PM Central Control Panel

NOTE: You must have Full Control permissions on the site to complete this action.

3.

From the PM Central Site Skins web part select the skin you want to use and click Apply. A preview of the skins provided is available here.

NOTE: The screen shot below shows the skins that are available for the Portfolio and Department sites.

The five skins available at the Portfolio site

The Mega Menu skin options were added in PMC. 4.2.

Add custom columns to the PM Central department site filter

Add custom columns to the PM Central department site filter

Create a PM Central Department Site Configure a PM Central Department Site

Scenario

Hierarchical depiction of a department site, displaying projects that have a project location value of VAYou have added a custom column, Project Location, to the Project Health lists associated with your PM Central portfolio and project sites.
Now, you want to create a PM Central department site that only displays information associated with projects that have a Project Location equal to Virginia so your Team Manager has easy access to this data.

In this topic we will look at the steps required to accomplish this objective.

Keep in mind:

  • PM Central department sites can only be filtered on information maintained in the Project Health list.

  • By default, you can only filter a department site on values associated with the following Project Health list columns:
    Project Name, Project Start Date, Project End Date, % Complete, Project Manager, Project Type, Project Status and Project Department columns are available for filtering

Step Action Result
1.

Add the new column to the Project Health lists found on the Portfolio and Project sites.

NOTE: See section A in this topic for additional information on how to add a custom column to a PM Central list.

Abbr_NewColumn.png
2. From the Portfolio site, go to Site Contents and click the Summary List. AccessSiteContents.png
3.

Add or create the same column that was added to the Project Health lists in Step 1 to the Summary list.

NOTE: The column added to the Summary list must match the column added to the Project Health lists.

Summary list with the new column displayed in the list view

NOTES:
1.The column will be immediately available from the department sites filter settings web part.
2.The column will be populated with content when the Bamboo Summary list timer job next runs.

4. Navigate to the Department site and configure the site by identifying the filter criteria. The new column will be available from the Column drop-down selector of the filter web part.
Dept_Filter _NewColumn.png

Create a PM Central Department Site Configure a PM Central Department Site

Add columns to a PM Central Portfolio data view

Add columns to a PM Central Portfolio data view

Scenario

You want to add a SharePoint Choice column, Project Location, to the Project Health list and make the contents of this column visible in the Project Summary dashboard on the Portfolio home page.

Default columns displayed in the Project Summary dashboard

In this topic we will look at the steps required to accomplish this objective.

Keep in mind:

  • Creating the new column as a site column will allow the column to be managed from a central location and ensure consistency when the column is added to other lists.

  • Only SharePoint or Bamboo Solutions columns can be supported as new columns in PM Central lists.

  • It is strongly
    recommended that you review the customization guide before making any changes to the out-of-the-box PM Central application.
A. Add the column to the list
1.

Project Site

Create the new column directly in the designated list

Or

Create the column as a site column, then add the site column to the designated list

NOTES:
1. Keep the Add to all contents types checkbox selected if it is displayed when adding or creating the column.
2. The new column should be added to a project site that will be maintained solely for the purpose of creating your organizations customized PM Central project site template

CreateColumn.png
2.

Portfolio Site

Add or create the same column in the same list on the Portfolio site.

NOTE: The column added to the list in the Portfolio site column must match the column added to the list on the Project level

B. Add the new column to the list rollup
4. From the Portfolio site navigate to the Site Contents Access Site Contents; 2010 vs 2013
5. Access the PMCentralPages document library and click the ListRollupSchemaDesigner link. You will be taken to the Web Part page.
6.

Locate the rollup schema you need to modify and access the schema’s edit screen by:

Clicking the rollup’s Title link

Or

Selecting Edit Schema from the drop-down menu

NOTES:
1. Each of the portfolio site’s data views is configured to reference a specific list rollup
2. All Project Health rollups are located on Page 2 of the schema designer.
Icon-Tip

Edit the desired “destination” web part to identify the name of the referenced List Rollup Schema.

List Rollup Schema Designer
7. Click the Select Columns button Select Columns button
8. Add the new column to the Selected Columns box on the right, then click Save Column Selector screen in List Rollup
9.

Click Create/Update Schema at the bottom of the page.

NOTE: Clicking Preview will allow you to verify that you can see the desired column content before you save the changed to the rollup.

You will be returned to the home page of the List Rollup Schema Designer.

C. Display the new column in the data view
10. Navigate to the web part that should be modified to display the newly added column and Edit the Web Part

Icon-Tip Make a note of the current column display order so it can be referenced in step 14.

Edit button in the Project Summary menu

NOTE: In this scenario the Project Summary – Active Projects data view, found on the Portfolio home page, will be updated to display the new Project Location column

11. Click the Data Viewer Web Part Settings button Data View configuration tool pane
12 Click Bamboo List Rollup on the left of the screen, then click Load List Rollup Schemas

List Rollup screen in Data Viewer configuration settings

NOTE: If you do not reload the schema the new column will not be available in the next step.

13. From the List Rollup Schema drop-down select the updated rollup, then click the Column Display Settings button. List Rollup screen in Data Viewer configuration settings
14. Check the boxes next to the columns to be displayed and enter the desired display order. Column display settings screen
15. Click Save & Close to exit the pop up. Then click Save & Close again to exit the Data View Configuration Settings screen. You will need to click OK to close the Web Part’s configuration tool page before you will be able to see the changes to the web part’s display.
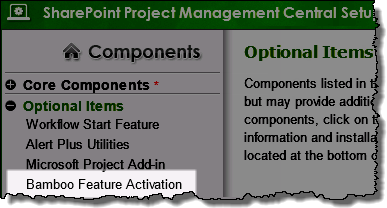
Project Summary dashboard with the new column

Working with Budget Status Cost KPI

Working with Budget Status Cost KPI

The Budget Cost Status KPI associated with a project site’s Project Health
list can be used to provide insight into the project’s budget health if the following conditions are met:

  1. Standard rates are associated with user profiles in the Enterprise Resource Pool
  1. The Resource column is used to assign users to tasks
  1. The budget value was manually entered into the Project Health list’s Budget Cost field

NOTE: When the above pre-requisites are not met the Budget Cost Status KPI will always be green.

Icon-WarningImportant: The Budget Cost Status KPI is not include in the default displays of Project Health information.
The removal of the Budget Cost Status KPI from the default displays was new in PM Central 4.3

To add the Budget Cost Status KPI to a dashboard display complete these steps:

Step Action
1.

Edit the Project Info web part on the Project Home tab of the project siteProject Info dashboard

OR

Edit the Project Summary Web Part on the Project Central tab (portfolio or department sites)Project Summary dashboard

2. Click the Data Viewer Web Part Settings button
Data Viewer configuration tool pane
3.

Date Viewer data source optionsClick SharePoint List and Library if you are editing the Project Info display on the project site

OR

Click Bamboo List Rollup on the left of the screen if you are editing the Project Summary on the portfolio site

4. Click the Column Display Settings button, then click the Budget Cost Status check box and Save & Close
5. Then click Save & Close again to exit the Data View Configuration Settings screen.
You will need to click OK to close the Web Part’s configuration tool page before you will be able to see the changes to the web part’s display.