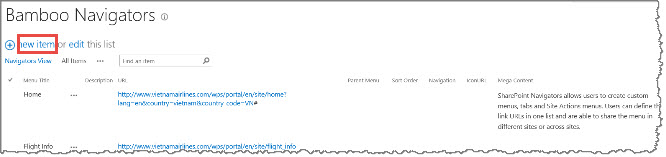
When you click the Create List button in the Navigators Web Part Tool Pane, the Bamboo Navigators list is created. It stores the values for the menu options displayed in the web part.
NOTE: Prior to Release 1.5, The Bamboo Navigators list was created automatically when any Navigator web part was added to a page in the site. With Release 1.5 and later, click the Create List button in the web part tool pane to create the list. It is no longer created automatically.
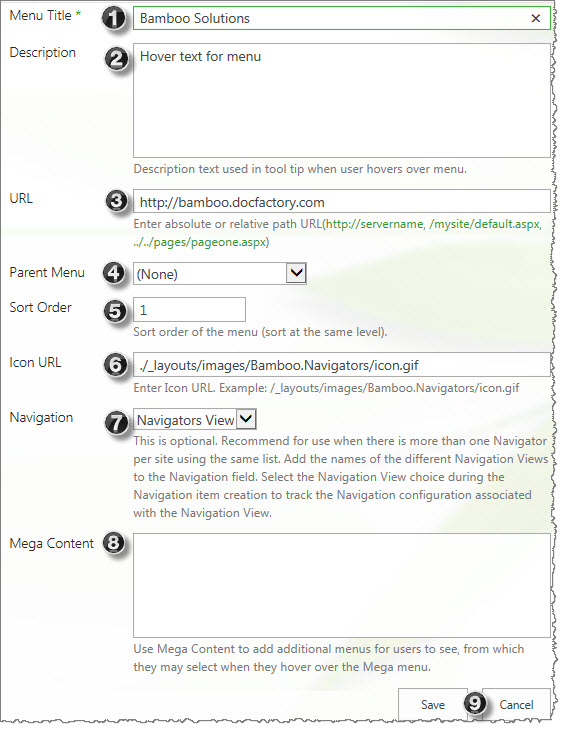
Below is a screen shot of the new form that opens when you create a new item in the Navigators list. Each option is described below to help make sense of what you see in the list and how the data shows up in the Navigators menu.
|
|
No. | Column | Description |
| 1. | Menu Title |
This is the title that displays on the menu.  |
|
| 2. | Desc- ription |
When users hover a mouse over the menu, this is the tool tip message they will see. |
|
| 3. | URL | You can enter an absolute URL (starts with http://) or a relative URL (for the current site, the relative notation is a dot followed by a slash, ./). Relative notation is recommended. | |
| 4. | Parent Menu |
This is a lookup column that looks up the Menu Title in this same list; use it to group your menu items. We recommend you first add all the parent menu items and subsequently add the child items that can look up to the parent.
|
|
| 5. | Sort Order |
You need to specify an ordering sequence beginning with 1 to put your menu options in a given order. This column is not required by default. | |
| 6. | Icon URL |
Each menu option can have an icon displayed next to it. If you decide to show these icons, enter the Icon URL in this column. Example: /_layouts/images/BambooNavigators/icon.gif | |
| 7. | Nav- igation |
This is optional. Recommended for use when there is more than one Navigator per site using the same list. Add the names of the different Navigation Views to the Navigation field and use this column to create filtered views of the Bamboo Navigators list. Select the appropriate list view when configuring each web part instance. | |
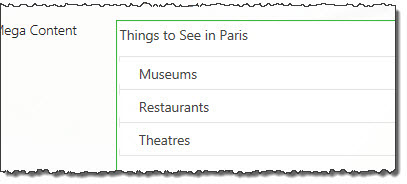
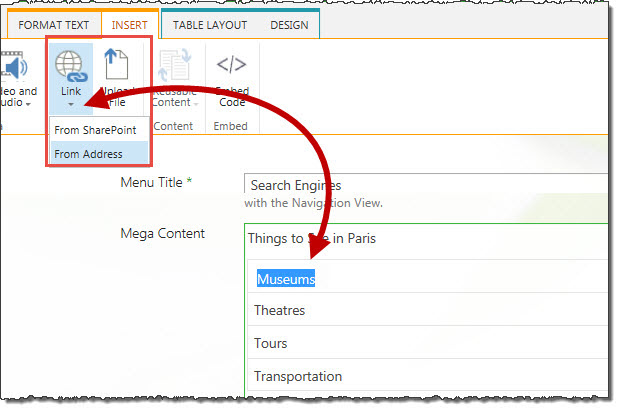
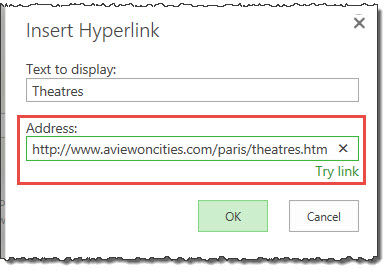
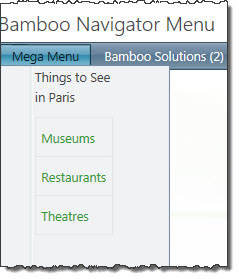
| 8. | Mega Content |
Use Mega Content to add additional menus for users to see.
|
|
| 9. | Save or Cancel | Always click Save to save your changes. Cancel will close the form without retaining any data you entered. | |
Also see:

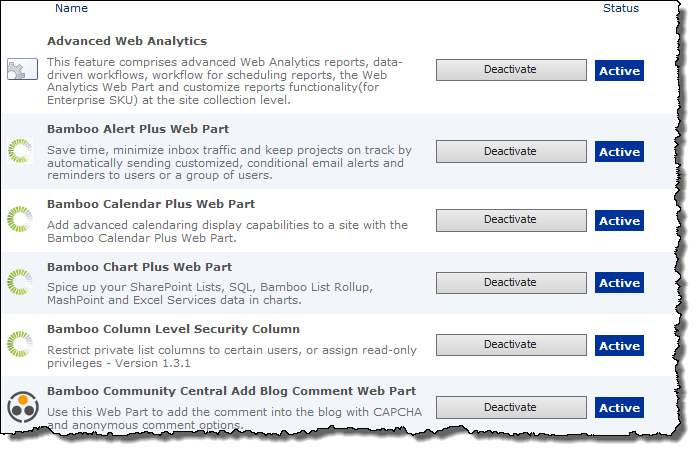
 Take control of your SharePoint environment! As your SharePoint deployment grows, don’t get bogged down with the cost and bottlenecks that come with using limited, out of the box tools. Below find a complete list of products included with your Bamboo Administration Toolkit.


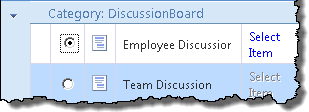 In some cases you will be given the option of adding alerts to specific items in the list.
 ) in the User Lookup form.
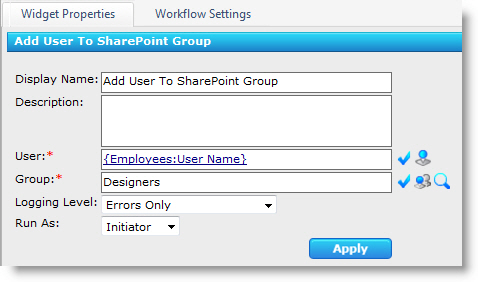 In this example, the Add User to SharePoint Group widget is configured to add a user to the SharePoint Designers group as part of a workflow that performs a number of activities when a user is assigned an administrative role in the company.
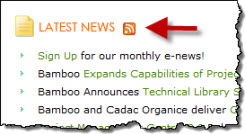
 Starting with World Clock and Weather version 2.3, locations can be configured with connections to RSS feeds. If a location is configured with an RSS feed, the RSS feed icon is displayed on the web part’s location image, as shown here.


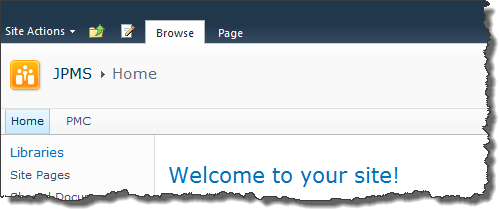 Specifically, the out-of-the-box Team Site v4.master looks like this before making any changes:
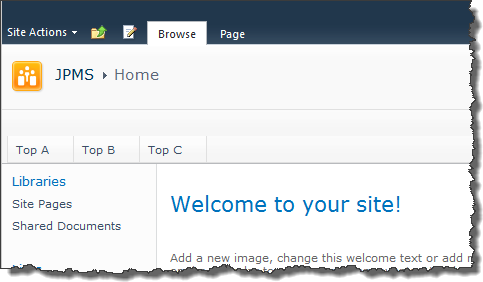 After adding the Bamboo Navigator Menu, it will look like this:
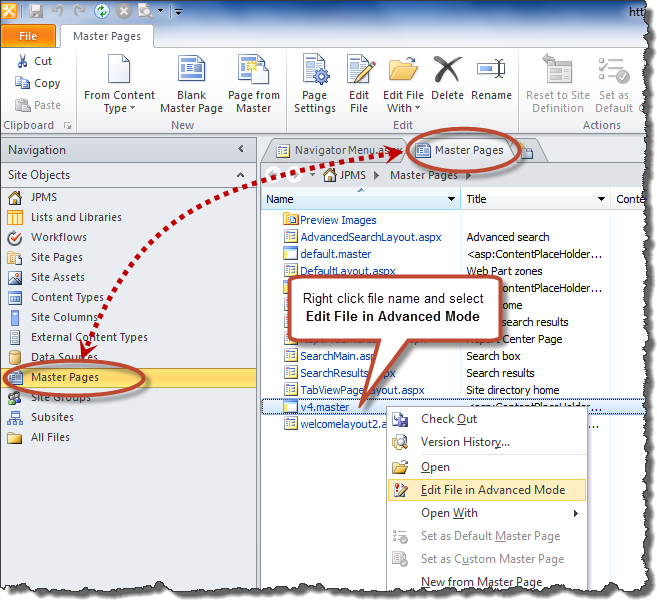
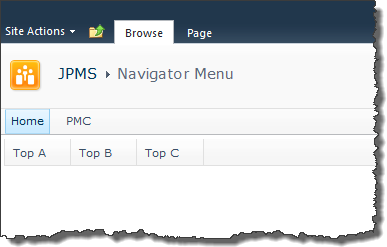 Go to the top site of the site collection where you want the master page changed and add a Bamboo Navigator Menu web part to a page on that site.
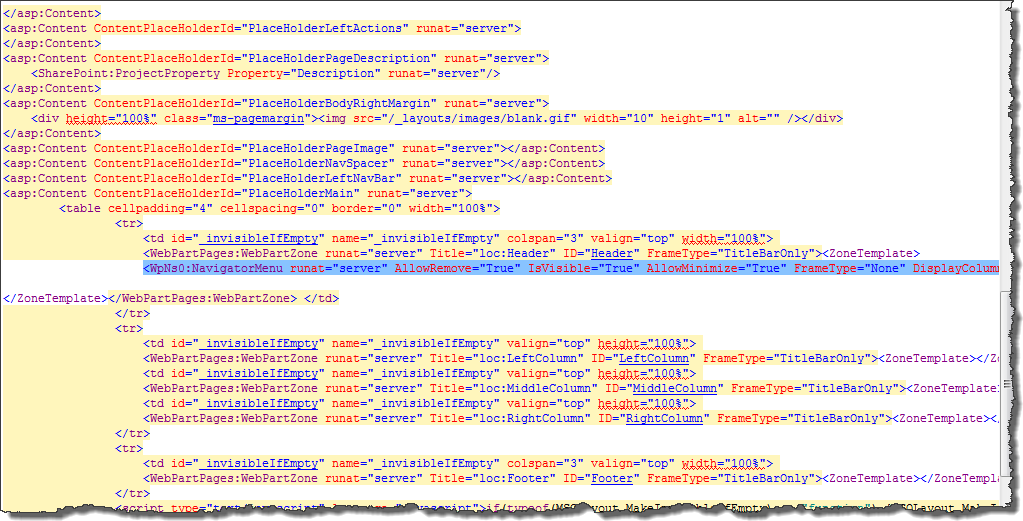
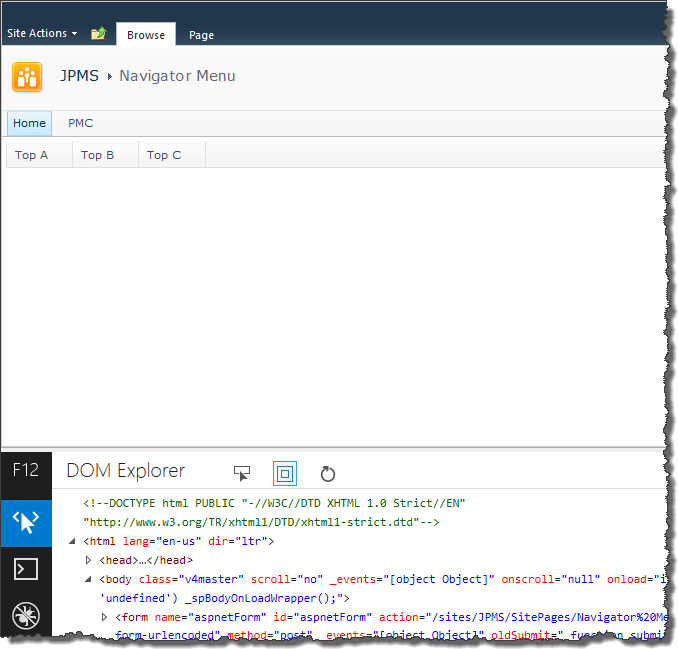 While viewing the web part page with the navigator web part in Internet Explorer, press F12 or click Tools > F12 Developer Tools to open the IE Developer window. It opens at the bottom of the page. Make sure the DOM Explorer window is displayed.
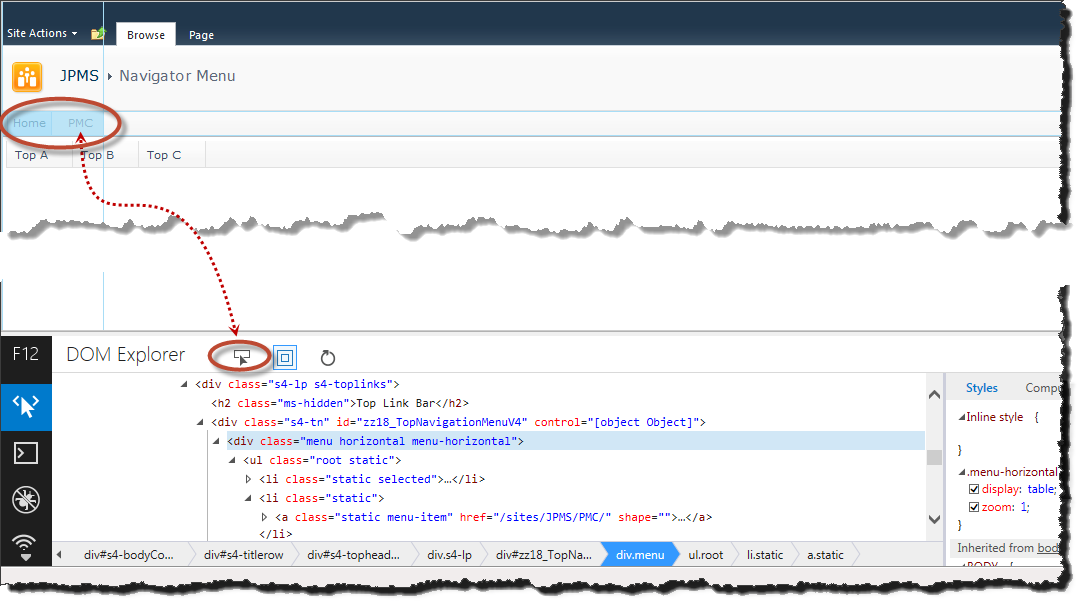
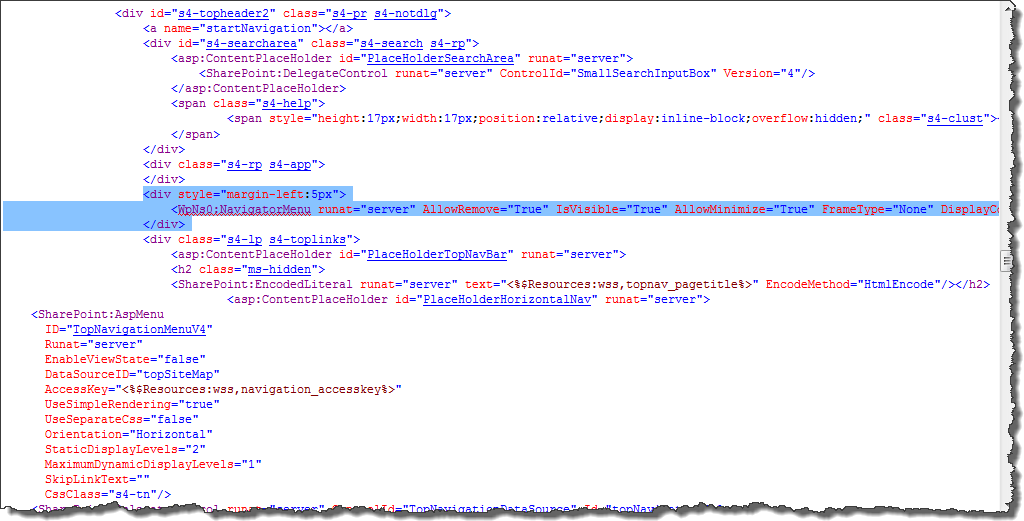
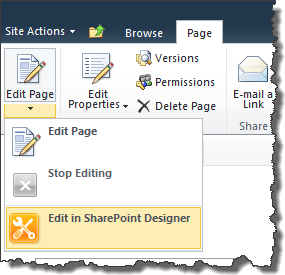 Edit the web part page where you put the Bamboo Navigator Menu Web Part in SharePoint Designer. From the Page ribbon, expand the menu beneath Edit Page and click Edit in SharePoint Designer. The page (and the site) will open in the SharePoint Designer.

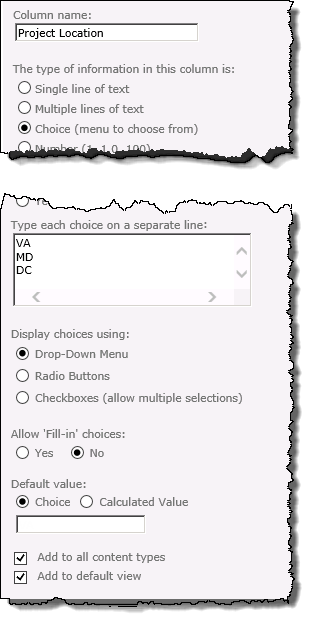
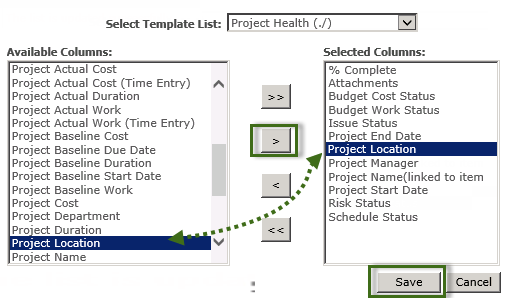
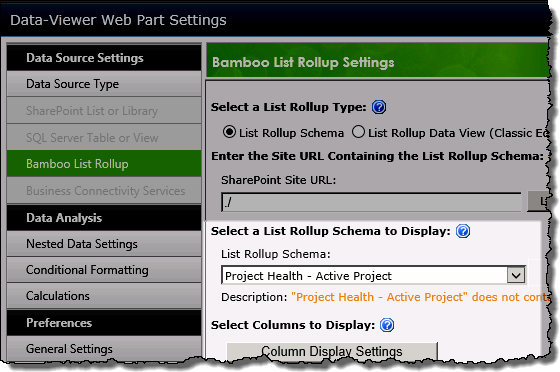
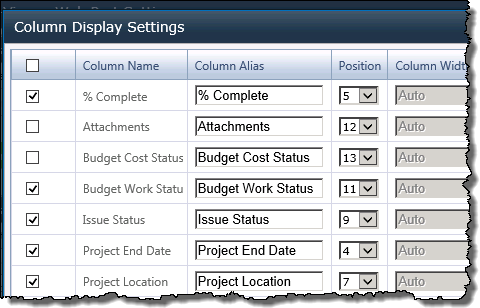

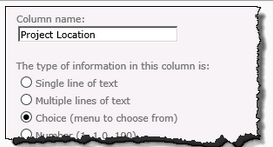
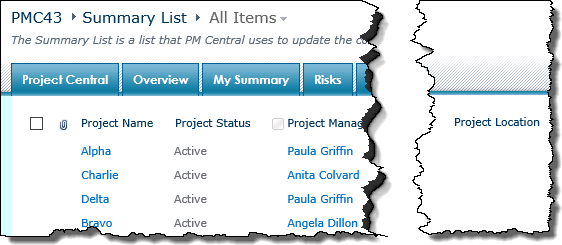
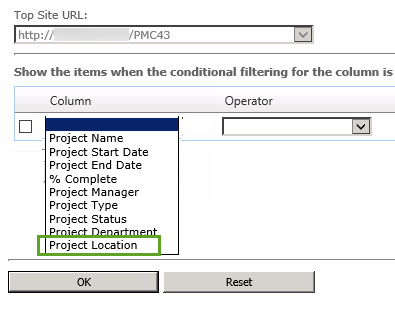
 You have added a custom column, Project Location, to the Project Health lists associated with your PM Central portfolio and project sites.
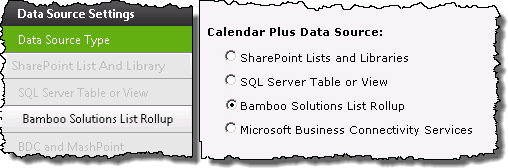
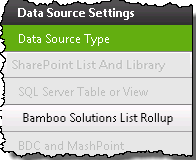
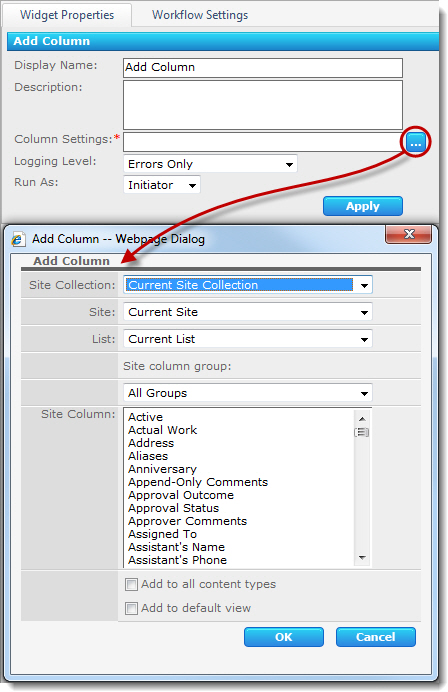 The Add Column widget adds an existing site column to a SharePoint list or library. Site columns can be added to any list in any site collection in the Web application. The widget includes the following features and options:
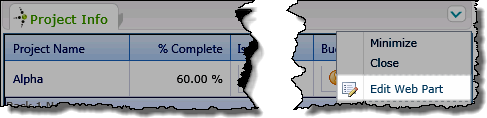
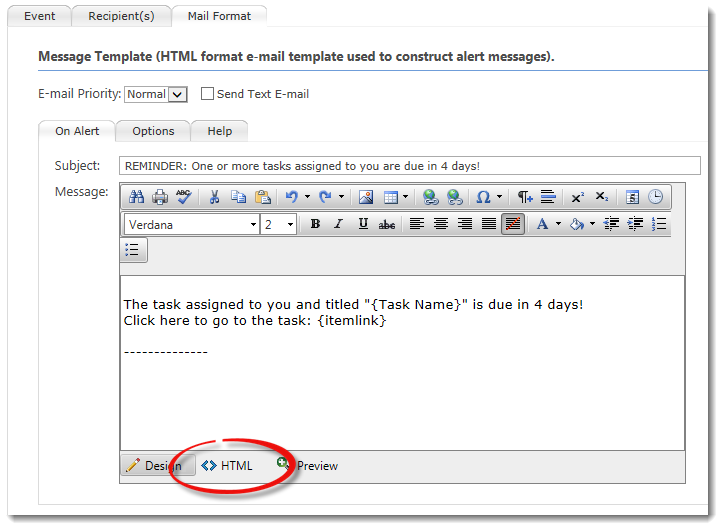
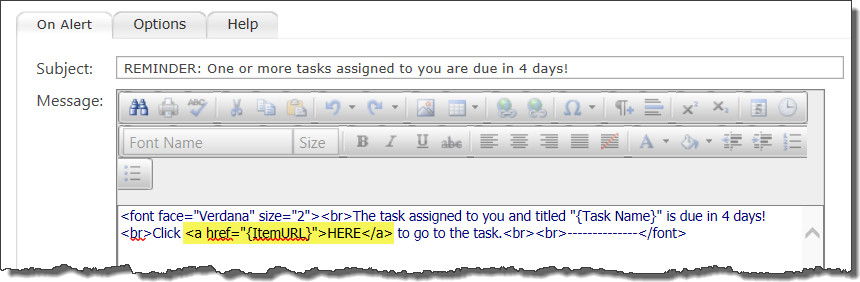
 Click SharePoint List and Library if you are editing the Project Info display on the project site
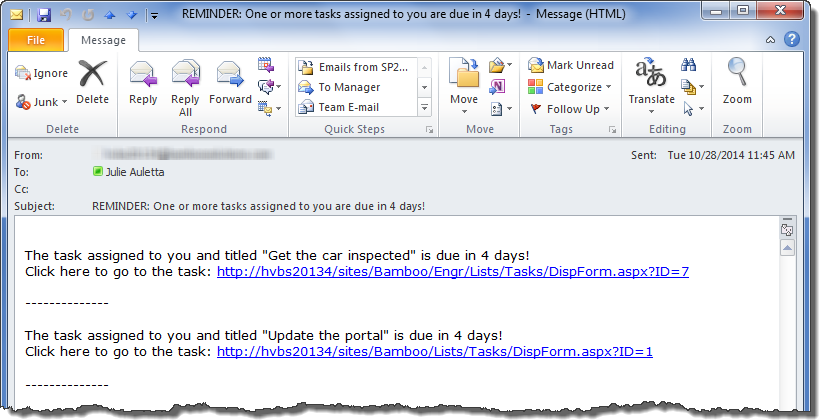 When you use the {itemlink} token in the body of your email message, the URL to the item that triggered the alert is displayed in the message, as shown here.


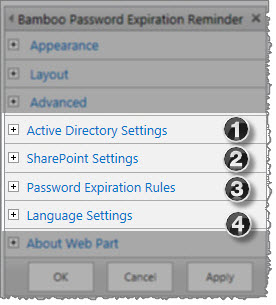 The Bamboo Password Expiration Reminder tool pane is displayed on the right side of the screen. Expand each section by clicking the plus sign next to the SharePoint Settings to configure the properties.
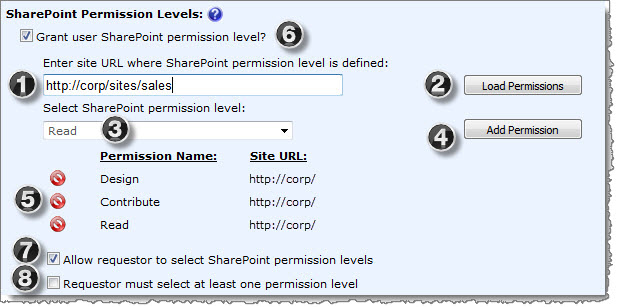
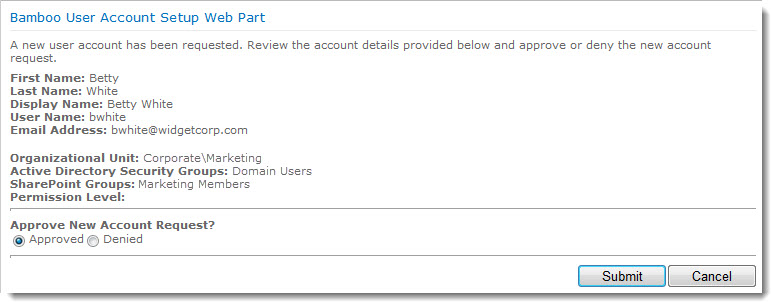
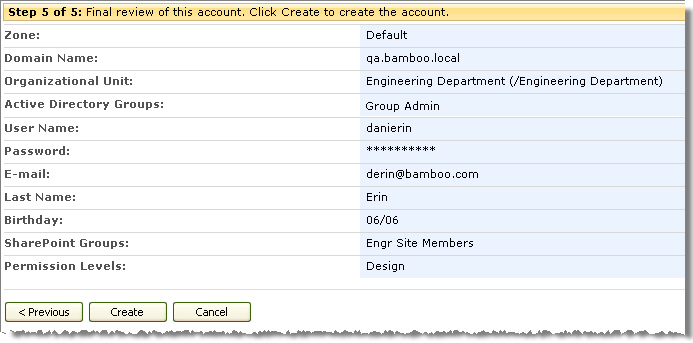
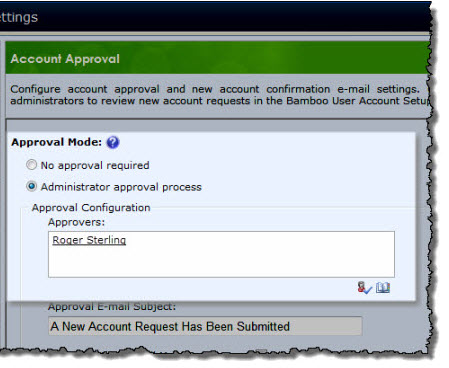
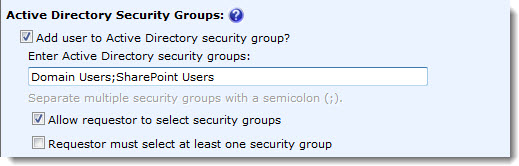 When a new account is created, User Account Setup can assign the new account to Active Directory security groups at the same time. Check the option Add user to Active Directory security group to enable this feature. When you select this option, the following additional settings are available:
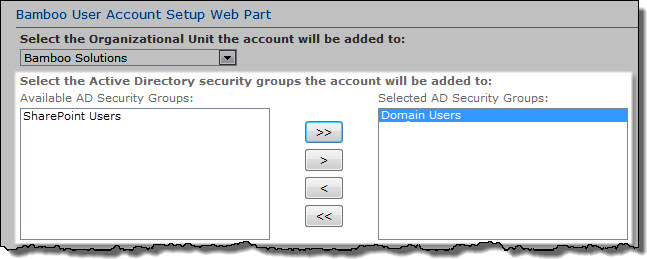
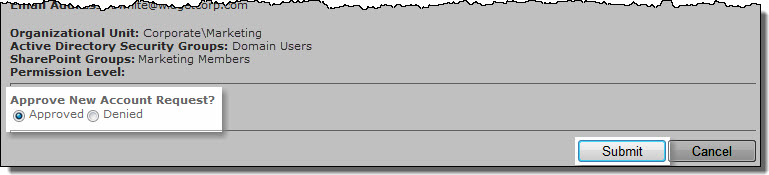
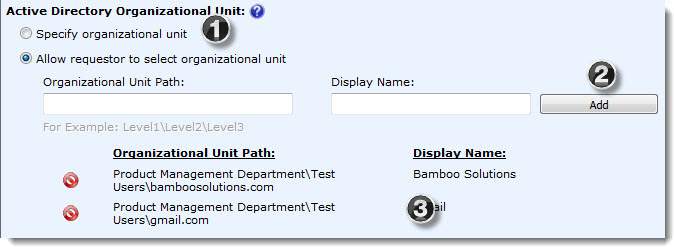 Check this option to allow the requestor to choose the OU to add the account to. You can provide a list of several possible OUs.
 . The OU will be removed from the displayed list.
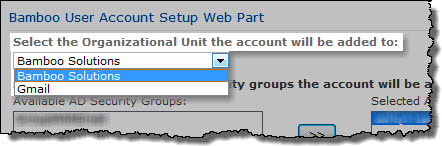
 The Automatically Create Columns in SharePoint User Information List option is enabled only if the User Account Setup Web Part instance is installed on a SharePoint Foundation 2013 site. When User Account Setup Web Part creates an account, it will attempt to copy account attributes in the Account Details list to a column with the same name in the SharePoint User Information List. The account information is then visible in the SharePoint profile. If a column with the same name does not exist, User Account Setup Web Part can create the column automatically in the User Information List.
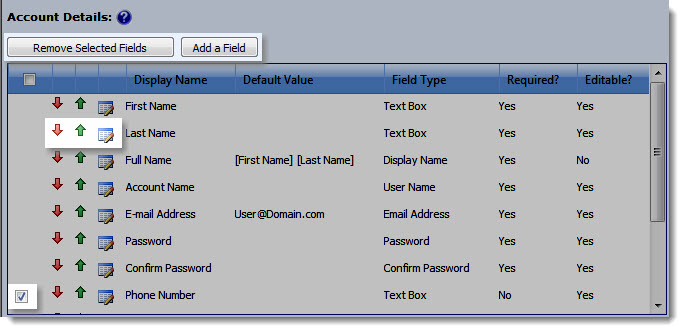 The Account Details section lets you define the account attributes to enter in User Account Setup. The minimum attributes required to create an account in Active Directory are configured by default.
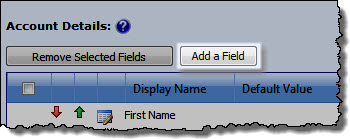 To add a new attribute to the User Account Setup Web Part form, click the Add a Field button above the attribute list and define the attribute properties.
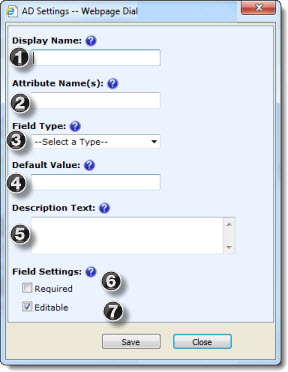
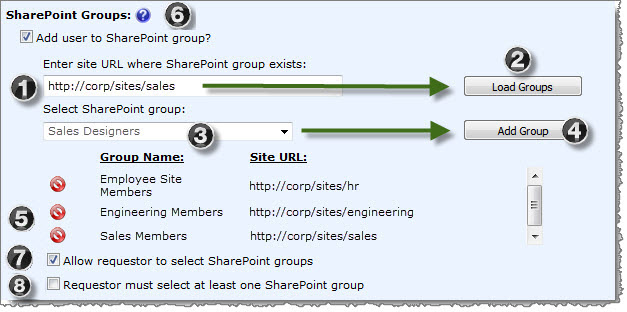
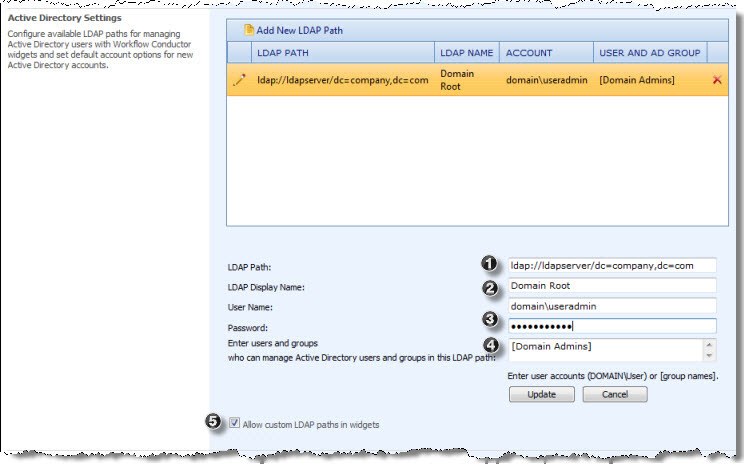 Configure available LDAP paths for managing Active Directory users with Workflow Conductor widgets and set default account options for new Active Directory accounts.
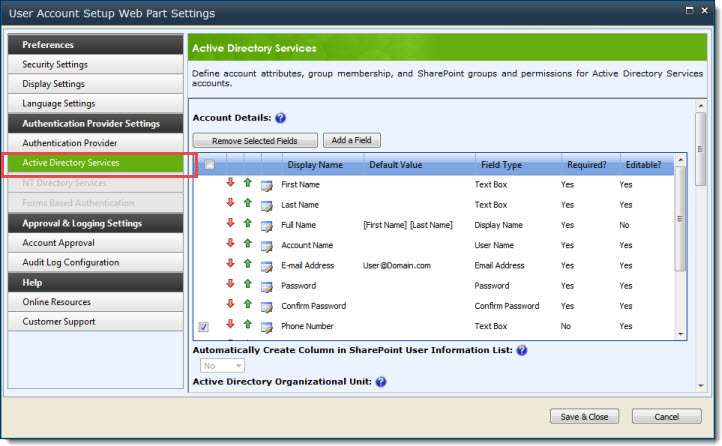 If User Account Setup is configured to use the Active Directory Services authentication provider, the Active Directory Services settings tab is active in the Web Part Settings page, and the following additional settings are available to define account attributes, group membership, and SharePoint groups and permissions for Active Directory Services accounts:
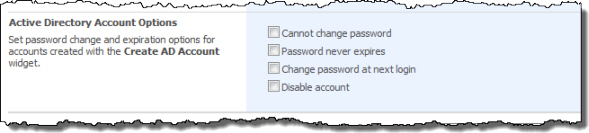


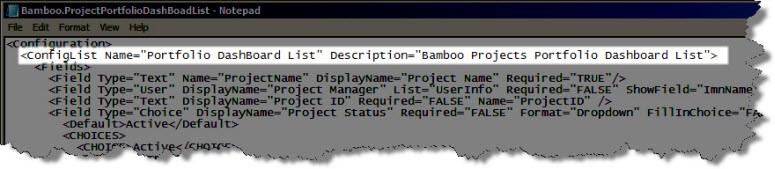 You can change the name of the Project Portfolio Dashboard list, but you must update the Bamboo.ProjectPortfolioDashboardList.xml configuration list with the name of the new list so that the web part points to the correct data source. The list may be located in the following location depending on your SharePoint configuration:
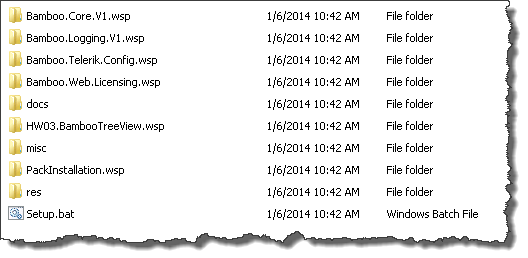 When you extract the product EXE to a location on your SharePoint server, several folders are created that contain installation files and Setup program configuration files. The root level of the extracted file system includes the file Setup.bat, which launches the Setup program. The list below shows the installation files for the Tree View Web Part, as an example.
 Change the display message welcoming users to your SharePoint site according to the time of day (i.e., Good Morning, Good Afternoon, Good Evening).
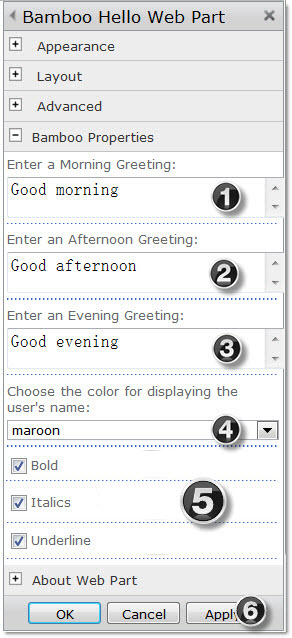
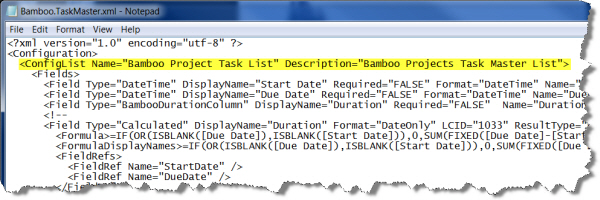 You can change the name of the Bamboo Project Task List, but you must also update the Bamboo.TaskMaster.xml configuration list with the new name; otherwise, each time that you add Task Master to a page, it will create the Bamboo Project Task List if it does not find a list of the same name in the site. The file may be located in the following location depending on your SharePoint configuration: