Using the Project Site Creation Request list
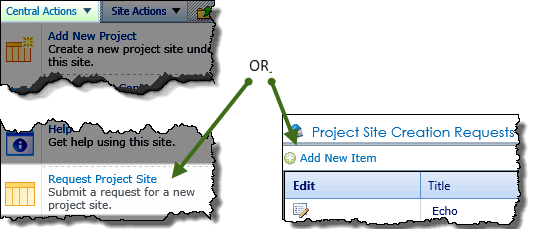
Project stakeholders who do not have the SharePoint permissions required to create sites, can submit requests for new project sites using the Project Site Creation Request list. Requests entered into the list are displayed under the portfolio site’s Overview tab.
Items entered into the list can then be approved using either:
Note: A sample workflow is included with the PM Central installation package. The approval workflow notifies a list of approvers that a new site has been requested. When the request is approved, the workflow notifies a list of people authorized to create project sites that a new site can be created. For more information about using the sample workflow included with PM Central, click here read KB.12789:
| Step |
Action |
Result |
| 1. |
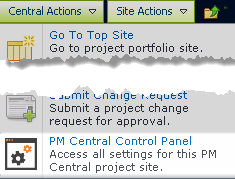
From the Central Actions drop down menu, click the Request Project
OR
On the portfolio site’s Overview tab, click the
Add New Item link above Project Site Creation Requests
|
Keep in mind:
1.The Request Project Site link is available by default, but this Central Actions Enhanced Menu feature may have been disabled by your administrator.
2.Requests created using either the Request Project Site and/or the Request Project Site Lite will be displayed in the Project Site Creation Request data view found on the Overview tab of the portfolio site |
| 2. |
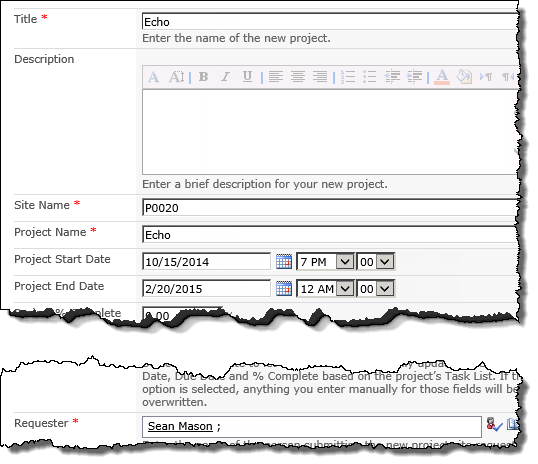
Enter a Title, Site Name and Project Name
Note: These fields are referenced by the sample workflow is included with the PM Central installation package.
|
 |
| 3. |
Identify the sites Requester |
| 4. |
Enter any other known information about the project, including Project Manager, Project Department, Project Type. |
| 5. |
Click Save |
The item will be displayed in the Project Site Creation Requests web part pending manual approval, or automatic approval and site creation if you are using Workflow Conductor. |
|
Using PM Central My Favorites
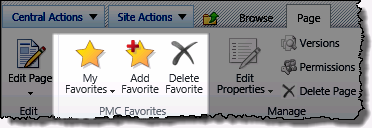
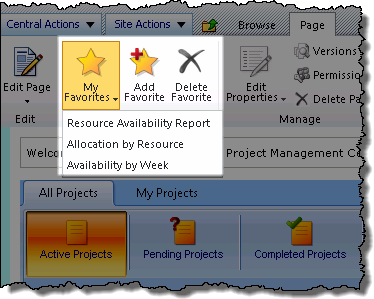
The PM Central My Favorites feature lets you create links to the PM Central pages you most frequently access.
NOTE: This feature is available by default, but may have been disabled by your administrator.
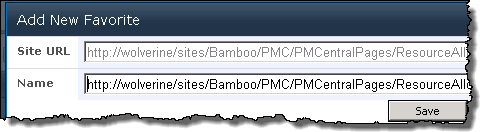
To Add a Favorite
| Step |
Action |
| 1. |
From the page that you want to save as a PMC Favorite access the Page tab in the ribbon and click Add Favorite
 |
| 2. |
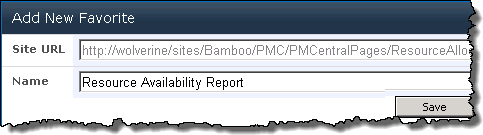
Enter a Name for the favorite
 |
| 3. |
Click Save. The new link will be available from the My Favorites drop down selector in the ribbon.
 |
|
Using the User Profiles Import utility to populate the Enterprise Resource Pool
With User Profile Import in PM Central, you can map and import users and their profiles, in bulk from the SharePoint User Profile Database to the Enterprise Resource Pool (ERP).
When using User Profiles Import keep in mind:
-
You must configure a Search Service application on the SharePoint server for the User Profiles Import utility to successfully search existing user profiles on SharePoint Server 2010. If the User Profiles Import Utility is unable to find users, verify that you are able to find the same users in a Search Center site before contacting Bamboo Support.
-
Information will be copied from the SharePoint User Profile Database
For more information, including links to instructions on how to configure a Search service application, see this article
| Step |
Action |
| 1. |
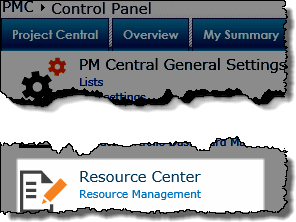
From the PM Central Control Panel on the Portfolio site, click Resource Management to access the Resource Center.
 |
| 2. |
Click User Profiles Import tab to access the tool |
| 3. |
Enter the desired criteria in some or all of the Search fields, then click Search
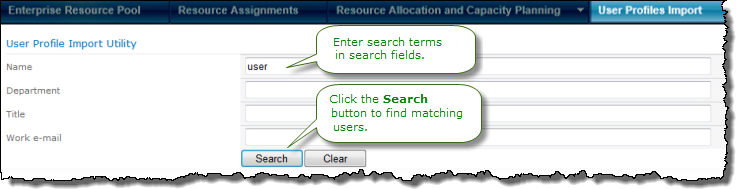
Note: The fields displayed can be modified in the Configuration Web Part Settings.
|
| 4. |
From the search results, select the users you want to import into the Enterprise Resource Pool, or click the top checkbox to Select All
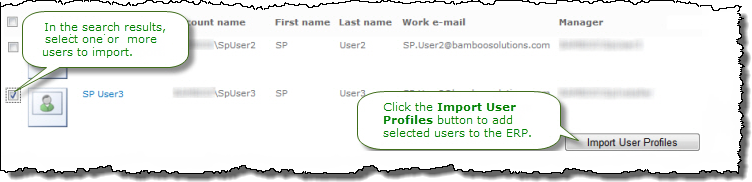 |
| 5. |
Click Import User Profiles.
User information will be imported into the ERP using the defined field mappings. |
|
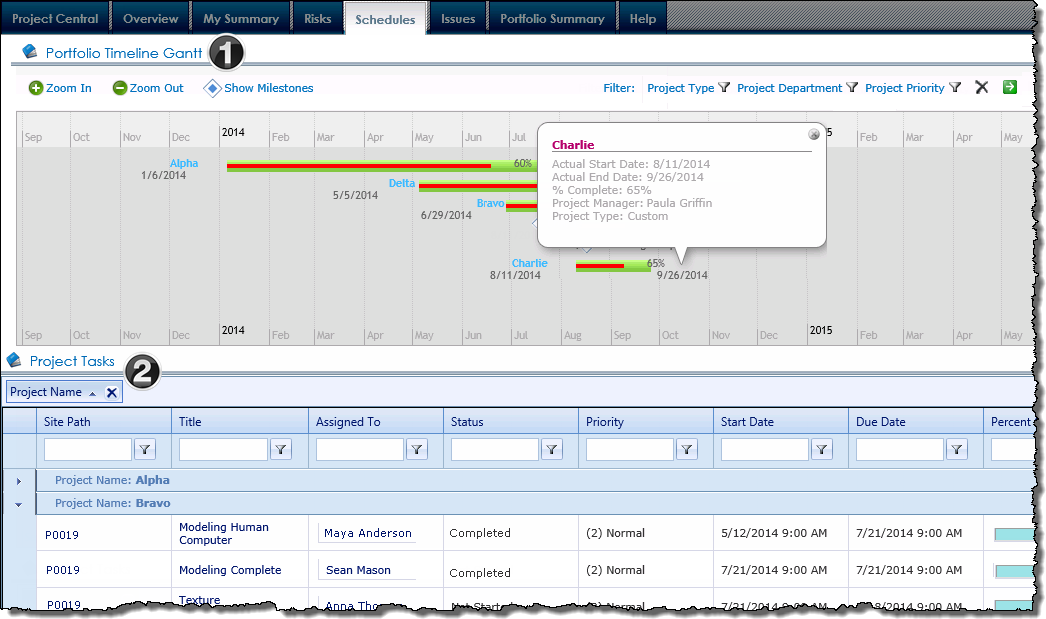
PM Central Portfolio – Schedules Tab
The Schedules tab on the portfolio site displays a Timeline Gantt of active projects as well as a data view of the project tasks associated with active projects.
NOTE: The Web Parts shown on the Schedules page of department sites are the same as those on the portfolio site. The content displayed in the Web Parts will be determined by the department site’s filter configuration.
|
|
Name / Web Part |
Description |
| 1. |
Timeline Gantt
Custom PM Central Web Part |
The Timeline Gantt Web Part displays a Gantt summary of projects, showing the project timeline of Active projects in the portfolio, and project’s % complete. Clicking a Project timeline or Milestone will provide additional information about the item.
The Timeline Gantt Web Part will not display any content by default. Use the provided toolbar to determine what project timelines will be displayed. 
-
To display a filtered view of the active projects in the portfolio, click the filter icon next one or more of the filter types and select the project type, status and/or department you want to display, then click the green arrow.
-
To display all active projects in the portfolio, simply click the green arrow next to the filter settings.
-
To clear the filters, click the delete icon.
-
The default time scale in the Timeline Gantt is months. To change the scale, click Zoom In or Zoom Out in the toolbar menu.
-
Display project milestones by clicking the Show Milestones option. Click Hide Milestones* to remove them from the Gantt.
-
Milestones are stacked vertically, or wrapped, by default. To display milestones horizontally, click Unwrap Milestones. To display them vertically again, click Wrap Milestones.
Information on configuring the Timeline Gantt web part is available here
|
| 2. |
Project Summary
Bamboo Data-Viewer Web Part |
The Project Tasks list is a display of all project tasks associated with Active projects, that have an Active Phase Status.
- Tasks with the status Not Started, Completed, Deferred and Waiting on Someone else will be included in this display.
|
|
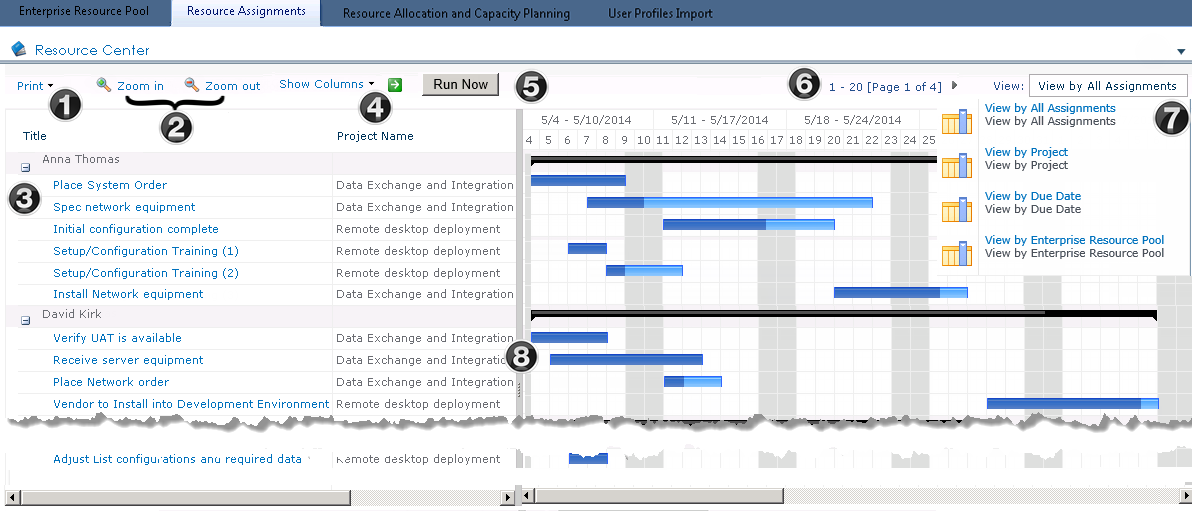
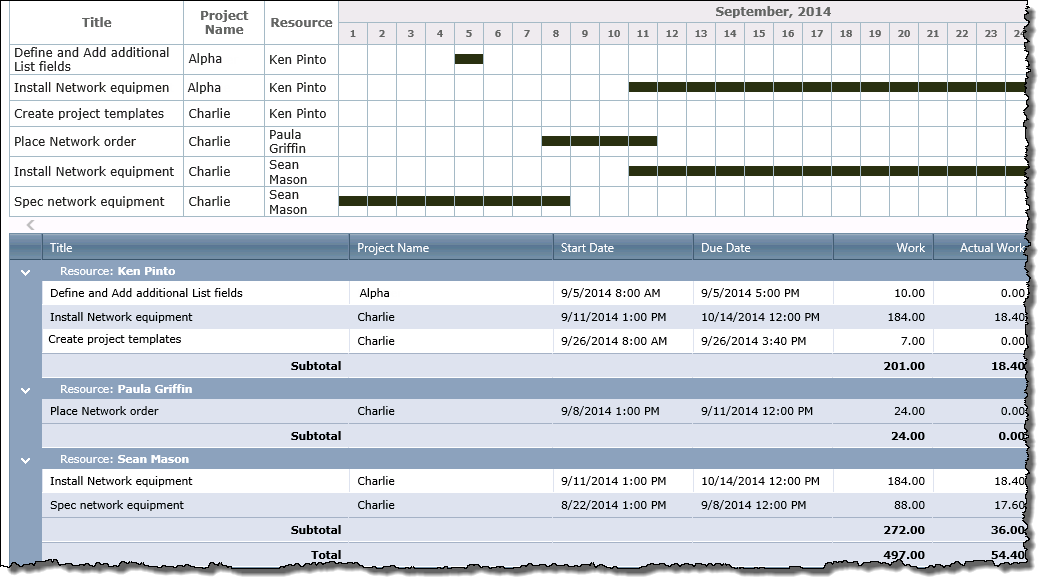
Using the Resource Assignments Gantt chart
The Resource Assignments Gantt Chart provides a visual summary of resource assignments.
When working with the Resource Assignments Gantt report keep in mind:
-
Only users with Full Control or Design permissions can access the Resource Center by way of the site’s PM Central Control Panel.
-
Assignments are only displayed when a resource has been associated with a task, using with the Assigned To or Resource fields in the task.
-
The information in this Web Part will be updated automatically by a timer job that is scheduled to run on a daily basis, or when you select the Run Now button.
-
The scope of the information displayed in the report will depend on where the Resource Assignment page is accessed:
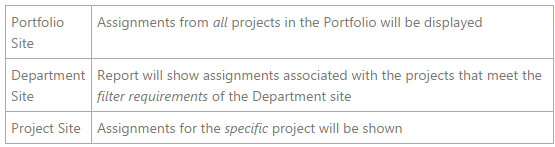
|
|
Function |
| 1. |
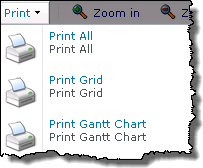
Print the grid with the task information, just the Gantt chart, or both from the drop down menu.
 |
| 2. |
Use the Zoom In and Zoom Out buttons to view tasks in the Gantt view from daily (Zoom In) to monthly (Zoom Out).
NOTE: After you click the Zoom In or Zoom Out buttons, there may be a brief delay as the Gantt view is rendering the appropriate view.
|
| 3. |
Click + or – to expand or collapse information in the assignment grid. When collapsed only the black summary bar depicting the total duration of the resource’s assignments will be displayed.  |
| 4. |
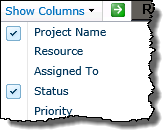 Choose which columns to display in the left-hand pane by selecting the desired columns from the Show Columns drop-down list, then click the green arrow to update the display. Choose which columns to display in the left-hand pane by selecting the desired columns from the Show Columns drop-down list, then click the green arrow to update the display.
Selecting and already checked box will remove it from the grid
Note: The drop down menu will refresh after each selection.
|
| 5. |
Click Run Now to force the Bamboo Gantt Chart Timer job to run immediately, updating the contents of the report. |
| 6. |
Page through the tasks and resources by clicking the arrow.
The number of items shown per page can be changed in the web parts configuration tool pane. |
| 7. |
Choose your view using the drop-down list to the right of the Web Part toolbar:
-
View by All Assignments: This default view displays tasks grouped by Assignment.
-
View by Project: Assignments are grouped by Project, then by the Assigned user 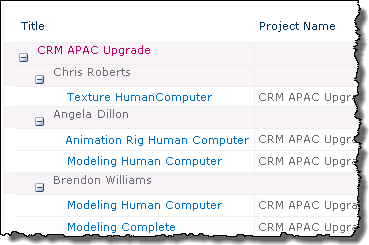
NOTE: View by Project is not available when accessing the Resource Assignments Gantt chart from a project site.
-
View by Due Date: Assignments are arranged by their completion status (On Time, Overdue, or a future due date).
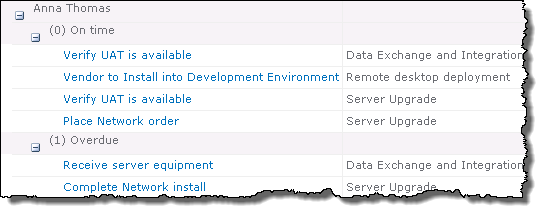
-
View by Enterprise Resource Pool: Resources are grouped by their SharePoint Membership as it is defined on the project site. If the user has not been granted permissions to a project site through a SharePoint group, tasks associated with that site will show under the heading No Group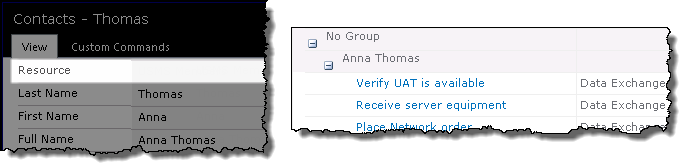
|
| 8. |
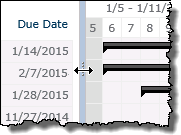 Place your cursor over the gray vertical bar between the assignment grid and the Gantt chart to show or hide either side. Place your cursor over the gray vertical bar between the assignment grid and the Gantt chart to show or hide either side. |
|
|
PM Central Project Resource Reports

When working with the Resource Allocation and Capacity Planning Reports keep in mind:
-
Only Users with Full Control or Design permissions can configure access the Resource Center to view resource reports.
-
By default, resource reports will be updated daily, starting at 11:45 AM.
The following options are available when working with the PM Central Resource Reports:
-
Change the report year displayed
-
Save report information to the Resource Work Allocation Summary list on the portfolio site
-
Print the reports or export to Excel
Resource Allocation and Capacity Planning Reports:
| Report Name |
Description |
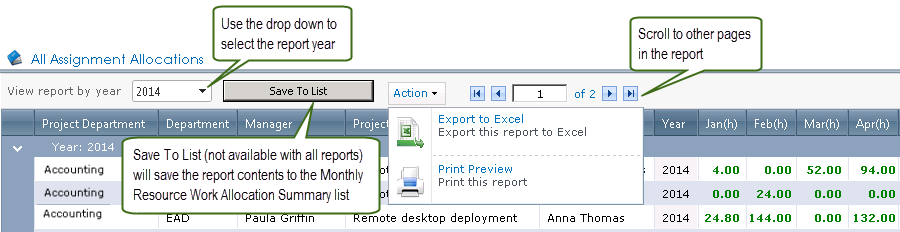
| All Assignment Allocations |
All Assignment Allocations displays the resources’ total allocation per month for the project, grouped by year. This lets you track how much work all of your resources are accumulating across the portfolio. |
| By Resource Allocation |
By Resource Allocation shows the total allocation per month for each resource assigned to the project, grouped by year. |
| Resource Availability |
Resource Availability displays the resources’ remaining availability. Availability is determined by deducting a users task assignments from their capacity per month.
-
Capacity is determined by the Work Hours and Holidays entered in the Resource Center Settings, and the Maximum Unit value associated with each resource.
-
If the resource has available time, the number of available hours is shown in green.
-
If the resource has too many tasks, the resource’s availability is shown as a negative number in red.
|
| Find Available Resources |
Find Available Resources lets you find available resources that you can request and assign to task for your projects.
- A user’s role is specified in the Resource Pool
|
|
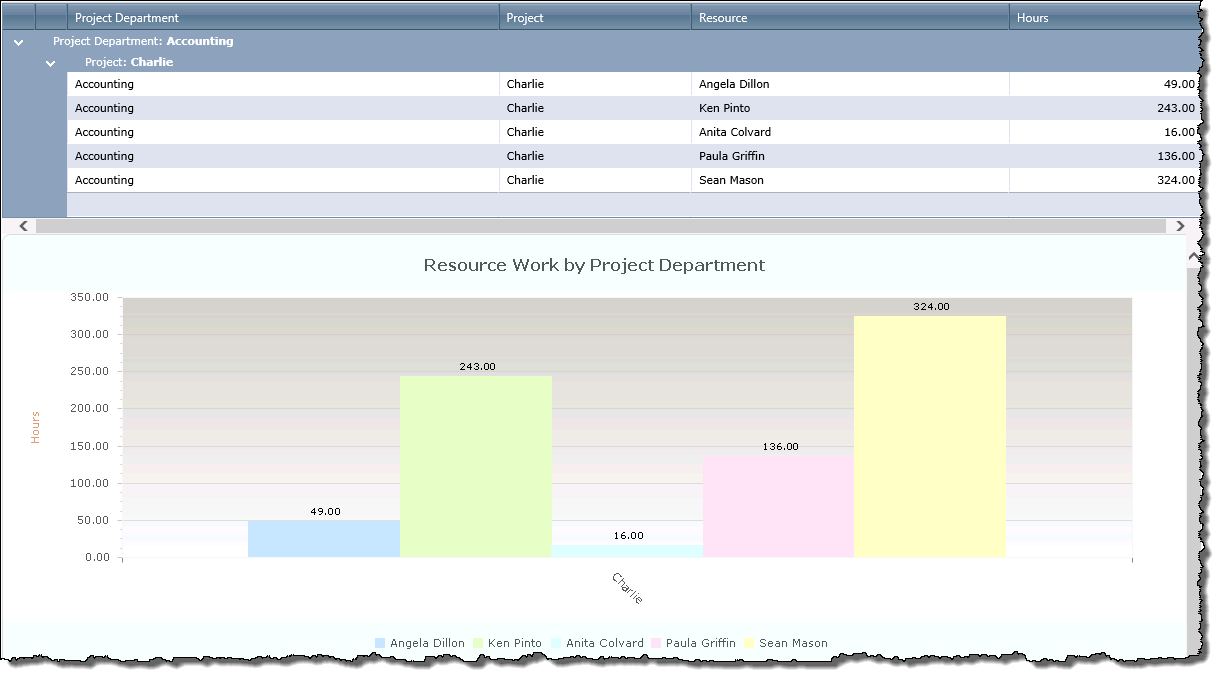
Report Center – Resource Work by Project Department
Resource Work by Project Department displays the hours or days per month that resources are assigned to work on projects filtered by selected project departments.
Note: The report filters by the department assigned to the project, not the department assigned to individual resources in the resource pool.
Define report data
| Step. |
Action |
| 1. |
In the Project Department field, use the drop-down list to select one or more project departments, or click All to select all projects. |
| 2. |
In the Project field, use the drop-down to select one or more projects, or select Check All to select all projects. |
| 3. |
In the Resource field, use the drop-down list to select a resource, or select Check All to select all resources. |
| 4. |
Click Custom Color to select a different color for each project you want to view in the report. |
| 5. |
In the Values in field, use the drop-down list to choose how you want the work displayed: Hours or Days.
NOTE: In Day View only a month duration can be displayed.
|
| 6. |
Click View Report to display the report. When you click View Report, the query is saved in the Report Information list. When the Bamboo Reporting Calculation Timer Job V4 runs, it will use the query to pull data from the List Rollup to display in the report. By default, the timer job is set to run daily.
OR
To view immediately, click the Run Now button. If you check this option, the application will go directly to the List Rollup to obtain the data for the report.
NOTE: This may impact performance.
|
| 7. |
To export or print the report data, click the Action menu on the Web Part toolbar. Click the forward and back arrows to move from one page of report information to the next or to the first or last page of the report. |
|
Report result
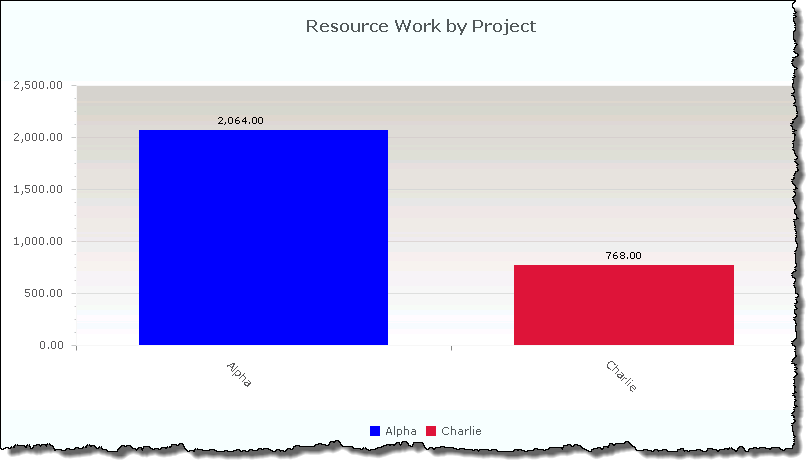
Report Center- Resource Work By Project
Resource Work by Project displays all the resource hours per project.
Define report data
| Step. |
Action |
| 1. |
In the Project field, use the drop-down list to select one or more projects, or click All to select all projects. |
| 2. |
In the Values in field, use the drop-down list to choose how you want the work displayed: Hours or Days. |
| 3. |
Click Custom Color to select a different color for each project you want to view in the report.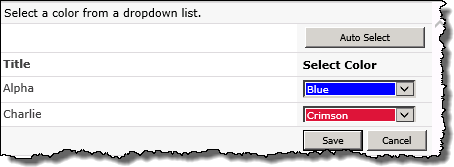 |
| 4. |
Click View Report to display the report. When you click View Report, the query is saved in the Report Information list. When the Bamboo Reporting Calculation Timer Job V4 runs, it will use the query to pull data from the List Rollup to display in the report. By default, the timer job is set to run daily.
OR
To view immediately, click the Run Now button. If you check this option, the application will go directly to the List Rollup to obtain the data for the report.
NOTE: This may impact performance.
|
| 5. |
To export or print the report data, click the Action menu on the Web Part toolbar. Click the forward and back arrows to move from one page of report information to the next or to the first or last page of the report. |
|
Report result
Report Center – Resource Work Allocation Per Month
Resource Work Allocation Per Month displays the hours or days per month that resources are allocated to the project(s). To track monthly resource work allocation, compare this report to the By Resource Allocation report in the Resource Center
Define report data
| Step. |
Action |
| 1. |
Change the year to display a different report. |
| 2. |
To export or print the report data, click the Action menu on the Web Part toolbar. Click the forward and back arrows to move from one page of report information to the next or to the first or last page of the report. |
|
Report Center – Actual Cost Per Month
Actual Cost Per Month displays the actual monthly cost for the project(s) based on the resource allocation, % complete and the standard rate.
Define report data
| Step. |
Action |
| 1. |
Change the year to display a different report. |
| 2. |
To export or print the report data, click the Action menu on the Web Part toolbar. Click the forward and back arrows to move from one page of report information to the next or to the first or last page of the report. |
|
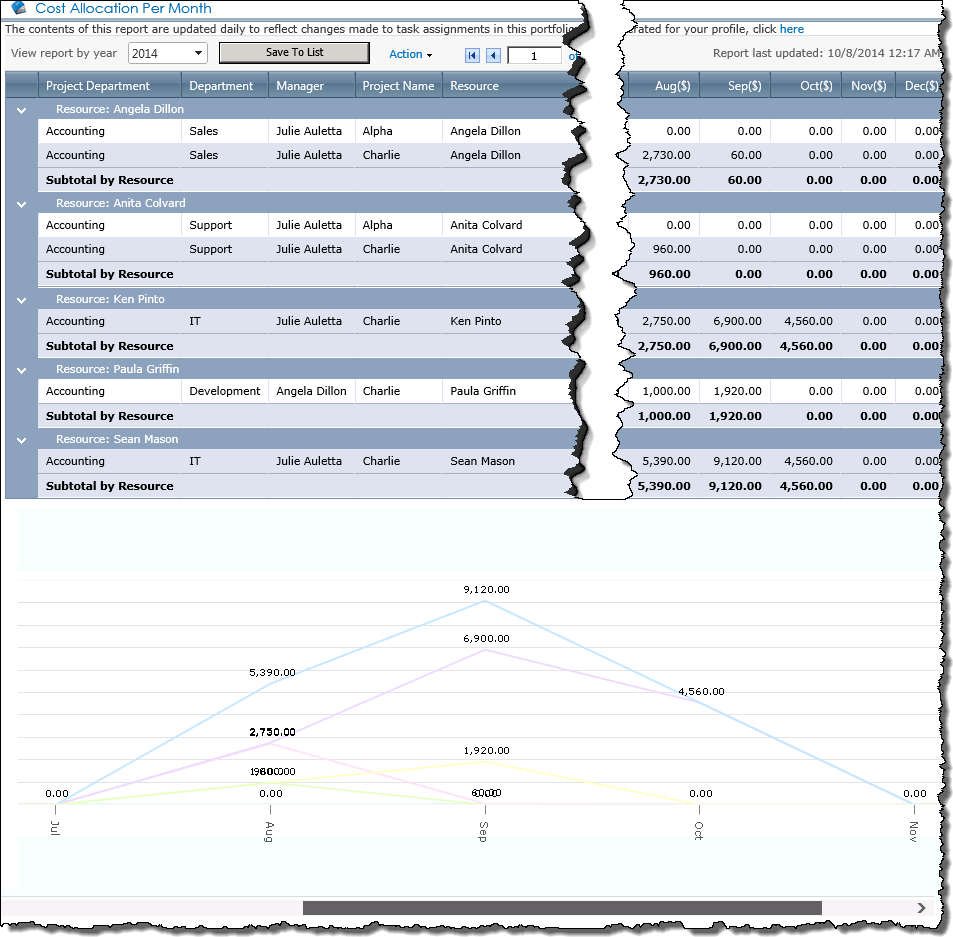
Report Center – Cost Allocation per Month
Cost Allocation Per Month displays the monthly cost for the project(s) based on resource allocation and the standard rate configured for each resource.
Define report data
| Step. |
Action |
| 1. |
Change the year to display a different report. |
| 2. |
Click View Report to display the report. When you click View Report, the query is saved in the Report Information list. When the Bamboo Reporting Calculation Timer Job V4 runs, it will use the query to pull data from the List Rollup to display in the report. By default, the timer job is set to run daily.
OR
To view immediately, click the Run Now button. If you check this option, the application will go directly to the List Rollup to obtain the data for the report.
NOTE: This may impact performance.
|
| 3. |
To export or print the report data, click the Action menu on the Web Part toolbar. Click the forward and back arrows to move from one page of report information to the next or to the first or last page of the report. |
|
Report result
Report Center – Resource Task Timeline
The Resource Task Timeline displays the tasks, timeline, work and actual work assigned to a resource.

Define report data
| Step. |
Action |
| 1. |
In the Resource field, use the drop-down list to select one or more resources, or select All to see all task timelines for all resources. |
| 2. |
In the View By field, use the drop-down list to choose how you want to display the timeline: Day, Month, Year or Interval. If you select Interval, then you can enter To and From dates to show in the report timeline. |
| 3. |
In the From field, enter in the day, month or year you want to show, or use the calendar icon to select a date. |
| 4. |
In the Values in field, use the drop-down list to choose how you want the work displayed: Minutes, Hours or Days. |
| 5. |
Click View Report to display the report. When you click View Report, the query is saved in the Report Information list. When the Bamboo Reporting Calculation Timer Job V4 runs, it will use the query to pull data from the List Rollup to display in the report. By default, the timer job is set to run daily.
OR
To view the report immediately, click the Run Now button. If you check this option, the application will go directly to the List Rollup to obtain the data for the report.
Note: This may impact performance.
|
| 6. |
To export or print the report data, click the Action menu on the Web Part toolbar. Click the forward and back arrows to move from one page of report information to the next or to the first or last page of the report. |
|
Report result
Report Center – Resource Work by Department
Resource Work by Department displays the hours or days per month that resources are assigned to work on projects filtered by selected departments that the resources belonged to. The report filters by the department assigned to individual resources in the resource pool, not the department assigned to the project.
Define report data
| Step. |
Action |
| 1. |
In the Manager field, use the drop-down list to select one or more resource managers, or click All to select all projects. |
| 2. |
In the Project field, use the drop-down to select one or more projects, or select All to select all projects. |
| 3. |
In the Resource field, use the drop-down list to select a resource, or select All to select all resources. |
| 4. |
Click Custom Color to select a different color for each project you want to view in the report. |
| 5. |
In the Values in field, use the drop-down list to choose how you want the work displayed: Hours or Days. |
| 6. |
Click View Report to display the report. When you click View Report, the query is saved in the Report Information list. When the Bamboo Reporting Calculation Timer Job V4 runs, it will use the query to pull data from the List Rollup to display in the report. By default, the timer job is set to run daily.
OR
To view immediately, click the Run Now button. If you check this option, the application will go directly to the List Rollup to obtain the data for the report.
NOTE: This may impact performance.
|
| 7. |
To export or print the report data, click the Action menu on the Web Part toolbar. Click the forward and back arrows to move from one page of report information to the next or to the first or last page of the report. |
|
Report Center – Resource Work by Manager
Resource Work by Manager displays the hours or days per month that resources are assigned to work on projects filtered by selected resource managers.
Note: The report filters by the manager assigned to the resource in the resource pool.
Define report data
| Step. |
Action |
| 1. |
In the Manager field, use the drop-down list to select one or more resource managers, or click All to select all managers. |
| 2. |
In the Project field, use the drop-down to select one or more projects, or select All to select all projects. |
| 3. |
In the Resource field, use the drop-down list to select a resource, or select All to select all resources. |
| 4. |
Click Custom Color to select a different color for each project you want to view in the report. |
| 5. |
In the Values in field, use the drop-down list to choose how you want the work displayed: Hours or Days. |
| 6. |
Click View Report to display the report. When you click View Report, the query is saved in the Report Information list. When the Bamboo Reporting Calculation Timer Job V4 runs, it will use the query to pull data from the List Rollup to display in the report. By default, the timer job is set to run daily.
OR
To view immediately, click the Run Now button. If you check this option, the application will go directly to the List Rollup to obtain the data for the report.
NOTE: This may impact performance.
|
| 7. |
To export or print the report data, click the Action menu on the Web Part toolbar. Click the forward and back arrows to move from one page of report information to the next or to the first or last page of the report. |
|
Report result
Work with the project site’s Project Resource Pool
Users with Full Control or Design permissions to a project site can access the Report Center to add users to the site’s Contacts list (Project Resource Pool), which acts as a repository of information about project team members.
To access the Report Center:
| Step |
Action |
Result |
| 1. |
Access the PM Central Control Panel from the Central Actions menu
 |
Keep in mind:
Access to the Control Panel is security trimmed, requiring either Full Control or Design permissions |
| 2. |
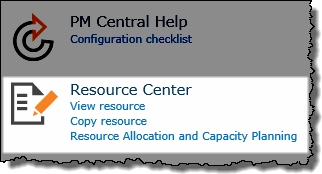
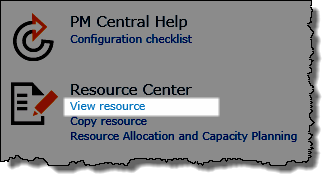
Under Resource Center select View resource or
Copy resource |
Based on your selection, you will be taken to a specific page in the Resource Center
 |
From the Resource Center you can:
-
Copy multiple users from the Enterprise Resource Pool into the Project Resource Pool.
-
Update user information in the Project Resource Pool with the current information maintained in the Enterprise Resource Pool
|
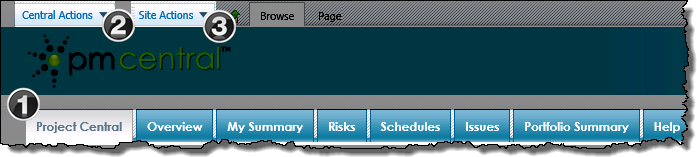
Overview of the PM Central Project Site
The Project Site is a sub site of the portfolio site and is designed to have its data rolled up to the portfolio site for a comprehensive status of all projects in your portfolio. Its enhanced template supports uniform project data input, visualization of task, issue and risk status, along with a file explorer-type interface for document management, and a built in discussion board.
On each page of the project site you will see:
|
|
Name / Web Part |
Description |
| 1. |
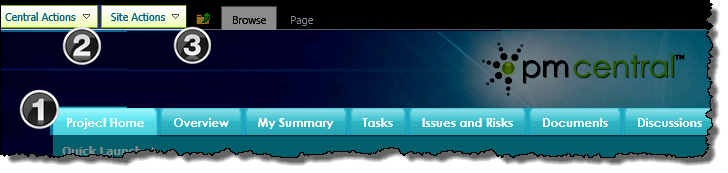
Project Site Navigators
SharePoint Navigators |
The seven default items in the Project Site Navigator view of the Project Site Navigators list make up the project site’s top level navigation.
The tabs take users to different aspx pages that contain Web Parts that are used to display specific content relevant to the project.
|
| 2. |
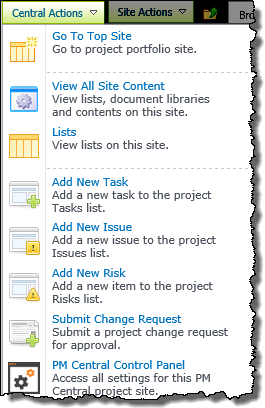
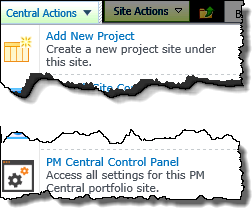
Central Actions Menu |
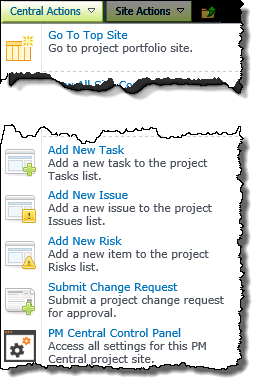 The Central Actions menu provides quick access to areas where common activities are performed on the site, including Adding a New Task and the PM Central Control Panel. The Central Actions menu provides quick access to areas where common activities are performed on the site, including Adding a New Task and the PM Central Control Panel.
Keep In Mind:
1. Use the bulls eye icon  to access Central Actions in 2013 to access Central Actions in 2013
2. Users must have Design permissions or higher on the site to see the PM Central Control Panel in the Central Actions menu
3. Quick links to commonly accessed forms are part of the Enhanced Central Actions menu.
|
| 3. |
Site Actions Menu |
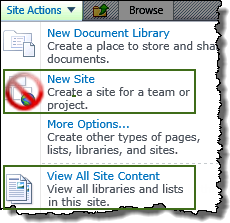 The SharePoint Site Actions menu provides shortcuts to commands commonly used when working with SharePoint sites. The command options you see depend on your permissions on the site. The SharePoint Site Actions menu provides shortcuts to commands commonly used when working with SharePoint sites. The command options you see depend on your permissions on the site.
Notes:
1. New Sites should be created using the PM Central Site Creation Plus tool NOT from SharePoint’s New Site page
2. A list of Site Contents is available here
|
|
PM Central Project – Risks Tab
The Risks page displays the active risks associated with the project.
When working with Risks keep in mind:
-
All Risks with an active phase status that are associated with active projects will be rolled up and displayed under the Risk tab of the portfolio, and applicable department sites.
-
By default, the number of overdue risks will be used by the Risk Status Key Performance Indicator in the Project Health list.
-
Starting with PM Central 4.3 the Business Value field in the Risk form must be populated for the risk to be displayed in the Risk Summary chart.
The Issues and Risks pages were separated under the Issues and Risks tab in PM Central 4.3

|
|
Name / Web Part |
Description |
| 1. |
All Active Risks
Bamboo Data Viewer Web Part |
Displays the active risks associated with Active projects in the portfolio.
-
Risks that have not been addressed by the designated Due Date will be highlighted in red
-
The total Exposure, Cost Exposure and Business Value of the Active items will be calculated by the Data-Viewer Web Part.
NOTE: It may be necessary to reload the page to update the column totals.
|
| 2. |
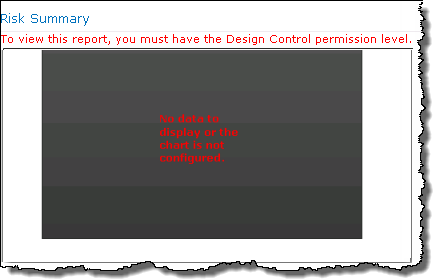
Risk Summary
PM Central Custom Web Part |
The Risk Summary chart enables project managers to identify risks that pose a threat to the project at a glance.
-
Only Active Risks will be displayed in the chart with consists of three zones; Red: high risk, Yellow: medium risk,Green: low risk
-
A risks placement on the chart will be determined by the identified Probability and Value
-
The size of the bubble will be determined by the Business Value
The Business Value column was added in PMC 4.3
Keep in mind:
Unless the default configuration settings are modified by the administrator, users must have Design permissions or higher to see the Risk Summary.
|
| 3. |
Risks Search
Bamboo List Search Simple |
Use the Risks Search Web Part to search the project site’s Risks list for items according to specific criteria.
Keep in mind:
-
The Web Part is configured by default to use an AND joiner. If you enter more than one criterion, all criteria must be met for a result to be returned.
-
The Status “choice” selector will list the valid choices in the drop-down selector (Active, Postponed, Cancelled) and a Select All option.
-
Search in all columns for: leverages SharePoint Search and allows searching in all list or library columns using a single search field.
-
Click the links for additional information on using or configuring the Risks Search Web Part.
|
|
Using the PM Central Risks list
When working with Risks keep in mind:
-
Active risks associated with active projects are rolled up and displayed on the portfolio site, and applicable department sites.
-
By default, the number of overdue risks will be used by the Risk Status Key Performance Indicator in the Project Health list.
-
The My Active Risks display, found under the My Summary tab at all levels of the PM Central hierarchy, will show risks the logged in user has been Assigned To
To create a new risk:
| Step |
Action |
Result |
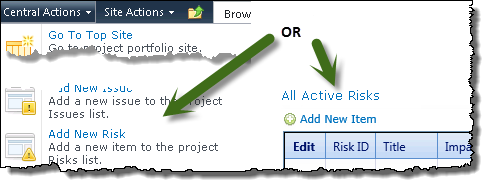
| 1. |
Click
Add New Risk in the Central Actions drop down
Or
From the Risks tab, under Issues and Risks, click Add New Item above the All Active Risks data view. |
 |
| 2. |
Enter a Title, Owner and Assigned To |
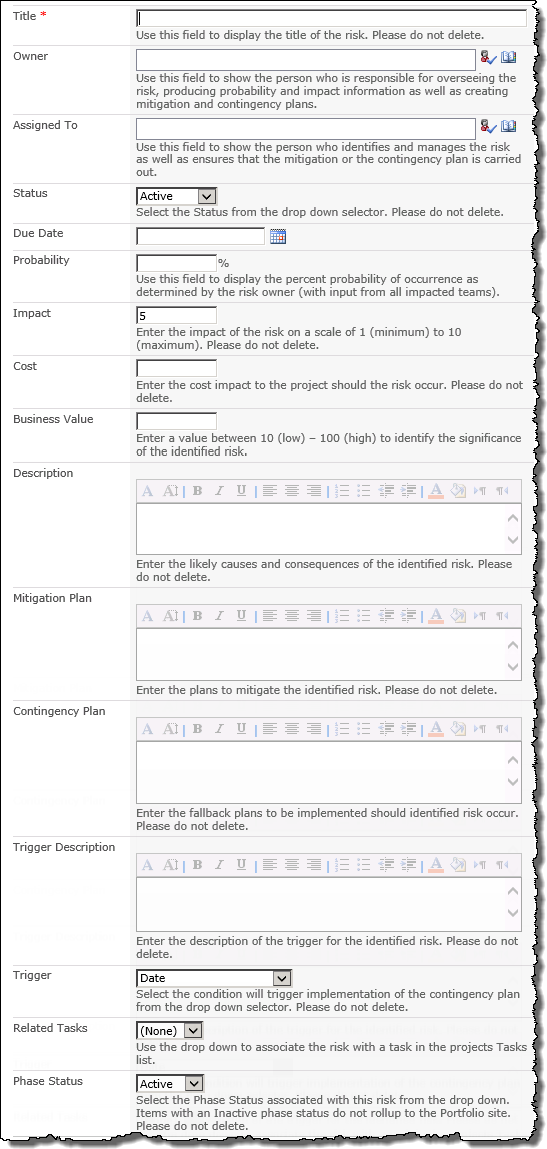 |
| 3. |
Enter a Due Date for the risk. |
| 4. |
Enter:
The Probability that the risk will occur
The Impact the event will have on the project using a scale of 1 (low) – 10 (high)
Probability x Impact will be used to calculate the risk’s Exposure.
|
| 5. |
The Cost that will be incurred should the risk occur
This value will be used when calculating cost of risks for the project displayed in the Summarized View of Project Risks on the Portfolio site
|
| 6. |
The Business Value on a scale of 10 (low) -100 (high)
This value will determine the size of the risk bubbles displayed in the Risk Summary chart
The Business Value column was added in PMC 4.3 |
| 7. |
Describe the risk, and the associated Contingency and Mitigation plans, along with the Trigger Description. |
| 5. |
Click Save |
Risks with an Active Status will be displayed in the All Active Risks data-view on the Risks page |
|
Add individual resources from the ERP to the Project Resource Pool
When you select the View resource link under the Resource Center Heading you will be taken to the Project Team Info page where you can:
-
Add users individually to the Project Resource Pool (Contacts list) from the Enterprise Resource Pool
-
View a display of the current Project Team Resources
-
Update user information to reflect the current contents of the Enterprise Resource Pool
-
Enter resources into the Project Resource Pool who are not part of the Enterprise resource pool. This option will require changing the default behavior of the Bamboo Role column.
NOTE: When users are added individually to the Project Resource pool, SharePoint permissions can be simultaneously assigned by users with the Full Control permission level on the site.
Add an individual resource to the Project Resource Pool from the Enterprise Resource Pool
| Step |
Action |
Result |
| 1. |
Access the PM Central Control Panel from the Central Actions menu drop down |
Keep in mind:
Access to the Control Panel is security trimmed, requiring either Full Control or Design permissions |
| 2. |
Click View resource
 |
You will be taken to the Project Team Info page of the Resource Center
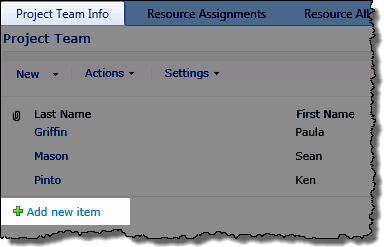 |
| 3. |
From the Project Team Info page, click Add New Item |
 |
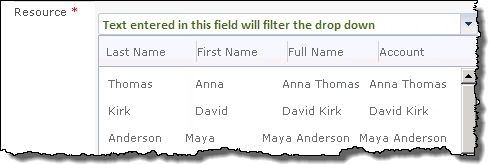
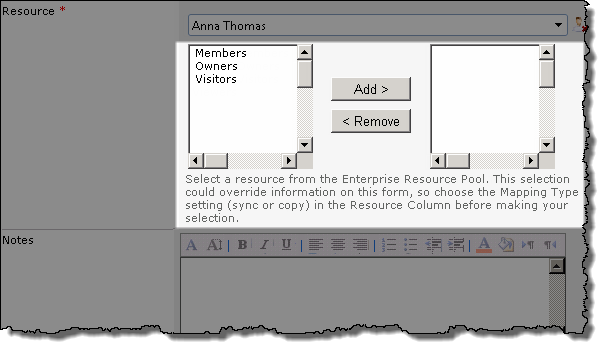
| 4. |
Click the drop-down arrow to see all the resources in the Enterprise Resource Pool
OR
Type the user name into the Resource field to filter the drop-down’s contents
|
 |
| 5. |
Optional:
Assign the Project Team member to a SharePoint group to provide access to the site
NOTE: Full control permissions are required to add a user to a SharePoint group
|
NOTE: Users with Design permissions can add users to the project team, but will not be able to assign users to SharePoint groups.
|
| 6. |
Click Save |
All information associated with the selected user in the Enterprise Resource Pool will be copied to the Project site’s contact list and displayed under the Project Team Info tab of the Resource Center. |
|
Update user profile’s in the Project Resource Pool
User information that is modified or updated in the Enterprise resource pool will not automatically get updated on the project site. This update process can be manually initiated on an “as needed” basis.
Individual user update
| Step |
Action |
Result |
| 1. |
From the Project Team Info page of the project Resource Center, select the user whose information you want to update |
You will be taken to the display view of the user’s contact information
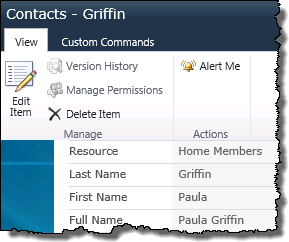 |
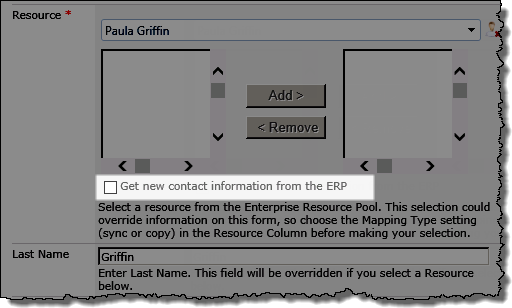
| 2. |
Click Edit Item
and then click the checkbox to Get new contact information from the ERP
 Important: User information that was modified after the initial copy from the Enterprise Resource Pool may be lost. Click here for additional information Important: User information that was modified after the initial copy from the Enterprise Resource Pool may be lost. Click here for additional information
|
 |
| 3. |
Click Save |
The user’s information will be re-copied from the Enterprise Resource Pool into the local Contacts list. |
|
Project Health Overview
The PM Central Project Health list contains basic information about the project, the contents of which are visible throughout the PM Central hierarchy.
When working with the Project Health list keep in mind:
-
There will only be one item with project health information in the Project Health list
-
Project Health information for all projects is rolled up and displayed in Project Summary dashboards found on the project, and applicable department sites.
-
Project Health information for the current project is is displayed Project Info display on the Project Home page
-
To view all the Project Health information, or to edit the project details, click the link found under Project Name
-
Some columns in the Project Health list, including the Key Performance Indicators, cannot be manually edited.
Project Health related topics:
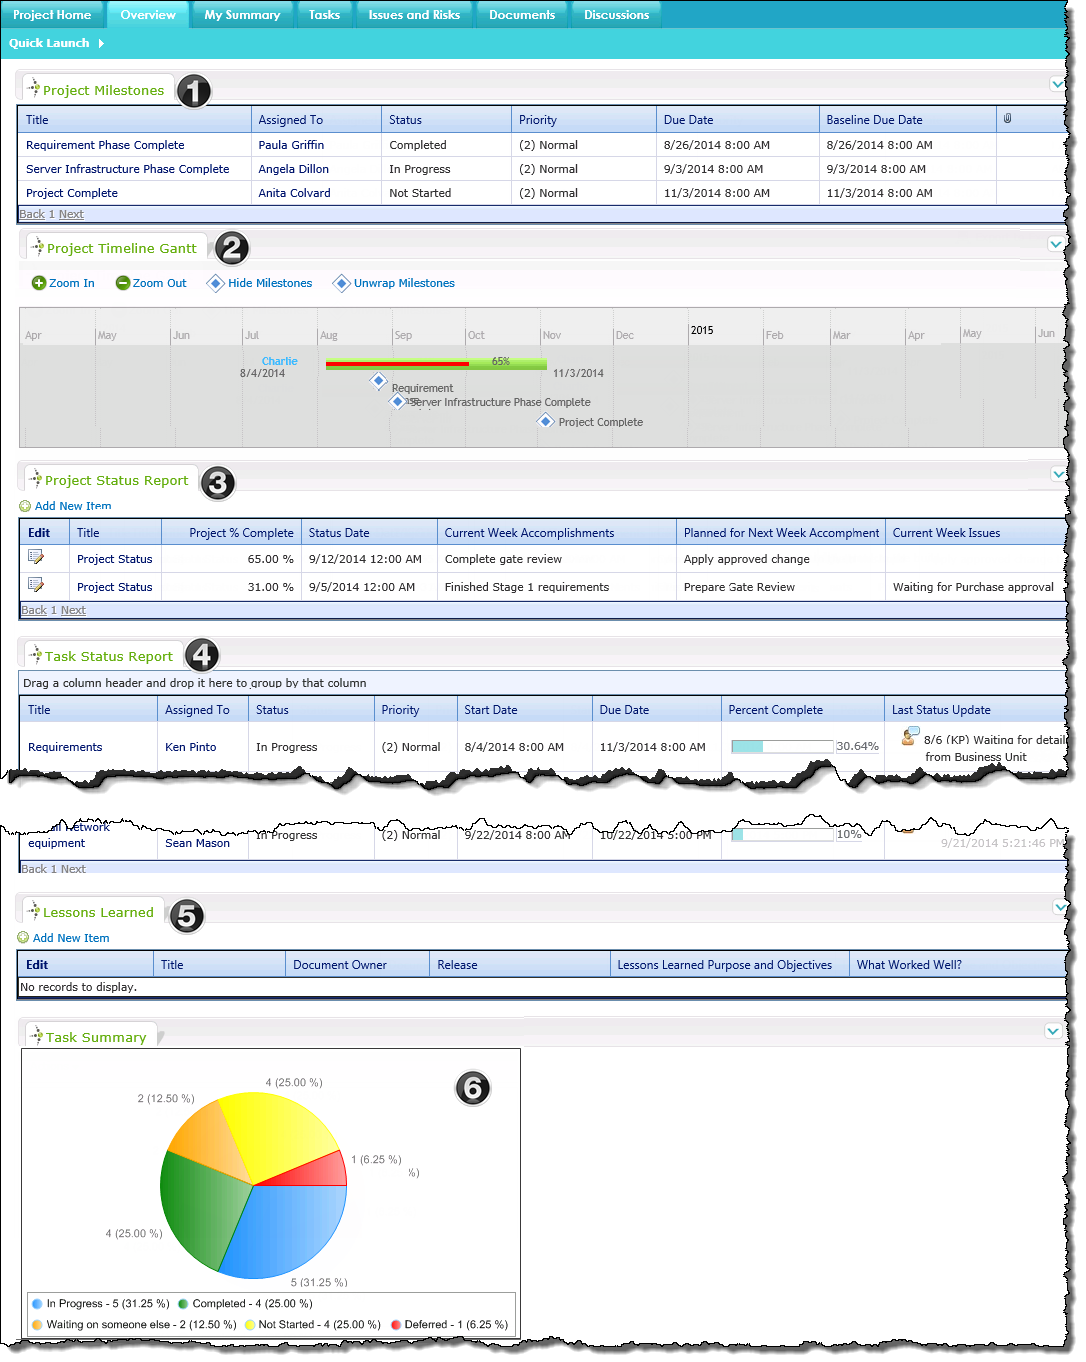
PM Central Project – Overview Tab
The Overview tab on the project site provides users with the high level view of the project.
|
|
Name / Web Part |
Description |
| 1. |
Project Milestones
Bamboo Data Viewer Web Part |
Displays the Overview/Milestones view of the Tasks list.
 Baseline Due Date values will only display if a Schedule Tasks Baseline was created. Baseline Due Date values will only display if a Schedule Tasks Baseline was created.
|
| 2. |
Timeline Gantt
PM Central Custom Web Part |
The Timeline Gantt Web Part displays a summary of the project, showing the project timeline and project’s % complete.
Use the provided toolbar to modify the display: 
-
The default time scale in the Timeline Gantt is months. To change the scale, click Zoom In or Zoom Out in the toolbar menu.
-
Display project milestones by clicking the Show Milestones option. Click Hide Milestones to remove them from the Gantt.
-
Milestones are stacked vertically, or wrapped, by default. To display milestones horizontally, click Unwrap Milestones. To display them vertically again, click Wrap Milestones.
Milestones are stacked vertically, or wrapped, by default. To display milestones horizontally, click Unwrap Milestones. To display them vertically again, click Wrap Milestones.
Information on configuring the Timeline Gantt web part is available here
|
| 3. |
Weekly Project Status Reports
Bamboo Data Viewer Web Part |
The Weekly Project Status Reports display provides a view of the Project Status Reports with a Status Date within the last 30 days.
- Project Status Reports with a Status Date within 7 days of today that are associated with active projects will be displayed under the Overview tab of the portfolio,and applicable department sites

NOTE: Prior to PMC 4.3 only items with a Status Date within in 7 days would be displayed
|
| 4. |
Task Status Reports
Bamboo Data Viewer Web Part |
Displays all Tasks in the project Task’s list that do not have a status of Completed or Not Stated
-
Allows Project Managers to quickly read the contents of the lists Last Status Update column.
-
All Tasks with an active phase status that are associated with active projects will be rolled up and displayed under the Schedule tab of the portfolio, and applicable department sites.
|
| 5. |
Change Requests
Bamboo Data Viewer Web Part |
The Change Requests data view provides information regarding any change requests submitted for the project.
- All Change Requests associated with active projects will be rolled up and displayed under the Overview tab of the portfolio, and applicable department sites.
|
| 6. |
Lessons Learned
Bamboo Data Viewer Web Part |
Capture lessons learned by the project team as part of the project closeout or phase end.
- All Lessons Learned will be rolled up and displayed on the Lessons Learned page of the portfolio, and applicable department sites.
|
|
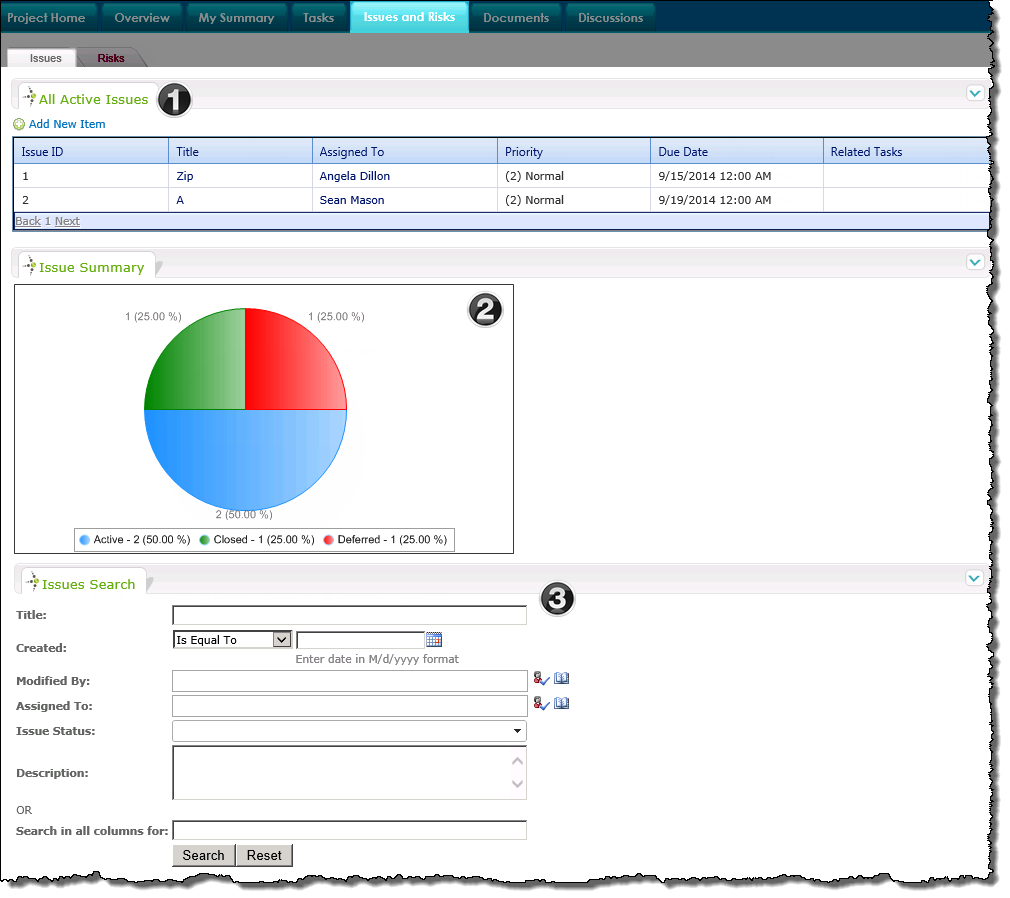
PM Central Project – Issues Tab
An issue is an unfavorable circumstance that has already occurred or is currently occurring and that is affecting the project’s cost, schedule or quality.
The Issues page displays the active issues associated with the project, along with a chart summarizing all the issues created.
When working with Issues keep in mind:
-
All issues with an active phase status that are associated with active projects will be rolled up and displayed under the Issues tab of the portfolio, and applicable department sites.
-
By default, the number of overdue issues will be used by the Issues Status Key Performance Indicator in the Project Health list.
-
Information about creating a new issue is available here
The Issues and Risks pages were separated under the Issues and Risks tab in PM Central 4.3
|
|
Name / Web Part |
Description |
| 1. |
All Active Issues
Bamboo Data-Viewer Web Part |
- The Issues tab shows the active issues associated with the project.
|
| 2. |
Issue Summary
Bamboo Chart Plus Web Part |
- The Issue Summary displays, in chart form, the number and percentage of issues by status (Active, Deferred and Closed).
|
| 3. |
Issues Search
Bamboo List Search Simple |
Use the Issues Search Web Part to search the project site’s Issues list for items according to specific criteria.
Keep in mind:
-
The Web Part is configured by default to use an AND joiner. If you enter more than one criterion, all criteria must be met for a result to be returned.
-
The Status “choice” selector will list the valid choices in the drop-down selector (Active, Deferred, Closed) and a Select All option.
-
Search in all columns for: leverages SharePoint Search and allows searching in all list or library columns using a single search field.
-
Click the links for additional information on using or configuring the Issues Search Web Part.
|
|
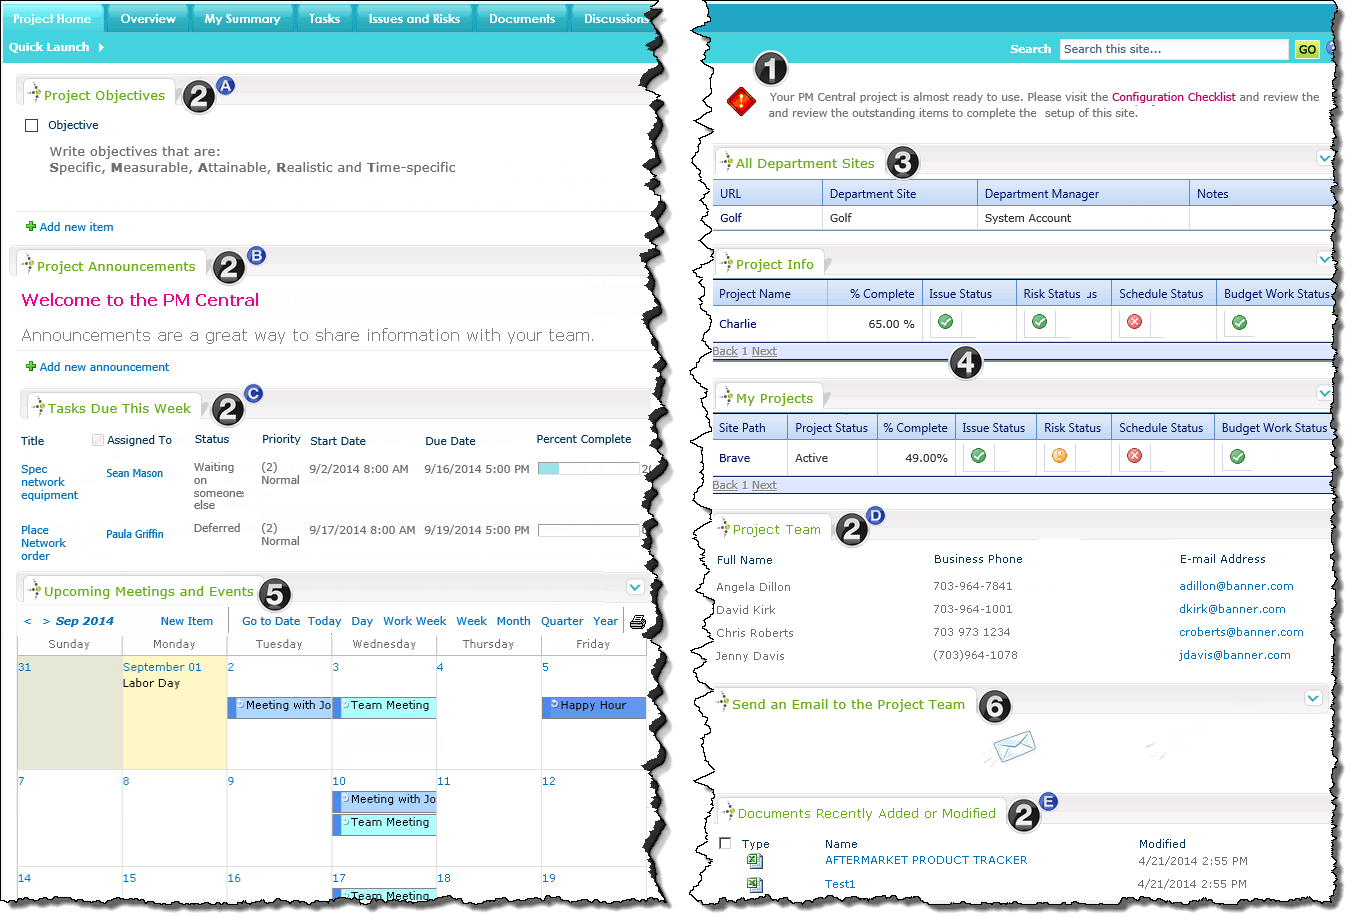
PM Central Project – Project Home Tab
Project Home is the default home page of the Project site.
|
|
Name /Web Part |
Description |
| 1. |
PMC Message Configuration Web Part
PM Central Custom Web Part |
The Warning message displayed in the custom PMC Message Configuration web part provides a reminder to complete the site’s Configuration Checklist. The warning text will remain on the page until all Mandatory items in the checklist have a Closed status. A Complete welcome message will be displayed when all Mandatory items are closed.
|
| 2. |
A.Objectives
B.Announcements
C.Tasks Due This Week
D. Project Team
E.Documents Recently Added or Modified
SharePoint List Views |
SharePoint list views display useful information about the project
Keep in mind:
-
Announcements will not be displayed after their due date
-
To add users to the Project Team you must access the Resource center via PM Central Control Panel
-
The ten most recently added or modified documents will be displayed in this view. All other documents can be accessed from the Documents tab
|
| 3. |
Department Sites
PM Central Custom Web Part |
The Department Sites custom web part will only be displayed on the page if the project site meets the filter criteria of an existing department site |
| 4. |
Project Info and My Summary
Bamboo Data Viewer Web Part |
The Project Info and My Summary data views display high-level Project Health information for each project including % Complete, and health status KPI’s
Keep in mind:
-
Project Info – pertains to the current project
-
My Projects – offers the same health information but only for projects where the logged-in user has been assigned as the project manager
-
Select the link under the Project Name header to access the Project Health list to view/edit additional project related data.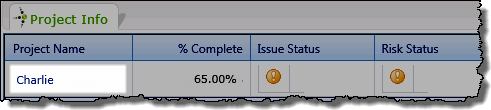
|
| 5. |
Upcoming Meetings and Events
Bamboo Data Viewer Calendar Web Part |
Displays items entered into the site’s Calendar list.
- The Calendar can configured to reference a Holiday list to display your organization’s designated holidays.
|
| 6. |
Send an Email to the Project Team
Bamboo Group Email Web Part |
 Clicking the envelope icon will generated a mail form pre populated with the email address information of all project team members. Clicking the envelope icon will generated a mail form pre populated with the email address information of all project team members.
NOTE: 1.Emails are not saved to the project site.
|
PM Central – Project Health List KPI’s
The Project Health list’s Key Performance Indicators (KPIs) allow executives to quickly draw conclusions about the current state of a project.

When working with the Project Health list’s Key Performance Indicators keep in mind:
-
The Budget Work and Budget Cost fields in the Project Health list must be manually populated with the budget values before PM Central will be able to determine your project’s budget health. If no budget data is provided the associated KPI will always be green.
-
The Budget Cost Status KPI is not displayed by default. Click here for information on how to expose this column in the dashboards.
The removal of the Budget Cost Status KPI from the default Project Summary display was new in PM Central 4.3
-
The Bamboo KPI Column thresholds can be modified. Information about configuring the Bamboo Key Performance Indicator column is available here.
Update key Project Health fields with “Auto Update”
When the Project Health list’s Auto Update field is checked, the lists Project Start Date, Project End Date and % Complete fields, will be automatically updated based on information in the project’s Task list.
When working with Auto Update keep in mind:
-
The Project Start Date will be determined by the item in the project’s task list with the earliest Start Date
-
The Project End Date will be determined by the item in the project’s task list with the latest End Date
-
Auto Update is completed by the Bamboo Update Project Health… Timer job which, by default, runs every 59 minutes.
-
The Bamboo Update Project Health…timer job can be forced to run from the Update Data page accessed from the portfolio site’s PM Central Control Panel.
NOTE: The Bamboo Update Project Health..timer job will also update the Project Name field in lists that have content rolled up and displayed on the Portfolio site.
The Auto Update field is unchecked by default, but can be easily checked from one following locations:
| PM Central Control Panel – Auto Update Settings |
Administrators can set the default value of the Auto Update field to Yes from the portfolio site’s PM Central Control Panel > Auto Update Settings.
The setting will be applied to all new sites created in the Portfolio.

Portfolio Auto Update Settings were added in PMC. 4.3.
NOTE: When this option is selected, the Auto Update field will not be displayed in the PM Central Site Creation tool
|
| PM Central Site Creation tool |
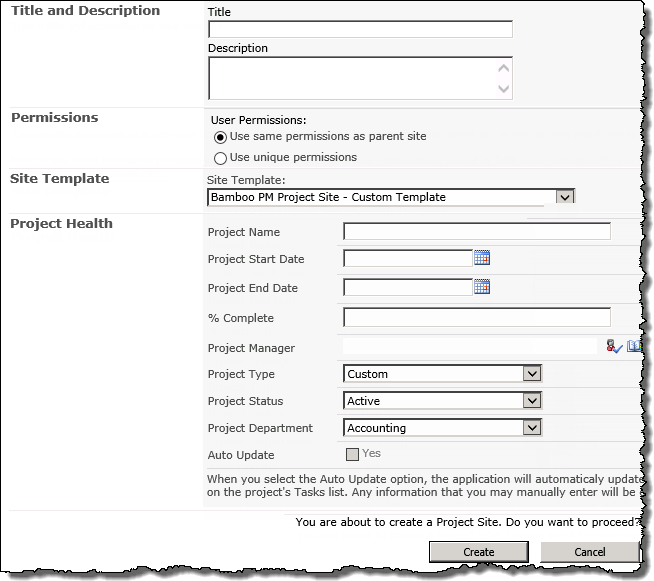 Check the Auto Update checkbox in the Project Health section of the site setup screen. Check the Auto Update checkbox in the Project Health section of the site setup screen.
NOTE: The Auto Update checkbox is not available from this screen in PM Central 4.3
|
| Project Health list |
Change the setting directly from the Edit form of the project’s Project Health list |
|
PM Central Portfolio – Portfolio Summary tab
NOTE: The Web Parts shown on the Department Summary page of department sites are the same as those on the Portfolio Summary page. The content displayed in the Web Parts will be determined by the department site’s filter configuration.
The Portfolio Summary tab and associated pages were added in PM Central 4.3.
|
|
Name / Web Part |
Description |
| 1. |
SharePoint Navigators |
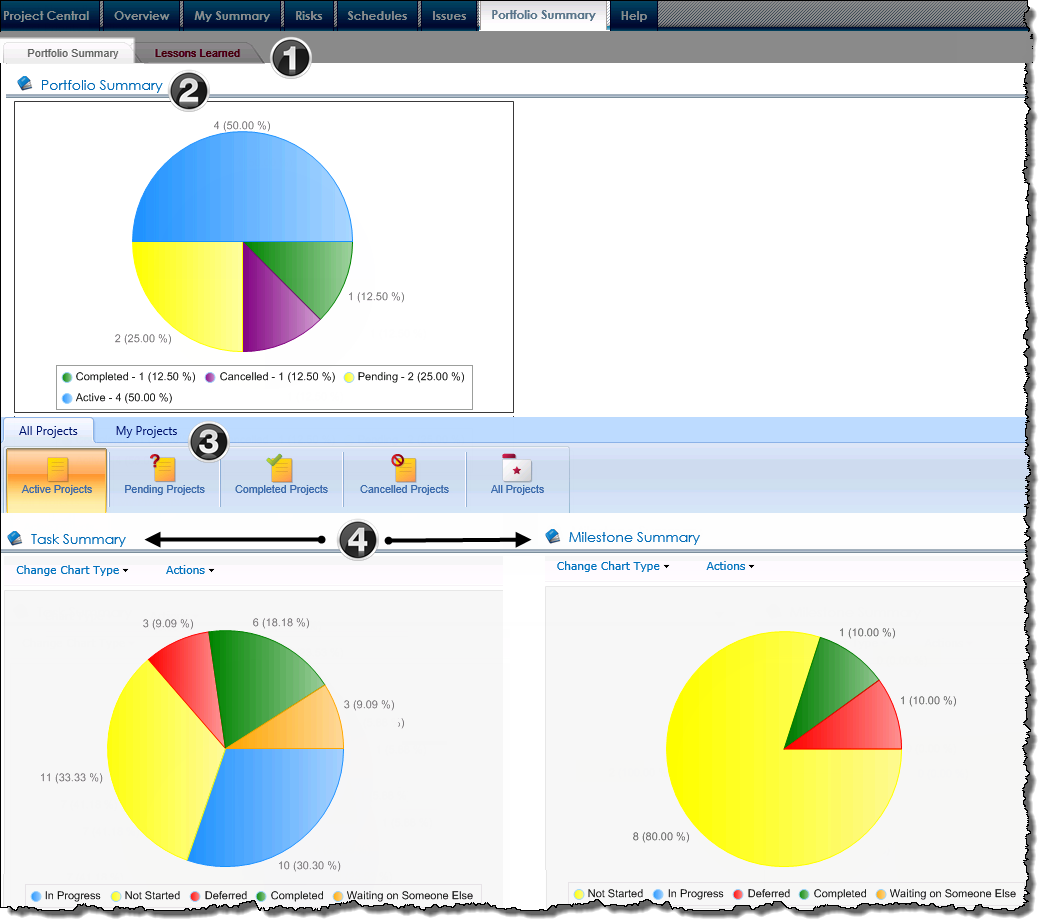
Provides a link to the Lessons Learned page |
| 2. |
Portfolio Summary
Bamboo Chart Plus Web Part |
A visual representation of the number and percentage of projects created in the Portfolio by Project Status (Active, Pending, Cancelled and Completed). |
| 3. |
SharePoint Navigators |
The Portfolio Summary tab displays the Task Summary and Milestone Summary charts associated with Active Projects by default. Users can view summaries for Pending Project, Completed Projects, Cancelled Projects and All Project views by clicking the respective icons.
- The My Projects displays offer similar views, but only for projects where the logged-in user has been assigned as the project manager
|
| 4. |
Task and Milestone Summary Charts
Bamboo Chart Plus Web Part |
The Task Summary and Milestone summary charts identify the number and percentages of tasks by status, and milestones by status, based on the status of the project.
- Both Chart Plus Web Parts use the Summary List (found on the Portfolio site) as the data source. The Summary list is updated by the Bamboo Update Summary List timer job.
|
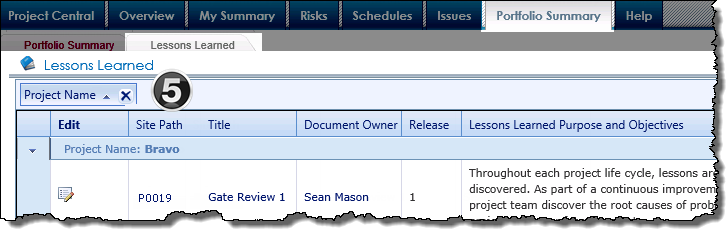
| 5. |
Lessons Learned
Bamboo Data-Viewer Web Part |
A rolled up display of lessons learned captured by the project team as part of project close-out or phase end.
 |
|
PM Central Portfolio Site
The Portfolio Site is the top site in the PM Central hierarchy and provides a place where information regarding the health of projects managed within the portfolio can be quickly relayed to executives and stakeholders through dashboards that report on tasks, issues, risks and schedules, and data views and charts that are easily accessed using site’s navigation links.
|
|
Name / Web Part |
Description |
| 1. |
Top Site Navigators
SharePoint Navigators |
The eight default items in the Top Site Navigator view of the Top Site Navigators list make up the Portfolio sites top level navigation.
The tabs take users to different aspx pages that contain Web Parts that are used to display specific content relevant to the Portfolio site.
|
| 2. |
Central Actions Menu |
 The Central Actions menu provides quick access to areas where common activities are performed on the site, including Adding a New Site and the PM Central Control Panel. The Central Actions menu provides quick access to areas where common activities are performed on the site, including Adding a New Site and the PM Central Control Panel.
Keep In Mind:
1. Use the bulls eye icon to access Central Actions in 2013
2. Users must have Design permissions or higher on the site to see the PM Central Control Panel in the Central Actions menu
3. Users must have Full Control to see the Add New Project link in the Central Actions menu.
|
| 3. |
Site Actions Menu |
The SharePoint Site Actions menu provides shortcuts to commands commonly used when working with SharePoint sites. The command options you see depend on your permissions on the site.
Notes:
1. New Sites should be created using the PM Central Site Creation Plus tool NOT from SharePoint’s New Site page
2. A list of Site Contents is available here
|
|
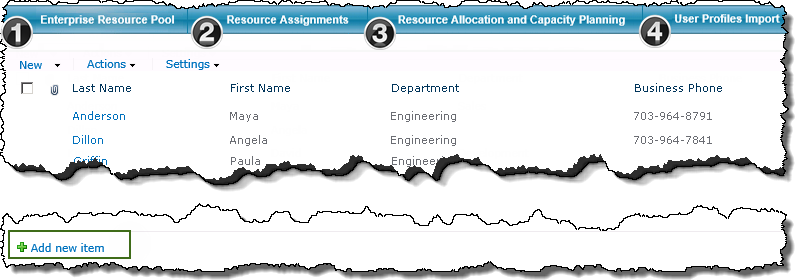
Portfolio Control Panel – Resource Center
The Resource Management link in the portfolio’s PM Central Control Panel, provides access to the Resource Center which consists of 4 separate subsections.
|
|
Function |
| 1. |
The contents of the portfolio’s Enterprise Resource Pool (ERP) list are displayed on the landing page of the portfolio Resource Center.
When working with the ERP keep in mind:
To add users to the ERP:
-
Manually add user information into the list list by selecting the Add New Item link found on the page and completing the associated form.
OR
-
Import users with the User Profile Import utility (see #4)
|
| 2. |
Under the Resource Assignments tab you will find a Gantt display of all tasks for all projects sorted by resource.
-
For information on using the web part click here.
-
For information on changing the number of items per page, click here.
|
| 3. |
The Resource Allocation and Capacity Planning tab provides access to a number of reports detailing resource capacity, allocation by resource, project, resource availability and others.
- Click here for a summary of the PM Central Resource reports available
-
For information on how to generate a resource report, click here
-
For information on configuring the PM Central resource reports, click here
|
| 4. |
User Profile Imports provides a tool to import resource information into the Enterprise Resource Pool from the SharePoint User Profile Database. |
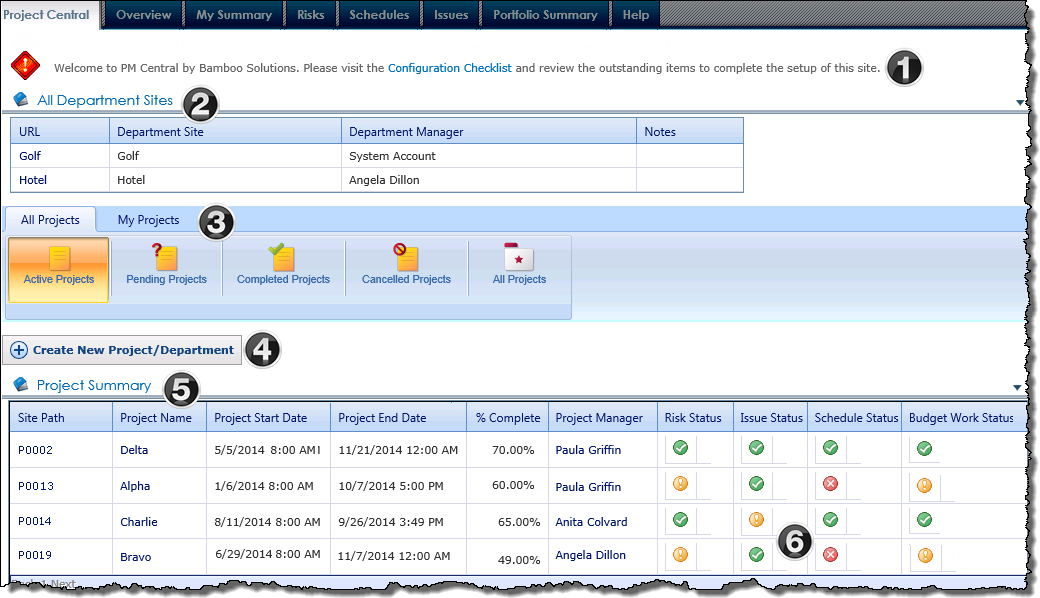
PM Central Portfolio – Project Central
Project Central is the default home page of the portfolio site.
|
|
Name /Web Part |
Description |
| 1. |
PMC Message Configuration Web Part
PM Central Custom Web Part |
The Warning message displayed in the custom PMC Message Configuration web part provides a reminder to complete the site’s Configuration Checklist. The warning text will remain on the page until all Mandatory items in the checklist have a Closed status. A Complete welcome message will be displayed when all Mandatory items are closed.
|
| 2. |
All Department Sites
PM Central Custom Web Part |
The All Department Sites custom web part will only be displayed on the page after a department site has been created using the provided site creation tool.
-
By default, the display will include the URL to the department site and information about the Department Manager, as well as any notes relating to the department.
-
This information is kept in the Department list on the portfolio site
|
| 3. |
Create New… button
PM Central Custom Web Part |
This button, which provides a quick link to the PM Central site creation tool, will only be visible to users who have the Create Sub-sites SharePoint permission. This permission is associated, by default, with the Full Control permission level.
Keep in mind:
- The Create New.. button is only found on the Portfolio home page (default.aspx), but you can easily access the page to Add a New Project from the link found in the Central Actions menu
|
| 4. |
SharePoint Navigator |
The Project Central tab defaults to the Active Project View under All Projects. Users can view Pending Project, Completed Projects, Cancelled Projects and All Project views by clicking their respective icons.
- The My Projects links provide similar displays, but only for projects where the logged-in user has been assigned as the Project Manager
|
| 5. |
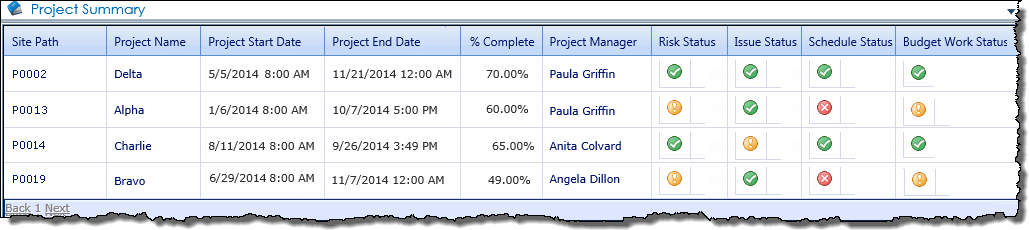
Project Summary
Bamboo Data Viewer Web Part |
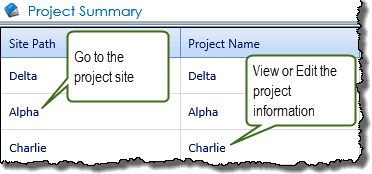 The Project Summary displays high-level status information for each project, including % Complete, Project Start Date and Project End Date. This information, including the displayed KPI’s is maintained in the project site’s Project Health list. The Project Summary displays high-level status information for each project, including % Complete, Project Start Date and Project End Date. This information, including the displayed KPI’s is maintained in the project site’s Project Health list.
Keep in mind:
-
Select the link under the Project Name header to view/edit project related data, or click the link under Site Path to access the project site.
-
The contents of the Project Summary display are security trimmed and the web part will show 25 items per page by default.
-
When Auto Update is selected in a Project Health list the Bamboo Update… Tasks Timer job will be responsible for updating the contents of the Project Start Date, Project End Date and % Complete field’s
-
Enabling filtering in the Data-Viewer web part will allow users to avoid the need to page to find project information.
|
| 6. |
Key Performance Indicators (KPIs) |
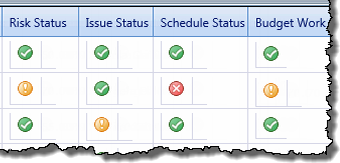 The Key Performance Indicators associated with the Project Health list provide insight into the health of projects. The Key Performance Indicators associated with the Project Health list provide insight into the health of projects.
- Information about the KPI settings is available here.
|
Which PM Central site template should I use?
PM Central includes several templates that provide different project management capabilities.
To an overview of the site templates is provided below. To see a feature comparison, click here.
| PMC Standard/Full Templates |
| When to use: |
Use the Full PM Central templates when you want to create sites that have all PM Central’s resource management, and reporting features activated by default.
-
Key information (project health, tasks, issues, risks, etc.) from project sites created under this top site will be automatically rolled up and displayed in the dashboards and summary views provided natively in the Portfolio site.
-
Full templates are available by default when PM Central is installed
|
| Standard/Full templates available: |
Portfolio Site
IMPORTANT: There is no difference in the functionality offered by these templates. The only difference is the appearance of the site on creation. Click here for a preview.
NOTE: The look of any PM Central site can be modified after the site has been created by changing the site skin.
|
|
Department Site
- Bamboo PM Central Department Level Site
|
|
Project Site
-
Bamboo PM Project Site – Custom Template
-
Bamboo PM Project Site
-
Bamboo PM Project Site – Custom Template – With sample data
-
Bamboo PM Project Site – With sample data
-
Bamboo PM Project Site – Discussion Board Plus Template
The PM Central Discussion Board Plus template was added in PMC 4.3
NOTE:
1.A licensed copy of Discussion Board Plus (sold separately) is required to make the PM Central Discussion Board Plus Template available
2.Templates with sample data are provided to make testing PM Central easier. It is not recommended that these templates be used in production. For information on removing this template from the displayed options click here
|
| To create a Standard/Full Portfolio site: |
-
Create a portfolio site using either the
Bamboo PM Central Top Level Site – Custom Template or the Bamboo PM Central Top Level Site
-
The following project and department sites can be used in association with a PM Central “Standard/Full” Portfolio:
- Bamboo PM Central Department Level Site
- Bamboo PM Central Department Level Site – Lite Template
- Bamboo PM Project Site – Custom Template
- Bamboo PM Project Site – Lite Template
|
| PMC Lite Templates |
| When to use: |
Use the provided Lite templates to create sites when your organization needs to manage multiple projects but does not need the resource management or reporting features provided with the Full templates.
-
Key information (project health, tasks, issues, risks, etc.) from project sites created under this top site will be automatically rolled up and displayed in the dashboards and summary views provided natively in the Portfolio site.
-
Lite templates are not available by default. The site collection feature for each Lite template must be activated to make the Lite template option(s) available.
NOTES:
1. Resource management and reporting capabilities can be enabled as needed
2.Custom sites created with the Lite template will not be available through the PM Central site creation tool. Information on creating and using Custom “Lite” templates is available here
Lite templates were added in PM Central 4.0 |
| Lite templates available: |
Portfolio Site
- Bamboo PM Central Top Level Site – Lite Template
|
|
Department Site
- Bamboo PM Central Department Level Site – Lite Template
|
|
Project Site
- Bamboo PM Project Site – LiteTemplate
|
| To create a Lite portfolio site: |
- Create a portfolio site using the Bamboo PM Central Top Level Site – Lite Template.
NOTE: The Bamboo PM Central Top Level Site – Lite Template site collection feature must be activated to make this template available.
- The following project and department sites can be used in associated with a PM Central Lite Portfolio:
- Bamboo PM Central Department Level Site – Lite Template
- Bamboo Project Site – Lite Template
|
| PMC Stand-alone Template |
| When to use: |
Stand-alone sites are intended to do just that: stand alone. These project sites are not connected to portfolio or department sites. Use this template when you want to create a project site allows you to monitor issues, risks, and tasks for a single project, but do not require a central dashboard for executives and managers to view the associated data.
Standalone templates were added in PM Central 4.0 |
| Stand-alone templates available: |
Project Site
- Bamboo PM Central Project Site- Stand alone template
|
| To create a Standalone PM Central site: |
- Create a portfolio site using the Bamboo PM Central Project Site- Stand alone template
NOTES:
1.The Bamboo PM Central Project Site – Stand alone template site collection feature must be activated to make this template available.
2. Do not create a PM Central Stand-alone site within an existing portfolio site.
|
|
Entering project information in the Project Health list
The Project Health list contains basic information about the project, the contents of which are visible throughout the PM Central hierarchy.
When working with the Project Health list keep in mind:
-
There will only be one item in the Project Health list
-
Project Health information for all projects is rolled up and displayed in Project Summary dashboards accessed from the portfolio and applicable department sites Project Central tab
-
Project Health information for the current project is found under the Project Info display on the Project Home tab.
-
To access the Project Health list, click the link found under Project Name 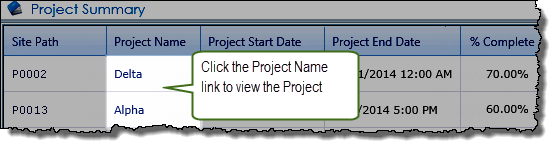
-
Some columns in the Project Health list, including the Key Performance Indicators are not available for editing from the Project Health Edit form.
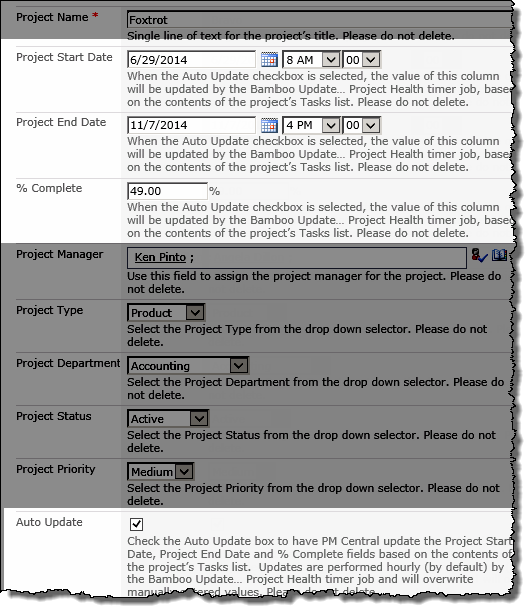
The Project Health Edit form
 |
| Project Health fields: |
|
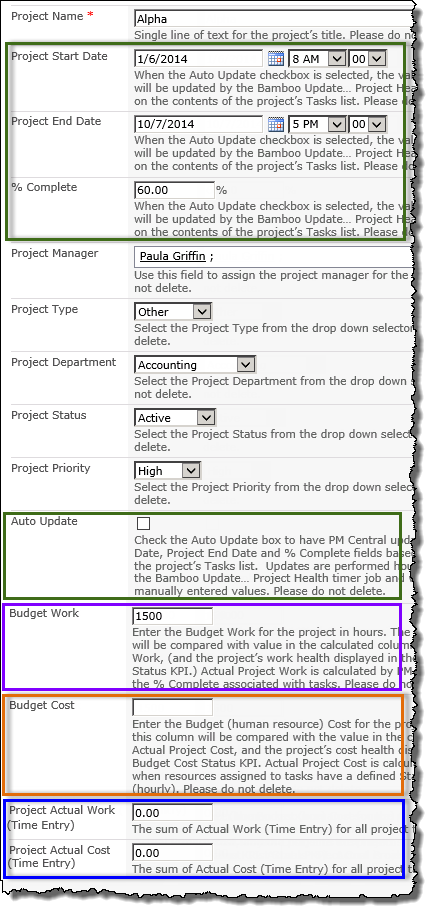
1. 
The Project Start Date,Project End Date, and
% Complete fields, will be updated hourly if the Auto Update checkbox is selected
|
|
2. Complete the Project Department, Project Type, Project Manager and Priority fields to provide additional information about the project.
Projects with an Active status will have additional key information (tasks, issues, risks, etc) automatically rolled up and displayed in the portfolio site, and applicable department sites.
|
|
3.  The Budget Work field must be manually populated with a value if you want to track work with the Budget Work Status KPI The Budget Work field must be manually populated with a value if you want to track work with the Budget Work Status KPI
NOTE: If a Budget Work value is not entered the associated Budget Work Status KPI will always be green.
|
|
3.  The Budget Cost field must be manually populated with a value if you want to track project’s human cost with the associated Budget Cost Status KPI. The Budget Cost field must be manually populated with a value if you want to track project’s human cost with the associated Budget Cost Status KPI.
NOTES: 1. Standard rates must be associated with user profiles in order to track costs
2. The Budget Cost Status KPI is not displayed by default.
|
|
4.  These fields are populated with the system calculated total of (Time Entry) fields associated with project tasks when you Update All or Update Progress. These fields are populated with the system calculated total of (Time Entry) fields associated with project tasks when you Update All or Update Progress.
NOTE: By default the (Time Entry) fields in the Task list are not populated, and the value of the fields in the Project Health list will be 0.00
|
|
Completing the PM Central project site’s project checklist
The Project Checklist provides project managers with a list of steps for working with project sites in PM Central. A link to the checklist will be available from the Project Home page when the mandatory items in the Configuration Checklist have been marked as completed.

NOTE:The Project Manager’s Checklist was new in PM Central 4.3
The list contains the following steps:
| Action |
Description |
| Enter the Project Objective |
Access the Project Objectives Add New Item link from the Project Home page, or this item’s action link.
NOTE: You should delete the default item which summarizes how to write an effective objective.
|
| Verify the project details in the Project Health list |
The Project Health list contains key information about the project including, Project Department, Project Type, Project Start Date, Project End Date, % Complete, etc.
- Click the Project Name link under the Project Info display on the Project Home page, or this item’s action link, and review the project information entered.
Important: Check the Auto Update box to have PM Central update the Project Start Date, Project End Date and % Complete fields based on the contents of the project’s Tasks list. Updates are performed hourly (by default) by the Bamboo Update… Project Health timer job and will overwrite manually entered values.
|
| Add Users to the Project Resource Pool |
PM Central provides two methods for adding users into the Project Resource Pool. Both methods will copy information associated with a user’s profile in the Enterprise Resource Pool into the local Resource Pool.
1. Add an individual user:
-
From the Project Control Panel, click View Resource under the Resource Center header to access the Project Team Info page, or click this item’s action link
-
Click Add new item and select the user from the Resource drop down selector
-
Click Save
NOTE: The drop down will display all users identified in the Enterprise Resource Pool. Users will Full Control permissions on the site will also be able to add the selected user to a SharePoint group directly from the New Contact form.
2. Add multiple users:
-
From the Project Central Panel, click Copy Resource under the Resource Center, or click this item’s action link and access the Copy Resources tab
-
Check all the users to be added to the Project Resource Pool from those available in the EPR
-
Click the Select Resources to be copied button, then click Copy Resources
NOTE: Permissions to the site will need to be granted separately when using the bulk import method.
|
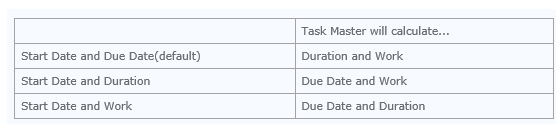
| Determine how tasks should be defined in Task Master |
Task can be defined using one of 3 different methods:
To check, or change, Task Master’s configuration, complete the following steps:
-
Navigate to the Tasks tab, or click this item’s action link to access the main Task page
-
Click the gear icon  on the right of the toolbar to access Project Schedule Settings. on the right of the toolbar to access Project Schedule Settings.
-
Make the necessary modifications in the Rules section and click Update.
|
| Enter the project schedule in Task Master |
The Task Master Web Part provides a Gantt display of the project plan.
- To access Task Master navigate to the Task page, or click this item’s action link.
There are several options available for entering tasks:
-
Enter the project tasks in the New Item form.
-
Copy a basic project plan into Task Master from Excel
-
Use the Bamboo MS Project Add-In tool.
|
| Identify the project’s risks |
- Navigate to the Risks page under the Issues and Risks tab, or click this item’s action link
Click the Add New Item link
Provide information about the risk, including Probability, Impact, Cost, Business Value and Due Date.
|
| Capture baselines |
PM Central can capture baselines for the project schedule, tasks and project costs.
- Go to the Tasks tab, or click this items’s action link, and click Update All. This will recalculate the project and update cost information (if applicable).
- Go to the Baseline View and click Capture Baseline in the toolbar of the desired baseline(s)
Up to 10 baselines can be created for Project Schedule and Scheduled Tasks. Each baseline will be displayed in a different color, with the current status displayed at the top of the baseline view in blue.
|
|
PM Central Portfolio Resource Reports
Portfolio sites created using a Standard/full template provide predefined resource reports that are available in the site’s Resource Center under the Resource Allocation and Capacity Planning tab.
 When working with the PM Central Resource Reports keep in mind:
-
By default, Resource reports available at the portfolio site are security trimmed so that only users that have been granted permission to a site will see resource assignments pertaining to the site.
-
Users with Full Control permissions on the Portfolio site can configure Resource Center Settings to use the System Account to generate resource reports.
Feature introduced in PMC 4.3
- By default, reports will be complied every evening starting at 11:45 PM.
- Information on configuring the Resource Center web parts is available here.
The report pages have the following characteristics:
-
Ability to change the year view of the report
-
Save report contents to the Monthly Resource Work Allocation Summary list on the Portfolio site(not available with all reports)
-
Option to export the report (grid and chart) to Excel, or to print the report.
Available Portfolio Reports:
| Report Name |
Report Description |
| All Assignment Allocations |
All Assignment Allocations displays the resource’s total allocation per month for the project, grouped by year. This lets you track how much work your resources are accumulating for the project. |
| By Resource Allocation |
By Resource Allocation shows the total allocation per month for each resource assigned to the project, grouped by year. |
| By Project |
Displays the resource’s total allocation per month, grouped by project |
| By Project Department |
Displays projects grouped by the identified Project Department. The Project Department field is part of a project site’s Project Health list. |
| Allocation by Manager |
Displays the resource’s total allocation per month, grouped by manager.
|
| Resource Availability |
Resource Availability displays the resource’s remaining availability. Availability is determined by deducting a user’s task assignments from their capacity per month.
-
Capacity is determined by the Work Hours and Holidays entered in the Resource Center Settings, and the Maximum Unit value associated with each resource.
-
If the resource has available time, the number of available hours is shown in green.
-
If the resource is over allocated, the resource’s availability is shown as a negative number in red.
|
| By Department |
Allocation by Department displays the resource’s total allocation per month, grouped by Department.
|
| Assignments by Department |
Allows users to specify the search criteria for the report. A Department must be selected from the drop down selector.
- Select the Department, followed by the Resource(s) associated with that department to be presented with a report displaying resource availability.
|
| Find Resources |
Find Available Resources lets you find available resources that you can request and assign to task for your projects.
- A users Role is defined in the Enterprise Resource Pool.
|
|
Using the PM Central Project Status Report
The Project Status Report list makes it easy for project managers to create status reports and to track progress from week to week. Weekly status reports are rolled up to the portfolio site’s Overview tab to provide a consolidated view of the project updates to Portfolio Managers.
When working with Project Status Reports keep in mind:
- The contents of the Project Status Report list are rolled up and displayed on the Portfolio site and applicable Department sites.
-
Project Status Reports that are associated with Active project and have a Status Date within 7 days of today will be visible on the Overview tab of the Portfolio site and any applicable Department sites.
-
Project Status Reports with that have a Status Date within 30 days of today will be visible in the Weekly Project Status Reports data view on the project site’s Overview tab
To create a new Project Status Report:
| Step |
Action |
Result |
| 1. |
Click the Add New Item link associated with the Weekly Project Status Report data-viewer on the Overview tab of the project site |
This will open a New Project Status Report form
 |
| 2. |
Enter the Status Date and complete the form
NOTE: In PM Central 4.3 the title field will be populated with the text Project Status by default.
|
 |
| 3. |
Click Save |
The change request, along with all other submitted change requests, regardless of request status, will be displayed in the Change Request data view from the projects’s Overview tab.
- Change request information will also be displayed on the Overview tab of the Portfolio and Department sites, and will be grouped by Project
|
|
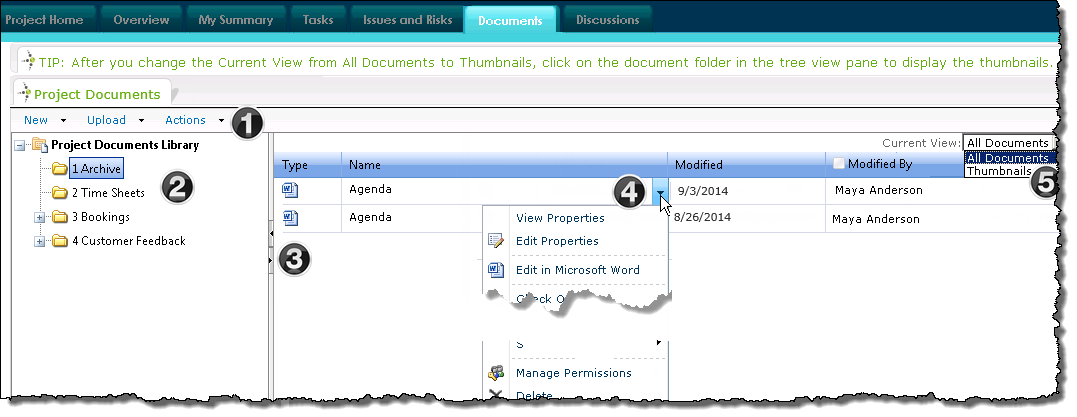
The Documents tab provides a hierarchical view of the project site’s Project Documents Library.
|
|
Function |
| 1. |
The standard SharePoint Document Library toolbar lets users:
- Create New Documents or Folders
- Upload one or multiple documents
- Create Alerts and more
|
| 2. |
The tree pane view on the left hand side displays the structure of the document library.
To DELETE a specific TREE VIEW folder, go to the list that drives this web part page. The tree view web-part on the page does not allow for deletion. Go to site contents then find a library called Project Documents Library. From there you can manage the folders and items. |
| 3. |
Move the vertical scrolling bar to the left or right to display more of the tree pane view or the document display. |
| 4. |
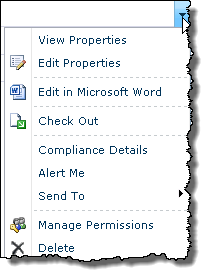 Click the document drop down arrow to access the standard SharePoint document library menu items. Click the document drop down arrow to access the standard SharePoint document library menu items. |
| 5. |
To change the view, click the Current View drop-down box and select either All Documents or Thumbnails.
- After you change to the Thumbails view, click on the document folder in the tree view pane to display the thumbnails.
NOTE: The Web Part can be configured to show any other views associated with the document library.
|
PM Central Mega Menu skins
PM Central comes with a variety of skins enabling you to quickly change the appearance of a site without the need to modify master pages and style sheets.
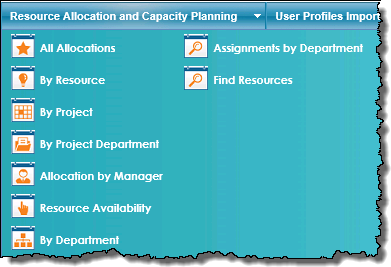
Mega Menu skins change the way the contents of both the Resource Center and Reports Center are displayed.
If you select one of the “mega menu” custom skins, the navigation tabs in both sections will be replaced with drop-down menus. The “mega menu” appears on hover and shows all the reporting options in one large panel.
NOTES:
1. Mega Menu skins are only available for PM Central Portfolio and Department sites.
2. Mega Menu skins were introduced in PM Central 4.2.
Resource Center – Tabbed navigation

Resource Center – Mega Menu navigation
PM Central – Change Request
Project stakeholders can submit change requests, such as new requirements, design changes, or schedule updates, to the project manager or other authorized approver. These requests can then be tracked and managed from the Change Requests data views the Overview tab found at all levels of the PM Central hierarchy.
When working with Change Requests keep in mind:
-
If you have Workflow Conductor, entering a change request can trigger an approval workflow that routes the request to the appropriate person for review. A sample workflow is included with the PM Central installation package. For more information about using the sample workflow provided by PM Central, read KB.12786
-
Without Workflow Conductor entering a change request, simply enters the item in the list, making it available for review by management in the data-views on the Overview tabs where it can be approved.
-
The contents of the Change Requests list are rolled up and will be visible on the Overview tab of the Portfolio site and any applicable Department sites. The list contents displayed will be determined by where you access the tab:
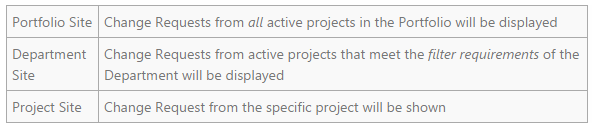
visible on theOverview tab of the Portfolio site and any applicable Department sites.
| Step |
Action |
Result |
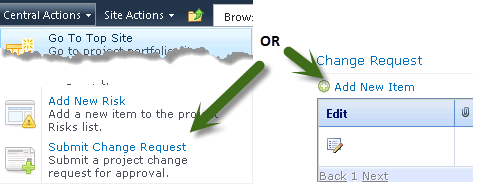
| 1. |
Click Submit Change Request in the Central Actions drop down
Or
Navigate to the Overview tab, scroll to the Change Request data view and click Add New Item |
This will open the New Item form of the Change Request list
 |
| 2. |
Enter the Title, and complete the form |
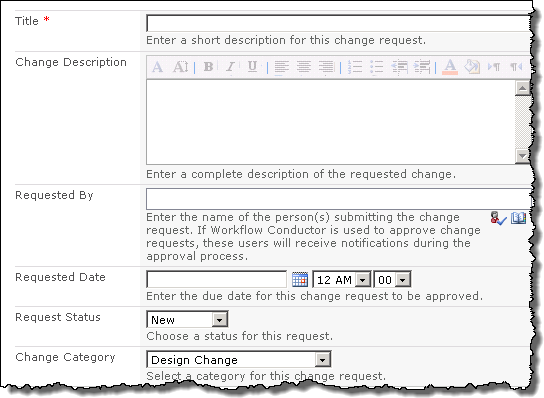 |
| 3. |
Click Save |
The change request, along with all other submitted change requests, regardless of request status, will be displayed in the Change Request data view on the projects’s Overview tab.
- Change request information will also be displayed on the Overview tab of the Portfolio and Department sites, and will be grouped by Project
|
|
PM Central Portfolio – Overview tab
The Overview tab on the portfolio site provides users with the high level view of Active projects.
NOTE: Unless noted the Web Parts shown on the Overview page of department sites are the same as those on the portfolio site. The content displayed in the Web Parts will be determined by the department site’s filter configuration.
|
|
Name / Web Part |
Description |
| 1. |
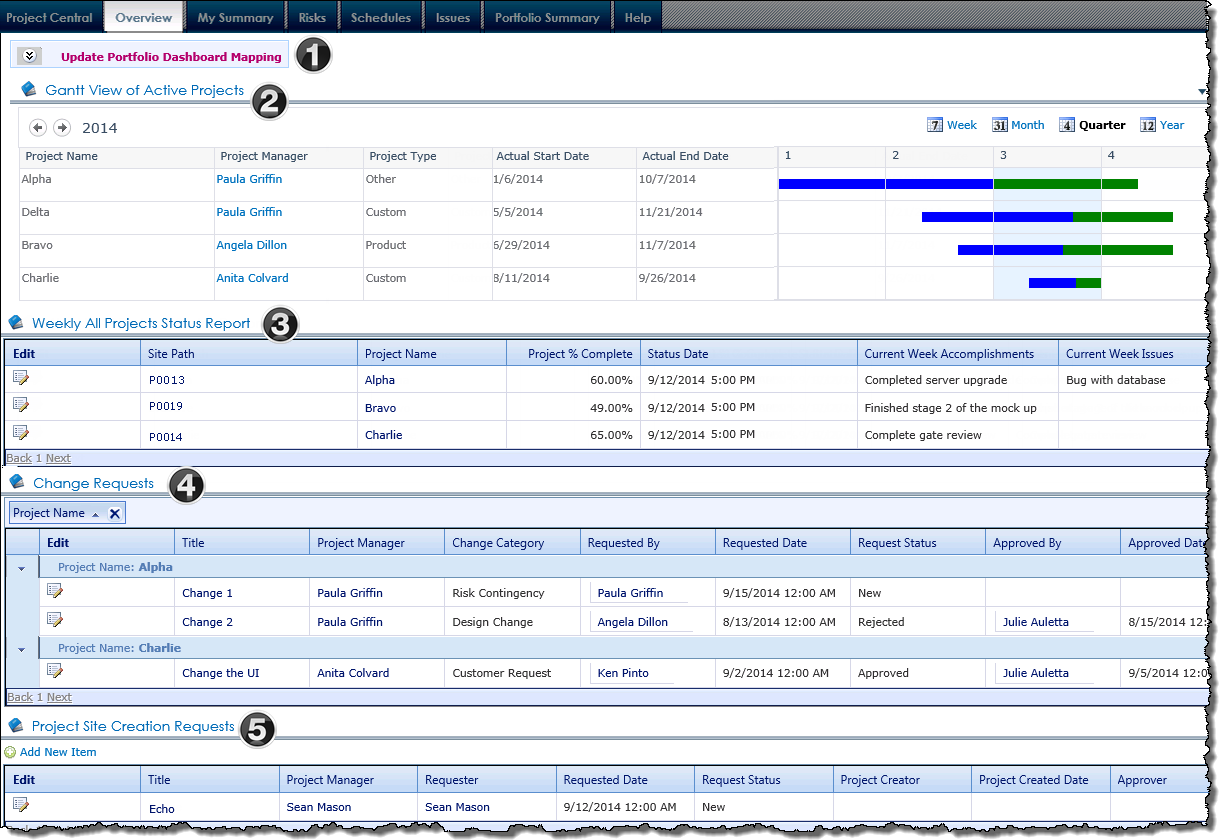
Update Portfolio Dashboard Mapping |
A link to the Portfolio Dashboard Mapping page. You must manually update the contents of this list in order to see information in the Gantt View of Active Projects. |
| 2. |
Gantt View of Active Projects
Bamboo Project Portfolio Dashboard |
The Gantt View of Active Projects displays the timeline of the active projects, with the project’s timeline depicted in green, and progress shown in blue.
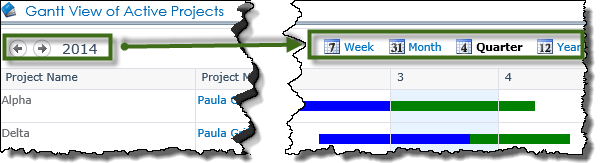
Project timeframes will be displayed in the Quarter view, by default, but Week, Month and Year views are available. Use the arrow buttons on the top left of the Gantt View to scroll through weeks, months, quarters by year, and years (depending on the view selected).
|
| 3. |
Weekly Project Status Reports
Bamboo Data Viewer Web Part |
The Weekly Project Status Reports display provides a consolidated view of the current status of Active projects in the portfolio. Project Status Reports with a Status Date within the last 7 days are displayed.
|
| 4. |
Change Requests
Bamboo Data Viewer Web Part |
The Change Requests data view provides information regarding any change requests submitted at the project. The data is rolled up using Bamboo’s List Rollup Web Part from all Active projects and will be displayed in the web part grouped by Project Name. Change Requests can be easily Approved or Rejected using the Inline Edit feature of the display
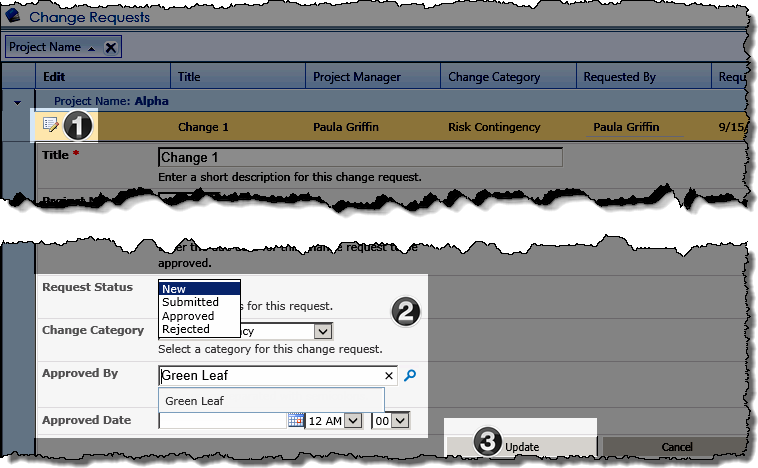
- Click the Edit icon next to the change request item to edit it.
- Select the updated Request Status from the drop down, then identify the decision maker by entering the name, clicking the icon
 , then selecting the user from the drop down selector. , then selecting the user from the drop down selector.
- Click Update
|
| 5. |
Project Site Creation Requests
Bamboo Data Viewer Web Part |
Displays the pending project site requests. From the Add New Item link above the Web Part, or from the Request Project Site link in the Central Actions drop down menu, stakeholders who do not have permissions to create project sites to submit requests for new project sties.
|
|
PM Central – My Summary Tab
The My Summary tab can be found at each level of the PM Central hierarchy and provides a summary of the tasks, overdue tasks, active issues and active risks that are assigned to the logged-in user.
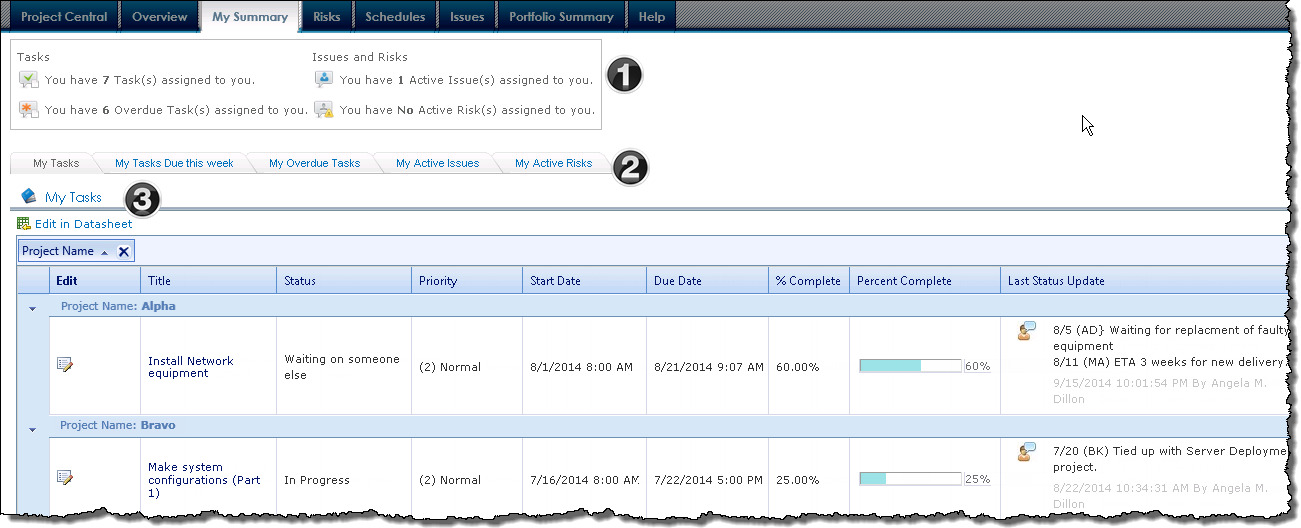
When working with the My Summary pages keep in mind:
- When the My Summary pages are accessed from the portfolio or department sites, tasks will appear grouped by the Project Name
- The content displayed is determined by where you are in the PM Central hierarchy when you access the My Summary pages:
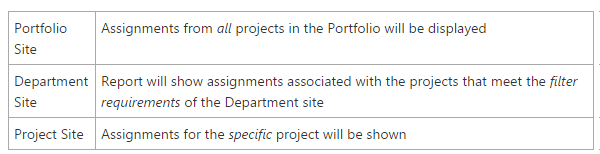
|
|
Name / Web Part |
Description |
| 1. |
My Status
PM Central Custom Web Part |
This custom Web Part located at the top of the page displays the number of tasks, overdue tasks, active issues and active risks that are assigned to the logged-in user.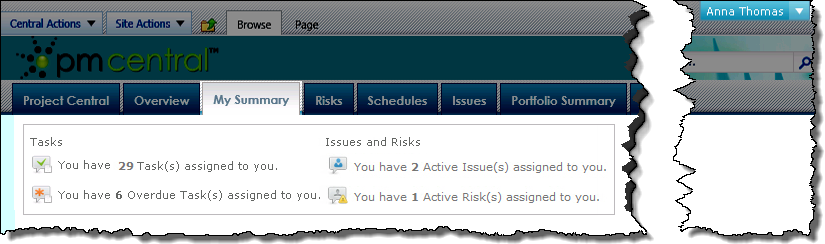 |
| 2. |
SharePoint Navigators |
Each of the tabs will take the user to a different display page. Users can see:
-
My Tasks: A display of all the tasks assigned to the logged in user.
-
My Tasks Due This Week: Displays tasks assigned to the logged in user that are due this week.
-
My Overdue Tasks: Displays tasks that are overdue and assigned to the logged in user.
-
My Active Issues: Displays all issues with an active status that are assigned to the logged in user.
-
My Active Risks: Risks that have an active status that are assigned to the logged in user.
NOTE: If PM Central is integrated with Bamboo Time Tracking and Management (TTM), an additional tab, My Timesheets will be also be displayed under My Summary, providing access to the TTM site.
|
| 3. |
Bamboo Data-Viewer Web Part |
Each page accessed from the My Summary navigators will have a Data-Viewer web part configured to reference a specific list rollup schema.
- For information about working with the Data-Viewer web part, click here.
|
|
PM Central Portfolio – Issues Tab
The Issues page displays the active issues associated with the portfolio’s active projects, and Issue Summary charts.
NOTE: The Web Parts shown on the Issues page of department sites are the same as those on the portfolio site. The content displayed in the Web Parts will be determined by the department site’s filter configuration.
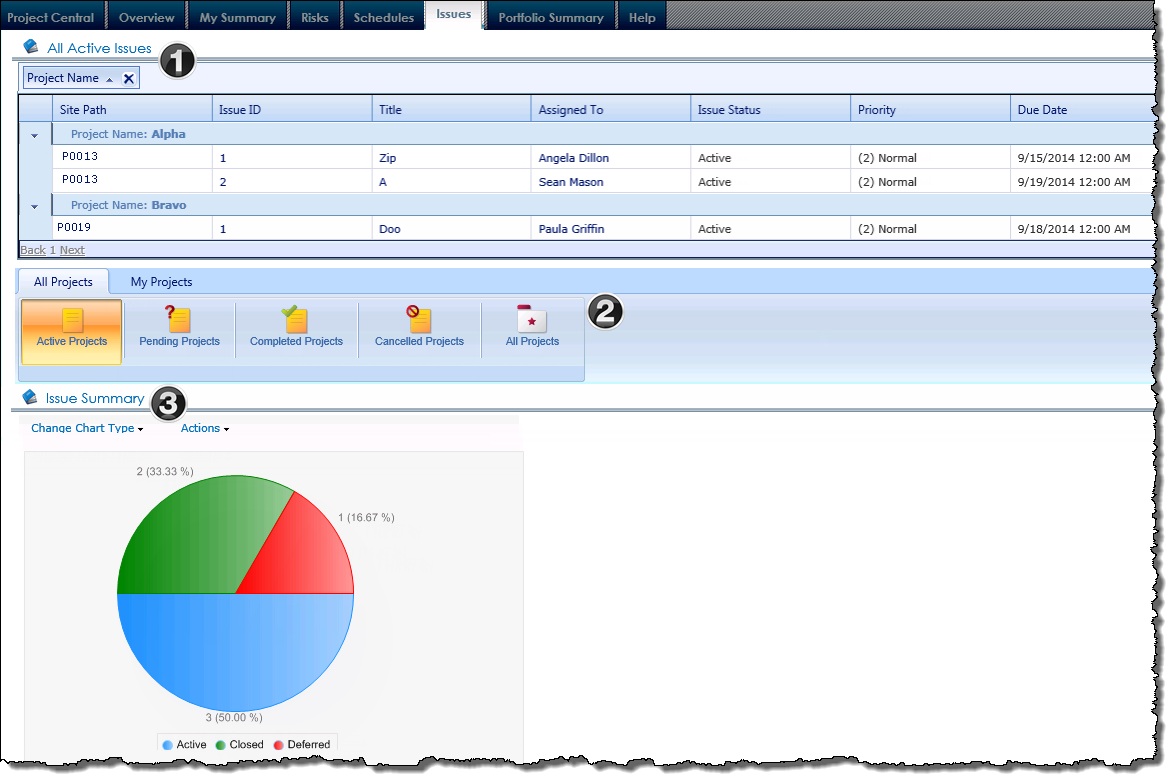
|
|
Name / Web Part |
Description |
| 1. |
All Active Issues
Bamboo Data-Viewer Web Part |
|
| 2. |
SharePoint Navigators |
The Issues tab defaults to a display of the Issue Summary chart associated with Active Projects. Users can view Pending Project, Completed Projects, Cancelled Projects and All Project views by clicking their respective icons.
- The My Projects displays offer similar views, but only for projects where the logged-in user has been assigned as the project manager
|
| 3. |
Issue Summary
Bamboo Chart Plus Web Part |
The Issue Summary displays, in chart form, the number and percentage of issues by status (Active, Deferred and Closed).
- The Chart Plus Web Part uses the Summary List as its data source. The summary list is updated by the Bamboo Update Summary List timer job.
|
|
Using the PM Central Issues list
When working with Issues keep in mind:
-
Active issues associated with active projects are rolled up and displayed on the Portfolio site and applicable Department sites.
-
By default, the number of overdue issues will be used by the Issues Status Key Performance Indicator in the Project Health list.
-
The My Active Issues display, found under the My Summary tab at all levels of the PM Central hierarchy, will show issues assigned to the logged in user.
To create a new issue:
| Step |
Action |
Result |
| 1. |
Click
Add New Issue in the Central Actions drop down
Or
From the Issues tab, under Issues and Risks, click Add New Item above the All Active Issues data view. |
 |
| 2. |
Enter a Title and Assigned To
Keep in mind:
If Alert Plus alerts have been enabled in the PM Central portfolio the assignee will receive an Alert notifying them of the assignment.
Additional reminder notifications are also available.
|
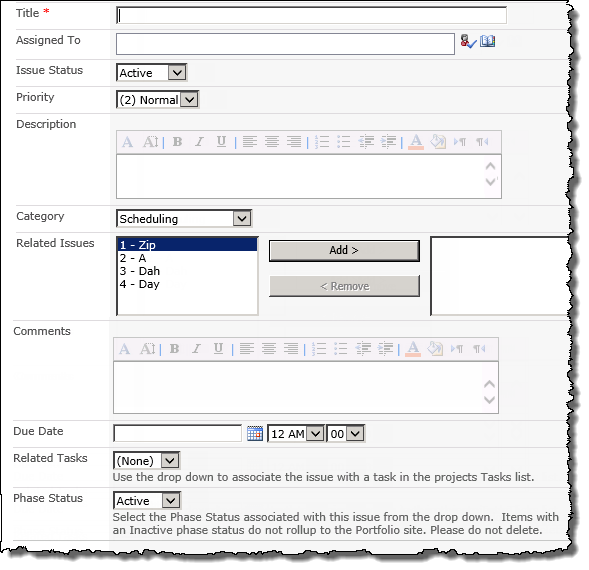 |
| 3. |
Provide information about the issue including;
Priority, Description, Category, Related Issues and Related Tasks |
| 4. |
Enter a Due Date for the issue. |
| 5. |
Click Save |
Issues with an Active Issue Status will be displayed in the All Active Issues data-view under on the Issues page |
|
Generate PM Central Resource Reports
Default Resource Report Behavior
The majority of the resource reports available under the Resource Allocation and Capacity Planning tab are configured to obtain data from the Report Information list, found on the local site.
This Report Information list is updated by the Bamboo Reporting Calculation Timer Job V4 and the Bamboo Top Site Calculation Timer jobs respectively, which are, by default, scheduled to start running every day at 11.45PM.
Portfolio Resource Reports are security trimmed, and are generated for individual users “by request”.
Users who have not previously submitted a “request” item in the Report Information list will see this message on the Report page and will need to wait need to wait for the next run time of the timer jobs to see the report contents.

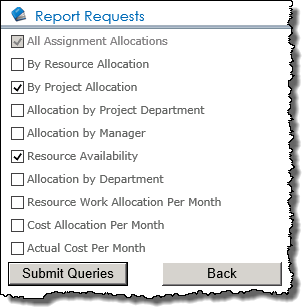 A request item for a specific report will be entered in the Report Information list for each logged in user who:
- Clicks on a report page under the Resource Allocation and Capacity Planning tab
OR
- Selects the report from the Report Requests page, accessed from the “here” hyperlink in the message text.
The Report Requests tool was added in PM Central 4.3
NOTE: A one time email notification will be sent to users who have submitted new report requests, if the reminder notification was Enable in Alert Plus by the site administrator.
The following configuration options are available:
1.Generate resource reports using the System Account:
This configuration setting will allow all users with access to the Report Center to see Resource Allocation and Capacity details for users assigned to all projects
2.Configure the reports to “Run Now
This option removes the wait time associated with the default configuration by referencing content from List Rollup rather than the Report Information list.
Important: This option can result in page time out errors.
NOTE: The Run Now option is only available for resource reports on the portfolio and department sites.
Overview of the Gantt View of Active Projects
Found on the Overview tab on the Portfolio and Department sites, the Gantt View of Active Projects (Gantt View) displays the timeline of the active projects as well as the color code for the progress bar.
Gantt View Basics
- The Gantt View of Active Projects is a widget in the Project Portfolio Dashboard (PPD) solution.
-
The Gantt View uses the Project Portfolio Dashboard list found on the Portfolio site as its data source
-
When the Project Portfolio Dashboard list is empty, or there are no active projects identified in the Portfolio Dashboard list, the Gantt View of Active Projects will not display any content.
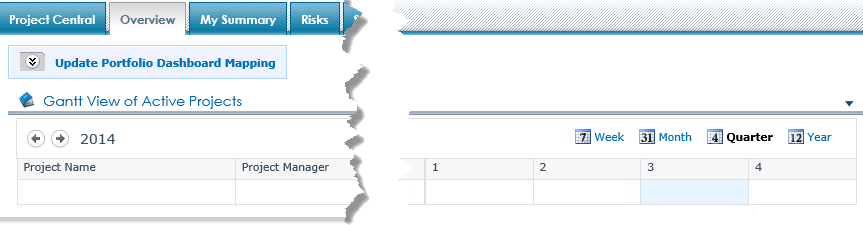
To have content displayed in the widget the following events need to occur:
|
|
Description |
| 1. |
From the Portfolio sites PM Central Control Panel click the Update Portfolio Dashboard Mapping link
OR
Click the Update Portfolio Dashboard Mapping button found on the Overview page of the Portfolio site
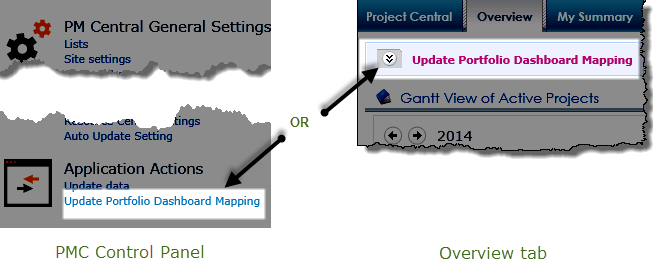
NOTE: The Update Portfolio Mapping links are not available on Department sites.
Prior to PMC 4.3 the Update Portfolio Dashboard Mapping button/link was labelled Refresh data on Gantt View |
| 2. |
The destination page displays the contents of the Bamboo Project Dashboard Data Mapping list. By default this list will contain a single item that references the current Portfolio site.
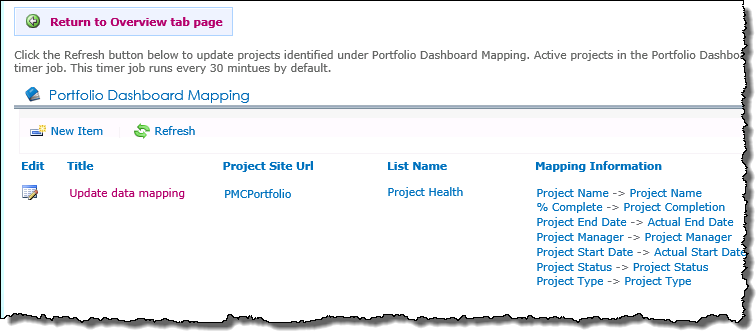
Pre configured mappings between fields in the Project Health list and the Portfolio Dashboard list are defined in this default item
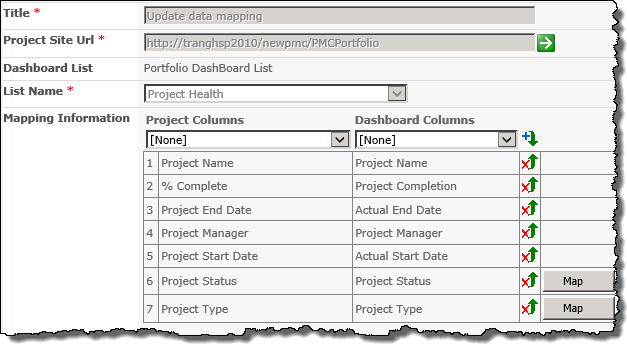 |
| 3. |
Click Refresh to update the contents of the Bamboo Project Dashboard Data Mapping list with any recently added projects.
Important: You must manually click the Refresh button to update the contents of the mapping list
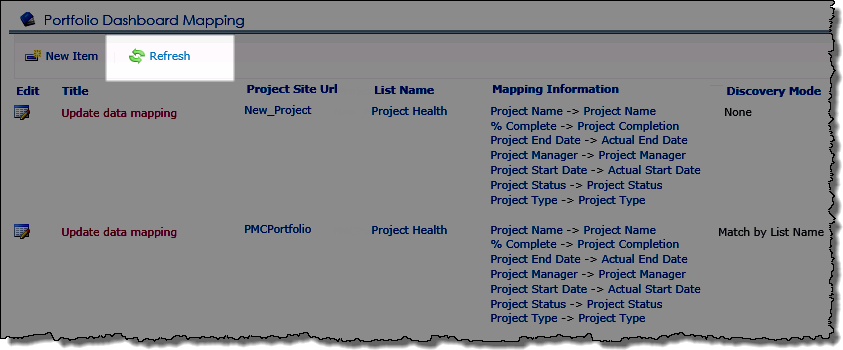 |
| 4. |
With all the projects identified in the Bamboo Project Dashboard Data Mapping list wait for the next runtime of the Update Dashboard List timer job.
This timer job runs every 30 minutes by default. |
| 6. |
When the timer job runs it will populate/update the Project Portfolio Dashboard list. Projects with an Active status will be displayed in the Gantt View of Active Projects.
 |
|
Completing the Enterprise Resource Pool form
The Enterprise Resource Pool (ERP) is a centralized list of resources available to be assigned to work on projects. Information from the ERP is used throughout the PM Central, but the fields in the ERP form that need to be populated will be determined by the PM Central features you require.
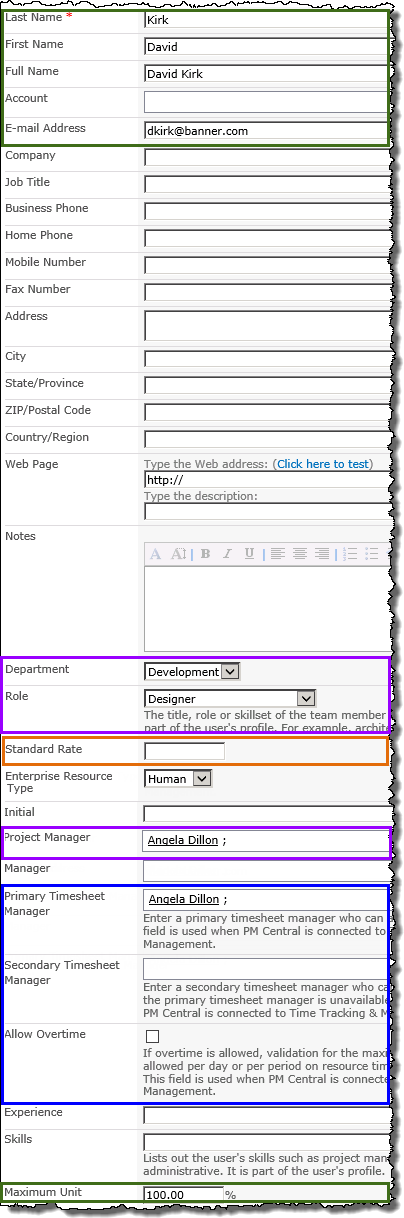 |
| What fields NEED to be populated: |
|
1.
The following fields must be populated for each user:
- Last Name
- First Name
- Full Name
- Account
- E-mail Address
- Maximum Unit
NOTE: The Maximum unit field has a default value of 100%.
|
|
2. Completing the Department, Project Manager and Role fields will allow Resource Reports to be generated that:
-
Group users by their identified Department
-
Group users by their identified Project Manager
-
Allow you to find available resources by Role
|
|
3. If you are going to track (human) resource costs in PM Central the Standard Rate field must be populated.
NOTE: PM Central uses the calculation
Standard Rate x Work to determine the cost of a task.
|
|
4. When using PM Central with Bamboo’s Time Tracking and Management (TTM) application these fields must be populated to allow users to submit timesheets:
- Primary Timesheet Manager
- Secondary Timesheet Manager
- Allow Overview
More information on integrating PM Central with TTM is available here
|
|
Create PM Central Project or Department sites
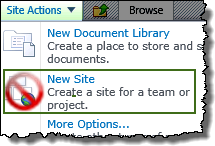 PM Central uses Site Creation Plus to create project and department sites in a portfolio to simplify the site creation process.
Keep in mind:
- PM Central project and department sites should not be created using the SharePoint New Site dialog box
To create a PM Central Project or Department site:
| Step |
Action |
Result |
| 1. |
On the Portfolio site click the
Create New Project… button on the Portfolio home page
OR
From the Central Actions drop down menu, click Add New Project
|
These options will only be visible to users with Full Control permission levels or the Create Sub site permission 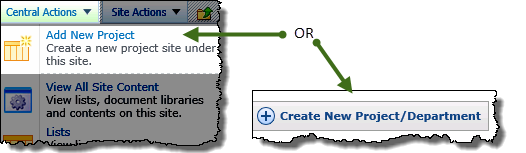 |
| 2. |
Enter a Title for the site
The text entered here will become the URL for the site.
|
|
| 3. |
Choose the permissions for the site.
NOTE: This area may have been hidden.
|
| 4. |
Select the template from the available options. |
| 5. |
If a project site template was selected, you will be able to enter any other known information about the project into the Project Health list |
| 6. |
Click Create |
You will be taken to the home page of the new site |
|
Using the Central Actions menu
The Central Actions menu provides quick access to areas where common activities are performed on the site. The specific options available to users from the Central Actions menu are determined by SharePoint Permissions.
NOTES:
1. Items marked with an asterisk (*) are made available by default with the Enhanced Central Actions Menu feature. This feature may have been disabled by your administrator.
2. Use the bulls eye icon to access the Central Actions menu on SharePoint 2013
Central Actions for the Portfolio Site
| Description |
|
Add New Project:
Available to users with the Full Control permission level, or users who have been specifically granted the Create Sub Sites SharePoint permission. The link takes users to the Site Creation tool in PM Central. |
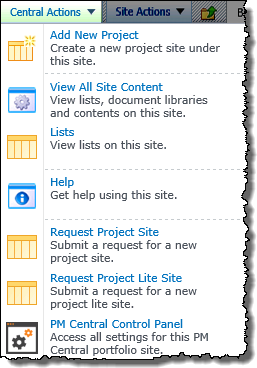 |
| View All Site Content: Displays a list of links to the settings pages for site lists and libraries. The list is visible to all users, but access is denied to users who do not have Design or Full Control permissions. |
| Lists: Displays the SharePoint view of all site content. Access to content is controlled by SharePoint permissions. |
| Help: A shortcut to the Help tab, which displays customizable text and links to PM Central online documentation and support resources. |
|
 Request Project Site & Request Project Lite Site: Allows users without access to the Add New Project option, or companies who have an approval process for new project sites, to submit a project site request for approval. Request Project Site & Request Project Lite Site: Allows users without access to the Add New Project option, or companies who have an approval process for new project sites, to submit a project site request for approval.
NOTE: Project approval routing features are available, including automated project site creation, if Workflow Conductor (sold separately) is installed.
|
| PM Central Control Panel: Access settings for the current PM Central Portfolio site. Only available to users with Full Control or Design permissions on the site. |
|
Central Actions for the Department Site
| Description |
|
Add New Project:
Provides a link to the site creation tool on the Portfolio site. |
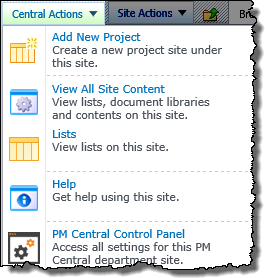 |
| View All Site Content: Displays a list of links to the settings pages for site lists and libraries. The list is visible to all users, but access is denied to users who do not have Design or Full Control permissions. |
| Lists: Displays the SharePoint view of all site content. Access to content is controlled by SharePoint permissions. |
| Help A shortcut to the Help tab, which displays customizable text and links to PM Central online documentation and support resources. |
| PM Central Control Panel:Access settings for the current PM Central Department site. Only available to users with Full Control or Design permissions on the site. |
|
Central Actions for the Project Site
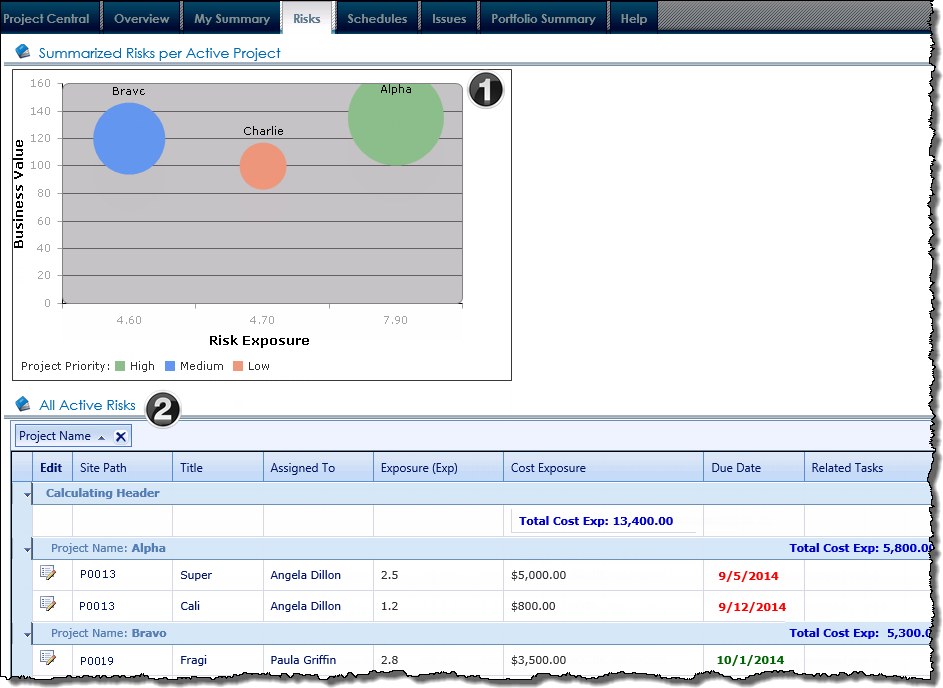
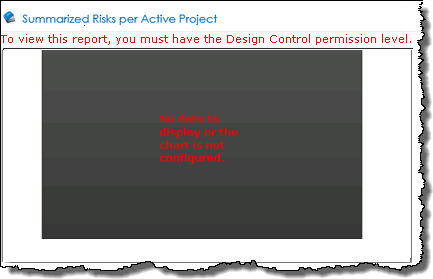
 0 overdue Issues
 Between 1 – 4 overdue issues
 5 or more overdue issues